DIGITAL VOICE
RECORDER
DS-2000
ONLINE
INSTRUCTIONS
Thank you for purchasing an Olympus Digital Voice Recorder.
Please read these instructions for information about using the product correctly and safely.
Keep the instructions handy for future reference.
To ensure successful recordings, we recommend that you test the record function and volume before use.
Table of Contents
Getting Started
SmartMedia ................................................ 6 Identification of Parts ................................. 8
Preparing For Recording
Basic operations
Other functions
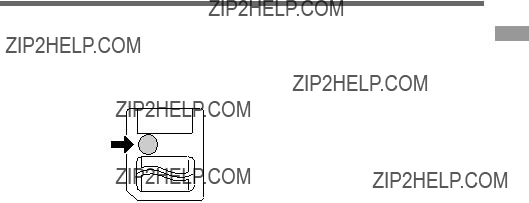
Inserting and Ejecting SmartMedia cards
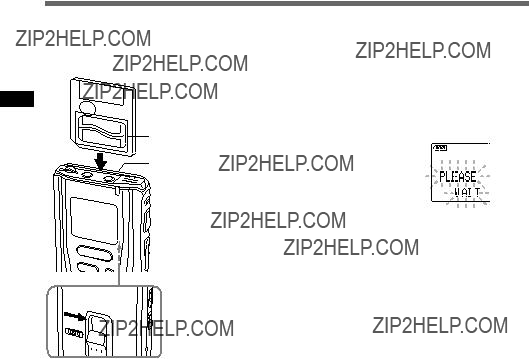
Inserting SmartMedia cards
Insert the SmartMedia card into the slot as shown below.
and Inserting
SmartMedia Ejecting cards
When the SmartMedia card is inserted properly, ???PLEASE WAIT??? flashes on the display.
................................................................................................
Setting Time/Date
If you have set the time and date, information as to when an audio file is recorded is stored automatically with that file. The time and date should be set to ease audio file management tasks. The time and date setting is also needed to perform the alarm playback function (??? P.32, 33).
1 Press the MENU button.
The menu opens (??? P.42).
2 Press the FF/+ or REW/??? button until ???TIME&DATE??? flashes on the display.
3 Press the PLAY button.
Time/Date screen appears. The hour indicator flashes, indicating the start of the time/date setup process.
PLAY button
(accepts a choice and moves on to the next item)
FF/+ or REW/??? button
(alters a choice)
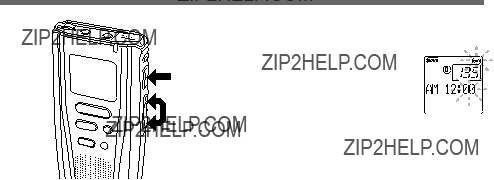
4 Repeat steps 1 and 2 to set the time and date:
Time/date setup proceeds in the order of hour, minute, year, month, and date.
1 Press the FF/+ button or REW/??? button to set a value.
2Press the PLAY button to accept the value.
5 Press the STOP button to end.
This completes the time setup procedure.
Notes
???If you press the STOP button during the setup operation, the clock will use the items that were set to that point.
???Each press of the FOLDER button during setting toggles the display between the 12-hour and 24-
hour system.
Time/Date Setting
Recording
The recorder provides three folders, A, B, and C, and each message recorded in a folder is saved as a Digital Speech Standard (DSS) file. These three folders can be selectively used to distinguish the kind of recording; for example, folder A might be used to store private information, while folder B might be dedicated to holding business information (??? P.36, 37). Up to 199 messages can be recorded per folder. Four recording modes are available: new, append, overwrite, and insert.
New Recording
Create a new file to record in.
Microphone
2 


 1
1
1 Press the FOLDER button to choose a folder.
The folder name is displayed for 2 seconds.
aCurrent file number bTotal number of files recorded in the folder
{
2 Press the REC button to start recording.
The record/play indicator lamp glows red.
Aim the microphone at the sound source.
{
3 Press the STOP button to stop recording.
16
cCurrent recording time
dRemaining recording time
Recording
Overwrite Recording
You can overwrite a previously recorded file from any point within the file. Note that the overwritten recordings will be erased.
rewind??? on page 24.
3 Press the PLAY button to play the file.
4 Press the STOP button where you want to start overwriting.
aCurrent
playback time
bTotal recording time of the file being played
Press the REC button to start overwriting.
The record/play indicator lamp glows red.
Press the STOP button to stop overwriting.
Notes
???When you are overwriting and reach the end of the file, the recorder begins to append the additional recording.
???Append recording does not erase the next previously recorded file.
???Locked files cannot be overwritten (??? P.30, 31).
???A SmartMedia card with a write-protect seal attached to it cannot be overwritten.
???You cannot select any recording mode other than that of the original file before overwrite recording (??? P.22).
Recording
inserting additional recording.
Press the STOP button to stop
rewind??? on page 24.
See ???To fast-forward,??? ???To skip,??? and ???To
3 Press the PLAY button to start playback.
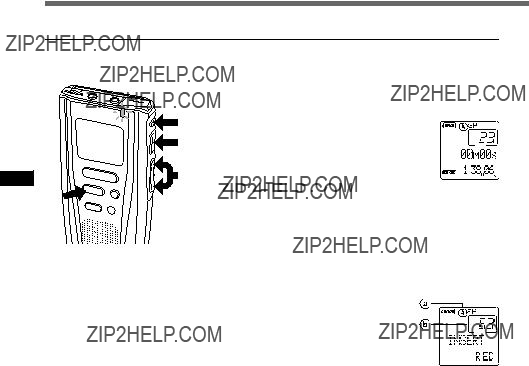
4 Press the PLAY button at the point where you want to insert a recording.
Playback pauses.
5 Press the REC button to start inserting additional recording.
The record/play indicator lamp glows red.
1 Press the FOLDER button to choose a folder.
1 2 Press the FF/+ or REW/??? button to 3,4 choose the file into which you want
to insert additional recordings.
2
Recording
Insert Recording
Additional recordings can be inserted into previously recorded files.
5
6
aCurrent folder 6bExisting file into
which data is to be inserted
Recording Modes
You can choose between two recording modes: SP (Standard Playback) mode and LP (Long Playback) mode. Once you choose a mode, files are recorded in the selected mode as long as you do not change the mode.
The included 16MB SmartMedia card holds approximately 2 hours and 35 minutes in SP mode and approximately 5 hours and 30 minutes in LP mode.
5
1 
3 Press the FF/+ or REW/??? button to choose between SP and LP.
4 Press the PLAY button to complete the setup screen.
5 Press the STOP button to close the menu.
................................................................................................
Notes
???Choose SP mode for recording meetings or lectures with crisp clarity.
???Use SP mode in conjunction with voice recognition software.
???You cannot select a different mode than that of the original file before append, overwrite, or insert recording.
Press the STOP button at any point you want to stop the playback.
Resume playback by pressing PLAY button again.
5
Adjust the VOLUME control to your liking.
4
3 Press the PLAY button to start playback.
The record/play indicator lamp glows green.
See ???To fast-forward,??? ???To skip,??? and ???To rewind??? on page 24.
The time and date when the file was recorded are displayed.
Press the FOLDER button to choose a folder.
1
2 Press the FF/+ or REW/??? button several times to choose the file that
1 you want to play.
3
2
Playing
You can start playing a file at any point. The recorder stops automatically when it finishes playing each file.
MIN4MAX
5
{
bCurrent playback time
cTotal recording time of the file being played
???ERASE OK??? is displayed when the file is erased. File numbers are incremented automatically.
................................................................................................
Notes
??? An erased file cannot be restored.
??? Locked files cannot be erased (??? P.30, 31).
??? Files stored on a SmartMedia card with a write-protect seal attached to it cannot be erased (??? P.7).
Press the ERASE button again.
The display lights continuously to indicate erasing has started.
4
aFile to be erased
2 Press the FF/+ or REW/??? button to choose the file you want to erase.
3 Press the ERASE button.
???FILE ERASE???? flashes on the display for 8 seconds.
Press the FOLDER button to choose a folder.
1
Erasing
Erasing One File at a Time
A selected file can be erased from a folder.
 1
1
 2 3,4
2 3,4
Erase All Files from a Folder
All files in a folder can be erased simultaneously, except for locked files (??? P.30, 31).
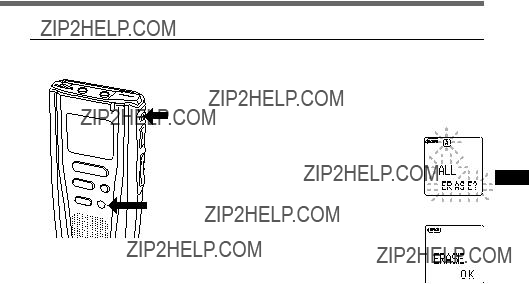
2 Press the ERASE button for 3 seconds or longer.
???ALL ERASE???? flashes on the display for 8 seconds.
3 Press the ERASE button again.
The display lights continuously to indicate erasing has started.
???ERASE OK??? is displayed when the files are erased. Locked files are reassigned file numbers in ascending order.
................................................................................................
Notes
???It might take more than 10 seconds to complete erasing tracks. Do not eject the SmartMedia card before erasing is finished.
???Files stored on a SmartMedia card with a write-protect seal attached to it cannot be erased (??? P.7).
Using the Variable Control Voice Actuator (VCVA)
When the microphone senses that sounds have reached a preset volume, the built-in Variable Control Voice Actuator (VCVA) starts recording automatically, and stops when the volume drops. Particularly helpful for extended recording, the VCVA not only conserves memory by turning off recording during silent periods, but also makes playback more efficient and convenient.
the Using
Control Variable
oiceV
Actuator
1 Start recording with the VCVA switch set to ON.
When the volume falls to a preset level or lower, recording automatically pauses, and ???STANDBY VCVA??? flashes on the display.
The record/play lamp glows when recording starts and flashes when recording pauses.
2 Using the VOLUME control, adjust the start/stop actuation level.
The higher the VOLUME control is set, the more sensitive the start/stop level becomes, allowing recording to automatically begin at a quieter level.
................................................................................................
Notes
???The start/stop actuation level also varies depending on the selected microphone sensitivity mode (??? P.21).
???To ensure successful recordings, prior testing and adjustment of the start/stop actuation level is recommended.
Index Marks
Index marks can be incorporated into a file during recording or playback to make it easy to locate interesting information. Index marks enable faster access to important information by pressing the FF/+ or REW/??? button.
 1
1
Setting an Index Mark
1 Press the INDEX button during recording or playback to set an index mark.
An index mark is set and the index number appears on the display.
Clearing an Index Mark
 1
1
 2
2
3
Notes
???Up to 16 index marks can be set in a file. Attempting to set more index marks will cause ???INDEX FULL??? to appear on the display.
???Index marks cannot be set or cleared in a file stored on a SmartMedia
Locking Files
Locking a file keeps important data from being accidentally erased.
Locked files are not erased when you choose to erase all files from a folder (??? P.27).
3
Press the FOLDER button to choose a folder.
Press the FF/+ or REW/??? button to choose the file you want to lock.
Press the MENU button.
The menu opens (??? P.42).
Press the FF/+ or REW/??? button until 

 ???LOCK??? flashes on the display.
5 Press the PLAY button.
The file locking setup process begins.
6 Press the FF/+ or REW/??? button to choose between ON and OFF.
ON : Locks the file and prevents it from being erased.
OFF : Unlocks the file and allows it to be erased.
aCurrent folder
bFile to be locked
Alarm Playback Function
The alarm playback function can be set to play a selected file at a pre-set time.
3
1
5,7
 2,4,6
2,4,6
1 Press the FOLDER button to choose a folder.
2 Press the FF/+ or REW/??? button to choose the file to be played when the alarm sounds.
3 Press the MENU button.
The menu opens (??? P.42).
4 Press the FF/+ or REW/??? button until ???ALARM??? flashes on the display.
When you choose OFF, the alarm playback setup process ends, and the alarm mark disappears. ??? Step 12
System Sounds
The recorder beeps to alert you to button operations or warn you of errors. System sounds may be turned off.
6
1 
4 Press the FF/+ or REW/??? button to choose between ON and OFF.
5 Press the PLAY button to complete the setup screen.
6 Press the STOP button to close the menu.
................................................................................................
Note
If the alarm playback function has been set, the alarm will sound at the scheduled time even if system sounds are turned off.
in the destination folder.
1 Choose the file you want to transfer and press the PLAY button to play it.
2 Press the FOLDER button while the file is playing.
Playback stops and destination folder names flash on the display.
3 Press the FF/+ or REW/??? button to choose the destination folder.
If you choose the current folder as the destination folder, the selected file will move to the end of the existing files in it.
4 Press the PLAY button to accept the destination folder.
The file is transferred.
aFile to transfer bCurrent folder
cDestination folder
 {
{
Files Moving
Folders Across
................................................................................................
Notes
???If the destination folder is full (a maximum of 199 files), ???FOLDER FULL??? appears on the display and files cannot be transferred to it.
???The file transfer process is aborted if you press the STOP button or leave the recorder idle for 8 seconds after you choose a destination folder.
???Files cannot be transferred from one folder to another on a SmartMedia card with a write-protect seal attached to it.
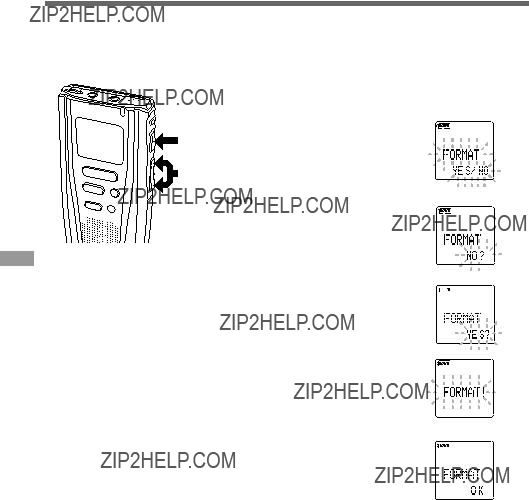
Formatting SmartMedia
Formatting prepares SmartMedia cards for recording. SmartMedia cards that have been used on non-Olympus devices, or that can???t be accessed by this unit, require formatting. The SmartMedia card that comes with this unit and Olympus SmartMedia cards are preformatted and can be used immediately following purchase.
1 
4 Press the FF/+ or REW/??? button to choose ???YES????.
 {
{
5 Press the PLAY button again.
Formatting begins and an indicator flashes on the display.
{
???FORMAT OK??? displays when formatting ends.
................................................................................................
Notes
??? When the recorder is connected to a PC with USB connection, you cannot perform these procedures.
??? While the recorder is set as PC microphone, the output level of the earphone jack is fixed.
??? Refer to the user's manuals of DSS Player 2002 and your voice recognition software for details.
Speak into the recorder???s microphone.
4
The record/play indicator lamp lights in red, and ???TRAIN PC??? flashes on the display, while you are holding the FOLDER button pressed.
Press and hold the FOLDER button to get into PC train mode.
1 Connect the KP-4 PC connection cable (supplied) to the recorder???s earphone jack and the PC microphone jack of your PC.
2 Start the software on your PC and prepare it to receive voice input. (Refer to the User???s manual of the software for details.)
3
Training your PC for Voice Recognition
When you use voice-recognition software such as IBM ViaVoice, it is recommended that you set the recorder to PC microphone and have the software learn the characteristics of the speaker???s voice and the recorder???s built-in microphone to maximize the accuracy of voice recognition.
Earphone jack
PC
To the PC???s microphone jack
your Training


for PC
oiceV
Recognition
Replace with new batteries (??? P.11).
Remove the write-protect seal from the SmartMedia card and try again (??? P.7).
Insert a compatible SmartMedia card (??? P.6).
Reinsert the SmartMedia card.
Erase files that are no longer required, or insert another SmartMedia card.
Reinsert the SmartMedia card and then reformat it (??? P.38).
Erase index marks that are no longer required (??? P.29).
Insert a SmartMedia card (??? P.12).
Unlock the file (??? P.30, 31).
Erase files that are no longer required or insert another SmartMedia card.
Select another folder.
Back up the data (??? P.39) and format the SmartMedia card.
Transfer the file to another folder.
Refer to page 41.
* File names are assigned during recording for file management purposes. **The recorder enters this state when you hold the FOLDER button (??? P.41).

San-Ei Building, 22-2, Nishi Shinjuku 1-chome, Shinjuku-ku, Tokyo, Japan. Tel. 03-3340-2211
Two Corporate Center Drive, Melville, NY 11747-3157, U.S.A. Tel. 1-800-622-6372
(Premises/Goods delivery) Wendenstrasse 14-18, 20097 Hamburg, Germany. Tel. 040-237730 (Letters) Postfach 10 49 08. 20034 Hamburg. Germany.
2-8 Honduras Street, London EC1Y 0TX, United Kingdom, Tel. 020-7253-2772 http://www.olympus.com
This device Complies with Part 15 of the FCC Rules. Operation is subject to the following two conditions: (1) This device may not cause harmful interference, and (2) this device must accept any interference received, including interference that may cause undesired operation.
Tested To Comply
With FCC Standards
FOR HOME OR OFFICE USE
Canadian RFI
This digital apparatus does not exceed the Class B limits for radio noise emissions from digital apparatus as set out in the Radio Interference Regulations of the Canadian Department of Communications.
Cet apparail numerique ne depasse pas limits de Categorie B pour les emissions de gruit radio emanant d???appareils numeriques, tel que prevu dans les Reglements sur l???Interference Radio du Department Canadian des Communications.
???CE??? mark indicates that this product complies with the European requirements for safety, health, enviroment and customer protection.
L???indication ???CE??? signifie que ce produit est conforme aux exigences concernant la s??curit??, la sant??, l???environnement et la protection du consommateur.
Das ???CE??? Zeichen best??tigt die ??bereinstimmug mit den Europ??ischen Bestimmungen f??r Betriebssicherheit und Umweltschutz.
Il marchio ???CE??? indica che questo prodotto ?? conforme alle norme della comunit?? europea per quanto riguarda la sicurezza, la salute, l???ambiente e la protezione del consumatore.
La marca ???CE??? indica que este producto se encuentra de conformidad con las exigencias europeas sobre seguridad, salud, medio ambiente y protecci??n al consumidor.
P2-2885-01


 Warning
 Warning


 Current file number
 Stop position


 Total recording time of the file
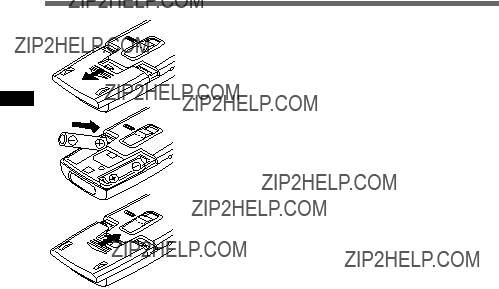


 5
5 4,6
4,6 


 1
1  5
5 


 1,4
1,4
 3
3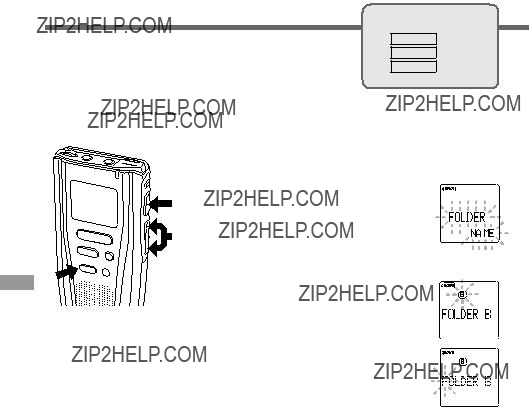


 7
7 6
6