ELECTRONIC FLASH

FL-40

JAPANESE

??????????????????

???????????????????????????????????? ???????????????FL-40???????????????????????????????????????????????? ?????????????????????

???????????????????????????????????????????????????????????????

ENGLISH

Instructions

???Before using your flash, read this maual carefully to ensure correct use.

FRAN??AIS

Instructions

???Avant d???utiliser votre flash, veuillez lire attentivement ce manuel, de mani??re ?? obtenir les meilleurs r??sultats possibles.

DEUTSCH

Bedienungsanleitung

???Machen Sie sich bitte vor Gebrauch des Blitzger??ts mit dem Inhalt dieser Bedienungsanleitung vertraut, damit stets eine sachgem????e Handhabung garantiert ist.

ESPAN??L

Instrucciones

???Antes de emplear el flash, lea este manual detalladamente para asegurar el uso correcto.

CHINESE

EIMPORTANT SAFETY INSTRUCTlONS

CAUTION

RISK OF ELECTRIC SHOCK

DO NOT OPEN

CAUTION: TO REDUCE THE RISK OF ELECTRIC SHOCK, DO NOT

REMOVE COVER (OR BACK) NO USER-SERVICEABLE PARTS INSIDE

REFER SERVICING TO QUALIFIED OLYMPUS SERVICE PERSONNEL

The lightning flash with the arrowhead symbol, within an equilateral triangle, is intended to alert the user to the presence of uninsulated ???dangerous voltage??? within the product's enclosure that may be of sufficient magnitude to constitute a risk of electric shock to persons.

The exclamation point within an equilateral triangle is intended to alert the user to the presence of important operating and maintenance (servicing) instructions in the literature accompanying the product.

WARNING:

TO REDUCE THE RISK OF FIRE OR SHOCK HAZARD, DO NOT EXPOSE

THIS EQUIPMENT TO RAIN, ANY LIQUID OR MOISTURE.

1.Read Instructions - All the safety and operating instructions should be read before the product is operated.

2.Retain Instructions - The safety and operating instructions should be retained for future reference.

3.Heed Warnings -All warnings on the product and in the operating instructions should be adhered to.

4.Follow Instructions - All operating and use instructions should be followed.

5.Cleaning - Do not use liquid cleaners or aerosol cleaners. Use a damp cloth for cleaning.

6.Attachments - Attachments not recommended by the product manufacturer may be hazardous and/or cause damage to the product. Do not use these attachments.

7.Water and Moisture - Do not use this product near water - for example, near a bath tub, kitchen sink, or laundry tub, in a wet basement, near a swimming pool or rain.

8.Accessories - Do not place this product on an unstable stand, tripod, bracket, table, or cart. The product may fall, causing serious injury to a child or adult, and serious damage to the product. Use only with a recomended camera. Any mounting of the product should follow the manufacturer's instructions, and should use a mounting accessory recommended by the manufacturer.

9.Power Sources - This product should be operated only from the type of power source indicated on the label. If you are not sure of the type of power supply to your home, consult your product dealer or local power company. For products intended to operate from battery power, or other sources, refer to the operating instructions.

10.Object and Liquid Entry - Never push objects of any kind into this product through openings as they may touch dangerous voltage points or short-circuit parts that could result in a fire or electric shock. Never spill liquid of any kind on the product.

11.Servicing - Do not attempt to service this product yourself as opening or removing covers may expose you to dangerous voltage or other hazards. Refer all servicing to qualified service personnel.

12.Damage Requiring Service - Refer servicing to qualified service personnel under the following conditions:

a) If liquid has been spilled, or objects have fallen into the product.

5

b)If the product has been exposed to rain or water.

c)If the product does not operate normally by following the operating instructions. Adjust only those controls that are covered by the operating instructions as an improper adjustment of other controls may result in damage and will often require extensive work by a qualified technician to restore the product to its normal operation.

d)If the product has been dropped or damaged in any way.

e)When the product exhibits a distinct change in performance - this indicates a need for service.

13.Replacement Parts - When replacement parts are required, be sure the service technician has used replacement parts specified by the manufacturer or which have the same characteristics as the original part.

Unauthorized substitutions may result in fire, electric shock, or other hazards.

14.Safety Check - Upon completion of any service or repairs to this product, ask the service technician to perform safety checks to determine that the product is in proper operating condition.

15.Heat - The product should be situated away from heat sources such as radiators, heat registers, stoves, or other products (including amplifiers) that produce heat.

All other brand names and product names are registered.

Radio and Television Interference - for the North & South American Continents

Change or modifications not expressly approved by the manufacturer may void the user's authority to operate this equipment. This equipment has been tested and found to comply with the limits for Class B digital device, pursuant to Part 15 of the FCC Rules. These limits are designed to provide reasonable protection against harmful interference in a residential installation. This equipment generates, uses, and can radiate radio frequency energy and, if not installed and used in accordance with the instructions, may cause harmful interference to radio communications.

However, there is no guarantee that interference will not occur in particular installation. If this equipment does cause harmful interference to radio or television reception, which can be determined by turning the equipment off and on, the user is encouraged to try to correct the interference by one or more of the following measures:

???Reorient or relocate the receiving antenna.

???Increase the distance between the flash and receiver.

This device complies with Part 15 of the FCC rules.

Operation is subject to the following two conditions:

(1)This device may not cause harmful interference, and

(2)This device must accept any interference received, including interference that may cause undesired operation.

This Class B digital apparatus meets all requirements of the Canadian Interference-Causing Equipment Regulations.

6

WARNING

???Keep the batteries away from children.

???If a battery is swallowed, see a doctor immediately.

???Dispose of used batteries promptly, in a safe manner that complies with all applicable laws.

???The battery may present the risk of fire or chemical burn if mishandled.

???Do not recharge, disassemble, heat above 212oF (lOOoC) or dispose of in a fire.

???Before use, wipe the battery clean with a dry soft cloth to assure good contact.

???Never use metallic tweezers to hold the battery, and never short circuit the

(+) and (-) sides of the battery.

Legal and other notices

???All contents of this publication are subject to change without notice.

???Although the contents of this publication have been carefully checked to avoid errors, some may still occur. If you are in doubt about any points or find mistakes or omissions, please contact us.

???No part of this publication may be reproduced or reprinted except for personal use without the prior permission of Olympus.

???Olympus makes no representations or warranties regarding any damages, or benefit expected by using this unit lawfully, or any request from a third person, which are caused by the inappropriate use of this unit.

???Olympus makes no representations or warranties regarding any damages or any benefit expected by using this unit lawfully which are caused by erasing the picture data.

FOR SAFE USE

Thank you for purchasing the Olympus external flash for digital still camera.

Before you start to use your new flash, please read these instructions carefully to obtain optimum performance and a longer service life from the unit. Be sure to retain this manual for future reference.

Warning:

Caution:

Ignoring this Warning mark and operating this product incorrectly may lead to serious injury or death.

Ignoring this Caution mark and operating this product incorrectly may lead to injury.

WARNING

1.NEVER TRY TO USE THE FLASH WHEN TAKING PICTURES OF

PEOPLE (ESPECIALLY INFANTS) AT CLOSE RANGE. THE

CAMERA'S FLASH MAY DAMAGE THE SUBJECT'S EYES AT

CLOSE RANGE.

DO NOT TAKE PICTURES OF CHILDREN FROM A DISTANCE OF

LESS THAN ONE METER (ABOUT THREE FEET).

2.DO NOT USE THIS FLASH IN THE VICINITY OF FLAMMABLE OR

EXPLOSIVE GAS.

3.DO NOT LEAVE THIS FLASH WITHIN THE REACH OF INFANTS OR

CHILDREN.

??? THE CHILD MIGHT SWALLOW BATTERIES OR SMALL

ATTACHMENTS. IF THIS HAPPENS, CONTACT A PHYSICIAN

IMMEDIATELY.

7

???THE CHILD MIGHT ACTIVATE THE FLASH FROM TOO CLOSE AND

CAUSE DAMAGE TO HIS OR HER EYES.

???THE CHILD MIGHT DAMAGE THE FLASH.

4.BATTERY FLUID MAY LEAK, GENERATING HEAT AND POSSIBLY

CAUSING A FIRE OR EXPLOSION.

???DO NOT USE NON-RECOMMENDED BATTERIES.

???DO NOT THROW BATTERIES INTO A FIRE, OR EXPOSE TO HEAT.

???DO NOT DISASSEMBLE THE UNIT WITH BATTERIES INSIDE.

???DO NOT USE NEW BATTERIES AND OLD BATTERIES TOGETHER.

DO NOT MIX DIFFERENT TYPES OF BATTERIES OR DIFFERENT

MANUFACTURERS' BATTERIES.

???DO NOT CHARGE ALKALINE BATTERIES.

???KEEP UNLOADED BATTERIES OUT OF THE REACH OF INFANTS

AND CHILDREN. IF AN INFANT OR CHILD SWALLOWS THE

BATTERIES, CONTACT A PHYSICIAN IMMEDIATELY.

???DO NOT LOAD THE BATTERIES IN THE OPPOSITE DIRECTION TO

THAT SHOWN IN THESE INSTRUCTIONS.

5.DO NOT STORE THE FLASH IN HUMID OR DUSTY PLACES. THIS

MAY CAUSE FIRE OR ELECTRIC SHOCK.

6.DO NOT COVER THE FLASH WITH YOUR HAND DURING

OPERATION. DO NOT TOUCH THE FLASH AFTER FIRING IT

CONTINUOUSLY. YOU MAY GET BURNED.

7.IF YOU DROP THE FLASH IN WATER OR GET WATER INSIDE IT,

UNLOAD THE BATTERIES IMMEDIATELY AND CONTACT YOUR

NEAREST OLYMPUS SERVICE CENTER. LEAVING BATTERIES IN A

WET CAMERA MAY CAUSE FIRE OR ELECTRIC SHOCK.

8.A HIGH-VOLTAGE CIRCUIT IS INSIDE THE FLASH. NEVER

DISASSEMBLE OR MODIFY THE FLASH. IT MAY CAUSE ELECTRIC

SHOCK OR INJURY.

9.TO PREVENT THE FLASHTUBE FROM OVERHEATING AND

DETERIORATING, DO NOT EMIT LIGHT IN MAXIMUM ILLUMINATION

MORE THAN 20 TIMES IN SUCCESSION. AFTER 20 SUCCESSIVE

EMISSIONS, STOP EMITTING FOR 10 MINUTES TO COOL DOWN

THE FLASHTUBE.

CAUTION

1.IF YOU NOTICE AN UNUSUAL SMELL, NOISE, OR SMOKE

EMITTING FROM THIS FLASH, UNLOAD THE BATTERIES

CAREFULLY TO AVOID BEING BURNED. CONTACT YOUR

NEAREST OLYMPUS SERVICE CENTER IMMEDIATELY.

2.THIS PRODUCT IS SPECIFICALLY DESIGNED FOR CAMERAS

MANUFACTURED BY OLYMPUS. IF THE FLASH IS MOUNTED ON

CAMERAS MADE BY MANUFACTURERS OTHER THAN OLYMPUS,

THE CAMERA AND THE FLASH WOULDN'T WORK OR, AT THE

WORST , WOULD BE DAMAGED.

3.UNLOAD THE BATTERIES WHEN NOT USING THE FLASH FOR

LONG PERIODS. BATTERY HEAT GENERATION OR FLUID LEAK

MAY CAUSE A FIRE OR INJURY.

4.DO NOT USE THE FLASH IF THE BATTERY FLUID HAS LEAKED.

LEAKED BATTERY FLUID MAY CAUSE A FIRE OR ELECTRIC

SHOCK. CONTACT YOUR NEAREST OLYMPUS DEALER OR

OLYMPUS SERVICE CENTER.

5.DO NOT OPERATE THE FLASH WITH WET HANDS AS YOU MAY

GET AN ELECTRIC SHOCK.

6.DO NOT STORE THE FLASH IN ANY PLACE EXPOSED TO

EXCESSIVE HEAT. THIS MAY WEAKEN THE PARTS OR CAUSE A FIRE.

8

CARE AND STORAGE

HANDLING

???This flash is built with precision electric parts. To avoid malfunction or mechanical problems, do not use or store the flash in the following places:

???Places exposed to direct sunlight (a beach in summer, for example).

???Places exposed to excessive heat, humidity, or extreme variation of temperature and humidity.

???Places exposed to sand or dust.

???Near a fire.

???Near any volatile materials.

???Near a heater, cooler, or humidifier.

???Places exposed to excessive moisture.

???Places exposed to vibrations.

???Inside a car.

???Near a magnetic field.

???Do not shake the flash or subject it to shocks.

???Do not leave the flash unused for a long period of time. This may cause battery leakage.

???Do not touch any of the flash's internal parts.It may cause trouble.

???Do not use the flash for extended periods as this can cause the flash to become excessively hot. Do not touch the flash when it is hot.

BATTERY HANDLING

???This flash uses four AA alkaline batteries, AA nickel metal hydride batteries or AA NiCd batteries. (Olympus brand AA nickel metal hydride batteries are recommended.)

???Do not use AA manganese batteries or AA lithium batteries. Besides shortening battery life, manganese batteries may overheat and damage the camera.

???Use the batteries correctly. Incorrect use of batteries can cause fluid leak, heat generation, or other damage. When replacing batteries, be sure to load them correctly.

???The batteries may be temporarily disabled when exposed to cold temperatures.

Try to keep the flash and batteries warm when using the flash in a cold environment. Batteries that are weak in cold temperatures will be restored under normal temperatures.

???Sweat, oil, and so on, can prevent a battery's terminals from making electrical contact. To avoid this, wipe both terminals before loading the battery.

???Keep spare batteries on hand when going on a long trip. New batteries may be difficult or impossible to obtain abroad.

???When using nickel metal hydride batteries or NiCd batteries, make sure to charge them fully with the correct battery charger.

???Read instructions carefully before handling nickel metal hydride batteries or NiCd batteries.

???Dispose of the old batteries in an ecologically and legally satisfactory manner in your local areas.

Cameras That the Flash Can Be Attached to

???Some functions available are limited depending on models of cameras even manufactured by Olympus.

9

E Check the Contents of the Carton

Check your flash came with all the following accessories. If something is missing or broken, contact the place of purchase.

???Flash

???Wide Panel adapter

???Flash case

???Instructions (This booklet)

???Warranty

47

E Names of Parts

Flashtube

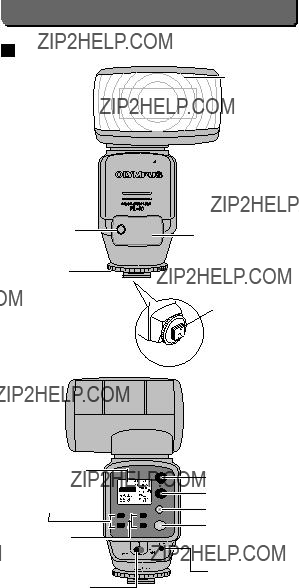
Battery compartment cover
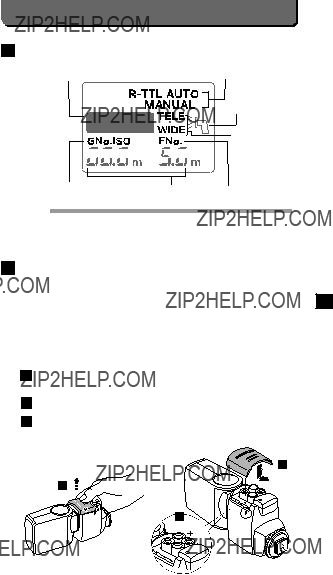
Mounting foot

Lock pin

BACKLIGHT button :

This button turns the control panel's backlight ON/OFF, so it can be seen in dark places.

CHARGED lamp / TEST button :

As a test button, this button lets you fire the flash at any time, not just when taking pictures.

In the TTL AUTO or R-TTL AUTO flash modes, a full flash is fired. In the regular AUTO or MANUAL modes, the flash fires at the required illumination and the Auto check lamp blinks.

48

E Names of Control panel

Wide-angle flash mode icon

Illuminating angle

??????

???

Guide No./ISOFocal range F-No.

MEMO

???Slide the ON/OFF switch to Onside with the BACKLIGHT button held down to switch the unit of focal range between m and ft.

E Loading Batteries

Batteries must be loaded into the flash before the flash can be mounted on the camera. This flash takes any four of the following batteries:

???1.5 V AA alkaline batteries(type LR6)

???Ni-MH batteries(type HR-AA)

???Ni-Cd batteries(type KR-AA)

Do not mix batteries of different manufacture or mix old batteries with new batteries. Also, before long periods of disuse, remove the batteries from the flash. Remember that conserving battery power not only saves you money, but protects the environment as well.

Slide the cover towards the flash head and lift up and away from the flash to detach the cover from the battery compartment.

Insert the batteries in the directions indicated in the illustration.

Slide the battery compartment cover back on and close securely.

3

1

2

49

E Turn the Power ON to Check the Battery

Load batteries into the flash before attempting to turn the power ON. As soon as power is turned ON, the flash automatically performs a battery check and starts charging the flash.

Set the ON/OFF switch to the ON side.

Check that the CHARGED lamp is lit.

If the CHARGED lamp is out, the flash is not yet fully charged for firing.

MEMO

???If the CHARGED lamp does not come ON at all or if it takes time to light up, the batteries may be run down too much to charge the flash. In such case, replace them with fresh batteries.

E Turn the Power OFF after Checking the Battery

Turn the power OFF after charged, unless using the flash immediately. Also, turn the power OFF before mounting it on the camera, and after use.

Set the ON/OFF switch to the OFF side.

50

E Mounting the Flash on the

Camera

Before mounting the flash on the camera, turn OFF power to both the flash and the camera. They can be damaged if the flash is mounted when they are turned ON. The flash can be mounted as follows.

Make sure the flash head is folded downward with the flashtube facing forward.

Detach the cap from the camera's hot-shoe.

Keep the cap in the pocket of the flash case.

Check the lock pin is not protruding.

If the lock pin is out, turn the mounting foot in the opposite direction of "<- LOCK " until it can turn no more. This will withdraw the lock pin.

Slide the flash into the
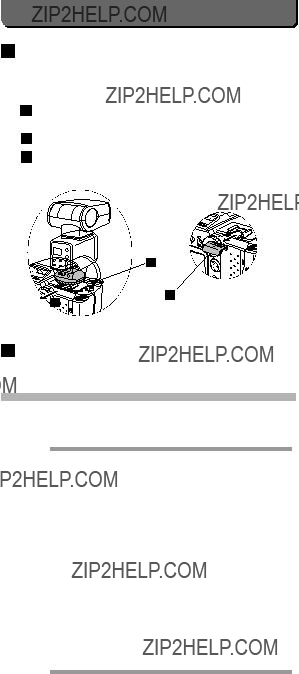
 hot-shoe until it "clicks".

Turn the mounting foot in the direction of "<-LOCK" until it can turn no more.

NOTE

???Do not apply more force to the mounting foot than required to lock/unlock it.

???Do not touch the electric contact of the flash with fingers or metal fittings. It may cause trouble.

???Do not mount the flash on the camera with lock pin protruding. It may cause trouble.

Cap

Lock pin

5

4

3

51

E Detaching the Flash from the

Camera

Before detaching the flash from the camera, turn OFF power to both the flash and the camera. It can cause serious damage.

Turn the mounting foot in the opposite direction of "<???LOCK" until it turns no more.

Slide the flash off the hot-shoe.

Cover the hot-shoe with its cap.

Cap

2

ETaking Pictures with Digital Cameras with Communication Capabilities

FL-40's Modes

When the flash is mounted on a camera which is capable of data communications, the flash can receive the data from the camera, and select one of the following control modes.

MEMO

???The TTL AUTO and R-TTL AUTO modes can be used only with digital cameras which are capable of data communications.

???TTL AUTO

In this mode, the flash is controlled entirely by the camera based on information sent from it. Available light is metered and illumination set automatically.

???R-TTL AUTO

In this mode, the flash is controlled entirely by the camera based on information sent from it. Available light is metered and illumination set automatically. The mode cannot function with cameras that do not support it.

???AUTO

The flash itself determines illumination and when to fire. The operation is automatic, so you are not troubled with flash setup. The mode cannot function with cameras that do not support it.

???MANUAL

In this mode, you must set the guide number yourself. The actual firing of the flash is automatically set according to the guide number.

MEMO

???Some cameras, which are capable of data communications, don't allow the flash to select a control mode of the flash. In this case, select it with the camera.

52

Taking Pictures in the Camera's P, A or S Shooting Modes

The camera has three shooting modes in the P (program) mode, A (aperture) mode and S (shutter) mode. You can take pictures in any of these modes using this flash instead of the camera's built-in flash.

Check that the camera's built-in flash is stowed away (OFF).

Set this flash's ON/OFF switch to the ON side.

Set the camera's mode dial to "P", "A" or "S".

Check that the flash's control panel shows either "TTL AUTO " , "R- TTL AUTO" or " AUTO" for the flash mode, "TELE" or "WIDE" for the zoom mode, and auto focal distance.

Check that the CHARGED lamp is lit.

If the CHARGED lamp is out, the flash is not yet fully charged for firing.

MEMO

???If the flash is turned ON but not operated for a specific time, the power saving will function and the control panel will be out. Pressing the shutter release button down halfway will light up the panel and enable flash photography.

Compose the picture and push the shutter release button down all the way.

The flash's illuminating angle will change automatically between WIDE (wide-angle) and TELE (telephoto) as you zoom with your camera.

MEMO

???In dark places, a red light is automatically emitted from the AF illuminator.

???Depending on the subject, the light from the AF illuminator will be of little or no effect. If you cannot focus on the subject, move closer to it or focus on its contrasted point.

Check that the AUTO CHECK lamp blinks.

You can check whether the flash fired correctly. If the AUTO CHECK lamp blinks for 5 seconds after the shutter release button has been pressed down all the way, the flash fired correctly.

The best shooting range (The CCD sensitivity = ISO100)

NOTE

???When selecting the TTL AUTO mode, the flash emits light three times when the shutter release button is pressed down all the way.

???The actual shooting is executed at the third emission.

??????

53

Taking Pictures with Both the FL-40 and the Camera's Built-in Flash

Pictures can be taken using both the FL-40 and the camera's built-in flash. This technique is a good way to improve lighting. For example, you can use this flash to bounce light off an object while using the built-in flash to catch the subject's pupils.

Set this flash's ON/OFF switch to the ON side.

Set the camera's built-in flash.

Select the flash mode from the camera side.

Check the Charged lamp lights up.

If not, the flash is not fully charged yet.

Press the shutter release button down all the way.

MEMO

???You can check whether the flash fired correctly. If the AUTO CHECK lamp blinks for 5 seconds after the shutter release button has been pressed down all the way, the flash fired correctly.

NOTE

???When using the dual flashes, pictures cannot be taken unless the built-in flash and the FL-40 are both charged and ready.

???When using both the FL-40 and the camera's built-in flash, the FL-40 emits more light than the built-in flash. Moreover, illumination is automatically set for both flashes so that the object is properly illuminated. However, when photographing far away objects, the built-in flash is turned OFF automatically and only this flash fires.

??????

Bouncing Light

"Bouncing light" is a technique for indirectly illuminating subjects by reflecting - said "bouncing" here - light from the flash off a wall or ceiling. In some cases, when flashing straight on the subject, shadows are easily produced in the background. Bouncing the light immerses the entire subject in soft lighting. It is also possible to use the camera's built-in flash to catch the subject's pupils at the same time.

Angle the flash head towards the wall or ceiling.

The flash head can be turned 0 to 90?? upward and to the left, and 0 to 180?? to the right.

90?????

180?????

90?????

54

Check that the CHARGED lamp is lit.

If the CHARGED lamp is out, the flash is not yet fully charged for firing.

Press the shutter release button down all the way.

MEMO

???The best recommended angle for bouncing light is 60??.

???You can check whether the flash fired correctly or not after the picture is taken. If the AUTO CHECK lamp blinks for 5 seconds after the shutter release button has been pressed down all the way, the flash fired correctly.

???To bounce light in photographs, set the camera to the P or A shooting mode.

???If the flash does not fire correctly, move closer to the subject, or set the camera to the A shooting mode and widen the aperture.

???Focal range is shorter in bounced light photography than when flashing straight on the subject.

Straight light shooting

Bouncing light shooting

Built-in flash+Bouncing light shooting(Catch light effect)

55

Flash Synchronization

When taking a flash-lit picture of people against a nightscape, it is likely that the background comes out underexposed. Even dark backgrounds can be illuminated by using flash synchronization.

Set the camera's mode dial to "S (Shutter speed)" or "M (Manual)", and the shutter to a slow speed.

Check that the CHARGED lamp is lit.

If the CHARGED lamp is out, the flash is not yet fully charged for firing.

Press the shutter release button down all the way.

??????

Normal synchronized

Flash-lit slow synchronized shooting

56

2nd Curtain Synchronization

In 2nd curtain synchronization, the flash is fired at the end of a slow shutter. If done - for example - when taking a picture of a moving vehicle, the lights from the tail lamps are drawn behind the car.

Set the camera to the 2nd curtain synchronization mode.

For more information on the 2nd curtain synchronization mode, see the instructions that came with the camera.

Check that "2nd - CURTAIN SYNCHRO" is displayed on the flash's control panel.

Check that the CHARGED lamp is lit.

If the CHARGED lamp is out, the flash is not yet fully charged for firing.

Press the shutter release button down all the way.

MEMO

???Shutter speed is slower, therefore it is recommended to use a tripod to prevent the kind of blurring that comes by shaking the camera.

??????

2nd curtain synchronized shooting

57

Taking Pictures in the MANUAL Flash

Mode

You can take flash-lit pictures at a shutter speed and aperture you set yourself.

Set the camera's mode dial to "M (Manual)".

Press the flash's MODE button until "MANUAL" appears on the flash's control panel.

Check the focal distance at the best exposure is displayed on the flash's control panel. This distance is determined from the flash guide number and current camera aperture and the sensitivity of CCD (Charge Coupled Device).

Set the focal distance with the GNo/ISO up/down buttons.

Exposure Compensation

In the MANUAL mode, exposure compensation can be set from the GNO/ISO up/down buttons. Every time one of these buttons is pressed, exposure is compensated in 1/4 EV steps.

In the TTL AUTO, R-TTL AUTO and regular AUTO modes, it can be linked to the camera's exposure compensation mode.

Press one of the flash???s GNo/ISO up/down buttons.

Every time one of these buttons is pressed, exposure is compensated in 1/4 EV steps.

58

E Taking Pictures with Digital Cameras without Communication Capabilities

The regular AUTO and MANUAL flash modes can be used with digital cameras which are not capable of data communications.

Taking Pictures in the Regular AUTO

Flash Mode

Exposure can be set automatically by inputting the sensitivity of CCD (digital camera) and lens F-No. yourself, even if the camera does not have communication capabilities.

It is possible to mount the flash direct on a camera with a hot shoe. When mounting the flash on a camera without a hot shoe but with a sync terminal, a conversion grip is necessary to send the light emission signal from the sync terminal to the flash.

For the information on how to attach the flash on the conversion grip or the camera, read page 51.

(It is not possible to mount the flash on the camera which has neither a hot shoe nor a sync terminal.)

Press the flash's MODE button until "AUTO" appears on the flash's control panel.

Set the sensitivity of the digital cameras CCD from the GNo/ISO up/ down buttons.

Set the lens F-No. from the FNo up/down buttons.

Check that the CHARGED lamp is lit.

If the CHARGED lamp is out, the flash is not yet fully charged for firing.

Press the shutter release button down all the way.

Check that the AUTO CHECK lamp blinks.

You can check whether the flash fired correctly or not after the picture is taken. If the AUTO CHECK lamp blinks for 5 seconds after the shutter release button has been pressed down all the way, the flash fired correctly.

MEMO

???Exposure can be compensated in 1/4 EV steps using the GNo/ISO up/down buttons.

???You can test whether illumination is sufficient or not before taking your picture, by pressing the TEST button. If the required light is emitted, the AUTO CHECK lamp will blink.

???When connecting the flash to a digital camera without communication capabilities, the power save function does not work. To prevent batteries from exhausting, turn the power off after taking pictures.

??????

59

Taking Pictures in the MANUAL Flash Mode

You can manually set the illumination for your pictures.

Press the flash's MODE button until "MANUAL" appears on the flash's control panel.

Set the illumination from the GNO/ISO up/down buttons.

Setting is possible in 1/4 EV steps.

E Setting Illuminating Angle Manually

The illuminating angle of the flash can be set manually.

WIDE:58?? vertical, 70??horizontal (It covers field angle of 28 mm lens.)* TELE:28?? vertical, 34??horizontal (It covers field angle of 80mm lens.)* * Converted into 35 mm film camera angle.

Press the flash's T/W button.

Check the selected illumination angle( "WIDE" or "TELE") is displayed.

MEMO

???In wide-angle zooming, the edges of pictures can be darkened by setting the flash's illuminating angle to "TELE" (telephoto).

??????

60

E Wide Panel

The flash can be dispersed across a wider-than-usual angle by mounting the wide panel on the flash and setting up the flash as follows.

It covers a field angle of 21 mm lens.

Illuminating angle: 70?? vertical, 86?? horizontal (Converted into 35 mm film camera angle).

Mount a Wide Panel on the flash.

Hold the T/W button down for at least 2 seconds.

Check appears on the flash's control panel.

You can cancel by pressing the T/W button down while appears.

??????

61

EFocal Distance and Aperture in the MANUAL Flash Mode

(UNIT: m)

*With the bundled Wide Panel

EAvailable Combinations of CCD Sensitivity and Aperture

???

CCD Sensitivity

Apertures other than the above cannot be used with bounced lighting or flash converters.

62

E Q & A

Q Can I take pictures using other external flashes together with this flash?

A No. The best you can do is dual flash photography with this flash and the camera's built-in flash.

Q When is the auto check feature (TEST button) useful?

A When using bounced lighting or a flash converter. Pressing the TEST button checks whether illumination is sufficient enough for the shot before the picture is taken. The AUTO CHECK lamp will blink if everything is OK. But, it can be used only in the regular AUTO mode.

Q Why does the CHARGED lamp not light up?

A The batteries are probably run down, which is making it harder to charge the flash. Before the flash can be fully charged, its sleep mode is triggered. So, change the batteries. But, remember to turn power OFF before trying to change them.

Q What happens when I use the built-in flash together with this flash?

A Both flashes fire at the same time. Exposure is automatically based on the total amount of illumination (camera shooting mode P or A). One advantage is that you can use this flash to bounce light off a wall or something, while the camera's built-in flash to catch the subject's pupils.

Q Does the flash get hot after continued flashes?

A Actually, the batteries get hot if the flash is continuously fired immediately after the CHARGED lamp lights up. You should allow sufficient time for the batteries to cool down between flashes. and Aperture

Q

A

Can I use the FL-40 with my Olypmus IS/L Series 35mm film camera? No, it cannot be used.

Q Why can't I mount the flash on the camera?

A When the lock pin protrude, it is not possible. Turn the mounting foot in the opposite direction of "<- LOCK" until it can turn no more. Then mount the flash on the camera.

Q Why doesn't the control mode switch, even though I pressed the mode button?

A Depending on the type of camera, it may be impossible to select a control mode with the flash itself. Select the control mode of the flash with the camera.

Q How should I set the white balance of the camera, when taking flash-lit pictures?

A Operating in the AUTO mode is recommended. When using the manual white balance, set the color temperature to 6500 K. Depending on the operating condition, the color temperature varies.

63

E Specifications

64

OLYMPUS OPTICAL CO., LTD.

San-Ei Building, 22-2, Nishi Shinjuku 1-chome, Shinjuku-ku, Tokyo, Japan. Tel. 03-3340-2026

OLYMPUS AMERICA INC.

Two Corporate Center Drive, Melville, NY 11747-3157, U.S.A. Tel. 516-844-5000

OLYMPUS OPTICAL CO. (EUROPA) GMBH.

(Premises/Goods delivery) Wendenstra??e 14-16, 20097 Hamburg, Germany. Tel. 040-237730 (Letters) Postfach 10 49 08, 20034 Hamburg, Germany.

OLYMPUS OPTICAL CO. (U.K.) LTD.

2-8 Honduras Street, London EC1Y 0TX, United Kingdom, Tel 0171-253-2772

??????CE??? mark indicates that this product complies with the European requirements for safety, health, environment and customer protection.

???La marque ???CE??? indique ce produit est conforme avec les exigences europ??ennes en mati??re de s??curit??, sant??, environnement et protection du

consommateur.

???Das CE-Zeichen best??tigt, da?? dieses Produkt mit den europ??ischen Bestimmungen f??r Sicherheit, Gesundheit, Umweltschutz und Personenschutz

??bereinstimmt.

VT0453