??
??

TABLE OF CONTENTS
JUDGE INSTRUCTION MANUAL 01
JUDGE
The precision of
??2005 Oakley, Inc. U.S. Patent Pending
SETTING THE DATE AND TIME
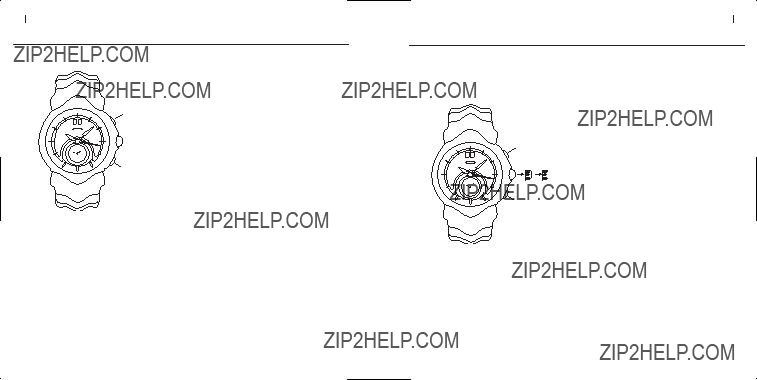
For normal use, the crown rests against the case to maintain a protective seal. The crown can be pulled out to two click positions for setting the date and time. To ensure that the
TO SET THE DATE AND TIME:
1.Pull the crown out to the first click position (a).
2.Turn the crown clockwise and set the date to yesterday???s date.
3.Pull the crown out to the second click position (b).
4.Turn the hands forward until today???s date appears, then continue forward until the current time is reached. If the current time is in the afternoon or evening, move the hour hand all the way around the dial to pass 12 o???clock noon.
5.Push the crown back down against the case.
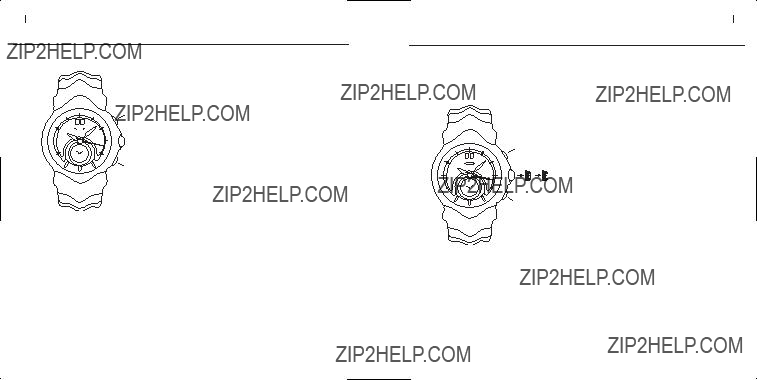
Hour hand
Chrono hour hand
Minute hand
Chrono second hand
Button A
Crown
POS A POS B
Button B
Chrono minute hand

02 JUDGE INSTRUCTION MANUAL
USING THE CHRONOGRAPH
JUDGE INSTRUCTION MANUAL 03
USING THE CHRONOGRAPH
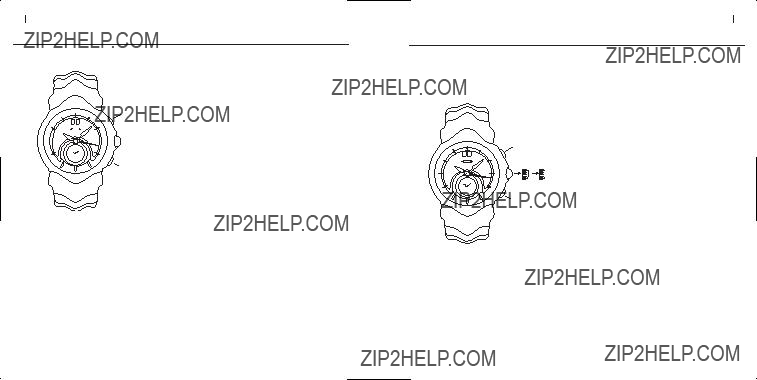
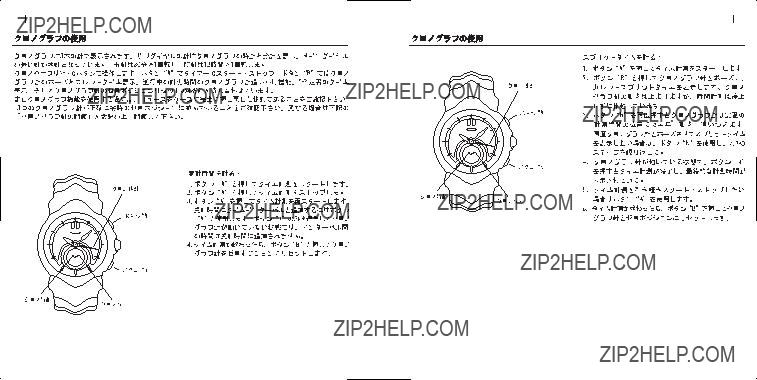
The chronograph includes three separate hands. A hand on the main dial face counts seconds. Minutes and hours are counted on the sub dial. One complete rotation of the minute hand represents 30 minutes. One complete rotation of the hour hand represents 12 hours.
The chronograph is controlled with two push buttons. Button ???A??? starts and stops the timer. Button ???B??? has four functions. In addition to pausing the display at the current intermediate time, it allows the chronograph hands to catch up to the ongoing time being measured; it displays a second time total; and it resets the chronograph hands to the zero position.
Before using the chronograph functions, ensure that the crown is fully against the case and not at one of the click positions used for setting time and date. The three chronograph hands should align precisely at the zero position. If they do not, see the section on page 5 on Adjusting the Chronograph Hands.
Chrono second hand
Button A
Button B
TO MEASURE INTERMEDIATE TIME:
Chrono second hand
Button A
Button B
TO MEASURE ACCUMULATED TIME:
1.Press button ???A??? to start timing.
2.Press button ???A??? again to stop timing.
3.Press button ???A??? again to restart timing.
Continue to use button ???A??? to add time intervals to the total measure of time. When using button ???A??? only, intermediate time (while the chronograph hands are not moving) is not added to the total measure of time.
4.While timing is stopped, press button ???B??? to reset the chronograph hands to the zero position.
Chrono hour
handChrono minute hand
Chrono hour
handChrono minute hand

04 JUDGE INSTRUCTION MANUAL
USING THE CHRONOGRAPH
JUDGE INSTRUCTION MANUAL 05
ADJUSTING THE CHRONOGRAPH HANDS
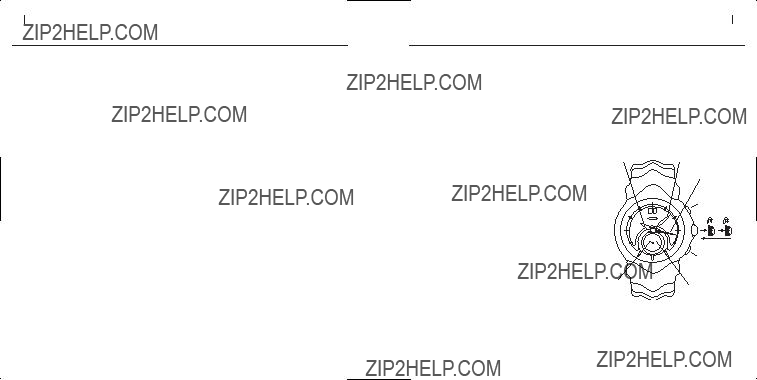
When the chronograph is reset with button ???B,??? the three chronograph hands return to the zero position. If the chronograph hands do not align precisely with the zero position (such as after a battery change), use the following procedure to adjust them.
Button A
A B
Button B
TO ADJUST THE CHRONOGRAPH HANDS:
1.If the chronograph hands currently show a measured time, use button ???B??? to reset them near the zero position.
Note that the hands must be stopped with button ???A??? to allow button ???B??? to reset them.
2.Pull the crown out to the second click position (b).
3.Press button ???A??? and button ???B??? at the same time and keep them pressed for at least two seconds. This puts the chronograph in correction mode.
4.Press button ???A??? to adjust the chronograph hand that measures seconds. Each press moves the hand one short step; press and hold the button for continuous movement.
5.Press button ???B??? then use button ???A??? to adjust the chronograph hands that measure minutes and hours. Each press of button ???A??? moves the minute hand one short step; press and hold the button for continuous movement.
6.Push the crown back down against the case.

06 JUDGE INSTRUCTION MANUAL
BATTERY REPLACEMENT
The miniature battery that powers the chronograph is designed to last approximately four years. However, because the battery is inserted at the factory for extensive performance checks, its actual life, once in your possession, may be less.
Battery replacement may be performed only by an Authorized Oakley Service Center. Any attempt to open the watch case by persons other than Authorized Oakley Service Professionals will void the product warranty.
Within the United States, call Oakley global headquarters at
BAND ADJUSTMENT
If links need to be added or removed from the band, the adjustment should be done by an Authorized Oakley Timepiece Dealer. Do not attempt to shorten the band by removing links yourself, as this may result in damage to the bracelet.
CLEANING
Use a soft, clean cloth to wipe off any moisture that adheres to the case or band. Made of
SPECIFICATIONS

08 JUDGE INSTRUCTION MANUAL
SAFEGUARDING
WATER EXPOSURE
Rated at
TEMPERATURE
For precision timekeeping, normal operating temperature is 0??C to 50??C (32??F to 122??F).
MAGNETISM
Strong magnetic fields can have an adverse affect on the timepiece. Keep it away from magnetic objects.
CHEMICALS
The timepiece may become discolored or damaged if exposed to cosmetic spray, detergents, adhesives, solvents, or paints.
SHOCK WAVE
Although the timepiece resists shock damage, impact against a hard surface may cause damage to the movement or crystal.
PERIODIC MAINTENANCE
To ensure that the case, crown, crystal seal, and gasket remain resistant to water exposure, it is recommended that the timepiece be inspected once every 2 to 3 years at an Authorized Oakley Service Center.
JUDGE INSTRUCTION MANUAL 09
OAKLEY WARRANTY POLICY
All authentic Oakley timekeeping instruments are warranted against manufacturer???s defects for one full year from the date of purchase. Coverage is valid only with proof of purchase from an Authorized Oakley Timepiece Dealer.
IMPORTANT
This limited warranty does not cover the crystal, strap/band/bracelet, or attachments. Scratches to the case caused by use are not covered, nor is moisture damage if the timepiece is a
REGISTRATION
The
Legal rights under applicable national law governing the sale of consumer goods are not affected by this warranty.

10 JUDGE INSTRUCTION MANUAL
HOW TO MAKE A WARRANTY CLAIM
Within the United States, call the Oakley Global Headquarters number listed below. Please have your purchase information ready. Customers outside the United States should contact their local Authorized Oakley Timepiece Dealer or use the list below to call the nearest Oakley headquarters.
Oakley Global Headquarters, USA: 1 (800)
Oakley Africa: +27 41 501 0200
JUDGE - MANUAL DE INSTRUCCIONES 11
OAKLEY JUDGE
La precisi??n de este mecanismo suizo de diez rub??es se une a un circuito de oscilaci??n que cuenta cada segundo como 32.768 vibraciones de un diapas??n de cristal. Este cron??grafo genuino est?? provisto de una esfera auxiliar para medir las horas y minutos transcurridos, m??s un segundero r??pido que mide los tiempos intermedios. Su pulsera est?? dise??ada con la ergonom??a de una columna vertebral, formada por eslabones robustos de una sola pieza hechos artesanalmente con acero inoxidable quir??rgico de la m??s alta calidad. Su geometr??a dise??ada digitalmente rodea la mu??eca proporcionando la m??xima comodidad y ajuste. El instrumento tiene tambi??n una gran esfera para la fecha, una pila con una autonom??a de 48 meses y el cristal m??s duro utilizado en la fabricaci??n de relojes: zafiro puro.
Oakley Brasil Ltda.:
Oakley Canada:
Oakley Europe:Benelux, France, Italia, Scandinavia: 00 800 62 55 39 00
??? Espa??a: 900 953 398 ??? Portugal: 800 833 121 ??? Sverige: 020 79 1037
Oakley GMBH: Germany, Austria and Poland:
Oakley Japan: 0120 009 146
Oakley M??xico: 52) 55 59503643
Oakley South Pacific (Australia): 1 800 637 001
Oakley South Pacific (New Zealand): 0800 696 255
Oakley UK: 01462 475400 Eire customers: 00 353 4439557
AJUSTE DE FECHA Y HORA
En uso normal, la corona est?? presionada contra la caja, proporcionando un sellado protector. La corona puede extraerse hasta dos posiciones, se??aladas con un clic, para ajustar la fecha y la hora.
Para asegurarse de que la funci??n de cambio de fecha se active a medianoche (y no a mediod??a), sincronice el reloj de la siguiente manera:
PARA AJUSTAR FECHA Y HORA:
1.Tire de la corona hasta que ajuste con un clic en la primera posici??n (a).
2.Gire la corona haciendo avanzar la fecha hasta la fecha de ayer.
3.Tire de la corona hasta que ajuste con un clic en la segunda posici??n (b).
4.Haga avanzar las manecillas hasta que aparezca la fecha de hoy, luego contin??e hasta alcanzar la hora actual. Si la hora actual es por la tarde o la noche, gire la manecilla horaria una vuelta completa de la esfera hasta pasar las doce del mediod??a.
5.Presione la corona hasta su posici??n normal, apoyada contra la caja.

12 JUDGE - MANUAL DE INSTRUCCIONES
USO DEL CRON??GRAFO
JUDGE - MANUAL DE INSTRUCCIONES 13
USO DEL CRON??GRAFO
El cron??grafo tiene tres manecillas independientes. La manecilla de la esfera principal cuenta los segundos. En la esfera auxiliar se cuentan los minutos y las horas. Una vuelta completa del minutero representa 30 minutos. Una vuelta completa de la manecilla horaria representa 12 horas.
El cron??grafo se controla con dos botones. El bot??n ???A??? detiene y pone en marcha el cron??grafo. El bot??n ???B??? tiene cuatro funciones. Adem??s de detener la indicaci??n en el tiempo parcial actual, permite a las manecillas del cron??grafo midar el tiempo intermedio, indicar un segundo tiempo total y poner a cero las manecillas del cron??grafo.
Antes de utilizar el cron??grafo, aseg??rese de que la corona est?? completamente presionada contra la caja y no en una de las posiciones utilizadas para ajustar la fecha y la hora. Las tres manecillas del cron??grafo deber??n encontrarse exactamente en la posici??n cero. Si no es as??, lea el procedimiento que se describe m??s adelante Ajuste de las manecillas del cron??grafo (p??gina 15).
PARA MEDIR TIEMPOS INTERMEDIOS:
PARA MEDIR EL TIEMPO TRANSCURRIDO:
1.Presione el bot??n ???A??? para poner en marcha el cron??grafo.
2.Presione el bot??n ???A??? de nuevo para detener el cron??grafo.
3.Presione el bot??n ???A??? de nuevo para volver a poner en marcha el cron??grafo.
Contin??e utilizando el bot??n ???A??? para a??adir intervalos de tiempo al tiempo total medido. Si se utiliza solamente el bot??n ???A???, no se pueden a??adir tiempos parciales (con las manecillas del cron??grafo detenidas) al tiempo total medido.
4.Con el cronometraje detenido, presione el bot??n ???B??? para poner a cero las manecillas del cron??grafo.
14 JUDGE - MANUAL DE INSTRUCCIONES
USO DEL CRON??GRAFO
PARA MEDIR UN SEGUNDO TIEMPO TOTAL:
JUDGE - MANUAL DE INSTRUCCIONES 15
AJUSTE DE LAS MANECILLAS DEL CRON??GRAFO
Al poner a cero el cron??grafo con el bot??n ???B???, las tres manecillas del cron??grafo vuelven a la posici??n cero. Si las manecillas no se alinean exactamente con la posici??n cero (como despu??s de un cambio de pila), proceda de la siguiente manera para ajustarlas:
Bot??n A
A B
Bot??n B
PARA AJUSTAR LAS MANECILLAS DEL CRON??GRAFO:
1.Si las manecillas del cron??grafo est??n indicando el tiempo actual, utilice el bot??n ???B??? para acercarlas a la posici??n cero.
Recuerde que las manecillas deben detenerse con el bot??n ???A??? para luego ponerlas a cero con el bot??n ???B???.
2.Tire de la corona hasta la segunda posici??n, se??alada con un clic (b).
3.Presione los botones ???A??? y ???B??? al mismo tiempo y mant??ngalos presionados durante dos segundos. De este modo pondr?? el cron??grafo en posici??n de ajuste.
4.Presione el bot??n ???A??? para ajustar el segundero del cron??grafo. Presi??nelo repetidamente para hacer avanzar la manecilla en peque??os tramos; presione y mantenga presionado el bot??n para que la manecilla avance r??pidamente.
5.Presione el bot??n ???B??? y luego utilice el bot??n ???A??? para ajustar las manecillas del cron??grafo que miden minutos y horas. Presione repetidamente el bot??n ???A??? para que el minutero avance en peque??os tramos; presione y mantenga presionado el bot??n para que la manecilla avance r??pidamente.
6.Empuje la corona para devolverla a su posici??n normal, presionada contra la caja.
16 JUDGE - MANUAL DE INSTRUCCIONES
SUSTITUCI??N DE LA PILA
La pila miniatura que alimenta el cron??grafo est?? dise??ada para una duraci??n aproximada de cuatro a??os. Sin embargo, puesto que la pila se coloca en f??brica para realizar pruebas exhaustivas de funcionamiento, su duraci??n real, una vez en poder del cliente, podr??a ser menor.
La sustituci??n de la pila s??lo puede ser llevada a cabo por el Servicio
Dentro de los Estados Unidos, llame a nuestras oficinas centrales de Oakley al n??mero
AJUSTE DE LA PULSERA
Si necesita a??adir o quitar eslabones de la pulsera, un Distribuidor Autorizado Oakley deber?? realizar el ajuste. No intente acortar la pulsera quitando eslabones usted mismo, pues podr??a estropear la pulsera.
LIMPIEZA
Utilice un pa??o suave y limpio para quitar la humedad adherida a la caja o la pulsera. La pulsera, hecha de acero inoxidable de alta calidad, se ensuciar?? con el polvo y el sudor debido al contacto con la piel. La falta de limpieza del reloj y la caja podr??a provocar erupciones cut??neas.
ESPECIFICACIONES
18 JUDGE - MANUAL DE INSTRUCCIONES
CONSERVACI??N
EXPOSICI??N AL AGUA
Al estar regulado para ser hidr??fobo hasta 10 bares, el reloj puede llevarse durante el ba??o, as?? como para nadar o practicar el buceo a pulm??n en poca profundidad. No est?? dise??ado para buceo con escafandra o a gran profundidad. Antes de poner el reloj en contacto con el agua debe asegurarse de que la corona est?? firmemente ajustada contra la caja. No extraiga la corona ni presione los botones del cron??grafo si el reloj est?? mojado. Cuando se moje con agua de mar, debe aclarar el reloj con agua dulce y secarlo completamente.
TEMPERATURA
Para mantener la precisi??n de cronometraje, la temperatura normal de funcionamiento es de 0??C a 50??C.
MAGNETISMO
Los campos magn??ticos fuertes pueden da??ar el mecanismo del reloj. Mant??ngalo alejado de los objetos magn??ticos.
AGENTES QU??MICOS
El reloj puede decolorarse o deteriorarse en contacto con aerosoles cosm??ticos, detergentes, adhesivos, disolventes o pinturas.
ONDAS DE CHOQUE
Aunque el reloj est?? dise??ado para resistir impactos, los golpes contra superficies duras pueden estropearlo o da??ar el cristal.
MANTENIMIENTO PERI??DICO
Para garantizar que tanto la caja como la corona, el sellado del cristal y la junta mantienen su estanqueidad en contacto con el agua, es recomendable que el reloj sea revisado cada 2 o 3 a??os en un Centro de Servicio Autorizado Oakley.
JUDGE - MANUAL DE INSTRUCCIONES 19
GARANT??A OAKLEY
Todos los cron??metros genuinos Oakley est??n garantizados por un a??o a partir de la fecha de compra contra defectos de fabricaci??n. La cobertura de esta garant??a s??lo es v??lida presentando el documento de prueba de compra de un Distribuidor Autorizado Oakley.
IMPORTANTE
Esta garant??a limitada no cubre el cristal, la pulsera, correa o brazalete, ni los accesorios adjuntos. No cubre el rallado producido por el uso, ni los da??os producidos por el agua en modelos que no sean hidr??fobos, as?? como tampoco cubre los da??os producidos por desastres naturales tales como el fuego, las inundaciones o los terremotos. Oakley se reserva el derecho a rechazar cualquier responsabilidad bajo esta garant??a para la reparaci??n de da??os producidos por un uso inadecuado o abusivo evidente, incluidos los defectos producidos por la apertura del mecanismo o por servicios de reparaci??n realizados por personas ajenas a los Servicios de Reparaci??n Autorizados Oakley. Esta garant??a no afecta a los derechos legales espec??ficos de los consumidores. Para tener derecho al servicio bajo la garant??a expresada m??s arriba, es imprescindible la presentaci??n de un documento de compra ??? que debe mostrar claramente la fecha de compra y el nombre del Distribuidor Autorizado Oakley ??? si es necesaria una reparaci??n durante el per??odo de garant??a.
Esta garant??a no afecta a los derechos establecidos por la legislaci??n sobre consumo aplicable en cada pa??s.

20 JUDGE - MANUAL DE INSTRUCCIONES
C??MO RECLAMAR UNA GARANT??A
Desde dentro de los Estados Unidos, llame a nuestras oficinas centrales al n??mero escrito abajo con su informaci??n de compra. Los clientes de fuera de los Estados Unidos deben ponerse en contacto con su Distribuidor Autorizado de Relojes Oakley o referirse a la lista abajo para llamar a su sede central Oakley.
Oakley Global Headquarters, USA: 1 (800)
Oakley Africa: +27 41 501 0200
MANUEL D'INSTRUCTIONS JUDGE 21
OAKLEY JUDGE
La pr??cision d???un mouvement suisse ?? dix rubis est associ??e ?? un oscillateur pour lequel une seconde repr??sente 32 768 vibrations d???un diapason ?? quartz. Ce v??ritable chronographe int??gre un
Oakley Brasil Ltda.:
Oakley Canada:
Oakley Europe:Benelux, France, Italia, Scandinavia: 00 800 62 55 39 00
??? Espa??a: 900 953 398 ??? Portugal: 800 833 121 ??? Sverige: 020 79 1037
Oakley GMBH: Germany, Austria and Poland:
Oakley Japan: 0120 009 146
Oakley M??xico: 52) 55 59503643
Oakley South Pacific (Australia): 1 800 637 001
Oakley South Pacific (New Zealand): 0800 696 255
Oakley UK: 01462 475400 Eire customers: 00 353 4439557
REGLAGE DE LA DATE ET DE L???HEURE
Dans les conditions normales d???utilisation, le remontoir est pouss?? contre le bo??tier afin de garantir un joint d?????tanch??it?? optimal. Il peut coulisser vers l???ext??rieur sur deux positions diff??rentes (rep??rables par un ???clic???) afin de r??gler la date et l???heure.
Afin de s???assurer que la fonction de changement de date s???activera ?? minuit (et non ?? midi), la montre doit ??tre synchronis??e en proc??dant comme suit :
POUR REGLER LA DATE ET L???HEURE :
1.Tirez le remontoir jusqu???au premier clic (a).
2.Tournez le remontoir dans le sens horaire et r??glez la date sur celle du jour pr??c??dent.
3.Tirez le remontoir jusqu???au second clic (b).
4.Tournez le remontoir pour faire avancer les aiguilles jusqu????? ce que la date du jour apparaisse, puis continuez jusqu????? ce que l???heure en cours soit atteinte. Si l???heure en cours se situe dans l???apr??s- midi ou en soir??e, faites faire un tour de cadran ?? l???aiguille des heures afin qu???elle passe l???indication de midi.
5.Repoussez le remontoir contre le bo??tier.
Aiguille des heures
Aiguille des heures du chronom??tre
Aiguille des minutes
Aiguille des secondes du chronom??tre
Bouton A
Remontoir
POS A POS B
Bouton B
Aiguille des minutes du chronom??tre

22 MANUEL D'INSTRUCTIONS JUDGE
UTILISATION DU CHRONOGRAPHE
MANUEL D'INSTRUCTIONS JUDGE 23
UTILISATION DU CHRONOGRAPHE
Le chronographe comporte trois aiguilles s??par??es : l???aiguille des secondes se trouve sur le cadran principal, tandis que celle des minutes et celle des heures sont situ??es au niveau du
Deux
Avant d???utiliser les fonctions du chronographe,
Aiguille des secondes du chronom??tre
Bouton A
Bouton B
POUR MESURER LES TEMPS INTERMEDIAIRES :
Aiguille des secondes du chronom??tre
Bouton A
Bouton B
Aiguille des heures
du chronom??treAiguille des minutes du chronom??tre
POUR MESURER LE TEMPS CUMULE :
1.Appuyez sur le bouton ???A??? pour enclencher le chronom??trage.
2.Appuyez ?? nouveau sur le bouton ???A ??? pour arr??ter le chronom??trage.
3.Appuyez ?? nouveau sur le bouton ???A ??? pour red??marrer le chronom??trage.
Continuez ?? utiliser le bouton ???A??? pour ajouter des intervalles de temps au temps total mesur??. En utilisant uniquement le bouton ???A???, le temps interm??diaire (pendant que les aiguilles du chronographe ne se d??placent pas) n???est pas rajout?? au temps total mesur??.
4.Pendant l???arr??t du chronom??trage, appuyez sur le bouton ???B??? pour remettre les aiguilles du
Aiguille des heures
du chronom??treAiguille des minutes du chronom??tre
chronographe en position z??ro.
24 MANUEL D'INSTRUCTIONS JUDGE
UTILISATION DU CHRONOGRAPHE
MANUEL D'INSTRUCTIONS JUDGE 25
CALIBRAGE DES AIGUILLES DU CHRONOGRAPHE
Lorsque le chronographe est r??initialis?? ?? l???aide du bouton ???B,??? ses trois aiguilles reviennent en position z??ro. Si
Bouton A
A B
Bouton B
POUR CALIBRER LES AIGUILLES DU CHRONOGRAPHE:
1.Si les aiguilles du chronographe indiquent ?? ce
2.Tirez le remontoir jusqu???au second clic (b).
3.Appuyez simultan??ment sur le bouton ???A??? et le bouton ???B??? et
4.Appuyez sur le bouton ???A??? pour calibrer l???aiguille des secondes du chronographe. Chaque pression sur le bouton fait avancer l???aiguille d???une courte distance ;
5.Appuyez sur le bouton ???B??? puis utilisez le bouton ???A??? pour calibrer les aiguilles des minutes et des heures du chronographe. Chaque pression sur le bouton ???A??? fait avancer l???aiguille d???une courte distance ;
6.Repoussez le remontoir contre le bo??tier.

26 MANUEL D'INSTRUCTIONS JUDGE
REMPLACEMENT DE LA PILE
La pile miniature qui alimente le chronographe est con??ue pour durer approximativement quatre ans. Toutefois, la pile ??tant ins??r??e ?? l???usine en vue de contr??les de performances approfondis, sa dur??e de vie r??elle, une fois en votre possession, peut s???av??rer inf??rieure.
Seul le Service Apr??s Vente Oakley peut remplacer la pile de votre chronographe. Toute tentative d???ouverture du bo??tier de la montre par des personnes autres que celles du SAV Oakley entra??nera l???annulation de la garantie du produit.
Aux
REGLAGE DU BRACELET
Si des segments doivent ??tre ajout??s ou retir??s de votre bracelet, nous vous recommandons de faire r??aliser ce r??glage par un revendeur de montres Oakley agr????. N???essayez pas de raccourcir votre bracelet en retirant par vous- m??me des segments car vous risqueriez d???endommager votre bracelet.
NETTOYAGE
Utilisez un tissu propre et doux pour retirer les traces d???humidit?? sur le bo??tier ou le bracelet. La poussi??re et la transpiration peuvent salir le bracelet r??alis?? en acier inoxydable de tr??s haute qualit??. Il convient donc de nettoyer r??guli??rement la montre et le bo??tier afin d?????viter tout risque d?????ruption cutan??e.
CARACTERISTIQUES

28 MANUEL D'INSTRUCTIONS JUDGE
ENTRETIEN
EXPOSITION A L???EAU
La montre r??siste ?? la pression de l???eau jusqu????? 10 bars : elle peut donc ??tre port??e dans le bain, pour nager ou faire de la plong??e en eaux peu profondes. Elle n???est pas con??ue pour la plong??e
TEMPERATURE
Votre montre Oakley est con??ue pour fonctionner id??alement dans une plage de temp??ratures allant de 0??C ?? 50??C.
MAGNETISME
La montre peut ??tre affect??e par les champs magn??tiques de forte intensit??. Veillez ?? la maintenir loin de tout objet magn??tique.
PRODUITS CHIMIQUES
Le bo??tier et le bracelet peuvent ??tre d??color??s ou endommag??s par des produits cosm??tiques, des d??tergents, des adh??sifs, des solvants ou des peintures.
ONDE DE CHOC
Bien que la montre soit tr??s r??sistante, un choc violent contre une surface dure peut n??anmoins endommager le mouvement ou la glace.
ENTRETIEN REGULIER
Pour vous assurer que le ch??ssis, le remontoir, le syst??me de fermeture de la glace et le joint d?????tanch??it?? offrent toujours une parfaite r??sistance ?? l???eau, il vous est conseill?? de faire inspecter votre montre une fois tous les 2 ou 3 ans par le Service Apr??s Vente d???Oakley.
MANUEL D'INSTRUCTIONS JUDGE 29
GARANTIE OAKLEY
Tous les instruments de chronom??trage Oakley sont garantis contre les vices de fabrication pendant une ann??e enti??re ?? compter de la date d'achat. Cette garantie ne s'applique que sur pr??sentation d'une preuve d'achat valable ??manant d'un revendeur de montres Oakley agr????.
IMPORTANT
La garantie limit??e Oakley ne couvre ni le verre, ni le bracelet, ni les ??l??ments de fixation. Les rayures sur le bo??tier r??sultant de l'utilisation normale de la montre ne sont pas couvertes, pas plus que les dommages dus ?? l'humidit?? s'il s'agit d'un mod??le non hydrophobe ou ceux r??sultant d'une catastrophe naturelle telle qu???un incendie, une inondation ou un tremblement de terre. Nous nous r??servons le droit de d??cliner toute responsabilit?? de r??paration des dommages au titre de la pr??sente garantie lorsque
L'exercice du droit ?? la r??paration pr??vu par la garantie
ENREGISTREMENT
La technologie de pointe dont b??n??ficie chaque montre Oakley suffit ?? d??montrer son authenticit??. Effectuez l???enregistrement de votre montre par courrier ou sur notre site www.oakley.com : vous nous fournirez ainsi toutes les r??f??rences n??cessaires pour certifier votre achat. L'exercice du droit ?? la r??paration pr??vu par la garantie
La pr??sente garantie ne remet pas en cause les droits l??gaux d??finis dans le cadre de la loi nationale r??gissant la vente de biens de consommation.
30 MANUEL D'INSTRUCTIONS JUDGE
POUR BENEFICIER DE LA GARANTIE
Aux
Oakley Global Headquarters, USA: 1 (800)
Oakley Africa: +27 41 501 0200
MANUALE DI ISTRUZIONI JUDGE 31
OAKLEY JUDGE
La precisione dell???orologio Oakley Judge ?? data dal meccanismo svizzero a dieci rubini calibrato da un oscillatore al quarzo che segna ogni secondo con 32.768 vibrazioni. Questo autentico cronografo ?? caratterizzato da un miniquadrante interno per misurare i minuti e le ore trascorsi, oltre che da una lancetta dei secondi che accelera al momento in corso quando si interrompe la pausa. Realizzate nel pi?? puro acciaio inossidabile chirurgico, le solide maglie del bracciale sono forgiate secondo il modello ergonomico della colonna vertebrale. La geometria creata digitalmente avvolge il polso per ottimizzare il comfort e la tenuta. Lo strumento ?? inoltre caratterizzato da un ampio display per visualizzare la data, da una pila con 48 mesi di autonomia e dal cristallo pi?? duro mai utilizzato in orologeria, lo zaffiro purissimo.
Oakley Brasil Ltda.:
Oakley Canada:
Oakley Europe:Benelux, France, Italia, Scandinavia: 00 800 62 55 39 00
??? Espa??a: 900 953 398 ??? Portugal: 800 833 121 ??? Sverige: 020 79 1037
Oakley GMBH: Germany, Austria and Poland:
Oakley Japan: 0120 009 146
Oakley M??xico: 52) 55 59503643
Oakley South Pacific (Australia): 1 800 637 001
Oakley South Pacific (New Zealand): 0800 696 255
Oakley UK: 01462 475400 Eire customers: 00 353 4439557
IMPOSTAZIONE DELLA DATA E DELL'ORA
In condizioni normali, la corona ?? inserita nella cassa e funge da guarnizione protettiva. La corona pu?? essere estratta e assumere due posizioni diverse per procedere all'impostazione della data e dell'ora.
Affinch?? la funzione di modifica della data si attivi a mezzanotte (e non a mezzogiorno), sincronizzate l'orologio come segue:
PER IMPOSTARE LA DATA E L???ORA:
1.Estraete la corona fino a farla scattare la prima volta (a).
2.Ruotate la corona in senso orario e fermatevi sulla data di ieri.
3.Estraete la corona fino a farla scattare la seconda volta (b).
4.Ruotate le lancette in avanti finch?? sul quadrante appare la data odierna e proseguite fino a raggiungere l'ora esatta. Per le ore pomeridiane e serali, fare avanzare la lancetta delle ore oltre le 12 e continuare fino a raggiungere l'ora esatta.
5.Reinserite completamente la corona nella cassa.
lancetta ore
lancetta ore (cronografo)
lancetta minuti
lancetta secondi (cronografo)
pulsante A
corona
POS A POS B
pulsante B
lancetta minuti (cronografo)

32 MANUALE DI ISTRUZIONI JUDGE
USO DEL CRONOGRAFO
MANUALE DI ISTRUZIONI JUDGE 33
USO DEL CRONOGRAFO
Il cronografo comprende tre lancette separate. Una lancetta sul quadrante principale segna i secondi. I minuti e le ore sono riportate nel quadrante inferiore. Una rotazione completa della lancetta dei minuti equivale a 30 minuti. Una rotazione completa della lancetta delle ore equivale a 12 ore.
Il cronografo si attiva con due pulsanti. Il pulsante ???A??? blocca e avvia il cronometro. Il pulsante ???B??? ha quattro funzioni. Oltre a bloccare la visualizzazione al tempo intermedio in corso, permette alle lancette del cronografo di continuare a misurare il tempo in corso; permette di visualizzare un secondo tempo e azzerare il cronografo. Prima di utilizzare le funzioni del cronografo, assicuratevi che la corona sia completamente inserita nella cassa e non estratta nelle posizioni di scatto utilizzate per impostare l'ora e la data. Le tre lancette del cronografo devono essere allineate precisamente sullo zero. In caso contrario, vedere il paragrafo (a pag.5) ???Azzeramento delle lancette del cronografo???.
lancetta secondi (cronografo)
pulsante A
pulsante B
PER MISURARE UN TEMPO INTERMEDIO:
lancetta secondi (cronografo)
pulsante A
pulsante B
lancetta ore
(cronografo)lancetta minuti (cronografo)
PER MISURARE UN TEMPO:
1.Premete il pulsante ???A??? per avviare il cronografo.
2.Premete nuovamente il pulsante ???A??? per bloccare il cronografo.
3.Premete nuovamente il pulsante ???A??? per riavviare il cronografo.
Continuate a utilizzare il pulsante ???A??? per addizionare sommare intervalli di tempo al tempo totale cronometrato. Quando si utilizza solo il pulsante ???A???, il tempo intermedio (mentre le lancette del cronografo non si muovono) non ?? addizionato al tempo totale cronometrato.
4.Mentre il meccanismo ?? bloccato, premete il pulsante ???B??? per azzerare il cronografo.
lancetta ore
(cronografo)lancetta minuti (cronografo)

34 MANUALE DI ISTRUZIONI JUDGE
USO DEL CRONOGRAFO
MANUALE DI ISTRUZIONI JUDGE 35
AZZERAMENTO DELLE LANCETTE DEL CRONOGRAFO
Quando azzerate il cronografo con il pulsante ???B,??? le tre lancette del cronografo ritornano in posizione di azzeramento. Se le lancette del cronografo non si allineano precisamente sulla posizione di azzeramento (come dopo la sostituzione della pila), utilizzate la seguente procedura di azzeramento.
pulsante A
A B
pulsante B
PER AZZERARE LE LANCETTE DEL CRONOGRAFO:
1.Se le lancette del cronografo segnano un tempo cronometrato, utilizzate il pulsante ???B??? per azzerare le lancette.
Le lancette devono essere bloccate con il pulsante ???A??? perch?? il pulsante ???B??? possa azzerarle.
2.Estraete la corona fino a farla scattare per la seconda volta (b).
3.Premete contemporaneamente il pulsante ???A??? e il pulsante ???B??? e manteneteli premuti per almeno due secondi. In questo modo il cronografo ?? in modalit?? di correzione.
4.Premete il pulsante ???A??? per azzerare la lancetta del cronografo che misura i secondi. Ogni pressione sposta la lancetta a scatti; per spostarla completamente, premete il pulsante e mantenetelo premuto.
5.Premete il pulsante ???B???, poi utilizzate il pulsante ???A??? per azzerare le lancette del cronografo che misurano i minuti e le ore. Ogni pressione del pulsante ???A??? sposta la lancetta a scatti; per spostarla completamente, premete il pulsante e mantenetelo premuto.
6.Reinserite completamente la corona nella cassa.

36 MANUALE DI ISTRUZIONI JUDGE
SOSTITUZIONE DELLA PILA
La mini pila che fa funzionare il cronografo ?? stata progettata per un'autonomia di circa quattro anni. Tuttavia, poich?? la pila ?? gi?? inserita in fabbrica per verificare approfonditamente le prestazioni dell'orologio, la vita effettiva della pila, una volta in vostro possesso, pu?? risultare pi?? breve.
La pila pu?? essere sostituita esclusivamente da un rivenditore di orologi Oakley autorizzato. Qualsiasi tentativo per aprire la cassa dell'orologio effettuato da chiunque non sia un esperto Oakley autorizzato annuller?? la garanzia del prodotto.
Negli Stati Uniti, potete contattare il numero verde
REGOLAZIONE DEL BRACCIALE
Qualora sia necessario aggiungere o togliere maglie al bracciale, la modifica deve essere apportata da un rivenditore di orologi Oakley autorizzato. Tentare di accorciare il bracciale senza l'intervento di un esperto autorizzato pu?? causare danni al bracciale.
PULITURA
Utilizzate un panno morbido e pulito per rimuovere qualsiasi residuo dalla cassa o dal bracciale. Forgiato in puro acciaio inossidabile, il bracciale si sporcher?? con la polvere e la traspirazione dovute al contatto con la pelle. La mancata pulizia dell'orologio e della cassa pu?? provocare un'irritazione cutanea.
SPECIFICHE TECNICHE
38 MANUALE DI ISTRUZIONI JUDGE
PRECAUZIONI
ESPOSIZIONE ALL'ACQUA
Calibrato per essere perfettamente impermeabile fino a una pressione di 10 bar, l'orologio pu?? essere tranquillamente indossato durante i bagni, il nuoto e le immersioni in acque poco profonde. Non ?? stato concepito per l'immersione in profondit?? o la saturazione. Prima di esporre l'orologio all'umidit??, assicuratevi che la corona sia completamente inserita nella cassa. Non estraete mai la corona e non premete i pulsanti del cronografo quando l'orologio ?? bagnato. Dopo ogni utilizzo in acqua marina, risciacquate con acqua dolce e asciugate perfettamente.
TEMPERATURA
Per prestazioni cronometriche, la normale temperatura di funzionamento ?? compresa tra lo 0??C e i 50??C (tra 32??F e 122??F).
MAGNETISMO
L???esposizione a campi magnetici intensi pu?? pregiudicare le prestazioni del meccanismo dell???orologio. Tenere lontano da oggetti magnetici.
AGENTI CHIMICI
L???esposizione a spray cosmetici, detergenti, collanti, solventi o vernici pu?? scolorire o danneggiare l???orologio.
ONDE D'URTO
L???orologio ?? stato progettato per assicurare la massima resistenza, gli impatti contro superfici dure possono per?? danneggiarlo.
MANUTENZIONE PERIODICA
Per mantenere le caratteristiche idrofobe di cassa, corona, sigillo di cristallo e guarnizione, si raccomanda di sottoporre l???orologio a un???ispezione periodica presso un Centro di Manutenzione Autorizzato Oakley ogni 2 o 3 anni.
MANUALE DI ISTRUZIONI JUDGE 39
GARANZIA OAKLEY
Tutti gli strumenti cronometrici Oakley sono garantiti contro difetti di fabbricazione per un anno intero dalla data di acquisto. La garanzia si applica solo dietro presentazione della prova d???acquisto presso un rivenditore di orologi Oakley autorizzato.
IMPORTANTE
La presente garanzia limitata non copre n?? il vetro, n?? il bracciale, n?? gli elementi di tenuta. Non si risponde inoltre per graffi alla cassa dovuti all???uso dell???orologio, per i danni imputabili all???umidit?? nei modelli non impermeabili, n?? per i danni originati da calamit?? naturali quali incendi, inondazioni o terremoti. Oakley si riserva il diritto di declinare ogni responsabilit?? per la riparazione di danni a titolo della garanzia in presenza di uso palesemente inadeguato o abusivo e di fronte a manutenzioni o modifiche non eseguite da centri di manutenzione autorizzati Oakley. La presente garanzia non pregiudica i diritti legali specifici dei consumatori.
REGISTRAZIONE
La tecnologia di punta racchiusa nella vostra macchina del tempo Oakley ?? una prova sufficiente della sua autenticit??. La registrazione dell???orologio per posta o online sul sito www.oakley.com vi fornisce tutte le referenze necessarie a certificare l???acquisto. Il godimento del diritto a servizi di riparazione previsti dalla garanzia di cui sopra richiede la presentazione di un titolo abilitante: la prova d???acquisto valida che indichi chiaramente la data d???acquisto e il nome del rivenditore di orologi Oakley autorizzato.
La presente garanzia non ha nessuna influenza sui diritti legali previsti dall???ordinamento giuridico nazionale in vigore che regola la vendita dei beni di consumo.

40 MANUALE DI ISTRUZIONI JUDGE
ATTIVAZIONE DELLA GARANZIA
Negli Stati Uniti, telefonare alla nostra sede centrale al numero elencato di seguito, fornendo tutte le informazioni relative al vostro acquisto. I clienti al di fuori degli Stati Uniti dovranno contattare un rivenditore autorizzato Oakley oppure la filiale del proprio Paese (qui di seguito sono elencati i numeri da contattare):
Oakley Global Headquarters, USA: 1 (800)
Oakley Africa: +27 41 501 0200
MANUAL DE INSTRU????O JUDGE 41
OAKLEY JUDGE
A precis??o do movimento su????o de dez j??ias ?? combinada com um oscilador que conta cada segundo como 32,768 vibra????es de um diapas??o de cristal. Esse verdadeiro cron??metro apresenta um subvisor para registrar minutos e horas decorridas, al??m de um ponteiro de segundos que se adianta para o hor??rio certo assim que o bot??o de pausa ?? desativado. Projetado imitando a ergonomia da coluna vertebral, a??o inoxid??vel do mais alto grau foi moldado formando elos fortes de metal s??lido. A geometria digital envolve o pulso, maximizando o caimento confort??vel. O instrumento tamb??m apresenta um mostrador grande de data, uma bateria com dura????o de 48 meses e o cristal mais resistente usado na fabrica????o de rel??gios, a safira.
Oakley Brasil Ltda.:
Oakley Canada:
Oakley Europe:Benelux, France, Italia, Scandinavia: 00 800 62 55 39 00
??? Espa??a: 900 953 398 ??? Portugal: 800 833 121 ??? Sverige: 020 79 1037
Oakley GMBH: Germany, Austria and Poland:
Oakley Japan: 0120 009 146
Oakley M??xico: 52) 55 59503643
Oakley South Pacific (Australia): 1 800 637 001
Oakley South Pacific (New Zealand): 0800 696 255
Oakley UK: 01462 475400 Eire customers: 00 353 4439557
AJUSTE DA DATA E HORA
Normalmente, a coroa deve estar pressionada contra a caixa para que haja uma veda????o protetora. A coroa pode ser puxada para duas posi????es para ajustar a data e a hora.
Para assegurar o funcionamento correto da fun????o de mudan??a de data ??
PARA AJUSTAR A DATA E A HORA:
1.Puxe a coroa para a primeira posi????o (a).
2.Gire a coroa em sentido hor??rio e ajuste o rel??gio para a data de ontem.
3.Puxe a coroa para a segunda posi????o (b).
4.Gire os ponteiros para frente at?? que a data de hoje apare??a, ent??o continue girando os ponteiros at?? que cheguem no hor??rio atual. Se a hora atual for ?? tarde ou ?? noite, gire o ponteiro de horas uma volta inteira para passar do
5.Empurre a coroa de volta a sua posi????o normal, pressionada contra a caixa.
Hour hand
Chrono hour hand
Minute hand
Chrono second hand
Button A
Crown
POS A POS B
Button B
Chrono minute hand

42 MANUAL DE INSTRU????O JUDGE
USO DO CRON??METRO
MANUAL DE INSTRU????O JUDGE 43
USO DO CRON??METRO
O cron??metro inclui tr??s ponteiros separados. Um ponteiro no visor principal conta os segundos. Os minutos e horas s??o contados no subvisor. Um giro completo do ponteiro de minutos representa 30 minutos. Um giro completo do ponteiro de horas representa 12 horas.
O cron??metro ?? controlado com dois bot??es. O bot??o ???A??? p??ra e inicia a cronometragem. O bot??o ???B??? tem quatro fun????es. Al??m de pausar o mostrador no tempo intermedi??rio atual, permite que os ponteiros do cron??metro se adiantem ao tempo que est?? sendo cronometrado, exibe um segundo tempo total e zera o cron??metro.
Antes de usar as fun????es do cron??metro,
Chrono second hand
Button A
Button B
PARA MEDIR TEMPO INTERMEDI??RIO:
Chrono second hand
Button A
Button B
Chrono hour
handChrono minute hand
PARA MEDIR TEMPO ACUMULADO:
1.Aperte o bot??o ???A??? para iniciar a cronometragem.
2.Aperte o bot??o ???A??? de novo para parar a cronometragem.
3.Aperte o bot??o ???A??? de novo para reiniciar a cronometragem.
Continue usando o bot??o ???A??? para acrescentar intervalos de tempo ao total do tempo transcorrido. Ao usar somente o bot??o ???A???, o tempo intermedi??rio (enquanto os ponteiros do cron??metro n??o est??o em movimento) n??o ?? acrescido ao tempo total.
4.Ao finalizar a cronometragem, aperte o bot??o ???B??? para zerar o cron??metro.
Chrono hour
handChrono minute hand
44 MANUAL DE INSTRU????O JUDGE
USO DO CRON??METRO
PARA MEDIR UM SEGUNDO TEMPO TOTAL:
MANUAL DE INSTRU????O JUDGE 45
AJUSTE DOS PONTEIROS DO CRON??METRO
Quando o cron??metro ?? reiniciado com o bot??o ???B,??? os tr??s ponteiros do cron??metro voltam ?? posi????o zero. Se os ponteiros do cron??metro n??o ficarem exatamente alinhados na posi????o zero (como depois de uma troca de bateria), siga o seguinte procedimento para
Button A
A B
Button B
PARA AJUSTAR OS PONTEIROS DO CRON??METRO:
1.Se os ponteiros do cron??metro estiverem exibindo uma cronometragem de tempo, use o bot??o ???B??? para que retornem aproximadamente ?? posi????o zero.
Observe que os ponteiros devem ser parados apertando o bot??o ???A??? para que o bot??o ???B??? possa
2.Puxe a coroa para a segunda posi????o (b).
3.Aperte o bot??o ???A??? e o bot??o ???B??? ao mesmo tempo e
4.Aperte o bot??o ???A??? para ajustar o ponteiro do cron??metro que mede segundos. Cada vez que se aperta o bot??o o ponteiro se adianta um pouco; mantenha o bot??o pressionado se quiser que ele se adiante continuamente.
5.Aperte o bot??o ???B??? e ent??o use o bot??o ???A??? para ajustar os ponteiros do cron??metro que medem minutos e horas. Cada vez que se aperta o bot??o ???A??? o ponteiro de minutos se adianta um pouco; mantenha o bot??o pressionado se quiser que ele se adiante continuamente.
6.Empurre a coroa de volta a sua posi????o normal, pressionada contra a caixa.

46 MANUAL DE INSTRU????O JUDGE
TROCA DA BATERIA
A minibateria do cron??metro foi projetada para durar aproximadamente quatro anos. No entanto, sua vida ??til real, uma vez em sua posse, poder?? ser menor porque a bateria ?? instalada na f??brica para a realiza????o de v??rios testes de performance.
A troca da bateria dever?? ser realizada apenas por um Centro Autorizado de Servi??os da Oakley. Qualquer tentativa de abrir a caixa do rel??gio realizada por pessoas que n??o sejam Profissionais do Servi??o Autorizado da Oakley anular?? a garantia do produto.
Nos Estados Unidos, ligue para a sede mundial da Oakley no n??mero
AJUSTE DA PULSEIRA
Se for preciso acrescentar ou remover elos da pulseira, o ajuste dever?? ser feito por um Revendedor Autorizado de Rel??gios da Oakley. N??o tente encurtar a pulseira removendo elos voc?? mesmo, pois poder?? causar danos ?? pulseira.
LIMPEZA
Use um pano limpo e macio para remover qualquer umidade que se adira ?? caixa ou ?? pulseira. Feita de a??o inoxid??vel de alta qualidade, a pulseira ficar?? suja com poeira e transpira????o devido ao contato com a pele. A falta de limpeza do rel??gio e caixa poder?? resultar em irrita????es cut??neas.
ESPECIFICA????ES

48 MANUAL DE INSTRU????O JUDGE
PRECAU????ES
EXPOSI????O ?? ??GUA
O rel??gio est?? classificado como hidrof??bico at??
TEMPERATURA
A faixa de temperatura operacional para manter a precis??o ?? de 0??C a 50??C (32??F a 122??F).
MAGNETISMO
Campos magn??ticos intensos poder??o danificar o mecanismo do rel??gio. Mantenha o rel??gio longe de objetos magn??ticos.
PRODUTOS QU??MICOS
O rel??gio poder?? se descolorir ou se danificar se for exposto a spray cosm??tico, detergentes, produtos adesivos, solventes ou tintas.
ONDAS DE CHOQUE
Embora o rel??gio seja projetado para resistir a impactos, choques contra superf??cies duras poder??o causar danos ao movimento ou ao cristal.
MANUTEN????O PERI??DICA
Para
MANUAL DE INSTRU????O JUDGE 49
POL??TICA DE GARANTIA DA OAKLEY
Todos os instrumentos aut??nticos de medi????o de tempo da Oakley t??m garantia contra defeitos de fabrica????o por um ano a contar da data de compra. A cobertura ?? v??lida somente com a apresenta????o de uma prova de compra de um Revendedor Autorizado de Rel??gios da Oakley.
IMPORTANTE
Esta garantia limitada n??o cobre o cristal, correia/pulseira/tira ou acess??rios. Arranh??es na caixa causados pelo uso n??o s??o cobertos, nem danos por umidade se o rel??gio for um modelo n??o hidrof??bico, nem danos causados por desastres naturais como fogo, enchente ou terremoto. Nos reservamos o direito de renunciar toda a responsabilidade dentro dessa garantia por reparos de danos quando o uso indevido ou abuso for evidente, incluindo os defeitos relativos ?? adultera????o ou a servi??os executados por outro que n??o seja o Servi??o Autorizado da Oakley. Essa garantia n??o afeta os direitos legais do consumidor.
REGISTRO
A tecnologia de ponta contida em cada rel??gio da Oakley serve como valida????o de sua autenticidade. Ao registrar seu rel??gio pelo correio ou
Os direitos legais sob as leis nacionais aplic??veis regendo a venda de bens de consumo n??o s??o afetados por essa garantia.

50 MANUAL DE INSTRU????O JUDGE
COMO EFETUAR UM RECLAMA????O DE GARANTIA
Nos Estados Unidos, ligue para a Oakley Global Headquarters no telefone abaixo. Por favor, tenha suas informa????es de compra ?? m??o. Clientes fora dos Estados Unidos devem contatar seu Revendedor Autorizado de Rel??gios da Oakley local ou usar a lista abaixo para ligar para a Sede da Oakley mais pr??xima.
Oakley Global Headquarters, USA: 1 (800)
Oakley Africa: +27 41 501 0200
JUDGE HASZN??LATI UTAS??T??S 51
JUDGE
Prec??zi??s t??z k??ves sv??jci mu???k??d??stechnika ??sszeillesztve egy olyan rezgo???k??rrel, amely minden m??sodpercben
Oakley Brasil Ltda.:
Oakley Canada:
Oakley Europe:Benelux, France, Italia, Scandinavia: 00 800 62 55 39 00
??? Espa??a: 900 953 398 ??? Portugal: 800 833 121 ??? Sverige: 020 79 1037
Oakley GMBH: Germany, Austria and Poland:
Oakley Japan: 0120 009 146
Oakley M??xico: 52) 55 59503643
Oakley South Pacific (Australia): 1 800 637 001
Oakley South Pacific (New Zealand): 0800 696 255
D??TUM ??S IDO??? BE??LL??T??SA
K??vesse az al??bbi utas??t??sokat az ??ra elso??? alkalommal t??rt??no??? be??ll??t??sakor. Ez az elj??r??s sz??ks??ges ahhoz, hogy a d??tumv??lt??si funkci??t az ??jf??llel szinkroniz??lja. (A korona k??tf??le poz??ci??ba h??zhat?? ki, az ido??? ??s a d??tum be??ll??t??s??hoz.)
1.H??zza ki a koron??t az elso??? kattan??sig (a).
2.A korona forgat??s??val l??ptesse elo???re a d??tumot, ??s ??ll??tsa be a TEGNAPI d??tumra.
3.H??zza ki a koron??t a m??sodik kattan??sig (b).
4.Forgassa a fo??? koron??t addig, am??g a mai d??tumhoz ??r, azt??n folytassa addig am??g el??ri a t??nyleges ido???t is. (Ha a t??nyleges ido??? du., az ??ramutat??t forgassa a deli ido???ponton t??lra, majd ??lljon meg a t??nyleges d??lut??ni/esti ido???pontn??l.).
5.Nyomja vissza a fo??? koron??t szok??sos helyzet??be.
Chrono second hand
Button A
Crown
POS A POS B
Button B
Chrono hour
handChrono minute hand
Oakley UK: 01462 475400 Eire customers: 00 353 4439557

52 JUDGE HASZN??LATI UTAS??T??S
AZ ??RA HASZN??LATA
JUDGE HASZN??LATI UTAS??T??S 53
AZ ??RA HASZN??LATA
Az ??ra 3 k??l??nb??zo??? mutat??t tartalmaz. A fo??? sz??mlapon l??vo??? a m??sodpercek m??r??s??re szolg??l. Az ??ra ??s a perc a kisebb sz??mlapon k??vetheto???. A percmutat?? ??ltal megtett egy teljes k??r 30 percet jelent. Az ??ramutat?? ??ltal megtett k??r pedig 12 ??r??t jelent. Az ido???m??ro k??t nyom??gombbal ir??ny??that??. Az ???A??? gombbal ind??thatjuk ??s ??ll??thatjuk meg az ido???z??to???t. A ???B??? gombnak n??gy funkci??ja van: r??szido??? m??r??se; leheto???v?? teszi a
Mielo???tt haszn??ln??nk az ido???m??ro funkci??t, gyo???zo???dj??nk meg a k??vetkezo???kro???l: a fo??? korona teljesen benyomva ??ll, ??s a h??rom mutat?? pontosan a nulla poz??ci??ban helyezkedik el. (ha nem nulla poz??ci??ban helyezkednek el, ??ll??tsa be o???ket az ???Ido???m??ro mutat??k be??ll??t??sa??? fejezetben le??rtak szerint.
Chrono second hand
Button A
A R??SZIDO??? M??R??SE
1.Nyomja meg az ???A??? gombot a kezd??shez.
2.Nyomja meg a ???B??? gombot a mutat??k meg??ll??t??s??hoz. B??r a mutat??k nem mozognak, az ido???m??r??s folytat??dik.
3.Nyomja meg a ???B??? gombot ism??t, ??s a mutat??k elindulnak, m??rik a jelenlegi ??sszido???t. Folytassa a ???B??? gomb haszn??lat??t k??v??ns??g szerint a mutat??k
meg??ll??t??s??hoz.
Chrono second hand
Button A
Button B
AZ ??SSZIDO??? M??R??SE
1.Nyomja meg az ???A??? gombot az ind??t??shoz.
2.Nyomja meg ism??t az ???A??? gombot az ido???m??r??s le??ll??t??s??hoz.
3.Nyomja meg ism??t az ???A??? gombot az ??jraind??t??shoz. Folytassa az ???A??? gomb haszn??lat??t az ido???intervallumok, teljes m??rt ido???h??z val?? hozz??ad??s??hoz. Am??g csak az ???A??? gombot haszn??lja a r??szido??? (amikor a mutat??k nem mozognak) nem ad??dik hozz?? a teljes m??rt ido???h??z.
4.Ha v??gzett az ido???m??r??ssel nyomja meg a ???B??? gombot a mutat??k nulla poz??ci??ba val?? vissza??ll??t??s??hoz.
Button B
Chrono hour
handChrono minute hand
4.Mialatt a mutat??k mozognak nyomja meg az ???A??? gombot a m??r??s v??gleges meg??ll??t??s??hoz ??s a teljes ido??? meg??llap??t??s??hoz. (ha az ???A??? gombot akkor nyomja meg amikor a mutat??k ??llnak, m??rheti a m??sodik teljes ido???t, lsd. lejjebb)
5.Haszn??lja az ???A??? gombot k??v??ns??g szerint a m??r??s
elind??t??s??hoz ??s le??ll??t??s??hoz.
6.Amikor befejezte a m??r??st nyomja meg a ???B??? gombot a mutat??k nulla poz??ci??ba val?? vissza??ll??t??s??hoz.
Chrono hour
handChrono minute hand

54 JUDGE HASZN??LATI UTAS??T??S
AZ ??RA HASZN??LATA
A M??SODIK TELJES IDO??? M??R??SE
1. Nyomja meg az ???A??? gombot az ido???m??r??s kezd??s??hez.
2. Haszn??lja a ???B??? gombot k??v??ns??g szerint a mutat??k meg??ll??t??s??hoz.
JUDGE HASZN??LATI UTAS??T??S 55
A MUTAT??K BE??LL??T??SA ID_M??R??SHEZ
A ???B??? gomb benyom??s??val a h??rom mutat?? a nulla poz??ci??ba ??ll. Ha ez nem k??vetkezne be ill. a helyzet??k nem teljesen pontos (pl. elemcsere ut??n) a k??vetkezo???ket kell tenni.
3. Amikor a mutat??k mozognak nyomja meg a ???B???
Button A
gombot az elso??? teljes ido??? megm??r??s??hez. B??r a mutat??k nem mozognak, az ido???m??r??s folytat??dik.
4. A kello??? pillanatban nyomja meg az ???A??? gombot a m??sodik ido??? megjel??l??s??hez, azt??n nyomja meg a ???B??? gombot a m??sodik teljes ido??? megm??r??s??hez.
Button B5. Nyomja meg a ???B??? gombot a mutat??k nulla poz??ci??ba val?? vissza??ll??t??s??hoz.
Button A
A B
Button B
A MUTAT??K BE??LL??T??SA
1.Ha a mutat??k ??ppen egy m??rt ido???t mutatnak, haszn??lja a ???B??? gombot a null??hoz k??zeli poz??ci??ra val?? be??ll??t??shoz.
2.H??zza ki a fo??? koron??t a m??sodik kattan??sig (b).
3.Nyomja meg az ???A??? ??s a ???B??? gombot egyszerre ??s tartsa nyomva legal??bb 2 m??sodpercig. Ez a mozdulat korrekci??s m??dba ??ll??tja az ??r??t.
4.Nyomja meg az ???A??? gombot a m??sodpercmutat?? be??ll??t??s??hoz. Minden egyes nyom??s egy kicsit l??pteti elo???re a mutat??t; nyomja ??s tartsa nyomva a gombot a folyamatos mozg??shoz.
5.Nyomja meg a ???B??? gombot ezut??n haszn??lja az ???A??? gombot a perc ??s ??ramutat??k be??ll??t??s??hoz. Az ???A??? gomb minden egyes nyom??sa egy kicsit l??pteti elo???re a percmutat??t; nyomja ??s tartsa nyomva a gombot a folyamatos mozg??shoz.
6.Nyomja vissza a fo??? koron??t a hely??re.
56 JUDGE HASZN??LATI UTAS??T??S
AZ ELEM CSER??JE
Az ??r??t mu???k??dteto pici elem ??lettartama kb. 4 ??v. Azonban, mivel az elemet a gy??rban ??? szigor??an ellen_rz??tt k??r??lm??nyek k??z??tt ??? helyezik az ??r??ba, ez az ido???tartam r??videbbnek tu???nhet, a v??s??rl??s ido???pontj??t??l f??ggo???en.
Az elemet kiz??r??lag az Oakley ??r??k m??rkakeresked??se, vagy garanci??lis szervize hajthatja v??gre. B??rmilyen, nem Oakley szerviz ??ltal t??rt??nt beavatkoz??s az ??r??ra vonatkoz?? garancia megszu???n??s??t eredm??nyezi
Magyarorsz??g ter??let??n h??vja az
A F??MSZ??J BE??LL??T??SA
Az ??rasz??j bo???v??t??s??t, vagy szu???k??t??s??t, csak az Oakley ??r??k m??rkakeresked??se, vagy garanci??lis szervize hajthatja v??gre. Ne pr??b??lja meg kapcsok kiv??tel??vel a f??msz??jat saj??t kezu???leg megr??vid??teni, mert ez megk??ros??thatja a karperecet, valamint elveszti az ??ra a garanci??j??t.
TISZT??T??S
Haszn??ljon puha, tiszta ruh??t az ??ratokhoz vagy a f??msz??jhoz tapad?? nedvess??g let??rl??s??re. Az ??ra ??s a tok tiszt??ntart??s??nak elmulaszt??sa allergi??s t??neteket eredm??nyezhet a bo???r??n.
SPECIFIK??CI??K
58 JUDGE HASZN??LATI UTAS??T??S
AZ ??RA V??DELME
V??Z??LL??S??G
Mino???s??t??se szerint 10 bar nyom??sig v??z??ll??, teh??t az ??ra viselheto??? f??rd??skor, ??sz??skor ??s v??zfelsz??nhez k??zeli b??v??rkod??skor. Nem alkalmas oxig??npalackos (Scuba) b??v??rkod??shoz vagy m??lyv??zi b??v??rkod??shoz. Mielo???tt v??zbe menne az ??r??val, gyo???zo???dj??n meg arr??l, hogy a korona teljesen be
HO???M??RS??KLET
Nagypontoss??g?? ido???m??r??s c??lj??b??l a szok??sos ??zemel??si ho???m??rs??klet 0??C - 50??C.
M??GNESS??G
Ero???s m??gneses terek k??ros hat??st gyakorolhatnak az ??r??ra. Tartsa t??vol m??gneses t??rgyakt??l.
VEGYSZEREK
Az ??ra ??s a f??m sz??j elsz??nezo???dhet, vagy k??rosodhat, ha kozmetikai permetek, tiszt??t??szerek, ragaszt??k, old??szerek vagy fest??kek ??rik.
??T??SV??DELEM
Az ??ra ugyan ellen??ll az ??t??seknek, de a kem??ny fel??letek k??rosod??st okozhatnak rajta.
KARBANTART??S
Annak biztos??t??sa ??rdek??ben, hogy a h??z, a korona, a z??r??krist??ly ??s a t??m??t??s v??z??ll?? maradjon, aj??nlatos az ??r??t k??t- vagy h??rom??venk??nt Oakley m??rkaszervizben megvizsg??ltatni.
JUDGE HASZN??LATI UTAS??T??S 59
OAKLEY GARANCI??LIS IR??NYELVEK
Minden eredeti Oakley ??ra a gy??rt??si hib??kra vonatkoz??an a v??s??rl??st??l sz??m??tott egy ??ves garanci??val rendelkezik. Ez a j??t??ll??s, csak az Oakley m??rkakereskedo???n??l kapott garanciak??rty??val ??rv??nyes??theto???.
FONTOS
A garancia nem fedezi a krist??lyt, a sz??jat, p??ntot, karperecet, vagy a csatokat ??rt s??r??l??seket. A tok haszn??lat okozta karcol??sokat, valamint a nedvess??g okozta k??rosod??st, - ha a sz??ban forg?? ??ra nem v??z??ll?? modell
REGISZTR??CI??
Az Oakley ??r??kba be??p??tett cs??cstechnol??gia bizony??t??kul szolg??l azok eredetis??g??t illeto???en. Amennyiben post??n, vagy a h??l??zaton www.oakley.com kereszt??l regisztr??ltatja az ??r??j??t, akkor tov??bbi biztos??t??kra tesz szert, mivel leheto???v?? teszi sz??munkra v??s??rl??s??nak dokument??l??s??t.
Ez a garancia nem befoly??solja az ??ru ??rt??kes??t??si hely??n ??rv??nyben l??vo??? jogszab??lyokat.

60 JUDGE HASZN??LATI UTAS??T??S
GARANCI??LIS IG??NY ??RV??NYES??T??SE
Az
Oakley Global Headquarters, USA: 1 (800)
Oakley Africa: +27 41 501 0200
JUDGE BEDIENUNGSANLEITUNG 61
OAKLEY JUDGE
Oakley Judge, das ist die Pr??zision eines Schweizer
Oakley Brasil Ltda.:
Oakley Canada:
Oakley Europe:Benelux, France, Italia, Scandinavia: 00 800 62 55 39 00
??? Espa??a: 900 953 398 ??? Portugal: 800 833 121 ??? Sverige: 020 79 1037
Oakley GMBH: Germany, Austria and Poland:
Oakley Japan: 0120 009 146
Oakley M??xico: 52) 55 59503643
Oakley South Pacific (Australia): 1 800 637 001
Oakley South Pacific (New Zealand): 0800 696 255
Oakley UK: 01462 475400 Eire customers: 00 353 4439557
EINSTELLEN VON UHRZEIT UND DATUM
Bei normalem Betrieb sitzt die Krone eng anliegend am Geh??use und gew??hrt so eine sch??tzende Dichtung. Die Krone kann zum Einstellen von Uhrzeit und Datum in zwei Raststellungen herausgezogen werden.
Synchronisieren Sie die Uhrzeit folgenderma??en, um sicherzustellen, dass die Funktion f??r den Datumswechsel um Mitternacht (und nicht mittags) ausgel??st wird:
EINSTELLEN VON DATUM UND UHRZEIT:
1.Ziehen Sie das Aufzugsr??dchen in die erste Raststellung (a) heraus.
2.Drehen Sie das Aufzugsr??dchen im Uhrzeigersinn und stellen Sie das gestrige Datum ein.
3.Ziehen Sie das Aufzugsr??dchen in die zweite Raststellung (b) heraus.
4.Drehen Sie die Zeiger so lange, bis das heutige Datum angezeigt wird und drehen Sie dann weiter, bis die aktuelle Uhrzeit erreicht ist. Wenn die aktuelle Uhrzeit nachmittags oder abends ist, drehen Sie den Stundenzeiger einmal ganz um das Zifferblatt, um zu den Nachmittagsstunden zu gelangen.
5.Dr??cken Sie die Krone wieder gegen das Geh??use in die Ausgangsstellung zur??ck.

62 JUDGE BEDIENUNGSANLEITUNG
NUTZUNG DES CHRONOGRAPHEN
JUDGE BEDIENUNGSANLEITUNG 63
NUTZUNG DES CHRONOGRAPHEN
Der Chronograph ist mit drei separaten Zeigern ausgestattet. Ein Zeiger am Hauptziffernblatt z??hlt die Sekunden. Die Minuten und Stunden werden an der Unterskala gez??hlt. Eine komplette Umdrehung des Minutenzeigers entspricht 30 Minuten. Eine komplette Umdrehung des Stundenzeigers entspricht 12 Stunden.
Der Chronograph wird mit zwei Druckkn??pfen bedient. Knopf ???A??? startet und stoppt die Stoppuhr. Knopf ???B??? hat vier Funktionen. Neben dem Anhalten der Anzeige an der aktuellen Zwischenzeit erm??glicht er, dass die Zeiger des Chronographen vorlaufen bis zur aktuell gemessenen Zeit; au??erdem k??nnen mittels dieses Knopfs eine zweite Gesamtzeit angezeigt und die Zeiger des Chronographen zur??ck in die Nullstellung gebracht werden.
Vergewissern Sie sich vor der Verwendung der
Chrono Sekundenzeiger
MESSUNG DER ZWISCHENZEIT:
Chrono Sekundenzeiger
MESSUNG DER GESAMTZEIT:
1.Dr??cken Sie Knopf ???A???, um die Zeitnahme zu starten.
2.Dr??cken Sie Knopf ???A??? erneut, um die Zeitnahme zu stoppen.
3.Dr??cken Sie Knopf ???A??? erneut, um die Zeitnahme fortzusetzen.
Verwenden Sie weiter Knopf ???A???, um Zeitabschnitte zur Gesamtzeitmessung hinzuzuf??gen. Bei ausschlie??licher Verwendung von Knopf ???A??? wird die Zeit, die vergeht, w??hrend sich die Zeiger des Chronographen nicht bewegen, nicht zur Gesamtzeitmessung hinzugef??gt.
4.Dr??cken Sie Knopf ???B???, wenn die Zeitnahme unterbrochen ist, um die Zeiger zur??ck in die
Nullstellung zu bringen.

64 JUDGE BEDIENUNGSANLEITUNG
NUTZUNG DES CHRONOGRAPHEN
MESSUNG EINER ZWEITEN GESAMTZEIT:
JUDGE BEDIENUNGSANLEITUNG 65
EINSTELLEN DER ZEIGER DES CHRONOGRAPHEN
Wenn der Chronograph mittels Knopf ???B??? zur??ckgesetzt wird, kehren die drei Zeiger des Chronographen in die Nullstellung zur??ck. Wenn die Zeiger des Chronographen nicht genau in die Nullstellung zur??ckkehren (beispielsweise nach dem Auswechseln der Batterie), dann gehen Sie nach dem nachfolgend beschriebenen Verfahren vor, um sie auszurichten.
Knopf A
A B
Knopf B
EINSTELLEN DER ZEIGER DES CHRONOGRAPHEN:
1.Wenn die Zeiger des Chronographen eine gemessene Zeit anzeigen, dr??cken Sie den Knopf ???B???, um sie in die N??he der Nullstellung zu bringen. Beachten Sie, dass die Zeiger mit dem Knopf ???A??? angehalten werden m??ssen, damit Sie mittels des Knopfes ???B??? zur??ckgesetzt werden k??nnen.
2.Ziehen Sie das Aufzugsr??dchen in die zweite Raststellung (b) heraus.
3.Dr??cken Sie gleichzeitig Knopf ???A??? und Knopf ???B??? und halten Sie sie mindestens zwei Sekunden lang gedr??ckt. Hierdurch wird der Chronograph in den Korrekturmodus versetzt.
4.Dr??cken Sie Knopf ???A???, um den Zeiger des Chronographen einzustellen, der die Sekunden misst. Jeder Knopfdruck bewegt den Zeiger ein kleines St??ck weiter. Halten Sie den Knopf f??r eine kontinuierliche Bewegung gedr??ckt.
5.Dr??cken Sie Knopf ???B???, und verwenden Sie dann Knopf ???A???, um die Zeiger des Chronographen einzustellen, die die Minuten und Stunden messen. Jeder Knopfdruck von Knopf ???A??? bewegt den Minutenzeiger ein kleines St??ck weiter. Halten Sie den Knopf f??r eine kontinuierliche Bewegung gedr??ckt.
6.Dr??cken Sie die Krone wieder gegen das Geh??use in die Ausgangsstellung zur??ck.
66 JUDGE BEDIENUNGSANLEITUNG
ERSETZEN DER BATTERIE
Die Miniaturbatterie, die den Chronographen speist, hat eine Haltbarkeit von etwa vier Jahren. Da die Batterie jedoch bereits im Werk f??r umfangreiche Funktionstests eingesetzt wird, betr??gt die tats??chliche Lebensdauer nicht unbedingt vier Jahre ab dem Kaufdatum.
Der Austausch der Batterie darf nur durch ein autorisiertes
Wenn Sie sich in den USA befinden, rufen Sie unsere weltweite Hauptniederlassung unter der Telefonnummer
EINSTELLUNG DES ARMBANDS
Wenn Glieder zum Armband hinzugef??gt oder aus dem Armband entfernt werden m??ssen, sollte die Anpassung von einem autorisierten
REINIGUNG
Verwenden Sie ein weiches, sauberes Tuch, um jegliche Feuchtigkeit abzuwischen, die sich am Geh??use oder am Armband befindet. Auf dem aus hochwertigen Edelstahl hergestellten Armband bildet sich aufgrund des Kontakts mit der Haut ein Schmutzfilm aus Staub und Schwei??. Wird die Uhr und das Geh??use nicht gereinigt, kann dies zu Hautirritationen f??hren.
MERKMALE

68 JUDGE BEDIENUNGSANLEITUNG
HINWEISE ZUM SCHUTZ IHRER UHR
WASSERDICHTE
Die Uhr ist bis 10 bar wasserdicht und kann beim Baden, Schwimmen und Tauchen im flachen Wasser getragen werden. Sie ist nicht f??r Sport- oder S??ttigungstauchen ausgelegt. Kontrollieren Sie stets, dass die Krone vollst??ndig in die Ausgangsstellung gegen das Geh??use gedr??ckt ist, bevor Sie die Uhr Feuchtigkeit oder N??sse aussetzen. Ziehen Sie die Krone nicht heraus und dr??cken Sie keine Kn??pfe des Chronographen, wenn die Uhr nass ist. Wenn die Uhr im Salzwasser getragen wird, muss sie anschlie??end mit S????wasser abgesp??lt und vollst??ndig getrocknet werden.
TEMPERATUR
Die Betriebstemperatur, bei der die Pr??zision des Uhrwerks nicht beeintr??chtigt ist, betr??gt 0??C bis 50??C (32??F bis 122??F).
MAGNETISMUS
Starke Magnetfelder k??nnen die Funktion der Uhr nachteilig beeintr??chtigen. Halten Sie die Uhr von magnetischen Gegenst??nden fern.
CHEMIKALIEN
Die Uhr kann sich unter Umst??nden verf??rben oder Schaden nehmen, wenn sie mit Kosmetika, Reinigungsmitteln, Klebstoffen, L??sungsmitteln oder Lacken in Ber??hrung kommt.
STOSSFESTIGKEIT
Obwohl die Uhr sto??fest ist, kann ein Aufschlag auf eine harte Oberfl??che das Uhrwerk oder das Glas besch??digen.
REGELM??SSIGE WARTUNG
Damit Geh??use, Krone, Glas und Dichtung wasserdicht bleiben, empfehlen wir, die Uhr alle 2 bis 3 Jahre von einem
JUDGE BEDIENUNGSANLEITUNG 69
OAKLEY - GARANTIEBESTIMMUNGEN
Alle
WICHTIG
Diese eingeschr??nkte Garantie gilt nicht f??r das Glas, das Armband oder f??r an der Uhr angebrachte Objekte. Durch Gebrauch verursachte Kratzer, Sch??den durch Feuchtigkeit (wenn es sich bei der Uhr nicht um ein wasserdichtes Modell handelt) und Sch??den durch Naturkatastrophen, wie Feuer, ??berschwemmungen oder Erdbeben sind nicht in der Garantie enthalten. Wir behalten uns vor, jegliche Haftung f??r die Reparatur von Sch??den im Sinne dieser Garantie abzulehnen, wenn Zweckentfremdung oder Missbrauch offensichtlich bzw. erkennbar ist. Hierzu z??hlen auch Defekte, die durch nicht zul??ssige Eingriffe oder durch Wartung durch andere als
REGISTRIERUNG
Die fortschrittliche Technologie in jeder einzelnen Uhr von Oakley dient als Beleg f??r die Authentizit??t des Erzeugnisses. Wenn Sie Ihre Uhr schriftlich oder im Internet unter der Adresse www.oakley.com registrieren, liefern Sie uns ein zus??tzliches Zeugnis, um Ihren Kauf zu dokumentieren. F??r die Inanspruchnahme der oben beschriebenen Garantieleistungen muss ein g??ltiger Kaufbeleg vorgelegt werden, aus dem deutlich das Kaufdatum und der Name des autorisierten
Rechtsanspr??che resultierend aus dem anwendbarem nationalen Recht betreffend den Verkauf von Konsumg??tern fallen nicht unter diese Garantieleistung.

Innerhalb der USA rufen Sie bitte unsere weltweite Hauptniederlassung unter der unten angegebenen Nummer an. Bitte halten Sie Ihre Einkaufsdaten bereit. Kunden au??erhalb der USA sollten sich an Ihren ??rtlichen autorisierten
Oakley Global Headquarters, USA: 1 (800)
Oakley Africa: +27 41 501 0200
Oakley Brasil Ltda.:
Oakley Canada:
Oakley Europe:Benelux, France, Italia, Scandinavia: 00 800 62 55 39 00
??? Espa??a: 900 953 398 ??? Portugal: 800 833 121 ??? Sverige: 020 79 1037
Oakley GMBH: Germany, Austria and Poland:
Oakley Japan: 0120 009 146
Oakley M??xico: 52) 55 59503643
Oakley South Pacific (Australia): 1 800 637 001
Oakley South Pacific (New Zealand): 0800 696 255
Oakley UK: 01462 475400 Eire customers: 00 353 4439557


80 JUDGE INSTRUCTION MANUAL


 (TEL:
(TEL: 
 9:30 - 18:00)


Oakley Global Headquarters, USA: 1 (800)
Oakley Africa: +27 41 501 0200
Oakley Brasil Ltda.:
Oakley Canada:
Oakley Europe:Benelux, France, Italia, Scandinavia: 00 800 62 55 39 00
??? Espa??a: 900 953 398 ??? Portugal: 800 833 121 ??? Sverige: 020 79 1037
Oakley GMBH: Germany, Austria and Poland:
Oakley Japan: 0120 009 146
Oakley M??xico: 52) 55 59503643
Oakley South Pacific (Australia): 1 800 637 001
Oakley South Pacific (New Zealand): 0800 696 255
Oakley UK: 01462 475400 Eire customers: 00 353 4439557

??
??2005 OAKLEY, INC. ONE ICON FOOTHILL RANCH CA 92610 WWW.OAKLEY.COM 1/05 REV. B