User Guide
QIP2500 Series
User Guide
QIP2500 Series

CAUTION
RISK OF ELECTRIC SHOCK
CAUTION: TO REDUCE THE RISK OF ELECTRIC SHOCK,
DO NOT REMOVE COVER (OR BACK).
NO
REFER SERVICING TO QUALIFIED SERVICE PERSONNEL.
Graphical symbols and supplemental warning marking locations on bottom of terminal.
WARNING
TO REDUCE THE RISK OF FIRE OR ELECTRIC SHOCK HAZARD, DO NOT EXPOSE THIS
APPLIANCE TO RAIN OR MOISTURE.
CAUTION
TO PREVENT ELECTRICAL SHOCK, DO NOT USE THIS (POLARIZED) PLUG WITH AN
EXTENSION CORD, RECEPTACLE, OR OTHER OUTLET UNLESS THE BLADES CAN
BE FULLY INSERTED TO PREVENT BLADE EXPOSURE.
The lightning flash with arrowhead symbol, within an equilateral triangle, is intended to alert the user to the presence of uninsulated ???dangerous voltage??? within the product???s enclosure that may be of sufficient magnitude to constitute a risk of electric shock to persons.
The exclamation point, within an equilateral triangle, is intended to alert the user to the presence of important operating and maintenance (servicing) instructions in the literature accompanying the appliance.
This installation should be made by a qualified service person and should conform to all local codes.
REPAIRS
If you find the unit in need of repair, contact your system operator for repair or replacement.
NOTE TO SYSTEM INSTALLER
This reminder is provided to call the system installer???s attention to Article
IMPORTANT SAFETY INSTRUCTIONS
1Read these instructions.
2Keep these instructions.
3Heed all warnings.
4Follow all instructions.
5Do not use this apparatus near water.
6Clean only with dry cloth.
7Do not block any ventilation openings. Install in accordance with the manufacturer???s instructions.
8Do not install near any heat sources such as radiators, heat registers, stoves, or other apparatus (including amplifiers) that produce heat.
9Do not defeat the safety purpose of the polarized or
10Protect the power cord from being walked on or punched particularly at plugs, convenience receptacles, and the point where they exit from the apparatus.
11Use only attachments/accessories specified by the manufacturer.
12Unplug this apparatus during lightning storms or when unused for long periods of time.
13Refer all servicing to qualified service personnel. Servicing is required when the apparatus has been damaged in any way, such as
Regulatory Information
Federal Communications Commission Radio and Television Interface Statement for a Class ???B??? Device
This equipment has been tested and found to comply with the limits for a Class B digital device, pursuant to part 15 of the FCC Rules. These limits are designed to provide reasonable protection against harmful interference in the residential installation. This equipment generates, uses and can radiate radio frequency energy and, if not installed and used in accordance with the instructions, may cause harmful interference to radio communications. However, there is no guarantee that interference will not occur in a particular installation.
If the equipment does cause harmful interference to radio or television reception, which can be determined by turning the equipment off and on, the user is encouraged to try to correct the interference by one of the following measures:
???Increase the separation between the equipment and the affected receiver
???Connect the equipment on a circuit different from the one the receiver is on
???Ensure that the cover plate for the security card is secured and tight
Changes or modification not expressly approved by the party responsible for compliance could void the user???s authority to operate the equipment.
Declaration of Conformity
According to 47 CFR, Parts 2 and 15 for Class B Personal Computers and Peripherals; and/or CPU Boards and Power Supplies used with Class B Personal Computers, Motorola, Inc., 6450 Sequence Drive, San Diego, CA 92121,
U.S. GOVERNMENT RESTRICTED RIGHTS
The Product and documentation is provided with RESTRICTED RIGHTS. The use, duplication or disclosure by the Government is subject to restrictions as set forth in subdivision (c)(1)(ii) of The Rights in Technical Data and Computer Software clause at
Canadian Compliance
This Class B digital apparatus complies with Canadian
Software License
IMPORTANT: PLEASE READ THIS SOFTWARE LICENSE (???LICENSE???) CAREFULLY BEFORE YOU
USE ANY SOFTWARE, FIRMWARE AND RELATED DOCUMENTATION (???SOFTWARE???) PROVIDED
WITH MOTOROLA???S DIGITAL CABLE RECEIVER OR HOME THEATER SYSTEM (EACH SHALL BE
REFERRED TO IN THIS LICENSE AS A ???RECEIVER???). BY USING THE RECEIVER AND/OR USING
ANY OF THE SOFTWARE, YOU INDICATE YOUR ACCEPTANCE OF EACH OF THE TERMS OF
THIS LICENSE. UPON ACCEPTANCE, THIS LICENSE WILL BE A LEGALLY BINDING AGREEMENT
BETWEEN YOU AND MOTOROLA. THE TERMS OF THIS LICENSE APPLY TO YOU AND TO ANY
SUBSEQUENT USER OF THIS SOFTWARE.
IF YOU DO NOT AGREE TO ALL OF THE TERMS OF THIS LICENSE (I) DO NOT USE THE
SOFTWARE AND (II) RETURN THE RECEIVER AND THE SOFTWARE (COLLECTIVELY,
???PRODUCT???), INCLUDING ALL COMPONENTS, DOCUMENTATION AND ANY OTHER MATERIALS
PROVIDED WITH THE PRODUCT, TO YOUR POINT OF PURCHASE OR SERVICE PROVIDER, AS
THE CASE MAY BE, FOR A FULL REFUND.
The Software includes associated media, any printed materials, and any
SOFTWARE LICENSE
You may:
USE the Software only in connection with the operation of the Product.
TRANSFER the Software (including all component parts and printed materials) permanently to another person, but only if the person agrees to accept all of the terms of this License. If you transfer the Software, you must at the same time transfer the Product and all copies of the Software (if applicable) to the same person or destroy any copies not transferred.
TERMINATE this License by destroying the original and all copies of the Software (if applicable) in whatever form.
You may not:
(1) Loan, distribute, rent, lease, give, sublicense or otherwise transfer the Software, in whole or in part, to any other person, except as permitted under the TRANSFER paragraph above. (2) Copy or translate the User Guide included with the Software, other than for personal use. (3) Copy, alter, translate, decompile, disassemble or reverse engineer the Software, including but not limited to, modifying the Software to make it operate on
The Product is not designed or intended for use in
MOTOROLA AND ITS THIRD PARTY LICENSORS DISCLAIM ANY EXPRESS OR IMPLIED
WARRANTY OF FITNESS FOR SUCH USES. YOU REPRESENT AND WARRANT THAT YOU SHALL
NOT USE THE PRODUCT FOR SUCH PURPOSES.
Title to this Software, including the ownership of all copyrights, mask work rights, patents, trademarks and all other intellectual property rights subsisting in the foregoing, and all adaptations to and modifications of the foregoing shall at all times remain with Motorola and its third party licensors. Motorola retains all rights not expressly licensed under this License. The Software, including any images, graphics, photographs, animation, video, audio, music and text incorporated therein is owned by Motorola or its third party licensors and is protected by United States copyright laws and international treaty provisions. Except as otherwise expressly provided in this License, the copying, reproduction, distribution or preparation of derivative works of the Software, any portion of the Product or the documentation is strictly prohibited by such laws and treaty provisions. Nothing in this License constitutes a waiver of Motorola???s rights under United States copyright law.
This License and your rights regarding any matter it addresses are governed by the laws of the Commonwealth of Pennsylvania, without reference to conflict of laws principles. THIS LICENSE SHALL TERMINATE AUTOMATICALLY if you fail to comply with the terms of this License.
Motorola is not responsible for any third party software that is provided as a bundled application, or otherwise, with the Software or that is downloaded to, or otherwise installed on, the Product.
Contact Us
For technical support of your
For Motorola consumer products, education, and support:
http://www.motorola.com/broadband
___________________________________________________________________________________
Copyright ?? 2005 by Motorola, Inc. All rights reserved. No part of this publication may be reproduced in any form or by any means or used to make any derivative work (such as translation, transformation or adaptation) without written permission from Motorola, Inc.
MOTOROLA and the Stylized M Logo are registered in the US Patent & Trademark Office. Dolby Digital manufactured under license from Dolby Laboratories Licensing Corporation. Dolby, ProLogic, and the
All other product or service names are the property of their respective owners.
Motorola reserves the right to revise this publication and to make changes in content from time to time without obligation on the part of Motorola to provide notification of such revision or change. Motorola provides this guide without warranty of any kind, either implied or expressed, including, but not limited to, the implied warranties of merchantability and fitness for a particular purpose. Motorola may make improvements or changes in the product(s) described in this manual at any time.
This device incorporates a copyright protection technology that is protected by U.S. patents and other intellectual property rights. Use of the copyright protection technology is granted by Macrovision for home and other limited
U.S. Patent Nos. 4631603, 4557216, 4819098 licensed for limited

QIP2500 User Guide
CONTENTS
1

INTRODUCTION
Congratulations on receiving your
This guide introduces you to the features and operation of the QIP2500. The EPG provides access to the QIP2500 features.
To get the most out of your QIP2500, be sure to read your EPG instruction manual or other literature supplied by your service provider.
Your QIP2500 includes or supports the following features:
???Superior
???
???Extended services support, including
???Remote control (supplied by your service provider)
???Parental control (using EPG)
???Favorite channel recall (using EPG)
???USB 1.1 connectivity (depending on local service offering)
NOTE
EPG services and features such as VOD and PPV are enabled by your local service provider. Services may vary based on local offerings and promotions.
2

QIP2500 User Guide
INTRODUCTION
Front Panel
The QIP2500 front panel has 11 keys and an LED display. Use the keys to perform basic functions, such as changing channels and turning the
Item Description
1CURSOR ??? Moves the cursor in menus and electronic program guide (EPG) screens
2MESSAGES ??? Lights to indicate that a message is present
3ON ??? Lights when the unit is turned on
4DISPLAY ??? Displays current channel number or time of day
5REMOTE ??? Flashes when a signal is received from the remote control
6CHANNEL ??? Changes the channel up and down
7SELECT ??? Selects menu options and tunes channels from the
EPG
8POWER ??? Turns the QIP2500 on and off
9MENU ??? Displays the Main Menu
10INFO ??? Displays current channel and program information
11GUIDE
3
INTRODUCTION
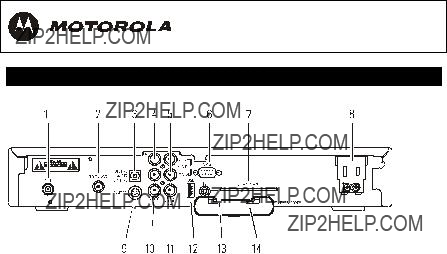
Rear Panel
Before you begin installing the QIP2500, take a moment to become familiar with the rear panel connections.
These connectors are for home entertainment cabling. An AC power cord connects the QIP2500 to an electrical power outlet. For cabling diagrams, see ???Connecting Your QIP2500.???
4
QIP2500 User Guide
INTRODUCTION
Item Description
1RF IN ??? Connects to and receives a cable signal from your service provider
2TO TV/VCR ??? Connects to a TV or VCR
3DIGITAL AUDIO OPTICAL ??? Connects to a digital A/V receiver (optional)
4AUDIO OUT TO TV ??? RCA stereo outputs (R/L) that connect to your
TV
5AUDIO OUT TO VCR ??? RCA stereo outputs (R/L) that connect to your VCR
6DATA ??? Serial data interface (check with your service provider before connecting any device to this port)
7SMART CARD ??? Supports a Smart Card device (currently not enabled)
8AC POWER ??? A
9
10VIDEO ??? RCA video output that connect to a TV, VCR, or other device
11DIGITAL AUDIO COAX ??? Connects to a digital A/V (audio/video) receiver
12USB ??? Connects to select USB 1.1 devices (check with your service provider before connecting any device to this port)
13IR ??? Connects the optional Infrared (IR) blaster attachment
14TV PASS CARD ??? For future use
5

USING THE REMOTE CONTROL ??? EXAMPLE ONLY
Use a remote control to operate the QIP2500, TV, and VCR.
Your remote control is provided by your local service provider and may be different from the example shown here.
The remote control must be programmed for use. If your service provider has not programmed your remote control, refer to the remote control instruction guide supplied by your service provider for setup and operation instructions.
6

QIP2500 User Guide
BASIC OPERATION
Turning Power On and Off
Press POWER on the front panel to turn the
Changing Channels
You can change channels in two ways:
???Press CHANNEL S or T on the front panel of the
???Enter the number of the channel you wish to view using the number keys on the remote control.
Adjusting the Volume
Press VOLUME + or ??? on the remote control to adjust the volume. When you adjust the volume, the volume scale is displayed on the screen. Press MUTE on the remote control to turn the sound off and on again.
For best audio quality, use the remote control to set the
Electronic Program Guide
The electronic program guide (EPG) displays information about TV programs and enables you to access features such as Parental Control or
Audio Output Modes
The QIP2500 includes utilities that enable you to select and adjust its DIGITAL AUDIO (coaxial or optical) or AUDIO OUT
7

AUDIO/VIDEO CONNECTIONS
Before you begin to install your QIP2500, review the following guidelines:
???For basic cable connections, use
???For audio or video outputs, use cables equipped with
???For the digital audio optical output, use a Toslink cable.
???Disconnect power from the QIP2500 before connecting or changing cable connections.
Do not place anything on top of the QIP2500, especially other home video components.
NOTE
To prevent overheating, make sure the
8

QIP2500 User Guide
Important Safety Considerations
Follow these important safety guidelines when positioning and connecting the
???Position the
???Do not block the slots and openings on the
???Do not place anything on top of the
???Do not position the
???Do not position the
???Allow for adequate ventilation around the
???Do not plug the AC power cord into a switched power outlet.
9
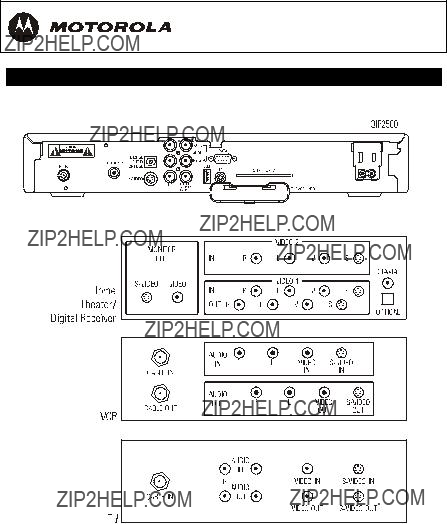
RECORDING YOUR CONNECTIONS
Use this diagram to record cable connections on the rear panel. Later, you can use this diagram to reconnect your system if you move the equipment or add new equipment.
Your home entertainment equipment may not have all connectors shown in the illustration, or it may have connectors that are not shown here.
Disconnect the power from the QIP2500 before making or changing cable connections. Do not place another component or object on top of the QIP2500.
10

QIP2500 User Guide
CONNECTING YOUR QIP2500
Standard TV Cabling
Use
If you connect the and to the coaxial to channel 3 or 4.
coaxial cable to the TO TV/VCR connector on the
The method shown will not provide stereo audio. Connect the
11

CONNECTING YOUR QIP2500
Standard VCR Cabling
To connect your VCR, you will need
The method shown will not provide stereo audio. Connect the
12
QIP2500 User Guide
CONNECTING YOUR QIP2500
Composite Video and
Connect the
Composite Video: Connect an
OR
When connecting the video path, never connect baseband composite video and
13

CONNECTING YOUR QIP2500
Composite VCR Cabling
This diagram shows how to connect the
When connecting the video path, never connect baseband composite video and
14
QIP2500 User Guide
CONNECTING YOUR QIP2500
Stereo Cabling (VCR to Stereo)
This diagram shows how to connect the
When connecting the video path, never connect baseband composite video and
15

CONNECTING YOUR QIP2500
Stereo Cabling (TV to Stereo)
This diagram shows how to connect the TV so that its sound plays through the stereo.
When connecting the video path, never connect baseband composite video and
16

QIP2500 User Guide
CONNECTING YOUR QIP2500
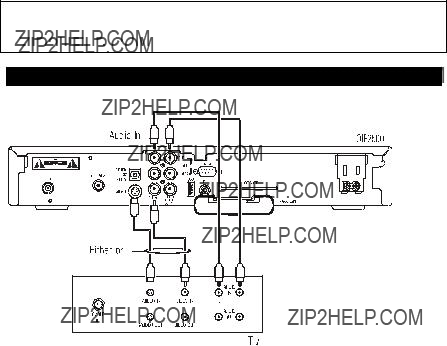
Baseband Cabling
This diagram shows baseband audio and video connections to a Dolby?? Digital receiver. This setup lets you record on the VCR and play back with sound through the Dolby Digital receiver, but this setup does not support surround sound. To play back Dolby Digital 5.1 surround sound through the Dolby Digital receiver, see ???Dolby Digital Cabling.???
NOTE
In this diagram, the baseband connectors on the entertainment components are labeled R for right audio, L for left audio, V for video, and S for
17

CONNECTING YOUR QIP2500
Dolby Digital Cabling
This diagram shows audio and video connections to a Dolby Digital receiver. This setup lets you record on the VCR and play back with sound through the Dolby Digital receiver.
To play back Dolby Digital 5.1 surround sound through the Dolby Digital receiver, you must connect the
AUDIO COAX or DIGITAL AUDIO OPTICAL connections. The audio R and L
connectors do not carry Dolby Digital 5.1.
NOTE
In this illustration, the baseband connectors on the entertainment components are labeled R for right audio, L for left audio, V for video, and S for
18

QIP2500 User Guide
TROUBLESHOOTING
19

20
QIP2500 User Guide
There is no video on the TV screen
Verify that the TV is powered on and set to the appropriate input source for the
Verify that the
Verify that all video cables between the
Verify that the coaxial cable feed is firmly connected to the
If the
If you are watching TV using your VCR, be sure your VCR is on.
21