. . . . .
Motorola, Inc. makes no representations or warranties with respect to the contents or use of this manual and specifically disclaims any warranties, express or implied, of merchantability or fitness for any specific purpose. Further, Motorola, Inc. reserves the right to revise this publication and to make any modifications to its content, at any time, without obligation to notify any party, person, or entity of such revisions or changes.
Personal Communications Sector Wireless Messaging Division 1500 Gateway Blvd.
Boynton Beach, FL
MOTOROLA, the Stylized M logo and all other trademarks indicated as such herein are trademarks of Motorola, Inc. ?? Reg. U.S. Pat. & Tm. Off.
STrueSync, Starfish and the Stylized Starfish Logo are registered trademarks of Starfish Soft- ware, Inc., a wholly owned independent subsidiary of Motorola, Inc. U.S. Patent Nos. D388,776 (TrueSync Desktop only), 5.519,606 and 5,778,346. Other patents pending.
All other product or service names are the property of their respective owners. ?? 2002 Motorola, Inc. All rights reserved. Printed in the U.S.A.
3

SOFTWARE LICENSE AGREEMENT
This is a legal agreement between you, the
GRANT OF LICENSE
Motorola grants you a limited,
COPYRIGHT
The Software is owned by Motorola and is protected by United States copyright laws and international treaty provisions. You acknowledge that no title to any intellectual property in the Software is transferred to you.
LIMITATIONS
Except as otherwise explicitly permitted in this Agreement, you may not: a.) modify, translate or adapt the Software or create derivative works of the Software or any part thereof; b.) decompile, disassemble, reverse engineer, or otherwise attempt to derive the source code of the Software; c.) copy (except to install the Wisdom OS and the Applications into a single Motorola Accompli 009; and except to make one archival
4 Accompli 009 User???s Guide
. . . . .
HIGH RISK ACTIVITIES
The Software is not
U. S. GOVERNMENT RESTRICTED RIGHTS
The U. S. Government acknowledges Motorola???s representation that the Software and its documentation were developed at private expense and no part of them is in the public domain and that the Software is Restricted Computer Software as that term is defined in
RESTRICTED RIGHTS LEGEND
Where applicable, use, duplication or disclosure by the U. S. Government is subject to restrictions as set forth in subparagraph(c) (1) (ii) of the Rights of Technical Data and Computer Software clause at DFARS
ENGLISH EXPORT LAW ASSURANCES
You hereby agree to comply fully with all applicable international and national laws that apply to this software, including the U.S. Export Administration Regulations. You hereby agree to comply with all
GENERAL
This Agreement will be governed by the laws of the State of Illinois, U.S.A., except for that body of law dealing with conflicts of law.
5

LIMITED WARRANTY
Motorola warrants that each copy of the Software will be free from physical defects in the media that tangibly embodies the copy for a period of ninety (90) days from the date the product accompanying the Software was purchased by you. Motorola, at its option, will at no charge repair or replace the media of the Software that contains defects in materials or workmanship in the media. No updates are provided. Motorola makes no warranty or representation that the Software will meet your requirements or will work in combination with any hardware or applications software products provided by third parties, that the operation of the Software will be uninterrupted or error free, or that all defects in Software will be corrected. The entire risk as to the quality and performance of the Software is with you.
EXCEPT FOR THE ABOVE NINETY (90) DAY WARRANTY, THE SOFTWARE IS
PROVIDED WITHOUT FURTHER WARRANTY OF ANY KIND, EITHER EXPRESS OR
IMPLIED, INCLUDING, BUT NOT LIMITED TO, THE WARRANTIES OF TITLE, NON-
INFRINGEMENT, MERCHANTABILITY, AND FITNESS FOR A PARTICULAR PURPOSE.
NO ORAL OR WRITTEN INFORMATION OR ADVICE GIVEN BY MOTOROLA, ITS
EMPLOYEES, DISTRIBUTORS, DEALERS OR AGENTS SHALL INCREASE THE SCOPE
OF THE ABOVE WARRANTIES OR CREATE ANY NEW WARRANTIES. SOME
JURISDICTIONS DO NOT ALLOW THE EXCLUSION OF IMPLIED WARRANTIES, SO THE
ABOVE EXCLUSION MAY NOT APPLY TO YOU. IN THAT EVENT, ANY IMPLIED
WARRANTIES ARE LIMITED IN DURATION TO NINETY (90) DAYS FROM THE DATE OF
DELIVERY OF THE SOFTWARE. THIS WARRANTY GIVES YOU SPECIFIC LEGAL
RIGHTS. YOU MAY HAVE OTHER RIGHTS, WHICH VA RY FROM STATE TO STATE.
LIMITATION OF LIABILITY
REGARDLESS OF WHETHER ANY REMEDY SET FORTH IN THE WARRANTY FAILS OF
ITS ESSENTIAL PURPOSE, IN NO EVENT WILL MOTOROLA BE LIABLE TO YOU FOR
ANY SPECIAL, CONSEQUENTIAL, INDIRECT, INCIDENTAL OR SIMILAR DAMAGES,
INCLUDING LOST PROFITS OR LOST DATA ARISING OUT OF THE USE OR INABILITY
TO USE THE SOFTWARE OR ANY DATA SUPPLIED THEREWITH EVEN IF MOTOROLA
OR ANYONE ELSE HAS BEEN ADVISED OF THE POSSIBILITY OF SUCH DAMAGES,
OR FOR ANY CLAIM BY ANY OTHER PARTY. SOME JURISDICTIONS DO NOT ALLOW
THE LIMITATION OR EXCLUSION OF LIABILITY FOR INCIDENTAL OR
CONSEQUENTIAL DAMAGES SO THE ABOVE LIMITATION OR EXCLUSION MAY NOT
APPLY TO YOU. IN NO CASE SHALL THE LIABILITY OF MOTOROLA EXCEED THE
PRICE PAID FOR THE SOFTWARE.
TERM
This Agreement is effective until terminated. This Agreement will terminate, and the license granted to you by this Agreement will be revoked, immediately, without any notice from Motorola, if you fail to comply with any provision of this Agreement. Upon termination, you must destroy the Software.
6 Accompli 009 User???s Guide

GENERAL SAFETY INSTRUCTIONS
This section contains important information on safe and efficient operation. Read this information before using your Motorola wireless device.
The information provided in this document supersedes the general safety information contained in user guides published prior to July 2000. For information regarding radio use in a hazardous atmosphere please refer to the Factory Mutual (FM) Approval Manual Supplement or Instruction Card, which is included with devices that offer this capability.
R F O P E R A T I O N A L C H A R A C T E R I S T I C S
Your device contains a transmitter and a receiver. When it is ON, it receives and transmits radio frequency(RF) energy. The device operates in the frequency range of 900 MHz to 1990 MHz and employs digital modulation techniques. When you communicate with your device, the system handling your call controls the power level at which your device transmits. The output power level typically may vary over a range from 0.063 watts to 1.58 watts.
Exposure To Radio Frequency Energy
Your Motorola wireless device is designed to comply with the following national and international standards and guidelines regarding exposure of human beings to radio frequency electromagnetic energy:
???United States Federal Communications Commission, Code of Federal Regulations; 47 CFR part 2
???American National Standards Institute (ANSI) / Institute of Electrical and Electronic Engineers (IEEE) C95.
???Institute of Electrical and Electronic Engineers (IEEE)
???National Council on Radiation Protection and Measurements (NCRP) of the United States, Report 86, 1986
???International Commission on
???National Radiological Protection Board of the United Kingdom 1995
???Ministry of Health (Canada) Safety Code 6. Limits of Human Exposure to Radio frequency Electromagnetic Fields in the Frequency Range from 3 kHz to 300 GHz, 1999
???Australian Communications Authority Radio communications (Electromagnetic Radiation - Human Exposure) Standard 1999 (applicable to wireless phones only)
General Safety Instructions 7

To assure optimal device performance and make sure human exposure to radio frequency electromagnetic energy is within the guidelines set forth in the above standards, always adhere to the following procedures:
Antenna Care
Use only the supplied or an approved replacement antenna. Unauthorized antennas, modifications, or attachments could damage the phone and may violate FCC regulations.
DO NOT hold the antenna when the device is ???IN USE.??? Holding the antenna affects call quality and may cause the device to operate at a higher power level than needed.
To maintain compliance with FCC RF exposure guidelines, if you wear a device on your body when transmitting, always place the device in a
Data operation
When using any data feature of the device, with or without an accessory cable, position the antenna of the device at least one inch (2.5 cm) from the body.
E L E C T R O M A G N E T I C I N T E R F E R E N C E / C O M P A T I B I L I T Y
Note Nearly every electronic device is susceptible to electromagnetic interference (EMI) if inadequately shielded, designed or otherwise configured for electromagnetic compati- bility.
Facilities
To avoid electromagnetic interference and/or compatibility conflicts, turn off your device in any facility where posted notices instruct you to do so. Hospitals or health care facilities may be using equipment that is sensitive to external RF energy.
Aircraft
When instructed to do so, turn off your device when on board an aircraft. Any use of an electronic device must be in accordance with applicable regulations per airline crew instructions.
8 Accompli 009 User???s Guide

Operational Warnings
. . . . .
Medical Devices
Pacemakers
The Health Industry Manufacturers Association recommends that a minimum separation of 6 inches (15 centimeters) be maintained between a handheld wireless device and a pacemaker. These recommendations are consistent with the independent research by, and recommendations of, Wireless Technology Research.
Persons with pacemakers should:
???ALWAYS keep the device more than six inches (15 centimeters) from their pacemaker when the device is turned ON.
???Not carry the device in the breast pocket.
???Use the ear opposite the pacemaker to minimize the potential for interference.
???Turn the device OFF immediately if you have any reason to suspect that interference is taking place.
Hearing Aids
Some digital wireless devices may interfere with some hearing aids. In the event of such interference, you may want to consult your hearing aid manufacturer to discuss alternatives.
Other Medical Devices
If you use any other personal medical device, consult the manufacturer of your device to determine if it is adequately shielded from RF energy. Your physician may be able to assist you in obtaining this information.
O P E R A T I O N A L W A R N I N G S
Use While Driving
Check the laws and regulations on the use of wireless devices in the area where you drive. Always obey them.
When using your wireless device while driving, please:
???Give full attention to driving and to the road.
???Use
???Pull off the road and park before making or answering a call if driving conditions so require.
General Safety Instructions 9

For Vehicles with Airbags
Do not place a portable wireless device in the area over an air bag or in the air bag deployment area. Air bags inflate with great force. If a portable radio is placed in the air bag deployment area and the air bag inflates, the device may be propelled with great force and cause serious injury to occupants of the vehicle.
Potentially Explosive Atmospheres
Turn off your device prior to entering any area with a potentially explosive atmosphere, unless it is a device especially qualified for use in such areas as "Intrinsically Safe" (for example, Factory Mutual, CSA, or UL Approved). Do not remove, install, or charge batteries in such areas. Sparks in a potentially explosive atmosphere can cause an explosion or fire resulting in bodily injury or even death.
Note The areas with potentially explosive atmospheres referred to above include fueling areas such as below decks on boats, fuel or chemical transfer or storage facilities, areas where the air contains chemicals or particles, such as grain, dust or metal pow- ders, and any other area where you would normally be advised to turn off your vehicle engine. Areas with potentially explosive atmospheres are often but not always posted.
Blasting Caps and Areas
To avoid possible interference with blasting operations, turn off your device when you are near electrical blasting caps, in a blasting area, or in areas posted: ???Turn off
O P E R A T I O N A L C A U T I O N S
Antennas
Do not use any portable wireless device that has a damaged antenna. If a damaged antenna comes into contact with your skin, a minor burn can result.
Batteries
All batteries can cause property damage and/or bodily injury such as burns if a conductive material such as jewelry, keys, or beaded chains touch exposed terminals. The conductive material may complete an electrical circuit (short circuit) and become quite hot. Exercise care in handling any charged battery, particularly when placing it inside a pocket, purse, or other container with metal objects.
10 Accompli 009 User???s Guide
Operational Cautions
Follow these additional guidelines to ensure the safe use of your Accompli 009 and accessories.
. . . . .
Battery Safety
???Do not dispose of the rechargeable
???To prevent injury or burns, do not allow metal objects to contact or short circuit the battery terminals.
???Recharge the battery only with the recommended Motorola battery charger. Charging this battery by any other method or with a product not approved by Motorola may cause damage to the battery.
???Do not charge other batteries in the Motorola battery charger. Charging other batteries can cause those batteries to burst or explode, resulting in personal injury or property damage.
Battery Charger Safety
???Do not expose the charger to rain or snow.
???Use of an attachment not recommended or sold by Motorola may result in a risk of fire, electric shock, or injury to persons.
???Make sure the cord is located where it will not be stepped on, tripped over, pinched, or subjected to damage or stress.
???If you need to use an extension cord, make sure:
???The pins on the plug of the extension cord are the same number, size, and shape as those on the plug of the charger.
???The extension cord is properly wired and in good electrical condition.
???The cord size is 18AWG for lengths up to 100 feet and 16AWG for lengths up to 150 feet.
???Do not operate the charger with a damaged cord, transformer block, or prongs; replace them immediately.
???Do not operate the charger if it has been damaged in any way; take it to a qualified service technician.
???Do not disassemble the charger; if service or repair is required, call Motorola at 1-
???Maximum ambient temperature around the power supply must not exceed 40 C (104 F).
???Keep battery contacts clean. Do not allow dirt or sticky substances to accumulate on the contacts. If you need to clean the contacts, unplug the charger to reduce the risk
General Safety Instructions 11
of electrical shock. Use a slightly dampened cloth to clean the contacts. Let the contacts dry before plugging the charger into an AC outlet.
???Do not immerse in water.
A G E N C Y A P P R O V A L S
The Accompli 009 has been approved for use by the Federal Communications Commission (FCC) and Underwriters Laboratories, Inc. (UL). The charger base has been FCC approved and the transformer has been UL approved.
C L E A N I N G Y O U R A C C O M P L I 0 0 9
To clean smudges and grime from the exterior of your device, use a soft,
C A R E A N D M A I N T E N A N C E
The Motorola Accompli 009 is durable, reliable, and can provide years of dependable service; however they are precision electronic products. Water and moisture, excessive heat, and extreme shock may damage the device. Do not expose your device to these conditions. If repair is required, the Motorola Service Organization, staffed with specially trained technicians, offers repair and maintenance facilities throughout the world.
To protect the operating system, applications, and data on your Accompli 009, ensure that the PC from which you download files is protected by
You can protect your device purchase with an optional extended warranty covering parts and labor. For more information about limited warranties, please contact either your Cellular Service Provider, retailer, or Motorola, Inc., at
Q U E S T I O N S ?
For questions about the use of your Accompli 009, call
12 Accompli 009 User???s Guide

CONTENTS
RF Operational Characteristics 7
Electromagnetic Interference/Compatibility 8
Messaging Service Instructions 19
The Flip??? Keypad Cover 21 The LED indicator 21
The Keyboard 22 The Home Screen 24
The Battery and Charger 26 The SIM Card 28
Contents 13

C o n t e n ts
Using the WAP micro browser 49
Receiving New Text Messages 53
Creating and Sending New SMS Messages 54 Receiving Messages 55
About Folders 58 Working with Folders 60
About Cell Broadcast Rules 63 Setting Message Preferences 64
Using Common Accompli 009 Features with SMS 65
Show Cellular Service Provider Services 76
Making and Receiving Phone Calls 79
14 Accompli 009 User???s Guide
. . . . .
Setting Contact Preferences 91
Using Common Accompli 009 Features with Contacts 92
Setting Calendar Preferences 99
Using Common Accompli 009 Features with Calendar 100
Marking a Task as Completed 103
Using Common Accompli 009 Features with Tasks 105
Contents 15

C o n t e n ts
Using Alert Script Language 114 Sample Alert Script Language Alerts 120
Alert Script Language Quick Reference 121
Setting Alarm Clock Options 124
Setting Calculator Options 130
16 Accompli 009 User???s Guide
. . . . .
TrueSync and Partner Settings 144
setting service provider information 147 Setting Up Email 147
Managing Accounts 149 Working with email 149 Reading Email 150 Writing Email 152 Email Folders 154
THIS MODEL PHONE MEETS THE GOVERNMENT'S REQUIREMENTS FOR EXPOSURE TO
Limited Warranty For GSM Handsets 179
How to get Warranty Service 180
Contents 17

C o n t e n ts
18 Accompli 009 User???s Guide

C H A P T E R 1
WELCOME
Congratulations! Your new Motorola Accompli??? 009 personal communicator is about to change the way you communicate. The Accompli model 009 can offer you quick access to essential information. You can benefit from the extended reach of the Internet and email, make and receive telephone calls, interface with your desktop computer applications and enjoy the convenience and portability of SMS messaging. This
Note Internet and email connectivity are network and subscription dependent features and may not be available in all areas.
The Accompli 009 includes
Offering power in an
Note The Accompli 009 is designed to synchronize with basic features of the initial release of many popular Personal Information Management (PIM) software and hardware prod- ucts.
M E S S A G I N G S E R V I C E I N S T R U C T I O N S
To begin messaging service, contact your wireless messaging service provider for activation instructions.
Welcome 19

C h a p t e r 1 Using this Manual
U S I N G T H I S M A N U A L
This manual uses several conventions to differentiate between keyboard keys on your Accompli 009 and buttons you select from an Accompli 009 application screen.
Specific conventions are also used to highlight additional helpful information in the form of tips, notes, and cautions. Before you begin using this manual, make certain you are familiar with these conventions:
Keys you press
Buttons you select
TIP
Note
When you are instructed to press a single key on the Accompli 009 key- board, the key name appears in small caps. For example:
Press NAVDISK down to see more information.
When you are instructed to select a button, press the TAB key to highlight the button and then press the ENTER key to select it.
Identifies actions you can perform to increase your ease of use and effi- ciency.
Provides further information about the procedural step or feature.
G E T T I N G A S S I S T A N C E
The Accompli Personal Communicator model 009 comes with a variety of support tools. To become familiar with the product, we recommend that you go through the Quick Start Guide, this User???s Guide, and the interactive demo included on the CD before attempting installation or operation.
In the event that you need further assistance, Motorola offers a variety of technical support options. Most problems can be resolved using FAQs listed at http://motorola.com/consumer/support.
Motorola provides free customer support for
20 Accompli 009 User???s Guide
C H A P T E R 2
USING ACCOMPLI 009
The lightweight, wearable design of the Accompli 009 allows you to open the Flip??? keypad cover and read your messages or make a phone call while the device is still in the belt holster. Audible and vibrating alerts notify you of incoming and waiting messages. The keyboard provides text entry capabilities that allow you to send full text messages. All this is combined with the ability to add applications, upgrade current applications, and, with the infrared interface in the Motorola Desktop Holder, synchronize your PIM information with your desktop computer.
Note The Accompli Personal Communicator model 009 displays a blank screen to conserve energy during periods of inactivity. Press any key to awaken the device.
T H E F L I P ??? K E Y P A D C O V E R
The front keypad cover on the Accompli 009 houses and protects its TFT screen. Opening the cover awakens the display screen, while closing the cover puts the screen into sleep mode. When in sleep mode, your Accompli 009 continues to work for you. It receives and stores incoming messages for access at your convenience. You can set loud or soft audible or vibrating alerts to notify you when messages are received. If you do not want to be alerted when new messages arrive, you can set the alert mode to silent.
T H E L E D I N D I C A T O R
The LED indicator on the front of the device provides you with the following information:
Using Accompli 009 21
C h a p t e r 2 The Keyboard
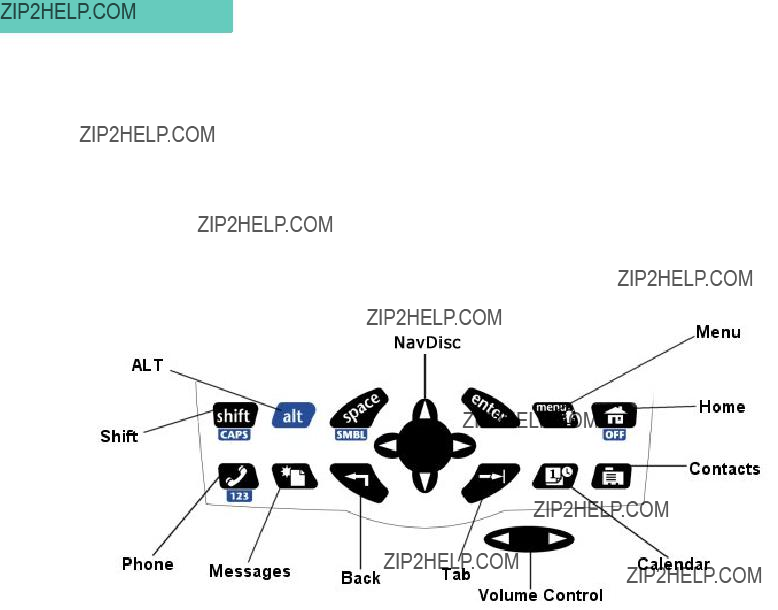
T H E K E Y B O A R D
The Accompli 009 comes with a keyboard with
Navigation Keys
To navigate through the Accompli 009 applications, become familiar with the following keys and their functions.
Special control keys and key combinations provide access to additional functions.
22 Accompli 009 User???s Guide
Using Accompli 009 23

C h a p t e r 2 The Home Screen
T H E H O M E S C R E E N
The Home screen provides quick access to both
The Desktop
To launch applications from the Desktop, press the NAVDISK in any direction to move between applications. Press the ENTER key to launch the highlighted application.
The Menu Wheel
To launch applications from the Menu Wheel, press the NAVDISK down to spin the wheel and display the next three applications. Continue pressing NAVDISK down to display all applications in succession. Press ENTER to launch the highlighted application.
24 Accompli 009 User???s Guide
Note Type the first letter of the application???s name. The Home screen displays the first appli- cation beginning with the letter you typed. If more than one application starts with the same letter, the shortcut takes you to the first occurrence of the letter. Press the letter again to move to the next occurrence of the letter.
You can also launch certain applications by pressing the numeric hot key that appears next to the application icon. You can assign numeric hot keys for up to nine applica- tions. See ???Home Screen Manager??? on page 137 for instructions on assigning numeric hot keys.
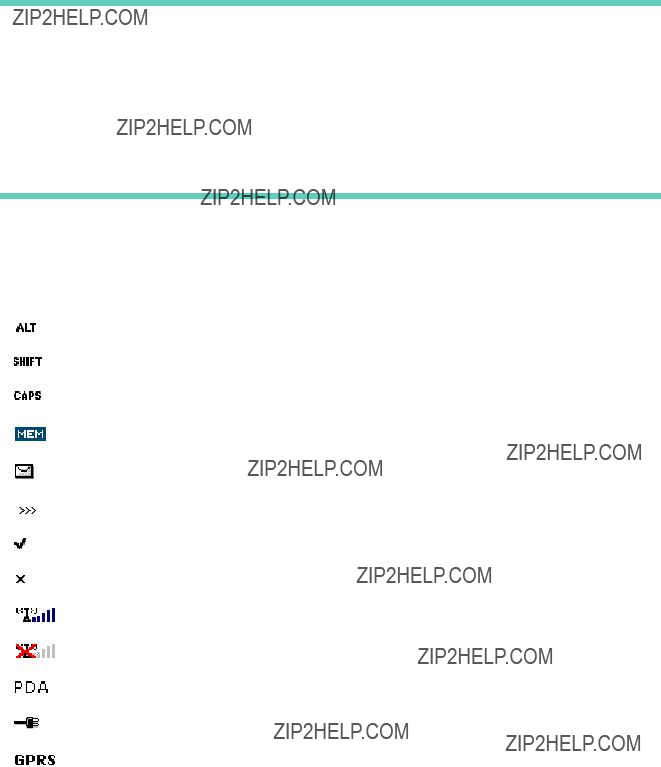
The Status Line
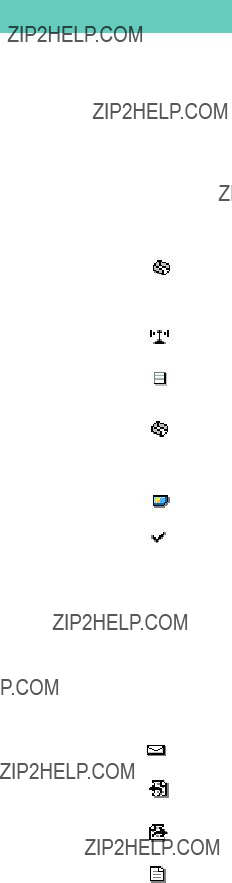
The Home screen contains a status line that includes graphic indicators for the following conditions.
Alt mode is on
Shift mode is on
Caps lock is on
Low memory
New message is waiting
Message is waiting to be sent
Message has been sent
Message could not be sent
Signal strength indicator
No signal
PDA Mode - Transceiver off
Device is charging
GPRS is currently available
Using Accompli 009 25

C h a p t e r 2 The Battery and Charger
Currently roaming. If in the home zone, nothing displays
Unread voice message(s) waiting
Keypad???s in "Numlock" mode
Earpiece is plugged in
Voice call is in progress
T H E B A T T E R Y A N D C H A R G E R
Motorola batteries and chargers are made from some of the
Batteries, as well as other Motorola Accompli 009 accessories, can be purchased through your dealer, or by calling Motorola direct at
Determining the Battery Power
A status indicator at the bottom of the Home screen displays a
Fully charged (displays while plugged into charger.)
Full
2/3
1/3
Low
26 Accompli 009 User???s Guide
The Battery and Charger
. . . . .
Recharging the Battery
Recharging can be accomplished by placing your Accompli 009 in the desktop holder. For optimum performance, use the recommended Motorola equipment.
3. Slide your device, face up, into the desktop holder. A red light appears indicating that the battery is charging.
(If the red light flashes for more than 20 seconds, your battery may be defective.)
4. A green LED indicator on the desktop holder indicates that the battery is charged.
Before leaving on a trip, make sure the battery and any extra batteries are fully charged. Recharging the battery to full charge usually takes about two hours or less per battery. All rechargeable batteries experience
Replacing the Battery
If your battery???s performance has degraded (e.g., the battery???s charge lasts only half as long as when it was new), consider replacing your battery with a new Motorola battery.
Using Accompli 009 27

C h a p t e r 2 The SIM Card
1. Turn the device over and press the battery door tab in, lift the door up, and remove the battery.
2. Align the battery so that the gold contacts on the battery match the gold contacts in the battery compartment.
3.Insert the battery at an angle toward the edge of the device. Press the battery into place.
4.Slide the battery door back into place.
T H E S I M C A R D
Your device uses a SIM card, which contains your phone number, service details and memory for storing phone numbers and messages. You will not be able to make or receive calls if you do not have a SIM card, which uses GSM technology, inserted in your phone.
1. With the battery removed from the device, slide the small SIM gate in the direction of the arrow and lift it up.
2. Place the SIM card face down, making sure the gold connectors on the card meet the connectors on the device.
3. Close the SIM gate and replace the battery in the device.
For additional information, see ???About Your SIM Card??? on page 76.
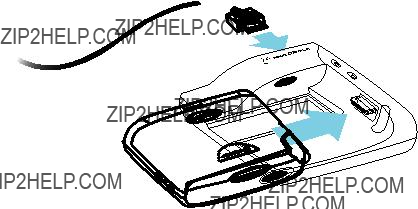
T H E D E S K T O P H O L D E R
The Accompli 009 includes a desktop holder with an infrared (IR) port. The desktop holder is used to transfer data to and from your computer or when synchronizing your Accompli 009 PIM applications with your desktop PIM applications.
28 Accompli 009 User???s Guide

The Holster
. . . . .
Connecting the Desktop Holder to Your Computer
The IR port in the desktop holder aligns with the IR port on your Accompli 009, enabling data transmission. The desktop holder is connected to your computer with the
1.Connect one end of the data cable to your computer???s
2.Connect the other end of the cable to the
3.Slide your Accompli 009 into the desktop holder. Start the Desktop applications to begin IR communication with your device.
T H E H O L S T E R
The durable
Using Accompli 009 29

C h a p t e r 2 Other Accessories
O T H E R A C C E S S O R I E S
The following accessories have been designed to work with your Motorola Accompli model 009. Additional accessories may be available and are packaged separately. Please refer to your local service provider or retail outlet for more information.
Speaker Phone (SYN8788A)
Allows you to use your device as a convenient handsfree phone.
Leather Carrying Case (SYN9131A)
Protects the device???s surface and can be worn on your belt.
Data Cable (SKN6330A)
www.motorola.com/accompli009 for more information.
T U R N I N G Y O U R A C C O M P L I 0 0 9 O N A N D O F F
The rechargeable battery in your Accompli 009 allows you to leave the device turned on 24 hours a day. Actual battery life will vary, depending upon usage. It is recommended that you recharge your battery every 2 - 3 days. Turning your device off at night will lengthen the time of your battery's charge.
Note Incoming messages are stored by the messaging service until your device is turned on and ready to receive messages. Turn your device off at night when you do not want to receive messages, and place the device in the
To turn on your device:
???Briefly press and hold any key.
To turn off your device:
???Press ALT, then press HOME.
30 Accompli 009 User???s Guide
The Accompli 009 as a Phone
. . . . .
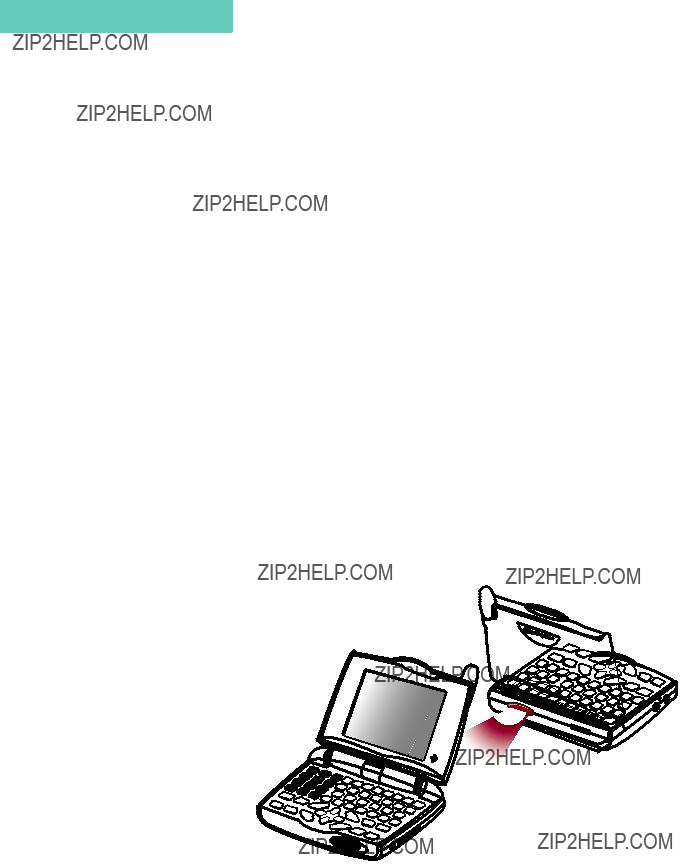
T H E A C C O M P L I 0 0 9 A S A P H O N E
It???s easy to use your device as a phone when you use the provided earpiece for
Connecting the Earpiece to the Device
1. Open the Flip Keypad Cover.
2. Plug the earpiece into the left side of the device, in the first port.
3. Adjust the volume using the Volume Control button on the front of the device.
The Smart Button
The Smart button is located on the
To answer an incoming call, press the Smart button and hold it for a moment until the call is connected. To disconnect a call, press the Smart button again.
Using Accompli 009 31
C O N F I G U R I N G Y O U R A C C O M P L I 0 0 9
The first time you start the device, the Welcome Tour appears. The tour helps you to become familiar with the basics of using your Accompli 009. You can also review the Welcome tour by selecting the Welcome application from the Home screen.
At the end of the tour, you are asked to perform the following setup tasks:
???Enter the correct time and date.
???Enter your signature so that it can be automatically appended to all messages you send.
???Enter your owner information so you can send it or beam it to other devices.
In addition, make certain the following are set correctly:
???Alert volume
???Transmit status
???Phone preferences
???Service Provider information
Setting Time and Date
Although your Accompli 009 comes
See Chapter 13, ???Control Panel,??? for
Creating Your Signature
This function allows you to create a signature that is automatically appended to each SMS message you send.
See Chapter 13, ???Control Panel,??? for
Entering Your Owner Information
Your owner information is like an electronic business card. After you enter your owner information, you can send that information to another compatible device that supports vCard format or beam to another Accompli 009 Personal Communicator.
See Chapter 13, ???Control Panel,??? for
Setting Alerts
You can select a default alert for each application that plays alerts. You can select or change alert settings at the Control Panel. See ???Alert settings??? on page 133.
32 Accompli 009 User???s Guide

Configuring Your
Setting the Alert Volume Level
The Home screen displays the current volume level for alerts. You can set the alert volume level directly from the Home screen. Press TAB to move to the volume level indicator. Press ENTER to choose from the following volume levels:
Loud - Sets all audible alerts to the loud volume.
Soft - Sets all audible alerts to the soft volume.
Vibrate - Sets all alerts to vibrate without changing the individual alert setting.
Silent - Silences all alerts without changing the settings.
Setting Transmit Status
Before attempting to place a phone call or send and receive messages, ensure that your device is set to the proper transmission mode.
The Home screen displays the current transmit status. You can set the transmit status directly from the Home screen. Press TAB to move to the transmit status indicator and press ENTER to choose from the following:
Phone - Voice and data calls can be made.
PDA - Voice and data calls cannot be made.
Setting Phone Preferences
You can set phone preferences that willl determine how your phone makes and receives calls.
See ???Setting Phone Preferences??? on page 67 for instructions on setting up your phone.
Entering Service Provider Information
Before you can use the Email application, you must make certain that your CSD or GPRS service provider information is set up correctly.
See ???Service Provider??? on page 143 for steps on entering Service Provider information.
Using Accompli 009 33
C h a p t e r 2 Setting Preferences
S E T T I N G P R E F E R E N C E S
Preferences enable you to customize your device to suit your individual needs. You can set preferences for the whole device or for a specific application.
To set preferences that affect the whole device:
1On the Home screen, select Controls.
2Press the NAVDISK to move to the desired option, and then press the ENTER key.
See Chapter 13, ???Control Panel,??? for
To set preferences that affect a specific application:
1On the Home screen, select the desired application.
2Select the Settings button from the toolbar.
B E A M I N G I T E M S
You can beam your owner information (vCard), other contact information, messages, and other items from your device to other compatible devices with infrared ports, even printers.
When beaming to another device, make certain to aim the IR port on the back of your device toward the IR port on the other device. The maximum distance between the devices should be no more than about 2.6 meters (8.5 feet).
To beam your owner information:
Press and hold the HOME key or the Contacts hot key.
34 Accompli 009 User???s Guide
Receiving Incoming Items
. . . . .
To beam contact information and other items:
1From within any application, highlight the item you want to beam.
2Select the Send item button.
3On the Send item
R E C E I V I N G I N C O M I N G I T E M S
When you receive a message or other incoming item sent
To scroll through the entire message:
Press the NAVDISK up or down.
To perform an action on the message or item:
1Press TAB to move to the spin list.
2Press the NAVDISK left or right to display the desired option.
3Press ENTER to perform the action.
When you are finished acting on the incoming message or item, the screen that you were viewing prior to receiving the new item redisplays. See Chapter 4, ???SMS,??? for additional information about working with incoming messages.
Using Accompli 009 35

C h a p t e r 2 Receiving Incoming Items
36 Accompli 009 User???s Guide

C H A P T E R 3
ACCOMPLI 009 FEATURES
The Accompli 009 includes a number of common features that make the Personal Information Management (PIM) applications easier to use. Once you learn to use a feature in one application, you can be confident of how the feature will work in many of the other PIM applications. For example, many of the PIM applications included with your Accompli 009 contain the following common features and functions:
???Categories
???Cut, Copy, and Paste
???Insert Text
???Send
???Private Entries
???"Go To" Feature
This chapter explains how to use these features with any of the Accompli 009 applications in which they are supported.
In addition, this chapter includes information about the following applications available from the Home screen:
???Trashcan
???Find
???Express
???RF Modem
???WAP micro browser
???Help
U S I N G C A T E G O R I E S
Several of the Accompli applications use categories to help you manage entries and track information. For example, you may assign contact entries, mailing lists, memos, and tasks to a category. By organizing your entries in this way, you can quickly view and work with just those entries that pertain to a particular category within an application.
Although your Accompli applications include several common categories, such as General, Business, and Personal, you can create custom categories to fit your individual needs.
Accompli 009 Features 37

C h a p t e r 3 Using Categories
You can also rename or delete most categories. You cannot, however, rename or delete the General category.
To add a category:
1From the main Contacts, Tasks, or Memos screen, select the Categories button from the toolbar.
2From the application Categories screen, select New Category.
3Type the name of the new category that you want to create.
4Select the OK button from the toolbar.
To rename a category:
1From the main application screen, select the Categories button.
2From the application Categories screen, highlight the category name that you want to change
Note You cannot rename the General category in any application, or the Calls category in the Tasks application.
3Select the Rename category button from the toolbar.
4Change the category name.
5Select the OK button from the toolbar.
To delete a category:
1From the main application screen, select the Categories button from the toolbar.
2From the application Categories screen, highlight the category name that you want to delete.
Note You cannot delete the General category in any application, or the Calls category in the Tasks application.
3Select the Delete category button from the toolbar.
4If there are entries in the category you are deleting, determine what to do with those entries. You can choose one of the following actions:
???Put in trash
???File in another category
???Cancel the Delete category action
38 Accompli 009 User???s Guide
Using Cut, Copy, and Paste
. . . . .
U S I N G C U T , C O P Y , A N D P A S T E
You can cut, copy, and paste information from Accompli messaging and PIM applications using the following hot keys.
CutALT, X
Copy ALT, C
Paste ALT, V
To cut text from a field you can type in:
1Position the cursor at the starting point of the text to be copied.
2Press and then release the SHIFT key.
3Use the NAVDISK to highlight the text.
4Press the ALT key, then type X to cut the highlighted text. The text is deleted from the current text box and copied to the clipboard.
To copy text from a field you can type in:
1Position the cursor at the starting point of the text to be copied.
2Press and then release the SHIFT key.
3Use the NAVDISK to highlight the text.
4Press the ALT key, then type C to copy the highlighted text. The text is copied to the clipboard.
To copy text from a field you cannot type in:
1Press the ALT key, then type Z to start highlight mode.
2Position the cursor at the starting point for the text that you want to copy.
3Press and then release the SHIFT key.
4Use the NAVDISK to highlight the text.
5Press the ALT key, then type C to copy the highlighted text. The text is copied to the clipboard.
To paste text into a field you can type in:
1Position the cursor where you want to insert the copied text.
2Press the ALT key, then type V to paste the highlighted text.
Accompli 009 Features 39

C h a p t e r 3 Inserting Text
I N S E R T I N G T E X T
To save you time when composing and editing messages, contact entries, calendar events, tasks, or memos, you can insert any of the following:
???Text from another Accompli application
???Current date and time
???Your signature
???Quick Text entries
To insert the current date/time, your signature, or Quick Text in SMS, Contacts, Calen- dar, Tasks, or Memos:
1Position the cursor at the point where you want to insert the text.
2Select the Insert text button from the toolbar.
3Using the NAVDISK, highlight one of the following:
???The current date/time
???My signature
???A Quick Text entry
4Select the OK button from the toolbar.
To insert text from an application:
1Position the cursor at the point where you want to insert the text.
2Select the Insert text button from the toolbar.
3Select ???from application.
4Highlight the application containing the text that you want to insert.
5Select the OK button from the toolbar.
6Narrow your search criteria by doing one of the following:
???If you selected Tasks, Memos, or Contacts, choose the category for the item containing the text that you want to insert.
???If you selected Calendar, choose the date of the calendar event containing the text that you want to insert.
???If you selected SMS, choose the folder containing the message text you want to insert.
7Using the NAVDISK, scroll through the list of items in the selected category, date, or
folder and highlight the item containing the text that you want to insert. 8 Select the OK button from the toolbar.
40 Accompli 009 User???s Guide
Sending Information
. . . . .
S E N D I N G I N F O R M A T I O N
The Personal Information Management (PIM) applications enable you to send contact entries, calendar events, tasks, and memos from your Accompli 009 to someone else using the Send function.
When you send information, you can choose to:
???Send as an SMS message.
???Beam the information to other compatible devices that support infrared (IR) beaming.
Note You cannot beam an entire category of information from your device to another com- patible device.
To send information as a formatted item:
1From the Contacts, Calendar, Tasks, or Memos application, select the item to send.
2Select the Send button from the toolbar.
3Select use SMS.
4Select the recipients from the Contact list.
5Type the message text that you want to accompany the item.
6Using the NAVDISK, highlight the recipient name and the sendable address to which you want to send the message.
7Select the Send button from the toolbar.
To beam PIM information to a compatible device or printer:
1From the Contacts, Calendar, Tasks, or Memos application, select the item that you want to beam.
2Select the Send button from the toolbar.
3Aim the IR port on the back of your device at the IR port on the other device or printer.
4Select either Beam to device or Beam to printer.
To beam a category to a compatible printer:
1From the Contacts, Calendar, or Tasks application, select the category (or day in Calen- dar) that you want to print.
2Highlight any item in the category.
3Select the Send button from the toolbar.
4Aim the IR port on the back of your device at the IR port on the printer.
5Select Beam category to printer. See ???Printer Setup??? on page 141 for more information.
Accompli 009 Features 41
C h a p t e r 3 Marking Private Entries
M A R K I N G P R I V A T E E N T R I E S
Many of the Accompli applications enable you to mark entries as private. If you mark an entry as private, you can control when the entry is visible with a setting in Privacy Options in Control Panel.
To mark items as private:
When creating a new entry or editing an existing entry in your Accompli applications, select the Private check box.
To show or hide private entries:
1Select Controls from the Home screen.
2Select the Privacy Options icon.
3Do one of the following:
???To make all private items visible, choose Show.
???To hide all items marked private, choose Hide.
4Select the Save settings button from the toolbar.
Note When you move private entries on your device to a desktop PIM application (Contacts, Tasks, Memos, and Calendar) during synchronization, the item is not marked as pri- vate on the desktop.
If you move the item from the desktop PIM application back to your device, make cer- tain to edit the item and select the Private check box to restore the private setting.
G O T O F E A T U R E
The Go To feature is a keyboard shortcut that provides a quick and easy way to select items from a list.
When the screen displays a list of items, you can select an item in that list by pressing the key that corresponds to the first letter of the item in the list that you want to select.
For example, if you are looking at a list of memos that you typed. The list contains the following items:car, boat jet, motorcycle, train. To select the item jet press J on the keyboard.
U S I N G T R A S H C A N
When you delete items on your Accompli 009, many of them are moved to the Trashcan before being permanently deleted. You can view the items in the Trashcan, permanently discard them, specify Trashcan settings that determine how often items in the Trashcan
42 Accompli 009 User???s Guide

Using Trashcan
. . . . .
should be deleted, or recover items from the Trashcan and restore them to the originating application.
The following application items are moved to the Trashcan when deleted.
???SMS (Msg)
???Contacts (Ctct)
???Calendar events (Cal)
???Tasks (Task)
???Memos (Memo)
???Email (Eml)
???Ringtone Alerts (Alrt)
???Calculator formulas (Form)
???Quick Text (Qtxt)
Items can be restored from the Trashcan until the Trashcan is emptied. The Trashcan is emptied whenever you request, when memory is low, or based on the settings that you assign.
To view items in Trashcan:
1Select the Trashcan application from the Home screen.
2Using the NAVDISK, scroll through the items in the Trashcan and highlight the item you want to view.
Note The originating application associated with the deleted item displays in parentheses on the left of the Trashcan list screen.
3 Select the View item button from the toolbar.
To restore items from Trashcan:
1Select the Trashcan application from the Home screen.
2Highlight the item that you want to remove from Trashcan and restore.
3Select the Restore item button from the toolbar. The main Trashcan screen is redisplayed without the restored item.
Note If you restore messages after their corresponding folder has been deleted, they are restored to the Inbox. If you restore items that belonged to a category that has been deleted, they are restored to the General category.
Accompli 009 Features 43
C h a p t e r 3 Using Find
To permanently delete all items in Trashcan:
1Select the Trashcan application from the Home screen.
2Select the Empty Trashcan button from the toolbar.
3If you are sure you want to delete all items in Trashcan, select the OK button.
Caution Items deleted from the Trashcan cannot be recovered.
4 The main Trashcan screen is redisplayed without any items.
To specify Trashcan settings:
1Select the Trashcan application from the Home screen.
2Select the Settings for Trashcan button from the toolbar.
3Type the number of days that you want deleted items to remain in the Trashcan before they are permanently discarded.
4Select the OK button from the toolbar to save your settings and return to the main Trashcan screen.
 U S I N G F I N D
Find enables you to search for words or phrases from within or across any of the Accompli 009 PIM applications and the messaging applications. Find searches through the data contained in your applications and returns a list of all entries, by application, that contain the text you specified.
To find a word or phrase:
1Select the Find application from the Home screen.
2In the Text to find box, type the text that you want to search for. The search is not case sensitive.
3From the Look in field, select the application that you want to search. You can search any or all of the following Accompli 009 applications:
???Calendar
???Contacts
???Memos
???SMS
???Tasks
4If you want Find to search through any deleted items in the Trashcan, select the Also look in Trashcan option.
44 Accompli 009 User???s Guide
Using Find
. . . . .
5Select the Find now button from the toolbar. Find searches for the text you requested and displays, by application, the number of items matching the word or phrase you specified.
6Review the list of applications containing found items and select the application whose items you want to view.
7To view the details for a found item, highlight the item and select the View item button from the toolbar.
Accompli 009 Features 45

C h a p t e r 3 Using Express
TIP To close the Find application and open the application associated with a found item, view the found item and select the Go to item toolbar button. The associated application will open with the found item displayed in View mode.
8When you are finished reviewing the item, press the HOME key to return to the Home screen.
 U S I N G E X P R E S S
The Express application enables you to quickly send information to recipients
The information you can send or beam to other users includes:
???Your owner information (known as a vCard when beamed)
???A calendar event (known as vCalendar when beamed)
???Contact information
???A Ringtone alert.
???A memos
???A message
???A task
To quickly beam or send other information:
1Select the Express application from the Home screen.
2Highlight the information type you want to send.
Note If you choose New Message, the Send SMS Message To screen appears. See ???Creat- ing and Sending New SMS Messages??? on page 54 for additional information.
3Select one of the following buttons from the toolbar.
???Send item
???Beam item
???Print item
4From the Choose an item
46 Accompli 009 User???s Guide

Using the RF Modem
. . . . .
???If you selected Contact info, Memo, or Task, choose the category for the item that you want to send.
???If you selected Calendar event, choose the date of the scheduled event that you want to send.
???If you selected Message, choose the folder containing the message text you want to send.
5Using the NAVDISK, scroll through the item list and highlight the item that you want to send.
6Select the OK button on the toolbar.
7Do one of the following:
???If you chose to send the item to recipients, from the Send item to screen, highlight the contact name of the person to whom you are sending the item and select Send.
???If you chose to beam or print the item, aim the IR port on the back of your communicator to the IR port on the other device or printer.
U S I N G T H E R F M O D E M
The RF Modem application enables you to communicate through a wired environment using your Accompli 009, a data cable, and a PC. To use RF Modem, visit www.mot.com/accompli009 and download the Accompli 009 modem. Install the Accompli 009 modem as described below.
To install the downloaded Accompli 009 modem:
1On the Windows taskbar, click Start>Settings>Control Panel.
2
3Select the Don???t detect my modem; I will select it from a list option. Then click Next.
4Click Have Disk and then click Browse.
5Locate the directory to which you saved the Accompli009.inf file and click Open.
6Click OK, then click Next.
7Select the port(s) to which you want to install the Accompli 009 modem and click Next.
8Once the modem is successfully installed, click Finish.
Verifying RF Modem Settings
The RF Modem settings on your Accompli 009 and the Accompli 009 modem settings on your PC must match in order to ensure a proper connection.
Accompli 009 Features 47

C h a p t e r 3 Using the RF Modem
To check your Accompli 009 modem settings on your PC:
1On the Windows taskbar, click Start>Settings>Control Panel.
2
3On the Modem Properties dialog box, select the Accompli 009 modem, then click Properties.
4Make certain the maximum speed is set to 38400.
5Click the Connection tab to verify the data bits, parity, and stop bits settings.
6Click the Advanced button to verify the flow control settings.
7Click OK to save any changes you make.
To change the RF Modem application settings on your device:
1Select the RF Modem application from the Home screen.
2On the toolbar, select the Settings button.
3Select the appropriate settings in the spin boxes. The options and defaults are as follows:
4 Select the Save button from the toolbar to save any changes you have made.
To access the RF Modem application:
1Select the RF Modem application from the Home screen.
2Select Connect from the toolbar.
3To disconnect, select Disconnect from the toolbar.
To restore RF Modem default settings:
1Select the RF Modem application from the Home screen.
2On the toolbar, select the Settings button.
3Select the Default button from the toolbar.
48 Accompli 009 User???s Guide

Using the WAP micro browser
. . . . .
 U S I N G T H E W A P M I C R O B R O W S E R
The WAP micro browser allows you to use your Accompli 009 to access information, such as flight information, email, and directions, on the Internet just as you would from your desktop.
Some websites offer information in a format designed especially for access through a wireless device. Using the WAP micro browser will give you instant access to that information. You must be in Phone mode to use WAP Browser.
Connecting to the WAP micro browser
You can connect to the WAP micro browser one of the following ways:
???GPRS (general packet radio service) network
???CSD
The type of network you set up will determine how you will access the WAP micro browser to connect to the wireless sites. You may need to acquire some information from your Internet Service Provider to complete these steps.
To set up the WAP micro browser for a GPRS or CSD network:
1Select the WAP micro browser application from the Home screen.
2Press the MENU key.
3Highlight Setup from the menu and press ENTER.
4Highlight the first available slot, and press TAB to highlight the Edit button. Press ENTER.
5Highlight one of the three profiles and press ENTER.
6Press tab twice to highlight the Edit option and press ENTER.
7Highlight the Profile Name option and press ENTER.
8Type in a name for this provider. For example, ???GPRS profile??? or ???CSD profile??? may help you distinguish this setup in the future.
TIP If you make a typo during text entry, press BKSP to erase the incorrect character. To erase all of the characters in the text entry field, press SHIFT, then BKSP.
9Press ENTER.
10Highlight the WAP Settings option and press ENTER.
11If necessary, enter the IP address and port information provided by your Internet Service Provider in the appropriate fields. Your Service Provider may have already configured this information for you.
12In the Idle Time Out box, specify a time period, in seconds, that the WAP micro browser can remain idle without disconnecting.
Accompli 009 Features 49

C h a p t e r 3 Using the WAP micro browser
13Press the NAVDISK up.
14Press TAB to highlight the Back button and press ENTER.
15Highlight the Data Bearer option and press ENTER.
16Select either the GPRS or CSD connection.
17If necessary, enter the appropriate data bearer settings obtained from your Service Provider in the appropriate fields and press ENTER. Your Service Provider may have already configured this information for you.
18To exit from the setup, press HOME.
Note When you are finished adding or updating profile information, reset the browser by pressing MENU, selecting the Advanced option, and then selecting Reset.
Once the WAP micro browser is configured, press the Menu key to explore the WAP micro browser options available to you.
Using Web Favorites
The Web Favorites option enables you to enter up to 10 of your favorite web URLs for quick access later.
To enter a Web Favorites URL:
1Select the WAP micro browser application from the Home screen.
2Press the MENU key.
3Highlight Web Favourites and press ENTER.
4Highlight the first available slot, and press TAB to highlight the Edit button. Press ENTER.
5Type the URL of your favorite web site, and press TAB to highlight the Ok button. Press
ENTER.
To access a Web Favorites URL:
1Select the WAP micro browser application from the Home screen.
2Press the MENU key.
3Highlight Web Favourites and press ENTER.
4Highlight the URL of the website you want to visit.
5Press TAB to highlight the Go button and then press ENTER.
TIP You can also access a web favorite from anywhere within the WAP micro browser appli- cation by pressing ALT, then B, and then the number of the web favorite URL you want to visit.
50 Accompli 009 User???s Guide
Using Help
. . . . .
 U S I N G H E L P
To assist you with learning certain features and functions of the Accompli applications, an online Help application is available from the Home screen. You can also access certain help topics directly from the application with which they are associated by selecting the Help button on the toolbar.
Accompli 009 Features 51

C h a p t e r 3 Using Help
52 Accompli 009 User???s Guide

C H A P T E R 4
SMS
SMS provides many of the same robust features you are accustomed to using in desktop e- mail messaging applications, along with added features that make sending and receiving messages easy and more useful.
R E C E I V I N G N E W T E X T M E S S A G E S
When a new message arrives, a New Message
To respond to a New Message alert:
When the New Message
SMS 53

C h a p t e r 4 Creating and Sending New SMS Messages
C R E A T I N G A N D S E N D I N G N E W S M S M E S S A G E S
The QWERTY keyboard provides a familiar key layout, enabling you to quickly type and send your message.
To compose and send an SMS message:
1 Select the Write new message button from the toolbar on the SMS Messages screen.
Note SMS messages can only be 160 characters in length, including message addressing. If the message you compose exceeds the 160 character limit, a message displays in the status line indicating that your message will be sent in multiple parts.
2Address the message by doing one of the following:
???From the Send SMS Message To screen, highlight the name of the contact to whom you are sending the message. With the contact name highlighted, press the NAVDISK right to sequence through the Send to... addresses for the contact entry. Choose the address that you want to use for this message and press the ENTER key. A check- mark appears to the left of the selected address. Repeat for each recipient to whom you are sending the message.
???Select the Address from SIM card button on the toolbar, select a recipient???s address, and select the OK button from the toolbar.
???Select New Contact to add a new address entry to you Contacts list.
3Select the OK button from the toolbar.
4Type your message.
5When you are finished composing a message, select the Send button from the toolbar.
Entering a
On occasion, you may want to send a message to an individual one time only. Since you don't anticipate ever sending a message to the recipient again, you may not want to add them to your contact list.
To enter a
1Select the Write new message button from the toolbar on the SMS Messages screen.
2Select
3In the Device type field, select one of the following:
???Email address (if the gateway is not configured, the email address will not be available)
???Phone number
???Fax number
54 Accompli 009 User???s Guide

Receiving Messages
. . . . .
4Type the number or address for the recipient.
5Select the OK button from the toolbar, and press ENTER to clear the confirmation box.
6Select the OK button at the Send SMS Messages To screen.
7Compose your message as described above and select the Send button from the toolbar.
Scheduling a Delayed Send
Messages and message replies can be composed at your convenience and then scheduled for automatic transmission at a later time. When you choose the recipients for your message, you can specify the delay sending options for the message.
To schedule a delayed message send:
1After composing a message, on the Send SMS To or Reply To screen, select the Delay sending button from the toolbar.
2In the Time field, type the time when you want to send the message.
Note Press the NAVDISK left or right in either the Time or Date field to increment or decre- ment the time and date.
3In the Date field, type the date you want to send the message.
4Select the OK button on the toolbar to accept the schedule.
R E C E I V I N G M E S S A G E S
Messages you receive are stored in system folders or in personal folders that you create. You can choose to respond to a message when it first arrives, or to store it in a folder so that you can work with it later.
You can do the following with the messages stored in your Inbox or personal folders:
???View the message
???Reply to the message
???Forward the message
???Attempt to call the sender of a message
???Move the message to another folder
???Delete the message
For more information about working with message folders, see ???About Folders??? on page 58.
SMS 55

C h a p t e r 4 Receiving Messages
Reading Messages
Incoming messages can be read when they are first received, or stored in the appropriate folder to be read at a later time.
To read a stored message:
1Select the SMS application from the Home screen.
2Select the folder containing the message.
3Select the message.
4Select the OK button from the toolbar to return to the Messages list, or press the HOME key to return to the Home screen.
Replying to Messages
Responding to messages is fast using QuickText replies you create or custom replies you type using the QWERTY keyboard.
See???Quick Text??? on page 142 for
To send a custom reply:
1Select the folder containing the message to reply to.
2Highlight the message.
3With the message highlighted, or while viewing the message, select the Reply button from the toolbar.
4From the Choose Reply screen, select Compose Reply.
5Type your response, then select the Send message button from the toolbar. The Sending Reply
To send a Quick Text reply
1Select the folder containing the message to reply to.
2Select the message.
3With the message selected, or while viewing the message, select the Reply button from the toolbar.
4From the Choose Reply screen, highlight the reply you want to send.
5Select the Send reply button from the toolbar. The Sending Reply
Forwarding Messages
Your Accompli 009 enables you to share your received messages without retyping them. Simply forward the message to an address in Contacts. Your signature is inserted at the beginning of the forwarded message.
56 Accompli 009 User???s Guide

Receiving Messages
. . . . .
To forward a message:
1Highlight the message you want to forward.
2Select the Forward message button on the toolbar.
3Select the contact to whom you want to forward the message.
4Select the OK button on the toolbar.
5(Optional) Write a brief comment or explanation above the original message or document.
6Select the Send message button on the toolbar.
Moving Messages to Folders
To help you manage the mail that you send and receive, you can move messages into folders you create.
To move a message to a folder:
1From the folder view, highlight the message you want to move.
2Select the Move message button from the toolbar.
3On the Move Message To
4Select the OK button from the toolbar.
Deleting Messages
Messages can be deleted from either a folder view or a message view. Deleted messages are moved to the Trashcan, where they are permanently erased when the Trashcan is emptied. For more information, see ???Using Trashcan??? on page 42.
To delete a message from a Folder view:
1From the Messages list, highlight the message to be deleted.
2Select the Put in trash button from the toolbar.
TIP To delete all read messages in the Inbox, select the Put all read messages in trash but- ton from the toolbar.
To delete a message from a Message view:
???While reading the message, select the Put in trash button from the toolbar.
SMS 57
C h a p t e r 4 About Folders
A B O U T F O L D E R S
If there are unread messages in any of the folders, an envelope appears to the left of the folder icon, and the number of unread messages follows the name of the folder. The system folders are as follows:
The Inbox automatically stores all messages that you receive (unless they are routed to another folder through a message rule), until you move them to another folder or delete them.
The Cell Broadcast folder automatically stores all cell broadcast messages.
The Drafts folder stores unfinished or partially composed messages that haven???t been sent yet.
The Outbox contains all messages that you have attempted to send, but that have not yet been sent successfully. Once the status of a message changes to Sent, it is moved to the Sent folder.
The SIM Archive folder contains all messages stored in the SIM card memory.
The Sent Messages folder contains all messages that have been sent success- fully.
You can have up to 200 folders, including system folders. See ???Creating New Folders??? on page 60 for more information.
About the Inbox
The Inbox receives incoming messages transmitted to your Accompli 009. Messages that appear in the Inbox can have one of the following four conditions:
The message has not been read.
The message was replied to.
The message was forwarded.
The message was read.
Unread messages appear at the top of the list, followed by replied to, forwarded, and read messages.
58 Accompli 009 User???s Guide

About Folders
Additional folders that you create provide the same view and functions as the Inbox.
. . . . .
About the Cell Broadcast Folder
Cell Broadcast Messages are general messages, broadcast to a group of phones and are stored in the Cell Broadcast folder. These messages are broadcast in numbered channels and, in general, each channel will tend to carry one particular type of information.
See ???About Cell Broadcast Rules??? on page 63 for more information.
About the Drafts Folder
The Drafts folder contains partial or unfinished messages that you save for later editing and transmission. You can choose to save draft messages on your device or on the SIM card.
When a message in the Drafts folder is opened, you will be prompted to select a recipient for the message. Then the Write SMS Message screen is displayed so that you can edit or complete the message.
About the Outbox
The Outbox acts as a holding area for unsent messages.
Items in the Outbox are sorted by date and time, with the most recent message appearing first. If the message was created today, the time appears next to the message; otherwise, the date the message was created appears.
Messages that appear in the Outbox are categorized into five types:
The message is waiting to be sent.
The message is being sent.
The message could not be sent. Transmitter is off or you are out of range. Mes- sage will be sent again automatically.
The message will be sent later based on the delayed send time you specified.
The message could not be sent.
Once the message is sent successfully, the message is moved to the Sent Folder.
About the SIM Archive Folder
The SIM Archive folder contains all SMS messages stored in the SIM card memory.
SMS 59

C h a p t e r 4 Working with Folders
About the Sent Messages Folder
The Sent Messages folder stores all SMS messages that were sent successfully.
Items in the Sent Messages folder appear in the order in which they were sent, most recent at the top. If the message was sent on the current day, the time appears after the Sent Successfully status icon. Otherwise, the date appears.
You can add the text of a sent message to the Quick Text database so that it can be used as a Quick Text reply.
All sent messages remain in the Sent Messages folder until a scheduled cleanup of the folder takes place or until you delete them.
W O R K I N G W I T H F O L D E R S
You can create, rename, and delete personal folders at any time. You cannot, however, delete or rename system folders. But you can change cleanup options for either personal or system folders any time you choose.
Creating New Folders
You can create personal folders to receive specific types of messages. Incoming messages are automatically routed to your personal folder based upon routing rules that you define.
To create a new personal folder:
1Select the SMS application from the Home screen.
2Select the New folder button from the toolbar.
3Type the name of the new folder in the Name field.
4If you want to make this a private folder, select the Private check box. See ???Marking Private Entries??? on page 42 for more information about private entries.
5Select one of the following storage options for the folder:
???Keep all messages
???Discard messages older than the number of days you specify
???Set folder limit to store only the number of messages you indicate. If the number of messages exceeds the limit you set, older messages will be deleted as new ones arrive. Choose whether to permanently delete the messages or move them to the Trashcan.
6Select the Save changes button from the toolbar.
To edit personal folder settings:
1Select the SMS application from the Home screen.
2Highlight the folder that you want to modify.
60 Accompli 009 User???s Guide
About SMS Message Rules
3Select the Edit folder settings button from the toolbar.
4Modify the folder name and storage options, as applicable.
. . . . .
Note You cannot rename system folders.
5 Select the Save changes button from the toolbar to save your changes.
To delete a personal folder:
1Select the SMS application from the Home screen.
2Highlight the personal folder that you want to delete.
Note You cannot delete the Inbox, Outbox, Sent Messages folder, or SMS Draft folder.
3Select the Delete folder button from the toolbar.
4If the folder contained messages, choose one of the following options:
???Save messages in Inbox
???Put messages in trash
???Cancel delete action
A B O U T S M S M E S S A G E R U L E S
The Message Rules feature enables you to set routing rules and message alert options for incoming messages that contain specific keywords or text you specify. When incoming messages arrive, your device looks to see whether the message meets the rule criteria. If so, the message is routed to a folder you specify and the appropriate alert sounds.
The keywords associated with the rule are displayed as the name of the rule. Each rule in the list is preceded by a number indicating its priority. The priority determines the order in which the rule is executed when a new message arrives. You can change the message priority by moving the rule up or down in the list.
Creating Message Rules
When you create a new rule, you specify the text that you want your device to look for when incoming messages arrive, specify the folder where you want to place messages meeting the rule criteria, and make decisions about how you want to be alerted when messages arrive that meet the rule criteria.
SMS 61

C h a p t e r 4 About SMS Message Rules
To create a message rule:
1Select the SMS application from the Home screen.
2Select the Message rules button from the toolbar.
3Select New Rule.
4In the If message contains text box, type the rule text.
5In the Store in field, select the folder to store messages that meet the rule.
6In the Play field, select the alert that you want to sound when you receive incoming messages matching this rule.
7If you want the specified alert to override the device settings for silent mode, vibrate mode, or Quiet Time settings, select the Play regardless of volume level option.
8If you want to receive alert reminders every two minutes for unread messages meeting this rule, select the Beep until read option.
9If you want incoming messages matching this rule to appear in a New Message
10Select the Save rule button from the toolbar to save the new message rule.
Editing Message Rules
You can change routing rule options for incoming messages anytime.
To edit a message rule:
1Select the SMS application from the Home screen.
2Select the Message rules button from the toolbar.
3On the Message Rules list, highlight the message rule you want to modify.
4Select the Edit rule button from the toolbar.
5Change the message rule options as appropriate.
6Select the Save rule button from the toolbar to save your changes.
Deleting Message Rules
You can delete most of the message rules you create. However, Cell Broadcast rules cannot be deleted from the device, only from the active view. You can choose to reactivate this rule in the Cell Broadcast Settings screen.
To delete a message rule:
1Select the SMS application from the Home screen.
2Select the Message rules button from the toolbar.
3On the Message Rules list, highlight the message rule you want to delete.
4Select the Delete rule button from the toolbar.
62 Accompli 009 User???s Guide

About Cell Broadcast Rules
. . . . .
A B O U T C E L L B R O A D C A S T R U L E S
Cell Broadcast Messages are general messages, broadcast to a group of phones. These messages are broadcast in numbered channels and, in general, each channel will tend to carry one particular type of information.
Typical cell broadcast channels may provide information on local weather conditions, traffic reports, or stock market prices. Please contact your network provider for a list of available channels and the information they supply.
Note Availability of this service requires support from your Cellular Service Provider.
Creating Cell Broadcast Rules
When you create a new Cell Broadcast rule, you specify the Broadcast channel you want to receive and make decisions about how you want to be alerted when Cell Broadcast messages arrive. Be aware that your Accompli 009 device limits the number of messages stored in the Cell Broadcast folder to 50.
You can set up to five Cell Broadcast rules.
To create a Cell Broadcast rule:
1Select the SMS application from the Home screen.
2Select the Cell Broadcast folder.
3Select the Settings button from the toolbar.
4Toggle the Cell Broadcast option to On.
5Highlight one of the five Cell Broadcast channels you want to set and select the Edit channel rules button on the toolbar.
6In the Channel Number field, replace the default number with the appropriate channel index number. Contact your network provider for a list of available channels.
7In the Play field, select the alert that you want to sound when you receive Cell Broadcast messages.
8If you want the specified alert to override the device settings for silent mode, vibrate mode, or Quiet Time settings, select the Play regardless of volume level option.
9If you want incoming Cell Broadcast messages to appear in a New Message popup box, select the Display
10If you want to receive alert reminders every two minutes for unread messages meeting this rule, select the Reminder beep option.
11Select the Save rule button from the toolbar to save the new rule.
SMS 63

S E T T I N G M E S S A G E P R E F E R E N C E S
The Message Settings feature enables you to specify message alert and reminder options for received messages. In addition, you can specify the SMS settings that are required to enable you to send SMS messages.
Using Message Settings, you can choose to receive alert reminders every two minutes about messages that were not read at the time they arrived and continue to be unread. You can also enable and disable receiving Cell Broadcast messages.
Note The default message alert and reminder options you specify in Message Settings are overridden by any message alert or reminder options you choose when creating a new message rule.
To set message preferences:
1Select the SMS application from the Home screen.
2Select the Settings for messages button from the toolbar.
3In the Remind Me Later spin box, specify how long to wait before reminding you again about the message. You can choose a time period between 5 minutes and 2 hours.
4Choose whether to receive incoming Cell Broadcast messages.
5In the Reminder beep field, select one of the following reminder options:
???Beep for the number of hours you specify
???Beep until read
???No reminder beep
6Select the Save settings button from the toolbar to save your message settings.
To set SMS message preferences:
1Select the SMS application from the Home screen.
2Select the Settings for messages button from the toolbar.
3On the Message Settings screen, select the Settings for SMS button on the toolbar.
4Type the Message Service Center number provided by your Cellular Service Provider.
5In the Gateway field, type the gateway number provided by your Cellular Service Provider. If you do not specify a gateway, you will not be able to select email addresses from the Select SMS Recipients screen.
6In the Expiry period field, specify the maximum time, in hours, that your unforwarded messages are to remain with the Message Service Center before being deleted.
64 Accompli 009 User???s Guide

Using Common Accompli 009 Features with SMS
. . . . .
U S I N G C O M M O N A C C O M P L I 00 9 F E A T U R E S W I T H S M S
SMS enables you to use a number of common Accompli 009 features, including the following:
???Cut, copy, and paste text from other messages or Accompli 009 PIM applications.
???Insert text from another message or an Accompli 009 PIM application.
???Beam SMS message information to another compatible device or printer that supports IR communication.
???Restore deleted messages from the Trashcan, if the Trashcan has not been emptied since the item was put in trash.
Note Messages restored from the Trashcan return to the user folder they were deleted from. If that folder no longer exists, the message is restored to the Inbox.
For more information about using these common features, see Chapter 3, ???Accompli 009 Features.???
SMS 65

C h a p t e r 4 Using Common Accompli 009 Features with SMS
66 Accompli 009 User???s Guide

C H A P T E R 5
PHONE
Your Accompli 009 provides unrivaled power in mobile phone technology and is packed with features that put you in control.
The Phone application provides the following features:
???SIM card support
???Direct dialing, automatic dialing,
???Conference calling
???Call waiting, call holding, and call transferring
???Call forwarding and call barring
???Call history and call metering
???Personal Information Management during call
Note The Phone application requires an active SIM Card. See ???About Your SIM Card??? on page 76 for more information.
S E T T I N G P H O N E P R E F E R E N C E S
Phone Setup enables you to set a number of preferences that enable you to control how the Phone application works. These preferences include:
???Selecting a network
???Specifying call forwarding options
???Specifying call barring options
???Fixed dialing
???Call meters
???Display carrier services
Phone 67
Setting Up Your Phone Using Control Panel
Using Phone Setup in the Control Panel application, you can switch between two phone lines, specify which phone format to use, indicate whether to allow call waiting, edit your voicemail phone number, and determine whether to restrict your phone number so that it does not display on a recipient???s caller ID (if applicable).
To set Phone Setup preferences:
1Select Controls from the Home screen.
2Select the Phone setup icon.
3Select the Phone Setup button on the toolbar.
4Choose whether to use Line 1 or Line 2.
Note Availability depends on the type and settings of the SIM card, your subscription to this feature, or both.
5Select Dial or
6If you want to be notified when another call is waiting, select On in the Call Waiting field. Otherwise, select Off.
Note Availability of this feature depends on your Cellular Service Provider.
7 If provided by your Cellular Service Provider, review the voicemail retrieval number. Otherwise, type your voicemail retrieval number.
Note Availability of this feature depends on your Cellular Service Provider.
8If you do not want your phone number displayed by a recipient???s caller ID, select the Restrict ID on Next Call option.
Note Check with your Cellular Service Provider to see whether this feature is supported.
9 Select the OK button to return to the Phone Setup screen.
68 Accompli 009 User???s Guide
Network Selection
. . . . .
N E T W O R K S E L E C T I O N
Network Selection enables you to register with an available GSM network, select an appropriate network band, locate and register with new networks, specify a preferred network, and set network preferences.
Selecting a Network
In order for your Accompli 009 to make and receive phone calls, it must register with one of the available networks. The Phone application can handle either of the following network types:
???GSM900/1800
???GSM1900
The Phone application automatically searches for the last network used. If, for any reason, this network is unavailable, Phone attempts to register with a new network.
When it is necessary to register with a new network, a list of networks is generated. The list is sorted in the following order:
???The Home network
???Networks from a preferred list
???A random list of other networks found above a certain signal strength.
Any forbidden networks, stored in the SIM card, will be displayed but cannot be selected.
Changing Network Bands
The country where you purchased your Accompli 009 determines the default band that it uses. When purchased in the United States, the GSM 1900 band defaults. When purchased elsewhere, the GSM 900/1800 band may default. When you travel abroad, remember to change to an appropriate band.
When you select a new band, the Phone application displays a confirmation message and then automatically searches all the available networks. It then attempts to register with a preferred network within the selected band.
To change the network band:
1Select Controls from the Home screen.
2Select the Phone setup icon.
3Select the Network Selection button from the toolbar. The Network Selection screen is displayed.
4In the Band option box, select one of the following options:
???GSM 900/1800
???GSM 1900
Phone 69

C h a p t e r 5 Network Selection
5Press the TAB key to register with a new network.
6Select the Exit screen button from the toolbar.
Finding a New Network
This feature enables you to locate and register with a new network. When the registration attempt is made, your current network is excluded from the list of those available. If the attempt fails, the Phone application will then try to
To register with a new network:
1Select Controls from the Home screen.
2Select the Phone Setup icon.
3Select the Network Selection button from the toolbar.
4Select the Register selected network button from the toolbar.
Making a Network Preferred
This option enables you to add a network to your preferred list.
To add a new network code:
1Select Controls from the Home screen.
2Select the Phone Setup icon.
3Select the Network Selection button from the toolbar.
4From the Network selection list, highlight the network that you want to mark as preferred.
5Select the Add to preferred button from the toolbar.
6When the confirmation message appears, select Yes.
7When complete, a confirmation message displays, letting you know that registration with the network was successful.
Setting Network Search Preferences
Use this feature to set preferences for how the Phone application searches for new network bands. You can choose to search for an available network automatically or manually.
In the automatic mode, the Phone application attempts to register with the first network in a sorted list. If successful, the network name is displayed. If unsuccessful, the Phone application will attempt to register with the next network in the list. If it fails to register with any of the listed networks, it will start at the beginning of the list based on the frequency you define.
70 Accompli 009 User???s Guide
Call Forwarding
. . . . .
In the manual mode, the Phone application presents you with a sorted list of networks. Select a network from the list and the Phone application will try to register with the selected network.
To set Network search settings:
1Select Controls from the Home screen.
2Select the Phone Setup icon.
3Select the Network Selection button from the toolbar.
4Select the Settings button from the toolbar.
5In the Registration type option box, select Automatic or Manual.
6In the Frequency option box, choose one of the four options. Your selection here tells Phone how long to wait before attempting to
???Slow search
???Medium search
???Fast search
???Continuous search
7Select the Save settings button from the toolbar.
C A L L F O R W A R D I N G
Call forwarding is a network feature. If your phone is unavailable, or you do not wish to receive incoming calls, incoming calls can be forwarded to other phone numbers. You can set call forwarding options for voice calls, incoming fax calls, and data calls.
To set up call forwarding:
1Select Controls from the Home screen.
2Select the Phone setup icon.
3Select the Call Forwarding Options button from the toolbar.
4In the option box on the Voice tab, choose from the following options:
Detailed forward- Forwards voice calls to different numbers, depending upon the
Phone 71

C h a p t e r 5 Call Barring
5Select the Next Page button from the toolbar to move to the Fax tab.
6If you want to forward incoming fax calls, select the Forward to option and specify the forwarding phone number.
7Select the Next Page button from the toolbar to move to the Data tab.
8If you want to forward data calls, select the Forward to option and specify the forwarding phone number.
9When you are finished, select the Save changes button from the toolbar.
To cancel call forwarding:
1Select Controls from the Home screen.
2Select the Phone Setup icon.
3Select the Call forwarding button from the toolbar.
4Select the Cancel call forwarding button from the toolbar.
5When the ???Cancel call forwarding???? message box appears, select Yes.
6Select the Save changes button from the toolbar.
C A L L B A R R I N G
Call barring is a network feature that can be used to selectively block outgoing and incoming calls.
If you change the barring setting, you may be asked to enter your barring password. There will be a short delay while the phone notifies the network of the new setting. When the change has been made by the network, the phone displays a confirmation message.
The initial password will be supplied to you by your Cellular Service Provider when you subscribe to this service.
To enable call barring:
1Select the Controls from the Home screen.
2Select the Phone setup icon.
3Select the Call Barring Options button from the toolbar. The Call Barring screen displays.
4Select the Enable call barring option.
5In the Bar incoming calls option box, choose one of the following:
???When roaming
???All calls
???Off
72 Accompli 009 User???s Guide

Fixed Dialing
. . . . .
6In the Bar outgoing calls option box, choose one of the following:
???International calls
???International calls except home
???All outgoing calls
???Off
7Select the OK button from the toolbar.
To change your call barring password:
1On the Call Barring screen, select the Change password button from the toolbar.
2In the Enter password box, type your new password.
3Select the Save changes button to save your password changes.
To cancel call barring:
1Select Controls from the Home screen.
2Select the Phone setup icon.
3Select the Call Barring Options button from the toolbar.
4Deselect the Enable call barring option.
5Select the OK button from the toolbar.
F I X E D D I A L I N G
Note Availability of the Fixed Dialing feature depends on the type of SIM Card. Fixed dialing can also be affected by the Call Blocking Setting.
This feature allows you to limit use of your phone to a
When Fixed Dialing is switched on, the only numbers that can be dialed from your phone are those stored (or whose prefix is stored) in the Fixed Dial list. This list is stored in your SIM Card memory.
Once you enable Fixed Dialing, you will only be able to redial those numbers that appear in your Fixed Dial list.
To set up your Fixed Dial list:
1Select the Phone application from the Home screen.
2Select the Fixed Dialing button from the toolbar.
3Select New Entry.
4Type the contact name and number in the Name and Number fields.
Phone 73
C h a p t e r 5 Call Metering
5Specify the SIM Card memory location for the entry. Memory locations 1 through 40 are available for Fixed Dial entries.
TIP When setting up your Fixed Dial list, you may want to reserve the first nine locations for phone numbers you wish to
6Select the OK button from the toolbar.
7Type your SIM PIN2 security code and select the OK button from the toolbar.
Note The default SIM PIN2 security code is **52*. See page Chapter
To edit a Fixed Dial entry:
1Select the Phone application from the Home screen.
2SSelect the Fixed Dialing button from the toolbar.
3From the Fixed Dialing list, select the entry that you want to change.
4Select the Edit button from the toolbar.
5Make your changes to the entry and select the Save changes button from the toolbar.
When you are using Fixed Dialing in conjunction with
C A L L M E T E R I N G
Phone has an internal metering system that provides you with individual and total call times and costs. The meter can be displayed during a phone call and audible tones can be generated to indicate the passage of call time.
Note Call charges are only available if you receive the Advice of Charge service from your Cellular Service Provider. If you do not receive this service, then only time meters are available.
Phone provides two programmable audible call timers:
???The ???Single??? alert call timer will sound once during a call, after a preset time has elapsed.
???The ???Repeating??? timer will sound regular beeps during a call, at preset intervals.
74 Accompli 009 User???s Guide
Call Metering
. . . . .
To show call time meters:
1Select the Phone application from the Home screen.
2Select the Call Meters button from the toolbar.
3Review the time totals. When you are finished, select the OK button from the toolbar.
To set preferences for call metering:
1From the Call Meters screen, select the Settings button from the toolbar.
2From the In Call Display box, specify the type of timer you want to appear when making a phone call. Choose from the following options:
???Call timer
???Lifetime timer
???Call charges
???Total charges
???Credit remaining
???None
3Type the change rate, in units per minute, to use when calculating call charges.
4To set a limit for call charges, select the Use charge limit option and specify the limit.
5Select the Call Meter Settings - Audible tab.
6Select one of the following options for audible call timers:
7Select the Call Meter Settings - Resets tab.
8If you want to reset call meters at regular monthly intervals, choose the interval and select the meter options you want reset.
9Select the OK button from the toolbar.
To reset time meters:
1From the Call Meters screen, select the Set up Call Meters button from the toolbar.
2Select the Reset timers button from the toolbar.
3If you are certain you want to reset the time meters, select Yes when the confirmation dialog displays.
Phone 75

S H O W C E L L U L A R S E R V I C E P R O V I D E R S E R V I C E S
This option displays a list of phone numbers and services provided by your Cellular Service Provider.
Note Availability depends on the type and settings of the SIM card, your subscription to this feature, or both.
To show services:
1Select the Phone application from the Home screen.
2Select the Show Services button from the toolbar.
3To call a provided service, select the service, and then select the Call button from the toolbar.
4When you are finished, select the Exit screen button from the toolbar.
A B O U T Y O U R S I M C A R D
Your SIM (Subscriber Identity Module) card was supplied by your Cellular Service Provider when you purchased your Accompli 009. You will not be able to make or receive calls if you do not have a SIM card inserted in your phone.
Note GSM Service Providers allow you to make emergency calls without a SIM card inserted. Contact your Service Provider for more details.
The SIM card is a ???Smart Card??? that contains your phone number, service details, and memory for storing contact numbers and messages. You can therefore use your SIM card in other compatible GSM handsets and you will be charged for the call.
Like a bank card or credit card, you should keep your SIM card secure. Do not bend or scratch your card, and avoid exposure to static electricity or water.
GSM Emergency Calls
In case of an emergency, you can use your Accompli 009 to make an emergency call. In the United States, dial 911. Outside of the United States, dial the GSM standard number, 112.
Provided that your phone has found a network, you will be able to make an emergency call. The call can be made regardless of any security codes and, depending on the network, with or without a SIM card inserted.
The emergency call will be directed to a central emergency operator.
76 Accompli 009 User???s Guide

Setting SIM Entries
. . . . .
To dial the GSM emergency number in the U.S.
1Select the Phone application from the Home screen.
2Type 9 1 1 and press Enter.
S E T T I N G S I M E N T R I E S
The SIM Card Numbers screen allows you to manage all of the phone numbers stored in the memory of your SIM card. Phone numbers appear in alphabetical order by name; numbers without a corresponding name are sorted at the top of the list. When a name is highlighted the corresponding number is shown in the area above the toolbar.
From this screen, all SIM card functions can be set, including editing phone entries, deleting an entry, dialing an entry, and selecting an entry to save as a Contact. The Personal Identification Number (PIN) settings can also be configured from this screen.
Note The SIM Card is not available when you are in Fixed Dialing mode.
To add a SIM card entry:
1From the Phone screen, select the SIM card button on the toolbar
2Highlight New Entry from the list. Press Enter.
3Type the name for the new entry in the Name box.
4Type the number for the new entry in the Number box.
5In the Memory location option box, select the number corresponding to the location where you would like to save the number. This feature is SIM card dependent, and only available location numbers will appear for selection.
6Select OK to complete the new entry.
To edit a SIM card entry:
1From the Phone screen, select the SIM card button on the toolbar.
2Highlight the SIM card entry you want to change.
3Select the Edit SIM button from the toolbar.
4Change the SIM card information, as appropriate.
5Select the OK button from the toolbar to save your changes.
PIN Features
When the SIM card Personal Identification Number (PIN) setting is enabled, you are prompted to enter the correct PIN when you turn your device on and when you switch from PDA mode to Phone mode. This is the PIN1 code. The PIN2 code controls your access to
Phone 77

C h a p t e r 5 Setting SIM Entries
advanced phone features, such as Fixed Dialing and Call Metering. Both of these numbers can be set from the SIM Card Phone Numbers screen.
To change SIM Card PIN1:
1Select the Phone application from the Home screen.
2Select the SIM Card button from the toolbar.
3Select the Change PIN Code button from the toolbar.
If the Require SIM card PIN option is checked, the PIN will be required to access the SIM card each time the phone is turned on.
4Type the old PIN number to access the PIN number change screen. The default PIN security code is **5*.
5Type the new PIN in the New PIN field. This must be a number between 4 and 8 digits in length.
6Retype the new PIN in the Confirm new PIN field.
7Select OK to save your changes.
To change SIM Card PIN2:
1Select the Phone application from the Home screen.
2Select the SIM Card button from the toolbar.
3Select the Change PIN2 Code button from the toolbar.
4Type the old SIM PIN2 number. The default SIM PIN2 security code is **52*.
5Type the new SIM PIN2 number. The number must be between 4 and 8 digits.
6Retype the new SIM PIN2 number in the Confirm SIM PIN2 box.
7Select OK to save your changes.
Unblocking your phone
If you receive the ???blocked??? message, you will need to enter an unblock code and key sequence on the Dial screen before you can use the phone.
Note The
To unblock your phone:
1Press the Phone hot key and make sure the Dial screen is displayed.
2Type * * 0 5 *, followed by the unblock code, and then press ENTER.
3Type the new PIN in the New PIN field. This must be a number between 4 and 8 digits in length.
78 Accompli 009 User???s Guide

Making and Receiving Phone Calls
4Retype the new PIN in the Confirm new PIN field.
5Select OK to return to the SIM Card Entries screen.
. . . . .
Warning If this operation is performed incorrectly 8 times in a row, your SIM card will become permanently blocked.
Copying a SIM Entry to Contacts
A SIM entry can be selected to be saved into the Contacts application. This will allow you to save address book information to your business and personal contacts.
To copy a new entry into Contacts:
1Select the Phone application from the Home screen.
2Select the SIM Card button from the toolbar.
3Highlight the SIM entry that you want to copy to Contacts.
4Select the Copy to Contacts button from the toolbar.
5Choose whether to store the phone number as a work, home, main, or mobile phone number.
6Select the OK button from the toolbar.
M A K I N G A N D R E C E I V I N G P H O N E C A L L S
The Phone application provides you with several ways to make a phone call:
???Using the numeric keys
???Using automatic redial
???Using
In addition, you can make a phone call from within the Contacts or SMS application.
Depending on the preferred Phone format you select in Phone Setup, either the Dial or One- Touch Dial screen appears when you launch the Phone application from the Home screen or using the Phone hot key.
Making a Phone Call
It will not be possible to make a phone call unless you are in an area where there is a GSM900, 1800, or 1900 service. When a service has been found, a series of rising bars displays next to the antenna icon, indicating the signal strength.
When the Phone application is launched from the Home screen, the Dial or
Phone 79

To make a phone call using Dial:
1Select the Phone application from the Home screen.
2Use the number keys at the top of the keyboard to enter the phone number. Optionally, with NumLock on, you can also use the dark blue phone pad keys on the left side of the keyboard to enter the number.
Note If you make a mistake while entering the phone number, press the BKSP key to remove the incorrect digit(s) or use the NAVDISK to insert a missing a digit.
TIP If you need to enter in an
3Press the ENTER key or select the Dial Number button from the toolbar.
4You can act on the current call by selecting one of the following options from the spin list:
To make a phone call using
1Select the Phone application from the Home screen.
2Do one of the following:
???Briefly press and hold the numeric key corresponding to a Speed Dial number.
???Highlight an entry in your
???Select Dial and type the phone number you want to call. Select the OK button from the toolbar.
80 Accompli 009 User???s Guide
Making and Receiving Phone Calls
. . . . .
To make a phone call from the Contacts List:
1Open the Contacts application from the Home screen.
2Select a contact name from the Contacts List.
3Press the hotkey number on the keypad corresponding to the contact number. One of the following happens.
???If the contact information is a telephone number, the Phone application will automatically dial the number.
???If the contact information is an email address, the SMS application will open and allow you to compose an SMS message to be sent to the selected email address in the Contacts List.
Automatic Redialing
If your call attempt does not succeed, the Automatic Redial
If you choose Yes, the number is automatically redialed up to 10 times. A short ring tone indicates that the call was connected.
If you choose No, the number will not be automatically redialed and the previous screen is displayed.
Receiving a Phone Call
When you receive a phone call, the LED on the front of the device flashes alternating red and green and a
To receive a phone call, make certain that:
???Your Accompli 009 is turned on and unlocked, which may require you to enter your SIM
PIN
???You are in an area where there is GSM900, 1800, or 1900 service
???Your Call Forwarding and Call Blocking settings are not set to forward or block incoming calls
To respond to an incoming call:
When a new call arrives, you can choose to answer the call by doing one of the following:
???Press the Smart Button on the side of the device
???If the earpiece is not plugged in, plug in the earpiece. The call is automatically answered.
???If the earpiece is already plugged in when the call is received, press and hold the send/end button on the earpiece
Phone 81

Choose one of the following options from the Incoming Call
C A L L W A I T I N G A N D C A L L H O L D I N G
Your Accompli 009 supports the GSM options of Call Waiting and Call Holding. When you are connected to a phone call and you receive a new call, an Incoming Call
Note To use these features, you must turn on the Call waiting option in Phone Setup.
From the Incoming Call
To respond to another incoming call:
When the Incoming Call
Working with Two Calls
If you have two calls connected, you can switch between the active call and the call that is on hold, join the callers in a
82 Accompli 009 User???s Guide

Conference Calling
When the Two Calls
. . . . .
C O N F E R E N C E C A L L I N G
If you choose to link an incoming call with your current call, the Conference Call
Note You must subscribe to both Conference Call and Call Waiting Supplementary Services to be able to use this feature.
To initiate a conference call:
1Place the active call on hold, by selecting Hold from the spin box.
2Select New Call from the spin box and dial the new phone number.
3Once the new call is connected, select Link Calls from the spin box to merge the calls.
To add an incoming call to a conference call:
???Select the Link Calls option from the spin box to link your incoming call to the connected conference members.
To end a conference call:
???Select the End Conference option from the spin list to disconnect all members of the conference call.
Phone 83

C h a p t e r 5 Viewing Call History
V I E W I N G C A L L H I S T O R Y
Call History enables you to review the last ten calls made in three categories: Received, Made, and Missed. If the call number is in Contacts, the name and phone number type are displayed; otherwise, only the number displays. The date of each call displays in the right column and the timestamp for the highlighted call appears in the status bar.
If the call number is on the SIM card, the caller???s name and phone number are displayed.
To view call history:
1Select the Phone application from the Home screen.
2Select the Call History button from the toolbar.
3From the Last 10 Calls spin box, choose one of the following:
???Received
???Missed
???Made
4When you are finished reviewing call history, choose the Exit screen button from the toolbar.
84 Accompli 009 User???s Guide

Calling Voicemail
. . . . .
C A L L I N G V O I C E M A I L
This option enables you to make a call to the current voicemail number entered in Phone Settings in Control Panel.
Note Availability of this feature depends on your Cellular Service Provider.
To call your voicemail:
1Select the Phone application from the Home screen.
2Select the Dial VoiceMail button from the toolbar and press ENTER.
TIP Pauses can be inserted into a string of numbers to allow the called number time to react to certain activities, such as dialing voice mail, an extension or mailbox, and your password.
To insert a pause into a phone number, insert a comma (,) in the desired location. For example, if your voicemail number is
Phone 85

C h a p t e r 5 Calling Voicemail
86 Accompli 009 User???s Guide

C H A P T E R 6
CONTACTS
The Contacts application is a convenient electronic address book that enables you to store contact information about your personal and business contacts.
Using Contacts, you can:
???Enter up to five telephone numbers and
???Record up to four additional pieces of information about each contact, such as spouse name, birthday, or whatever else might be important to you.
???Attach notes that provide additional information about your contacts.
???Organize your contact entries into categories so that you can quickly locate them based on category, such as business contacts or personal contacts.
???Organize contacts into groups, called mailing lists.
???Dial a contact directly using their contact information.
???Compose an SMS message to a selected contact.
???Send contact information to a compatible device or printer.
???Copy a contact to your SIM card.
???Add domain names for wireless addresses.
E N T E R I N G C O N T A C T S
You can enter contact information for individuals and businesses. You can even organize your contacts into groups and establish mailing lists so that you can quickly send messages to an entire group of individual contacts at one time.
To enter a contact:
1Select the Contacts application from the Home screen.
2Select New Contact.
3Type the contact???s first name, last name, company name, and title in the appropriate fields.
Note If you enter a contact, but do not specify a first, last, or company name, the contact will appear at the top of the Contacts list and the Choose Recipients list as ???unnamed.???
4 In the Category field, choose a category for the contact.
Contacts 87

C h a p t e r 6 Entering Contacts
Note You can also create a new category for a contact. See ???Using Categories??? on page 37 for more information.
5To make this a private contact entry, select the Private check box.
6(Optional) Enter the following additional information for this contact entry:
???All telephone numbers
???Main, work, home, alternate, and web
???Device type and wireless address
???Home and work fax number
???Work address
???Home address
???Up to four additional pieces of information for the contact
TIP To move between tabs, highlight the current tab icon and press the NAVDISK left or right. Press
7To write notes about the contact, select the Notes button from the toolbar.
8When you are finished typing information about this contact, select the Save contact button from the toolbar.
To edit a contact entry:
1Select the Contacts application from the Home screen.
2From the Category field, choose the category of the contact whose address information you want to edit.
3Using the NAVDISK, scroll through the list of contacts and highlight the contact name.
TIP Type the first several characters of the contact name to quickly scroll to the names beginning with those characters.
4Select the View item button from the toolbar.
5Select the Edit item button from the toolbar.
6Edit the information for the contact.
7Select the Save contact button from the toolbar to save your changes and redisplay the main Contacts screen.
88 Accompli 009 User???s Guide
Looking up Contact Entries
. . . . .
Deleting a Contact Entry
A
You can delete contacts from your Accompli 009 in either of the following ways:
???Delete a contact entry directly from the main Contacts screen.
???Delete a contact entry after opening and reviewing it in the View Contacts screen.
Caution Deleted contact information cannot be recovered.
To delete a contact from the main Contacts screen:
1Select the Contacts application from the Home screen.
2From the Category field, choose the category of the contact that you want to display. If you want to see all of the contacts that you have entered, change the category to All.
3Using the NAVDISK, scroll through the list of contacts and highlight the contact that you want to delete.
4Select the Put in trash button from the toolbar. The main Contacts screen reappears without the contact.
L O O K I N G U P C ON T A C T E N T R I E S
When you open the Contacts application from the Home screen, the main Contacts screen displays all of your contact entries in alphabetical order.
Note Whether the entries are sorted by last name, first name, or company name depends on the settings you choose in Contacts Settings. See ???Setting Contact Preferences??? on page 91.
To scroll through the list of contacts, use the NAVDISK. To quickly scroll to a specific contact, type the first few characters of the contact name. To see all of the address information available for the contact, use the following procedure.
Contacts 89

To look up contact information:
1Select the Contacts application from the Home screen.
2From the Category field, choose the category of the contact or mailing list for whom you want to look up address information.
TIP Type the first several characters of the contact name to quickly scroll to the names beginning with those characters.
3Using the NAVDISK, scroll through the list of contacts and highlight the contact entry you want to view.
4Select the View item button from the toolbar.
TIP If this entry contains more contact information than can be displayed on one screen, press the NAVDISK down to display the remaining information.
5 Select the OK button from the toolbar to return to the main Contacts screen.
To make a phone call or send from the Contacts List:
1Select the Contacts application from the Home screen.
2From the Category field, choose the category of the contact or mailing list for whom you want to look up address information.
3Using the NAVDISK, scroll through the list of contacts and highlight the contact entry you want to view.
4Select the View item button from the toolbar.
5Press the hotkey number on the keypad corresponding to the contact number. One of the following happens.
???If the contact information is a telephone number, the Phone application will automatically dial the number.
???If the contact information is an email address, the SMS application will open at the screen were you can compose an SMS message to be sent to the selected email address in the Contacts List.
90 Accompli 009 User???s Guide
Setting Contact Preferences
. . . . .
S E T T I N G C O N T A C T P R E F E R E N C E S
You can choose to sort contacts by last name, first name, or company name. If a contact entry does not contain the name you choose to sort by, the contact entry is sorted by the next available name.
For example, if you choose to sort by last name, then first, and the contact entry does not include a last name, the entry is sorted alphabetically by first name. If the contact entry does not contain a first name, the company name is used to determine the sort order.
The following chart summarizes what happens to the sort order in the three sorting alternatives when a field is empty:
Contacts provides four custom fields that you can rename to identify additional information about your contact entries. This enables you to record information such as spouse name, birthday, anniversary, or whatever information you choose to record for your contact entries.
To set contact preferences:
1Select the Contacts application from the Home screen.
2Select the Settings for Contacts button from the toolbar.
3Choose the format to use when showing contact entries. You can choose one of the following options:
???Last, First
???First Last
???Company, Last
4(Optional) Rename the four Custom field names with field names of your choice.
5Select the Save settings button from the toolbar.
Contacts 91

C h a p t e r 6 Creating a Mailing List
C R E A T I N G A M A I L I N G L I S T
If you frequently send messages to the same group of contacts, you can create a mailing list to make it easier to address messages to the group. Instead of addressing the message to each contact individually, you can address the message to the mailing list.
To create a mailing list:
1Select the Contacts application from the Home screen.
2Select New Mailing List.
3In the List name field, type the name for the mailing list as you want it to appear in the Contacts list.
4In the Category field, choose a category for the mailing list.
TIP You can also create a new category for a mailing list. See ???Using Categories??? on page 37 for more information.
5To make this mailing list entry private, select the Private check box.
6Select Add Addresses to List.
7Highlight the first contact name that you want to include in the mailing list.
8With the contact name highlighted, press the NAVDISK right to cycle through the Send to... addresses for the contact entry. Highlight the address that you want to use for this contact and press ENTER. A checkmark appears to the left of the selected address.
TIP You can choose multiple addresses for a contact.
9Repeat steps 7 and 8 for each contact you want to include in the mailing list.
10When you are finished adding contacts to the list, select the OK button from the toolbar, then select the Save mailing list button to save the mailing list.
U S I N G C O M M O N A C C O M P L I 0 0 9 F E A T U R E S W I T H C O N T A C T S
Contacts enables you to use a number of common Accompli 009 features, including the following:
???Define new categories for organizing your contact entries and mailing lists into logical groups.
???Cut, copy, and paste text from other contact entries, mailing lists, Accompli 009 PIM applications, or the clipboard.
???Insert text from another contact entry or application.
92 Accompli 009 User???s Guide
Using Common Accompli 009 Features with Contacts
. . . . .
???Beam contact or mailing list information to another device or printer that supports IR communication or send as an SMS message.
???Restore deleted contacts from the Trashcan, if the Trashcan has not been emptied since the item was put in trash.
For more information about using these common features, see Chapter 3, "Accompli 009 Features."
Contacts 93

C h a p t e r 6 Using Common Accompli 009 Features with Contacts
94 Accompli 009 User???s Guide

C H A P T E R 7
CALENDAR
Calendar enables you to record appointments, meetings, birthdays, anniversaries, and other events that you don't want to forget.
Using Calendar, you can:
???Create calendar entries for scheduled appointments,
???View your appointments for a specific date or see all calendar events for an entire week or month at a glance.
???Create recurring events for appointments that repeat.
???Set Calendar preferences, including a default view and event reminder options.
???Beam your calendar events to other compatible
V I E W I N G E V E N T S
Calendar has three different views from which you can choose. You can easily navigate among these views or go directly to a specific calendar date.
TIP To view calendar entries for a specific day, select the Jump to date toolbar button from any calendar view.
Use the following toolbar buttons to select the desired view:
Day View
Week View
Month View
Using Settings for Calendar, you can choose which view you want to use as the default when you open the Calendar application.
Calendar 95

C h a p t e r 7 Adding an Event
Day View
This view displays a list of appointments for a specific date with a single timeline column showing appointments and conflicts. Press the NAVDISK left or right to view the next or previous day.
Week View
A weekly view shows seven timeline columns, with appointment blocks in gray and conflicts in black.
Month View
This view displays a monthly calendar that uses various symbols to indicate scheduled events. Press the NAVDISK left, right, up, or down to move between days and months.
A D D I N G A N E V E N T
You add new events from the Day View screen. If you are viewing your calendar using the Week View or the Month View, you must first select Day View before adding a new calendar entry.
You can indicate that an event is recurring, and specify a schedule for how often it occurs and when it should stop repeating. By setting reminders and alerts, you can tell your Accompli 009 to play an alert to remind you of a scheduled event.
To add an event:
1Select the Calendar application from the Home screen.
2From the Day View screen, select New Event.
3In the Subject field, type a brief description of this event.
4Choose one of the following event types for this calendar entry:
???Event
???
???Special day
5If you want to make this event a private entry, select the Private check box.
6In the Date field, type the date of the event.
TIP Press the NAVDISK left or right to increment or decrement the displayed date.
96 Accompli 009 User???s Guide

Adding an Event
. . . . .
7If this is an
TIP You can use the NAVDISK to increment or decrement the time by 15 minutes.
8Select the Location tab.
9In the Location field, type the place for the event or leave this field blank.
10Select the Repeat Options tab.
11In the Event occurs field, choose a frequency for how often this event repeats.
12If you selected an option other than Once in step 11, specify how often and for how long the event will repeat.
???In the Every field, specify the interval.
???In the End date field, type the date that this event will stop repeating.
???If this is a weekly event that occurs some weekdays, but not all, select the On check boxes for the weekdays this event occurs.
or
???If this is a monthly event, specify whether the event repeats on this date, or on this day.
13Select the Alert Options tab.
14In the Reminder field, type the time, prior to the event, that you want to receive a reminder alert.
15In the Alert field, select the alert for this event reminder.
16If you want the event reminder to sound even if the device is in silent mode, vibrate mode, or in Quiet Time, select the Play regardless of volume level option.
17If you want to record additional information about this event, select the Notes for event button from the toolbar.
18Type any additional information that you want to record about this event in Notes.
19Select the Save note button from the toolbar to save your note.
20Select the Save event button from the toolbar to save your entry.
Calendar 97

R E C E I V I N G E V E N T R E M I N D E R S
Prior to the start time for a scheduled event, you will receive an event reminder
To reply to event reminders:
???When the event reminder
E D I T I N G A N E V E N T
Calendar entries can be updated as information about your scheduled events changes.
To edit an event:
1Select the Calendar application from the Home screen.
2In Day view, highlight the event that you want to edit.
Note If you wish to edit an event that occurs on a different day, use the Jump to button from the toolbar to go to that date.
3Select the View event button from the toolbar.
4Select the Edit event button from the toolbar.
5Modify the event information as desired. If the event is recurring, you can choose to apply the changes to all occurrences of the event.
6Select the Save event button from the toolbar to save your modifications and return to the Day View.
D E L E T I N G E V E N T S
You can delete events in Calendar in either of the following ways:
???Delete a calendar entry from the Day View screen.
???Delete a calendar entry after opening and reviewing it in the Event View screen.
98 Accompli 009 User???s Guide

Setting Calendar Preferences
. . . . .
To delete a calendar entry:
1Select the Calendar application from the Home screen.
2In Day View, highlight the event that you want to delete.
Note If you wish to delete an event that occurs on a different day, use the Jump to button from the toolbar to go to that date.
3 Select the Put in trash button from the toolbar.
To review and then delete an event:
1Select the Calendar application from the Home screen.
2In Day View, highlight the event that you want to delete.
Note If you wish to view, then delete, an event that occurs on a different day, use the Jump to button from the toolbar to go to that date.
3Select the View event button from the toolbar.
4Review the event and then select the Put in trash button from the toolbar. The Day View reappears without the event.
S E T T I N G C A L E N D A R P R E F E R E N C E S
Using Settings for Calendar you can select which calendar view you want to display as the default when you launch Calendar, as well as when events are removed from Calendar, when you want to receive reminders about events, and whether you want the alert to sound until read.
To set Calendar view preferences:
1Select the Calendar application from the Home screen.
2Select the Settings for Calendar button from the toolbar.
3In the Always open Calendar to field, choose a default view for Calendar.
4In the Remove events field, choose one of the following options for removing events from Calendar:
???After the event occurs
???1 week after the event occurs
???30 days after the event
???90 days after the event
Calendar 99

C h a p t e r 7 Using Common Accompli 009 Features with Calendar
5In the Reminder field, select the time in hours and minutes prior to the event that you want to receive an alert.
6If you want event reminders to continue to play until read, select the Beep until reminder is read option.
7Select the Save settings button to save your settings and return to a Calendar view.
U S I N G C O M M O N A C C O M P L I 0 0 9 F E A T U R E S W I T H C A L E N D A R
Calendar enables you to use a number of common features, including the following:
???Cut, copy, and paste event information to or from another event or another Accompli 009 PIM application.
???Insert text from another event or another Accompli 009 PIM application.
???Beam calendar events to other
???Restore deleted events from the Trashcan, if the Trashcan has not been emptied since the item was put in trash.
For more information about using these common Accompli 009 features, see Chapter 3, "Accompli 009 Features."
100 Accompli 009 User???s Guide
C H A P T E R 8
TASKS
Using Tasks, you can:
???Make a quick list of things you don't want to forget.
???Assign due dates and priorities to your tasks.
???Mark tasks as completed.
???Organize your tasks into categories for quick retrieval.
???Sort tasks by priority or due date.
C R E A T I N G A T A S K
Enter tasks to track things you need to do. You can organize your task list by assigning priorities and due dates to your tasks and classifying them by category.
To create a new task:
1Select the Tasks application from the Home screen.
2Select New Task.
3Type the task information in the New Task area.
4In the Category field, choose a category for the task.
TIP You can also create a new category for a task. See ???Using Categories??? on page 37 for more information.
5To make this a private task, select the Private check box.
6Choose a priority for the task.
7To assign a due date to the task, type the date in the Due date field.
TIP To remove a due date from a task, type none in the Due date field.
8If the task is already complete, select the Completed option.
9Select the Save task button from the toolbar to save the task and return to the main Tasks screen.
Tasks 101
C h a p t e r 8 Editing a Task
E D I T I N G A T A S K
Tasks can be updated as information changes. Use this procedure to edit a task.
To edit a task:
1Select the Tasks application from the Home screen.
2From the Category field, choose the category of the task that you want to edit.
3Using the NAVDISK, scroll through the list of tasks and highlight the task that you want to edit.
4Select the View task button from the toolbar.
5Select the Edit task button from the toolbar.
6Modify the task. You can also change the category of a task during editing.
7When you are finished, select the Save task button from the toolbar to save your changes and return to the main Tasks screen.
P R I O R I T I Z I N G T A S K S
You can assign any one of three priorities to your tasks:
High
Normal
Low
Priority and due date determine how tasks are listed on the main Tasks screen.
???If sorting by priority, all high priority tasks appear at the top of the screen followed by normal priority tasks, low priority tasks, and then completed tasks. Within each priority category, tasks are sorted by due date from sooner to later.
???If sorting by due date,
V I E W I N G A T A S K
You can quickly view the tasks that you have created from the main Tasks screen. The screen displays the tasks by category. As you change the category, the list box updates to display only the tasks for that category.
102 Accompli 009 User???s Guide
Marking a Task as Completed
. . . . .
To view a task:
1Select the Tasks application from the Home screen.
2From the Category field, choose the category of the task that you want to display. If you want to see all of the tasks that you have entered, change the category to All.
TIP When you start Tasks, the displayed category defaults to the category that was dis- played when you last exited Tasks.
3Using the NAVDISK, scroll through the list of tasks and highlight the task that you want to view.
4Select the View task button from the toolbar.
5When you are finished viewing the task, select the OK button from the toolbar to return to the main Tasks screen.
M A R K I N G A T A S K A S C O M P L E T E D
After you have completed a task, you can mark the task as completed. Completed tasks are displayed on the main Tasks screen after low priority tasks.
To mark a task as completed:
1Select the Tasks application from the Home screen.
2From the Category field, choose the category of the task that you want to display. If you want to see all of the tasks that you have entered, change the category to All.
TIP When you start Tasks, the displayed category defaults to the category that was dis- played when you last exited Tasks.
3Using the NAVDISK, scroll through the list of tasks and highlight the task that you want to mark as completed.
4Select the Check as completed button from the toolbar. A checkmark indicates that this task is completed.
TIP If a completed task is highlighted and you select the Check as completed button from the toolbar, the status icon changes back to the original priority status.
Tasks 103

C h a p t e r 8 Deleting Tasks
D E L E T I N G T A S K S
You can delete tasks from your Accompli 009 in any of the following ways.
???Delete a task directly from the main Tasks screen.
???Delete a task after opening and reviewing it in the View Tasks screen.
???Delete a task category and all of its corresponding task entries.
To delete tasks from the main Tasks screen:
1Select the Tasks application from the Home screen.
2From the Category field, choose the category of the task that you want to display. If you want to see all of the tasks that you have entered, change the category to All.
3Using the NAVDISK, scroll through the list of tasks and highlight the task that you want to delete.
4Select the Put in trash button from the toolbar.
5The main Tasks screen reappears without the task.
To review and then delete a task:
1Select the Tasks application from the Home screen.
2From the Category field, choose the category of the task that you want to display. If you want to see all of the tasks that you have entered, change the category to All.
3Using the NAVDISK, scroll through the list of tasks and highlight the task that you want to delete.
4Select the View tasks button from the toolbar.
5Review the task and then select the Put in trash button from the toolbar. The main Tasks screen reappears without the task.
To delete a task category and all of its tasks:
1Select the Tasks application from the Home screen.
2Select the Categories button from the toolbar.
3Using the NAVDISK, scroll through the list of categories and highlight the category that you want to delete. You cannot delete the General or Calls categories.
4Select the Delete category button from the toolbar. When the confirmation message box appears select Put in Trash.
104 Accompli 009 User???s Guide
Sorting Tasks
. . . . .
S O R T I N G T A S K S
Task Settings enables you to determine whether you want to display tasks by priority or by due date.
To specify task settings:
1Select the Tasks application from the Home screen.
2Select the Settings for Tasks button from the toolbar.
3Choose whether to display tasks by priority or by due date.
4Select the Save settings button from the toolbar to return to the main Tasks screen.
U S I N G C O M M O N A C C O M P L I 00 9 F E A T U R E S W I T H T A S K S
Tasks enables you to use a number of common features, including the following:
???Define new categories for organizing your tasks into logical groups.
???Cut, copy, and paste task information to or from another task or other Accompli 009 PIM application.
???Insert text from another task or another Accompli 009 PIM application.
???Beam tasks to another
???Restore deleted tasks from the Trashcan, if the Trashcan has not been emptied since the item was put in trash.
For more information about using these common features, see Chapter 3, "Accompli 009 Features."
Tasks 105

C h a p t e r 8 Using Common Accompli 009 Features with Tasks
106 Accompli 009 User???s Guide
C H A P T E R 9
MEMOS
Memos lets you easily compose and store notes that you want to have at hand. Using the Memos application, you can:
???Quickly take notes or record any type of information on your Accompli 009.
???Organize your memos into categories so that you can quickly locate
???Send a memo to other Accompli 009 users.
V I E W I N G A M E M O
The main screen displays the memos in the current category. As you change the category, the list box updates to display only the memos for that category.
To view a memo:
1Select the Memos application from the Home screen.
2From the Category field, choose the category of the memo that you want to display. If you want to see all of the memos that you have recorded, change the category to All.
TIP When you start Memos, the category defaults to the category that was displayed when you last exited Memos.
3Using the NAVDISK, scroll through the list of memos and highlight the memo that you want to view.
4Select the View memo button from the toolbar.
5When you are finished viewing the memo, select the OK button from the toolbar to display the main Memos screen.
C O M P O S I N G A N D E D I T I N G M E M O S
You create and edit memo entries in much the same way. The Edit Memo screen lets you compose or edit a memo, and assign it to a category. You can also include a subject for a memo if you choose.
Memos 107

C h a p t e r 9 Deleting Memos
To compose a new memo:
1Select the Memos application from the Home screen.
2Select New Memo.
3If you want to include a subject for the memo, type the subject text in the Subject field.
TIP Memos are sorted alphabetically by subject. Memos that do not contain a subject are sorted alphabetically by memo text.
4 In the Category field, choose a category for the memo.
TIP You can also create a new category for a memo. See ???Using Categories??? on page 37 for more information.
5To make this a private memo, select the Private check box.
6Type the text that you want to appear in the memo.
7Select the Save memo button from the toolbar to save the memo.
To edit a memo:
1Select the Memos application from the Home screen.
2From the Category field, choose the category of the memo that you want to edit.
3Using the NAVDISK, scroll through the list of memos and highlight the memo that you want to edit.
4Select the View memo button from the toolbar.
5Select the Edit memo button from the toolbar.
6Edit the memo. You can also change the category of a memo during editing.
7When you are finished, select the Save memo button from the toolbar to keep your changes.
D E L E T I N G M E M O S
You can delete memos from your Accompli 009 in any of the following ways:
???Delete a memo directly from the main Memos screen.
???Delete a memo entry after opening and reviewing it in the View Memos screen.
???Delete a memo category and all of its corresponding memo entries.
To delete memos from the main Memos screen:
1 Select the Memos application from the Home screen.
108 Accompli 009 User???s Guide
Using Common Accompli 009 Features with Memos
. . . . .
2From the Category field, choose the category of the memo that you want to display. If you want to see all of the memos that you have recorded, change the category to All.
3Using the NAVDISK, scroll through the list of memos and highlight the memo that you want to delete.
4Select the Put in trash button from the toolbar. The main Memos screen reappears without the memo.
To review and then delete a memo:
1Select the Memos application from the Home screen.
2From the Category field, choose the category of the memo that you want to display. If you want to see all of the memos that you have recorded, change the category to All.
3Using the NAVDISK, scroll through the list of memos and highlight the memo that you want to delete.
4Select the View memo button from the toolbar.
5Review the memo and then select the Put in trash button from the toolbar. The main Memos screen reappears without the memo.
To delete a memo category and all of its memos:
1Select the Memos application from the Home screen.
2Select the Categories button from the toolbar.
3Using the NAVDISK, scroll through the list of categories and highlight the category that you want to delete.
4Select the Delete category button from the toolbar and select Put in trash when the confirmation message box appears.
U S I N G C O M M O N A C C O M P L I 00 9 F E A T U R E S W I T H M E M O S
Memos enables you to use a number of common features, including the following:
???Define new categories for organizing your memos into logical groups.
???Cut, copy, and paste memo information to or from another memo or another Accompli 009 PIM application.
???Insert text from another memo or another Accompli 009 PIM application.
???Beam memo information to another
???Restore deleted memos from the Trashcan, if the Trashcan has not been emptied since the item was put in trash.
For more information about using these common features, see Chapter 3, "Accompli 009 Features."
Memos 109

C h a p t e r 9 Using Common Accompli 009 Features with Memos
110 Accompli 009 User???s Guide
C H A P T E R 1 0
RINGTONES
The Ringtones application provides you with a selection of basic and system alerts that you can use to personalize your message notification alerts and event reminders. In addition, Ringtones gives you the ability to compose your own custom alerts.
Using Ringtones, you can:
???Modify, add, or compose custom musical themes or other special effects using the powerful alert script language.
???Use different alerts for
???Activate standard and custom Ringtone alerts for use in other Accompli 009 applications.
???Share your Ringtone alerts with other Accompli 009 users.
A B O U T R I N G T O N E A L E R T S
Ringtone alerts consist of the following:
Basic alerts consist of both standard alerts provided by Motorola and custom alerts you compose.
Basic alerts can be turned on or off. When turned on, they are preceded by a dou- ble note icon.
You can edit, send, beam, or delete basic alerts.
Application alerts are associated with specific Accompli 009 applications, such as the Ship2Ship application.
You cannot edit application alerts; however, they can be deleted.
System alerts are built into certain Accompli 009 applications.
You cannot edit, send, beam, or delete system alerts.
P L A Y I N G R I N G T O N E A L E R T S
The Ringtones application provides basic and system alerts that you can use as message alerts or event reminders. You can sample Ringtone alerts before assigning them as alerts or reminders.
Ringtones 111

To play a Ringtone alert:
1Select the Ringtones application from the Home screen.
2Highlight the basic alert, application alert, or system alert that you want to sample.
3Select the Play alert button from the toolbar. After a few moments, the Ringtone alert plays.
TIP You can play alerts in Ringtones without turning them on. However, to activate alerts so that they are available in other applications, you must turn them on.
T U R N I N G R I N G T O N E A L E R T S O N A N D O F F
When you compose a new alert, or receive a custom alert from another Accompli 009, it is automatically installed in Ringtones with an alert status of OFF. To use the alert as an alert, you must first turn it ON in Ringtones.
To conserve memory, you should turn OFF unused alerts. Turning OFF an alert does not remove it from the device. The alert can be turned back on at any time.
To turn a Ringtone alert on or off:
1Select the Ringtones application from the Home screen.
2Highlight the name of the alert.
3Select the Turn on/off button from the toolbar to toggle the state of the alert. Alerts that are on are marked with a double note icon.
112 Accompli 009 User???s Guide

Composing or Editing Ringtone Alerts
. . . . .
C O M P O S I N G O R E D I T I N G R I N G T O N E A L E R T S
You can compose your own custom Ringtone alerts to use as message alerts or event reminders.
To compose an alert:
1Select the Ringtones application from the Home screen.
2To compose a new alert, select New Alert.
3In the Title field, type the name of the alert.
4Do one of the following:
???Using the NAVDISC, select the notes, octave, and note lengths for your alert. Pressing the NAVDISC left and right selects the note; pressing the NAVDISC up and down selects the note length. When the correct note, octave, and note length are displayed, press the SPACE key to hear the note or press the ENTER key to both hear the note and copy it to the notes text box below the piano keyboard.
???In the notes text box below the piano keyboard, type the alert script language symbols for your alert, using the alert codes in alert script language.
TIP To see a reference list of alert script language alert codes, select the Help button from the toolbar. For detailed information on how to write alerts with alert script language, see ???Using Alert Script Language??? on page 114.
5To sample your composed alert, select the Play alert button from the toolbar.
6When you are finished composing your alert, select the Save alert button from the toolbar to save your custom alert.
7Select the Exit screen button from the toolbar to exit the New Alert screen and return to the main Alerts screen. Your new custom alert should appear in the Alerts list.
8To play the new alert, highlight the name of the alert and select the Play alert button from the toolbar.
9To turn on your alert, highlight the name of the alert and select the Turn on/off button from the toolbar.
D E L E T I N G R I N G T O N E A L E R T S
You can remove basic and application alerts at any time. If the alert was being used as a message alert or event reminder, the Ring system alert is used in its place.
Be careful about deleting application alerts that were installed with
Ringtones 113
You cannot delete system alerts.
To delete a Ringtone alert:
1Select the Ringtones application from the Home screen.
2Highlight the alert you want to remove.
3Select the Put in trash button from the toolbar.
4Select the Exit screen button from the toolbar to return to the Home screen.
U S I N G A L E R T S C R I P T L A N G U A G E
Alert script language is a scripting language that allows you to compose alerts on your device. With alert script language, you can compose any alert where one note is being sounded at any one time. Just as the human voice can't produce two notes at the same time, your device can only play one note at a time.
Alert script language supports octaves, note values, rests, sharps, flats, and some special effects.
The Basics
To understand alert script language, think of a piano keyboard.
In alert script language, each note is represented by the corresponding
CDEFGABC
Formatting Your Alert Script Language Text
When you create an alert using alert script language, you can use spaces to improve the readability of the text. When your Accompli 009 plays an alert script language alert, it ignores all spaces.
Although the examples in this documentation use spaces to improve the readability, keep in mind that you don't have to use them when you create your own alerts.
Using Multiple Octaves
In alert script language, each octave is designated with a number from 1 to 8, for a total of eight octaves. The octave that starts with middle C has an octave number of 4. To use a note that is outside of the current octave, you must type the new octave number before the letter. When the device plays the alert, it will continue playing in the same octave until it encounters a different octave number.
If you do not specify an octave number at the beginning of your alert, the device will use octave number 5 by default.
114 Accompli 009 User???s Guide

Using Alert Script Language
. . . . .
To play the C scale starting with middle C and ending with the C above middle C, type the following:
4CDEFGAB 5C
To play the C scale starting with middle C, and then play the descending scale, type the following:
4CDEFGAB 5C 4BAGFEDC
Assigning Note Values
In music, notes have values that define how long the note should be sounded. The following table describes the note values supported by alert script language. When the device plays an alert, the notes are held for the length of time shown in the alert script language time value column.
Ringtones 115

To assign a value to a note, type the note value symbol after the letter for the note. When the device plays the alert, it will continue giving each note this new value until it encounters a different note value symbol.
Using Rests
Rests are periods of time in which no note is sounded. Rests have the same values as notes, as shown in the following table.
To add a rest, type an
Maximum Alert Lengths
Alerts written with alert script language cannot exceed 30 seconds. If you create an alert longer than 30 seconds and then try to play it, your device will not sound any notes.
To calculate an alert length, use the tables in the ???Assigning Note Values??? and ???Using Rests??? sections to sum up the time values for all notes and rests in your alert.
116 Accompli 009 User???s Guide

Using Alert Script Language
. . . . .
Adding Sharps, Flats, Naturals, and Accidentals
If an alert is written in any key other than C major or A minor, a key signature appears, defining which notes must be sharped (raised ?? step) or flatted (lowered ?? step) throughout the entire piece of music. A natural is a note that the key signature indicates should be sharped or flatted, but that should not be altered for that particular note.
An accidental is a note that should be sharped or flatted for a single note only. (In music, an accidental affects all occurrences of the same note within a measure. On the device, an accidental affects only one note.)
The following table describes how these elements are supported by alert script language.
If an alert changes key, the key signature also changes to indicate which notes (if any) are sharped or flatted for the new key. If you want to change keys with alert script language, you must enter new symbols to indicate which notes should be sharped or flatted. To indicate that a note should no longer be sharped or flatted, type an
Ringtones 117

Tempo
Tempo refers to the rate of speed that individual notes in an alert are played. In Ringtones, the default tempo is 120 quarter notes per minute. You can increase or decrease the tempo as appropriate for your alert.
Staccato and Legato
Staccato means that a note should have a slight break after it, before the next note is sounded. Legato means that the notes should be blended together. By default, the device plays all notes staccato.
To blend a series of notes together, place a
Volume
Alert script language allows you to assign nine levels of volume to notes, as shown in the following table. By default, the device plays notes at a volume level of 9.
Symbol Description
a1 - a9 Volume level from lowest to highest
+Increases volume one level (up to level 9)
-Decreases volume one level
To change the volume of an alert, place the volume symbol before the note for which you want to change the volume. You can use multiple + and - symbols to increase and decrease the volume multiple levels.
Note The volume level you set on the Home screen affects all alerts that do not include vol- ume control symbols. If you have included volume control symbols in your alert, the device will play them at that volume level, regardless of the volume level selected on the Home screen.
To play the entire C scale, increasing the volume on each ascending note, and decreasing the volume on each descending note, type the following:
a1 C +D +E +F +G +A +B +6C +C
In this example, the volume starts at level one, which is the softest level. The volume increases for each note until level 9 is reached on the second C in octave number 6. The volume then decreases for each note until level 1 is reached on the final C.
118 Accompli 009 User???s Guide
Using Alert Script Language
. . . . .
Special Effects
Alert script language allows you to add two special effects to your alerts: The red LED indicator on the front of the device and the vibration feature.
The following table describes how to turn these features off and on.
In the following example, the vibrator and LED special effects were added to The Blue Danube.
CCEGGh V Lr Ge lr v Re
V Lr Gh lr v V Lr Ee lr v Re
V Lr Eh lr v
In this example, the second, fourth, fifth, and seventh lines turn the vibrator on, turn the LED on, play the note, turn the LED off, and turn the vibrator off.
Ringtones 119
S A M P L E A L E R T S C R I P T L A N G U A G E A L E R T S
The following sample alerts are provided to give you practice using the alert script language.
The Blue Danube
4C C E G Gh
V Lr Ge lr v Re V Lr Gq lr v Rq V Lr Ee lr v Re V Lr Eq lr v Rq
Cq C E G Gh
V Lr Ge lr v Re V Lr Gq lr v Rq
V Lr Fe lr v Re V Lr Fq lr v Rq
DqDFAAwF#qG5Ew
Cq 4E Eh Dq Ah Gq C Ce Ce Cq
V Lr Cq lr v
The Entertainer
Ds E C4 Ae Bs G Rs 5Ds E C4 Ae Bs G Rs 4Ds E C3 Ae Bs A Ab Ge Re 5Gs Rs 4Ds D# Lr E 5lr Ce 4Es
Lr 5Ce 4Es lr 5Cq.
Lr Cs D D# lr E C D Ee
Lr 4Bs 5De Cq lr Rs5 Cs D D# E C D Ee Lr Cs lr DC
Lr E lr Cs D Ee Cs D C E C D Ee 4Bs 5D Rs C
Reveille
Lr Ds. G Bt. G lr Ds. B G Bt. G
Lr Ds. B G Bt. G lr Ds. Gs. Be. Gs.
Lr D G Bt. G lr Ds. B G Bt. G
Lr Ds. B G Bt. G lr Ds. D Lr Ge Re
120 Accompli 009 User???s Guide
Alert Script Language Quick Reference
. . . . .
Lr Bs. B B B Bt. lr B 6De.
5Lr Bs. G B G lr B Gt. G Be. Gs. Lr Bs B B B B lr 6De.
5Lr Bs. Gt. B6 Ds. lr 5Bt. G Ds. Lr D G lr
When the Saints Go Marching In
Lr 4Cs lr E Fs Lr Gq lr
Lr Cs lr E F Lr Gq lr
Lr Cs lr E F Lr Ge lr E Lr C lr E Lr Dq lr
Es E D Lr Ce. lr Cs Ee Gs G Lr Gs Fq lr
Lr Ct. lr Es Lr F Ge lr E Lr C lr D Lr C
A L E R T S C R I P T L A N G U A G E Q U I C K R E F E R E N C E
Use the following list of alert script language symbols when composing alerts.
Ringtones 121
122 Accompli 009 User???s Guide

C H A P T E R 1 1
ALARM CLOCK
Alarm Clock allows you to set, display, and manage up to three different alarms on your Accompli 009 to remind yourself of important activities or tasks that you need to perform.
Using Alarm Clock, you can:
???Set repeating
???Set daily alarms that remind you when to exercise, practice an instrument, or feed your pet.
???Set
???Specify different alert sounds for each of your alarms so that you can easily distinguish among them.
???Toggle your alarms on and off so that they are active only when you need them. A bell icon next to the alarm indicates it is on.
???Use your Accompli 009 as a travel alarm clock, complete with a snooze setting.
S E T T I N G A L A R M S
When you set new alarm clock entries, you name the alarm, specify the time of the alarm, set the frequency with which it occurs, and specify which alert the alarm should play.
To set a new alarm clock entry:
1Select the Alarm Clock application from the Home screen.
2Select the Alarm 1, Alarm 2, or Alarm 3 button from the toolbar to create the alarm.
3Toggle the alarm on or off by pressing the NAVDISK right or left.
4In the Subject field, type the name of the new alarm.
5In the Time field, either type the time for the alarm or use the NAVDISK to increment or decrement the default time, as appropriate.
6In the Occurs field, choose a frequency for the alarm.
7In the Alert field, choose the alert sound that you want the alarm to play.
8If you want the alarm to sound even if the device is in silent mode, vibrate mode, or in Quiet Time, select the Play regardless of volume level option.
9Select the Save settings button on the toolbar to save your new alarm entry.
Alarm Clock 123

C h a p t e r 11 Turning Alarms On and Off
To edit an alarm:
1Select the Alarm Clock application from the Home screen.
2Select the Alarm 1, Alarm 2, or Alarm 3 button from the toolbar, depending on which alarm entry you want to edit.
3Modify the alert as desired.
4When you are finished making changes, select the Save settings button from the toolbar.
T U R N I N G A L A R M S O N A N D O F F
Once you create an alarm, you can choose whether the alarm is on or off. This allows you to control the state of the alarm and determine whether it is played or not. For example, you may wish to turn off certain alarms while you are on vacation or out of town on business and turn them back on when your normal routine resumes.
To toggle an alarm on and off:
1Select the Alarm Clock application from the Home screen.
2Highlight the alarm icon whose state you want to toggle.
3Press ENTER to toggle the alarm on and off. When the alarm is on, a bell appears next to the alarm number. Otherwise, an ellipsis appears next to the alarm.
S E T T I N G A L A R M C L O C K O P T I O N S
Using Alarm Clock Settings, you can specify certain default values for the Alarm Clock application.
To change Alarm Clock settings:
1Select the Alarm Clock application from the Home screen.
2Select the Settings for Alarm Clock button from the toolbar.
3In the Alert plays field, choose how long you want alarms to play.
4In the Set snooze for minutes field, select the number of minutes that you want Alarm Clock to wait before repeating an alarm.
5Select the Save settings button from the toolbar.
124 Accompli 009 User???s Guide
About Alarm Sounding Mode
. . . . .
A B O U T A L A R M S O U N D I N G M O D E
Turn your Accompli 009 into a portable travel alarm clock by placing it in the desktop holder while you are using the Alarm Clock application.
When the alarm goes off, an alarm
To turn the alarm off:
1Press the NAVDISK left or right to choose from the following options:
???Turn off
???Snooze
2Press ENTER to perform the action.
Alarm Clock 125
126 Accompli 009 User???s Guide

C H A P T E R 1 2
CALCULATOR
Calculator is a desktop calculator application that enables you to perform basic arithmetical calculations.
Using Calculator, you can do the following:
???Perform basic addition, subtraction, multiplication, and division operations.
???Store and retrieve numbers from memory.
???Calculate tax and tip based on percentages you specify.
???Perform calculations using special formulas.
???Set preferences for how numbers should be displayed.
T H E C A L C U L A T O R S C R E E N
C A L C U L A T O R B U T T O N S
Use the following table to determine what action the calculator buttons perform.
Adds the next number you type to the current total
Subtracts the next number you type from the current total
Multiplies the next number you type by the previous number
Calculates the reciprocal of the dis- played number
Displays the result of multiplication as a percentage
Changes the sign of the displayed number
Calculator 127

C h a p t e r 1 2 Keyboard Shortcuts
Divides the next number you type into the previous number
Clears the calculation
Clears the displayed number
Converts the amount you enter to U.S. dollars based on the rate you enter in Calculator Settings
Calculates the tip for the current amount, based on the tip rate you enter in Calculator Settings
Performs any operation on the previ- ous two numbers
Clears the memory
Recalls (displays) the number stored in memory
Stores a number in memory. If a number is already stored in memory, this clears the memory and then stores the new number.
Adds the displayed number to a number already stored in memory
K E Y B O A R D S H O R T C U T S
If you'd rather use the keyboard keys on your device than select the buttons on the Calculator screen, use the following key equivalents.
p (plus) or ALT +
m (minus) or hyphen
d (divide) or /
t (times) or x
e (equal) or =
U S I N G C A L C U L A T O R
You can use Calculator to perform simple calculations, store values in memory that you want to reuse, or perform percent calculations. Calculator includes a tape area that displays your work.
128 Accompli 009 User???s Guide
About Formulas
. . . . .
To perform a simple calculation:
1Select the Calculator application from the Home screen.
2Type the first number in the calculation.
3Select the operator button for the calculation: + to add, - to subtract, x to multiply, or / to divide.
4Press the ENTER key, unless you used the keyboard shortcuts.
5Type the next number in the calculation.
6Type any remaining operators and numbers.
7Select the = button.
8Press the ENTER key.
A B O U T F O R M U L A S
Calculator includes several formulas that guide you through some typical calculations. These include the ability to determine:
???How to split a check, based on check amount and number of parties dividing the check
???A loan payment, based on loan amount, annual percentage rate, and term
???The purchase price of an item, based on its original cost, discount percentage, and sales tax
In addition, Calculator gives you the ability to manage the formulas that you use. For example, you can delete formulas that you do not use, or send formulas to other Accompli 009 users.
To perform an operation using a
1Select the Calculator application from the Home screen.
2Select the Insert formula button from the toolbar.
3From the Formula list, highlight the formula you want to use.
4Select the OK button from the toolbar.
5Respond to each of the prompts displayed in the tape area and press the ENTER key. When you are finished responding to the prompts, Calculator will perform the operation and display the results at the end of the tape.
To delete formulas:
1Select the Calculator application from the Home screen.
2Select the Formulas button from the toolbar.
3Select the formula that you want to delete.
4Select the Put in trash button from the toolbar.
Calculator 129

To send formulas to other Accompli 009 users:
1Select the Calculator application from the Home screen.
2Select the Formulas button from the toolbar.
3Select the formula that you want to send.
4Select Send. See ???Sending Messages??? for additional information.
S E T T I N G C A L C U L A T O R O P T I O N S
There are several options that enable you to customize how Calculator displays your work and to specify what percentage amounts to use when calculating tax and tip information.
To set Calculator preferences:
1Select the Calculator application from the Home screen.
2Select the Settings for Calculator button from the toolbar.
3In the Format field, choose whether you want Calculator to display numbers as currency.
4In the Number of decimal places field, type the number of decimal places to display when performing calculations.
TIP Currency automatically displays two decimal places.
5In the Exchange rate box, type the conversion rate you want Calculator to use when converting a particular amount to U.S. dollars.
6In the Tip % box, type the percent you want Calculator to use when calculating a tip amount.
7Select the Save settings button from the toolbar to save your preferences and return to the main Calculator screen.
130 Accompli 009 User???s Guide
C H A P T E R 1 3
CONTROL PANEL
The Control Panel application provides a variety of features that enable you to customize your Accompli 009 to suit your individual needs.
Using Control Panel, you can do the following:
???View version, operating system, and memory allocation information.
???Free up memory using
???Enable, disable, or temporarily suspend visual and audio alerts.
???Specify settings for accessories.
???Specify desktop synchronization and
Note The Accompli 009 is designed to synchronize with basic features of the initial release of many popular Personal Information Management (PIM) software and hardware prod- ucts.
???Customize the user interface to reflect your personal preferences.
???Create and maintain text entry shortcuts that make composing and replying to messages even faster and easier.
???Create an electronic business card, or vCard, that enables you to automatically exchange your personal contact information with other
???Secure the information on your messaging device using privacy options.
Control Panel 131

C h a p t e r 1 3 About Control Panel
A B O U T C O N T R O L P A N E L
Key Clicks
To select applications in Control Panel, press the TAB key to highlight the application, then press ENTER to open the application.
132 Accompli 009 User???s Guide

About Accompli
. . . . .
 A B O U T A C C O M P L I
The About Accompli feature enables you to view version, model, operating system, and copyright information
To view system information:
1Select Controls from the Home screen.
2Select the About Accompli icon from the Control Panel.
3Press the NAVDISK down to review a list of installed applications.
4When you are finished reviewing system information, select the Exit screen button from the toolbar to return to Control Panel.

 A L E R T S E T T I N G S
The Alert Settings feature enables you to select the default alert that you want to use for each application that plays alerts.
To enable/disable alert settings:
1Select Controls from the Home screen.
2Select the Alert Settings icon from the Control Panel.
3In the Volume level field, specify the default volume level for your device.
4Highlight the application for which you want to specify a default alert.
5Press the NAVDISK left or right to choose the alert you want to play.
6Select the Save settings button on the toolbar to set the default alerts.
A U T O T Y P E
AutoType saves you keystrokes when typing message text or other information by allowing you to type characters or abbreviations that are automatically replaced with other text as you type. You specify which applications can use AutoType entries.
To create an AutoType entry:
1Select Controls from the Home screen.
2Select the AutoType icon from the Control Panel.
3Select New AutoType Entry.
4In the Replace box, type the characters that you want to type to initiate an AutoType correction.
5In the With field, type the characters to appear in place of the shortcut characters.
6Select the Save settings button from the toolbar to save your AutoType entry and return to the Control Panel.
Control Panel 133

C h a p t e r 1 3 Battery Status
To specify which applications use AutoType entries:
1On the main AutoType entry list, select the Settings for AutoType button from the toolbar.
2Select one of the following options
???Enable AutoType entries in all applications.
???Enable AutoType entries in all applications except SMS.
???Do not enable AutoType entries in any application.
3Select the Save settings button from the toolbar to save your AutoType settings and return to the Control Panel.

 B A T T E R Y S T A T U S
The Battery Status feature enables you to view the percentage of battery power left in your battery. When the battery level drops below 20%, you will be notified of the low battery level and prompted to set the Battery Saving mode on. When the battery saving mode is on, the device conserves power by switching to discontinuous transmission, the LED status indicator is turned off, and automatic keypad lighting is disabled.
To view battery status:
1Select Controls from the Home screen.
2Select the Battery Status icon from the Control Panel to view the battery usage information on the device.
3Use the Battery Saving Mode toggle to turn the battery saving mode on or off.
4Select the OK button on the toolbar to return to Control Panel.
 B E A M I N G S E T T I N G S
Use the Beaming Settings feature to specify how many times you want your device to attempt to beam information to another compatible device.
To specify beaming settings:
1Select Controls from the Home screen.
2Select the Beaming Settings icon from the Control Panel.
3In the Number of times to retry field, press the NAVDISK left or right to increment or decrement the number of attempts.
4If you want a message
5Select the Save settings button from the toolbar.
134 Accompli 009 User???s Guide

. . . . .
 C L E A N - U P
If you are running low on memory, you can free up space on your device by running the
To run the
1Select Controls from the Home screen.
2Select the Clean Up icon from Control Panel.
3Select the OK button from the toolbar.

 D A T E A N D T I M E
The Date and Time feature enables you to set the current time and date on your messaging device, specify options for moving between time zones, and choose a format for displaying times and dates on your device.
To set the date and time:
1Select Controls from the Home screen.
2Select the Date and Time icon from Control Panel.
3In the Time field, type the current time or press the NAVDISK left or right to select the appropriate value.
4In the Date field, type the current date or press the NAVDISK left or right to select the appropriate value.
5Select the Settings for Date & Time button from the toolbar.
6In the Time format field, press NAVDISK left or right to toggle between AM/PM or 24 hour.
7In the Date format field, press NAVDISK left or right to cycle between one of the following date formats:
???Day/Month/Year (dd/mm/yyyy)
???Year/Month/day (yyyy/mm/dd)
???Month/Day/Year (mm/dd/yyyy)
8Select the Save settings button from the toolbar to return to the Date and Time main screen.
9Select the Save settings button to return to the Control Panel.

 D E L E T I N G A D D - O N A P P L I C A T I O N S
The Delete Applications feature enables you to remove unwanted applications from your Accompli 009.
Control Panel 135

C h a p t e r 1 3 Device Security
To delete applications from Accompli 009:
1Select Controls from the Home screen.
2Select the Delete Applications icon from Control Panel.
3Highlight the application that you want to delete.
4Select the Delete application button on the toolbar.
5When the confirmation
 D E V I C E S E C U R I T Y
The Device Security feature enables you to protect your Accompli 009 from unauthorized use by requiring entry of a four digit unlock code whenever your device is powered on or set to Device Locked mode. In addition, a Security code enables you to control access to the Unlock code.
To enable device security:
1Select Controls from the Home screen.
2Select the Device Security icon from Control Panel.
3Select the Automatic Device Lock option to require that an unlock code be entered whenever your device is powered on.
4Type information to identify you as the owner when device security is enabled. The information you type is displayed until the correct unlock code is entered.
5To change your unlock code, select the Change unlock code button from the toolbar.
6To change the Security code, select the Change security code button from the toolbar.
7To immediately lock your device, select the Lock now button from the toolbar.
TIP To enable the Device Lock feature directly from the Home screen, press ALT, then MENU.

 F O N T S I Z E S
You can choose to display all messages, memos, and tasks in one of three font sizes.
To select message font size:
1Select Controls from the Home screen.
2Select the Font sizes icon from Control Panel.
136 Accompli 009 User???s Guide

Home Screen Manager
3 In the Use this font to view items field, choose one of the following font examples:
. . . . .
12 pt Sample Text
4 Select the Save settings button from the toolbar to return to the Control Panel.
 H O M E S C R E E N M A N A G E R
The Home Screen Manager enables you to specify the order in which you want applications to appear on the Home screen. You can also assign hot keys to applications. Hot keys enable you to launch an application from the Home screen by simply pressing a number.
In addition, you can specify whether to use the Menu Wheel or Desktop format as your default Home screen.
To arrange applications on the Menu Wheel:
1Select Controls from the Home screen.
2Select the Home Screen Manager icon from the Control Panel. The applications appear, grouped in the order in which they appear on the Home screen.
3Highlight the application you want to move and select the Move app up or Move app down button from the toolbar, as applicable.
4To change the application???s hot key assignment, make certain the application is highlighted, then press the number key you want to assign.
5Repeat Steps 3 and 4 for any other applications that you want to move on the Home screen or assign hot keys.
TIP You can assign up to nine hot keys (???1??? - ???9???).
6Select the Settings for Home Screen button from the toolbar.
7Press the NAVDISK left or right to choose Menu Wheel or Desktop as your Home screen preference.
8Select the Save settings button from the toolbar to return to the Home Screen Manager main screen.
Control Panel 137

C h a p t e r 1 3 Key Clicks
9 Select Save Settings to accept your changes and return to the Control Panel screen.
 K E Y C L I C K S
Key Clicks enables you to turn on or off the audible keyboard clicks.
To set key clicks:
1Select Controls from the Home screen.
2Select the Key Clicks icon from the Control Panel.
3Press the NAVDISK left or right to toggle key clicks on and off.
4Select the Save settings button from the toolbar to save the settings and return to Control Panel.
 M E M O R Y M A N A G E R
The Memory Manager feature enables you to view the amount of used and available memory on your messaging device. Further, you can view how much memory is allocated to each application and application data. You can also delete certain applications from within Memory Manager.
You will receive warnings about low memory if memory is less than 150K. If available memory falls below 75K, an emergency cleanup occurs, including emptying Trashcan.
Note The memory usage level refers to persistent flash storage (analogous to the hard drive on your PC) rather than volatile memory (RAM).
To view memory usage:
1Select Controls from the Home screen.
2Select the Memory Manager icon from the Control Panel to view the used and available memory on the device.
3Select the Details button on the toolbar to view the amount of memory used by each application and by application data.
4Select the OK button from the toolbar.
5Select the Total memory button from the toolbar to view the amount of user memory, reserved memory, and random access memory (RAM) allocated on the device.
6When you are finished viewing memory information, select the OK button on the toolbar to return to Control Panel.
138 Accompli 009 User???s Guide

Owner Information
. . . . .
To delete applications from the Memory Usage screen:
1From the Details screen, highlight the application that you want to delete. Applications that are eligible for deletion are preceded by a dot.
2Select the Delete application button on the toolbar.
3When the confirmation
4Select the OK button on the toolbar to return to the Memory Manager screen.
5Select the Exit screen button on the toolbar to return to the Control Panel.

 O W N E R I N F O R M A T I O N
The Owner Information feature lets you to enter your personal contact information into your messaging device.
Think of your owner information as an electronic business card, or vCard, that automates the exchange of personal information typically found on a traditional business card.
You can beam your owner information to other Accompli 009 devices, compatible
Note You cannot synchronize your owner information with your other contacts when using the Desktop synchronization software.
To enter owner information:
1Select Controls from the Home screen.
2Select the Owner Information icon from Control Panel.
3Type your first name, last name, company name, and title in the appropriate fields.
4To make your personal information private, select the Private check box.
5(Optional) Enter the following personal information:
???Main, work, home, mobile, and alternate phone numbers
???Main, work, home, alternate, and other email addresses
???Device type and wireless address
???Home and work fax number
???Work and home addresses
???Up to four additional pieces of information
6To record notes, select the Notes button from the toolbar.
Control Panel 139
C h a p t e r 1 3 Phone Setup
7When you are finished entering your owner information, select the Save contact button from the toolbar.
P H O N E S E T U P
Phone Setup enables you to set a number of preferences that enable you to control how the Phone application works. These preferences include:
???Selecting a network
???Specifying call forwarding options
???Specifying call barring options
???Resetting phone options to original settings
Phone Setup
Phone Setup enables you to switch between two phone lines, specify which phone format to use, indicate whether to use call waiting, edit your voicemail phone number, and decide whether to use caller ID.
See ???Setting Phone Preferences??? on page 67 for
Network Selection
Network Selection enables you to register with an available GSM network, select an appropriate network band, locate and register with new networks, specify a preferred network, and set network preferences.
See ???Network Selection??? on page 69 for
Call Forwarding Options
Call Forwarding is a network feature. If your phone is unavailable, or you do not wish to receive incoming calls, incoming calls can be forwarded to other phone numbers. You can set call forwarding options for voice calls, incoming fax calls, and data calls.
See ???Call Forwarding??? on page 71 for
Call Barring Options
Call Barring is a network feature that can be used to selectively block outgoing and incoming calls.
See ???Call Barring??? on page 72 for
140 Accompli 009 User???s Guide
Printer Setup
. . . . .
Master Reset
The Master Reset option enables you to set certain phone options to their original settings.
This option should be used with caution. Any changes you have made to your phone configuration will be lost.
To restore the default phone settings:
1Select Controls from the Home screen.
2Select the Master Reset icon from the Control Panel.
3Select the Master Reset button from the toolbar.
Select the OK button from the toolbar to return to the Control Panel.
 P R I N T E R S E T U P
You can print messages, memos, tasks, contact information, and other information to compatible printers that support infrared (IR) beaming.
Use the Printer Selection feature to specify a default
To specify printer settings:
1Select Controls from the Home screen.
2Select the Printer Selection icon from the Control Panel.
3Select a default printer.
4Select the Save settings button on the toolbar.
 P R I V A C Y O P T I O N S
In many of the Accompli 009 applications, you can mark individual entries as private. You can then control whether the private entries are visible or hidden using Privacy Options.
To set privacy options:
1Select Controls from the Home screen.
2Select the Privacy Options icon from the Control Panel.
3Do one of the following:
???To make all entries that are marked private visible and accessible, choose Show.
???To hide all items marked private, choose Hide.
4Select the Save settings button from the toolbar.
Control Panel 141

C h a p t e r 1 3 Quick Text
To set a privacy password:
1Select Controls from the Home screen.
2Select the Privacy Options icon from the Control Panel.
3Select the Change password button from the toolbar.
4In the Old box, type your previous password, if applicable.
5In the New box, type a new password.
6In the Confirm new box, retype the new password.
7Select the Save changes button from the toolbar to return to the Privacy screen.
8Select the Save settings button from the toolbar to save your settings and return to the Control Panel.
 Q U I C K T E X T
Quick Text enables you to create and store frequently used text. You can then insert that text when you are creating a message, replying to a message, or typing notes.
Quick Text entries are available whenever you compose a message or select the Insert text toolbar button.
To create a new Quick Text entry:
1Select Controls from the Home screen.
2Select the Quick Text icon from the Control Panel.
3Select New Quick Text.
4Type your new Quick Text entry.
5If you want to make the Quick Text entry available for use when replying to messages, select the Also use as a reply option.
6Select the Save entry button from the toolbar to save your Quick Text entry and return to the Control Panel.
To edit a Quick Text entry:
1Select Controls from the Home screen.
2Select the Quick Text icon from the Control Panel.
3Highlight the Quick Text entry you want to modify and select the Edit entry button from the toolbar.
4Change the text and the reply option as desired.
5Select the Save entry button from the toolbar to save your changes and return to the Control Panel.
142 Accompli 009 User???s Guide
Quiet Time
. . . . .
 Q U I E T T I M E
The Quiet Time feature lets you specify daily time periods during which message alerts and Alarm Clock alarms will not be played. During Quiet Time, the volume level is set to Silent.
Note Quiet Time settings are overridden by the alert options you set in Message Rules. Whether you are notified of messages received and stored during Quiet Time also depends on the preferences you specify in Settings for messages in the SMS applica- tion.
To enable/disable Quiet Time settings:
1Select Controls from the Home screen.
2Select the Quiet Time icon from the Control Panel.
3Toggle the Quiet Time settings on or off by pressing the NAVDISK left or right.
4In the Start time and End time fields, type the beginning time and ending time for the Quiet Time period.
5Select the Save settings button on the toolbar to return to the Control Panel.

 S E R V I C E P R O V I D E R
The Accompli 009 supports up to 10 Service Providers. Use the Service Provider option to record information about your Service Provider. This information is required before you can use the Email or WAP Browser applications.
In addition, you can configure settings to determine which services to use when making data calls.
To enter a new CSD or GPRS provider:
1Select Controls from the Home screen.
2Select the Service Providers icon from the Control Panel.
3Select either New CSD Provider or New GPRS Provider, as appropriate.
4If you want this to be your default provider, select the Default Provider option.
5Type the name of your Internet Service Provider.
6Type the phone number or Access Point Name (APN) number of the Service Provider. You can obtain this information from your Internet Service Provider.
7Type your user name, if necessary.
8Type your password, if necessary.
9Select the Save button from the toolbar.
Control Panel 143

C h a p t e r 1 3 Signature
10Type the primary and secondary DNS IP addresses in the appropriate boxes. You can obtain this information from your Internet Service Provider.
11Select the Save button from the toolbar.
To set data call settings:
1Select Controls from the Home screen.
2Select the Service Providers icon from the Control Panel.
3Select the Data Call Settings button from the toolbar.
4In the Using box, choose one of the following options:
???GPRS only, if you always want to use GPRS when it is available
???CSD only, if you only want to use CSD, even if GPRS is available
???GPRS or CSD, if you want to choose when you connect.
5Select the OK button from the toolbar to save your settings.
 S I G N A T U R E
Signature enables you to create a signature that is automatically appended to each message you send.
To create a signature:
1Select Controls from the Home screen.
2Select the Signature icon from the Control Panel.
3Type your message signature in the Signature text field.
4To automatically add your signature to each message you send, select the Automatically include signature when composing messages option.
5Select the Save settings button on the toolbar to save your changes and return to the Control Panel.
 T R U E S Y N C A N D P A R T N E R S E T T I N G S
The Accompli 009 is designed to synchronize with basic features of many popular Personal Information Management (PIM) software and hardware products. If you installed the Desktop applications that shipped with the Accompli 009 CD, make certain that you review TrueSync and Partner Settings in Control Panel. The TrueSync?? software applications enable you to synchronize PIM information on your Accompli 009 with your PC desktop applications.
Using TryeSync and Partner Settings, you can require that a password be entered on your messaging device before synchronization begins. This helps prevent the desktop application from synchronizing with your device without your intervention.
144 Accompli 009 User???s Guide

Transmit Status
. . . . .
To set synchronization settings:
1Select Controls from the Home screen.
2Select the TrueSync and Partner Settings icon from Control Panel.
3To require password entry on the device prior to synchronization, select the Prompt for password when communicating with desktop option.
4Select the Change password button from the toolbar.
5In the New password field, type a password.
6In the Confirm new password field, retype the password.
7Select the Save settings button on the toolbar to save your changes. Select Save settings button again to return to the Control Panel. You will be prompted for your password when the PC desktop application attempts to synchronize with your Accompli 009.
 T R A N S M I T S T A T U S
The Transmit Status feature enables you to set your device to the proper transmission mode before attempting to send or receive messages.
To set the transmission mode:
1Select Controls from the Home screen.
2Select the Transmit Status icon from Control Panel.
3Select one of the following signal modes for message transmission:
4Select the Save settings button from the toolbar to save your settings and return to the Control Panel.
Control Panel 145

C h a p t e r 1 3 Transmit Status
146 Accompli 009 User???s Guide

C H A P T E R 1 4
You can???t always be in your office, but you can always have access to your email with the Accompli 009.
The Email application includes the following features:
???Advanced configuration options
???Multiple account management
???Folders for ease of organization
???Rules to help you control how messages are downloaded and displayed
S E T T I N G S E R V I C E P R O V I D E R I N F O R M A T I O N
Before you can use the Email application, you must make certain that your CSD or GPRS Service Provider information is set up correctly.
For
S E T T I N G U P E M A I L
You have the ability to set up and store as many as 12 separate email accounts. To set up the accounts, there are certain things you will need to know about your network service. This information can be obtained from your network Service Provider.
To set up a new account:
1Select the Email application from the Home screen.
2Select the Add account button from the toolbar.
3Type the name of the email account in the Account name field. This is usually the part of your email address that appears to the left of the @ symbol.
4In the Sender name field, type the ???friendly??? name associated with this account. This is the name that will appear in the From field when you send an email.
5In the email address field, type the address that others will use when sending mail to this account. The address should be in the format of name@company.com. For example, JSmith@motorola.com.
6Select the Save changes button from the toolbar.
7In the Login name box, type your account name. This is usually the part of your email address that appears to the left of the @ symbol.
Email 147

C h a p t e r 1 4 Setting Up Email
8In the POP server field, type the POP server IP address. This can be obtained from your email service provider.
9In the SMTP server field, type the SMTP server IP address, also obtained from your email service provider.
10Select the Save changes button from the toolbar.
11Type the password you use to access this account.
Note Passwords are case sensitive and cannot include special characters, such as those found in the Symbol Table.
12In the Confirm box, retype the password. Note that passwords are
13Select the Save changes button from the toolbar.
To specify settings for downloading:
1Select the Email application from the Home screen.
2Highlight the account for which you want to specify download settings.
3Select the Edit account settings button from the toolbar.
4Select the Settings for downloading button from the toolbar.
5Set the maximum size message that can be downloaded. The default is 2000 out of a maximum of 30000 bytes.
6Use the spin box to select the action to take after messages are downloaded.
7Use the spin box to select an alert to play after messages are downloaded.
8Select the Save changes button from the toolbar.
To set up server ports:
1Select the Email application from the Home screen.
2Highlight the account for which you want to specify advanced settings.
3Select the Edit account settings button from the toolbar.
4Select the Server ports button from the toolbar.
5In the POP3 server port field, type in the number for your server port. This number is usually 110.
148 Accompli 009 User???s Guide
Managing Accounts
. . . . .
6In the SMTP server port field, type in the number for your server port. This number is usually 25.
7Select Save changes twice from the toolbar to return to the email Accounts screen.
M A N A G I N G A C C O U N T S
Once you have set up your accounts, you may find that you need to occasionally make changes to them or remove them from your device. These things can be done in the Email application.
To edit an account:
1Select the Email application from the Home screen.
2Highlight the account you wish to edit.
3Select the Edit account settings button from the toolbar.
4Make your changes in the account settings fields.
5Select Save changes from the toolbar.
To delete an account:
1Select the Email application from the Home screen.
2Highlight the account you wish to delete.
3Select Delete account from the toolbar.
4Confirm your decision to delete the account by selecting Yes.
W O R K I N G W I T H E M A I L
Once your accounts have been set up in the Email application, you can begin accessing and working with your email in these accounts, including sending email directly from your device.
To download and transfer email:
1Select the Email application from the Home screen.
2Select the Send and receive button from the toolbar.
This opens an active connection, sends any unsent email messages and downloads all new email to the highlighted account.
Email 149

C h a p t e r 1 4 Reading Email
To access accounts:
1Select the Email application from the Home screen.
2Highlight the account you wish to access.
3Select the View button from the toolbar.
The main screen for this account lists information about your access of the account. The date and time of the most recent access appears on the first line. If more than a week has elapsed since the last time you accessed the account, only the date displays.
R E A D I N G E M A I L
To read an email message from the Inbox:
1Select the Email application from the Home screen.
2Highlight the account you wish to access.
3Select the View button from the toolbar.
4Highlight the Inbox.
5Select the View messages button from the toolbar.
6Using the NAVDISK, scroll to the email message you wish to read.
7Select the View message button from the toolbar.
To read and reply to an email message:
1Select the Email application from the Home screen.
2Highlight the account you wish to access.
3Select the View messages button from the toolbar.
4Highlight the Inbox.
5Select the View button from the toolbar.
6Using the NAVDISK, scroll to the email message you wish to read and reply to.
7Select the View message button from the toolbar.
8Select Reply from the toolbar.
9Using the NAVDISK, choose a Reply option:
150 Accompli 009 User???s Guide
Reading Email
. . . . .
Reply to all with his- tory
Addresses the new email to all addresses contained in the To: and CC: fields of the original email, and includes the body of the original email in the new mail.
10Once you have chosen the reply option, type in the body of the email.
11Select the Send to outbox button from the toolbar.
12From the email folders screen, highlight the Email Outbox and press ENTER.
13To retrieve mail from the current email account and then send the messages in the Email Outbox, select the Send and receive button from the toolbar. Otherwise, select the Send only button from the toolbar to send all messages queued in the outbox.
To view and forward an email message:
1Select the Email application from the Home screen.
2Highlight the account you wish to access.
3Select the View button from the toolbar.
4Highlight the Inbox.
5Select the View button from the toolbar.
6Using the NAVDISK, scroll to the email message you wish to forward.
7Select the Forward button from the toolbar.
8Select a recipient from the Send Email To list. If the recipient does not appear in the list, select New Contact to add them to Contacts or select
9Select the OK button from the toolbar.
10From the email folders screen, highlight the Email Outbox and press ENTER.
11To retrieve mail from the current email account and then send the messages in the Email Outbox, select the Send and receive button from the toolbar. Otherwise, select the Send only button from the toolbar to send all messages queued in the outbox.
To delete an email message:
1Select the Email application from the Home screen.
2Highlight the account you wish to access.
3Select the View button from the toolbar.
4Highlight the Inbox.
Email 151

C h a p t e r 1 4 Writing Email
5Select the View messages button from the toolbar.
6Using the NAVDISK, scroll to the email message you wish to delete.
7Select the Put in trash button from the toolbar.
W R I T I N G E M A I L
To write a new email message:
1Select the Email application from the Home screen.
2Highlight the account you wish to send the email message from.
3Select the View button from the toolbar.
4Select the Write new message button from the toolbar.
5Using the NAVDISK, scroll to the contact you wish to send the email message to.
Note If the intended recipient is not an existing contact, you can select New Contact and enter their information here.
6Select the
7Repeat steps 5 and 6 for any additional recipients.
8Select the OK button from the toolbar.
9Type in your email message with subject and body.
10Select the Send to outbox button from the toolbar.
11Select Email Outbox.
12If you want messages from your POP3 email account forwarded to your device while you are sending messages from your Email Outbox, select the Send and receive button from the toolbar. Otherwise, select the Send button from the toolbar.
To save an email message as a draft:
Note email drafts are stored in the email Drafts system folder of each account. You will need to readdress the email message before sending it to the Email Outbox.
1Compose a message as described in steps
2Select the Save to drafts button from the toolbar.
To send a carbon copy of the email message:
1Compose a message as described in steps
2Select the Carbon copy to button from the toolbar.
152 Accompli 009 User???s Guide
Writing Email
3Using the NAVDISK, scroll to the contact you wish to send a carbon copy of the email message to.
Note If the intended recipient is not an existing contact, you can select New Contact and enter their information here.
. . . . .
4Select the
5Repeat steps 3 and 4 for any additional recipients.
6Select OK.
7Type in your email message.
8Select the Send to outbox button from the toolbar.
9Select Email Outbox.
10If you want messages from your POP3 email account forwarded to your device while you are sending messages from your Email Outbox, select the Send and receive button from the toolbar. Otherwise, select the Send button from the toolbar.
To send a blind carbon copy of an email message:
1Compose a message as described in steps
2Select the Blind carbon copy to button from the toolbar.
3Using the NAVDISK, scroll to the contact you wish to send a blind carbon copy of the email message to.
Note If the intended recipient is not a contact, you can select New Contact and enter their information here.
4Select the
5Repeat steps 3 and 4 for any additional recipients.
6Select OK.
7Select the Send to outbox button from the toolbar.
8Select Email Outbox.
9If you want messages from your POP3 email account forwarded to your device while you are sending messages from your Email Outbox, select the Send and receive button from the toolbar. Otherwise, select the Send button from the toolbar.
Email 153

C h a p t e r 1 4 Email Folders
E M A I L F O L D E R S
Using email folders, you can better manage your email accounts and the messages contained within them. There are several
To create a folder in an email account:
1Select the Email application from the Home screen.
2Highlight the account you wish to access.
3Select the View button from the toolbar.
4Select the New folder button from the toolbar.
5Type the name of the new folder.
6If you wish to mark the new folder as private, select the Privacy option.
7Using the spin box, make a selection for how you would like to store the messages placed in this folder:
8 Select the Save changes button from the toolbar.
To read an email message from a folder:
1Select the Email application from the Home screen.
2Highlight the account you wish to access.
3Select the View button from the toolbar.
4Highlight the folder.
5Select the View messages button from the toolbar.
6Using the NAVDISK, scroll to the email message you wish to read.
7Select the View messages button from the toolbar.
To edit a folder:
1Select the Email application from the Home screen.
2Highlight the account you wish to access.
3Select the View button from the toolbar.
4Using the NAVDISK, scroll to the folder you wish to edit.
5Select the Edit folder button from the toolbar.
154 Accompli 009 User???s Guide
Email Folders
. . . . .
6Specify the new name or storage options for the folder.
7Select the Save changes button from the toolbar.
To delete a folder:
1Select the Email application from the Home screen.
2Highlight the account you wish to access.
3Select the View button from the toolbar.
4Using the NAVDISK, scroll to the folder you wish to delete.
5Select the Delete folder button from the toolbar.
Email 155

C h a p t e r 1 4 Email Folders
156 Accompli 009 User???s Guide

C H A P T E R 1 5
ENTERTAINMENT
Your Accompli 009 Personal Communicator comes with a variety of games to entertain you and help you become familiar with navigating your device. This chapter includes information about playing the following games:
???NitroMan
???Phinny
???SameGame
???Ship2Ship
???Mines
???Draw 21
 N I T R O M A N
Now you can enjoy the challenge and excitement of a classic arcade game anytime, anywhere you carry your Accompli 009 wireless device.
Object of the Game
Help NitroMan move through a series of
Playing the Game
You control NitroMan by pressing the NAVDISK in the direction that you want him to move. When game play begins, NitroMan has three lives. But be careful; the alien enemies are after him and if they contact him, NitroMan can lose a life. When NitroMan eats a larger power pellet, the aliens turn blue and NitroMan can consume them for extra points.
NitroMan must consume all of the pellets in the maze to proceed to the next level.
To start playing:
1Select the Play button from the main NitroMan screen.
2Press the NAVDISK in the direction that you want NitroMan to move.
Entertainment 157

C h a p t e r 1 5 Phinny
Keeping Score
Each object has the following point values:
Turning Game Sounds On/Off
Game Settings enable you to choose whether the NitroMan sounds are audible.
Note If you turn game sounds on, but your device is set to vibe or silent mode, no sounds will play.
To turn game sounds on/off:
1Select the Settings button from the main NitroMan screen.
2Select On or Off and then select the Save changes button from the toolbar.
Control Keys
You can use the following control keys during game play:
PPauses the game. Press any other key to exit Pause.


 P H I N N Y
What do you get when you have a phish out of water, bombs, cows, brick walls, water pipes, and 18 different puzzles to solve? Phinny the phish and his wet and wild adventures!
Phinny???s life is held in a delicate balance as he sets out on a journey to get back to his phish bowl. Can Phinny phind his way through the tall grass, woods and escape the perils of a firing range? It???s an anything goes game of phish you???ll be hooked on.
158 Accompli 009 User???s Guide
Phinny
. . . . .
Object of the Game
The object of each puzzle is to help Phinny phind his phish bowl before he???s phried. But beware, its no easy task as he dodges explosive rockets, flying arrows, and charging bulls in his quest for home.
For more clues on how to play, read ???A Phish Tale??? on page 160
Choosing a Puzzle
As a beginner, you???ll play the Meet Phinny puzzle first. After you???ve successfully solved the Meet Phinny puzzle, you can choose another puzzle to solve. Puzzles that you have beaten are displayed as empty fishbowls.
To choose a puzzle:
1Select Play from the Phinny main menu.
2Press the NAVDISK in any direction to choose a puzzle. The name of the puzzle appears in the status bar at the bottom of the device screen.
3Press the ENTER key to select the highlighted puzzle.
4Press the NAVDISK in the direction that you want Phinny to move.
Viewing Puzzle Menu Options
During game play, press the MENU key to display the following menu options:
???
???Restart
???Choose a
???
???
Entertainment 159

C h a p t e r 1 5 Phinny
A Phish Tale
Once upon a time, there was a phish  named Phinny. Phinny was a phish out of water and he needed help getting back to his phish bowl
  .
.
On his quest for home, Phinny dodged rockets  and arrows
  that threatened to phry him. Phinny used other rockets and arrows to destroy trees
 in his path. He also phound bombs
  and explosive rockets useful for destroying brick walls
  .
.
When Phinny got phamished, he set out to phind phish phood  for more energy.
At one point, Phinny noticed cows  following him. One of the tipped cows phood.
following him. Phinny tipped the cows and they quit was hit by a flying arrow and Phinny ate it for
Phinny also noticed a bull  , but thankfully he was careful to stay out of the bulls line of sight to keep from being phlattened.
When Phinny became phearful of phalling in a hole  , he pushed a rock into the hole
  to fill it up. He would have used a marble
  , but he couldn???t push the marble through the tall grass
  .
.
Just when Phinny thought he was almost home safely, he discovered his phish bowl was empty . Phinny thought for a minute. Then it clicked. He decided to phill the bowl using a water pipe . But, the water pipe was broken and the valve had been shut off. ???No problem,??? Phinny thought, ???I???ll just push a fixed pipe over the leaky pipe . , open the closed
valve , and the water will flow again.???
???Phinally!??? Phinny cried as he splashed into his bowl, safe and
160 Accompli 009 User???s Guide
SameGame
. . . . .
 S A M E G A M E
SameGame is a
Object of the game
The object of SameGame is to accumulate the highest score. You earn points when you eliminate a cluster; you get bonus points for larger clusters (4 points for a cluster of three, say, but 44 points for a cluster of eight).
Game board
The game board has two sections:
???
???Status
Game keys
Use the following keys for game play:
???
???New
???Resume
???
???
Entertainment 161

C h a p t e r 1 5 SameGame
Game play
A new game begins with five different types of items (for example, spheres or colored blocks in five different colors) randomly populating the whole grid. Play is as follows:
1In the grid, look for two or more of the same type of item in a cluster. A cluster is any number of matching items that touch each other horizontally or vertically.
2Use the NAVDISK to move the highlight to any item in the cluster.
3Press Enter once to select the whole cluster. The status bar shows the point value for the cluster.
4Press Enter a second time to eliminate the highlighted cluster (To cancel your selection without eliminating the cluster, move the highlight to a different spot on the grid.)
When a cluster is highlighted, the status bar displays the point value of that cluster; with no cluster highlighted, the status bar displays your point total for this game.
If you clear the grid, or when there are no more clusters in the grid, the game automatically ends. The status bar displays ???Game Over??? and your score.
If your score falls within the top five, a New High Score
To set SameGame preferences:
1Press the MENU key to display the menu options.
2Press the NAVDISK down and select Settings.
3Press the NAVDISK left or right to select a game style.
4Select the Save button from the toolbar to save your changes.
5Resume play as described above.
Hint: Eliminating clusters from rows toward the bottom (as well as eliminating whole col- umns) causes the most rearrangement of items, and thus has the greatest potential for creating new clusters.
162 Accompli 009 User???s Guide
Ship2Ship
. . . . .
 S H I P 2 S H I P
Ship2Ship is a game of naval warfare.
Object of the Game
The object of the game is to sink your opponent's ships. Shots that miss appear as O's on the grid; shots that hit a ship appear as X's.
The game is played on an 8x8 grid on which you and your opponent place your battleships. A battleship is four cells long, therefore four hits are required to sink it.
If playing against your device, you always get the first turn. In an
During
Online help, available by selecting the Help toolbar button, provides information on how to play, as well as tactical suggestions.
Selecting your opponent
You can play against your device or issue a challenge to anyone in your opponent list. To add a contact to your opponent list, select New Opponent. From the Choose New Opponent screen, select a contact who has a
Variations of the game
There are two play modes from which you can choose:
Standard ??? In a standard game, you can play against the device or
Salvo ??? This version differs from the standard game in that each player takes four shots per turn. All four shots must be made before the results are known.
Starting a game
After you've selected an opponent, position your ships on the 8x8 grid. Your opponent is unable to see where you place your ships, just as you are unable to see your opponent's ships.
Entertainment 163

C h a p t e r 1 5 Ship2Ship
The TAB key moves the focus between your grid, the Fire! button, the New Game button, and the Surrendr button. Use the NAVDISK to move your ship on the 8x8 grid. Use 'R' to rotate the ship 90 degrees. When you've decided where you want to place your ship, press the ENTER key to fix the ship permanently. In
Note When placing your ships in a
Other buttons on the menu bar are Help, Won/Lost, Done, and Resend. Help provides a synopsis of the game and its rules. Won/Lost provides information about your record against an opponent. Done returns you to the Select Opponent screen. Resend appears if you're playing an OTA game; it resends your last shot or challenge to the selected OTA opponent.
Once you've placed your ship, one of the following events will occur:
???If you're playing against your device, you can fire.
???If you're playing an OTA game, a challenge will automatically be issued to the selected opponent.
???To fire, press TAB until the cursor appears in your opponent's grid, position the cursor with the NAVDISC, then do one of the following:
???Press the ENTER key, or
???Tab to the Fire! button and press the ENTER key.
In
Note After you fire once at your OTA opponent, the status bar displays a message indicating the current and total allotted shots. (Recall that after you lose one or more ships, your allotment of shots decreases.) For example, if you've lost a cruiser and you've fired twice, the status bar would read "Fire 2 of 3."
If you're losing badly and don't wish to wait for the inevitable, you can surrender by choosing the Surrender button. You can also choose the New Game button to start a new game.
After the game is over, you'll get a summary of your victory or defeat.
164 Accompli 009 User???s Guide

Mines 2001
. . . . .
OTA games and interrupted games
After issuing a challenge in an OTA game, you are immediately taken to the Select Opponent screen. The status of current games and
You do not have to remain on a game screen in order to play the game. You can use your device for any other activity while playing Ship2Ship. It does not interfere with sending or receiving other messages, nor does it prevent you from using other applications.
Note For Ship2Ship, the global volume preference is obeyed.
You can carry on multiple OTA games simultaneously. The Select Opponent screen keeps track of all the current games.
M I N E S 2 0 0 1
Mines is a
Object of the Game
The object of the game is to uncover all the safe squares on the mine field as quickly as possible without uncovering any mines.
Rules of the game
The Mines game consists of a status bar, a button bar, a minefield, a timer, and an icon that indicates when the game is over. In addition, a mine counter indicates how many mines are left to be flagged.
The mine field consists of 104 squares. Each square may or may not contain a mine. It a square doesn't contain a mine, it is referred to as a safe square.
If you uncover a mine, all the mines appear on the minefield, and you lose the game.
Entertainment 165

C h a p t e r 1 5 Mines 2001
If you uncover a safe square, one of the following occurs:
???A number appears on the square specifying how many mines are in the eight squares surrounding the numbered square, or
???If the square is part of a safe zone, all the squares in the safe zone are automatically uncovered and all the numbered squares bordering the safe zone are also uncovered.
To help identify the safe squares, you can do one of the following to the squares you think might contain a mine:
???
 Flag it, which places a flag in the square and decreases the mine counter by one, or
???
 Mark it with a question mark, which does not affect the mine counter.
Note If you flag a square, the game does not indicate whether or not you have correctly identified a square that contains a mine.
If you uncover all safe squares without uncovering a mine, you win the game.
If you win the game in a shorter amount of time that you have won before, a message appears congratulating you on your New Personal Best time, and the time is added to the Best Times list.
Playing the game
To start a game, select any square on the mine field and the mine counter starts. The game is designed so that no matter which square you select first, it will not be a mine.
After you select the first square in the game, do the following:
If you want to. . .
Use the NavDisc to highlight the square, and then. . .
Uncover a square because you think it doesn???t contain a mine
Flag a square because you think it contains a mine
Remove a flag or a question mark from a square
Press the ENTER key.
If you uncovered a safe square, a number appears in the square, indicating the number of mines sur-
rounding the square. 

Press the SPACE key or the f key. A flag appears in the square. 
 Press the f key.
166 Accompli 009 User???s Guide

Mark a square with a question mark because you are unsure whether or not it contains a mine
Press the ? key.
A question mark appears in the square. 

Automatically uncover the squares around a safe square or flagged square when you???ve located all the mines surrounding it
Press the ENTER key.
Note If you haven???t correctly flagged all the mines surrounding the selected square, nothing happens when you press the ENTER key.
Tips
Use these tips to get started:
1Select the Options button, and then select the game type as Classical and the level of difficulty as Beginner.
2Uncover squares at random until you uncover one or more squares with a number 1 that can have a mine in only one square surrounding it.
3Flag the squares that contain the mines.
4Select a square that contains a 1 and touches a flagged square, and press the ENTER key to automatically uncover all the surrounding cells.
5Continue to automatically uncover surrounding cells where you know there are no more mines.
If you need help, highlight a square and press the h key. A hint appears in the status bar.
Note If you view a hint during a game and then you win the game, your score is not eligible for the Best Times list.
Entertainment 167

C h a p t e r 1 5 Draw 21
Levels of difficulty
The level of difficulty for Mines is determined by the number of mines in the mine field. You can select from the following levels:
Selecting the level of difficulty:
1On the menu bar, select the Options button.
2Tab to Select Level Of Difficulty.
3Use the NavDisc to select one of the levels.
4If you selected Custom, use the NavDisc to select the number of mines to display.
5Select the Done button.
D R A W 2 1
You play Draw 21 against the house, which is your Accompli 009.
Object of the Game
The object of the game is to get a hand of cards with a value that is closer than the house's hand to 21 points, without going over 21.
Rules of the Game
Each card has the following point values:
168 Accompli 009 User???s Guide

To start the game, the house deals two cards (one face up and one face down) to himself and two cards (face up) to the player. Draw 21 displays the points for the player's hand and the points for the house's card that is face up.
The Player's Play
First, the player plays his hand, using the following choices:
If???
If the player has 21 points
The player doesn't have 21 points
The player's hand contains five cards without exceeding 21 points
The player's hand exceeds 21 points
The player hasn't bust, and he doesn't want any more cards
Then???
The player should stand, which means he doesn't want any more cards.
The player can request another card, which is called a hit. The player can request three cards in addition to the two cards he was dealt at the beginning of the hand.
The player wins the hand.
This is called a bust, and the player loses the hand.
The player should stand.
Example
In the following example, the player is dealt a 4 and an ace, for a total of 15 points.
Then, the player takes a hit, and gets a 7. Counting the ace as 11 points would cause the player's hand to exceed 21 points, so Draw 21 counts the ace as 1 point.
The player takes another hit and busts. The house wins and the hand is over.
The House's Play
If the player doesn't bust, but chooses to stand, the house plays his hand. The house must take additional cards until his hand is 17 or greater. If the house's hand exceeds 21 points, this is called a bust, and the house loses the hand.
Entertainment 169

C h a p t e r 1 5 Draw 21
Determining a Winner
After the house plays, Draw 21 determines a winner, as follows:
After a winner is determined, the running score for the house and for the player are incremented.
Playing the Game
1To start the game, select the Deal button. The house deals two cards to the player and two cards to himself.
2To request another card for the player, select the Hit button.
3If you don???t want any more cards for the player, select the Stand button.
170 Accompli 009 User???s Guide
THIS MODEL PHONE MEETS THE GOVERNMENT'S REQUIREMENTS FOR
EXPOSURE TO RADIO WAVES.
Your wireless phone is a radio transmitter and receiver. It is designed and manufactured not to exceed limits for exposure to radio frequency (RF) energy set by the U.S. Federal Communications Commission for the United States and by Health Canada for Canada. These limits are part of comprehensive guidelines and establish permitted levels of RF energy for the general population. The guidelines are based on standards that were developed by independent scientific organizations through periodic and thorough evaluation of scientific studies. The standards include a substantial safety margin designed to assure the safety of all persons, regardless of age or health.
The exposure standard for wireless mobile phones employs a unit of measurement known as the
Specific Absorption Rate, or SAR. The SAR limit set by the FCC and by Health Canada is 1.6W/kg.1 Tests for SAR are conducted using standard operating positions accepted by the FCC and by Industry Canada with the phone transmitting at its highest certified power level in all tested frequency bands. Although the SAR is determined at the highest certified power level, the actual SAR level of the phone while operating can be well below the maximum value. This is because the phone is designed to operate at multiple power levels so as to use only the power required to reach the network. In general, the closer you are to a wireless base station antenna, the lower the power output.
Before a phone model is available for sale to the public in the U.S. and Canada, it must be tested and certified to the FCC and Industry Canada that it does not exceed the limit established by each
described in this user guide, is 0.256 W/kg.2
The FCC and Industry Canada have granted an Equipment Authorization for this model phone with all reported SAR levels evaluated as being in compliance with the FCC and Health Canada RF exposure guidelines. SAR information on this model phone is on file with the FCC and can be found under the Display Grant section of http://www.fcc.gov/oet/fccid after searching on FCC ID: IHDT6AF2. You may also refer to Motorola's website: www.motorola.com/rfhealth. Additional information on Specific Absorption Rates (SAR) can be found on the Cellular Telecommunications & Internet Association (CTIA) website at http://phonefacts.net or the Canadian Wireless Telecommunications Association (CWTA) website, http://www.cwta.ca.
______________________________________________________
1In the United States and Canada, the SAR limit for mobile phones used by the public is 1.6 watts/kg (W/kg) averaged over one gram of tissue. The standard incorporates a substantial margin of safety to give additional protection for the public and to account for any variations in measurements.
2Additional related information includes the Motorola testing protocol, assessment procedure, and measurement uncertainty range for this product.
171

172 Accompli 009 User???s Guide

The U.S. Food and Drug Administration's Center for Devices and Radiological Health Consumer Update on Mobile Phones
FDA has been receiving inquiries about the safety of mobile phones, including cellular phones and PCS phones. The following summarizes what is
Why the concern?
Mobile phones emit low levels of radiofrequency energy (i.e., radiofrequency radiation) in the microwave range while being used. They also emit very low levels of radiofrequency energy (RF), considered
What kinds of phones are in question?
Questions have been raised about
Additional Health and Safety Information 173

H e a l t h a n d S a f e t y
How much evidence is there that
Briefly, there is not enough evidence to know for sure, either way; however, research efforts are
For the past five years in the United States, the mobile phone industry has supported research into the safety of mobile phones. This research has resulted in two findings in particular that merit additional study:
In a
When 20 types of glioma were considered separately, however, an association was found between mobile phone use and one rare type of glioma, neuroepithelliomatous tumors. It is possible with multiple comparisons of the same sample that this association occurred by chance. Moreover, the risk did not increase with how often the mobile phone was used, or the length of the calls. In fact, the risk actually decreased with cumulative hours of mobile phone use. Most cancer causing agents increase risk with increased exposure. An ongoing study of brain cancers by the National Cancer Institute is expected to bear on the accuracy and repeatability of these results.(1)
174 Accompli 009 User???s Guide
. . . . .
Researchers conducted a large battery of laboratory tests to assess the effects of exposure to mobile phone RF on genetic material. These included tests for several kinds of abnormalities, including mutations, chromosomal aberrations, DNA strand breaks, and structural changes in the genetic material of blood cells called lymphocytes. None of the tests showed any effect of the RF except for the micronucleus assay, which detects structural effects on the genetic material. The cells in this assay showed changes after exposure to simulated cell phone radiation, but only after 24 hours of exposure. It is possible that exposing the test cells to radiation for this long resulted in heating. Since this assay is known to be sensitive to heating, heat alone could have caused the abnormalities to occur. The data already in the literature on the response of the micronucleus assay to RF are conflicting. Thus,
FDA is currently working with government, industry, and academic groups to ensure the proper
Two other studies of interest have been reported recently in the literature:
Two groups of 18 people were exposed to simulated mobile phone signals under laboratory conditions while they performed cognitive function tests. There were no changes in the subjects' ability to recall words, numbers, or pictures, or in their spatial memory, but they were able to make choices more quickly in one visual test when they were exposed to simulated mobile phone signals. This was the only change noted among more than 20 variables compared.(3)
In a study of 209 brain tumor cases and 425 matched controls, there was no increased risk of brain tumors associated with mobile phone use. When tumors did exist in certain locations, however, they were more likely to be on the side of the head where the mobile phone was used. Because this occurred in only a small number of cases, the increased likelihood was too small to be statistically significant.(4)
In summary, we do not have enough information at this point to assure the public that there are, or are not, any low incident health problems associated with use of mobile phones. FDA continues to work with all parties, including other federal agencies and industry, to assure that research is undertaken to provide the necessary answers to the outstanding questions about the safety of mobile phones.
Additional Health and Safety Information 175

H e a l t h a n d S a f e t y
What is known about cases of human cancer that have been reported in users of
Some people who have used mobile phones have been diagnosed with brain cancer. But it is important to understand that this type of cancer also occurs among people who have not used mobile phones. In fact, brain cancer occurs in the U.S. population at a rate of about 6 new cases per 100,000 people each year. At that rate, assuming 80 million users of mobile phones (a number increasing at a rate of about 1 million per month), about 4800 cases of brain cancer would be expected each year among those 80 million people, whether or not they used their phones. Thus it is not possible to tell whether any individual's cancer arose because of the phone, or whether it would have happened anyway. A key question is whether the risk of getting a particular form of cancer is greater among people who use mobile phones than among the rest of the population. One way to answer that question is to compare the usage of mobile phones among people with brain cancer with the use of mobile phones among appropriately matched people without brain cancer. This is called a
What is FDA's role concerning the safety of mobile phones?
Under the law, FDA does not review the safety of
Although the existing scientific data do not justify FDA regulatory actions at this time, FDA has urged the mobile phone industry to take a number of steps to assure public safety. The agency has recommended that the industry:
???support needed research into possible biological effects of RF of the type emitted by mobile phones;
???design mobile phones in a way that minimizes any RF exposure to the user that is not necessary for device function; and
176 Accompli 009 User???s Guide
. . . . .
???cooperate in providing mobile phone users with the best possi- ble information on what is known about possible effects of mobile phone use on human health.
???At the same time, FDA belongs to an interagency working group of the federal agencies that have responsibility for different aspects of mobile phone safety to ensure a coordinated effort at the federal level. These agencies are:
???National Institute for Occupational Safety and Health
???Environmental Protection Agency
???Federal Communications Commission
???Occupational Health and Safety Administration
???National Telecommunications and Information Administration
The National Institutes of Health also participates in this group.
In the absence of conclusive information about any possible risk, what can concerned individuals do?
If there is a risk from these
People who must conduct extended conversations in their cars every day could switch to a type of mobile phone that places more distance between their bodies and the source of the RF, since the exposure level drops off dramatically with distance. For example, they could switch to:
???a mobile phone in which the antenna is located outside the vehi- cle,
???a
???a headset with a remote antenna to a mobile phone carried at the waist.
Again, the scientific data do not demonstrate that mobile phones are harmful. But if people are concerned about the radiofrequency energy
Additional Health and Safety Information 177

H e a l t h a n d S a f e t y
from these products, taking the simple precautions outlined above can reduce any possible risk.
Where can I find additional information?
For additional information, see the following websites:
Federal Communications Commission (FCC) RF Safety Program (select "Information on Human Exposure to RF Fields from Cellular and PCS Radio Transmitters"): http://www.fcc.gov/oet/rfsafety
World Health Organization (WHO) International Commission on
United Kingdom, National Radiological Protection Board:
http://www.nrpb.org.uk
Cellular Telecommunications Industry Association (CTIA):
U.S. Food and Drug Administration (FDA) Center for Devices and
Radiological Health: http://www.fda.gov/cdrh/consumer/
1.1. Muscat et al. Epidemiological Study of Cellular Telephone Use and Malignant Brain Tumors. In: State of the Science Sympo- sium;1999 June 20; Long Beach, California.
2.2. Tice et al. Tests of mobile phone signals for activity in geno- toxicity and other laboratory assays. In: Annual Meeting of the Environmental Mutagen Society; March 29, 1999, Washington, D.C.; and personal communication, unpublished results.
3.3. Preece, AW, Iwi, G,
4.4. Hardell, L, Nasman, A, Pahlson, A, Hallquist, A and Mild, KH. Use of cellular telephones and the risk for brain tumors: a case- control study. Int. J. Oncol., 15:
178 Accompli 009 User???s Guide

LIMITED WARRANTY FOR GSM HANDSETS
Motorola warrants to you, the original purchaser, the cellular phone and accessories which you have purchased from an authorized Motorola dealer (the ???Products???), to be in conformance with the applicable Motorola specifications current at the time of manufacture for a term of 1 year from date of purchase of the Product(s) (limited Warranty Term).
You must inform Motorola of the lack of conformity to the applicable specifications of any of the Products within a period of two (2) months from the date on which you detect a defect in material, workmanship or lack of conformity and in any event within a term not to exceed the Warranty Term, by submitting the Product for service to Motorola. Motorola shall not be bound by Product related statements not directly made by Motorola.
A list of the Motorola Call Center numbers is enclosed with this Product.
During the Warranty term, Motorola will, at its discretion and without extra charge, as your exclusive remedy, repair or replace your Product which does not comply with this warranty; or failing this, to reimburse the price of the Product but reduced to take into account the use you have had of the Product since it was delivered. This warranty will expire at the end of the Warranty Term.
This is the complete and exclusive warranty for a Motorola cellular phone and accessories and in lieu of all other warranties, terms and conditions, whether express or implied.
Where you purchase the product other than as a consumer, Motorola disclaims all other warranties, terms and conditions express or implied, such as fitness for purpose and satisfactory quality.
In no event shall Motorola be liable for damages in excess of the purchase price nor for any incidental special or consequential damages* arising out of the use or inability to use the Product, to the full extent such may be disclaimed by law.
This Warranty does not affect any statutory rights that you may have if you are a consumer, such as a warranty of satisfactory quality and fit for the purpose for which products of the same type are normally used under normal use and service, nor any rights against the seller of the Products arising from your purchase and sales contract.
(*) including without limitation loss of use, loss of time, inconvenience, commercial loss, lost profits or savings.
Limited Warranty For GSM Handsets 179

Wa r r a n t y How to get Warranty Service
H O W T O G E T W A R R A N T Y S E R V I C E
In most cases the authorized Motorola dealer which sold and/or installed your Motorola cellular phone and original accessories will honor a warranty claim and/or provide warranty service. Alternatively, for further information on how to get warranty service please contact either the customer service department of your cellular operator or Motorola???s call centercenter at the telephone numbers below for your country.
In order to claim the warranty service you must return the cellular phone and/or accessories in question to Motorola; please avoid leaving any supplementary items such as SIM cards. The Product should also be accompanied by a label with your name, address, and telephone number; name of cellular Carrier and a description of the problem. In the case of vehicular installation, the vehicle in which the cellular phone is installed should be driven to the Authorized Repair Center, as analysis of any problem may require inspection of the entire vehicular installation.
In order to be eligible to receive warranty service, you must present your receipt of purchase or a comparable substitute proof of purchase bearing the date of purchase. The phone should also clearly display the original compatible electronic serial number (IMEI) and mechanic serial number [MSN]. Such information is contained with the Product.
C O N D I T I O N S
This warranty will not apply if the type or serial numbers on the Product has been altered, deleted, removed, or made illegible. Motorola reserves the right to refuse
Repair, at Motorola's option, may include the replacement of parts or boards with functionally equivalent, reconditioned or new parts or boards.
Replaced parts, accessories, batteries, or boards are warranted for the balance of the original warranty time period. The Warranty Term will not be extended. All original accessories, batteries, parts, and cellular phone equipment that have been replaced shall become the property of Motorola. Motorola does not warrant the installation, maintenance or service of the products, accessories, batteries or parts.
Motorola will not be responsible in any way for problems or damage caused by any ancillary equipment not furnished by Motorola which is attached to or used in connection with the Products, or for operation of Motorola equipment with any ancillary equipment, and all such equipment is expressly excluded from this warranty.
When the Product is used in conjunction with ancillary or peripheral equipment not supplied by Motorola, Motorola does not warrant the operation of the Product/peripheral combination and Motorola will not honor any warranty claim where the Product is used in such a combination and it is determined by Motorola that there is no fault with the Product. Motorola
180 Accompli 009 User???s Guide
What is not covered by the warranty
. . . . .
specifically disclaims any responsibility for any damage, whether or not to Motorola equipment, caused in any way by the use of cellular phone, accessories and peripherals (specific examples include, but are not limited to: batteries, chargers, adapters, and power supplies) when such accessories and peripherals are not manufactured and supplied by Motorola.
W H A T I S N O T C O V E R E D B Y T H E W A R R A N T Y
This warranty is not valid if the defects are due to damage, misuse, tampering, neglect or lack of care and in case of alterations or repair carried out by unauthorized persons.
1Defects or damage resulting from use of the Product in other than its normal and cus- tomary manner.
2Defects or damage from misuse, accident or neglect.
3Defects or damage from improper testing, operation, maintenance, installation, adjustment, or any alteration or modification of any kind.
4Breakage or damage to antennas unless caused directly by defects in material or workmanship.
5Products disassembled or repaired in such a manner as to adversely affect performance or prevent adequate inspection and testing to verify any warranty claim.
6Defects or damage due to range, coverage, availability, grade of service, or operation of the cellular system by the cellular operator.
7Defects or damage due to moisture, liquid or spills of food.
8Control unit coil cords in the Product that are stretched or have the modular tab broken.
9All plastic surfaces and all other externally exposed parts that are scratched or damaged due to customer normal use.
10Leather cases (which are covered under separate manufacturers??? warranties).
11Products rented on a temporary basis.
12Periodic maintenance and repair or replacement of parts due to normal wear and tear;
Note The
Limited Warranty For GSM Handsets 181
P A T E N T I N F O R M A T I O N
This Motorola product is manufactured under one or more Motorola US patents. Other patents for this product are pending.
182 Accompli 009 User???s Guide

INDEX
A
about
Alarm Clock 123
Calculator 127
Calendar 95 categories 37 Contacts 87 copy 39
cut 39
Draft folder 59 Express 46 Find 44 folders 58 Help 51 Inbox 58
inserting text 40 Memos 107 message rules 61 messages 53 Outbox 59
paste 39 Phone 67 private entries 42 Ringtones 111 send 41
Sent Messages folder 60 SMS 53
Trashcan 42 access 48 accessories 29
Accompli 009
common features 37
activation 19 add
alarms 123
calendar event 96 category 38 contact 87 folders 60
memo 107
message rules 62, 63
Alarm Clock
about 123 features 123 settings 124 sounding mode 125
alarms adding 123 editing 124 off 124
alert
volume level 33
alert script about 114
quick reference 121
Alt mode 22 applications
basic concepts 37 common features 37 starting 25
B
inserting 27 recharge in device 27 recharging 26 replacing 27
status indicator 26 beam
using Send 41 book conventions 20
C
Calculator
about 127 buttons 127 features 127 formulas 129
keyboard shortcuts 128 settings 130
using 129
Calendar
about 95 adding event 96 delete event 98 edit event 98 features 95
other functions 100 settings 99 viewing 95
calendar event beaming 41 printing 41 sending 41
Calendar views
Day 96
Month 96
Week 96
Index 183

I n d e x
Caps Lock 22 category
about 37 adding 38 deleting 38 renaming 38
charging
desktop holder 28
completed tasks 103 conference calling 83 connect pager to PC 29 contact
add to mailing list 92 adding 87
beaming 41 deleting 89 editing 88 printing 41 sending 41 viewing 90
Contacts
about 87 custom fields 91 features 87 mailing lists 92 other functions 92 settings 91 sorting entries 91
conventions 20 copy
about 39
text in edit fields 39 text in
create
folder 60
message rules 62, 63 ringtone alerts 113
custom
contact information 91
custom reply 56 cut
about 39
D
date
set 32
date and time
inserting 40
Day view 96 delete
category (Memos) 109 category (Tasks) 104 contact 89
folders 61
message 57 message rules 62 ringtone alerts 113 tasks 104
connecting 29 device
device lock 136 device security 136
Draft folder about 59
draft messages 59
E
edit
alarms 124 calendar event 98 contact 88 folders 60
memo 107 message rules 62 tasks 102
Enter key 22
Express about 46
F
features 19
Find
about 44
find
text 44
words and phrases 44
Flip 21 folder
Draft 59
moving message 57 Sent Messages 60
folders
about 58 creating 60 deleting 61 icons 58
formulas 129 forward message 56
G
group, See mailing list 92
H
Help
about 51
hide
private entries 42
holster 29
Home screen
Desktop 24
Menu Wheel 24
Home Screen Manager 137 hot keys 137
I
icons
battery gauge 26 Calculator buttons 127 calendar views 95 folders 58
Inbox 58
Outbox 59
184 Accompli 009 User???s Guide
Ringtones 111 task priorities 102 volume level 33
infrared port 28 insert
battery 27
current date/time 40 Quick Text 40 signature 40
text 40
IR port 28
K
keyboard navigation 22
shortcuts (Calculator) 128 keys
Alt 22
Back 22
Enter 22
Menu 22 NavDisk 22 Shift 22 TAB 22
L
M
mailing lists
contacts 92
marking
private entries 42
memo
add 107 beaming 41 deleting 108 edit 107 printing 41 sending 41
viewing 107
other functions 109
Menu key 22 Menu Wheel 24 message rules
about 61
messages
about 53
creating rules 62, 63 deleting 57 deleting rules 62 edit rules 62 forwarding 56 moving 57
reading 56 receiving new 53 replying 56 rules 61 sending 54
messaging service
activate 19
N
NavDisk 22 Navigation 22 new message 53
O
overview 19
owner information 32
P
Phone
. . . . .
PIM applications 37
PIM information sending 41
playing alerts 112 power
using Send 41 private entries
about 42 hiding 42 marking 42 showing 42
Q
Quick Text
R
read messages 56 receive
new message 53
recharge battery 26
in device 27 rename
category 38 reply
custom 56
Quick Text 56 reply to message 56 respond
new message alert 53
restore items in Trashcan 43 restrictions
environmental 33
ringtone alerts
composing 113 deleting 113 off 112
Index 185

I n d e x
186 Accompli 009 User???s Guide

"
Wireless Phone Safety Tips
???Safety is your most important call!???
Your Motorola wireless telephone gives you
the powerful ability to communicate by
When driving a car, driving is your first
responsibility. If you find it necessary to use your wireless phone while behind the wheel of a car, practice good common sense and remember the following tips:
1Get to know your Motorola wireless phone and its features such as speed dial and redial. If available, these features help you to place your call without taking your attention off the road.
2When available, use a
3Position your wireless phone within easy reach. Be able to access your wireless phone without removing your eyes from the road. If you receive an incoming call at an inconvenient time, if possible, let your voice mail answer it for you.
4Let the person you are speaking with know you are driving; if necessary, suspend the call in heavy traffic or hazardous weather conditions. Rain, sleet, snow, ice, and even heavy traffic can be hazardous.
5If you receive an incoming call at an inconvenient time do not take notes or look up phone numbers while driving. Jotting down a ???to do??? list or going through your address book takes attention away from your primary
6Dial sensibly and assess the traffic; if possible, place calls when you are not moving or before pulling into traffic. Try to plan calls when your car will be stationary. If you need to make a call while moving, dial only a few numbers, check the road and your mirrors, then continue.
7Do not engage in stressful or emotional conversations that may be distracting. Make people you are talking with aware you are driving and suspend conversations which have the potential to divert your attention away from the road.
Wireless Phone Safety Tips 187
S a f e t y Ti ps
"
8Use your wireless phone to call for help. Dial
9Use your wireless phone to help others in emergencies. If you see an auto accident, crime in progress or other serious emergency where lives are in danger, call
10Call roadside assistance or a special
Check the laws and regulations on the use of wireless telephones and their accessories in the areas where you drive.
Always obey them. The use of these devices may be prohibited or restricted in certain areas.
* Wherever wireless phone service is
188 Accompli 009 User???s Guide

6881037B45