TABLE OF CONTENTS

FOR FUTURE REFERENCE

Congratulations on your choice of a Maytag gas range. On the following pages you will find iuformation regarding the operation of your new range. By following these instructions carefully, you will be able to fully enjoy and maintain your range. Please take a moment to renew tim enclosed booklet, "Cooking Made Simple"

as well. Whether you need assistance in selecting the right eookware or reviewing the dos and don'ts of

baking, the answers are eontained in this booklet.

Should you have any questions about using your Maytag gas range, call or write us. Be sure to provide the model and serial numbers of your range.

For future reference, we suggest you retain this manual after recording the model number and serial number of this gas range in the spaces provided. This information can be found on the data plate located on the frame around the storage or broiler drawer, depending on your model.

Mode[Number

SerialNumber

BE SURE YOU BEAD THE SAFETY

INSTRUCTIONS ON PAGES 1-3 BEFORE

YOU START TO USE THIS RANGE.

IMPORTANT SAFETY

Read all instructions before using

this appliance,

The following instructions are based on safety considerations and must be strictly followed to reduce

the potential risks of fire, electric shock, or personal injury.

???

WARNING: If the information in this

manual is not followed exactly, a fire or explosion may result causing

property damage, personal injury or death,

-Do not store or use gasoline or other flammable vapors and liquids in the vicinity of this or any other appliance,

-WHAT TO DO IF YOU SMELL GAS:

???Do not try to light any appliance,

???Do not touch any electrical switch; do not use any phone in your

building,

???Immediately call your gas supplier from a neighbor'sphone. Follow the

gas supplier'sinstructions,

???If you cannot reach your gas supplier, call the fire department,

-installation and service must be performed by a qualified installer, service agency or the gas supplier,

WARNING

A

--

iINJURY TO

PERSONS COULD

???INSTALL ANTI-TIP

DEVICES PACKED

WITH RANGE

??? SEE INSTALLATION

INSTRUCTIONS

INSTRUCTIONS

Have your appliance installed and properly grounded by

a qualified installer according to the installation instrnetions. Have the installer show you the location of

the gas shut off valve and how to shut it off in an emergency.

Always disconnect power to appliance before servicing.

Do not attempt to adjust, repair, service, or replaee any part of appliance unless it is specifically recommended in this book. All other servicing should be referred to a quali_ied servicer.

To Prevent Fire or Smoke Damage

Remove packing materials from the appliance before operating it.

Keep area around appliance clear and free from combustible materials, gasoline, and other flammable

vaporsand materials.

If appliance is installed near a window, proper precautions should be taken to prevent curtains from

blowing over burners,

Do not leave any items on the eooktop. The hot air from the vent may ignite flamlnable items and may increase

pressure in closed containers which may cause them to burst.

Many aerosol-type spray caus are EXPLOSIVE when exposed to heat and may be highly flammable. Avoid

their use or storage near wl appliance.

Do not leave plastic items on the cooktop as they may melt or soften if left too close to the vent or a lighted

surfaeeburner.

TO eliminate the hazard of reaching over hot surfaee

burners, cabinet storage should not be provided directly above a unit. If such storage is provided, it should be

limited to items which are used infrequently and which

appliance. Temperatures may be unsafe for some items, such as volatile liquids, cleaners or aerosol sprays.

In Case of Fire

T_rn off appliance and ventilating hood to avoid arespreadingsafely thestoredflamein .an area subjected to heat from an

soda to smother }_re or flame. Never use water on a grease fire.

If fire is in the oven or broiler pan, smother hy closing

oven door.

If fire is in a pan on the surface bnrner, cover pan. Never attempt to pick up or move a flaming pan.

PAGE 1

Child Safety

Do not leave children alone or unsupervised near the appliance when it is in use or is still hot.

Children must be taught that the appliance and utensils in or on it can be hot.

Children should be taught that an appliance is not a toy. Children should not be allowed

to play with controls or other parts of the unit. Children should

never be allowed to sit or stand

on any part of the appliance. CAUTION: Do not store items of interest to children in cabinets

above an appliance or on the backguard of a range. Children climbing on the appliance or the

appliance door to reach items could be seriously' injured,

About Your Appliance

flow of combustion and ventilation air by blocking the oven vent or air intakes. Restriction of air flow to the

bnrner prevents proper performance and increases carbon monoxide emission to unsafe levels.

Avoid touching oven vent area while oven is on and for several minutes after oven is turned o[}: Some parts of

the vent and surrounding area become hot enough to

cause bnrus.

drawer, may result in possible tipping of the appliance, breakage of door, and serious injuries,

WARNING,; To reduce the risk of tipping of the appliance from abnormal usage or by excessive loading of the oven door, the applianee must be secured by a properly installed anti-tip device. If the range is moved from the wall, be sure the anti-tip device is engaged

when the range is replaced. Look underneath range to verify that one of the rear Ieveling legs is properly engaged in the bracket slot. The anti-tip device secures the rear leveling leg to the floor when properly engaged. Also, be sure the range is properly re-installed.

Do not touch a hot oven light bulb wifll a damp cloth as the bulb could break. Should the bnlb break, disconnect

power to the appliance before removing bulb to avoid electrical shock.

Cooking Safety

Always place a pan on a surface burner before turning it on. Be sure you know which knob controls which sur[hce burner. Make sure file correct burner is tumed

on and that the burner has ignited. When cooking is completed, turn burner off before removing pan to prevent exposure to burner flame.

Always adjust surface burner flame so that it does not extend beyond the bottom edge of file pan. An excessive flame is hazardous, wastes energy and may damage the appliance, pan or cabinets abo_e the appliance.

Never leave surface cook- ing operations unattended at high heat settings or when deep fat frying. Boilovers cause smoking and greasy spillovers may ignite.

Never heat an unopened /ood container. Pressure build-up may canse container to burst resulting in

personal injm y or damage to the appliance.

Use dry,, sturdy potholders. Damp potholders on hot surfaces may cause bums from steam. Towels or other substitutes should never be used as potholders because flley ean trail across hot surface burners and ignite or get canght on appliance parts.

Always let quantities of hot fat cool before attempting to move or handle.

Do not let grease or other flammable materials

accumulate in or near the appliance, hood or vent f_n. Clean hood frequently to preveut grease from

accumulating on hood or [liter.

Loose fitting or long _,,__ hanging-sleeved apparel

should not be worn while

cooking. Clothing may ignite or cateh utensil handles.

PAGE 2

Always place oven racks in the desired positions while oven is cool. If a rack must be moved while hot, use a d_ potholder. Always turn the oven off at the end of cooking,

Use care when opening the oven door. Let hot air or steam escape before rmnoving or replacing food. PREPARED FOOD WARNING: Follow food manufacturer's instrnctions. If a plastic frozen food container and/or its cover distorts, warps, or is otheiwise

damaged during cooking, immediately discard the food and its container. The food could be contaminated.

Utensil Safety

Use pans with flat bottoms and handles that are easily grasped and stay cool. Avoid using unstable or loose handled pans.

Be sure utensil is large enough to properly contain food and avoid boilovers. Pan size is particularly important in deep fat frying,

To minimize burns, ignition of flammable materials and spillage due to unintentional contact with the utensil, do not extend handles over adjacent surface burners.

Always turn pan handles toward the side or back of the appliance, not out into the room where they are easily

hit or reached by small children.

Never let a pan boil dry as this could damage tbe utensil audtheapplianee.

Follow the iuanufaeturer's directions when using oven cooking bags.

Only certain types of glass, glass/ceramic, ceramic, or glazed utensils are suitable for eooktop or oven usage without breaking due to the sudden change in

temperature,

This appliance has been tested for safe performance using conventional eoolcware. Do not use any devices or accessories that are not specifically recommended in this manual. Do not use eyelid covers for the surfaee units, stove top grills, or add-on oven convection systems. The use of devices or accessories that are not expressly recommended in this manual ean create serious salety hazards, result in performanee problems, and rednee the life of the components of the appliance.

Cleaning Safety

Turn off"all controls and wait for appliance palts to cool before touching or cleaning them. Do not touch the burner grates or surrounding areas untiI they have had suttlcient time to cool.

Clean appliance with caution. Use care to avoid steam burns if a wet sponge or cloth is used to wipe spills on a hot surface. Some cleaners can produce noxious {hines if applied to a hot surface.

Self-Clean Oven (select models)

Clean only- parts listed in this booklet. Do not clean door gasket. The door gasket is essential for a good seal. Care should be taken not to rub, damage, or move the gasket. Do not use oven cleaners of any kind in or aroumt any"part of the selfLelean oven.

Before self-cleaning the oven, rmnove broiler pan, oven racks, and other utensils, and wipe off excessive spillovers to prevent excessive smoke or flare-ups. CAUTION: Do not leave food or cooking utensils, etc., in the oven during the self-clean cycle.

It is normal (br the eooktop of the range to become hot during a self-clean cycle. Therefore, touching the eooktop dnring a clean cycle should be avoided.

Important Safety Notice and Warning

The California Safe Drinking Water and Toxic Enforcement Act of 1986 (Proposition 65) requires the

Governor of California to publish a list of substances known to the State of California to cause cancer or

reproductive harm, and requires businesses to warn customers of potential exposures to such substances. Users of this appliance are hereby warned that the burning of gas can result in low-level exposure to some of the listed substances, including benzene, formaldehyde and soot, due primarily to the incomplete eombnstion of natural gas or liquid petrolemn (LP) fuels. Properly adjusted burners will minimize incomplete combustion. Exposure to these substances can be minimized by properly venting the burners to the outdoors.

SAVE THESE INSTRUCTIONS

PAGE 3

RANGE CONTROL PANEL

Electronic Clock and Oven Control

S)'ling and features may differ depending on the model you selected.

The electronic dock and oven control on your Maytag range is used for the time-of-day clock, timer, bake, broil, programmed oven operations and self-clean (select models) functions. A beep will sound each time a function pad is pressed.

The display on the control will flash when power is first supplied to the range or if there is a power failure. Once the time-of-day clock has been set (see Setting the

Clock, page 5), the display will stop flashing.

The oven will automatically tuna off if it is left on for 12 hours,

The _bllowing pads are found on your Maytag electronic clock and oven eontroh

Cancel Pad

Press this pad to cancel all operations except the time-

of-@ clock and timer. If you are ever unsure if you've programmed the control correctly, press the CANCEL pad and start over.

???and ??? Pads

Press or press and hold these pads to enter the time or

temperature desired. These pads are also used to seleet Hi or Ix) broil.

Timer Pad

The timer can be set from 1 minute to 9 hours, 50

minutes. It will count dou_l by seconds (when set for ] minute) or minutes (when set for 2 minutes or more

time). See page 5 for instructions on setting the timer.

PAGE 4

ClockPad

Use this pad to set the time-of-day clock. For instruc- tions to do this, see below.

You may also press this pad to recall the cmxent time of day. For example, if the timer is counting down in the display, press the CLOCK pad to return the current

time to the display. The timer will continue to count down and a signal will sound when the time expires.

Cook Time/Oven Stop Pads

These pads are used to program the oven to start and stop automatically; either immediately or at a later time.

For detailed information on using Programmed Oven Operations, see pages 10-11.

Self Clean Pad (select models)

This pad is pressed to set the oven for a self-clean cycle, See pages 12-13 for detailed information on the self-

clean feature.

Broil Pad

Use this pad to select broil. Two heat selections are

available for broiling--Hi and Lo. See page 10 for more broiling information.

Oven Temp Pad

The oven temperature is set by pressing this pad and the ??? or ??? pad. Additional baking and roasting

information can be found on pages 8-9.

Setting the Clock and Timer

Clock

To set the time-of-day clock:

1.Press the CLOCK pad once. The words "Set Time" will flash in the display.

2.Set the correct time ofdaynsingthe ??? and ??? pads.

???To change the time by one minute, press either pad once.

???To change the time in increments of 10 minutes, press and hold either pad.

When the power is first supplied to the range or if there

has been a power failure, the display will flash. Follow above instructions to set the clock. The clock time

cannot be changed when the oven is set tbr a cook or self-clean (select models) operation. Cancel the operation to set the clock.

Press the CLOCK pad to recall the time of day when another function is displayed.

Timer

To set the timer:

1.Press the TIMER pad once. The words "Set Timer" will flash in the display.

2. Set the desired time using the ??? and ??? pads.

???Press either pad once to change the time by 1 minute (if the Timer is set fbr up to 1 hour), 5 minutes (if the Timer is set for over 1 hour), or 10 minutes (if the Timer is set fbr over 2 hours).

???Press and hold either pad to change the time in 5 minute or 10 minute increments, depending npon the time set in the display.

The TIMER can be set from 1 minute (0HR:01) up to 9 hours and 50 minutes (9 HR:50).

The timing operation will start automatically. Colons will flash in the display to indicate a timing operation. One long continuous beep will signal the end of the timing operation and "End" will briefly appear in the display: The time of day will automatically reappear in the display. The TIMER pad does not control the oven.

To cancel: Press the TIMER pad and hold for 3 seconds. The time of day will reappear after a slight delay.

PAGE 5

SURFACE COOKING

Panel Light (select models)

The panel light is turned on by pushing tile rocker switch on the control panel and holding it in until the

fluorescent light comes on. It may be tnrned off by pushing the other side of the switeh,

Sealed Burners

The sealed burners of your range are secured to the cooktop and are not designed to be removed.

Since the burners are sealed into the eooktop, boilovers or spills won't seep underneath the oooktop.

Your range features two special Power Burners

located in the left rear and right front positions. (NOTE: Model CHG9800 features one Power Burner

located in the front posiCton.) These offbr higher speed cooking that can be used to quickly bring water to a boil and for large-quantity cooking.

The eooktop on gas ranges with sealed burners is designed with two contoured wells which contain spills. Unlike a range with standard gas burners, this eooktop does not lift-up nor is it removable. To prevent damage to the range, do not attempt to lift the cooktop for any reason.

POWERBURNER

L__]

When reinstalling the grates, place the indented sides together

so the straight sides are at the front and rear. Although the burner grates are durable, they will gradually lose their shine due

_"#'/_'_REAR VIEW OF SEALED BURNER

PAGE 6

Lighting the Surface Burners

1.Place a pan on the burner grate,

2.Push in and turn on the knob to the START position,

A clicking sound will be heard and the burner will light.

3.After the burner lights, turn the knob to the desired flame size. The clicking will not stop until the knob is turned from the START position,

A properly adjusted burner with clean ports will light

within a few seconds. If using natural gas, the flame will

be blue with a deeper blue inner core; there should be

no trace of yellow in the flame (this indicates an improper mixture of air/gas which wastes fuel and

should be adjusted by a service technician). With LP

gas, some yellow tips on the flames are acceptable. This is normal and adjustment is not necessary.

With some types of gas, you may hear a "popping" sound when the surface burner is turned off. This is a

normal operating sound of the burner.

Selecting the Flame Size

Ira knob is turned very quickly from HIGH to WARM, the flame may go out, particularly if the burner is cold. If this occurs, turn the knob to the OFF position. Wait several seconds, then light the burner again.

The flame should be adjusted so it does not

extend beyond the edge of the pan. This instruction is based on safety considerations. Adjusting the flame

size also improves your cooking effieieney, and prevents damage to any cabinets above the range,

Use a MEDIUM flame setting to continue a cooking operation. Food will not cook any faster when a higher flame setting is used than that needed to maintain a gentle boil. Remember, water boils at the same temperature whether boiling gently or vigorously.

Use a WARM

simmer or keep

food at serving temperature. Some

cooking may take place if tbe pan is

covered.

Be sure to adjust the knob so there is an adequate

supply of gas to maintain a stable flame on the burner. Check to be sure burner is lit and the flame is

stable.

Operating During Power Failure

To operate one or more of the sl]naaee burners during a power failure:

1.Hold a lighted match to the desired surface burner head.

2, Turn the control knob to START. The burner will

then light.

3. Adjust the flame to the desired level.

PAGE 7

USING YOUR OVEN

Every oven has its own characteristics. You may find that the cooking times and temperatures vary" slightly from your old oven. This is normal.

Your Maytag range is equipped with pilotless ignition. with this type of ignition system, the oven will not operate during a power failure or if the range is disconnected from the wall outlet. No attempt

should be made to operate the oven during a power failure.

When opening the oven door, Jlow steam and hot air to

escape before reaching into the oven to cheek, add or remove food.

Baking and Roasting

(For additional baking and roasting tips, refer to "CooMng Made Simple" booklet.)

Setting the Oven Controls for Baking

and Roasting:

1.Press the OVEN TEMP pad. "Bake" and 000 ?? will appear in the display,

2, Press either the ??? or ??? pad once and 350 ?? will appear in the display. Press the ??? or ??? pad until the desired oven temperature is displayed.

The word ON will light in tile display, tile oven will turn on and the temperature display will rise in 5 ?? increments while the oven is preheating. A beep will sound to indicate that the oven has preheated. Allow 10-15 minutes for preheating.

3.After the cooking operation, turn the oven off by

pressing the CANCEL pad. Remove food from the oven.

Oven Racks

The oven racks are designed with a lock-stop edge to keep the racks from coming completely out of the oven when there is food placed on them.

To remove: Be sure the rack is cool. Pull the rack

straight out until it stops. Tilt the front end of the rack up and continue pulling it out.

To replace: Tilt the front end of the rack up and place it between the rack supports. Slide it back until it clears the lock-stop position. Lower the front and slide the

rack str@t in.

Do not cover an entire oven rack or oven bottom with aluminum foil. This will restrict air flow.

Rack Positions

Do not attempt to change the rack positions when the

oven is hot. Use the following guidelines when selecting the proper rack position. Never place pans directly

on the oven bottom.

PAGE 8

Oven Light

Push the switch on the control panel marked OVEN LIGHT to turn it on and off. On select models the oven light automatically comes on whenever tile oven door is opened,

Oven Vent

Tile oven vent is located on the baekguard. When the oven is in use, this area may feel warm or hot to the touch. To prevent problems, do not bloek the vent opening,

Fan (CHG9800 model only)

A fan automatieally turns on whenever the overt is set for a cooking operation or self-clean operation to ensure

long life of the eloek and oven eontrols. The fan will antomatieally turn offwben the oven has cooled,

Oven Bottom

To protect the oven bottom against spillovers, use the correct pan size. Tile oven bottom can be removed for

cleaning ifspillovers occur.

To remove: When cool, remove the oven racks. Slide the two catches, located at each rear corner of the oven

bottom, towaM the front of tile oven. Lift the rear edge of the oven bottom slightly, then slide it back until the

front edge of the oven bottom clears the oven front frame. Remove the oven bottom from the oven.

To replace: Fit the front edge of the oven bottom into the front frame. Lower the rear of the oven bottom and

slide the catches back to lock the oven bottom into

place.

Adjusting the Oven Thermostat

After using your oven tile first few"times, it may seem hotter or cooler than your previous oven. Oven thermostats, over a period of years, may drift from the

factory setting and timing differences of 5 to 10 minutes are not unusual between an old and a new oven.

If you think the oven shoukl be hotter or cooler, you can adjust it. To decide bow much to change the thermostat, set the oven temperature 25??F higher or lower than the temperature in your recipe, then bake. The results of the "test" should indicate how much the thermostat should be adjusted.

To adjust the thermostat:

1.Press the OVEN TEMP pad.

2.Press the ??? pad and select an oven temperature between 500??F and 550??F.

3. Press and hold the OVEN TEMP pad for about four seconds. The display will change to the oven adjustment display which reads 00 ??.

4.The oven thermostat can be adjusted tlp to +35??F hotter or -35??F eoole_: Use the ??? or ??? pad to select

the desired change in the display.

5.When you have made the adjustment, press the CANCEL pad to return to the time of day display. Use your oven as you would normally.

PAGE 9

Broiling

For best results, use the broiler pan and insert supplied with your range,

(For additional broiling tips, refer to "Cooking Made Simple" booklet.)

Setting the Controls for Broiling:

1.Press the BBOIL pad and press the ??? or ??? pad to select either Hi or Lo broil as indicated in the

display. Hi is used for most broiling operations. Lo should be selected when broiling thicker meats to the well-done stage (to prevent excessive browning). Broiling times may increase if LO is selected.

2.Place the broiler pan on tile recommended position shown in the broiling char*.

3.Follow the suggested times in the broiling chart below. Broil until the top of the meat is browned. It should be approximately half cooked by the time tile top is browned.

4.Check the doneness by cutting a slit in the meat near the center to check tile color.

5.To cancel or end the broiling operation, press the CANCEL pad.

Broiling Chart

Until yon become more familiar with your new range, use the foUowing chart as a guide when broiling foods.

*The bottom rack position is #I.

start and then turn off the oven.

This feature will not operate unless the clock is f, metioning and is set to the correct time of@

If you delay more than 30 seconds between touching a pad and pressing the ??? or ??? pad, the display will either return to the previous setting or the time of day will reappear arid the program will cancel.

Tu recall tile preset stop time or cook time, just press the corresponding pad.

PAGE 10

To Bake by Time (with immediate start):

1.Place the food in the oven.

2.Press the COOK TIME pad. The words "Set Cook Time" will flash in the display:

3.Enter the cooking time (how long you wish tile food

to cook) by pressing the ??? or ??? pad. The time will appear in hours and minutes. The maximum time that can be set is 11 hours and 55 minutes.

4.Press the OVEN TEMP pad. The word "'Bake" and 000 ?? will light in the displa}_ If this step is not clone

within 7 seconds after entering the cook time, the control will beep until another pad is pressed.

5.Enter the oven temperature with the _, or ??? pad.

6.The oven will automatically turn on and the words

"Timed Bake On" will light in the display. The display will begin to count down the time

remaining.

7.At the end of the preset eooklug time, the oven will automatieally turn off and

eontinuous beeps will sound. Remove the food from the oven and press the CANCEL pad to stop the beeps,

8.Enter the cooking time (how long you wish the food to cook) by pressing the ??? or ??? pad. The time will

appear in hours and minutes. The m_L,:imum time that can be set is ll hours and 55 minutes, NOTE:

The oven automatically programs the start time.

4.Press the OVEN STOP pad. The words "Set Stop Time" will flash in the display:

5.Enter the time you wish the oven to turn off by pressing tile ??? or ??? pad. The words "Delay Stop Time" will light in the displav.

6.Press the OVEN TEMP pad. The word "Bake" and 000 ?? will light in the display.

7.Enter the oven temperature by pressing the ??? or ??? pad.

8.If desired', press the CLOCK pad and the time of daywill reappear in tile displa3a

9."Delay Bake" will light in the display and at the preset time the oven will automatically turn on and "Timed Bake" will appear in the displa}:

10.At the end of the preset cooking time, the oven will automatieally tur, off and eontinuous beeps will sound. Bemoxe the food from the oven and press the CANCEL pad to stop the beeps.

To Bake by Time (with delayed start):

1.Place the food in the oven.

2.Press the COOK TIME pad. The words "Set Cook Time" will flash in the displav.

PAGE 11

CARE AND CLEANING

Removing Range for Cleaning and

Servicing

When necessaD-, follow these procedures to remove applialce for cleaning or servicing:

1, Shut offthe gas supply to the appliance,

2. Disconnect the electrical supply to the appliance,

3. Disconnect gas supply tubing to appliance.

4. Slide range forward to disengage hinge from the anti-tip bracket. (See Installation Instructions for location of bracket.)

5.Reverse procedure to reinstall. If gas line has been disconnected, cheek for gas leaks after reconnection. (See Installation Instructions for gas leak test method.)

Manual-Clean Oven

(select models)

Clean as directed in the cleaning chart on pages 14-15.

Self-Clean Oven (select models)

A self-clean oven uses above normal cooking tempera- tures to automatically clean the entire oven. The

separate clean cycle eliminates soil completely or

reduces it to a gray ash which is easily wiped up with a damp cloth when the cycle is complete and the oven has cooled.

It is better to dean the oven regularly than to wait until there is a heavy build-up of soll in the oven.

It is normal for the eooktop, oven door and window to

become hot during a clean cycle. Therefore, avoid touching these areas during a clean cycle. As tbe oven

heats and cools, you may hear the sounds of metal parts expanding and contracting. This is not3na] and will not

damage your oven.

The first f_w times the oven is cleaned, some smok

and odor may be detected. This is normal and wi lessen or disappear with use. If the oven is heavil) soiled, smoke and odor are common. During th_ cleaning process the kitchen should be well ventilated.

The oven will automatie_ly begin to heat when the doe: is locked and the SELF CLEAN pad is pressed. When

the oven reaches cleaning temperature, the word "Lock" will light in the display. At this point, the

oven door cannot be manually opened.

To prevent damage to the door and lock lever, do not force the door open when the word "Lock" is displayed.

Preparing for the Self-Clean Cycle

1.Remove oven racks and any pans, utensils or the broiler pan from the oven. The oven racks should be washed by hand. If left in the oven during the self-dean cycle, the racks will become permanently discolored and may not slide easily.

2.Clean the oven fi'ame and door frame with a non- abrasive cleaning agent such as Ben Ami, These areas are not exposed to cleaning temperatnms and should be cleaned to prevent soil from baking on during the clean cycle

3.Wipe up any excess grease or spillovers from the oven bottom to prevent excessive smoking and flare- upsduring the clean cycle.

4.Wipe up acid spillovers such as lemon juice, tomato

sauce or milk-based sauces and sugary spillovers. Porcelain enamel is acid resistant, not acid proof. The porcelain finish may discolor if acid spills are not wiped up prior to a self-clean cycle.

5.Do not use oven eleaners or oven liner proteetlve coatings of any kind on the self-dean oven finish or around any part of the oven as they will damage the oven finish.

6.To prevent damage, do not clean or rub the gasket on the oven door. The gasket is designed to seal in heat during the clean cycle.

7, Turn off the oven light before starting the self:-clean operation. If the oven light is left on dnring the cletm

cycle, the light bulb will burn out.

PAGE 12

Setting the Controls for the Self-Clean

Cycle

1.Close the oven door and move the door lock lever to the right until it rests in the lock position,

2.Press tile SELF CLEAN pad. The words "Set Clean Time" will flash and "3:00" will appear in tile display Also, "Clean On" will light as the oven begins to heat. The oven will automatically set a clean cycle of three hours. A shorter (2 hours) or longer (4 hours) dean cyele can be selected by pressing the SELF CLEAN pad and pressing tile ??? or ??? pad to select 2 to 4 hours,

3. Press the CLOCK pad and the current time of day will reappear in the displa}a "Clean" and "On" will remain in the display to show that the oven is in a clean cycle.

If the door is not locked properly, the word "door" will appear in the display and Beeps _I1 sound.

To interrupt or Reset the Clean Cycle

If the door has not locked, the lock lever can be moved completely- to the left to cancel the cycle.

If the door is locked, push the CANCEL pad. The door will not open until "Lock" turns off in the display. At that time, the door lock lever can be returned to its

original position and the door can be opened. The even will still be hot.

After the Self-Clean Cycle

About one honr after the clean cycle is complete, tile word "Lock" will turn off in the display and the door

lever can be returned to its original position. The oven will still be hot.

Some soil may leave a light gray; powdeu ash which can be removed with a damp cloth. If soil remains, it indicates that the clean cycle was not long enough or a large spillover was not wiped up be_bre the self-dean cycle, The soil should be removed during the next dean cycle,

If"the oven racks were left in the oven dining the self clean cycle and do not slide smoothly, wipe the rack edges and rack supports with a small amount of vegetable oil to restore the ease of movement.

Fine hair-like lines may appear in the oven intmior or oven door. This is a normal condition resulting from the heating and cooling of the porcelain finish. These lines do not affect the performance of the oven.

Storage Drawer (select models)

The storage drawer in the range is a safe and convenient place for storing eookware. Do not store plastic, paperware, food or flammable material in this drawer. Remove the drawer to dean under the range.

To remove: Empty the drawer then pull it out to the first stop position. Lift up the front of tile drawer and pull it to the second stop position. Grasp the sides and lift up and out to remove tile drawer.

To replace: Fit the ends of the drawer glides onto the rails. Lift up the drawer l_cont and gently push in to the first stop position. Lift up the drawer again and continue to slide the drawer to the closed position.

Broiler Drawer (select models)

Store a clean broiler pan and insert in the broiler drawer.

To remove: Pull the drawer out to the first stop position. Lift up the front of the drawer and pull it to the second stop position. Grasp the sides and lift up and out to remove the drawer.

To replace: Fit the ends of the drawer glides onto the

rails. Lift up the drawer front and gently push in to the first stop position. Lift up the drawer again and continue to slide the drawer to the closed position.

PAGE 13

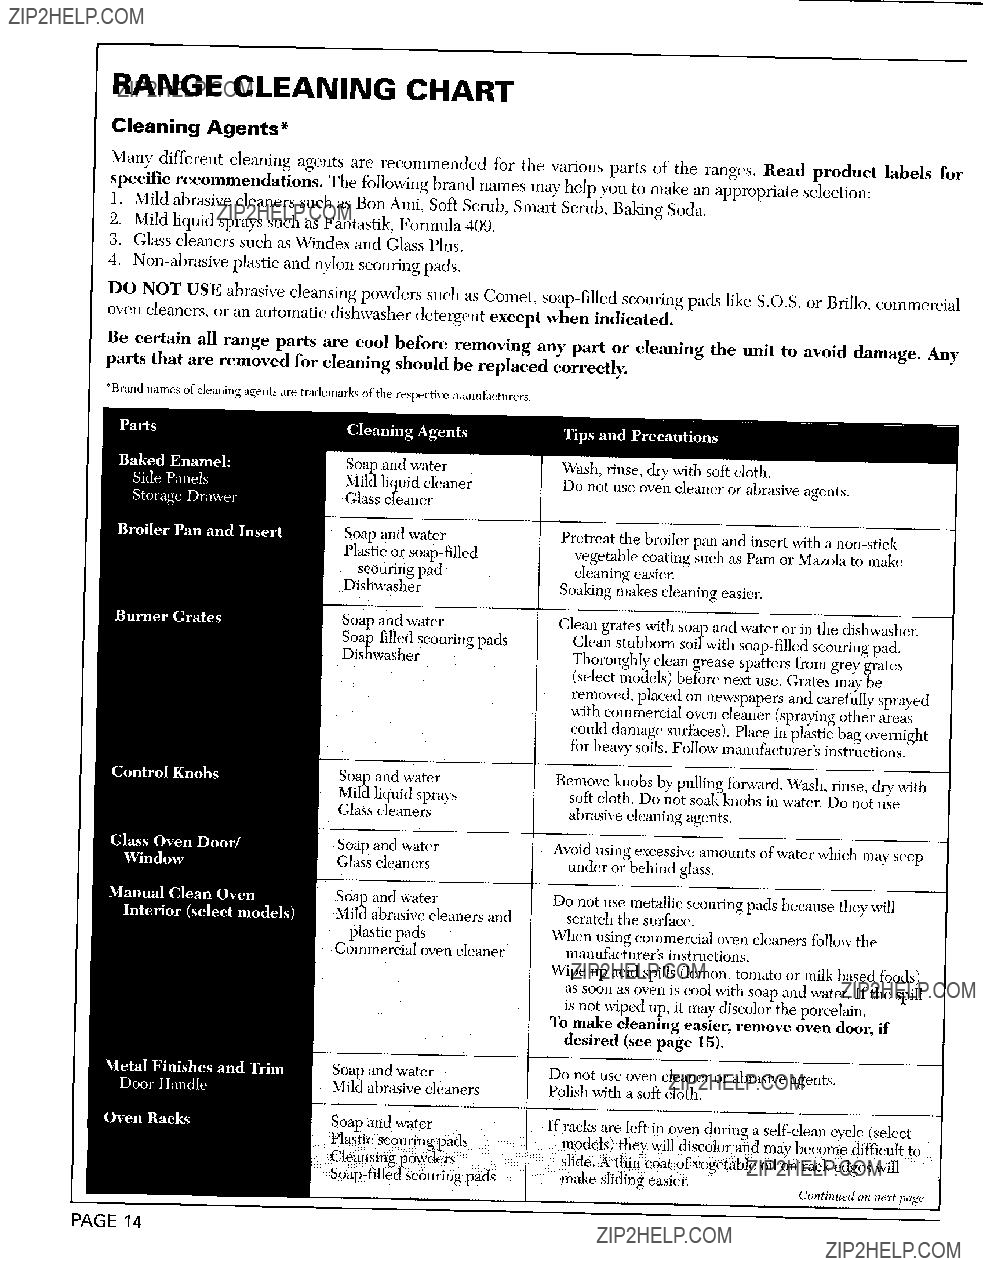
RANGE CLEANING CHART

Cleaning Agents*

Many different cleaning agents arc: recommended fbr the various parts of the ranges. Read product labels for specific recommendations. The following brand names may help you to make an appropriate selection:

1. Mild abrasive cleaners such as Bon Ami, Soft Scrub, Smart Scrub, Baking Soda.

'2. Mild liquid sprays such as Fantastik, Formula 409. 3. Glass cleaners such as Windex and Glass Plus.

4. Non-abrasive plastic and nylon scouring pads.

DO NOT USE abrasive cleansing powders such as Comet, oven cleaners, or an automatic dishwasher detergent except

soap-filled scouring pads like S.O.S. or BriIlo, commemial when indicated.

Be certain all range parts are cool before removing any part or cleaning the unit to avoid damage. Any parts that are removed for deanlng should be replaced correctly.

*Brandnamesofcleaningagentsare trademarksof the r espe_l_a'emanl]_ctl/re_.

(hlntinuedon m,xtpage

PAGE 14

Range Cleaning Chart (continued)

scratch or mar the finish. To prevent staining or discoloration, remove f;at, grease or acid (tomato, lemon, vinegar, milk. fruit juice, marinade) soils immediately with a dr}"paper towel or cloth. When surface is cool clean with soap and water; rinse, and dry.

Soap and water , Mild abrasive cleaners

Mild liquid sprays

Wipe up all spillovers immediately with a dry cloth-- especially acid spills (milk. fruits, tomato, etc.}.

Never wipe a warm or hot surface with a damp cloth as cracking and chipping may result.

NOTE: Do not use abrasive cleaning agents such as steel wool pads. These products will scratch the surface.

Soap and water

Plastic scouring pads

Soap- filled seomir)g pads

Follow instructions on pages 12-13 for the self-clean cycle.

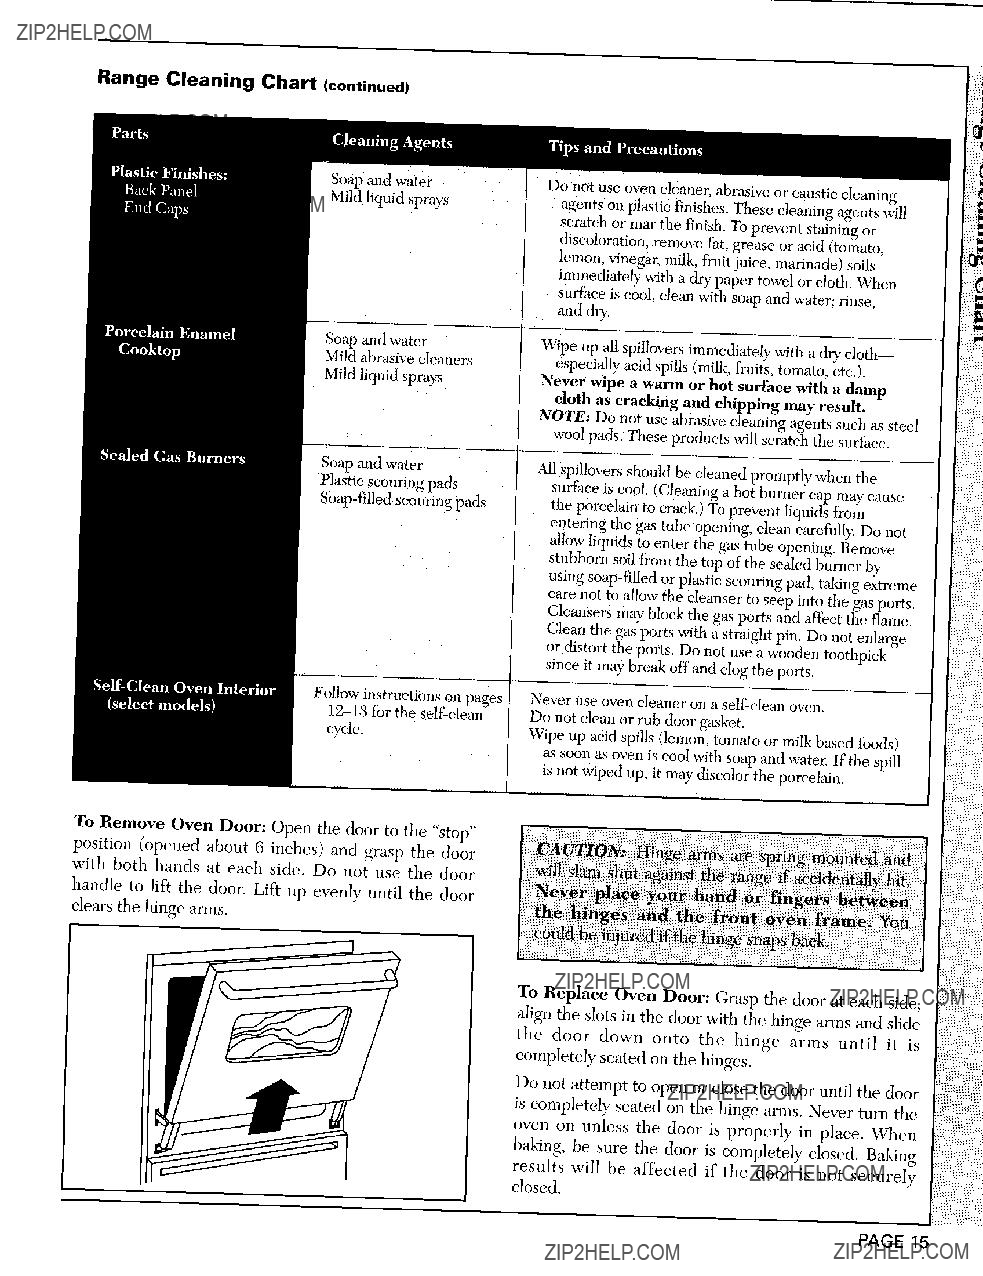
To Remove Oven Door: Open the door to the "stop"

position (opened about 6 inches) and grasp the door with both hands at each side. Do not use the door

handle to lif} the door. Lift up evenly until the door

clears the hinge arms.

All spilhwers should be cleaned promptly when the sn_ace is cool (Cleaning a hot burner cap may cause

the porcelain to crack. To prevent liquids from entering the gas tube opening, dean carefidlk; Do not alh_w liquids to enter the gas tube opening. Bemove stubborn soil from the top of the sealed burner by using soap-filled or plastic scouring pad, taking extreme care not to allow the cleanser to seep into the gas ports. Clemasers may Noek the gas ports and affect the flame. Clean the gas ports with a straight pin. Do not enlarge

or distort the ports. Do not use a wooden toothpick since it may break off' and clog the ports.

Never use oven cleaner on a self dean oven. Do not clean or rub door gasket.

Wipe up acid spills (lemon, tomato or milk based tbods) as soon as oven is cool with soap and watee If'the spill is not wiped up, it may discolor the porcelain.

To Replace Oven Door: Grasp the door at each side, align the slots in the door with the hinge anus and slide the door down onto the hinge arms until it is completely seated on the hi,ages.

Do not attempt to open or close the door until the door

is completely seated on the hinge arms. Never turn the

"1 oven on nnless the door is properly in place. \_?? len

baking, be sure the door is completely closed. Baking results will he affected if the door is not securely closed.

PAGE 15

MAINTENANCE

O

Always disconnect power to appliance before servicing.

Proportional Valve Adjustment

The WARM setting should produce a stable flame when turning the knob from HIGH to WARM. The flame should be 1/8 inch or lower and nmst be stable on all

ports.

To adjust: Operate burner on HIGH for about 5 minutes to preheat burner cap. Turn knob back to WARM; remove knob, and insert a small screwdriver into the center of the valve stem. Adjust flame size by turning adjustment screw in either direction. Flame

ports.mUstbeiftlame??fsufficientadjustmentsize ist??J}eeded,bestableadjuston alloNLybUrneron the WARM setting. Never adjust flame size on a higher setting.

Light Replacement

Before replacing the oven or panel light bulb,

disconnect power to range. Be sure tim bulb and range parts are coo/. Do not touch a hot bulb with a

damp cloth as the bulb may break.

To Replace Panel Light (select models)

Grasp the top trim of' the back panel with your tbmnbs under the front edge and pull outward while lifting the

trim. Remove the bulb and replace it with an 18 watt fluorescent tube. Snap the top trim back into place and

restore the power. Reset the clock.

_....,__

F-

To Replace Oven Light

Carefully unscrew the lens cover (select models) with a &y potbolder. "very carefully remove the bnlb with the potbolder. Replace witb a 40 watt appliance bulb.

Reconnect the power to the range and reset the clock.

PAGE 16

BEFORE YOU CALL FOR SERVICE

Check these points if...

Part or all of your gas range does not operate

???Is the range plug loose or disconnected from the electrical outlet (if not wired direct to the electrical

snpply)?

???Are any house fuses blown or circuit breakers tripped?

???Has a range fuse bloval (Canadian ranges only')?

???lids the power supply to the home been interrupted?

???Are the oven controls properly' set?

???Was the door left in the locked position fellowing a self-clean cycle (select models)?

???Is the oven set for a programmed oven operation?

Surface elements fail to turn on or heat the food properly"

???Is the range plug loose or disconnected from the electrical outlet (if not wired direct to the electrical

supply)?

???Has a range fuse blown (Canadian ranges only)?

???Were appropriate pans used (See "Cooking Made

Simple" booklet)?

???Are the surface burner controls properly set?

Food not baking correctly"

???Are the oven racks properly placed for baking (See

"Cooking Made Simple" booklet)?

???Have you used aluminum foil correctly?

???Was the oven preheated as recommended?

???Are the controls for bake operations properly set?

???Is there 1 to 2 inches of space between pans and the oven wails? Are the range and oven racks level?

???Was good cookware/bakeware of the proper size used?

???Are you using a tested recipe from a reliable source? The oven thermostat on your new range may be more accurate than the one on your old range,

???Was the oven vent covered or blocked on the range surface?

Food does not broil properly

???Are the controls for broiling set properly? (See Broiling section, page 10.)

???Was the proper rack position used? (See Broiling section, page 10.)

???Was the broiler pan received with the range used?

???Was aluminum foil used on the broiler pan insert, blocking the slits for fat drainage?

Oven light does not operate

???Is the bulb loose or burned out?

???Is the light switch in the On position?

Oven will not self-clean (select models)

???Is the self-clean control set properly? (See Self-Clean instructions, pages 12-I3.)

???Is the oven set for a programmed oven operation?

Oven door won't lock (select models)

???Are the proper controls set for the self-clean cycle? (See Self-Clean instructions, pages t2-13.)

Oven door will not unlock (select models)

???Has the self-clean cycle been _nished for at least one hour?

"F" plus a number appears in the display (select models)

???These are fault codes. If a fault code appears in the display" and a continuous beep sounds, press the CANCEL pad. If the fanlt eode reappears, disconneet power to the range and call a qualified service technician.

Fan sound (select models)

???A fan will automatically turn on when the oven is operated to cool the clock controls. This is normal. It

may continue to run even after the oven is turned off

For further assistmtce contact your Maytag dealer or call Maytag Customer Service:

U.S.1-800-688-9900

CANADA 1-800-688-2002

PAGE 17

RANGE WARRANTY

Full One Year Warranty

For one (1) year from the date of original retail purchase, any part which fails in normal home use will be repaired or replaced free of charge.

Limited Warranty

After the first year from the date of original retail purchase, through the second year, parts which fail in normal home use will he repaired or replaced free of charge for the part itself, with the owner paying all other eosts, including labor, when the appliance is located in the United States or Canada.

Third Through Fifth Year

After the second vear from the date of original retail purchase through the fifth year, all of the fbllowing components whiell fail in normal home use will he repaired or replaced free of charge for the part itself,

with the owner paying all other costs, including Tabor. when the appliance is located in the United States or Canada.

These components include:

All Electronic Clocks: on electric or gas ranges

Electric Heating Elements: Includes all surface elements (solid disc, coil and smooth top), glass eooking surfaces, broil elements and oven bake elements on electric ranges.

Third Through Tenth Year

After the second year frum the date of original retail purchase throngh the tenth year, sealed gas burners on gas ranges which fail in normal home use will be repaired or replaced free of charge for the part itself;

with the owner paying all other costs, including labor, when the appliance is located in the United States or Canada.

Canadian Residents

This warranty covers only those applianees installed in Canada that have been listed with Canadian Standards Association unless the applianees are brought into Canada due to transfer of residence from the United States to Canada.

Limited Parts Warranty Outside The United States Or Canada

For two (_) years from the date of original retail purchase, any part which _dls in normal home use will be repaired or replaced free of charge for the part itsel?? with the owner paying all other costs, including labor, when the applianee is located outside the United States or Canada.

This Warranty gives you specific legal rights, and you may also have other rights which va_ from state to state.

To Receive Warranty Service

To locke an authorized service company in your area eontarX the Ma_ag dealer from whom your appliance was purchased; or call Maytag Customer Service. Should you not receive satist:aetory warran_ service, eall or "aMte:

Maytag Customer Assistance

% Maytag Customer Service RO. Box 2370

Cleveland, TN 37320-2370

US1-800-088-9900

CANADA 1-800-688-2002

When contacting Maytag Customer Service be sure to provide the model and serial nnm}_er of your appliance, the name and address of the dealer from whom yeu purchased the appliance and the date of purchase.

Should you still have a problem, write to: Major Appliance Consumer Action Program, 20 North Waeker Drive, Chieago, Illinois 60606. MACAP is an industry spo_'_soredbut ii"_dependentgroup of e_msumerexperts M_o receive madacton comI_laintsfrom applianee o_a_ers.

NOTE: When writing about au unsolved service problem, p/ease include the follo_ing informatiom (a) Yourname, address and telephone number;

(b)Model rmmber and serial number (found on the data plate) ofyour appliance:

(e)Name and address of your dealer m_ddate the appliance was bought;

(d) A olear description of the problem you are having.

Surface

Cooking

Regardless of the cooking surface used- coil elements, ceramic

glass, standard gas burners or sealed gas burners - good results

depend on several factors. Cookware

construction, size and material; plus proper heat setting or flame size are critical for

good results.

ProperCookware

Proper pans will reduce cooking times,use less en-

"ergy and cook food more evenly. Optimum cook-

ing performance can be achieved when heavy gauge, flat, smooth bottom, metal pans with straight

sides and tight fitting lids are used. When selecting cookware consider construction, material and size.

Flat Bottom Construction

Heat transfers primarily by conduction (contact). If the pan is not flat, heat is not transferred as well and food will cook unevenly and take longer. To determine the flatness of the bottom of a pan, try one of these tests:

CookingTest: Put an inch of water into the pan. Place it on the cooktop and turn the control to High. As the water heats, observe the bubble formation. If the bubbles are uniform across the bottom of the pan, it will perform satisfactorily. Uneven bubbre for- mation indicates poor pan/cooktop contact which

causes hot spots and uneven cooking.

Ruler Test: Place the edge of a ruler across the bottom of the pan. HoJd it up to the light. Little or no right should be visible under the ruler.

3

PanMaterial

The pan material determines how evenly and quickly

heat is transferred from the heat source to the pan bottom. Some widely used pan materials are:

?

a

Pan Size

On electric cooktops, match the size of the pan to the coil element or indicated cooking area. ldeally, the pan should not extend more than 1/2-1" over the cook- ing area on ceramic glass cook-tops and notmorethan2"beyondtheelementon

coil eooktops. Avoid using small pans on large elements to reduce energy loss and for safety reasons.

On gas cooktops, adjust the burner flame so it does not extend beyond the

edge of the pan. This is for safety reasons and also to save energy.

Do not use oversized pans or pans that rest across two elements or burners.

These may transfer heat to the porcelain cooktop which causes cracking or chip- ping. Likewise, on ceramic glass cooktops oversized pans (more than 1" beyond indicatedcooking area) lengthen cooking times.

Home Canning

Recommendations

Acceptable water-bath or pressure can- ners should not be oversized and should have flat bottoms. When can- ners do not meet these standards, cook-

ing times may be extended and cooktops may be damaged. For best results, use a canner not more than 1"

larger than the cooking area on a co- ramic glass surface and not more than 2" larger than a coil element or gas

burner,

When canning, use the High setting just until the water comes to a boil or pressure is reached in the pressure canner, then reduce to the lowest heat setting that maintains the boil or pres- sure. If the heat is not turned down, the cooktop may be damaged.

For more information on canning pro- cedures, contact your local county Ex-

tension Office.

Heat Settings

It is better to select a lower setting and

increaseto a higher one later if needed.

There are many factors that affect the choice of the heat setting.

Keepinmindthatfooddeesnotcook anyfasteratahighersettingorflame

size than that which maintains a

gentle boil. Water boils at the same temperature, whether boiling vigor- ously or gently. If too high a setting

is used, food may burn on the bot- tom before it is completely cooked.

5

UsingYour

Oven

Delicious baking and roasting results depend on the recipe, type of pan used and the rack and pan

_ositions.

PanPositions

As ranges and wall ovens get older, it is not uncom-

mon for the oven temperature to shift. It is normal

to notice some cooking time differences between a

new oven and an old one. Compare your recipes with tested recipes for proper recommendations,

Use tested recipes from dependable cookbooks.

Follow directions carefully and use fresh ingredients, Measure and mix as instructed and use the recom-

mended pan size.

Preheat the oven if called for in the recipe or on the package directions. Preheating is NOT necessary for roasting. Selecting a temperature higher than the desired temperature will not preheat the oven any faster. In fact, this may have a negative effect on baking results.

Do not cover the entire oven rack or oven bottom with aluminum foil or place it directly under a pan. If needed to catch spill-overs from baked items, place a piece of foil cut a little larger than the pan on the rack below the pan. However, foil will reduce air flow and may cause poor baking results. In a gas oven, placing foil on the oven bottom may cause perma- nent damage to the porcelain enamel,

Most recipes provide minimum and maximum baking times such as "bake 35-45 minutes." Check the baking progress at the minimum time. DO NOT open the door until the minimum time haselapsed. Ifthe doorisopened too frequently, heat will escape, which can affect baking results.

BakingPans

Always use the pan size recommended in the recipe. Many pans have the mea- surements marked on them. If there are no measurements, measure inside width and length of the pan.

Frozen pies in foil pans should be placed on pans with dark or dull fin- ishes for baking. The shiny foil pan reflects heat away from the pie de- creasing browning while the dark pan helps absorb the heat and improves bottom browning.

RackPositions

The correct rack position depends on

the kind of food and the browning desired. As a general rule, center the rack in the middle ofthe oven. Iffood is placed on a rack toward the top of

the oven, top browning may be too dark. If food is placed on a rack lo-

cated near the bottom of the oven, the food may be too dark on the bottom.

Refer to the User'sGuide for specific

rack positions,

@

Cookies baked in pans with short sides all around may result in lighter top browning or uneven top browning. For best results select cookie sheets with- out sides.

PanPositions

When baking foods in one pan, place pan in the center of the oven rack.

When baking in more than one pan, allow one to two inches between the

pans and the edge of the pan(s) and the oven walls.

If baking on more than one rack, stag- ger the pans so one pan is not directly over another pan.

Do not crowd a rack with pans. Never place more than one 9x13-inch or larger pan on one rack.

Do not place pans directly on the oven bottom.

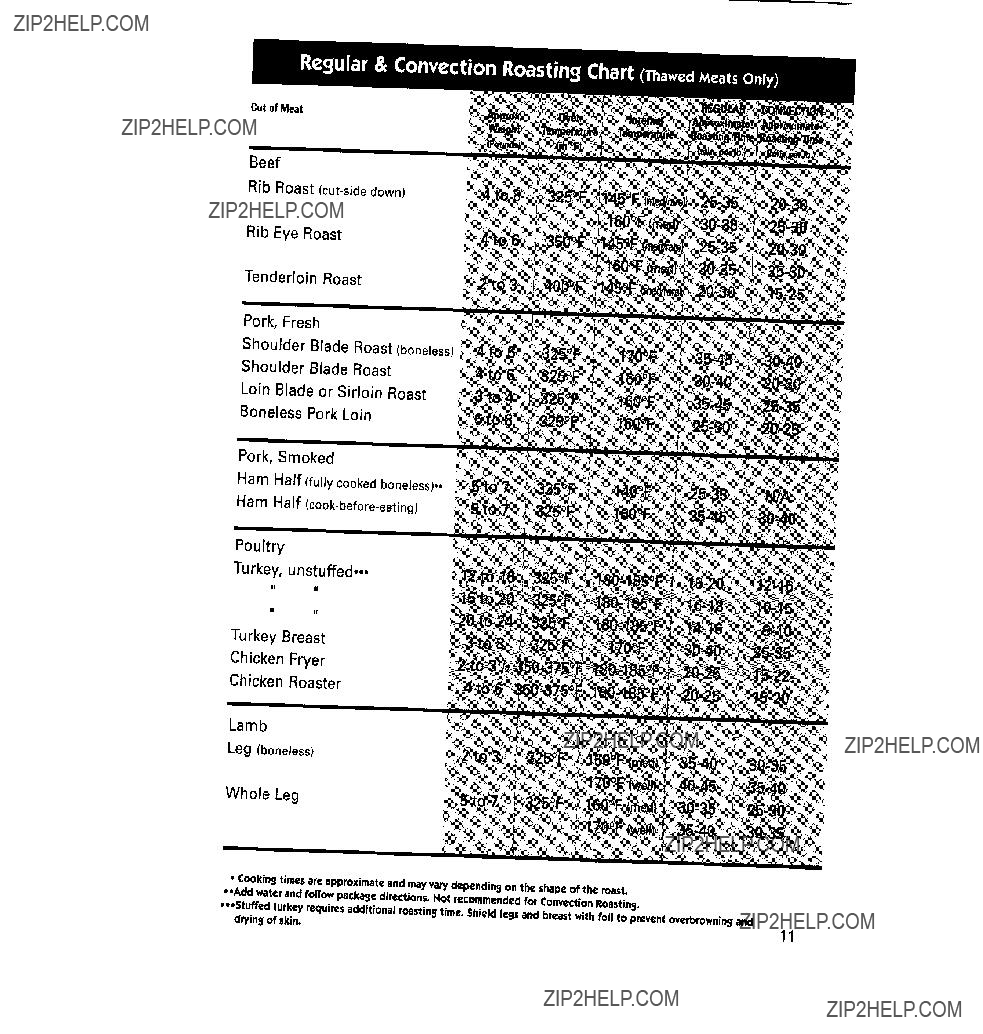
Place meat fat-side-up to allow self-basting of the meat during roasting,

Cooking time for roasting is determined by the

weight of the meat and the desired doneness. Use ameat thermometer for best results. Insert the ther-

mometer so the tip end is in the center of the thick- est part ofthe meat. It should not touch fat or bone.

Refer to the Roasting Chart on page 11 for best re- suits,

Remove the roast from the oven when the thermom-

eter registers approximately 5?? below the aloneness desired. Cooking will continue after the meat is re- moved from the oven.

Less tender cuts of meat need to be roasted in a

covered pan or in an oven cooking bag,

10

Cutof Meat

Beef

Rib Roast (cut-sidedown)

Rib Eye Roast

Tenderloin Roast

Pork, Fresh

Shoulder B)ade Roast (boneless)

Shoulder Blade Roast

Loin Blade or Sirloin Roast

Boneless Pork Loin

Pork, Smoked

Ham Half (fully cooked boneless)*,

Ham Half (cook-before-eating)

Poultry

Turkey, unstuffed...

Turkey Breast

Chicken Fryer

Chicken Roaster

Lamb

Leg (boneless)

Whole Leg

Convection

Baking and

a fan circulates hot air evenly over, under and around the food. As e result, foods are

evenly cooked and browned - often in

shorter cooking times

at lower tempera- tures and with the

flexibility of using more racks at one

time.

???Convection baking is good for Jargequantities of baked foods such as cookies, biscuits, muffins, brownies, cupcakes, sweet rolls and bread.

???Foods such as layer cakes or quick breads have a

more even top when baked with the regular con- ventional baking method.

Roasting

???Convection roasting, in most cases, takes less time and is good for large tender cuts of meat.

Use uncovered roasting pans with low sides. Meats are generally dark brown on the outside and tender and juicy inside,

???Less tender cuts of meat are best roasted with

the regular conventional method. The regular conventional method is also best when an oven

cooking bag or covered dish is required.

Baking:

Reduce the oven temperature by 25 ??

for convection baking. Times will be similar to or a few minutes lees than

recipe recommendations.

For multi-rack baking, it may be nec- essary to remove the pan on the bot- tom rack and/or top rack 1-2 minutes before the set time to prevent overbrowning.

Cookie sheets should be made of shiny metal without sides.

Three Rack Baking - For optimal brown ing, place cookie sheets or rec- tangular (9"x13") pans lengthwise, front to back on the oven racks. Ar-

range pans so they are directly over each other. Stacking pans one above the other centers the food in front of the convection fan which improves air circulation and browning. If pans are too long to place front- to-back, cen- ter the pans side-to-side on the racks,

Four Rack Baking - (This is based on the use of rack positions 2, 3, 4 and 5 with the lowest position being #1--rec- ommended only on 30 inch width ov- ens.) Stagger the pans on the racks so that one pan is NOT directly over another pan. For example, on rack 2 place the pan within one inch of the left wall of the oven, on rack 3 place the pan within one inch of the right wall and so on,

Roasting:

Do not reduce oven temperature by

25?? for convection roasting. However roasting times can be reduced up to 25% when using convection heat,

Refer to the Roasting Chart on page 11 for best results,

Do not use a roasting pan with high sides.

Do not cover meat.

Since the breast meat and drumsticks on aturkey cook more quickly than the i

thigh areas, place a "foil shield" over I these areas after desired brownees is reached to prevent overbrowning,

Broiling

Broiling is used for tender cuts of meat or

marinated meats, fish and some fruits and

vegetables. The food

is placed directly under the top element or under the gas flame,

The desired doneness

is determined by the distance between the

food and the heat source and the cooking time.

When broiling in an electric oven, preheat 3-4 min- utes for optimal browning.

For best results, steaks and chops should be at least 3/4" thick. Thinner cuts should be panbroiled.

Before broiling, trim excess fat to prevent exces- sive spattering or smoking. Cut srashesin the outer edges of the fat to prevent curling during cooking.

Season meat after cooking. Salt tends to draw juices out of the meat and delay browning.

Use the broiler pen supplied with your oven. It is designed to drain excess liquid and fat away from the cooking surface to prevent spatters and smoke.

Do not cover the broiler insert with aluminum foil. This prevents fat from draining into the pan bot- tom. However, for easier clean-up, line the broiler pan (bottom portion) with foil and spray the insert with non-stick vegetable coating.

The rack position selected for broiling depends on the thickness of the meat and the desired doneness.

Thin cuts (3/4 to 1inch) should be placed 2-3 inches

from the heat; thicker cuts should be placed 3-6 inches from the heat,

14

Generally for a brown exterior and rare interior, the meat should be close to the element or flame. If you want the meat well done, place the broiler pan farther from the element or flame.

Increasing the distance between the meat and the heat source will de-

crease spattering and smoking.

When broiling in an electric oven, the door should be opened to the broil stop position (about 4"). When broil-

ing with e gas oven, the door should be closed.

If the food requires turning, broil until the top side is brown. Turn only once during broiling. Meat should be ap- proximately half cooked by the time the top is browned.

Consult the User's Guide for spe- cific broiling times and rack posi- tions.