CLUB SERIES UPRIGHT LIFECYCLE??
EXERCISE BIKE (CSLU)
OPERATION MANUAL
CLUB SERIES UPRIGHT LIFECYCLE??
EXERCISE BIKE (CSLU)
OPERATION MANUAL

AMERICAS
North America
Life Fitness Inc.
5100 N River Road
Schiller Park, IL 60176 U.S.A
Telephone: (847) 288 3300
Fax: (847) 288 3703
Service Email: commercialservicereply@lifefitness.com
Sales/Marketing Email:commercialsales@lifefitness.com
Operating Hours: 7:00 am - 6:00 pm (CST)
Brazil
Life Fitness Brasil
Av. Cidade Jardim, 900
Jd. Paulistano
S??o Paulo, SP
BRAZIL
SAC: 0800 773 8282
Telephone: +55 (11) 3095 5200
Fax: +55 (11) 3095 5201
Service Email: suporte@lifefitness.com.br
Sales/Marketing Email: lifefitness@lifefitness.com.br
Service Operating Hours:
9:00 - 17:00 (BRT)
9:00 - 20:00 (BRT)
Latin America & Caribbean*
Life Fitness Inc.
5100 N River Road
Schiller Park, IL 60176 U.S.A
Telephone: (847) 288 3300
Fax: (847) 288 3703
Service Email: customersupport@lifefitness.com
Sales/Marketing Email:commercialsales@lifefitness.com
Operating Hours:
EUROPE, MIDDLE EAST, & AFRICA (EMEA)
Netherlands & Luxemburg
Life Fitness Atlantic BV
Bijdorpplein
2992 LB Barendrecht
THE NETHERLANDS
Telephone: (+31) 180 646 666
Fax: (+31) 180 646 699
Service Email: service.benelux@lifefitness.com
Sales/Marketing Email: marketing.benelux@lifefitness.com
Operating Hours:
United Kingdom & Ireland
Life Fitness UK LTD
Queen Adelaide
Ely, Cambs, CB7 4UB
Telephone: General Office (+44) 1353.666017
Customer Support (+44) 1353.665507
Fax: (+44) 1353.666018
Service Email: uk.support@lifefitness.com
Sales/Marketing Email: life@lifefitness.com Operating Hours:
General Office: 9.00am - 5.00pm (GMT)
Customer Support: 8.30am - 5.00pm (GMT)
CORPORATE HEADQUARTERS
5100 River Road
Schiller Park, Illinois 60176 ??? U.S.A. 847.288.3300 ??? FAX: 847.288.3703 800.735.3867
Global Website: www.lifefitness.com
INTERNATIONAL OFFICES
Germany & Switzerland
Life Fitness Europe GMBH
Siemensstra??e 3
85716 Unterschlei??heim
GERMANY
Telephone: (+49) 89.31 77 51.0 (Germany)
(+41) 0848 000 901 (Switzerland)
Fax: (+49) 89.31 77 51.99 (Germany)
(+41) 043 818 07 20 (Switzerland)
Service Email: kundendienst@lifefitness.com
Sales/Marketing Email: kundenberatung@lifefitness.com
Operating Hours: 08.30
Austria
Life Fitness Austria
Vertriebs G.m.b.H.
D??ckegasse
1220 Vienna
AUSTRIA
Telephone: (+43) 1.61.57.198
Fax: (+43) 1.61.57.198.20
Service Email: kundendienst@lifefitness.com
Marketing/Sales Email: kundenberatung@lifefitness.com
Operating Hours:
Spain
Life Fitness IBERIA
C/Frederic Mompou 5,1??1??
08960 Sant Just Desvern Barcelona
SPAIN
Telephone: (+34) 93.672.4660
Fax: (+34) 93.672.4670
Service Email: info.iberia@lifefitness.com
Sales/Marketing Email: info.iberia@lifefitness.com
Operating Hours:
Belgium
Life Fitness Benelux NV
Parc Industrial de
BELGIUM
Telephone: (+32) 87 300 942
Fax: (+32) 87 300 943
Service Email:internationalservicesupport@lifefitness.com
Sales/Marketing Email:marketing.benelux@lifefitness.com
Operating Hours: 9.00h
Italy
Life Fitness Europe GmbH
Siemensstra??e 3
85716 Unterschlei??heim
GERMANY
Telephone: (+39)
Service: 800438836 (In Italy)
Fax: (+39)
Service Email: assistenzatecnica@lifefitness.com
Sales/Marketing Email: info@lifefitnessitalia.com
Operating Hours: 08:30 - 16:30h (CET)
All Other EMEA countries & distributor business
Bijdorpplein
2992 LB Barendrecht
THE NETHERLANDS
Telephone: (+31) 180 646 644
Fax: (+31) 180 646 699
Service Email: service.db.cemea@lifefitness.com
Sales/Marketing Email: marketing.db.cemea@lifefitness.com
Operating Hours:
ASIA PACIFIC (AP)
Japan
Life Fitness Japan
Nippon Brunswick Bldg., #8F
Japan
Telephone: (+81) 3.3359.4309
Fax: (+81) 3.3359.4307
Service Email: service@lifefitnessjapan.com
Sales/Marketing Email: sales@lifefitnessjapan.com
Operating Hours:
China and Hong Kong
Life Fitness Asia Pacific LTD
Room 2610, Miramar Tower
132 Nathan Road
Tsimshatsui, Kowloon
HONG KONG
Telephone: (+852) 2891.6677
Fax: (+852) 2575.6001
Service Email: HongKongEnquiry@lifefitness.com
Sales/Marketing Email: ChinaEnquiry@lifefitness.com
Operating Hours:
All Other Asia Pacific countries & distributor business Asia Pacific*
Room 2610, Miramar Tower
132 Nathan Road
Tsimshatsui, Kowloon
HONG KONG
Telephone: (+852) 2891.6677
Fax: (+852) 2575.6001
Service Email: HongKongEnquiry@lifefitness.com
Sales/Marketing Email: ChinaEnquiry@lifefitness.com
Operating Hours:
* Also check www.lifefitness.com for local representation or distributor/dealer.
1
TABLE OF CONTENTS
Section Description
?? 2010 Life Fitness, a division of Brunswick Corporation. All Rights Reserved
2

Before using this product, it is essential that this ENTIRE operation manual and ALL installation instructions be read.
It describes equipment setup and instructs owners on how to use it correctly and safely.
Avant toute utilisation de ce produit, il est indispensable de lire ce manuel d'utilisation dans son INT??GRALIT??, ainsi que TOUTES les instructions d'installations.
Ce manuel explique comment installer l'??quipement et comment l'utiliser correctement et sans danger.
FCC Warning - Possible Radio / Television Interference
NOTE: This equipment has been tested and found to comply with the limits for a Class B digital device, pursuant to part 15 of the FCC rules. These limits are designed to provide reasonable protection against harmful interference in a residential installation. This equipment generates, uses and can radiate radio frequency energy, and if not installed and used in accordance with the user manual, may cause harmful interference to radio communications. However, there is no guarantee that the interference will not occur in a particular installation. If this equipment does cause harmful interference to radio or television reception, which can be determined by turning the equipment off and on, the user is encouraged to try to correct the interference by one or more of the following measures:
???
???Increase the separation between the equipment and the receiver.
???Connect the equipment into an outlet on a circuit different from that to which the receiver is connected.
???Consult the dealer or an experienced radio/TV technician for help.
Class HA (Home): Domestic use.
CAUTION: Any changes or modifications to this equipment could void the product warranty.
MISE EN GARDE: Tout changement et toute modification de ce mat??riel peut annuler la garantie du pro- duit.
Any service, other than cleaning or user maintenance, must be performed by an authorized service representative. There are no user serviceable parts.
3

This Operation Manual describes the functions of the following product:
Club Series Upright Lifecycle?? Exercise Bike (CSLU)
See "Specifications" in this manual for product specific features.
Statement of Purpose: The Life Fitness Lifecycle exercise bike is a machine that simulates the movements of riding a bi- cycle at various speeds and levels of resistance.
CAUTION: Life Fitness STRONGLY recommends seeing a physician for a complete medical exam before undertaking an exercise program, particularly if the user has a family history of high blood pressure or heart disease, or is over the age of 45, or smokes, has high cholesterol, is obese, or has not exercised regularly in the past year.
If, at any time while exercising, the user experiences faintness, dizziness, pain, or shortness of breath, he or she must stop immediately.
MISE EN GARDE: Life Fitness conseille VIVEMENT de consulter un m??decin pour subir un examen m??di- cal complet avant de commencer tout programme d'exercice, et tout particuli??rement si l'utilisateur a des ant??c??dents familiaux d'hypertension ou de troubles cardiaques, ou s'il a plus de 45 ans, s'il fume, s'il a du cholest??rol, s'il est ob??se ou n'a pas fait d'exercice r??guli??rement depuis un an.
Si, pendant l'utilisation de l'appareil, l'utilisateur ressent un malaise, des vertiges, des douleurs ou des difficult??s ?? respirer, il doit cesser imm??diatement.
4

1 GETTING STARTED
1.1IMPORTANT SAFETY INSTRUCTIONS
SAFETY WARNING: The safety of the product can be maintained only if it is examined regularly for dam- age and wear. See Preventive Maintenance section for details.
???Use the Life Fitness Lifecycle exercise bike only as directed in this manual.
???If a Lifecycle exercise bike does not function properly after it has been dropped, damaged, or even partially immersed in water, contact Life Fitness Customer Support Services for assistance.
???Do not allow other people to interfere in any way with the user or equipment during a workout.
???Always follow the console instructions for proper operation.
???Supervise closely any children or disabled persons using the Lifecycle exercise bike.
???Do not use the Lifecycle exercise bike outdoors, near swimming pools, or in areas of high humidity.
???Never insert objects into any opening of the Lifecycle exercise bike. If an object should drop inside, carefully retrieve it while the unit is not in use. If the object cannot be reached, contact Life Fitness Customer Support Services.
???Never place containers filled with liquids directly on the unit, except in the accessory tray water bottle holder. Containers should be covered with lids.
???Wear shoes with rubber or
???Do not use the Lifecycle exercise bike with bare feet.
???Keep all loose clothing, shoelaces, and towels away from moving parts.
???Do not reach into, or underneath, the unit; and do not tip the unit on its side during operation.
???Keep the area around the Lifecycle exercise bike clear of any obstructions, including walls and furniture. Provide at least three feet between the front or rear of the bike to any other objects.
???Use caution when stepping on or off of the Lifecycle exercise bike.
???Never face backward while using the Lifecycle exercise bike.
SAVE THESE INSTRUCTIONS
FOR FUTURE REFERENCE.
5

1POINT DE D??PART
1.1 CONSIGNES DE S??CURIT?? IMPORTANTES
CONSIGNE DE S??CURIT?? : pour un emploi s??r, le produit doit ??tre inspect?? r??guli??rement afin de s'as- surer qu'il n'est pas us?? ni endommag??. Consultez la section de Maintenance pr??ventive pour obtenir de plus amples informations.
???Si un v??lo d'exercice Life Cycle ne fonctionne pas correctement apr??s avoir subi une chute, des dommages ou une immersion m??me partielle dans l'eau, contactez le service d'assistance client??le de Life Fitness.
???Pour un fonctionnement correct, suivez toujours les instructions de la console.
???Une surveillance ??troite est n??cessaire en cas d'utilisation par des enfants, des personnes invalides ou handicap??es.
???N'utilisez pas ce produit ?? l'ext??rieur, pr??s d'une piscine ou dans endroits tr??s humides.
???Ne faites jamais fonctionner de produit Life Fitness dont les bouches d'a??ration seraient bloqu??es.
???N'ins??rez jamais d'objet dans les ouvertures de cet appareil. Si un objet tombe dedans, coupez l'alimentation ??lec- trique, d??branchez le cordon de la prise et
???Ne placez jamais de liquides d'aucune sorte directement sur l'appareil, sauf si vous disposez d'un support ou d'un plateau pour accessoires. Il est recommand?? d'utiliser des conteneurs munis d'un couvercle.
???Portez des chaussures avec semelles en caoutchouc ou antid??rapantes. N'utilisez pas de chaussures ?? talons, de semelles en cuir ou ?? crampons.
???Maintenez les v??tements l??ches, les lacets et les serviettes ?? l'??cart des pi??ces en mouvement.
???N'utilisez pas cet appareil sans chaussures.
???Ne faites pas basculer l'appareil sur le c??t?? tandis qu'il fonctionne.
???Maintenez la zone autour du produit Life Fitness exempte d'obstructions, y compris de murs et de meubles. Veillez ?? laisser au moins 30 cm d'espace autour du Lifecycle exercise bike.
???Proc??dez avec pr??caution lors du montage ou du d??montage de la machine. Utilisez la barre fixe pour renforcer votre stabilit??. Pendant les exercices, saisissez les bras mobiles.
???N'utilisez jamais cet appareil en vous tournant vers l'arri??re.
CONSERVEZ CES INSTRUCTIONS POUR USAGE ULT??RIEUR.
6

1.2SETUP
Read the entire Operation Manual before setting up the Lifecycle exercise bike.
WHERE TO PLACE THE LIFECYCLE EXERCISE BIKE
Following all safety instructions in Section 1.1, move the bike to the location in which it will be used. See Section 7, titled Specifications, for the dimensions of the footprint. Allow a distance of 16 inches, or 41 centimeters, between the widest part of the bike and other objects on either side. Allow a distance of 3 feet, or 1 meter, between the front or rear of the bike to any other objects.
HOW TO STABILIZE THE LIFECYCLE EXERCISE BIKE
After placing the bike in position, check the unit???s stability by attempting to rock it from side to side. Any slight rocking indicates that the unit must be leveled. Determine which foot is not resting completely on the floor. Loosen the jam nut with an
HOW TO ADJUST THE SEAT
It is important to adjust the seat to an optimal height for pedaling on the Lifecycle Exercise Bike. Pedaling with the seat too low can place excessive strain on the knees and quadriceps muscles. Pedaling with the seat too high can irritate the feet, ankles, hips, and knees. To determine whether or not the seat requires adjustment, sit on it and place the balls of the feet on the pedals. The knee should bend slightly when the pedal is at the lowest point of its rotation. It should be possible to pedal without locking the knees or shifting in the seat.
The bike features a vertical ratchet seat adjustment system, which makes it easy and safe to change the height of the seat quickly. To raise the seat, either lift the body so that there is no weight on the seat, or get off the bike. Then, simply pull the seat upward to the desired height, and let it lock into place. Test and
To lower the seat, first get off the bike. Holding the seat, pull up the ad- justment lever in front of the seat post to unlock the post, let the seat slide down to the desired height, and release the lever to lock the post into place. Test and
CAUTION: When using the height adjustment mechanism to change the height of a partially raised seat, hold the seat to prevent it from falling on the hand.
MISE EN GARDE - Lorsque vous utilisez le m??canisme de r??glage de la hauteur pour monter une selle d??j?? partielle- ment sur??lev??e, maintenez cette derni??re afin qu'elle ne vous tombe pas sur la main.
7

HOW TO ADJUST THE PEDAL STRAPS
The bike pedal straps keep the user???s shoes on the pedals during a workout. The straps should fit comfortably, but they also should be tight enough to prevent shoes from slipping at any point in the pedaling rotation. Before working out, a user should test and adjust the tightness of the straps.
The safety straps on the foot pedals can be adjusted to fit a variety of shoe sizes. The straps are held in place by two knobs that extend from either side of each pedal. The ???inner??? knob extends sideways, that is, toward the bike. The ???outer??? knob extends downward. The ends of each strap are perforated with slots that fit tightly over the knobs. The ???inner??? end of each strap is perforated with two slots, and the ???outer??? segment of the strap is perforated with a row of slots.
To tighten or loosen a strap, grasp the outer end, and pull it back, away from the knob, until the strap slides off. Pull the strap out through the outer loop on the pedal. Rest the foot on the pedal, and wrap the strap over the foot to determine the desired length. Thread the strap through the outer loop on the pedal, tuck it under the pedal, select the appropriate slot, and pull that slot down over the knob, until the top of the knob pops through the slot. A click indicates that the strap is locked into place.
STARTING UP THE BIKE CONSOLE
When a user begins pedaling on the Lifecycle exercise bike, the unit???s
USING THE POWER ASSIST OPTION
The Lifecycle exercise bike???s optional Power Assist feature makes it possible for the console to be powered by an external electrical source, eliminating the need to pedal at a minimum speed to supply constant power to the console. With this op- tion, users who wish to ride the bike for rehabilitative exercise may pedal at a rate below the minimum without losing con- sole power.
Enabling the Power Assist option requires an optional kit. To order the kit, contact Life Fitness Customer Service. See page one for contact information.
When the kit is installed, the connector plugs into the bike at the front of the frame, near the base.
8
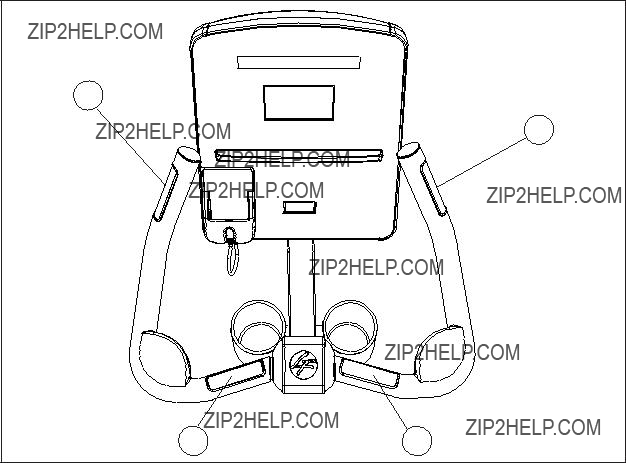
SERVICE ACCESS PORT
The two interchangeable type RJ45 networking ports (A) are located on the back of the display console and are enclosed by a removable cover. See figure below. Any use of the ports for other than their intended purpose could void the product warranty.
A
Location of Service Ports
9
2 CONSOLE OVERLAY
2.1CONSOLE OVERLAY OVERVIEW
The computerized display console allows the user to tailor a workout to personal fitness abilities and goals and to monitor progress. With this
B
C
D
O
10
2.2CONSOLE OVERLAY DESCRIPTIONS
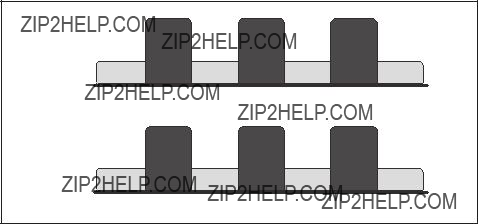
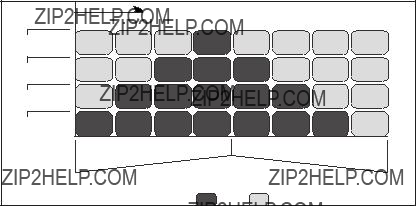
A.WORKOUT PROFILE window: This window displays shapes, made of columns of lights, that represent the levels of intensity in a
During a FAT BURN, CARDIO, HEART RATE HILL, HEART RATE INTERVAL, or EXTREME HEART RATE work- out, which requires the use of a Polar?? telemetry heart rate chest strap or the Lifepulse system sensors, the WORK- OUT PROFILE window displays a flashing heart shape to request the user???s heart rate signal. If the console does not detect a signal, the MESSAGE CENTER displays the prompt ???NEED HEART RATE - PLACE HANDS ON SENSORS OR USE TELEMETRY STRAP". If the console does not receive the signal within three minutes, the workout automati- cally is converted to a MANUAL program.
B.MESSAGE CENTER: This window displays
???Level: the programmed intensity level. It is displayed continuously unless the heart rate is being measured, in which case, Heart Rate is displayed.
???Heart Rate: the detected heart rate if the user is wearing the chest strap or grasping the Lifepulse system sen- sors. If the heart rate is not being measured during a workout, then Level is displayed instead.
???Distance: the total distance traveled in miles (or kilometers if enabled).
???RPM (Revolutions per Minute): the pedaling speed or rate.
???Calories: the number of calories burned since beginning the workout, alternates with Time.
???Time: the time elapsed since the beginning of the workout; alternates with Calories.
If configured to do so, the MESSAGE CENTER displays other values each time the intensity level changes during the workout:
???Calories per Hour: the rate of calories burned per hour.
OR
???Watts: effort level in Watts. The Watt is a unit of power output or the expression of the mechanical rate of work.
???METs: effort level in METs. The MET is an expression of the rate of work for the human body at rest, or a meta- bolic equivalent; one MET is approximately equal to the metabolism of a person at rest.
C.DISPLAY LOCK: During a workout, the MESSAGE CENTER alternately displays TIME and CALORIES. Pressing the DISPLAY LOCK key when the MESSAGE CENTER displays one of these statistics forces the MESSAGE CENTER to display that statistic throughout the workout. Pressing DISPLAY LOCK again allows the MESSAGE CENTER to re- sume toggling between both statistics.
D.WORKOUTS PLUS: When prompted by the MESSAGE CENTER to select a workout, press this key to select WATTS (when enabled), METs (when enabled), LIFE FITNESS FIT TEST, MILITARY FIT TEST (when enabled), AEROBICS TRAINER, INTERVAL, AROUND THE WORLD, CASCADES, FOOTHILLS, SPEED TRAINING, or KILIMANJARO programs.
E.CHANGE WORKOUTS: Press this key to change workout programs during a workout (on the fly).
F.BIKE MODE: Press this key to activate the Bike workout mode in which the rate of calories burned and total distance traveled increase automatically as the user increases the pedaling speed.
G.ARROW keys: When prompted by the MESSAGE CENTER to select a workout, use these keys to scroll through dis- played choices. When setting up a workout, use these keys to change workout parameters displayed on the console, such as length of workout, weight, age, target heart rate, and intensity level. During a workout, pressing the ARROW keys changes intensity levels or target heart rate.
H.CONSTANT CAL./HOUR: Press this key to activate this alternate workout mode, which enables a user to maintain a consistent rate of calories burned per hour.
I.ENTER key: Press this key to confirm entries of workout setup values, as displayed in the MESSAGE CENTER.
J.QUICK START key: Press this key to begin a manual workout immediately, without having to select a workout pro- gram. Once the workout is in progress, use the ARROW keys to change the intensity level or workout duration as de- sired.
11
K.COOL DOWN key: Workout programs end automatically in a Cool Down mode, which lowers the intensity level. Press the COOL DOWN key at any desired point during a workout to go immediately into Cool Down mode. In this phase of a workout the body begins to remove lactic acid and other accumulated
L.PAUSE: Press this key to pause the current workout. Continue the workout by pressing the PAUSE key again, or by pressing ENTER.
M.START: Press this key, while pedaling, to activate the console for programming a new workout. The activated console lights up and displays SELECT WORKOUT USING ARROW KEYS OR PRESS QUICK START.
N.CLEAR key: Press this key, when programming a workout, to clear incorrect data, such as weight or age, before pressing the ENTER key. Pressing CLEAR during a workout stops it immediately, at which point, the MESSAGE CEN- TER displays a summary of the workout, including total time elapsed, total distance traveled, and total calories burned. Pressing CLEAR a second time causes the MESSAGE CENTER to prompt the user for a new workout setup.
O.HEADPHONE JACK: Headphones must be plugged into the Bike to access the sound for the iPod. The jack is not a
P.iPOD HOLDER: Users can attach an iPod via a
Q.iPOD KEYPAD: The keys are used to provide control of an iPod.
12

IPOD KEYPAD
 R
R
U 


S
T
R.MUTE: Press this key to turn off the sound.
S.PLAY / PAUSE: Use this key to Play or Pause the current track.
T.UP AND DOWN ARROW KEYS: Use these keys to select the next track and previous track.
U.LOWER AND HIGHER VOLUME KEYS: Use these key to increase or decrease the volume.
13

2.3READING RACK AND BOTTLE HOLDERS
Two water bottle holders (A) are available to hold water bottles and/or personal objects. Additionally, an integrated reading rack (B) for supporting a book or magazine is located at the base of the upper panel of the console.
14

3 HEART RATE ZONE TRAINING??
3.1WHY HEART RATE ZONE TRAINING?? EXERCISE?
Research shows that maintaining a specific heart rate while exercising is the optimal way to monitor the intensity of a workout and to achieve maximum results. That is the idea behind the Life Fitness Heart Rate Zone Training?? approach to exercise.
Zone Training identifies an exerciser's ideal heart rate range, or zone, for burning fat or increasing cardiovascular fitness. The zone is a percentage of the theoretical maximum (HRmax), and its value depends on the workout. The maximal heart rate formula is defined by the American College of Sports Medicine's "Guidelines for Exercise Testing and Prescription", 8th Edition, 2010. HRmax equals to 206.9 minus the total of 0.67 multiplied by a person???s age.
HR Max = 206.9 - (0.67 * age)
The Life Fitness Lifecycle exercise bike features exclusive workouts designed to take full advantage of the benefits of Heart Rate Zone Training+ exercise:
Each workout offers different benefits, as discussed in Section 4 The Workouts.
Note: Consulting a fitness trainer is recommended for defining specific fitness goals and designing a workout program.
To change the target heart rate during a workout use the ARROW keys. To switch between programs during a workout, use the CHANGE WORKOUTS key.
The Heart Rate Zone Training?? workout programs measure heart rate. Wear the optional Polar?? telemetry heart rate chest strap, or grip the LifepulseTM sensors, to enable the bike???s
Note: Reference the above chart for Theoretical Maximum Heart Rates and Target Heart Rates.
15
3.2HEART RATE MONITORING
THE LIFEPULSETM DIGITAL HEART RATE MONITORING SYSTEM
The patented Lifepulse system sensors are the
???Grasp two of the four sensors (A) firmly.
???Hold each sensor at the vertical midpoint.
???Keep hands steady and in place.
The console displays the heart rate within 10 to 40 seconds after the user grasps the sensors. The following factors may affect a Lifepulse reading: incorrect hand placement on the sensors, upper body activity, lotion or dirt on hands, and ex- cessive or insufficient pressure used when gripping the sensors.
16

THE OPTIONAL POLAR?? TELEMETRY HEART RATE CHEST STRAP
The Lifecycle Bike is equipped with Polar?? telemetry, a heart rate monitoring system in which electrodes, pressed against the skin, transfer heart rate signals to the console. These electrodes are attached to a Polar telemetry heart rate chest strap that the user wears during the workout. The Polar telemetry heart rate chest strap is optional. Contact Life Fitness Customer Support Services to order.
See the diagram below for correct positioning of the Polar telemetry heart rate chest strap. The electrodes (A), which are the two grooved surfaces on the underside of the strap, must remain wet to transmit accurately the electrical impulses of the heart back to the receiver. Moisten the electrodes. Then, secure the Polar telemetry heart rate chest strap as high under the chest muscles as possible. The strap should be snug, but comfortable enough to allow for normal breathing.
The transmitter strap delivers an optimal heart rate reading when the electrodes are in direct contact with bare skin. How- ever, it functions properly through a thin layer of wet clothing.
If it becomes necessary to
Note: If the Lifepulse system sensors are grasped while the chest strap is worn, and if the signals from the sensors are valid, the
 A
A  A
A 
17
4 THE WORKOUTS
4.1WORKOUT OVERVIEWS
The following workouts are
???QUICK START is the fastest way to begin exercising. After the QUICK START key is pressed, a
???MANUAL is a constant effort workout in which the user can change the intensity level at any time.
???RANDOM is an interval training workout of constantly changing intensity levels that occur in no regular pattern or progression.
???FAT BURN is a
???CARDIO is a higher intensity workout for more fit users, maximizing cardiovascular benefits and total calories burned. The user wears a Polar telemetry heart rate chest strap or grasps the LifepulseTM sensors continuously. The program adjusts the intensity level, based on the actual heart rate, to maintain the rate at 80% of the theoretical maximum.
???HILL is an interval training workout. Intervals are periods of intense aerobic exercise separated by regular periods of
???HEART RATE HILLTM takes the user through three different hills based on the target heart rate. The user wears a Polar telemetry heart rate chest strap or grasps the LifepulseTM sensors continuously.
???HEART RATE INTERVALTM alternates between a hill and a valley based on the target heart rate. The user wears a Polar telemetry heart rate chest strap or grasps the LifepulseTM sensors continuously.
???EXTREME HEART RATE TM is an intense workout for more experienced users. It is designed to get the heart rate up and down as quickly as possible. The user wears a Polar telemetry heart rate chest strap or grasps the LifepulseTM sensors continuously.
???SPORT TRAINING simulates an outdoor terrain by setting various resistance levels.
???EZ RESISTANCE features a gradual, subtle increase in resistance, independent of the user???s pedaling speed. A peak in resistance is followed by an equally subtle decrease in resistance.
18
The following workouts are accessed by pressing the WORKOUTS PLUS key.
???AROUND THE WORLD is an
???CASCADES is a
???FOOTHILLS is a rolling hill workout with low intensity levels.
???INTERVAL is a HILL workout in which intensity levels rise and fall. The higher levels gradually incline toward a peak and then gradually decline.
???KILIMANJARO is a HILL workout in which the intensity levels gradually incline toward one ultimate peak and then gradually decline.
???SPEED TRAINING is a HILL workout in which the intensity level alternates between high and low levels very quickly to simulate a typical speed training workout.
???LIFE FITNESS FIT TEST estimates cardiovascular fitness and can be used to monitor improvements in endurance every
???MILITARY FITNESS TEST is similar to the FIT TEST workout, except that this program is based upon a specific prede- fined protocol. The available test is:
???AIR FORCE PHYSICAL READINESS TEST (PRT) - (U.S. MILITARY)
???WATTS targets a rate of effort equal to a certain number of Watts. By default, this workout is turned off. For informa- tion on making it available, see Section 5, titled System Menu.
???METs targets a rate of effort equal to a certain number of METs. By default, this workout is turned off. For informa- tion on making it available, see Section 5, titled System Menu.
???AEROBICS TRAINER is a workout in which the MESSAGE CENTER prompts the user to switch continuously be- tween a high and low pedaling speed. The speed intervals alternate in a pattern that promotes a
19
4.2USING THE WORKOUTS
Different Bike workouts require different setup steps. See the chart at the end of this section for a quick glance at the steps for setting up any workout program. This section provides details on the steps themselves.
TO BEGIN A WORKOUT
Start pedaling and press START, or simply start pedaling to activate the console. The MESSAGE CENTER displays the prompt: ???SELECT WORKOUT USING ARROW KEYS OR PRESS QUICK START???. If it displays a different message, press the CLEAR key twice rapidly.
SELECTING AND USING QUICK START
QUICK START is the fastest way to begin exercising and bypasses the steps of selecting a specific workout program. At the MESSAGE CENTER prompt to select a workout, press the QUICK START key. The workout begins at an intensity level that remains the same unless manually changed.
SELECTING A WORKOUT
For all workouts: When prompted to select a workout, use the ARROW KEYS or WORKOUTS PLUS key to scroll through the workout names as they appear in the MESSAGE CENTER. When the desired workout appears, press ENTER.
For MY WORKOUTS, once a workout is configured and saved, no further setup steps are necessary. For more informa- tion, see Section 4.4, titled Using My Workouts Personal Programs.
ENTERING WEIGHT
When prompted by the MESSAGE CENTER to enter weight, use the ARROW keys to increase or decrease the displayed weight to the correct value and press ENTER. The default weight is 150 pounds or 68 kilograms.
ENTERING AGE
When prompted by the MESSAGE CENTER to enter age, use the ARROW KEYS to increase or decrease the displayed age to the correct value and press ENTER.
Life Fitness Bike workout programs that set a target heart rate zone first calculate the user???s theoretical maximum heart rate. The HRmax equals 206.9 minus the total of 0.67 multiplied by a person???s age. The programs then calculate the tar- get zone as a percentage of the theoretical maximum.
ENTERING TIME
When prompted by the MESSAGE CENTER to enter a time, use the ARROW keys to increase or decrease the displayed time to the desired value and press ENTER.
20
SELECTING AND ADJUSTING THE INTENSITY LEVEL
When prompted by the MESSAGE CENTER, use the ARROW keys to increase or decrease the displayed intensity level or target heart rate to the desired value and press ENTER. Adjust the level as needed or desired during the workout.
???Intensity level: The Bike provides a selection of 20 intensity levels. The intensity level appears in the WORKOUT PROFILE window as rows of lights arranged in columns. Selecting a low intensity level at first is recommended. As physical conditioning improves, the levels can be increased.
???Target heart rate: Programs that calculate a target heart rate base this number on the age of the user and the type of workout. The user accepts or adjusts the rate when setting up the workout. During the workout itself, the program reads the heart rate, which is transmitted via the heart rate chest strap or the Lifepulse system sensors; it uses this data to adjust the resistance. Manually raising the rate increases the intensity of the cardiovascular ex- ercise.
SELECTING A WORKOUT MODE
Two workout mode options on the Lifecycle exercise bike feature alternate ways to vary workouts.
???Bike Mode: This workout mode simulates the experience of riding a real bicycle. The rate of calories burned and total distance travelled increase automatically as the user increases the pedaling speed. This mode can be used with all workouts, except for FAT BURN, CARDIO, HEART RATE HILL, HEART RATE INTERVAL, EXTREME HEART RATE, WATTS, METS, FIT TEST, and AIR FORCE PRT. To select Bike mode, press the BIKE MODE key.
???
If the user selects a FAT BURN, CARDIO, HEART RATE HILL, HEART RATE INTERVAL, EXTREME HEART RATE,
WATTS, METS, FIT TEST, or AIR FORCE PRT workout during the setup, the default mode is
SWITCHING WORKOUTS
It is possible, during a workout, to switch to another workout program. After a switch, the console retains all the progress information about the workout since its beginning. To change workouts ???on the fly,??? simply press the CHANGE WORKOUT key for the desired new workout. This feature is available for all workouts except for AROUND THE WORLD, KILIMAN- JARO, INTERVAL, CASCADES, SPEED TRAINING, FOOTHILLS, FIT TEST and AIR FORCE PRT workouts.
PAUSING WORKOUTS
To pause a workout, simply stop pedaling. To resume, resume pedaling and press the ENTER key when prompted TO
CONTINUE WORKOUT.
ENDING WORKOUTS EARLY
To end a workout before the
21

STEPS TO SETUP EACH WORKOUT
22

4.3WORKOUT DESCRIPTIONS
QUICK START
QUICK START is the fastest way to begin exercising and bypasses the steps of selecting a specific workout program. The intensity level for the workout is set automatically and remains the same unless manually changed. To change the level, use the ARROW keys to enter a higher or lower level number.
MANUAL
The MANUAL program sets an intensity level that does not change automatically. While the workout is in progress, raise or lower the intensity level as desired using the ARROW keys.
RANDOM
The RANDOM program creates a terrain of hills and valleys that varies with each workout. More than one million different patterns are possible.
FAT BURN
The FAT BURN workout is designed to maintain a user???s heart rate at 65% of the theoretical maximum (HRmax) for opti- mal results. Throughout the workout, the user wears a Polar telemetry heart rate chest strap or grasps the LifepulseTM sensors. If the user is not wearing a Polar telemetry heart rate chest strap, the WORKOUT PROFILE WINDOW displays a heart shape, and the MESSAGE CENTER displays a prompt to grasp the sensors. The console continuously monitors and displays the heart rate, adjusting the intensity level of the Bike to reach and maintain the target. This system elimi- nates
CARDIO
The CARDIO workout is virtually identical to FAT BURN, however the target heart rate is calculated at 80% of the theoret- ical maximum (HRmax). The higher target promotes cardiovascular improvement by placing a heavier workload on the heart muscle.
SPORT TRAININGTM WORKOUT
This workout sets different hills, or resistance levels, throughout the course. Each hill matches a progressive degree of difficulty. Hills last between 30 and 60 seconds, depending on the workout duration.
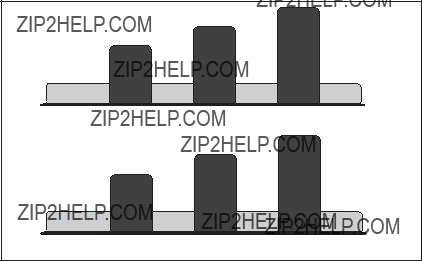
EZ RESISTANCE
In this workout, the gradual changes in resistance are extremely subtle, lowering perceived exertion. The changes in re- sistance also are independent of user???s pedaling speed. The cardiovascular workout is effective, efficient, and enjoyable at the same time.
The workout consists of one hill. The user determines the height of the peak of this hill by selecting an intensity level during the setup. The higher the level selected, the higher the intensity at the entry point, which is the beginning of the workout, and the higher the intensity at the peak, which occurs after 75% of the workout is completed. After the peak is reached, the resistance gradually returns to the same intensity level as that of the entry point. See the chart below.
23
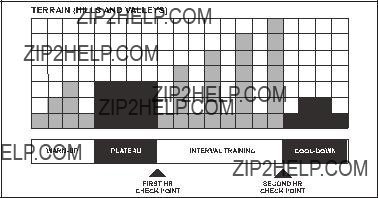
HILL
The Life
The HILL workout goes through four phases, each marked by different intensity levels. The WORKOUT PROFILE window displays the progress of these phases. As noted in the descriptions below, the heart rate should be measured at two stages in the workout to gauge its effectiveness. Wear the Polar telemetry heart rate chest strap or continuously grip the LifepulseTM handles. The MESSAGE CENTER does not display a request for a heart rate measurement, as it does with
CARDIO, FAT BURN and the HEART RATE ZONE TRAINING programs.
1.
2.Plateau increases the intensity slightly and keeps it steady, to bring the heart rate to the low end of the target zone. Check the heart rate at the end of this phase.
3.Interval Training is a series of increasingly steeper hills alternating with valleys or stints of recovery. The heart rate should rise to the high end of the target zone. Check the heart rate at the end of this phase.
4.Cool Down is a
Each column, as seen in the WORKOUT PROFILE WINDOW and the chart above, represents one interval. The overall duration of the workout determines the length of each interval. Each workout is made up of 20 intervals, so the duration of each interval is equal to the duration of the entire workout divided by 20.
1 to 9 minutes: A workout with a duration of less than 10 minutes is insufficient for the HILL program to complete all four phases adequately. The program therefore condenses a workout of this duration at various stages.
10 to 19 minutes: The interval durations initially are set at 30 seconds for a
20 to 99 minutes: All intervals last 60 seconds. If the user adds minutes to the
24
HEART RATE HILLTM
This program combines the standard HILL workout profile with the concept of Heart Rate Zone Training. The default tar- get heart rate is calculated as 80% of the theoretical maximum (HRmax), but the user can adjust the target rate during the workout setup. All hills and valleys are percentages of HRmax. The workout consists of three hills that target three heart rate goals:
???The first hill brings the heart rate to 70% of HRmax.
???The second hill increases the rate to 75% of HRmax.
???The third hill matches the Target Heart Rate bringing the heart rate to 80% of HRmax. The valley is always defined as 65% of HRmax.
After a standard
Hill
70% HRmax
User Example: 80 percent of theoretical maximum (HRmax) (40 year old / 144 recommended BPM)
25
HEART RATE INTERVALTM
This program also combines the standard HILL workout profile with the concept of Heart Rate Zone Training. The default target heart rate is calculated as 80% of the theoretical maximum (HRmax), but the user can adjust the target rate during the workout setup. The workout alternates between a hill, which brings the heart rate up to the target rate of 80% of HRmax, and a valley which brings the heart rate down to 65% of HRmax. After a standard
Hill
80% HRmax
Valley
User Example: 80 percent of theoretical maximum (HRmax) (40 year old / 144 recommended BPM)
26

EXTREME HEART RATETM
This intense, varied workout is designed to help more experienced users to break through fitness improvement plateaus. The workout alternates between two target heart rates as quickly as possible. The effect is similar to that of running sprints. The user must wear a Polar telemetry heart rate chest strap or grip the LifepulseTM sensors throughout the work- out.
When setting up the workout, the user enters a target heart rate. After a standard
27
WATTS
This workout targets a rate of effort equal to a certain number of Watts. A Watt is a unit of power that measures the amount of mechanical work required to operate a device, such as a Lifecycle exercise bike. It is roughly equal to .25 calo- ries per hour. The workout program automatically alters the intensity level to maintain the appropriate rate of effort. By de- fault, this workout is turned off. For information on making it available, see Section 5, titled System Menu.
METS
This workout targets a rate of effort equal to a certain number of METs. A MET is a unit of measurement used to express the metabolic rate of work (oxygen consumption per unit of body weight) required to perform a task. One MET is approximately equal to a person???s metabolism when seated and relaxed. By default, this workout is turned off. For information on making it available, see Section 5, titled Optional Settings.
AEROBICS TRAINER
In this workout, the MESSAGE CENTER continuously prompts the user to switch between a high pedaling speed and a low pedaling speed. These speed intervals alternate in a pattern that promotes a
The workout consists of 32 intervals, which are divided into groups of four. In the first group, the user encounters one fast interval followed by three slow intervals. The second group features two fast intervals followed by two slow intervals. The third group features three fast intervals followed by one slow interval. The fourth group, which is the most intense point of the workout, features four fast intervals. Afterward, the workout decreases in intensity, concluding with a group of four, consecutive, slow intervals. See the chart below:
The length of the intervals depends on the workout duration selected by the user.
28
FIT TEST
The Life Fitness Fit Test program is another exclusive feature of this product. The Fit Test workout estimates cardiovascu- lar fitness and can be used to monitor improvements in endurance every four to six weeks. The user must grasp the Lifepulse hand sensors when prompted or wear a heart rate chest strap, as the test score calculation is based on a heart rate reading. The workout duration will be five minutes at the chosen resistance level. Immediately afterward, the console will take the user's heart rate reading, calculate a fitness score, and display the score in the MESSAGE CENTER.
The Fit Test is considered to be a submax VO2 (volume of oxygen) test. It gauges how well the heart supplies oxygenated blood to the exercising muscles, and how efficiently those muscles receive oxygen from the blood. Physicians and exer- cise physiologists generally regard this test as a good measure of aerobic capacity. Please note that the estimated VO2 max scores achieved will be 10 percent to 15 percent lower on stationary exercise bikes than those achieved on other Life Fitness cardiovascular equipment. Stationary cycling has a higher rate of isolated muscle fatigue of the quadriceps when compared to walking/running on a treadmill, climbing on a stairclimber, or utilizing a bike. This higher rate of fatigue corre- sponds to lower levels of estimated VO2 max scores.
To set up the Fit Test:
???Begin pedaling.
???Press the WORKOUTS PLUS button repeatedly until the FIT TEST option appears in the message center. Press ENTER to select the FIT TEST option.
???The message center will prompt for a user weight (ENTER WEIGHT). Use the ARROW keys to input your weight. Press ENTER to accept the weight.
???The message center will next prompt for a user age (ENTER AGE). Use the ARROW keys to input your age. Press ENTER to accept the age.
???The message center will next prompt for a user gender (SELECT GENDER). Using the ARROW keys, select a gender. Press ENTER to accept the gender selection.
???The message center will next prompt for a workout level (ENTER LEVEL). Consult the following recommended fit test level chart for an appropriate effort level based on your age, gender and activity level. Use the UP/DOWN ARROW KEYS to enter the corresponding level.
After the
FIT TEST PROGRAM SUGGESTED EXERTION LEVELS
Suggested exertion levels should be used as a guideline for setting up the Fit Test program. The goal is to elevate the user's heart rate to a level that is between
Within each suggested range, these additional guidelines can be used:
* In cases of excessive weight, use lower half of range
The computer will not accept:
???heart rates less than 52 or greater than 200 beats per minute
???body weights less than 75 pounds (34 kg) or greater than 400 pounds (181 kg)
???ages below 10 or over 99 years
???data input that exceeds human potential
29
If you make an error when entering any Fit Test data, you can correct it by pressing CLEAR, inputting the correct informa- tion and pressing ENTER.
It is important for you to take the Fit Test under similar circumstances each time. Your heart rate is dependent on many factors, including:
???amount of sleep the previous night (at least seven hours is recommended)
???time of day
???time you last ate (two to four hours after the last meal is recommended)
???time since you last drank a liquid containing caffeine or alcohol, or smoked a cigarette (at least four hours is rec- ommended)
???time since you last exercised (at least six hours is recommended)
For the most accurate Fit Test results, you should perform the Fit Test on three consecutive days and average the three scores.
Note: To receive a proper Fit Test score, the work done must be within a training heart rate zone that is 60% to 85% of the theoretical maximum heart rate (HRmax). This program requires a constant exertion for accuracy, so it will not be allowed to resume if paused. This program will control level. Manual adjustment of level is not permitted.
The tables below list fit test results
Life Fitness developed this rating scale based on VO2 max percentile distributions referenced in American College of Sports Medicine's Guidelines for Exercise Testing and Prescription (8th E. 2010). It is designed to provide a qualitative description of a user's VO2 max estimation, and a means of assessing initial fitness level and tracking improvement.
30
MILITARY FITNESS TEST
The Lifecycle?? Exercise Bike features an Air Force Physical Readiness Tests (PRT). This test is similar to the fit test work- out, except that it does not have a preset time goal.
To begin an Air Force PRT:
???Press the WORKOUTS PLUS button repeatedly until the AIR FORCE PRT appears in the message center and press ENTER to select the AIR FORCE PRT option.
???The message center will prompt for a user weight (ENTER WEIGHT). Enter a weight between 75 - 400 pounds using the ARROW keys. Press ENTER to accept the weight.
???The message center will prompt for a user height (ENTER HEIGHT). Enter a height between 36 - 90 inches using the ARROW keys. Press ENTER to accept the height.
???The message center will next prompt for a user age (ENTER AGE). Enter an age between 17 - 70 years using the ARROW keys. Press ENTER to accept the age.
???The message center will next prompt for a user gender (SELECT GENDER). Using the ARROW keys, select a gen- der. Press ENTER to accept the gender selection.
???The message center will next prompt for a user Fitness Level ("Do you perform Aerobic Activity at least 3 times per week"). Using the ARROW keys, select 'YES' or 'NO'. Press ENTER to accept the selection.
The Air Force PRT begins after the user selects their Fitness Level and presses ENTER. During the PRT the user must maintain
4.4USING MY WORKOUTS PERSONAL PROGRAMS
The MY WORKOUTS personal programs feature makes it possible to
MY WORKOUTS allows the
MY WORKOUTS - PROGRAMMING OPTIONS
Press the CHANGE WORKOUTS key. Scroll through the names displayed in the MESSAGE CENTER, by pressing the ARROW keys. When the desired name appears, press ENTER. The workout then begins.
By factory default, the workouts are stored under the names MY WORKOUT 1 through MY WORKOUT 7. Each workout must be set up before it can be accessed. See the following section for steps to set up and change workouts stored under
MY WORKOUTS.
31
EDITING SETTINGS FOR WORKOUTS SAVED UNDER MY WORKOUTS
Use the following steps to change settings for a stored workout or to change a workout name.
1.When the MESSAGE CENTER displays the prompt ???SELECT WORKOUT USING ARROW KEYS OR PRESS QUICK START,??? press the CHANGE WORKOUTS key.
2.Scroll through the user names displayed in the MESSAGE CENTER by pressing the ARROW keys.
3.When the desired name appears, press the ENTER key.
4.The MESSAGE CENTER displays the prompt, ???SELECT MY WORKOUTS OPTIONS USING ARROW KEYS ??? THEN PRESS ENTER???. At this prompt, it is possible to select ???MY WORKOUTS NAMING??? to change a workout name, ???MY WORKOUTS CREATION??? to change settings for a workout, or ???MY WORKOUT STATISTICS??? to view statistics for a workout.
To change settings for a stored workout:
5.Select ???MY WORKOUTS CREATION??? and press ENTER.
6.Press ENTER to modify an existing workout, or press CLEAR to erase an existing workout.
7.Enter setup information as prompted by the MESSAGE CENTER. Use the ARROW keys to scroll through displayed values, and press ENTER to confirm the desired value. Once all information is entered, the MESSAGE CENTER dis- plays WORKOUT SAVED.
To view statistics for a stored workout:
5.Select ???MY WORKOUT STATISTICS,??? and press ENTER.
6.Scroll through the statistic displays by pressing the ARROW keys.
7.Press ENTER or CLEAR to return to the MY WORKOUTS menu.
To change a workout name
5.Select ???MY WORKOUTS NAMING,??? and press ENTER
6.The MESSAGE CENTER displays the prompt, ???SELECT LETTER USING CHANGE WORKOUT KEY AND CHANGE LETTER USING ARROW KEYS.??? The workout name appears in the MESSAGE CENTER, with the first letter blink ing. Scroll to the desired letter, number, or punctuation symbol, using the arrow key. When the desired character appears, press CHANGE WORKOUT to move on to the next letter. Repeat this step for all characters. Press the WORKOUTS PLUS key to move back one letter.
7.Press ENTER to save the new name. The MESSAGE CENTER displays, ???NAME SAVED.???
32
5 SYSTEM MENU
A special system menu is available to equipment owners and other authorized personnel to allow access to certain infor- mation, diagnostics tests and configuration settings.
5.1ENTERING AND USING THE SYSTEM MENU
The System Menu consists of 3 submenus including the Information submenu, Diagnostic submenu and Configuration submenu. To enter the System Menu press and hold down the UP ARROW key and then press the CLEAR key twice. Continue to hold down the UP ARROW key until the MESSAGE CENTER displays the words CODE VER. X.XX. This is the Information menu which is the default submenu in the System Menu.
INFORMATION MENU (CODE VER X.XX)
The Information submenu will display information identifying the software version numbers and their associated part num- bers as well as the version numbers of other installed software components. Use this menu when it is necessary to iden- tify the version/part numbers installed on the product. The UP and DOWN arrow keys can be used to navigate through the list of items that may be displayed. Press the CLEAR key once to exit the Information Menu and hence the System Menu.
DIAGNOSTIC MENU (SERVICE MENU)
The Diagnostics submenu allows technicians to run system diagnostics. This menu can be entered from the Information Menu by pressing and holding the COOL DOWN key then pressing the ENTER key. The MESSAGE CENTER will display the words SERVICE MENU. Pressing the ENTER key will navigate forward through the list of diagnostic utilities while pressing the CLEAR key will navigate backward. Use the CLEAR key repeatedly to exit the Diagnostic Menu.
CONFIGURATION MENU (OPTIONAL SETTINGS)
The Configuration submenu allows the owner to configure options for the product. This menu can be entered from the In- formation Menu by pressing the ENTER key. The MESSAGE CENTER will display the words OPTIONAL SETTINGS. Pressing the ENTER key will navigate forward through the list of optional settings while pressing the CLEAR key will navi- gate backward. Use the CLEAR key repeatedly to exit the Configuration Menu. See the next page for a list of configura- tion options (Optional Settings).
33
5.2SYSTEM CONFIGURATION (OPTIONAL SETTINGS)
34
6 SERVICE AND TECHNICAL DATA
6.1PREVENTIVE MAINTENANCE TIPS
The Life Fitness exercise bike is backed by the engineering excellence and reliability of Life Fitness and is one of the most rugged and
Note: Safety of the equipment can be maintained only if the equipment is examined regularly for damage or wear. Keep the equipment out of use until defective parts are repaired or replaced. Pay special attention to parts that are subject to wear, as outlined below.
REMARQUE: pour conserver un mat??riel s??r, il convient de l'inspecter r??guli??rement afin de d??celer tout signe d'usure ou d'endommagement. N'utilisez pas l'appareil tant que les pi??ces d??fectueuses n'ont pas ??t?? r??par??es ou remplac??es. Portez une attention toute particuli??re aux pi??ces qui s'usent, comme indiqu??
The following preventive maintenance tips will keep the Life Fitness exercise bike operating at peak performance:
???Locate the Life Fitness Bike in a cool, dry place.
???Keep the pedal straps fastened securely when using the Bike.
???Clean the top surface of the pedals regularly.
???Keep the display console free of fingerprints and salt
???Clean the display console and all exterior surfaces with an approved or compatible cleaner (see Life Fitness Approved Cleaners) and a soft cotton cloth.
???Long fingernails may damage or scratch the surface of the console; use the pad of the finger to press the selec- tion buttons on the console.
???Clean the housing thoroughly on a regular basis.
LIFE FITNESS APPROVED CLEANERS
Two preferred cleaners have been approved by Life Fitness reliability experts: PureGreen 24 and Gym Wipes. Both clean- ers will safely and effectively remove dirt, grime and sweat from equipment. PureGreen 24 and the Antibacterial Force for- mula of Gym Wipes are both disinfectants that are effective against MRSA and H1N1.
PureGreen 24 is available in a spray which is convenient to use. Apply the spray to a microfiber cloth and wipe down the equipment. Use PureGreen 24 on the equipment for at least 2 minutes for general disinfection purposes and at least 10 minutes for fungus and viral control.
Gym Wipes are large, durable
Contact Customer Support Services to order these cleaners
LIFE FITNESS COMPATIBLE CLEANERS
Mild soap and water or a mild
35
6.2PREVENTIVE MAINTENANCE SCHEDULE
36
6.3TROUBLESHOOTING THE OPTIONAL POLAR?? TELEMETRY HEART RATE CHEST STRAP
37

TROUBLESHOOTING THE OPTIONAL POLAR?? TELEMETRY HEART RATE CHEST STRAP (CONTINUED)
Belt transmitter electrodes are
not wet enough to pick up
Wet the belt transmitter
electrodes (see Section 3.2).
accurate heart rate readings.
38
6.4TROUBLESHOOTING THE iPOD??
39
TROUBLESHOOTING THE iPOD?? (CONTINUED)
40

6.5TROUBLESHOOTING THE LIFEPULSE SYSTEM SENSORS
If the heart rate reading is erratic or missing, do the following:
???Dry the hands if necessary to prevent slipping.
???Apply hands to both sensors;one in each hand.
???Grasp the sensors firmly.
???Apply constant pressure around the sensors.
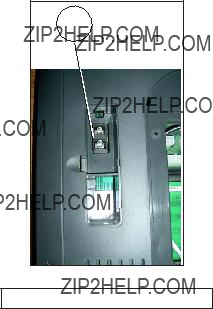
6.6HOW TO OBTAIN PRODUCT SERVICE /
SERIAL NUMBER LOCATION
1.Verify the symptom and review the operating instructions. The problem may be unfamiliarity with the product and its features and workouts.
2.Locate and write down the serial number of the unit which is lo- cated on the front stabilizer at the bottom of the unit.
3.Contact Life Fitness Customer Support Services.
Remove plastic shroud to find the small serial label location
6.7RECYCLING THE BATTERY
When this Life Fitness product is about to be discarded at the end of its useful life, the rechargeable battery must first be re- moved and recycled. If an optional external power supply is present, it must be disconnected before the battery is removed. To access the battery, remove the
41
7 SPECIFICATIONS
7.1LIFE FITNESS CSLU LIFECYCLE?? EXERCISE BIKE SPECIFICATIONS
42
7.2WARRANTY INFORMATION
WARRANTY COVERAGE: CSLU BIKE
NOTE - Warranty coverage begins at the original date of sale.
WHAT IS COVERED:
This Life Fitness consumer exercise equipment (???Product???) is warranted to be free of all defects in material and workmanship.
WHO IS COVERED:
The original purchaser or any person receiving the Product as a gift from the original purchaser.
HOW LONG IS IT COVERED:
All coverage is provided by specific Product according to the guidelines listed on the chart below.
WHO PAYS TRANSPORTATION & INSURANCE FOR SERVICE:
If the Product or any covered part must be returned to a service facility for re- pairs, We, Life Fitness, will pay all transportation and insurance charges for the first year. You are responsible for transportation and insurance charges during the second and third years (if applicable).
WHAT WE WILL DO TO CORRECT COVERED DEFECTS:
We will ship to you any new or rebuilt replacement part or component, or, at our option, replace the Product. Such replacement parts are warranted for the re- maining portion of the original warranty period.
WHAT IS NOT COVERED:
Any failures or damage caused by unauthorized service, misuse, accident, neg- ligence, improper assembly or installation, debris resulting from any construction activities in the Product???s environment, rust or corrosion as a result of the Prod- uct???s location, alterations or modifications without our written authorization or by failure on your part to use, operate and maintain the Product as set out in your Operation Manual (???Manual???).
Two type RJ45 interchangeable Network ready and Fitness Entertainment ports are supplied with the Product. These ports comply with the FitLinxx CSAFE specification dated August 4, 2004 stating: 4.75VDC to 10VDC; maximum cur- rent of 85mA. Any Product damage caused by a load exceeding this FitLinxx CSAFE specification is not covered by warranty.
All terms of this warranty are void if this product is moved beyond the continental borders of the United States of America (excluding Alaska, Hawaii and Canada) and are then subject to the terms provided by that country???s local authorized Life Fitness representative.
WHAT YOU MUST DO:
Retain proof of purchase (our receipt of the attached registration card assures registration of purchase information but is not required);
use, operate and maintain the Product as specified in the Manual;
notify Customer Support Services of any defect within 10 days after discovery of the defect; if instructed,
return any defective part for replacement or, if necessary, the entire Product for repair.
OPERATION MANUAL:
It is VERY IMPORTANT THAT YOU READ THE MANUAL before operating the Product. Remember to perform the periodic maintenance requirements specified in the Manual to assure proper operation and your continued satisfaction.
HOW TO GET REPLACEMENT PARTS & SERVICE:
Simply call Customer Support Services at (800)
Before shipping:
1.obtain a Return Authorization Number (RA#) from Customer Support Serv- ices
2.securely pack your console (use the original shipping carton, if possible)
3.write the RA# on the outside of the carton
4.insure the console, and
5.include a letter explaining the defect or problem and a copy of your proof of purchase if you believe the service is covered by warranty
EXCLUSIVE WARRANTY:
THIS LIMITED WARRANTY IS IN LIEU OF ALL OTHER WARRANTIES OF
ANY KIND EITHER EXPRESSED OR IMPLIED, INCLUDING BUT NOT LIM-
ITED TO THE IMPLIED WARRANTIES OF MERCHANTABILITY AND FITNESS
FOR A PARTICULAR PURPOSE, AND ALL OTHER OBLIGATIONS OR LIABIL- ITIES ON OUR PART. We neither assume nor authorize any person to assure for us any other obligation or liability concerning the sale of this Product. Under no circumstances shall we be liable under this warranty, or otherwise, of any damage to any person or property, including any lost profits or lost savings, for any special, indirect, secondary, incidental or consequential damages of any na- ture arising out of the use of or inability to use this Product. Some states do not allow the exclusion or limitation of implied warranties or of liability for incidental or consequential damages, so the above limitations or exclusions may not apply to you.
CHANGES IN WARRANTY NOT AUTHORIZED:
No one is authorized to change, modify or extend the terms of this limited war- ranty.
EFFECT OF STATE LAWS:
This warranty gives you specific legal rights and you may have other rights which vary from state to state.
OUR PLEDGE TO YOU:
Our Products are designed and manufactured to the highest standards.
We want you completely satisfied with our Products and will do everything possi- ble under the terms of this warranty to keep you secure in knowing you have bought the best!
43