MT-100 Wet/Dry Band Saw

User Guide

Thank you for buying this MTI product. Please take time to read all the instructions to understand the correct components, set up, and use of the model you purchased.

Safety

???It is extremely important to wear proper eye protection when using any saw. We highly recommend that you wear safety goggles rather than safety glasses.

???DO NOT wear loose clothing or any accessories (long necklaces, bracelets, shirts with long fringes, and similar) that might get caught by the saw during operation.

???Use only in a properly grounded and tested outlet. Under NO circumstances should you override the grounding system or modify the plug.

???Set up your machine on a sturdy, level work surface that is water tolerant and a

comfortable height to work on.

Assembly Instructions

Exploded View

Assembly will take about 5 minutes and only requires a Phillips screwdriver. If a part is already installed on your machine, skip to the next section. Use the exploded drawing on the following page to reference parts during the assembly process.

1

Installing the Blade

1.Open the front cover of the saw. If you have a toothed blade, make sure to mount it with the teeth pointing downward, in the direction of sawing. Diamond blades are positioned with the diamond surface facing the saw front.

2.Position the blade around the lower wheel and into the right and left guide channels. DO NOT bend or twist the blade at any time during installation or use.

2

3.Use one hand to grasp the bottom of the upper wheel between two spokes and pull the bottom of the wheel towards you (approximately 3/8", but you should feel it move easily initially and then "hit" and not want to go further without forcing), then, while the wheel is tilted towards you, pull the wheel down enough to place the blade around the wheel using your other hand.

4.Slowly release the wheel as you make sure the blade remains on both wheels and passes through the right and left channels.

5.Tracking, the position of the blade on the wheels, is controlled by adjusting the tilt of the upper wheel. Check the tracking by rotating the lower drive wheel several revolutions by hand while watching the position of the blade on the wheels. The blade should remain centered on both wheels. If the blade isn???t centered or comes off either wheel, you will need to adjust the tracking and alignment as outlined in the next sections. If the blade rides centered on the wheels skip to installing the table.

Adjusting Blade Tracking and Alignment

The wheels are factory aligned so that the position of the blade is controlled by adjusting the upper wheel tilt. On the back of the upper housing is the tension device with a nylon tilt adjustment screw in the middle. Be aware that any changes made to the blade position on the upper wheel will have the opposite effect on the blade???s position on the lower wheel. Read through the possible problems below to find the one that best describes what is happening when you hand turned the wheel and follow the instructions for fixing it. Make all adjustments in small increments.

1.If the blade ???walks??? off the front of the upper wheel: Tilt the top of the upper wheel backward by turning the nylon tilt adjustment screw to the right (clockwise). Make 1/2 turn adjustments and test the effect on tracking by hand turning the lower wheel. Repeat as necessary until the blade remains in the correct position.

2.If the blade ???walks??? to the back of the upper wheel: Tilt the top of the upper wheel forward by turning the nylon tilt adjustment screw to the left (counter-clockwise). Make 1/2 turn adjustments and test the effect on tracking by hand turning the lower wheel.

Repeat as necessary until the blade remains in the correct position.

3.If the blade "walks" off the lower wheel: This indicates that the upper and lower wheels are not in alignment with each other. The lower (fixed) wheel is closer to the back of the frame than the upper (adjustable) wheel. The lower wheel should be 1/2??? from the inside of the frame. You can check this with a ruler or scale. The lower wheel can be moved in or out by inserting the 5/64??? long arm Allen wrench through the hole in the lower

3

left side of the saw???s frame and loosening the set screw on the brass arbor. Move the wheel to the correct position, check with the ruler or scale, and secure the set screw.

Blade Tension

Proper blade tension is important for ease of cutting and obtaining maximum blade life. The tension springs lessen the stress that twists and pulls put on the blade to maximize blade life. All MTI saws have tension springs preset for a blade 37.7" in circumference (+ or - .005"). That is the exact dimension of MTI brand blades. If you use an MTI blade you should never have problems with tension. Some competitors make blades that are only 37.2???. These blades will have too much tension which could shorten blade life. We highly recommend the use of MTI brand blades for all MTI brand saws.

Installing the Work Table

Place the metal table on the table supports with the split facing the front of the saw. Use a Phillips screw driver to attach the table using the (4) 10-24 1/2??? phillips screws. Take care not to overtighten.

Our patented BladeSert??? eliminates the need for upper blade guides by providing blade support where it is most crucial: at the point of sawing. Place the BladeSert??? into the work surface making sure the blade passes through the slot and the split faces the saw front.

IMPORTANT NOTE: The BladeSert??? will wear with saw use. The slot that the blade passes through will widen over time. Using a worn BladeSert??? allows for excess play in the blade and the blade becomes more likely to break. How fast this happens will depend on use and your sawing style. You should check the BladeSert??? for wear each time you use the saw. Immediately replace the BladeSert??? when it begins to show signs of widening and wear. It is also a good practice to use

4

a new BladeSert??? whenever you install a new blade.See the BladeSert??? User Guide for more information.

Installing the Coolant Hose Holder and Coolant Reservoir

The gray coolant hose holder and coolant reservoir must be installed when using a diamond saw blade. The reservoir and hose holder feed coolant to the blade. Using coolant with a diamond blade is imperative to maintaining the cutting ability and life of the blade.

Install the drip blade guide by placing it against the upper back of the frame with the blade passing through the vertical slot in the holder front. Secure using (2) 10-24 x 3/4??? thumb screws. Attach the length of small diameter plastic tubing (about 10??? long) to the stem on the back of the coolant hose holder. NOTE: Running the end of the plastic hose under warm water makes it easier to insert onto the stem.

Installing Drain Hose

When using a diamond blade, the coolant drain hose must be installed. This is the large diameter plastic tube (about 48" long). If you are using the WoodCut??? or MetalCut??? blade omit this step.

Straighten the hose before using by soaking it in warm water a few minutes and then pull it to remove any kinks. Slide the drain hose onto the large stem located at the bottom front of the saw. Put the opposite end of the hose into a collection container placed below the saw. Position the saw to the front edge of your work bench with the drain hose laying flat and extending straight out and then down off the work bench into the collection container.

NOTE: Periodically remove the hose and flush out any cutting residue to keep it working correctly.

5

Optional Leather Wiper

The leather wiper functions to help reduce the amount of over spray that might be carried from the blade to the upper wheel chamber. If you run the saw with a diamond blade, we recommend you install the wiper at this time. If you are using a WoodCut??? or MetalCut??? blade the wiper is not needed and you may omit this step.

Installing the Wiper:

1.Use a pair of pliers to compress one end of the leather wiper. Clamp down hard.

2.Apply a small amount of common bar soap to the crimped end.

3.Use your pliers to push the crimped end into the slot so that the edge of the leather just brushes against the blade. Make sure the wiper does not push the blade out of its normal path.

Using the Diamond Blade

If you have purchased a saw with a diamond blade or are installing a diamond blade for use on your saw, please follow the instructions outlined below for its proper use. Your saw must be converted for wet sawing before use.

1.Before sawing with a diamond blade, check to make sure the coolant reservoir, coolant hose holder and drain hose are installed on the saw (see steps above).

2.Make sure that the coolant flow adjustment screw on the back of the reservoir is closed shut and then fill the reservoir with water. You can fill the reservoir with plain water or add a capful of MTI Diamond Coolant (stock no. 50011).

3.Plug the saw into a grounded electrical outlet.

6

4.Make sure you have proper eye protection on before operating the saw.

5.Turn on the saw. The black control knob is located on the left side of the saw. Please note the saw has a variable speed motor. You need to turn the knob slowly until you reach your desired sawing speed. It is not necessary to run your saw at full speed to achieve maximum cutting ability. In fact running the saw at full speed on a continual basis cases extra stress on the blade and does not increase its cutting ability.

6.Adjust the flow of coolant onto the blade by slowly turning the coolant flow adjustment screw. Coolant flow rate should be about one drop of coolant every 4-5 seconds. Water should not flow excessively. Increase the water flow rate ONLY if the dry powder forms on the tip of the material being sawed.

7.With the saw now running, place a scrap piece of material flat on the work table in front of the blade. Using light pressure, guide the material into the blade. It is important not to force or push material into the diamond blade . Once you have the right "feel", the blade will seem like it is pulling material into it. Pushing into the blade will not increase cutting speed and is more likely to bog it down. Use the speed control to adjust the sawing speed to the material being cut and intricacy involved. The tighter the cut, the slower the speed needed to maintain control and not twist the blade.

8.Your blade will last longer if you do not let the motor run idly. The continuous bending and unbending that the metal experiences as it moves over the wheels causes the blade to work harden and become brittle over time. A properly used blade will often fail from this work hardening before the diamonds wear out. To maximize the value of your blade, make sure you are using the diamonds every time you make that metal bend and unbend.

9.Shut off the coolant flow after use. Frequently check the reservoir level while sawing and fill as needed.

Using the WoodCut??? or MetalCut??? Blade

If you have purchased a saw with a WoodCut??? blade or are installing a WoodCut??? or MetalCut??? blade onto your saw, follow the instructions outlined here for proper use.

1)If your saw was set up for wet sawing using a diamond blade, make sure the flow adjustment screw that controls the water drip rate is completely turned off. Drain the water coolant reservoir. Remove the drain hose and dry out the interior of the saw.

2)Install the blade with the teeth pointing downward. Refer to installing the blade on page 3.

3)Plug the saw into a grounded outlet.

4)Wear safety eye protection while operating the saw.

5)Turn the saw on. The black control knob is on the left of the saw. Please note that the saw has a variable speed motor. When turning the saw on, turn the speed up slowly to your desired sawing speed. It is not necessary to run the saw at full speed to cut. In fact, running the saw at full speed on a continual basis will cause extra stress on the blade and does not increase its cutting ability.

6)With the saw now running, place a scrap piece of material flat on the work table in front of the blade. Using light pressure at first, slowly guide the material into the blade. It is important not to force material into the blade. Allow the blade to do the work. As you get the right "feel", the blade will seem to pull the material into it.

7

7)Pushing too hard will not increase cutting speed. It will actually slow it down. Use the speed control to adjust sawing speed to the material being cut and intricacy involved. For tight inside curves and intricate work, operate at a slower speed to maintain control and not twist the blade.

8)If the blade seems limp, loose or slips on the wheels as you saw, adjust the blade tension or tracking as outlined on page 3 and check the BladeSert??? for wear, replace as needed.

Sawing Tips For All Blades

Sawing effectively is an acquired skill. Just remember to let the blade do the work. Be aware that sawing with a diamond blade is quite different than sawing with toothed blades. The diamond in the blade is actually wearing away the material being cut rather than ripping fibers like a wood blade.

1.Wear safety eye protection while operating your saw.

2.Never leave the saw running when not in use. The blade will last longer.

3.Guide the material straight into the blade. Never push or force the cutting action.

4.Use lighter pressure and slower speeds when starting a cut and then increase speed to the desired cutting level.

5.Never twist or bend the blade.

6.Slower speeds and lighter pressure are recommended for intricate cuts, tight curves, when completing a cut or when backing out of a cut.

7.If a dry powder appears on the cutting surface or in the air when wet sawing with the diamond blade, more coolant (water) is needed. Check the reservoir level first. If there is plenty of coolant, increase the drip rate by slowly turning the coolant adjustment screw on reservoir.

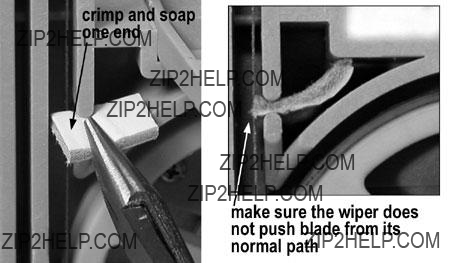
8.If excess coolant (water) is spraying off the blade or coolant puddles on the work surface when wet sawing, check the drip rate. You may also want to install the leather wiper to help control excess water on the blade. (See page 4 for leather wiper instructions)

9.You can use the WoodCut??? or MetalCut??? blade "wet" when sawing plastics and fiberglass to reduce heat and melting.

10.Keep out of the reach of children.

11.Turn off and unplug your saw when not in use.

Maintenance

Maintenance to your saw is minimal but important to prolonging the life and performance of the machine.

1.Saw Frame: The main components of your saw are virtually maintenance free. Periodically clean the interior of your saw. Either rinse clean with water or wood and metal cutting residues can be vacuumed out.

2.The Motor: The unit is sealed and requires no internal maintenance. Make sure to keep the entire unit clean and dry.

3.Upper Drive Wheel: The upper drive wheel needle bearing should be oiled about every 10 hours of running time. Do this by first emptying the coolant reservoir if need be. Tilt the saw backward at a 45?? angle. Place 4 to 6 drops of general purpose oil into the bearing area.

4.BladeSert??? Blade Guide: The BladeSert??? will wear with saw use. The slot that the blade passes through will widen over time. Using a worn BladeSert??? allows for excess play in the blade and the blade becomes more likely to break. How fast this happens will depend on use and your sawing style. You should check the BladeSert??? for wear each time you use the saw. Immediately replace the BladeSert??? when it begins to show signs of widening and wear. You can use the "X" behind the slot as a wear guide. When the

8

slot has worn out beyond the reach of the legs of the "X" (enhanced detail image) it is time to replace the BladeSert. It is no longer providing proper support for your blade. The "X" also serves as reminder not to deflect the blade more than this amount in either direction.

5.Leather Wiper: The wiper does wear as the blade brushes against it. As the end wears, move the wiper back up against the blade, referring to section on page 5 for proper placement.

6.Work Table: The work table may be either metal or plastic, depending on the year and model you purchased. Periodically wipe down or rinse the table to remove accumulated cutting residue.

7.Large Drain Hose: Periodically remove the hose and rinse it to remove cutting residue and keep it free flowing.

Service

Questions about your saw can be answered by calling MTI Customer Service at 1-800-525- 3070 Monday through Friday, 9:00 am to 5:00 PM Pacific time, by visiting the MTI web site at www.mtixtl.com, or e-mail customer service at info@mtixtl.com.

9