DIRECTV?? HD
Receiver
OWNER???S MANUAL
MODEL :
Before connecting, operating or adjusting this product, please read this instruction booklet carefully and completely.
DIRECTV?? HD
Receiver
OWNER???S MANUAL
MODEL :
Before connecting, operating or adjusting this product, please read this instruction booklet carefully and completely.
SAFETY WARNING
THE LIGHTNING FLASH WITH ARROWHEAD SYMBOL, WITHIN AN EQUILATERAL TRIANGLE, IS INTENDED TO ALERT THE USER TO THE
PRESENCE OF UNINSULATED ???DANGEROUS VOLTAGE??? WITHIN THE PRODUCT???S ENCLOSURE THAT MAY BE OF SUFFICIENT MAGNITUDE TO
CONSTITUTE A RISK OF ELECTRIC SHOCK TO PERSONS.
THE EXCLAMATION POINT WITHIN AN EQUILATERAL TRIANGLE IS INTENDED TO ALERT THE USER TO THE PRESENCE OF IMPORTANT
OPERATING AND MAINTENANCE (SERVICING) INSTRUCTIONS IN THE LITERATURE ACCOMPANYING THE APPLIANCE.
WARNING
TO PREVENT FIRE OR SHOCK HAZARDS, DO NOT EXPOSE THIS PRODUCT TO RAIN OR MOISTURE.
WARNING: Do not install this equipment in a confined space such as a bookcase or similar unit.
NOTE TO CABLE/TV/SATELLITE DISH INSTALLER:
This reminder is provided to call the cable TV system/satellite dish installer???s attention to Article
REGULATORY INFORMATION : FCC PART 15
This equipment has been tested and found to comply with the limits for a Class B digital device, pursuant to Part 15 of the FCC Rules. These limits are designed to provide reasonable protection against harmful interference when the equipment is operated in a residential installation. This equipment generates, uses and can radiate radio frequency energy and, if not installed and used in accordance with the instruction manual, may cause harmful interference to radio communications. However, there is no guarantee that interference will not occur in a particular installation. If this equipment does cause harmful interference to radio or television reception, which can be determined by turning the equipment off and on, the user is encouraged to try to correct the interference by one or more of the following measures:
-Reorient or relocate the receiving antenna.
-Increase the separation between the equipment and receiver.
-Connect the equipment into an outlet on a circuit different from that to which the receiver is connected.
-Consult the dealer or an experienced radio/TV technician for help.
REGULATORY INFORMATION: FCC Part 68
???This product complies with Part 68 of the FCC rules. On the back of this product is a label that contains, among other information, the FCC registration number and Ringer Equivalent Number (REN) for this product. If requested, this information must be provided to the telephone company.
???The REN is used to determine the quantity of devices that may be connected to the telephone line. Excessive RENs on the telephone line may result in the devices not ringing in response to an incoming call. Typically, the sum of the RENs should not exceed five (5). To be certain of the number of devices that may be connected to the line (as determined by the total RENs) contact the local telephone company.
???If this product causes harm to the telephone network, the telephone company will notify you in advance that temporary discontinuance of service may be required. But if advance notice isn???t practical, the telephone company will notify the customer as soon as possible. Also, you will be advised of your right to file a complaint with the FCC if you believe it is necessary.
???The telephone company may make changes to its facilities, equipment, operations or procedures that could affect the operation of the product. If this happens, the telephone company will provide advance notice so you can make the necessary modifications to maintain uninterrupted service.
???Connection to party line service is subject to state tariffs. (Contact the state public utility commission, public service commission, or corporate commission for information.)
???If trouble is experienced with this product, for repair or warranty information, please contact LG Electronics Inc. If the product is causing harm to the telephone network, the telephone company may request that you disconnect the product until the problem is resolved.
???An FCC compliant telephone cord and modular plug is provided with this equipment. This equipment is designed to be connected to the telephone network or premises wiring using a compatible modular jack which is Part 68 compliant. See installation instructions for details.
COMPLIANCE: The responsible party for this product???s compliance is:
Zenith Electronics Corporation, 2000 Millbrook Drive, Lincolnshire, IL, 60069, USA Phone:
CAUTION
DO NOT ATTEMPT TO MODIFY THIS PRODUCT IN ANY WAY WITHOUT WRITTEN AUTHORIZATION FROM LG ELECTRONICS CORPORATION. UNAUTHORIZED
MODIFICATION COULD VOID THE USER???S AUTHORITY TO OPERATE THIS PRODUCT.
THIS EQUIPMENT IS INTENDED TO RECEIVE AND DECODE SIGNALS TRANSMITTED ACCORDING TO ATSC DIGITAL TELEVISION STANDARD A/53, DIRECTV
SPECIFICATION AND IS INTENDED TO BE USED WITH AN APPROPRIATE ANTENNA, DISH AND DISPLAY DEVICE THAT YOU MUST PROVIDE.
Dolby Digital??
Manufactured under license from Dolby Laboratories. ???Dolby??? and the
Macrovision Information
This product incorporates copyright protection technology that is protected by U.S. patents and other intellectual property rights. Use of this copyright protection 1 technology must be authorized by Macrovision, and is intended for home and other limited
engineering or disassembly is prohibited.

DECLARATION OF CONFORMITY
This device complies with Part 15 of the FCC Rules. Operation is subject to the following two conditions : (1) this device may not cause harmful interference, and (2) this device must accept any interference received, including interference that may cause undesired operation.
Equipment Classification : Part 15 TV Interface Device
Type of Product(EUT) : DIRECTV?? HD Receiver
Manufacturer : LG Electronics Inc.
Address :
Attention : Mr. H.S. Lee - General Manager
Digital Media Standards Group
We here by declare that the equipment bearing the trade and model number specified above was tested conforming to the applicable FCC Rules under the most accurate measurement standards possible, and that all the necessary steps have been taken and are in force to assure that production units of the same equipment will continue to comply with the Commission???s requirements.


 -
-


 .
.
2

IMPORTANT SAFETY INSTRUCTIONS
CAUTION: PLEASE READ AND OBSERVE ALL WARNINGS AND INSTRUCTIONS IN THIS OWNER???S MANUAL
AND THOSE MARKED ON THE UNIT. RETAIN THIS BOOKLET FOR FUTURE REFERENCE.
This set has been designed and manufactured to assure personal safety. Improper use can result in electric shock or fire hazard. The safeguards incorporated in this unit will protect you if you observe the following procedures for installation, use, and servicing.
This unit does not contain any parts that can be repaired by the user.
DO NOT REMOVE THE CABINET COVER, OR YOU MAY BE EXPOSED TO DANGEROUS VOLTAGE. REFER
SERVICING TO QUALIFIED SERVICE PERSONNEL ONLY.
1.Read these instructions. - All these safety and operating instructions should be read before the product is operated.
2.Keep these instructions. - The safety, operating and use instructions should be retained for future reference.
3.Heed all warnings. - All warnings on the product and in the operating instructions should be adhered to.
4.Follow all instructions. - All operating and use instructions should be followed.
5.Do not use this apparatus near water. ??? For example: near a bath tub, wash bowl, kitchen sink, laundry tub, in a wet basement; or near a swimming pool; and like.
6.Clean only with dry cloth. ??? Unplug this product from the wall outlet before cleaning. Do not use liquid cleaners.
7.Do not block any ventilation openings. Install in accordance with the manufacturer???s instructions. - Slots and openings in the cabinet are provided for ventilation and to ensure reliable operation of the product and to protect it from over- heating. The openings should never be blocked by placing the product on a bed, sofa, rug or other similar surface. This product should not be placed in a
8.Do not install near any heat sources such as radiators, heat registers, stoves, or other apparatus (including amplifiers) that produce heat.
9.Do not defeat the safety purpose of the polarized or
10.Protect the power cord from being walked on or pinched particularly at plugs, convenience receptacles, and the point where they exit from the apparatus.
11.Only use attachments/accessories specified by the manufacturer.
12.Use only with the cart, stand, tripod, bracket, or table specified by the manufacturer, or sold with apparatus. When a cart is used, use caution when moving the cart/ apparatus combination to avoid injury from
13.Unplug this apparatus during lightning storms or when unused for long periods of time.
14.Refer all servicing to qualified service personnel. Servicing is required when the apparatus has been damaged in any way, such as power- supply cord or plug is damaged, liquid has been spilled or objects have fallen into the apparatus, the apparatus has been exposed to rain or moisture, does not operate normally, or has been dropped.
3

IMPORTANT INFORMATION
Due to copyright restrictions, you may not be able to view some
In certain markets, access to local channels requires a DIRECTV??
Activation of programming may be subject to credit approval and requires valid service address, social security number and/or major credit card. Deposit or prepayment may be required. Programming subject to change. You must be physically located in the U.S. to subscribe to DIRECTV service. DIRECTV services not available outside the U.S. DIRECTV pro- gramming is sold separately and independently of DIRECTV System hardware. A valid pro- gramming subscription is required to operate DIRECTV System hardware. Activate your DIRECTV programming today at
DIRECTV, Inc. DIRECTV, the Cyclone Design logo and Advanced Program Guide are trademarks of DIRECTV, Inc., a unit of Hughes Electronics Corp. and are used with permission.
4

TABLE OF CONTENTS
5

7. Advanced Program Guide???
9. EZ
Product Specifications . . . . . . . . . . . . . . . . . . . . . . . . . . . . . .117
Warranty . . . . . . . . . . . . . . . . . . . . . . . . . . . . . . . . . .Rear Cover
6

1. INTRODUCTION
Welcome to the
The DIRECTV HD Receiver delivers a variety of programs from DIRECTV and has a
The Advanced Program Guide??? delivered via satellite service also enables you to access and view program listings for
The ATSC Tuner uses LG???s 4th generation VSB technology for improved
The
7

Ultimate Entertainment
??? A Wide Variety of Programs
Hundreds of channels are available by subscription from DIRECTV.
??? DIRECTV Advanced Program Guide???
Instant access for up to seven days of program listings.
Ability to jump a day or 6 hours at a time.
Ability to search and tune by program title, key word, or category.
Technical Flexibility
???Seamless Tuning between Channels
Tune seamlessly to
???Multiple Output Jacks
Multiple output jacks are provided on the back panel of the DIRECTV?? HD Receiver ensuring max- imum connectivity to a variety of display devices.
???Screen Format Adaptability
Various screen formats are available including 1080i, 720p, 480p, 480i, variable 1, variable 2, vari- able 3, auto DVI, and true native modes.
??? ANT/CABLE Only Mode
Viewing analog/digital broadcasting with an
??? Simultaneous 480i Display Output
Supporting simultaneous 480i Display Output for
Superior Performance
??? Crisp Picture
??? Superior Sound
Sensational sound with Dolby Digital?? 5.1 channels.
???
For an
??? RF Remote Control
Remote control access from your easy chair, anywhere in the room, or even from another room within your home.
Convenient Use
??? EZ Help
??? EZ
The
??? Setup Wizard
??? Easy Recording to VCR
Up to seven days of program guide information from which shows can be easily selected for auto- matic VCR recording.
8

2. IMPORTANT OVERVIEW
Satellite
Digital Analog signal signal
DIRECTV
TV
HD Receiver
Digital broadcasting is a new way of sending programs over the airwaves with superior qual- ity video and audio. The DIRECTV?? HD Receiver enables you to take full advantage of digital broadcasting. To fully enjoy it, it is helpful to understand the ways that program signals are sent.
There are two types of TV signal formats; analog (often called NTSC format; National Television System Committee) and digital (ATSC format; Advanced Television System Committee). Digital formats are classified into three categories:
There are also three ways that program signals can be received;
9
Standard Comparison Table
The digital TV standards allow several different formats. Broadcasters can choose between
four formats:
???480p - The picture is 704 x 480 pixels, sent at 60 complete frames per second (480i is also possible, sent at 60 interlaced frames per second).
???720p - The picture is 1280 x 720 pixels, sent at 60 complete frames per second.
???1080i - The picture is 1920 x 1080 pixels, sent at 60 interlaced frames per second (30 complete frames per second).
(The ???p??? and ???i??? designations stand for ???progressive??? and ???interlaced.??? In a progressive for- mat, the full picture updates every sixtieth of a second. In an interlaced format, half of the pic- ture updates every sixtieth of a second.)
The 480i format is called SD. 480p format is called the ED format. 480i is roughly equivalent to a normal analog TV picture. The 720p and 1080i formats are called the HD formats.
Some analog televisions can display a picture 720 pixels wide by 480 pixels high, that???s a total of 345,600 pixels. HD digital signals can have a maximum resolution of 1920 x 1080, that???s 2,073,600 pixels, or six times more pixels than the older resolution. Pictures will be crisper and cleaner, with more detail in every
10

2. IMPORTANT OVERVIEW
The DIRECTV?? HD Receiver provides several display formats. Pressing the DISPLAY FORMAT button repeatedly on the front panel changes the display formats following order: 1080i ??? 720p ??? 480p ??? 480i ??? native ??? variable 1 ??? variable 2 ??? variable 3 ??? EZ DVI. In 1080i, 720p, 480p, and 480i modes, all input signal formats are converted to the chosen dis- play format. In native, variable 1, variable 2, and variable 3 modes, the output display for- mat is automatically adapted depending on input signal format, as follows.
In EZ DVI mode, the output display format is automatically adapted based on the preferred res- olution format of the
Note : Only one of the YPbPr, RGB or
Note : The EZ DVI mode is only available when a
11

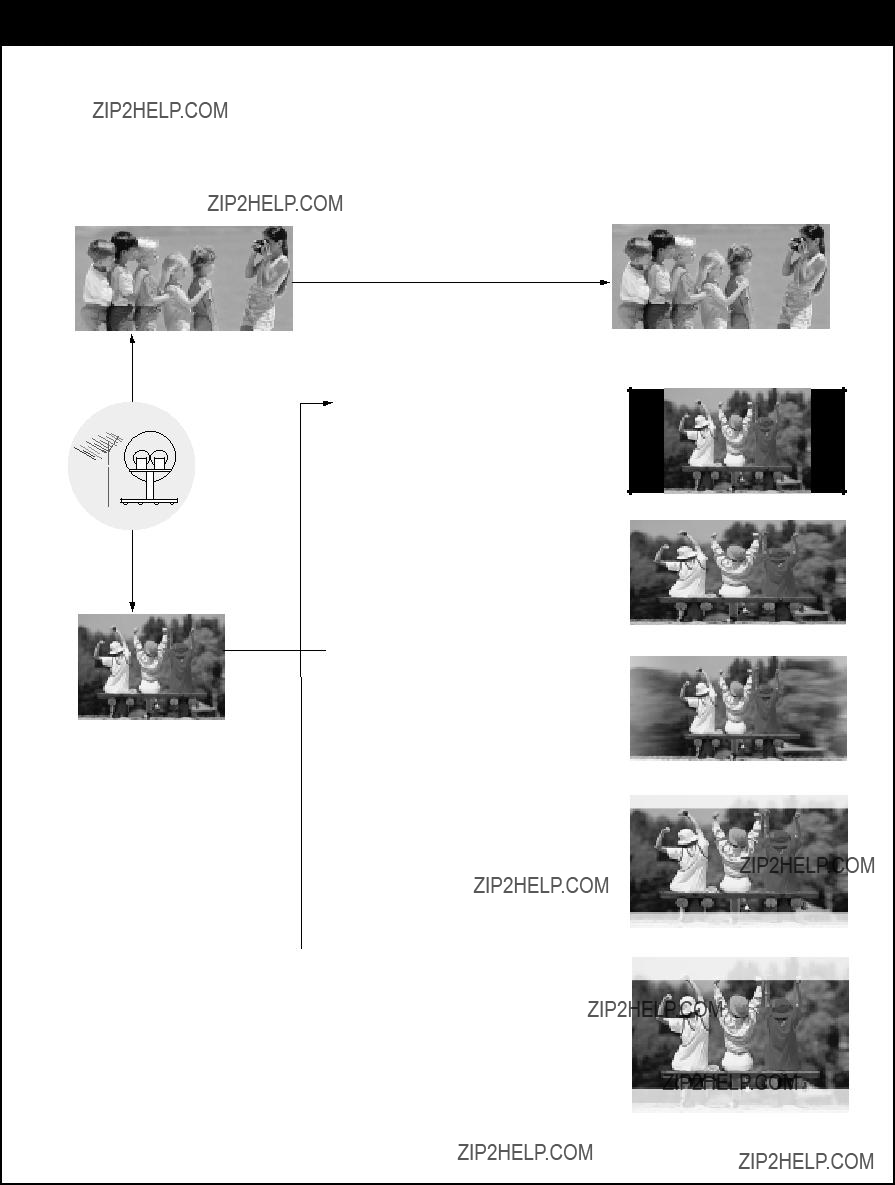
When you view a
When you view a standard definition picture (4:3) with 720p or 1080i format setting, the RATIO button on the remote control changes th e wide mode in the cycle of Normal ??? Wide ???
 Standard Definition (4:3)
 Letter box
Choose when you want to view a wide format (16:9) picture on a nor- mal screen (4:3) without squeezing.
antenna
 Cropped
Choose when you want to view a picture filling the entire screen while keeping the wide format.
 Squeezed
Choose when you want to view a full picture filling the entire screen with no black bars. The picture in a 16:9 format will be horizontally adjusted or squeezed to fit the 4:3 ratio monitor.
12
2. IMPORTANT OVERVIEW
WHEN YOU SET THE DISPLAY FORMAT TO HDTV (1080i/720p)
*Three temporary adjustment options available
antenna
Adjustment
Required
Standard Definition(4:3)
*Note.
Normal
Choose when you want to view a picture with an original 4:3 aspect ratio on your 16:9 TV. Black or gray bars will show at the left and right sides.
 Wide
Wide
Choose when you want to evenly stretch the width of a normal picture to fill the entire screen.
 Panorama
Choose when you want to evenly stretch the edges of a normal picture to fill a wide screen.
 Zoom
Zoom
Choose when you want to fill the entire screen with the picture. The image will be altered both horizontally (stretched) and vertically (cropped). The top and bottom portions of the picture will not be shown. Zoom1 shows you the picture with a trade- off between distortion and screen coverage.

Choose when you want to adjust zooming.
13
The HDTV formats should always be broadcast in the 16:9 aspect ratio.
However, you may choose one of three temporary options to select for
your preference. The three options are Standard, Expand and Shrink.

Digital Audio Signals
center channel  speaker
Dolby Digital Sound with 5.1 Channels
The DIRECTV?? HD Receiver will be the focal center of your home entertainment system comprising a variety of components, such as TV, DVD, VCR, etc. and external audio systems. Since digital programs being broadcast contain
When you tune to a channel, the DIRECTV HD Receiver can send signals either to a Dolby Digital decoder/receiver or to a PCM (normal digital) decoder. (* Refer to Section
GLOSSARY
Dolby Digital?? audio, formally known as Audio Coding 3rd Generation is a coding technique that can provide up to five independent, full frequency response audio channels (three in left, center, and right, two in rear left and right,) and one low frequency effect for a sound you can feel.
14

2. IMPORTANT OVERVIEW
Analog Audio Signals
Analog stereo amplifier
AUDIO IN
Audio cables
The analog audio outputs may be used to drive an external
If you set the Analog Mode to SAP (Second Audio Program), you can hear the program???s dia- log in another language such as French or Spanish, if provided on the analog broadcast.
15

Main Menu
You can adjust the setup through a
MENU button on your remote control. The
???DEFG??? on your remote control, and select it by pressing ???  ???. The
Advanced Program Guide???
The DIRECTV Advanced Program Guide is an
16

2. IMPORTANT OVERVIEW
EZ Help
First, certain features and terminologies used in the
Second, if you press the ???HELP (?)??? button while you are viewing a program with no menus on
This is, in fact, an
17

3. SETUP AND CONNECTIONS
Make sure you have received all these items listed below with the DIRECTV?? HD Receiver.
Audio/Video Jacks
Batteries
AA
AA
Access Card
ACCESS
CARD
OUT TO TV
Phone Jacks
Remote Control
RF Antenna
Y PB PR
Component Jacks
VCR
CONTROL
18

3. SETUP AND CONNECTIONS
DIRECTV?? HD Receiver
The DIRECTV HD Receiver is capable of receiving signals from the satellite dish, cable, and/or
Remote Control
In addition to the DIRECTV HD Receiver, the remote control can be programmed to control many other devices.
Batteries
To install the batteries, slide open the battery compartment and insert the two AA batteries provided.
Component Out Jacks and Cables
Component Cables are used to connect the DIRECTV HD Receiver to an industry standard Y/Pb/Pr compat- ible HD Monitor. Component jacks carry only the video signals, not the audio.
DVI cable is used to connect the DIRECTV HD Receiver to an industry standard
An
Receiver and is used together with audio cables. An
Audio/Video Jacks and Cables
The Audio/Video jacks provide good picture and sound quality. They are used for making most Audio/Video connections between components. The Audio/Video jacks may be color coded (yellow for video, red for right audio, and white for left audio). If your component has only one input for audio (mono), connect it to the left (white L/mono) audio jack on the DIRECTV HD Receiver.
RF (Radio Frequency) Jacks and Coaxial Cables
RF jacks are necessary for reception of
Telephone Jack and Cord
A telephone line cord is required to connect the DIRECTV HD Receiver to a phone line. To subscribe to DIRECTV?? programming, this phone line is required to be connected.
Access Card
The Access Card is the means by which DIRECTV controls the distribution of its service. The card must be inserted into the access card slot (on the front of the DIRECTV HD Receiver) at all times to ensure recep- tion of satellite signals.
Remote Control RF Antenna
The Remote Control RF Antenna can be used with the supplied remote control.
19VCR Controller
The VCR Controller allows the Record function to automatically operate your VCR.
Ant In
Is used to connect an
Cable In
Is used to connect a coaxial cable coming from your cable TV service outlet or cable box.
Out to TV
Provides an RF connection between the DIRECTV HD Receiver and older TVs. All decoded signals are pro- vided on channel 3 or 4 as selected in the Output Channel section of the Setup menu. When the DIRECTV HD Receiver is in the standby mode, Cable or Antenna signals are passed through as chosen in the Out to TV section of the Setup menu.
Video Out 1,2
Is used to provide baseband composite video signal to a VCR or TV set. Video connection generally pro- vides picture quality that is superior to RF connections. For a better quality picture connection, use the S- Video jack if it is available.
Component Out
Is used to connect to a
Is used to connect to either a
Notes
???The
???For the best access to
20

3. SETUP AND CONNECTIONS
Audio Out 1,2
Is used to provide analog audio signals to VCR, TV set, HD Monitor, or Analog
Digital Audio Out
Is used to connect a digital optical cable from the DIRECTV HD Receiver to the Dolby Digital?? receiver or decoder. Dolby Digital audio enables the viewer to experience
Data Port
Can be used to communicate with certain compatible devices, such as Personal Video Recorders.
VCR Control
Is used to connect the VCR controller cable to your receiver.
RF Remote
Is used to connect the RF Remote control antenna to your receiver.
Phone Jack
Is used to connect a phone line.
Satellite In
Is used to connect a satellite dish antenna to your receiver.
21

CAUTION: Make all connections before plugging the power supply cord into a standard 120V, 60Hz AC power outlet.
You can connect the DIRECTV?? HD Receiver in a variety of configurations. The answers to the follow- ing questions will determine the correct setup for you.
-What type of antennas do you have? Satellite dish, cable, and/or
-What type of connectors does your TV or VCR have: Y/Pb/Pr, RGB,
-Do you have an external audio or audio/video system? Consider integrating the DIRECTV HD Receiver into a home theater configuration to take advantage of the audio capabilities of your Dolby Digital?? System (Digital) or
-Does your TV have Y/Pb/Pr connectors? Use it to connect your TV to the DIRECTV HD Receiver. An Y/Pb/Pr connection provides a better picture than
-Does your TV have an
-Does your TV have
Although there are numerous connections possible for optimum video and audio performance, try to fol- low the guidelines listed below when you hook up your components. Detailed
22

3. SETUP AND CONNECTIONS
Antenna
Cable TV wall jack
Receiving Signals
1.Connect the ???Antenna??? to the ???ANT IN??? jack on the DIRECTV?? HD Receiver using a coaxial RF cable.
2.Connect the cable TV signal to the ???CABLE IN??? jack on the DIRECTV HD Receiver using a coaxial RF cable.
23

Antenna
Cable TV wall jack
LNB
Sat A
Dish
Jack 1
OUT TO TV
Phone wall jack
Receiving Signals
1.Connect the ???Antenna??? to the ???ANT IN??? jack on the DIRECTV?? HD Receiver using a coaxial RF cable.
2.Connect the cable TV signal to the ???CABLE IN??? jack on the DIRECTV HD Receiver using a coaxial RF cable.
3.Connect the ???Jack 1??? of the dish antenna to the ???SATELLITE IN??? jack on the DIRECTV HD Receiver using a coaxial RF cable. (For proper dish installation, refer to the ???Installer???s Guide??? provided with your satellite dish antenna. Use RG6 type cable.)
4.Connect the ???Phone Wall Jack??? to ???PHONE JACK??? on the DIRECTV HD Receiver using a phone cable.
NOTE
While you are a subscriber to a DIRECTV?? pro- gram package, you can still view
NOTE
A triple LNB
24

3. SETUP AND CONNECTIONS
Antenna
Cable TV wall jack
Dish
5x4
Phone wall jack
Receiving Signals
1.Connect the ???Antenna??? to the ???ANT IN??? jack on the DIRECTV?? HD Receiver using a coaxial RF cable.
2.Connect the cable TV signal to the ???CABLE IN??? jack on the DIRECTV HD Receiver using a coaxial RF cable.
3.Connect the ???Jack 1??? of the
4.Connect the ???Phone Wall Jack??? to ???PHONE JACK??? on the DIRECTV HD Receiver using a phone cable.
NOTE
While you are a subscriber to a DIRECTV?? program package, you can still view over-
25
NOTE
A triple LNB

Dish
5x4
Output
Phone wall jack
Receiving Signals
1.Connect the ???Antenna??? to the ???ANT IN??? jack on the DIRECTV?? HD Receiver using a coaxial RF cable.
2.Connect the cable TV signal to the ???CABLE IN??? jack on the DIRECTV HD Receiver using a coaxial RF cable.
3.Connect ???Output??? of the
4.Connect the ???Phone Wall Jack??? to ???PHONE JACK??? on the DIRECTV HD Receiver using a phone cable.
NOTE
While you are a subscriber to a DIRECTV?? program package, you can still view
NOTE
A triple LNB

3. SETUP AND CONNECTIONS
Antenna
Cable TV wall jack
Dish
5x4
Phone wall jack
TV Viewing
1.Connect the ???OUT TO TV??? jack on the DIRECTV?? HD Receiver to the ???ANT IN??? jack on your TV using a coaxial RF cable.
2.Connect the ???AUDIO OUT??? and ???VIDEO OUT??? jacks on the DIRECTV HD Receiver to the ???A/V IN??? jack on your TV using
3.Select Antenna In or A/V In source on your TV. (Refer to TV user's manual.)
27

Dish
Output
Phone wall jack
TV Viewing
1.Connect the ???OUT TO TV??? jack on the DIRECTV?? HD Receiver to the ???ANT IN??? jack on your TV using a coaxial RF cable.
2.Connect the ???COMPONENT OUT??? jacks on the DIRECTV HD Receiver to the ???COMPONENT IN??? jacks of your TV using
3.Connect the L/R ???AUDIO OUT??? jacks on the DIRECTV HD Receiver to the L/R ???AUDIO IN??? jacks on your TV using
4.Select Antenna In or Component In, source on your TV. (Refer to TV user's manual.)
28

3. SETUP AND CONNECTIONS
Antenna
Dish
Cable TV wall jack
Output
Phone wall jack
TV Viewing
1.Connect the ???OUT TO TV??? jack on the DIRECTV?? HD Receiver to the ???ANT IN??? jack on your TV using a coaxial RF cable.
2.Connect the ???RGB OUT??? jack on the DIRECTV HD Receiver to the ???RGB IN??? jack of your TV using
3.Connect the L/R ???AUDIO OUT??? jacks on the DIRECTV HD Receiver to the L/R ???AUDIO IN??? jacks on your TV using
Note : The RGB OUT jack supports 480p, 720p, and 1080i formats.
Output
Phone wall jack
TV Viewing
1.Connect the ???OUT TO TV??? jack on the DIRECTV?? HD Receiver to the ???ANT IN??? jack on your TV using a coaxial RF cable.
2.Connect the
3.Connect the L/R ???AUDIO OUT??? jacks on the DIRECTV HD Receiver to the L/R ???AUDIO IN??? jacks on your TV using
Note : For the best access to

3. SETUP AND CONNECTIONS
Dish
VCR
Output
COMPONENT OUT (1080i/720p/480p/480i)
TV Viewing
Phone wall jack
Refer to Section
VCR Recording
1.Connect the ???OUT TO TV??? jack on the DIRECTV?? HD Receiver to the ???ANT IN??? jack on your VCR using a coaxial RF cable.
2.Connect the ???AUDIO OUT??? and ???VIDEO OUT??? jacks on the DIRECTV HD Receiver to the ???A/V IN??? jacks on your VCR using
Note: The OUT TO TV and VIDEO OUT(480i) 1, 2 jacks are always available sources output no matter what the display format is selected.
31

VCR Controller
IR Sensor
VCR (front view)
VCR (side view) 1/2" to 1"
Connect the VCR Controller to allow the Timer and Rec feature to automatically operate your VCR. See ???VCR Control Setup??? on page 113 for information about setting up the Digital Satellite Receiver to operate with your VCR.
1.Connect the VCR Controller to the VCR CONTROL jack on the DIRECTV?? HD Receiver.
2.Place the VCR Controller under and in front of the VCR. The VCR Controller must extend just on front of the infrared sensor of the VCR.
Note: If the infrared sensor is not marked on your VCR, shine a flashlight into the front panel of the VCR to locate the sensor.
32

3. SETUP AND CONNECTIONS
SPDIF IN
A/V Receiver
Dolby Digital?? Connection
1.Connect the ???DIGITAL AUDIO OUT??? jack on the DIRECTV?? HD Receiver to the ???SPDIF IN??? jack on your Dolby Digital or Pro Logic?? decoder using a digital optical cable.
(A digital optical cable is not supplied.)
NOTE
To enjoy Dolby Digital audio when it is available in a broadcast, set the HD Receiver???s Digital Output to the Dolby Digital setting (see section
33

Analog stereo amplifier
AUDIO IN
Audio cables
1.Connect the Left and Right ???AUDIO OUT??? jacks from the DIRECTV?? HD Receiver to the Left and Right ???INPUT??? jacks on your
NOTE
When viewing a digital broadcast with Dolby Digital?? audio, you will be able to hear the broadcast???s audio from the analog audio left and right jacks. However, a digital audio con- nection to a Dolby Digital audio receiver is required to enjoy Dolby Digital audio with up to 5.1 channels.
34

3. SETUP AND CONNECTIONS
Remote Control RF Antenna
The DIRECTV?? HD Receiver can be used with the supplied remote control RF (radio frequency) antenna and remote control that allow you to control your receiver from your easy chair, anywhere in the room, or even from another room within your home.
RF Antenna Connection
1.Plug the remote control RF cable into the RF REMOTE connector on the DIRECTV Receiver rear panel.
2.Extend the cable and place the antenna in the desired location
To achieve the best operating range from the remote control, position the antenna as high and as far away from metal objects as possible.
3.Before using the Remote Control RF Antenna, the Remote Control Setup menu must be set to ???RF Type??? (see section
Note : Do not place the RF antenna directly on top of the DIRECTV HD Receiver or any other metal object. For best results, place the RF antenna in a location visible to the RF remote signal.
35

4. FRONT PANEL AND REMOTE CONTROL
1POWER
Turns the DIRECTV HD Receiver on or off.
2Access Card and RESET button Door
The Access Card is the means by which DIRECTV controls the distribution of its services. The card must be inserted into the access card slot at all times to enable reception of satellite signals. The RESET button resets the HD Receiver.
3Display Window
Shows DIRECTV HD Receiver status : Current output format, interface type, and channel number. Also displays artist and song information of satellite
4Remote Control Sensor
Receives signals from the remote control.
5DISPLAY FORMAT
Sets the output resolution to either native, 1080i, 720p, 480p, 480i, variable 1, variable 2, variable 3, or Auto DVI formats. Choose the best display format for your TV. (Refer to Section
6INFO
Shows station and program information in the banner shown at the top of the screen. To remove the banner, press the
button again or wait for 10 seconds. You can also change the Audio language, when available, with ???FG???.
7MENU
Shows the main menu on the screen. You can return to normal viewing by pressing the EXIT button.
8GUIDE
Shows the DIRECTV Advanced Program Guide??? screen that shows you a program schedule containing a list of current and future programs. You can also access the Advanced Program Guide via the main menu (DIRECTV Guide). You can return to normal viewing by pressing the EXIT button. The Guide is only available with satellite service.
9Arrow Keys (CH
Allows you to navigate
q; SELECT
If the main menu is displayed, pressing the SELECT button will activate the selected MENU item. If the SELECT but- ton is pressed while you are in normal viewing, the information banner will be displayed.
qa EXIT
Clears all
36

4. FRONT PANEL AND REMOTE CONTROL
1
2
3
7
6
1POWER
Turns the DIRECTV?? HD Receiver on and off. If your remote control is programmed to control other components such as VCR, DVD, etc., Power will turn the component on and off. If you want to control other components from different manufacturers, you must first pro- gram your remote control. For further instructions on remote control programming, please refer to the section
2MODE
Selects the device that will be controlled by the remote. For exam- ple, if your remote control is set to VCR, the CH +/- button will change the channel number of the VCR. If you want to control other devices from different manufacturers, you must first program your remote control.
3Digit Buttons (0~9)
Allows you to enter channel numbers for direct tuning or to scroll to the designated page of the program list on the Guide menu. Digit buttons can be used to enter numerical values wherever required e.g. to enter a password.
4Dash
Is used to enter a channel number for multiple program channels such as
5SELECT ( )
)
Use with numbered buttons for instant channel selection. When you press a channel number, for example, 22, the receiver awaits anoth- er stroke for three seconds and then tunes to 22.
6MUTE
Is used to temporarily turn off the sound. Press again to restore the sound.
7VOL +/-
Increases/decreases the sound level of the DIRECTV HD Receiver.
37

8
9
8CH +/-
Scrolls the channels up or down while you are viewing a program, or scrolls the program list in the Guide menu page by page. Press and hold the but- ton to speed up and continue scrolling channels.
9RATIO
Changes the picture aspect ratio. When you view a picture with a wide
(16:9) aspect ratio in 480i or 480p format, the button changes the display- ing options in the cycle of Letterbox ??? Cropped ??? Squeezed. When you
(16:9) aspect ratio in 720p or 1080i format, the button temporarily changes the RATIO options to Standard, Expand, or Shrink. Detailed descriptions of the TV aspect ratios are given in section
10SIGNAL
Shows the signal strength of the current channel, if it is a digital channel or satellite channel. You may improve the signal strength by adjusting the direction of your
11FREEZE
Freezes the current image. With digital video sources, pressing a second time enlarges the image. Pressing again returns to the the live video.
12PREV CH
Returns to the last channel viewed. Allows you to move back and forth between the last two channels viewed.
13CC/DATE (Closed Caption)
Changes the Digital Caption options and the Closed Caption options of the DIRECTV HD Receiver. The digital caption mode and the closed caption mode can also be selected in the Preferences menu. You can also change the date of the Advanced Program Guide??? by pressing the CC button when the Guide is displayed.
NOTE : Closed Caption will appear only when it is provided by the broad- caster.
38

4. FRONT PANEL AND REMOTE CONTROL
14MENU
Brings up the main menu. You can return to normal viewing by pressing the EXIT button or pressing the MENU button again.
15GUIDE
Brings up the DIRECTV Advanced Program Guide, showing ALL channels. You can also access the Advanced Program Guide via the main menu. Return to normal viewing by pressing the EXIT button.
16 SURF
Shows the list of your surf channels. A Surf channel list can contain up to fifty channels. You can return to normal viewing by pressing the EXIT button or pressing the SURF button again. Refer to Section
17INFO
Shows station and program information in the banner shown at the top of the
screen. To remove the banner, press the button again or wait for 10 seconds. You can select the display mode, short or detailed, with ???DE???. You can also change the audio language, when available, with ???FG???.
18HELP (?)
Shows the
19Navigation/
Allows you to navigate the  ???. If ???
  ??? is pressed while you are in normal view- ing, the information banner is displayed.
Clears all
21 Component Control Buttons
Provides control for DVD players, VCRs, and similar components. The left and
during DVD playback. The remote control must be programmed for the brand of component being used. For further instructions on remote control program- ming, please refer to Section
39
The DIRECTV?? HD Receiver remote control is a
NOTE
The remote control may not control all models of other brands.
1.Test your remote control
To find out whether your remote control can operate a component without programming, turn on the component such as a VCR and press the corresponding mode button (VCR) on the remote control while pointing at the component. Use the POWER and CH +/- buttons to see if the component responds properly. If not, the remote control requires programming.
2.Turn on the component to be programmed, then press the corresponding mode button on the remote control.
3.Press the POWER button and the MUTE button simultaneously. The remote control is now ready to program the code for the component.
4.There are two ways to find the right code of the component.
First, if you press the CH +/- buttons repeatedly, the codes will change one
Second, enter the code number using the digit buttons on the remote control. The right code numbers for the corresponding component can be found on the following pages. Press the POWER button.
Again, if the code is correct, the device will turn off.
5.Press the EXIT button to store the programming code.
6.Test the remote control functions to see if the component responds properly. If not, repeat from step 2.

4. FRONT PANEL AND REMOTE CONTROL
TV Codes
41

VCR Codes
DVD Codes
960Zenith
961Toshiba
962Sony
963Pioneer
964Mitsubishi
965JVC
42

4. FRONT PANEL AND REMOTE CONTROL
AUX (AUDIO)
AUX (CD)
43

5. INITIAL SETUP
IMPORTANT: Check your TV owner???s manual for the prefered or required video format. The appropriate format should be set using the DISPLAY FORMAT button on the front panel of the DIRECTV?? HD Receiver. If the correct format is not selected, the
When you turn on the DIRECTV?? HD Receiver for the first time, you will be asked if you want to set up DIRECTV?? programming.
If you have chosen to subscribe to DIRECTV programming, you should initialize the system according to section
If you do not have a dish, you should select ???NO???. This means you can receive only
Although this setup process will be displayed only once, you can change your selection at any time in the future using the DIRECTV Initial setup menu.
If you have chosen to subscribe to DIRECTV service, you should contact DIRECTV at
When you order programming, you need to know your access card number. To get this num- ber, press MENU on the remote control, then select SYSTEM on the Menu. Select System Test on the screen, and you will see the Access Card Identifier. Another way to find the num- ber is by taking out the access card and referring to the number printed on it.
44

6. BASIC OPERATION
The Channel Banner appears whenever you tune to a new channel or press the INFO button on the remote control while viewing a program. It displays channel and program information in the banner shown at the top of the screen. To remove the banner, press INFO again, EXIT or wait for 10 seconds.
The icons in the Channel Banner represent the status or availability of important features. The icons will be highlighted when the feature is active or available as provided by the broadcast- er and service provider. The information available on the Channel Banner is described below.
Program Description
Rating
Time (Program start and finish (duration))
Dolby Digital
Closed Caption
Alternate Audio
Input Source
Channel Number
Channel Logo
Date
Lock
Message
45

Input Source Icon (DIRECTV)
Indicates from which source the current program signal is being received. The DIRECTV?? HD Receiver can receive a signal from ANT, ANT/Digital, CABLE or DIRECTV.
Lock Icon (  )
)
Indicates that the parental or spending limit lock system is activated (see section
Alternate Audio (  ENGLISH
  /
/  )*
)*
DIRECTV and digital channels sometimes provide multiple audio tracks, often in a different language. When multiple audio tracks are available, the Alternate Audio icon changes its appearance to indicate that you can select one of those audio setups with ???FG??? buttons.
Message Icon (  )
)
Indicates that your DIRECTV HD Receiver has messages from DIRECTV. The message icon will appear in the channel banner to indicate that a new message has arrived or there are unread messages in the box.
HD Icon ( HD )*
Indicates that the current program is broadcast in the HD format.
Dolby Digital Icon (  D )*
D )*
Indicates that the currently selected audio track is Dolby Digital?? audio and may contain up to 5.1 channels depending on the broadcast.
CC Icon ( CC )*
Indicates that the current program contains the closed caption data service.
Channel Logo
Displays the logo of the current satellite channel. If a channel logo is not available, the channel name will be displayed instead.
Channel Number
Displays the current channel number.
Start and End Time*
Displays the start time and end time of the current program.
Rating*
Displays the rating of the current program.
Date
Displays the current date and time.
Program Description*
Displays a brief description of the current program (if available).
Category*
Displays the genre of the current program.
*Items are based on information provided by the broadcaster or service provider. Occasionally incorrect information may be provided. For example, a service such as ???HD??? may be available even if the icon is not highlighted, or a service such as ???Alternate Audio??? may not be available even if the Icon is highlighted.
46

6. BASIC OPERATION
The surf list appears on the TV screen when you press the SURF button on the remote control. It enables you to surf up to 50 favorite channels that were chosen in the Edit Channel section of the Setup menu or directly added in the Favorite guide as described below. The surf list consists of the channel logos or channel numbers. If the logo of a certain channel is not available, the chan- nel number is displayed instead.
You are also able to add or delete the logo of a channel on the surf list by pressing the INFO but- ton on the remote. A dialog box will ask what you want to do with the highlighted logo area: you can replace the highlighted logo area with the current channel, or delete it.
You can easily move the highlight on the surf list using ???DEFG??? on the remote control. The next page is accessible by using PG UP/DN button on the remote. You can tune to a favorite channel by pressing ???  ???. Or the EXIT button on the remote will clear the surf list and take you back to the current channel.
Scroll Bar
47

Pressing the FREEZE button freezes the current image. Pressing the FREEZE button again enlarges the image. The image can then be scanned vertically and horizontally. Pressing the FREEZE button once again returns the image to live video.
FREEZE Mode Screen
NOTE
The
digital channels.
48

6. BASIC OPERATION
The DIRECTV?? HD Receiver is designed to receive signals from DIRECTV, ANT and/or CABLE sources. If you are a DIRECTV customer, you can enjoy programming provided by DIRECTV.
You can also receive the analog and digital
If you don???t subscribe to DIRECTV?? programming, however, the function of the DIRECTV HD Receiver will be limited to receiving signals only from ANT and/or CABLE. You can still enjoy HD services provided by
49
7. ADVANCED PROGRAM GUIDE???
The DIRECTV Advanced Program Guide???, contains schedule and program information for all DIRECTV?? channels. The Advanced Program Guide also provides local
Helping you to find a program easily and conveniently, the Advanced Program Guide allows you to view schedule and descriptive program information for the channels. The receiver offers 10 different channel lists: ALL, CUSTOM, FAVORITE and CATEGORY (MOVIES, SPORTS, SPECIALS, SERIES, NEWS, MY CATEGORY 1 and MY CATEGORY 2). You may edit the CUSTOM and FAVORITE channel lists to customize and design your favorite channels, respectively. In addition, you can easily find specific programs by using the CATEGORY search of KEYWORD search func- tions. An explanation of each channel list is described in Section
You can display or exit the Advanced Program Guide in several ways.
To display the Advanced Program Guide:
- Press the GUIDE button on your remote control.
or
-Press the MENU button on the remote control and select the DIRECTV menu. Several options will appear. Choose the Guide option (MENU ??? DIRECTV ??? Guide).
To exit the Advanced Program Guide:
-Press the EXIT button to return to the last channel you were tuned to. or
-When any currently broadcasted program is highlighted, pressing ???  ??? will make the guide screen disappear and tune to that channel.
In the Advanced Program Guide, you can also show or hide the Guide menu.
To show or hide the Guide menu:
-Press the GUIDE button on your remote control in the Advanced Program Guide. The panels on the left disappear and you can see the Guide menu. The first press shows the Guide menu at the far left. Pressing the button a second time makes the Guide menu disappear.
50

7. ADVANCED PROGRAM GUIDE???
The
and programs that belong to that channel list. The meaning and generation of each channel list is
described below
Note: When viewing the Program Guide, press the GUIDE button on the remote control to view the items
below in the Guide menu (see section
ALL
As the default guide type when pressing the GUIDE button, the ALL category shows program listings for
all channels to which you may subscribe. The guide shows DIRECTV?? channels that your dish antenna can
receive, and
setup procedure. Program details for
lite service provider.
CUSTOM
Shows the program listings that belong to the CUSTOM channel list. You can customize the CUSTOM
channel list by hiding channels from the All Channel List that you do not wish to view.
SURF
Shows program listings only for those channels in the SURF channel list. You can generate a FAVORITE channel list, which is a short list of channels you tune to most frequently, by setting a favorite icon to the channels from the menu sequence MENU ??? SETUP ??? Surf List/Ch. Edit (see section
CATEGORY (MOVIES/SPORTS/SPECIALS/SERIES/NEWS)
Lists only Movies/Sports/Specials/Series/News programs from channels in the All channel list. The DIRECTV?? HD Receiver generates the list automatically based on the category information for programs appearing within the next few hours in the Advanced Program Guide???.
MY CATEGORY 1/ MY CATEGORY 2
Shows only
51

The guide screen also provides two search menus:
Category
Searches for programs that belong to a given category. The DIRECTV HD Receiver first shows you currently applicable categories and allows you to search for programs in that category (see section
Keyword
Searches for programs that have or are related to a specific keyword. You can choose a key- word for program titles or credit titles (for example, actor/actress, director, writer, awards, etc.) (see section
When accessing an
NOTE
After first installing satellite service, it may take several hours before all program information is fully available in the Advanced Program Guide???.
52

7. ADVANCED PROGRAM GUIDE???
The Advanced Program Guide??? is operated based on a simple and straightforward ???Highlight and Select??? process.
1.Use ???DEFG??? on your remote control to navigate the guide screen.
2.Press ???  ??? to select or execute the highlighted menu or function.
The
Line Scrolling
You can reach other time slots or channels that are currently hidden from the screen using the arrow buttons ???DEFG???. Move horizontally to reach other time slots and move vertically to reach other channels.
Page Scrolling
You can move through channels faster by scrolling
Date Scrolling
Pressing the CC button on the remote control to jump to the Date Change Box. Alternatively, you can move the highlight to the Date Change Box and change the date to jump to the time slot of that day. Pressing ???FF??? button will show you a previous 6 hours guide.
NOTE
Press the GUIDE button to return immediately to the guide menus, the
53

Direct Jumping
You can quickly jump to a page that contains a specific channel by directly entering a channel number using the digit buttons ???0~9??? on the remote control.
Pressing ???G??? following the digit button strokes will move to the channel immediately.
Picture In Guide view
You can preview the highlighted channel in the Picture In Guide at
You can also quickly jump to a Picture In Guide window by pressing the PREV CH button on the remote control. This press moves the highlight to the Picture In Guide at the  ??? button returns you to TV viewing.
NOTE
Press the GUIDE button to return immediately to the guide menus, the
54

7. ADVANCED PROGRAM GUIDE???
The top region of the guide screen displays the schedule and program information of the cur- rently highlighted program. You can also see other detailed information about the program by pressing the INFO button.
When you select the highlighted program by pressing ???  ???, what happens or appears next depends on whether the highlighted program is currently
Current Program / non
If the selected program is a current program and not one of the PPV programs, you will tune directly to the program.
Current Program / DIRECTV??
If the selected program is a current
Future Program / non
If the selected program is scheduled in the future and is not a PPV, you will be offered a dialog box that enables you to reserve this program for watching. If you select Timer option in the Guide menu, this program is put on the Timer/Record List and you will be reminded by a message at the topleft corner of the screen 10 seconds before its airing time.
Future Program / DIRECTV??
If the selected program is a
A continuous connection to a
(Note:
55

Pressing the INFO button will display available additional information about the highlighted program. Depending on the broadcaster and service provider, information may include actor and role relationships, original material, production studio, the date on which the program was first shown, and so on.
To display program details:
1.Move the highlight to a desired program using ???DEFG??? on the remote control.
2.Press the INFO button on the remote control to display the available additional information.
3.To move the highlight to the left menu bar, press ???F??? on remote control. To return to the additional information box, press ???G???.
4.To view this TV program, move the highlight to the left menu bar, move the highlight to the ???View??? menu, locat- ed on the left side of the additional information box, and press ???  ???.
???.
56

7. ADVANCED PROGRAM GUIDE???
5.If you want to check any other broadcasting schedules for this same program, move the highlight to the
???Showings??? menu, located on the left side of the additional information box, and press ???  ???.
???.
6.To return to the previous guide screen, Move the highlight to the ???Back??? menu, located on the left side of the additional information box, and press ???  ???.
???.
57

If you want to view a program scheduled in the future, you can put that program on the Timer/Record List so that program will be automatically tuned.
A timer event will automatically tune to the selected channel at the specified time. A Record event will also turn on the DIRECTV?? HD Receiver if it is turned off and will automatically control your VCR to record the program; if the VCR Controller is correctly set up (see sections
Timer/Record Events may also be manually set through the menu (see section
To schedule a future viewing :
1.Move the highlight to a future program you want to watch using ???DEFG??? on the remote con- trol.
2. Press the ???  ??? button on the remote control to display the available additional information.
3.Pressing ???F??? will move the highlight to the ???Timer??? menu, located on the left side of the addition- al information box, then press ???  ???.
???.
4.A dialog box will appear for your review.
5.Move the highlight to the ???OK??? option in the dialog box and press ???  ??? to confirm.
NOTE
A reminder message will appear at the
Pay per view programs can only be purchased within 24 hours of the program times.
6.The program name will be preceded by the Timer mark. If you want to cancel any reservation, exe- cute the menu sequence MENU ??? DIRECTV ??? Timer/Record List and press ???  ??? when the high- light is on the reservation.
58

7. ADVANCED PROGRAM GUIDE???
If you subscribe to DIRECTV?? programming, you may preview pay per view movies on channel 200, the DIRECTV promo channel, to determine if you would like to purchase them.
To purchase Pay Per View (PPV) programs:
1.From the program guide, press INFO button to see detailed information about the selected pro- gram. If this program is a pay per view program, the ???PURCHASE??? menu will be appear at left- menu. Selecting the ???PURCHASE??? menu will show you the dialog box.
2.Move the highlight to the right to ???Buy??? in the dialog box and press ???  ???. Another
(A continuous connection to a land based phone line is required to order PPV with your remote control.)
59
You can search for specific programs by categories. The category information of each program is provided by the Advanced Program Guide??? so that you can choose one of them to search for matching programs. You can also set a search range of One Day or One Week. In the search result one program may have multiple showings on different channels and/or at different time slots.
Note : You can also specify an
To search programs by Category :
1. While viewing the Program Guide, press the GUIDE button on the remote control to view the Guide menu.
2. Highlight the SEARCH in the guide menu. Pressing ???  ??? will show search
  ???. The Category Search screen consist of two columns: the first column from the left shows the cat- egory names, and the right column lists programs resulting from a category search.
3.Move the highlight to the category column. If a category has a  ??? will move to the
name, pressing ???  ??? will move the highlight to ???Search??? button. Pressing ???
  ??? again will start the search process.
4.Programs resulting from the search will be listed in the right column. The highlight goes to the top program on the list and its program information will be displayed at the top region of the guide screen. You can see program infor- mation on each program by moving the highlight using ???DE???.
5.In the result column, pressing ???D??? will move the highlight to the
(Note : If the result list is too big and it is difficult to navigate the list, press SURF button on the remote control. It will show the ???Quick Jump???
6.If you choose a program and press ???  ???, the detailed information screen will be displayed.
60

7. ADVANCED PROGRAM GUIDE???
When you search for programs by category, you can also use the
Note : You can also specify an
To search programs by MY CATEGORY :
1.While viewing the Program Guide, press the GUIDE button on the remote control to view the Guide menu.
2.Highlight the MY CATEGORY in the guide menu. Pressing ???  ??? will show search
  ???. The My Category Edit screen consist of two columns: the first column from the left shows the cate- gory names, and the right column shows the selected category name.
3.Select the MY CATEGORY1 or MY CATEGORY2 using ???FG???. And move the highlight to the category column. If a cat- egory has  ??? will move to the
  ??? will move the highlight to ???Save??? but- ton. Pressing ???
  ??? again will modify the ???MY CATEGORY1??? or the ???MY CATEGORY2???.
4.If you select the ???MY CATEGORY1??? or the ???MY CATEGORY2???, the guide screen will list only
61

You can also search for programs by keywords which can be found in program titles or credit titles such
as actor/actress name, director name, etc.
To search programs by keyword:
1.While viewing the Program Guide, press the GUIDE button on the remote control to view the Guide menu.
2.Highlight SEARCH in the guide menu. Pressing ???  ??? will show the search
  ???. The Keyword Search screen consists of two columns: the first column from the left is the key input box, and the right column lists programs found from a keyword search.
3. Enter a word using the on screen keyboard. Highlight the first letter and press ???  ??? to type it in.
4.While entering a word, the ???Candidate???
5.When a word is complete or even when only a partial word is typed in, you may move the highlight to the Search button with ???G???, and press ???  ??? to start the search.
6.The programs resulting from the search will be listed in the right column. Program information will be displayed at the top region of the guide screen. You can see program information on each program by moving the highlight using ???DE???.
7.In the result column, pressing ???D??? will move the highlight to the
8.If you choose a program and press ???  ???, detailed information about the program will be displayed.
62

8. CUSTOMIZATION
In the menu system, there are several ways to customize the settings provided. To navigate the menu levels, you will see ???  ??? or ???G??? on the right side of the menu label to help you go to the next level.
To display and exit the Menu:
Press the MENU button on the remote control to display the menu. A second press of the
MENU button or a press of the EXIT button will take you back to TV viewing.
To go to the next level:
Press ???  ??? or ???G??? on the remote control.
To go back to the previous level:
Press ???F??? or MENU button on the remote control.
63

DIRECTV
Guide
Purchase List
Mail List
Timer/Record
Timer/Record List
Initial Setup
EZ Channel Scan
Manual Ch. Add
SETUPSurf List/Ch. Edit Clock
Out to TV EZ
Digital Output
Audio Mode
AUDIOAudio Language
PREFERENCE
Dolby Digital
Audio Variable
TV Aspect Ratio
DTV Caption
DTV Caption Style
Closed Caption
Advanced
EZ Demo
Lock System
Block Channel
Movie Rating
LOCKTV Rating ??? Children
TV Rating ??? General
Spending Limit

8. CUSTOMIZATION
Purchase List
Shows a history of recently purchased programs and display upcoming DIRECTV?? Pay Per View purchases.
Upcoming DIRECTV?? Pay Per View purchases can be canceled. You may do this by selecting the program. A
If you select a past DIRECTV?? Pay Per View purchase, you can see each charge of the PPV programs pur- chased and shown.
To review programs in the Purchase List:
1.Press the MENU button on the Remote Control to display the
2.Select the DIRECTV menu by pressing ???  ???on the remote control.
3.Scroll down to the Purchase List using ???  ???.
???.
4.Move the highlight to the right with ???  ??? to scroll the purchase list.
5.Press ???  ??? to return to the previous level or press the EXIT button on the remote control to return to TV view- ing.
NOTE
CAM: Conditional Access Module, usually referred to as the access card. A removable, electronic subassembly provides conditional access control of the subscriber terminal.
CAM Slot No: The CAM slot number indicates which slot the purchase occupied. A satellite service provider provider cus- tomer service representative may use these slot numbers to help resolve billing issues.
65

Allows you to view the messages that are sent from DIRECTV. For example, you may receive a mes- sage requesting your attention to a new service or special program offering.
To check the Mail Box:
1.Press the MENU button on the Remote Control to display the
2.Select the DIRECTV?? menu by pressing ???  ??? on the remote control.
3.Scroll down to the Mail List menu using ???E???.
4.Move the highlight to the right with ???G??? to select a mail item from the list.
5.Press ???  ??? and the full text of the mail will be displayed in the
6.Select ???Delete??? on the
7.Press ???F??? to return to the previous level or press the EXIT button on the remote control if you want to return to TV viewing.
NOTE
The Message icon will be displayed in the Channel Banner only when at least one unread message is in the mail list.
66

8. CUSTOMIZATION
Allows you to set up a timer or record event manually. You can see the event list in the Timer/Record List menu (DIRECTV ??? Timer/Record List). You can also set a one time Timer/Record event in the Guide (see section
A Timer event will automatically tune to the selected channel at the selected time. A Record event will also turn on the DIRECTV?? HD Receiver if it is turned off and will automatically control your VCR to record the program if the VCR Controller is correctly set up (see sections
To add a program to the Timer/Record List :
1.Press the MENU button on the Remote Control to display the
2.Select the DIRECTV menu by pressing ???  ??? on the remote control.
3.Scroll down to the Timer/Record menu using ???E???.
4.Press ???G??? or ???  ???. The
5.Select a Type option, either Timer or Record.
Then select a Channel, Date, Time, Duration and Repeat options.
6.Pressing ???  ??? will show the confirm dialogue box. Press ???
  ??? again.
7. After adding a program, you can check the new item in the Timer/Record List (see next page
8.Press MENU button to return to the previous level or press the EXIT button on the remote control if you want to return to TV viewing.
67
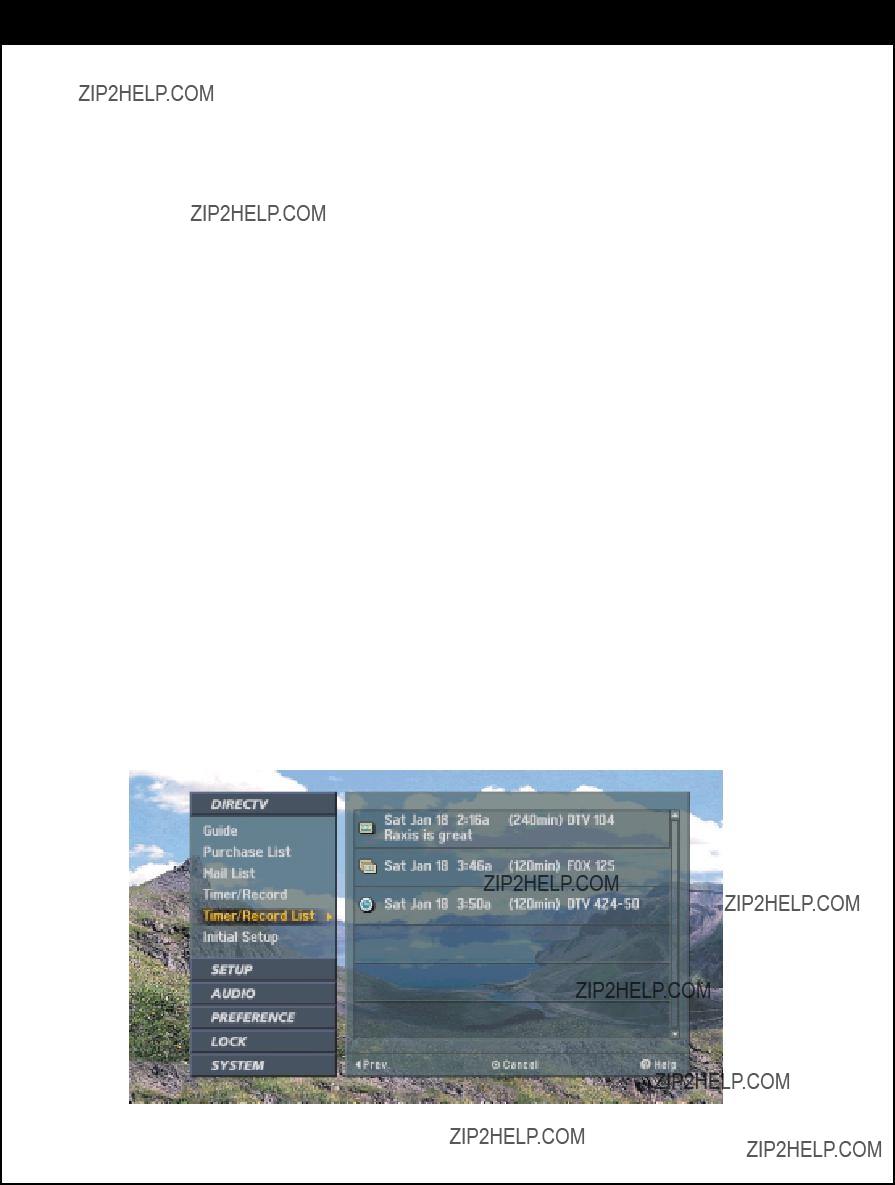
The Timer/Record List shows the programs you have reserved in the Guide menu or in the Timer/Record menu. You may cancel any program in the list by selecting the program. You may also modify any event in the list that was created in the Timer/Event menu.
To modify or delete a program in the Timer/Record List:
1.Press the MENU button on the Remote Control to display the
2.Select the DIRECTV menu by pressing ???  ???on the remote control.
3.Scroll down to Timer/Record List using ???E???.
4.Move the highlight to the right with ???G??? to select a program from the list.
5.Press ???  ??? and the
6.Select ???Delete??? in the
Select ???Modify??? in the
(Note : If the program was reserved in the Guide menu, ???Modify??? can not be selected.)
7.Press ???F??? to return to the previous level or press the EXIT button on the remote control if you want to return to TV viewing.
68

8. CUSTOMIZATION
About Initial Setup
The DIRECTV?? HD Receiver is capable of receiving three types of signals; ANT, CABLE and DIRECTV?? programming (if you are a DIRECTV customer). Initial Setup lets you initialize your system to function properly with your dish antenna.
Setup Wizard
Provides whole sequential process from dish selection (Step 1) to channel setup (Step 5).
Step 1. Dish Setup
As first step, you should select one of three dish setup modes ( Manual Selection / Auto Detection /No Dish ).
Manual Selection allows you to select the correct dish type among three different types available; Round Dish for Satellite Network A only, Oval Dish for Satellite Networks A and B, or Oval Dish for Satellite Networks A, B, and C. For advice on selecting a dish that will provide the services that you desire, contact DIRECTV
The Auto Detection feature will help you select your dish if you are unsure of your dish type.
If you are not a DIRECTV customer and want to view programming only from Antenna/Cable, then select the No Dish Mode.
69
To Select your dish type in Manual Selection:
1.Press the MENU button on the Remote Control to display the
2.Select the DIRECTV?? menu by pressing ???  ??? on the remote control.
3.Scroll down to Initial Setup using ???E???.
4.Move the highlight to the right with ???G??? to choose Setup Wizard.
5.Press ???  ??? and the Setup Wizard menu will be displayed.
6.Select the Manual Selection option and press ???  ???.
???.
7.In the Manual Selection screen, select your dish type using ???DE???.
8.Press ???  ??? to move to the next step of the initial setup.
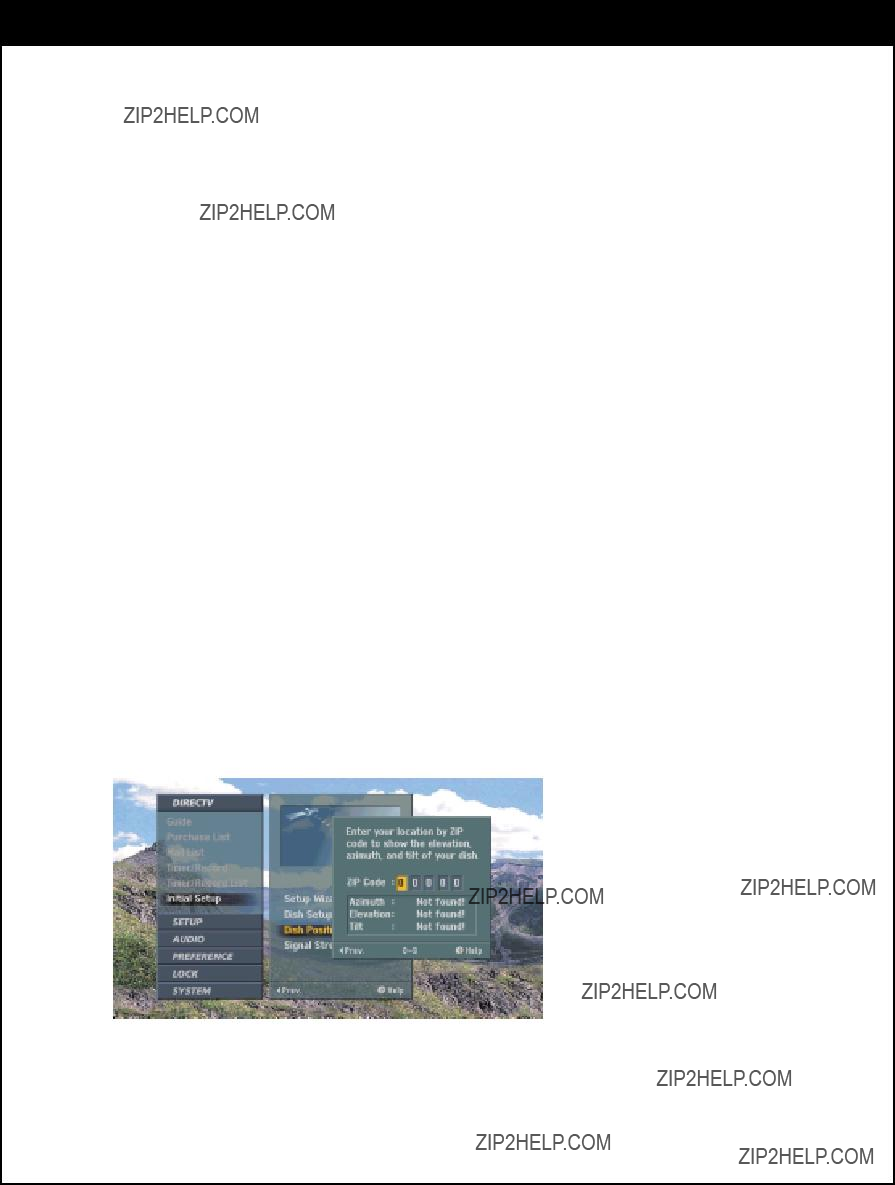
Step 2. Dish Positioning
Your Location provides the coordinates of elevation, azimuth, and tilt based upon your ZIP code. Elevation is the up/down angle of the dish. Azimuth is the
To enter your location:
1.Enter your ZIP code using the digit buttons on the remote control.
2.Press ???  ??? to show the elevation, azimuth and tilt.
Point your dish properly with the azimuth, elevation and tilt values given.
3.Press ???  ??? to move to the next step of the initial setup.
70

8. CUSTOMIZATION
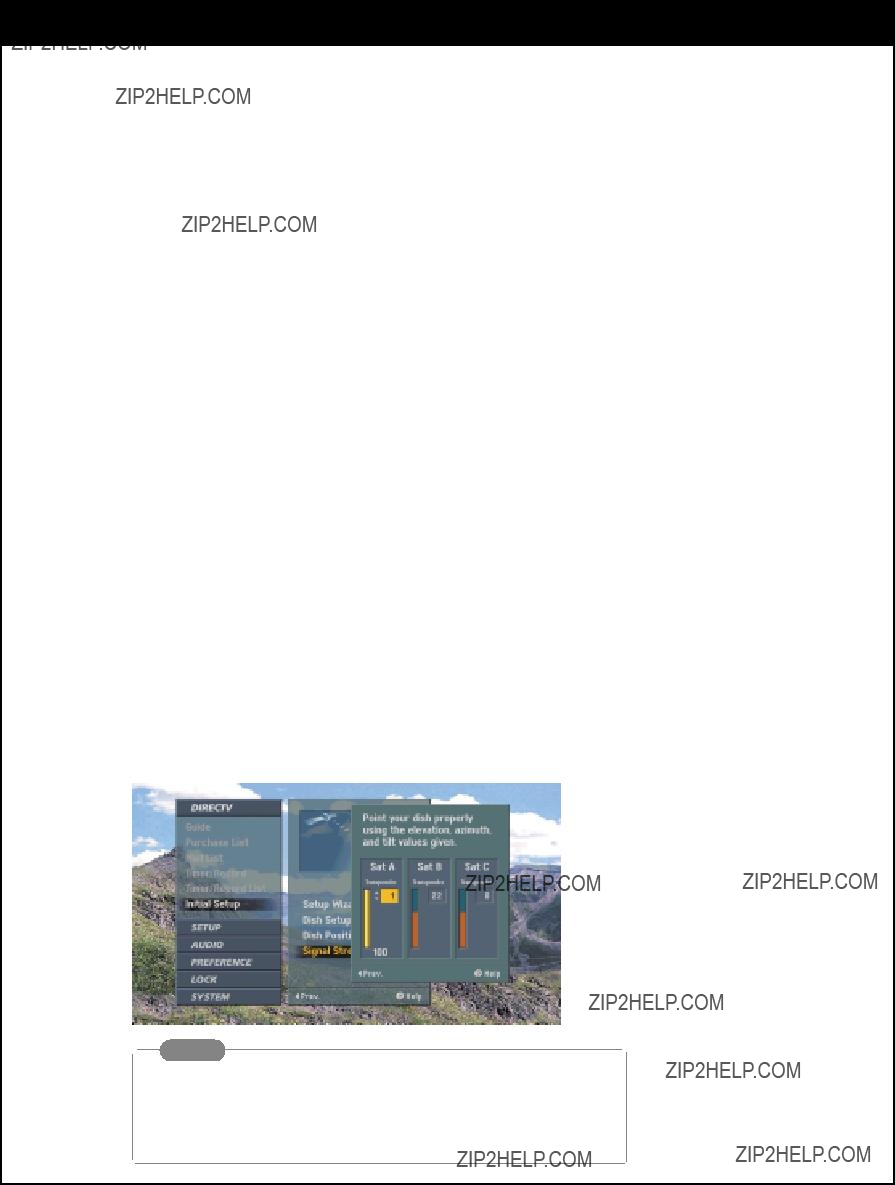
Step 3. Signal Strength
Depending on the Dish Type you have selected, the Signal Strength menu shows you up to three sig- nal strength bars for Satellite Networks A, B, and C, in order to help you adjust the dish to the cor- rect position with the elevation, azimuth, and tilt values obtained from the Your Location menu. While the maximum signal strength is 100, there will be no apparent difference in picture quality between signal strengths of 60 to 85. The higher the signal, the less likely you are to experience pic- ture quality degradation during adverse weather conditions such as heavy rain or snow.
A transponder is a receiver/transmitter on the satellite. It receives signals from DIRECTV and retrans- mits them to your dish. The DIRECTV?? HD Receiver is capable of displaying the signal strength of most transponders by using the following method.
To see the signal strength:
1.Move the highlight to select the desired satellite using ???FG???.
2.Set an each transponder using ???DE???
3.Press ???  ??? to move to the next step of the initial setup.
NOTE
If you have selected an Oval Dish and SAT B and/or SAT C do not display a signal strength on any transponder, re- check your dish installation or perform Step 1: Dish Setup again.
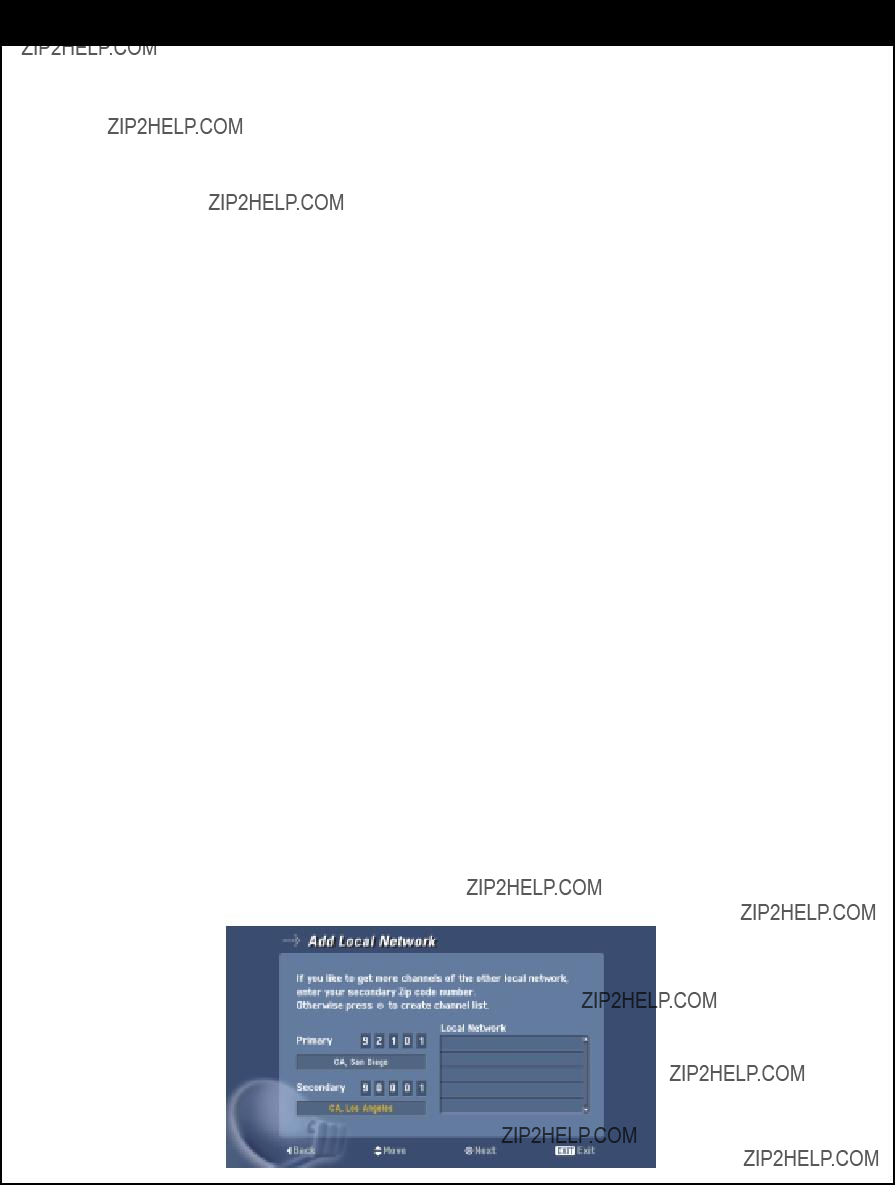
Step 4. Add Local Network
Adds program information for channels available over the air (terrestrial) in a selected local area as defined by the satellite service provider. You can select two distinct areas by ZIP code to view the chan- nels being broadcast from both areas. This is useful if you live between two major broadcast centers and are capable of receiving signals from both. After this Channel Setup process, the channel list of over the air stations will be added to the guide.
To Add Local Network:
1.If you want to add over the air digital and analog channels to your guide, you must select ???YES???, then the next input screen will be displayed.
NOTE: If you select ???NO???, you don???t need to do the following procedure.
2. Press ???  ??? if your ZIP code is correct for the primary local channels. The channel search progress will be shown.
3. If the ZIP code is missing or incorrect, select the ZIP code for your city using ???E???and pressing ???  ???.
???.
4. If you want to add secondary local channels from another area, enter a secondary ZIP code using the digit buttons on the remote control and press ???  ???.
???.
5.Repeat steps 2 to 4.
6.Press ???  ??? to move to the next step of the initial setup.
7.Press ???F??? to return to the previous level or press the EXIT button on the remote control if you want to return to TV viewing.
Note : The Add Local Network feature only adds station and program information to the guide. Depending on your location, such stations may be received by connecting an antenna to the ANT IN jack (see section
If
72

8. CUSTOMIZATION
Step 5. Create Channel list
The Setup wizard will show the summary screen of the setup sequence.
The next page will create the channel list automatically.
When the Setup Wizard function is complete, press the ???  ??? button on the remote control to finish the Initial Setup.
73

Dish Setup Status
Shows the dish type and up to two distinct areas by ZIP code.
To see the dish setup status:
1. Press the MENU button on the Remote Control to display the
2. Select the DIRECTV?? menu by pressing ???  ??? on the remote control.
3.Scroll down to the Initial Setup using ???E???.
4.Move the highlight to the right with ???G??? to select Dish Setup Status.
5. Move the highlight to Dish Setup Status and press ???  ???. The Dish Information dialogue box will be displayed.
6. Press ???F??? to return to the previous menu.
74
8. CUSTOMIZATION
Dish Positioning
Provides the coordinates of elevation, azimuth, and tilt based upon your ZIP code. Elevation is the up/down angle of the dish. Azimuth is the
To enter your location:
1.Press the MENU button on the Remote Control to display the
2.Select the DIRECTV?? menu by pressing ???  ??? on the remote control.
3.Scroll down to Initial Setup using ???E???.
4.Move the highlight to the right with ???G??? to select Dish Positioning.
5.Move the highlight to Dish Position and press ???  ???. The positioning dialogue box will be displayed.
6.Enter your ZIP code using the digit buttons on the remote control.
7.Press ???  ??? to show the elevation, azimuth and tilt.
Point your dish properly with the azimuth, elevation and tilt values given.
8.Press ???F??? to return to the previous menu.
75
Signal Strength
Depending on the Dish Type that is selected, the Signal Strength menu shows you up to three signal strength bars for Satellite Networks A, B, and C, in order to help you adjust the dish to the correct position with the elevation, azimuth, and tilt values obtained from the Your Location menu. While the maximum signal strength is 100, there will be no apparent difference in picture quality between signal strengths of 60 to 85. The higher the signal, the less likely you are to experience picture quality degra- dation during adverse weather conditions such as heavy rain or snow.
A transponder is a receiver/transmitter on the satellite. It receives signals from DIRECTV and retrans- mits them to your dish. The DIRECTV?? HD Receiver is capable of displaying the signal strength of most transponders by using the following method.
To see the dish setup status:
1.Press the MENU button on the Remote Control to display the
2.Select the DIRECTV?? menu by pressing ???  ??? on the remote control.
3.Scroll down to Initial Setup menu using ???E???.
4.Move the highlight to the right with ???G??? to select Signal Strength.
5.When the highlight is on the Signal Strength, press ???  ???. The signal strength dialogue box will be displayed.
6.Move the highlight to select the desired transponder and satellite.
7.Press ???F??? to return to previous menu.

8. CUSTOMIZATION
EZ Channel Scan (Channel Search)
Automatically finds all channels (both analog and digital) available through the antenna and cable inputs, and stores all the active channels in the channel list. Inactive or weak channels may not appear in the list. In that case, add missing channels manually in the Manual Ch. Add menu. The channel list created here can be seen in the Surf List/Ch. Edit menu.
To scan the channels:
1.Press the MENU button on the Remote Control to display the
2.Scroll down using ???E??? on the remote control.
3.Select the Setup menu by pressing ???  ???.
???.
4.EZ Channel Scan will be automatically highlighted.
5.Move the highlight to the right with ???G??? to display the channel find box.
6.Select ???Start??? button and press ???  ??? and the moving yellow bar will indicate the progress scan- ning the channels. When the scanning process begins, ???Start??? will change to ???Next???. If you press
???Next???, the scanning of the current signal source will be ignored and the scanning of the next sig- nal source will proceed.
7.When the scanning is completed, the scanned result will be stored.
8.Press the EXIT button on the remote control if you want to return to TV viewing.
77

Manual Ch. Add
Manually adds a channel to your channel list without rescanning all the channels again. EZ Channel Scan may not pick up every channel that is available on Air and Cable. Therefore, it may be necessary for you to add channels manually using this feature.
Note :The Manual Channel Add feature is not available in ANT/CABLE mode. Use the EZ Channel Scan and Favorite/Ch Edit menus to add channels in the ANT/CABLE mode.
To add the channels missed in your channel list:
1.Press the MENU button on the remote control to display the
2.Scroll down using ???E??? on the remote control.
3.Select the Setup menu by pressing ???  ???.
???.
4.Scroll down to Manual Ch. Add using ???E???.
5. Move the highlight to the right with ???G??? to display the channel add box.
6.Enter the channel number desired using the digit buttons on the remote control.
7.Press ???  ??? and the
8.Press the EXIT button on the remote control to return to TV viewing.
Note :
78

8. CUSTOMIZATION
Surf List/Ch. Edit
The default channel list is made in the EZ Channel Scan menu. Surf List/Ch. Edit allows you to create two other types of channel lists; custom list and surf list. A custom list can be created by toggling each channel on or off with ???  ???. Once a channel is highlighted, you will be able to see whether the channel is currently shown or hidden by referring to the small window at the
To create your own surf list, with up to 50 favorite channels, press the SURF button on the remote con- trol when a channel is highlighted.
To edit the channel list:
1.Press the MENU button on the remote control to display the
2.Scroll down using ???E??? on the remote control.
3.Select the Setup menu by pressing ???  ???.
???.
4.Scroll down to Surf List/Ch. Edit using ???E ???.
5.Press ???G??? to display the channel editing screen.
To create a custom list:
1.Use ???DEFG??? to move the highlight on the channel editing menu.
2.Choose ???Shown??? or ???Hidden??? by pressing ???  ???.
???.
The screen shown at the top left will indicate if the highlighted channel is shown or hidden.
To create a surf list:
1.Use ???DEFG??? to move the highlight on the channel editing menu.
2.Choose ???Surf??? or ???No Surf??? using the SURF button on the remote control.
6.Press the MENU button to return to the previous screen or press the EXIT button on the remote control to return to TV viewing.
NOTE
Use the ???Show All??? button to show all the channels.
Use the ???Hide All??? button to hide all the channels.
79
80
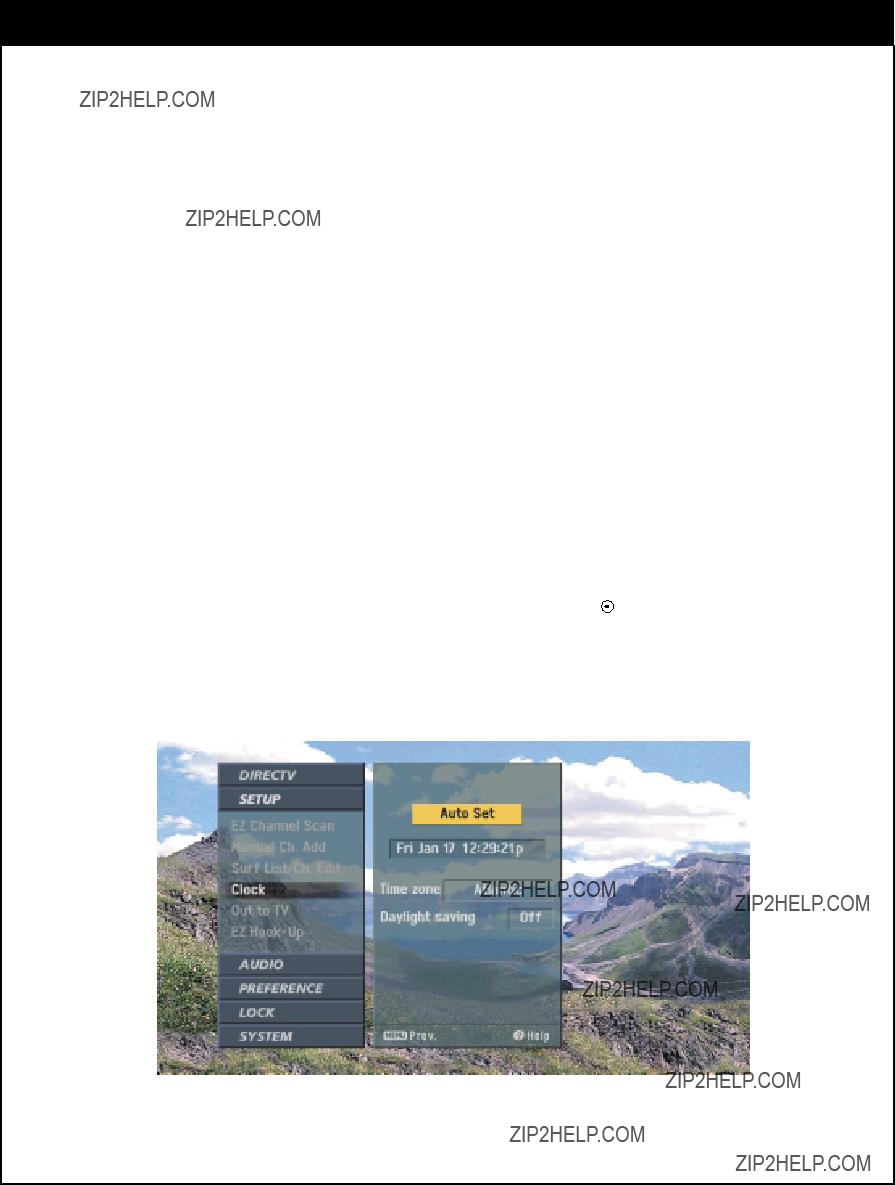
8. CUSTOMIZATION
Clock (Auto)
Enables adjustment of the time zone and activation of daylight savings time. Normally, your clock is set using signals transmitted by DIRECTV.
To set auto clock:
1.Press the MENU button on the Remote Control to display the
2.Scroll down using ???E??? on the remote control.
3.Select the Setup menu by pressing ???  ???.
???.
4.Scroll down to Clock using ???E???.
5.Move the highlight to the right with ???G???.
6.Select your time zone by pressing ???G??? repeatedly.
9.Press the MENU button to return to the previous menu or press the EXIT button on the remote control to return to TV viewing.
81

Clock (Manual)
Enables you to set the time manually for the ANT/CABLE source only.
To set clock manually:
1.Press the MENU button on the Remote Control to display the
2.Scroll down using ???E??? on the remote control.
3.Select the Setup menu by pressing ???  ???.
???.
4.Scroll down to Clock using ???E???.
5.Move the highlight to the right with ???G???.
6.Use ???DE??? to move the highlight in the entry boxes.
7.Set the Year, Date and Time using the number buttons on the remote control.
8.Press MENU button to return to the previous screen or press the EXIT button on the remote con- trol to return to TV viewing.
82

8. CUSTOMIZATION
Output Channel
If you use the OUT TO TV jack, select channel 3 or 4 to send RF signal from your DIRECTV?? HD Receiver to your TV. Your TV must be tuned to the selected channel to display the pic- ture.
Loop Through
A signal from CABLE IN or ANT IN jacks is passed through to the OUT TO TV jack when your HD receiver is in the standby (power off) mode.
To set Out to TV settings of the DIRECTV HD Receiver:
1.Press the MENU button on the Remote Control to display the
2.Scroll down using ???E??? on the remote control.
3.Select the Setup menu by pressing ???  ???.
???.
4.Scroll down to Out to TV using ???E???.
5.Move the highlight to the right with ???G???.
6.Select your output channel to Channel 3 or Channel 4 with ???FG???. Select your default signal source to Antenna or Cable with ???FG???.
7.Press the MENU button to return to the previous menu or press the EXIT button on the remote control to return to TV viewing.
83

Graphically depicts possible ways to connect the DIRECTV?? HD Receiver to your dish antenna and other components. Since the connection that is best for you depends on the components in your sys- tem, keep in mind that an alternative connection may also be possible.
To see EZ
1.Press the MENU button on the remote control to display the
2.Scroll down using ???E??? on the remote control.
3.Select the Setup menu by pressing ???  ???.
???.
4.Scroll down to EZ
5.Press ???G??? to display the EZ
6.Scroll up and down the
the correct connections for your system.
7.Press the MENU button to return to the previous screen or press the EXIT button on the remote control to return to TV viewing.
84

8. CUSTOMIZATION
Digital Output
If you are using an external audio system that supports Dolby Digital?? audio, select Dolby Digital audio mode. If you are using an external audio system that has a PCM only decoder, select PCM (Digital). If you are not using an external audio system, select OFF.
Do not select the Dolby Digital setting if connecting to an audio system that is not capa- ble of decoding Dolby Digital audio. Doing so may cause the audio receiver to create
To set the digital audio mode:
1.Press the MENU button on the Remote Control to display the
2.Scroll down using ???E??? on the remote control.
3.Select the Audio menu by pressing ???  ???.
???.
4.Digital Output will be automatically highlighted.
5.Move the highlight to the right with ???G???.
6. Select one of the three options and press ???  ??? to return to the previous level.
7. Press the EXIT button on the remote control to return to TV viewing.
85

PCM (Digital)
Pulse Code Modulation (PCM) decoders support L/R stereo only. If selected, audio outputs are decoded and transmitted to the Digital Output (SPDIF) in PCM mode.
Dolby Digital?? Audio
Dolby Digital?? audio, formerly known as Audio Coding 3rd Generation or 5.1 channel audio, is a coding technique that provides up to five independent, full frequency response audio chan- nels and one low frequency bass channel.
NOTE
Refer to section
NOTE
Please make sure that your A/V ampli- fier supports Dolby Digital decoding, as not all A/V amplifiers support 5.1 decoding.
86

8. CUSTOMIZATION
Audio Mode
Allows you to choose the default audio mode when a program is broadcast in analog for- mat.
When you view a program broadcast in mono, you will hear only mono sound, even though Stereo mode is set. When Second Audio Program ???SAP??? mode is set, the program???s sec- ond audio program is broadcast in mono, if provided.
To Set the Analog Audio Mode:
1.Press the MENU button on the Remote Control to display the
2.Scroll down using ???E??? on the remote control.
3.Select the Audio menu by pressing ???  ???.
???.
4.Scroll down to Audio Mode using ???E???.
5.Move the highlight to the right with ???G???.
6. Select one of the three options and press ???  ??? to return to the previous level.
7. Press the EXIT button on the remote control to return to TV viewing.
87

Dolby Digital?? Audio
Allows you to choose a Dolby Digital?? audio mode decoding mode according to which analog audio output port you use to adjust the adequate audio level. If you connect audio line output to your TV, select ???Line Mode???. If you use the OUT TO TV port to connect to your TV, select ???RF Mode???.
To set the Dolby Digital:
1.Press the MENU button on the Remote Control to display the
2.Scroll down using ???E??? on the remote control.
3.Select the Audio menu by pressing ???  ???.
???.
4.Scroll down to Dolby Digital using ???E???.
5.Move the highlight to the right with ???G???.
6.Select the Line Mode or RF Mode option and press ???  ??? to return to the previous level.
7.Press the EXIT button on the remote control to return to TV viewing.
88

8. CUSTOMIZATION
Audio Language
If available, allows you to hear a program in other languages if the program is broadcast in digital format. You may select a language while you are viewing a program by selecting an option on the audio language box in the channel banner and pressing ???DE??? repeatedly to select the desired language.
To set the digital audio language:
1.Press the MENU button on the Remote Control to display the
2.Scroll down using ???E??? on the remote control.
3.Select the Audio menu by pressing ???  ???.
???.
4.Scroll down to Audio Language using ???E???.
5.Move the highlight to the right with ???G???.
6. Select one of the eight language options and press ???  ??? to return to the previous level.
7. Press the EXIT button on the remote control to return to TV viewing.
89
Variable Audio
Allows you to control the volume with the remote control of the DIRECTV?? HD Receiver.
To set Variable Audio:
1.Press the MENU button on the Remote Control to display the
2.Scroll down using ???E??? on the remote control.
3.Select the Audio menu by pressing ???  ???.
???.
4.Scroll down to Audio Variable using ???E???.
5.Move the highlight to the right with ???G???.
6. Select ???On??? or ???Off??? and press ???  ??? to return to the previous level.
7. Press the EXIT button on the remote control to return to TV viewing.
NOTE
Only when Audio Variable is set to On, the sound level will be controlled.
90
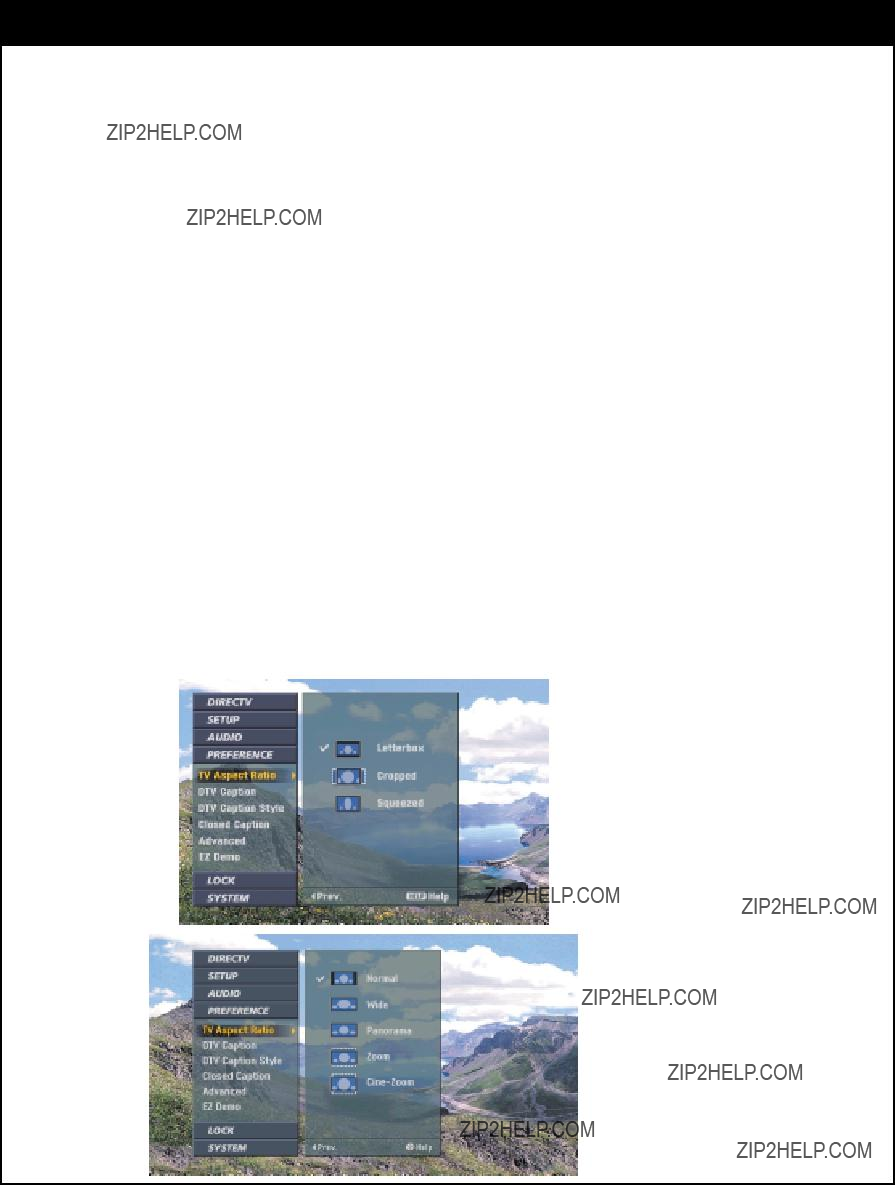
8. CUSTOMIZATION
Allows you to choose the screen format. When you view a
When you view a
(Refer to section
Choosing the screen format of your TV:
1.Press the MENU button on the Remote Control to display the
2.Scroll down using ???E??? on the remote control.
3.Select the Preference menu by pressing ???  ???.
???.
4.TV Aspect Ratio will be automatically highlighted.
5.Move the highlight to the right with ???G???.
6.Select one of the options and press ???  ??? to return to the previous level.
7.Press the EXIT button on the remote control to return to TV viewing.
Note : The RATIO button on the remote control may also be used to toggle through the available aspect ratio settings of the current content and output format.
91

Modes for viewing
Letter Box
Use for a picture with an original 16:9 aspect ratio (in a wide format). Letterbox mode will shrink the picture to fill the screen, with black (or gray) bars appearing at the top and bottom of the screen.
Cropped
Use for a picture filling the entire screen by cropping (removing) the left and right portions of the picture.
Squeezed
Use for a full picture filling the entire screen with no black/gray bars. The picture in a 16:9 format will be horizontally adjusted or squeezed to fit the 4:3 ratio monitor.
Modes for viewing normal image (4:3) on a wide TV (16:9) display when output display format is 720p or 1080i mode :
Normal
Use for a picture with an original 4:3 aspect ratio on your 16:9 monitor, with black/gray bars appearing at the left and right sides.
Wide
Use for a picture adjusted horizontally (in a linear proportion) to fill the entire screen.
Panorama
Use to adjust a picture in a
Zoom
Use when you want to fill the entire screen with no black/gray bars appearing. The image will be altered both horizontally (stretched) and vertically (cropped). The top and bottom portions of the picture will be cut.
Use to adjust zooming. The picture can be adjusted in multiple steps to provide the best dis- play for many program formats on your display device.
92

8. CUSTOMIZATION
Modes for viewing
FORMAT IS 720p OR 1080i MODE :
(Note: you may choose one of three picture appearance options for your preference)
Standard
Choose when you want to view a picture with no adjustment.
Expand
Choose when you want to view a picture in the 16:9 ratio. The picture will be horizontally adjusted or expanded to fit 16:9 ratio size. Left and right portions of the picture will not be shown.
Shrink
Choose when you want to view a picture in the 4:3 ratio. The picture will be horizontally adjusted or squeezed to fit 4:3 ratio size. Black or gray bars will show at the left and right side.
Aspect Ratio Summary
NOTE
The aspect ratio setting changes both the
93
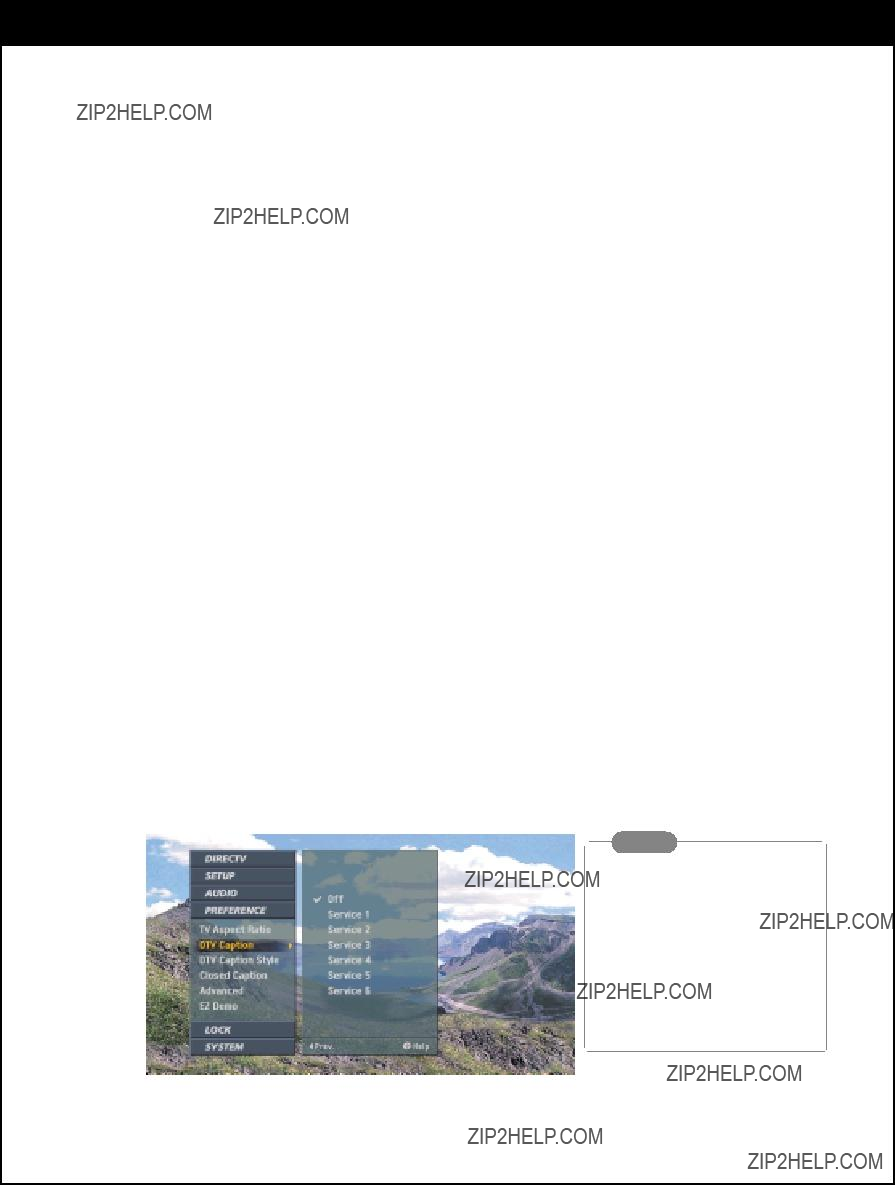
Allows you to select a mode for displaying Digital Caption Data. In the Digital Caption
Service, Services
Service 1
Service 1 is designated as the Primary Caption Service. This service contains the verbatim, or
Service 2
Service 2 is designated as the Secondary Language Service. This service contains captions in a secondary language which are translations of the captions in the Primary Caption Service.
Services
The other services are not
To set Digital Caption:
1.Press the MENU button on the Remote Control to display the
2.Scroll down using ???E??? on the remote control.
3.Select the Preference menu by pressing ???  ???.
???.
4.Scroll down to Digital Caption using ???E???.
5.Move the highlight to the right with ???G???.
6. Select one of options and and press ???  ??? to return to the previous level.
7. Press the EXIT button on the remote control to return to TV viewing.
NOTE
If both digital caption and closed caption are selected, only the digital caption will be selected. The digital caption can also be selected using the
CC button on the remote con-
trol.
94

8. CUSTOMIZATION
Allows you to customize the caption style to your preference by allowing you to change: Font, Edge Type, Color, etc.
Note : If the Style setting is ???Set By Program??? the captions will appear as defined by the program provider.
To set DTV Caption Style:
1.Press the MENU button on the Remote Control to display the
2.Scroll down using ???E??? on the remote control.
3.Select the Preference menu by pressing ???  ???.
???.
4.Scroll down to DTV Caption Style using ???E???.
5.Move the highlight to the right with ???G??? to move to the caption style box.
6.Select each value from Style to Edge Color.
Move the highlight using ???ED???, and Select a value for each option with ???FG???.
7.Press the MENU button on the remote control to return to the previous level. Press the EXIT button on the remote control to return to TV viewing.
95

Allows you to select a mode for displaying analog Closed Caption Data. In the Analog Caption Service, Captions
Caption1 (CC1)
CC1 is the primary caption service that synchronizes the captioning language with the sound, used by most broadcasters. The captioning is displayed in the same language as the program???s dialog.
Caption2 (CC2)
CC2 is the special
Caption3 (CC3)
CC3 serves as an alternate captioning service channel. The captioning is often a secondary lan- guage translation such as French, Spanish, simplified English or displayed at a slower rate.
Caption4 (CC4)
CC4 is another special
Text
To set Closed Caption:
1.Press the MENU button on the Remote Control to display the
2.Scroll down using ???E??? on the remote control.
3.Select the Preference menu by pressing ??? ???.
???.
4.Scroll down to Closed Caption using ???E???.
5.Move the highlight to the right with ???G???.
6.Select one of options and and press ??? ??? to return to the previous level.
7.Press the EXIT button on the remote control to return to TV viewing.
NOTE
If both digital caption and closed caption are selected, only the digital caption will be selected. The closed caption can also be selected using the CC button on the remote con- trol.
96

8. CUSTOMIZATION
Advanced Setup
Allows you to configure special settings such as the background matte color for wide aspect ratio programming, the channel banner
To set advanced Setup Menu:
1.Press the MENU button on the Remote Control to display the
2.Scroll down using ???E??? on the remote control.
3.Select the Preference menu by pressing ???  ???.
???.
4.Scroll down to Advanced using ???E???.
5.Move the highlight to the right with ???G???
6.Select your default background Matte Color which appears with certain aspect ratio settings with ???F G???.
Or
Select a
Or
Select a Banner style of ???Small???, ???Medium??? or ???Large??? to be displayed when changing channels or pressing the INFO button.
Or
Select each DVI Level between ???Standard??? which is recomended for most TVs or ???Expand??? which is recommended for most digital monitors.
7.Press the MENU button on the remote control to return to the previous level. Press the EXIT button on the remote control to return to TV viewing.
97

Shows you how to navigate through the
To run EZ Demo:
1.Press the MENU button on the Remote Control to display the
2.Scroll down using ???E??? on the remote control.
3.Select the Preference menu by pressing ???  ???.
???.
4.Scroll down to EZ Demo using ???E???.
5.Press ???G??? to display the EZ Demo screen. EZ Demo will run automatically.
6.Press ???F??? anytime to return to the previous screen or press the EXIT button on the remote control to return to TV viewing.
98

8. CUSTOMIZATION
Lock System
Allows you to set up specific channels, ratings and spending limits through blocking schemes. Also allows you to activate or disable all of the lock schemes previously set up. A password is required to gain access to this menu if the lock system is activated. You can change the password by inputting a new password twice. When the system is unlocked, the Block Channel, Program Rating and Spending Limits are not effective.
To activate or deactivate the Lock System:
1.Press the MENU button on the Remote Control to display the
2.Scroll down using ???E??? on the remote control.
3.Select the Lock menu by pressing ???  ???.
???.
4.If unlocked, Lock System will be automatically highlighted, otherwise requires a password.
To lock the system:
1. Move the highlight to the right with ???G??? in Lock On/Off box.
2.Switch On or Off by using ???G??? Whenever you switch the lock system on, you need to enter the password as a reminder.
To set the password:
1.Move the highlight to the Set Password with ???E???.
2.Enter the password by using the digit buttons on the remote control.
3.Enter the password again for verification.
5.Press ???F??? to return to the previous screen or
press the EXIT button on the remote control to return to TV viewing.
99
Block Channel
Blocks any channels that you do not want to view or that you do not want your kids to watch. If you tune in a blocked channel, a black screen with a
To block channels:
1.Press the MENU button on the Remote Control to display the
2.Scroll down using ???E??? on the remote control.
3.Select the Lock menu by pressing ???  ???.
???.
4.Scroll down to Block Channel using ???E???.
5.Press ???G??? to display the Block Channel screen.
6.Use ???DEFG??? to move the highlight in the channel editing screen.
7.Toggle Blocked or Unblocked using ???  ???.
???.
The screen shown at the top left will indicate if the highlighted channel is blocked or unblocked.
8.Press ???F??? to return to the previous screen or press the EXIT button on the remote control to return to TV viewing.
NOTE
When you tune to a blocked channel, a password is required for access.
The Channel Block feature should not be used as the only parental control. Since station assignments may change from time to time, controls such as rat- ing and spending limits should always be used as the primary parental control. Additionally, the Channel Block settings may be reset if there is an interruption to the AC power (such as if set is unplugged or there is a power failure).
100
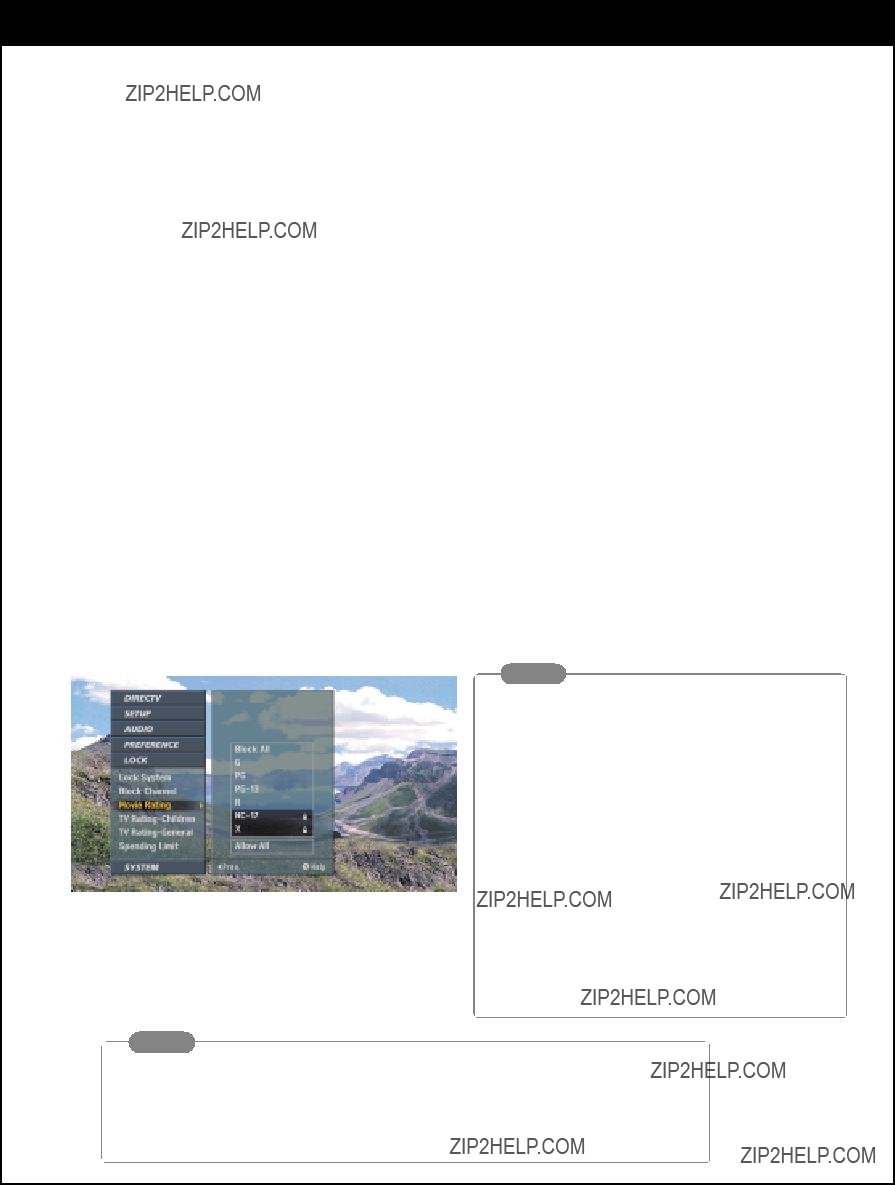
8. CUSTOMIZATION
Movie Rating
Blocks movies according to the movie ratings limit, as defined by the Motion Picture Association of America, so children cannot view certain movies. You can set the ratings limit by blocking out all the movies with the ratings above a specified level. Keep in mind that the movie ratings limit applies only to movies shown on TV, not TV programs such as soap operas.
To block movie programs:
1.Press the MENU button on the Remote Control to display the
2.Scroll down using ???E??? on the remote control.
3.Select the Lock menu by pressing ???  ???.
???.
4.Scroll down to Movie Rating using ???E???.
5. Select the level you want using ???DE??? and press ???  ??? to return to the previous level.
6. Press the EXIT button on the remote control to return to TV viewing.
NOTE
MOVIE/MPAA rating
G: General Audiences
All ages admitted.
PG: Parental Guidance Suggested.
Some material may not be suitable for children.
Some material may not be appropriate for children under 13.
R: Restricted Under 17 requires parent or adult guardian present.
X: No viewers 17 and under.
NOTE
The Lock feature relies on correct rating information to be provided by broadcaters and service providers. If broadcast rating information is missing or incorrect, the Lock fea- ture cannot function as designed.
101
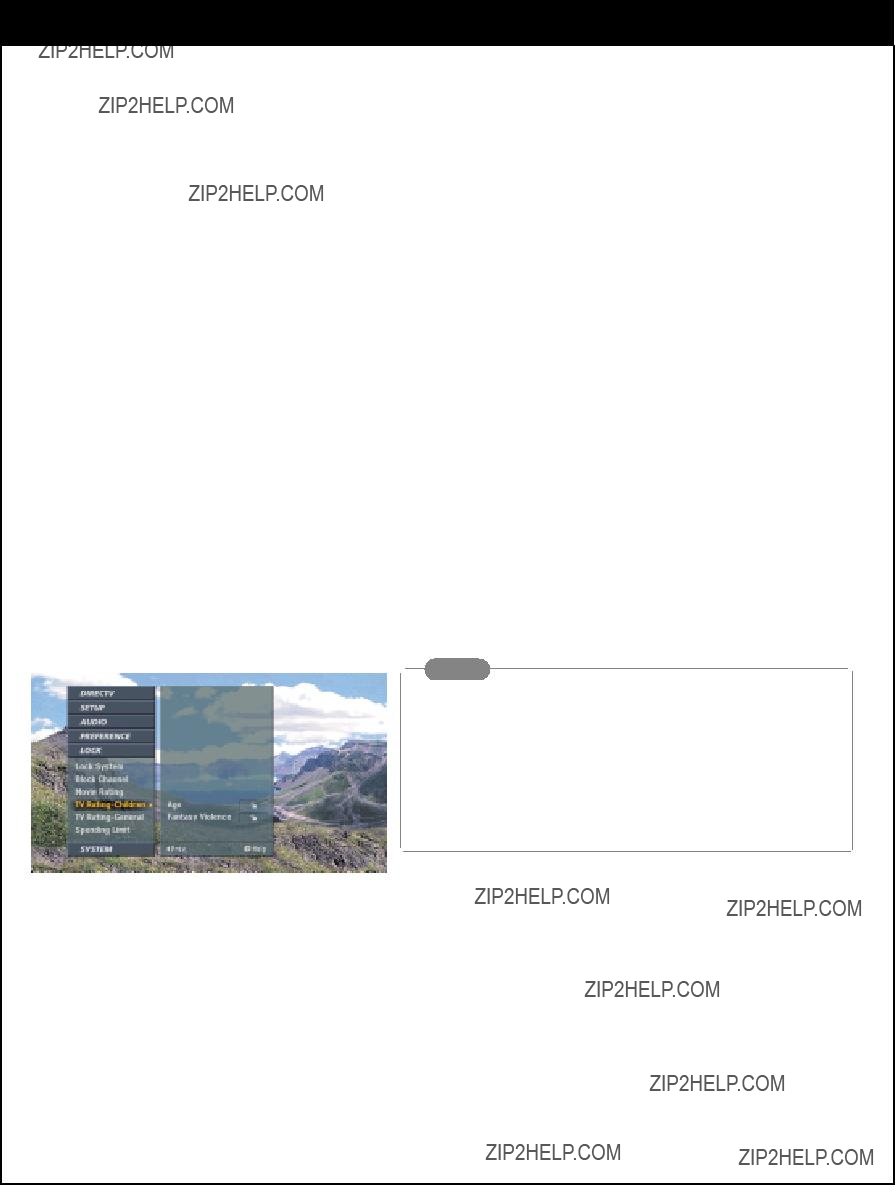
TV Rating for Children???s Programs
Keeps children from watching certain children???s TV programs according to the ratings limit as defined by the TV Parental Guidelines Monitoring Board. This rating applies only to TV programs for children. Unless you block TV programs intended for mature audiences in the TV Rating ??? General menu, your children may view those programs.
To block TV programs:
1.Press the MENU button on the Remote Control to display the
2.Scroll down using ???E??? on the remote control.
3.Select the Lock menu by pressing ???  ???.
???.
4.Scroll down to TV
5.Select Age or Content, if you want to lock a TV program based on age or content.
6. Select the level you want using ???DE??? and press ???  ??? to return to the previous level.
7. Press the EXIT button on the remote control to return to TV viewing.
NOTE
TV Rating Children Programs
This program is designed to be appropriate for all children.
This program is designed for children age 7 and above.
102

8. CUSTOMIZATION
TV Rating for General Programs
Blocks TV programs that you and your family do not wish to watch, based on the rating scheme defined by the TV Parental Guidelines Monitoring Board.
To block TV programs:
1.Press the MENU button on the Remote Control to display the
2.Scroll down using ???E??? on the remote control.
3.Select the Lock menu by pressing ???  ???.
???.
4.Scroll down to TV
5.Select Age or Content, if you want to lock a TV program based on age or content.
6. Select the level you want using ???DE??? and press ???  ??? to return to the previous level.
7. Press the EXIT button on the remote control to return to TV viewing.
NOTE
TV Rating for General Programs
Most parents would find this program suitable for all ages.
This program contains material that parents may find unsuit- able for younger children.
This program contains some material that many parents would find unsuitable for children under 14 years of age.
This program is specifically designed to be viewed by adults and therefore may be unsuitable for children under 17.
103

Spending Limit
Sets a spending limit for individual Pay Per View (PPV) programs. After a spending limit is set and the system is locked, you must enter the password to purchase a PPV program that costs more than your spending limit allows. The system will temporarily unlock the limit you previ- ously set. Once the receiver is turned off and then turned back on, the lock will be reactivat- ed.
To set the spending limit of each PPV program:
1.Press the MENU button on the Remote Control to display the
2.Scroll down using ???E??? on the remote control.
3.Select the Lock menu by pressing ???  ???.
???.
4.Scroll down to Spending Limit using ???E???.
5.Move the highlight to the right with ???G???.
6.Enter the maximum amount of money to be spent on each PPV program.
7.Press ???  ??? to return to the previous level.
8.Press the EXIT button on the remote control to return to TV viewing.
104

8. CUSTOMIZATION
General Info
Shows you general information about your DIRECTV?? HD Receiver.
To view General information in the HD receiver:
1.Press the MENU button on the Remote Control to display the
2.Scroll down using ???E??? on the remote control.
3.Select the System menu by pressing ???  ???.
???.
4.System Info will be automatically highlighted.
5.Move the highlight to the right with ???G??? to display the information option box.
6.General Info will be automatically highlighted.
7.Press ???  ??? and the
8.Press the EXIT button on the remote control to return to TV viewing.
105
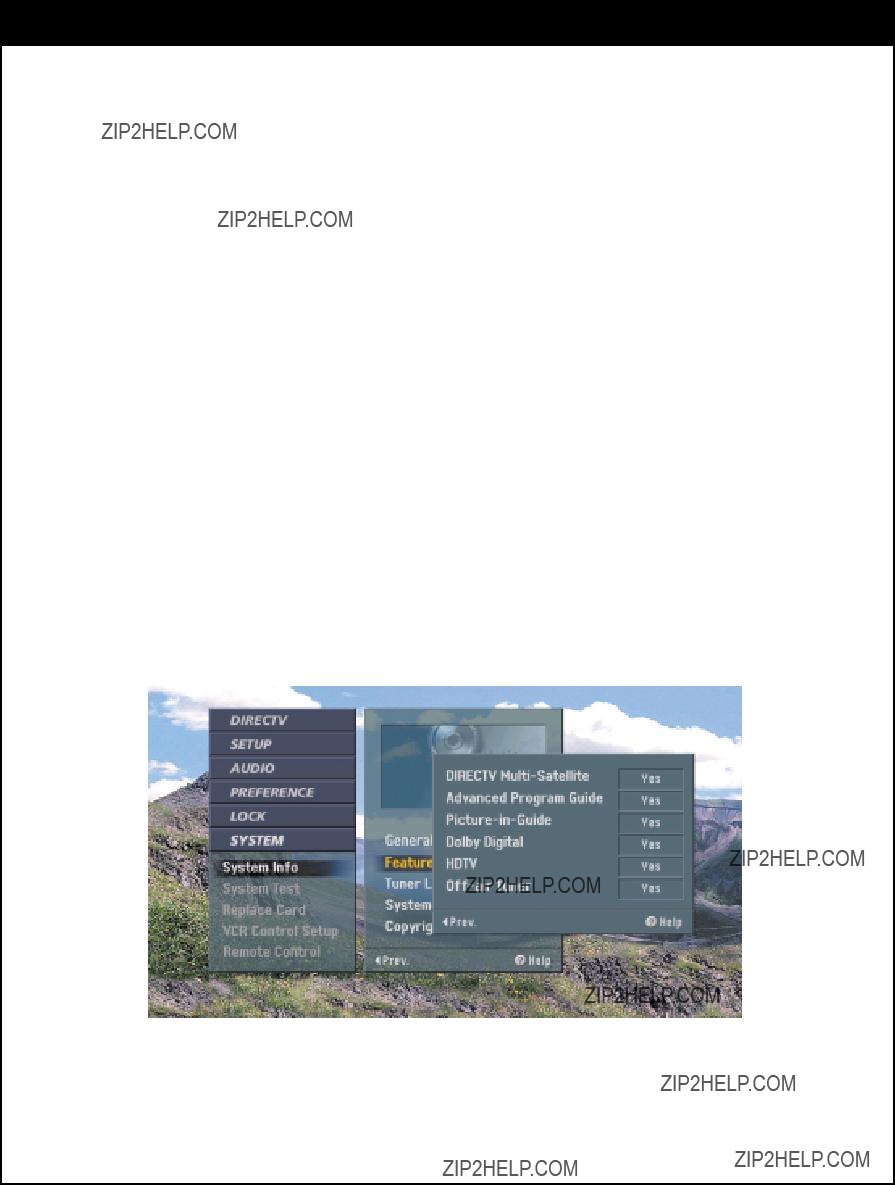
Feature List
When in Satellite mode, allows you to see which major features are available for your DIRECTV?? HD Receiver.
To view Feature list in the HD receiver:
1.Press the MENU button on the Remote Control to display the
2.Scroll down using ???E??? on the remote control.
3.Select the System menu by pressing ???  ???.
???.
4.System Info will be automatically highlighted.
5.Move the highlight to the right with ???G??? to display the information option box.
6.Scroll down using ???E??? on the remote control to select Feature List.
7.Press ???  ??? and the
8.You can see the feature list on the right side of the menu.
9.Press the EXIT button on the remote control to return to TV viewing.
106

8. CUSTOMIZATION
Tuner List
When in Satellite mode, shows you what kind of tuners are built in DIRECTV?? HD Receiver.
To upgrade the software in the your HD receiver:
1.Press the MENU button on the Remote Control to display the
2.Scroll down using ???E??? on the remote control.
3.Select the System menu by pressing ???  ???.
???.
4.System Info will be automatically highlighted.
5.Move the highlight to the right with ???G??? to display the information option box.
6.Scroll down using ???E??? on the remote control to select Tuner List.
7.Press ???  ??? and the
8.You can see the Tuner list on the right side of the menu.
9.Press the EXIT button on the remote control to return to TV viewing.
107

System Upgrade
When in Satellite mode, shows you the current software version. If there is a software upgrade planned, you will be notified by a
To upgrade the software in the DIRECTV?? HD Receiver:
1.Press the MENU button on the Remote Control to display the
2.Scroll down using ???E??? on the remote control.
3.Select the System menu by pressing ???  ???.
???.
4.System Info will be automatically highlighted.
5.Move the highlight to the right with ???G??? to display the information option box.
6.Scroll down to System Upgrade using ???E???.
7.Press ???  ???, then you can see the current software version on the right side of the menu. The next version will be seen if DIRECTV plans to upgrade the software.
8.Press the EXIT button on the remote control to return to TV viewing.
The DIRECTV HD Receiver is able to receive upgrades or modifications to some of its features and functions via satellite service. These modifications will automatically be made, usually at times when the receiver would likely be turned off. If your receiver is on when an upgrade or modification is sent, you may experience a disruption in reception for a minute or two. Your reception should return to normal after the modification is complete. Your receiver must be plugged in and connected to satellite service to receive any upgrades. Please consult the Upgrade Menu to find a schedule of upgrades or modifications planned by DIRECTV.
(Note: Do not unplug your receiver while an upgrade is in progress. )
108

8. CUSTOMIZATION
Basic Test
When in Satellite mode, diagnoses essential system components of your HD receiver. Once the Basic System Test is done, your HD receiver???s status will be displayed. If any problems are detected, a short message will be displayed.
To test basic items in DIRECTV?? HD Receiver:
1.Press the MENU button on the Remote Control to display the
2.Scroll down using ???E??? on the remote control.
3.Select the System menu by pressing ???  ???.
???.
4.Scroll down to System Test using ???E???.
5.Move the highlight to the right with ???G??? to display the system test option box.
6.???Basic Test??? Info will be automatically highlighted.
7.Press ???  ??? and the
8.Press ???  ??? to activate the System Basic test.
It will run automatically from DIRECTV Tuner to Phone Connection and if there is any problem in your system, the
9.Press the EXIT button on the remote control to return to TV viewing.
109
Satellite Dish Antenna (Outdoor Unit) Test
When in Satellite mode, diagnoses the Satellite Dish Antenna (LNB and Satellite Antenna) connected to the HD receiver.
Once the Satellite Dish Antenna (Outdoor Unit) Test is done, Satellite signal status will be displayed. If any problems are detected, a short message will be displayed.
To test the Outdoor Unit :
1.Press the MENU button on the Remote Control to display the
2.Scroll down using ???E??? on the remote control.
3.Select the System menu by pressing ???  ???.
???.
4.Scroll down to System Test using ???E???.
5.Move the highlight to the right with ???G??? to display the system test option box.
6.Scroll down to Outdoor Unit Test using ???E??? on the remote control.
7.Press ???  ??? and the
8. Press ???  ??? to activate the system outdoor unit test.
It will run automatically and if there is any problem in your system, the
9. Press the EXIT button on the remote control to return to TV viewing.
110
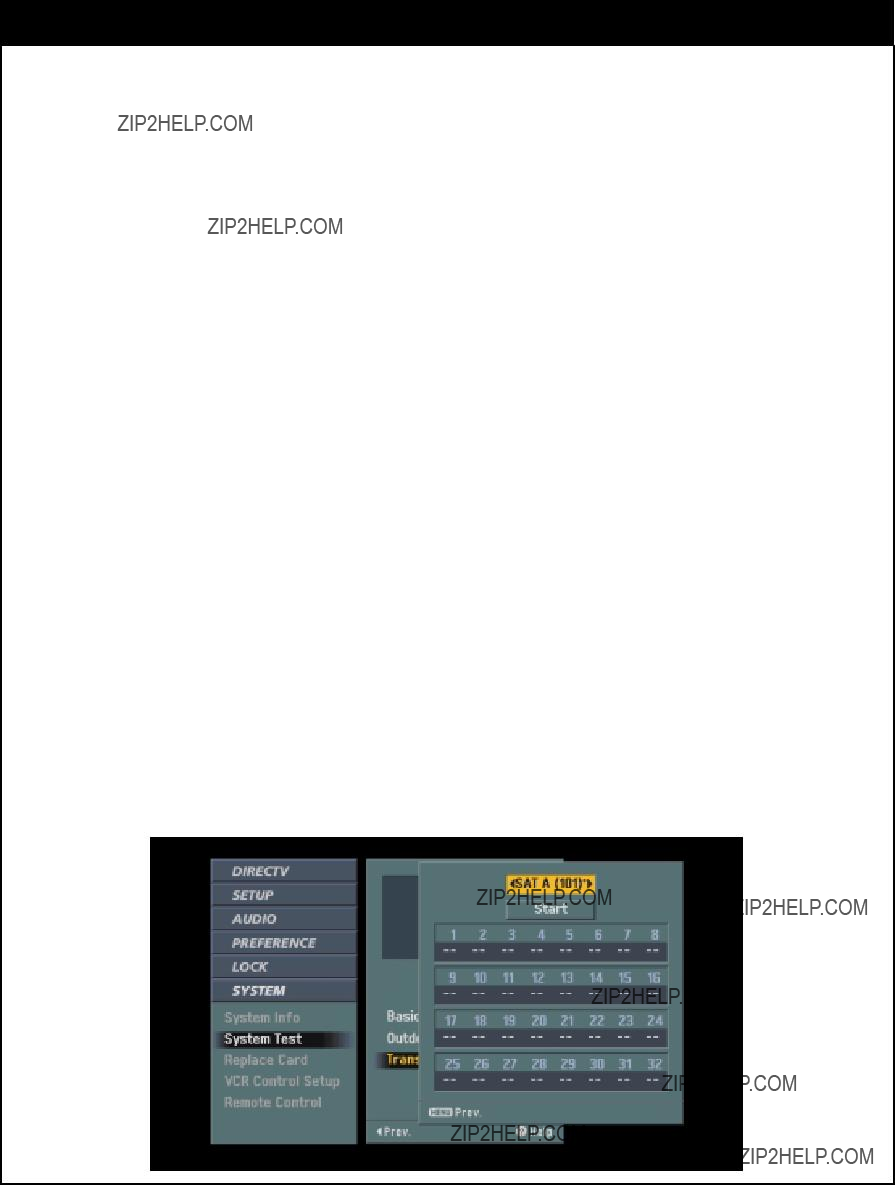
8. CUSTOMIZATION
Transponder Test
When in Satellite mode, diagnoses all transponder signals of each Satellite. Once the Transponder Test is done, all transponder signal status of the selected Satellite will be dis- played.
To test the Transponder:
1.Press the MENU button on the Remote Control to display the
2.Scroll down using ???E??? on the remote control.
3.Select the System menu by pressing ???  ???.
???.
4.Scroll down to System Test using ???E???.
5.Move the highlight to the right with ???G??? to display the system test option box.
6.Scroll down to Transponder Test using ???E??? on the remote control.
7.Press ???  ??? and the
8.Select one of SAT A/SAT B/SAT C with ???FG???.
9. Move the highlight to the Start Button and press ???  ??? to activate the system transponder test. It will run automatically and if there is any problem in your system, the
10.Press MENU button to return to the previous level or press the EXIT button on the remote con- trol to return to TV viewing.
Note : Depending on your location in the United States, certain transponders may not be available. It is normal for the signal strength level of a few transponders to be at zero.
111

If you are a DIRECTV customer, DIRECTV may issue you a replacement access card periodically when in Satellite mode. This menu enables you to transfer information, such as the record of your purchas- es, from the old card onto a new one. The access card fits into the slot on the front panel of the DIRECTV?? HD Receiver.
 Once you proceed past ???Read the old card???, ???Replace Card??? cannot be cancelled.
To replace the card :
1.Press the MENU button on the Remote Control to display the
2.Scroll down using ???E??? on the remote control.
3.Select the System menu by pressing ???  ???.
???.
4.Scroll down to Replace Card using ???E???.
5.Pressing ???  ???. Replay Card Wizard will be displayed.
6.If you want the process to proceed, follow the instructions in the Replay Card Wizard.
7.Press the EXIT button on the remote control to return to TV viewing.
112

8. CUSTOMIZATION
Allows you to set up the DIRECTV?? HD Receiver to control your VCR for automatic recording
when used with the Record feature (see section
To set up the VCR Control:
1.Press the MENU button on the Remote Control to display the
2.Scroll down using ???E??? on the remote control.
3.Select the System menu by pressing ???  ???.
???.
4.Scroll down to VCR Control Setup using ???E???.
5.Pressing ???  ???. VCR Control Setup Wizard will be displayed.
6.If you want the process to proceed, follow the instructions in the VCR Control Setup Wizard.
7.Press the EXIT button on the remote control to return to TV viewing.
113

Your DIRECTV?? HD Receiver???s remote control can send signals to the HD Receiver in two ways. Standard IR (Infrared) and RF Control. Standard IR (Infrared) control allows the Remote Control to send signals to the HD Receiver within a line of sight. RF (Radio Frequency) control allows the remote con- trol to send signals from your easy chair, any location in the room, or even from another room within your home. The Remote Control RF Antenna must be connected to use the RF Remote feature (see sec- tion
You can also choose to assign one of eight remote ID???s for IR Control or one of eight remote ID???s for RF Control. This can be useful if you have more than one satellite receiver in your home or if local RF sig- nals cause interference to your RF Remote control.
To choose the Remote Control type:
1.Press the MENU button on the Remote Control to display the
2.Scroll down using ???E??? on the remote control.
3.Select the System menu by pressing ???  ???.
???.
4.Scroll down to Remote Control using ???E???.
5.Pressing ???  ???. Remote Control Setup Wizard will be displayed.
6.Choose the IR type or RF type using ???D E???.
If you want the process to proceed, follow the instructions in Remote Control Setup Wizard.
7.Press the EXIT button on the remote control to return to TV viewing.
114

9. EZ HELP
The EZ Help feature is designed to let you understand each function of the Menu and Advanced Program Guide??? in an easy and convenient way. When you navigate through the Menu and the Advanced Program Guide, press and hold the ???HELP (?)??? button on your remote control if you want information about the highlighted item. The information will be displayed on the right side of the TV screen.
Simply press and hold ???HELP (?)??? button to see the helpful information.
NOTE
Pressing the ???HELP (?)??? button on your remote control with no menu
115

The EZ Help is an
The see the EZ Help feature:
1.Press the ???HELP (?)??? button on the remote control to display the EZ Help screen.
2.Scroll up and down to select EZ Help menu items using ???DE??? on the remote control.
3.Move the highlight using ???DEFG???.
The explanations of the highlighted item will be displayed on the right side or at the bottom of the screen.
4.Press the EXIT button on the remote control if you want to return to TV viewing.
116

PRODUCT SPECIFICATIONS
Specifications For Model No.
Design and specifications are subject to change without notice.
117

TROUBLESHOOTING
LG and DIRECTV are dedicated to providing you with quality support and customer service. If you have questions or diffi- culties that you cannot resolve using the tips in this troubleshooting section, consult your dealer or call DIRECTV at
118

TROUBLESHOOTING
120

TROUBLESHOOTING
121

LG Electronics, Inc.
DIRECTV?? HD Receiver
An LG Electronics product, marketed by Zenith, will be repaired or replaced, at LG???s option, if it proves to be defective in material or workmanship, under normal use, during the warranty period (???Warranty Period???) listed below, effective from the date ("Date of Purchase") of original consumer purchase of the product. This warranty is good only to the original purchaser of the product and effective only when used in the United States, excluding U.S. Territories.only when used in the United States, excluding U.S. Territories.
THIS WARRANTY IS IN LIEU OF ANY OTHER WARRANTIES, EXPRESSED OR IMPLIED, INCLUDING WITHOUT LIMI-
TATION, ANY WARRANTY OF MERCHANTABILITY OR FITNESS FOR A PARTICULAR PURPOSE. TO THE EXTENT
ANY IMPLIED WARRANTY IS REQUIRED BY LAW, IT IS LIMITED IN DURATION TO THE EXPRESSED WARRANTY
PERIOD ABOVE. LG ELECTRONICS WILL NOT BE LIABLE FOR ANY INCIDENTAL, CONSEQUENTIAL, INDIRECT,
SPECIAL OR PUNITIVE DAMAGES OF ANY NATURE, EVEN IF ADVISED OF THE POSSIBILITY OF SUCH DAMAGES,
INCLUDING WITHOUT LIMITATION, LOST REVENUES OR PROFITS, LOST OR CORRUPTED PROGRAMMING OR DATA, OR ANY OTHER DAMAGE WHETHER BASED IN CONTRACT, TORT OR OTHERWISE. Some states do not allow the exclusion or limitation of incidental or consequential damages or limitation on how long an implied warranty lasts, so the above exclusion or limitation may not apply to you. This warranty gives you specific legal rights and you may also have other rights that may vary from state to state.
THIS LIMITED WARRANTY DOES NOT APPLY TO:
zDamages or operating problems that result from shipping, installation, adjustment of user controls, calibration, mainte- nance or failure to maintain, or separate system components; and
zDamages or operating problems that result from normal wear and tear, misuse, abuse, operation outside environmental specifications or contrary to the requirements or precautions in the Operating Guide, accident, lightning strikes or other natural causes, unauthorized modification or alteration, incorrect electrical current or voltage, reception problem caused by inadequate home antenna or faulty antenna connections, computer software, institutional or commercial use, or other causes not arising out of defect in material or workmanship.
Therefore, the cost of repair or replacement of such defective product shall be borne by the consumer.
CUSTOMER
Issue O