OWNER???S MANUAL
Speaker Sound Bar
Please read this manual carefully before operating your set and retain it for future reference.
LSB316 (LSB316,
OWNER???S MANUAL
Speaker Sound Bar
Please read this manual carefully before operating your set and retain it for future reference.
LSB316 (LSB316,

1 GettingStarted
2 Getting Started
IMPORTANT SAFETY
INSTRUCTIONS
1.Read these instructions.
2.Keep these instructions.
3.Heed all warnings.
4.Follow all instructions.
5.Do not use this apparatus near water.
6.Clean only with dry cloth.
7.Do not block any ventilation openings. Install in accordance with the manufacturer???s instructions.
8.Do not install near any heat sources such as radiators, heat registers, stoves, or other apparatus (including amplifiers) that produce heat.
9.Do not defeat the safety purpose of the polarized or
10.Protect the power cord from being walked on or pinched particularly at plugs, convenience receptacles, and the point where they exit from the apparatus.
11.Only use attachments/accessories specified by the manufacturer.
12.Use only with the cart, stand, tripod, bracket, or table specified by the manufacturer, or sold with the apparatus. When a cart is used, use caution when moving the cart/apparatus combination to avoid injury from
13.Unplug this apparatus during lightning storms or when unused for long periods of time.
14.Refer all servicing to qualified service personnel. Servicing is required when the apparatus has been damaged in any way, such as power- supply cord or plug is damaged, liquid has been spilled or objects have fallen into the apparatus, the apparatus has been exposed to rain or moisture, does not operate normally, or has been dropped.
1 GettingStarted

4 Table of Contents
Table of Contents
1Getting Started
2Safety Information
6 Unique Features
6
6
6Accessories
7Introduction
7
7Playable file
7
8Remote control
9Front panel
9 Rear panel
2 Connecting
10 Mounting the main unit on a wall
12 Setting up
12
13Optional Equipment Connection
13
13
13
13
14
3 Operating
15Basic Operations
15
15Other Operations
15
15
16
16
16
16
16
17Sound adjustment
17
18Using Bluetooth technology
18
19
20
21Controlling a TV with the Supplied
Remote Control
21
TV

4 Troubleshooting
22 Troubleshooting
5 Appendix
23 Maintenance
23
24Trademarks and Licenses
25Specifications
6 Warranty
27 Warranty
Table of Contents 5
1
2
3
4
5
6

 9:30:57
6 Getting Started
1 GettingStarted
Unique Features
Portable In
Listen to music from your portable device. (MP3, Notebook, etc)
Speaker ez (easy) Setup
Listen to sounds from TV, DVD or Digital device with vivid 2.1 or 2.0 ch mode.
Accessories
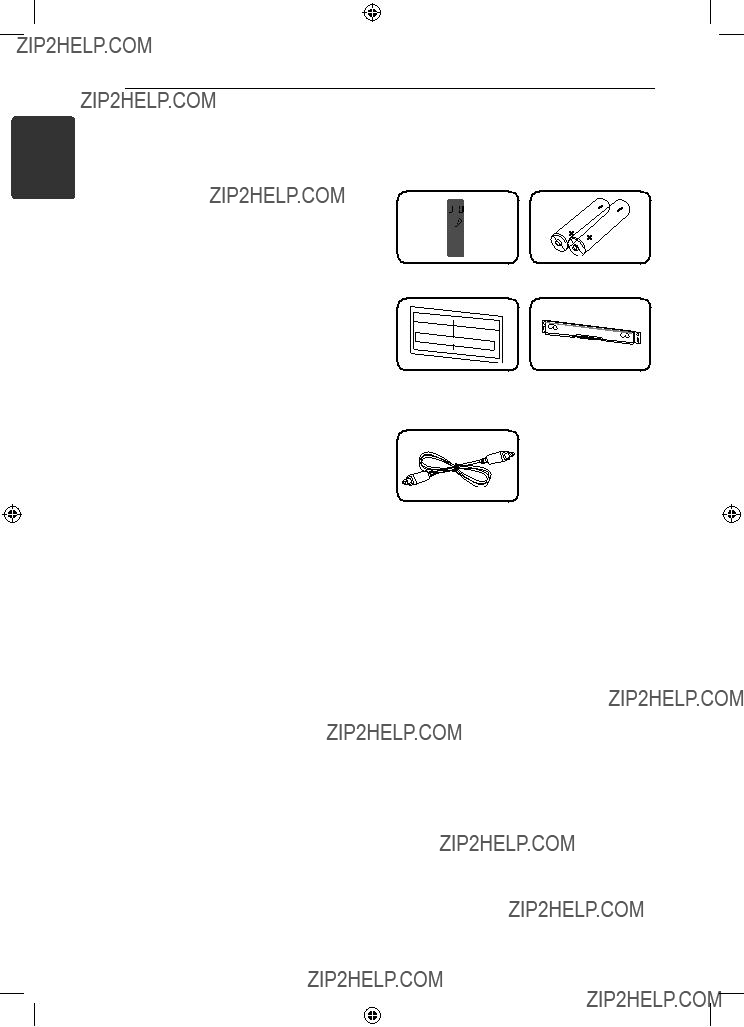
Please check and identify the supplied accessories.
Optical cable (1)

Introduction
Symbols Used in this Manual
,,Note
Indicates special notes and operating features.
,,Tip
Indicates tip and hints for making the task easier.
>>Caution
Indicates cautions for preventing possible damages from abuse.
Playable file
MP3/ WMA music file requirement
MP3/ WMA file compatibility with this unit is limited as follows :
yy Sampling frequency : within 32 to 48 kHz (MP3), within 32 to 48 kHz (WMA)
yy Bit rate : within 32 to 320 kbps (MP3), 40 to 192 kbps (WMA)
yy Maximum files : Under 999
yy File extensions : ???.mp3???/ ???.wma???
1 GettingStarted

1 GettingStarted
8 Getting Started

Front panel
A B
G F E D C
1 GettingStarted
Rear panel


 A
A


 B
B

10 Connecting
1.Match the TV???s BOTTOM EDGE of Wall Mount Bracket Installation Template with the bottom of TV and attach to the position.
,,Note
Screws and Wall Plugs are not supplied for mounting the unit. We recommend the Hilti
4.Fix it with screws (not supplied) as shown in the illustration below.
Step 4
,,Note
Detach the unit from the bracket as shown below.
,,Note
You can arrange power cord cable with the bracket as shown below.
Power cord cable
>>Caution
yy Do not hang onto the installed unit and avoid any impact to the unit.
yy Secure the unit firmly to the wall so that it does not fall off. If the unit falls off, it may result in an injury or damage to the product.
yy When the unit is installed on a wall, please make sure that a child does not pull any of connecting cables, as it may cause it to fall.

12 Connecting
2
Connecting
Setting up
Pairing wireless subwoofer
LED indicator of wireless subwoofer
Setting up the wireless subwoofer for the first time
1.Connect the power cord of the Wireless subwoofer to the outlet.
2.Turn on the main unit : The main unit and wireless subwoofer will be automatically connected.
Manually pairing wireless subwoofer
When your connection is not completed, you can see the red LED on the woofer and woofer is not made sound. To solve the problem, follow the below steps.
1.Press and hold ISTOP button on the unit
and  MUTE button on the remote control simultaneously.
-Displays the ???REMATE???.
2.Press PAIRING on back of the woofer.
-The blue LED will flicker
3.Turn off and on the unit.
-If you see ???blue??? LED, it??? s successful.
4.If you don???t see ???blue??? LED, try again Step 1 - Step 3.
,,Note
yy If you operate main unit then wireless subwoofer (rear speakers) sound within a few seconds in standby mode.
yy Set the distance between this unit and subwoofer Receiver within 10 m (32 ft.).
yy Optimum performance can be implemented only when the unit and the Wireless subwoofer within distance of 2 m (6 ft.) to 10 m (32 ft.) is used since communication failure may occur if longer distance is used.
yy It takes a few seconds (and may take longer) for the Wireless Transmitter and subwoofer to communicate with each other.

Connecting 13
Optional Equipment
Connection
AUDIO (PORT. IN) In
Connection
PORT.IN Connection
 MP3 player, etc...
Listening to music from your portable player
The unit can be used to play the music from many types of portable player or external devices.
1.Connect the portable player to the AUDIO (PORT. IN) IN connector of the unit.
2.Turn the power on by pressing 1POWER.
3.Select the PORTABLE function by pressing
INPUT.
4.Turn on the portable player or external device and start playing it.
OPTICAL In connection
Connect an optical output of Unit (or Digital Device etc) to the OPTICAL IN 1/ 2 connector.
OPTICAL IN Connection
To the digital optical output jack of your component
Speaker ez (easy) setup
Listens to sound from TV or DVD or Digital Device with 2.1 or 2ch mode.
1.Connect the unit???s OPTICAL IN 1/ 2 jack to jack on optical out of your TV (or Digital Device etc.).
2.Select the OPTICAL 1/ 2 by using the OPTICAL. To select the OPTICAL 1/ 2 directly
3.Listen to sound with 2.1 or 2ch speaker.
4.Press OPTICAL to exit from OPTICAL 1/ 2. Function is retuned to previous one.
2
Connecting
14 Connecting
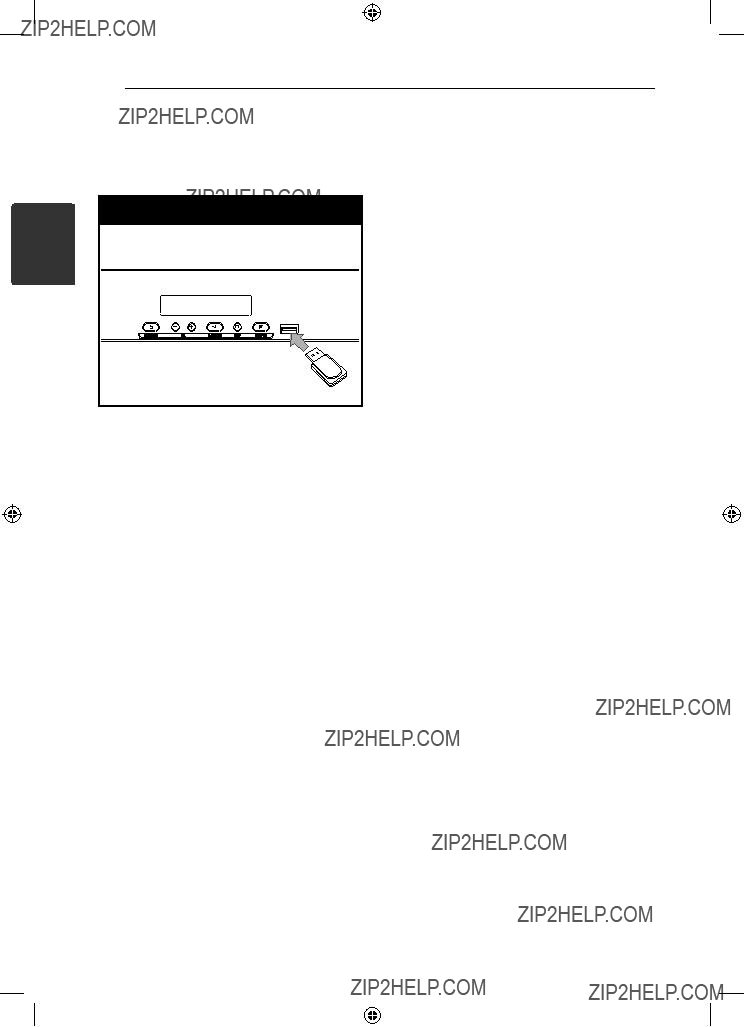
USB Playback
Insert USB memory device to the USB port on the front of the unit.
Removing the USB Device from the unit.
1.Choose a different function mode or press ISTOP twice in a row.
2.Remove the USB device from the unit.
Compatible USB Devices
yy MP3 Player : Flash type MP3 player.
yy USB Flash Drive : Devices that support USB2.0 or USB1.1.
yy The USB function of this unit does not support some USB devices.
USB device requirement
yy Devices which require additional program installation connected to a computer, are not supported.
yy Do not extract the USB device while in operation.
yy For a large capacity USB, it may take longer than a few minutes to be searched.
yy To prevent data loss, back up all data.
yy If you use a USB extension cable or USB hub, the USB device is not recognized.
yy Using NTFS file system is not supported. (Only FAT(16/32) file system is supported.)
yy This unit is not supported when the total number of files is 1 000 or more.
yy External HDD, Card readers, Locked devices, or hard type USB devices are not supported.
yy The unit???s USB Port cannot be connected to PC. The unit can not be used as a storage device.
Operating 15
USB Operation
1.Connect the USB device to the USB port.
2.Select the USB function by pressing INPUT.
3.Select a file you want to play by pressing Cor V.
DOLBY DRC (Dynamic Range
Control)
Make the sound clear when the volume is turned down (Dolby Digital only). Set to [DRC ON] by using
DOLBY DRC.
AV Sync
When receiving audio signals from TV, sound and images may not be matched. In the case, this function can adjust the delay time.
1.Press AV SYNC.
2.Use CVto scroll up and down through the delay amount, which you can set at anything between 0 and 300m/sec.
3
Operating

16 Operating
Sleep Timer Setting
Press SLEEP one or more times to select delay time between 10 and 180 minutes, after the unit will turn off.
To check the remaining time, press SLEEP.
To cancel the sleep function, press SLEEP repeatedly until ???SLEEP 10??? appears, and then press SLEEP once again while ???SLEEP 10??? is displayed.
Displaying file and input source
You can display various information on the USB and OPTICAL IN 1/ 2 mode by pressing INFO..
USB : MP3/ WMA containing file information
OPTICAL IN 1/ 2 : Audio format, Audio channel
3
Operating
,,Note
You can check the remaining time before the Unit turns off.
Press SLEEP The remaining time appears in the display window.
Dimmer
Press SLEEP once. The display window will be darken by half. To cancel it, press SLEEP repeatedly until dim off.
Turn off the sound temporarily
Press  MUTE to mute your unit.
You can mute your unit in order, for example, to answer the telephone, appearing the  in the display window.
Adjust the woofer level settings
You can adjust the sound level of woofer.
1.Press WOOFER LEVEL.
2.Press VOLUME

Operating 17
Sound adjustment
Setting the surround mode
This system has a number of
The displayed items for the equalizer may be different depending on sound sources and effects.
,,Note
yy In some of surround modes, some speakers, there???s no sound or low sound. It depends on the mode of surround and the source of audio, it is not defective.
yy You may need to reset the surround mode, after switching the input, sometimes even after the sound file changed.
3
Operating

18 Operating
3
Operating
Using Bluetooth technology
About Bluetooth
Bluetooth?? is wireless communication technology for short range connection.
The available range is within 10 meters.
(The sound may be interrupted when the connection interfered by the other electronic wave or you connect the bluetooth in the other rooms.) Connecting individual devices under
Bluetooth?? wireless technology does not incur any charges. A mobile phone with
Bluetooth?? wireless technology can be operated via the Cascade if the connection was made via Bluetooth?? wireless technology.
Available Devices : Mobile phone, MP3, Laptop, PDA (This units be supported the Stereo Headset.)
Bluetooth Profiles
In order to use Bluetooth wireless technology, devices must be able to interpret certain profiles. This unit is compatible with following profile.
A2DP (Advanced Audio Distribution Profile)
AVRCP (Audio/ Video Distribution Remote Control Profile)
Listening to music stored on the Bluetooth devices
Pairing your unit and Bluetooth device
Before you start the pairing procedure, make sure the Bluetooth feature is turned on in to your Bluetooth device. Refer to your Bluetooth device???s user guide. Once a pairing operation is performed, it does not need to be performed again.
1.Select the Bluetooth function by using the
INPUT.
Appears ???BT??? and then ???BT READY??? in display window.
2.Operate the Bluetooth device and perform the pairing operation. When searching for this unit with the Bluetooth device, a list of the devices found may appear in the Bluetooth device display depending on the type of Bluetooth device.Your unit appears as ???LG AUDIO???.
3.Enter the PIN code. PIN code : 0000
4.When this unit successfully paired with your Bluetooth device, Bluetooth LED of this unit lights up and appears ???PAIRED???.
,,Note
yy Depending on the Bluetooth device type, some device have a different pairing way.
yy This function is recommended to use to listening to music. While using Bluetooth headset, sound and images may not
be matched depending on the wireless environment or the connection conditions.
5.Listen to music.
To play a music stored on your Bluetooth device, refer to your Bluetooth device???s user guide.
,,Note
yy If you change the function of the unit, the Bluetooth function is disconnected, operate pairing again.
(Bluetooth yFunction other than the Bluetooth)
yy AVRCP is not supported in this mode.

Operating 19
Listening to sound through the Bluetooth devices
Pairing your unit and Bluetooth device
Before you start the pairing procedure, make sure the Bluetooth feature is turned on in to your Bluetooth device. Refer to your Bluetooth device???s user guide. Once a pairing operation is performed, it does not need to be performed again.
1.Select a function other than the Bluetooth function by using the INPUT.
2.Place the Bluetooth device to be connected to this unit within 3 feet of the unit.
3.Put the Bluetooth device in pairing mode. Refer to your Bluetooth device???s user guide.
4.Press and hold BLUETOOTH. Appears ???INQUIRY???.
If searched Bluetooth is only one, pairing the unit. Refer the step 7.
5.Appears depending on type of Bluetooth devices in display window .
6.Select a Bluetooth device you want to connect by using WSFOLDER and press Z(STOP).
7.Enter the PIN code by using numberical buttons.
PIN code : 0000
8.Press Z(STOP) to confirm.
When this unit successfully paired with your Bluetooth device, Bluetooth icon of this unit lights up and appears ???BT SRC???.
You can listen to music played on this unit using your Bluetooth device.
Sound output from the speakers is stopped.
,,Note
You cannot use VOL (volume), SOUND EFFECT, WOOFER LEVEL buttons on the remote control or the unit in this mode.
Operating with Bluetooth device
You can operate a unit by connecting a Bluetooth device using AVRCP. For details about operation, refer to the Bluetooth device???s User Guide.
,,Note
These operations may not be vailable for certain Bluetooth device. In addition, the actual operations may differ depending on the connected Bluetooth device.
Connecting and disconnecting with a Bluetooth device
This function is operated after pairing.
Press BLUETOOTH to connect or disconnect with a Bluetooth device.
Appears in as below display window.
Connection : BT CONN
Disconnection : DISCONN
,,Note
If you change the function of the unit, the Bluetooth function is disconnected, press BLUETOOTH pairing again.
(Bluetooth yFunction other than the Bluetooth)
3
Operating
20 Operating
3
Operating
Checking the information of connected Bluetooth device
This function is operated after pairing. You can check the Bluetooth information.
Press and hold INFO. repeatedly.
Bluetooth information is changed as follows.
Local Bluetooth Device Address tDevice Name tNone t...
,,Note
yy This units does not be supported the Mono Headset Profile (Hands Free Profile)
yy The sound may be interrupted when the connection interfered by the other electronic wave.
yy You cannot control the Bluetooth device with this unit.
yy Pairing is limited one Bluetooth device per one unit and
yy Although the distance between your Bluetooth and the set is less than 10m, there are obstacles between both, your Bluetooth device cannot be connected.
yy Depending on the type of the device, you may not be able to use the Bluetooth function.
yy You can enjoy wireless system using phone, MP3, Notebook, headset, etc..
yy When not connected the Bluetooth, ???BT READY??? appears on the display window.
yy The Electrical malfunction due to devices using same frequency such as Medical equipment, Microwaves or wireless
LAN devices, the connection will be disconnected.
yy When someone stands and interrupts communication between Bluetooth device and the player, the connection will be disconnected.
yy If the gotten away of the distance between Bluetooth and the unit, the sound quality is lower and lower the connection will disconnect when the space between the Bluetooth and the unit gets out of the operating range of Bluetooth.
yy The device with Bluetooth wireless technology is disconnected, if you turn off the main unit or put the device away from the main unit more than 10m.
Operating 21
Controlling a TV with the Supplied Remote Control
You can control your TV using the buttons below.
,,Note
Depending on the unit being connected, you may not be able to control your TV using some of the buttons.
Setting up the remote to control your TV
You can operate your TV with the supplied remote control.
If your TV is listed in the table below, set the appropriate manufacturer code.
1.While holding down 1(TV POWER) button, and press the manufacturer code for your TV with the numerical buttons (see the table below).
2.Release the 1(TV POWER) button to complete setting.
Depending on your TV, some or all buttons may not function on the TV, even after entering the correct manufacturer code. When you replace the batteries of the remote, the code number you have set may be reset to the default setting. Set the appropriate code number again.
3
Operating

4
Troubleshooting
22 Troubleshooting
Troubleshooting

Maintenance
Handling the Unit
When shipping the unit
Please save the original shipping carton and packing materials. If you need to ship the unit, for maximum protection,
Keeping the exterior surfaces clean
yy Do not use volatile liquids such as insecticide spray near the unit.
yy Wiping with strong pressure may damage the surface.
yy Do not leave rubber or plastic products in contact with the unit for a long period of time.
Cleaning the unit
To clean the player, use a soft, dry cloth. If the surfaces are extremely dirty, use a soft cloth lightly moistened with a mild detergent solution. Do not use strong solvents such as alcohol, benzine, or thinner, as these might damage the surface of the unit.
Appendix 23
5
Appendix

24 Appendix
Trademarks and
Licenses
5
Appendix
Manufactured under license from Dolby Labo- ratories. Dolby and the
Manufactured under license under U.S. Patent #???s: 5,451,942; 5,956,674; 5,974,380; 5,978,762; 6,487,535 & other U.S. and worldwide patents issued & pending. DTS and the Symbol are registered trademarks & DTS Digital Surround and the DTS logos are trademarks of DTS, Inc. Product includes software. ?? DTS, Inc. All Rights Reserved.
Bluetooth?? wireless technology is a system which allows radio contact between electronic devices within a max. range of 10 meters.
Connecting individual devices under Bluetooth?? wireless technology does not incur any charges. A mobile phone with Bluetooth?? wireless tech- nology can be operated via the Cascade if the connection was made via Bluetooth?? wireless technology.
The Bluetooth?? word mark and logos are owned by the Bluetooth?? SIG, Inc. and any use of such marks by LG Electronics is under license.
Other trademarks and trade names are those of their respective owners.

Appendix 25
Specifications
General
Designs and specifications are subject to change without prior notice.
5
Appendix


Warranty 27
LG Electronics, Inc. Limited Warranty - USA
This LG Electronics product, will be repaired or replaced, at LG???s option, if it proves to be defective in material or workmanship, under normal use, during the warranty period (???Warranty Period???) listed below, effective from the date (???Date of Purchase???) of original consumer purchase of the product. This warranty is good only to the original purchaser of the product and effective only when used in the United States, excluding U.S. Territories.
THIS WARRANTY IS IN LIEU OF ANY OTHER WARRANTIES, EXPRESS OR IMPLIED, INCLUDING
WITHOUT LIMITATION, ANY WARRANTY OF MERCHANTABILITY OR FITNESS FOR A PARTICULAR
PURPOSE. TO THE EXTENT ANY IMPLIED WARRANTY IS REQUIRED BY LAW, IT IS LIMITED IN
DURATION TO THE EXPRESS WARRANTY PERIOD ABOVE. LG ELECTRONICS WILL NOT BE LIABLE
FOR ANY INCIDENTAL, CONSEQUENTIAL, INDIRECT, SPECIAL OR PUNITIVE DAMAGES OF ANY
NATURE, EVEN IF ADVISED OF THE POSSIBILITY OF SUCH DAMAGES, INCLUDING WITHOUT
LIMITATION, LOST REVENUES OR PROFITS, LOST OR CORRUPTED PROGRAMMING OR DATA, OR ANY OTHER DAMAGE WHETHER BASED IN CONTRACT, TORT OR OTHERWISE. Some states do not allow the exclusion or limitation of incidental or consequential damages or limitation on how long an implied warranty lasts, so the above exclusion or limitation may not apply to you. This warranty gives you specific legal rights and you may also have other rights that may vary from state to state.
THIS LIMITED WARRANTY DOES NOT APPLY TO:
???Damages or operating problems that result from shipping, installation, adjustment of user controls, calibration, maintenance or failure to maintain, or separate system components; and
???Damages or operating problems that result from normal wear and tear, misuse, abuse, operation outside environmental specifications or contrary to the requirements or precautions in the Operating Guide, accident, lightning strikes or other natural causes, unauthorized modification or alteration, incorrect electrical current or voltage, reception problem caused by inadequate home antenna or faulty antenna connections, computer software, institutional or commercial use, or other causes not arising out of defect in material or workmanship.
Therefore, the cost of repair or replacement of such defective product shall be borne by the consumer.
CUSTOMER
LG ELECTRONICS U.S.A., INC. 1000 SYLVAN AVENUE
ENGLEWOOD CLIFFS, NJ
6
Warranty

LG Customer Information Center
Register your product Online!
www.lg.com
Printed in China