VCR Mode Tape Playback
Preparation
Before using the remote control, press the VCR but- ton to select the device to be operated.
Turn the TV on and select the video input source con- nected to the VCR/DVD Recorder.
Audio system: Turn the audio system on and select the input source connected to the VCR/DVD Recorder.
Normal Playback VHS
2 Press PLAY (N) once.
PLAY icon appears on the TV screen.
It is not necessary to select the tape speed for play- back. It will be automatically selected by the VCR/DVD Recorder.
In playback, the TV/VCR selector switches to VCR mode automatically.
3 Press STOP (x) to stop playback.
STOP icon appears on the TV screen.
If the tape reaches the end before STOP (x) is pressed, the VCR/DVD Recorder will automatically stop, rewind and eject the tape, and turn itself off.
Tracking Control VHS
Auto Tracking
The automatic tracking function adjusts the picture to remove snow or streaks.
The AUTO TRACKING function works in the following cases:
A tape is played back for the first time. Tape speed (SP, LP, SLP) changes.
Streaks or snow appear because of scratches on the tape.
Manual Tracking
If noise appears on the screen during playback, press either CH/TRK (v/V) on the remote control or
CH (v/V) on the front panel until the noise on the screen is reduced.
In case of vertical jitter, adjust these controls very carefully. Tracking is automatically reset to normal when the tape is ejected or the power cord is unplugged for more than 3 sec- onds.
Special Effect Playback VHS
 Special effects playback notes
Horizontal lines (noise bars) will appear on the TV screen. This is normal.
The audio is automatically muted during special effect modes, so there is no sound during search.
During the high-speed picture search modes, a short time is needed to stabilize tape speed when re-entering the PLAY mode. Slight interference may be observed during this time.
Search
This function lets you visually search forward and back- ward for a desired scene on your tape.
1Press BACKWARD (m) or FORWARD (M) during playback.
The VCR/DVD Recorder will be activated in the
SEARCH mode.
If the VCR/DVD Recorder is left in the SEARCH mode for more than 3 minutes, the VCR/DVD Recorder will auto- matically enter the PLAY mode, to protect the tape and video heads.
2 To return to playback, press PLAY (N).
Still Picture and Frame-by-Frame Playback
1 Press PAUSE/STEP (X) during playback. A still picture appears on the TV screen.
If a still picture vibrates vertically, stabilize it by using CH/TRK (v/V) on the remote control.
If the VCR/DVD Recorder is left in the STILL mode for more than 5 minutes, the VCR/DVD Recorder will auto- matically enter the STOP mode to protect the tape and video heads.
2Press PAUSE/STEP (X) repeatedly to advance the video picture one frame at a time while viewing a still picture.
3To return to playback, press PLAY (N).
Slow Motion
1While in still mode, press FORWARD (M).
The tape will be played back at a speed 1/19 times
slower than the normal speed.
During slow playback, use CH/TRK (v/V) on the Remote Control to minimize noise bands.
If slow motion mode continues for more than 3 minutes, the VCR/DVD Recorder will automatically change to nor- mal play mode.
2 To return to playback, press PLAY (N).
Counter Memory Function
This is useful if there is a section of tape you want to view immediately after recording or if you want to return to the same point several times.
1Begin recording or playing a tape.
2Press DISPLAY repeatedly to display the real-time counter on the TV screen.
3At the point you want to locate later, reset the real- time counter to 0:00:00 by pressing CLEAR.
Continue to play or record.
4Press STOP when recording or playback finishes.
5Press RETURN (O).
The tape automatically stops when the tape counter returns to about ???0:00:00???.


 Indicates special operating features of this unit.
  Indicates tips and hints for making the task easier.
 otes
otes otes
otes otes on DVDs and Video CDs
 ote
ote otes
otes
 and
and  aligned cor- rectly.
 Caution
 No
No 
 symbol display
 ??? may appear on the TV screen during operation. This icon means the function explained in this owner???s manual is not available on that specific disc.
 Indicates when the recorder is in timer recording or a timer recording is programmed.
 B
B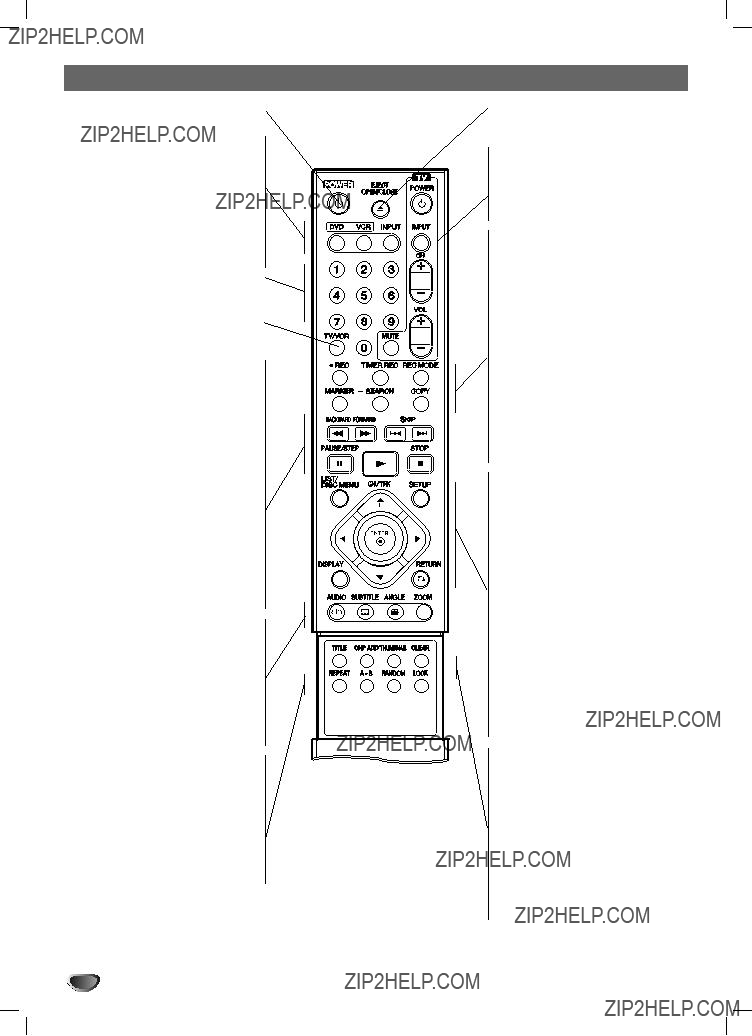
 LOCK
LOCK
 Caution
 ips
ips Caution
 ip
ip ote
ote
 ote
ote otes
otes
 Digital
  Caution:
 otes
otes ote
ote
 ote
ote ote
ote
 Prev.
Prev.  Select
 ote
ote
 ote
ote
 ote
ote 16:9 Wide
 Prev.
Prev.  Select
 Prev.
Prev.  Select
 Caution
 Prev.
Prev.  Select
 Movie Rating
 Prev.
Prev.  Select
 Unlock
 ip
ip ip
ip
 ip
ip Prev.
Prev.  Select
 DV Record Audio
 Audio 1
 Prev.
Prev.  Select
 Caution
 Caution
 Cancel
 ote
ote ips
ips


 appears on the TV screen, indicating that the operation is not permitted by the VCR/DVD Recorder or is not available on the disc.
 otes
otes ote
ote


 Playback Setup
 ip
ip otes
otes ote
ote ote
ote ote
ote ote
ote ote
ote ip
ip ote
ote ote
ote
 ote
ote
 ip
ip 5.1CH 1. ENG

 ote
ote otes
otes

 ips
ips and press ENTER to return to the previous menu screen.

 otes
otes ip
ip otes
otes ip
ip
 ote
ote icon displays in a JPEG file list, it means you cannot see those JPEG files.
 ip
ip icon and press ENTER.
 ote
ote
 ote
ote otes
otes ips (VCR mode only)
 ote
ote ip
ip ote
ote ote
ote ip
ip ote
ote
 ote
ote ote
ote ips
ips
 ote
ote
 Caution
 ip
ip
 ote
ote ip
ip

 ote
ote ote
ote