ENGLISH
Portable Navigation
OWNER???S MANUAL
LN500 Series
Please read this manual carefully before operating your Navigation device.
Keep it for future reference.
Designs and specifications are subject to change without prior notice for improvement.
ENGLISH
Portable Navigation
OWNER???S MANUAL
LN500 Series
Please read this manual carefully before operating your Navigation device.
Keep it for future reference.
Designs and specifications are subject to change without prior notice for improvement.
Table of contents
Installation sequence for the
Navigation Menu . . . . . . . . . . . . . . . . . . . . . . . . . . . . . .24 Address Screen . . . . . . . . . . . . . . . . . . . . . . . . . . . . . . .24 Recent Places Screen . . . . . . . . . . . . . . . . . . . . . . . . . .24 My Places Screen . . . . . . . . . . . . . . . . . . . . . . . . . . . . .24 POI Screen . . . . . . . . . . . . . . . . . . . . . . . . . . . . . . . . . .25 Route Manager Screen . . . . . . . . . . . . . . . . . . . . . . . . . .25 Setup Screen . . . . . . . . . . . . . . . . . . . . . . . . . . . . . . . .25 Menu Buttons . . . . . . . . . . . . . . . . . . . . . . . . . . . . . . . . .26 Main
2

Table of contents
Address
Display . . . . . . . . . . . . . . . . . . . . . . . . . . . . . . . . . . . . . .46
Map Views . . . . . . . . . . . . . . . . . . . . . . . . . . . . . . . . . . .47
Units & Time . . . . . . . . . . . . . . . . . . . . . . . . . . . . . . . . .48
Language . . . . . . . . . . . . . . . . . . . . . . . . . . . . . . . . . . . .48
GPS Status . . . . . . . . . . . . . . . . . . . . . . . . . . . . . . . . . .49
GPS Not Found . . . . . . . . . . . . . . . . . . . . . . . . . . . . . . .50
Map
Tutorial . . . . . . . . . . . . . . . . . . . . . . . . . . . . . . . . . . . . . .51
Help . . . . . . . . . . . . . . . . . . . . . . . . . . . . . . . . . . . . . . . .51
Start Demo . . . . . . . . . . . . . . . . . . . . . . . . . . . . . . . . . . .51
Select Map . . . . . . . . . . . . . . . . . . . . . . . . . . . . . . . . . . .52
Initialize . . . . . . . . . . . . . . . . . . . . . . . . . . . . . . . . . . . . .52
3

Table of contents
Using the ???PC
Installing Maps . . . . . . . . . . . . . . . . . . . . . . . . . . . . . . . .59
Removing Maps . . . . . . . . . . . . . . . . . . . . . . . . . . . . . . .60
Importing Favourite
General Warning
Getting Started . . . . . . . . . . . . . . . . . . . . . . . . . . . . . . . .64 Browse to an Image . . . . . . . . . . . . . . . . . . . . . . . . . . . .64 Viewing Image . . . . . . . . . . . . . . . . . . . . . . . . . . . . . . . .65
Symbol used in this manual
Indicates special notes and operating features.
4

Safety note
CAUTION
RISK OF ELECTRIC SHOCK
DO NOT OPEN
CAUTION : TO REDUCE THE RISK OF ELECTRIC SHOCK DO NOT
SPLIT COVER(OR BACK) NO USER SERVICEABLE PARTS
INSIDE. REFER SERVICING TO QUALIFIED SERVICE
PERSONNEL.
The lightning flash with arrowhead symbol, within an equilateral triangle is intended to alert the user about the presence of uninsulated dangerous voltage within the product???s enclosure that may be of sufficient magnitude to constitute a risk of electric shock.
The exclamation point within an equilateral triangle is intended to alert the user to the presence of important operating and maintenance (servicing) instructions in the literature accompanying the appliance.
To disconnect power from the mains, pull out the mains cord plug. When install the product, ensure that the plug is easily accessible.
Batteryshall not be exposed to excessive heat such as sunshine, fire or the like.
WARNING
To reduce the risk of fire or
Do not expose this equipment to dripping or splashing and ensure that no objects filled what liquids, such as vases, are placed on the equipment.
???LG is not responsible for any injury, property damage or accidents resulting from reliance on the navigation system.
???LG is not responsible for the accuracy of
???LG disclaims all liability for use of the navigation that causes or contributes to death, injury or property damage or that violates any law including traffic laws. All the stated instructions should be
followed, because if not, it may lead to death, serious injury or property damage.
5

Safety note
Always operate the vehicle in a safe manner. Do not become distracted by the navigation while driving, and always be fully aware of all driving conditions.
Minimize the amount of time spent viewing the navigation screen while driving and use voice prompts when possible.
Do not enter destinations, change settings, or access any functions requiring prolonged use of the unit???s controls while driving.
Pull over in a safe and legal manner before attempting such operations.
Do not kink or crease the power cable or place heavy objects on the power cable.
Fire can result from damaged power cables.
Unplug the AC adapter during electrical storms. This may result in electrical shock.
Do not handle the power plug nor the adapter with wet hands. This may result in electrical shock.
Immediately power off the unit and unplug the AC adapter if you notice smoke or odours coming from the player or adapter.
Fire can result from improper use.
Make sure to insert the power plug tightly.
Fire can result from improper use.
Use only the specified power adapter.
Using a different type of adapter may damage the product. (DC 5 - 5.4V)
The appliance is not intended for use by children or infirm persons without supervision.
6

Safety note
Note that malfunctions may occur if you use the product in places where static electricity occurs frequently.
Do not use the unit near water.
Do not touch the unit with wet hands.
Do not attempt to disassemble or repair the product yourself.
Do not use the product for other purposes than those described in this guide.
Do not use for many hours at extremely low or high temperatures.
Avoid leaving the product in hot or humid places.
Take special attention when touching the product box, owner's manual and accessories to avoid cuts.
While driving, keep the sound volume at a proper level.
Do not drop it and avoid heavy impacts at anytime.
7

Safety note
If you notice unusual odours, excessive heat coming from the product, anything else that seems unusual, do not use the product and contact our Customer Service Centre.
Always use soft and dry cotton cloth when cleaning the product. Do not use strong solvents such as alcohol, benzine, or thinner, as these might damage the surface of the unit.
When attaching a navigation holder, remove impurities from the surface before attaching, and press the suction lever to avoid falling.
Do not pull out the SD Memory Card while the navigator is operating. It may cause mechanical problems.
Do not use the navigator for extended periods of time. This may result in battery discharge.
Please obey all traffic regulations.
To aid safe driving, information on safe driving routes and routes where accidents occur frequently is included.
Voice guidance and map route may differ from the actual traffic conditions.
When moving the product, separate the power plug from cigarette lighter socket and separate the main body from holder or separate the holder from the window before moving.
8

Safety note
???If you attach the vacuum disk on the glass for a long period of time, the pressure in the disk slowly reduces and the vacuum disk may fall off.
???The Navigator holder may fall off at a sudden stop, thus causing a dangerous situation. We recommend it should be installed close to the dashboard so it can be supported properly.
???Applying too much force to adjust while the connecting arm is tightly fixed, may deform the rubber disk connecting all the components.
???If the holder falls off, please follow the instructions again to reinstall and use it.
???Please note that if the product is damaged due to user negligence, it cannot be returned or refunded.
Winter precaution
???The vacuum disk can easily come off the glass due to differences in temperature between inside and outside the windscreen.
Caution : Danger of explosion if battery is incorrectly replaced. Replace only with the same or equivalent type.
Summer precautions
???The vacuum disk can easily come off the glass due to difference in temperature between inside and outside of the windscreen.
???Remove the vacuum disk and store it separately when parking for a long period of time.
???The
Separate the unit and store it in a cool place.
A temperature rise can reduce the battery life span or cause an explosion.
9

Safety note
???Never leave your unit/accessories (including windshield mount, car charger etc) visible in an unattended vehicle, since it???s an easy target for thieves.
???Back up your data using our provided software in the CD.
???In order to protect the screen and the unit, always store it in the carry case.
???Do not use the memory card (SD card) with any other devices since the memory card could be damaged.
???The unit has to be outdoors to locate the current position from satellite. It could take few minutes to locate your position when you start it for the first time.
If it takes longer than 5 minutes, make sure there aren???t any tall trees or buildings around you.
???When installing the unit, make sure that it does not block the view on the windscreen.
Make sure that unit does not interfere with the safety operations of the vehicle when installed. Eg. Deployment of air bags or other safety equipments.
???The unit could require the external antenna kit if the vehicle has the heat reflective shield embedded in the windshield which may prevent the unit from locating the current position.
The external antenna kit is available as an optional accessory.
???The instructions are not 100% correct, so only use it to aid you finding the destination.
Map data is updated annually, so it can be different to the actual road if there are changes during that period.
???The unit is designed to provide you with route suggestions, so it does not reflect road conditions, traffic congestion, weather conditions or other factors that may affect safety or timing while driving.
10
Supplied parts
Contents may be changed without notice.
AC Adapter
(Optional)
11

Part names
Front panel
3
4
RESET
5
1.LCD
2.MENU button
Moves to the main menu screen
Power sleep
Entering power sleep mode. ON: Press and hold.
OFF: Press and hold again.
3.Volume Up
Increases the volume level.
4.Volume Down
Decreases the volume level.
5.RESET hole
If the unit does not operate properly, press the reset button using a ball point pen or a similar tool.
To activate the menu function on LCD screen, touch the LCD screen with a finger.
If the sleep mode rests more than 1 hour, the device will be shut down. And during the
If you push the power key or pull out the ACC plug, or the device is in Low battery condition for several seconds, the device will come into sleep mode.
12
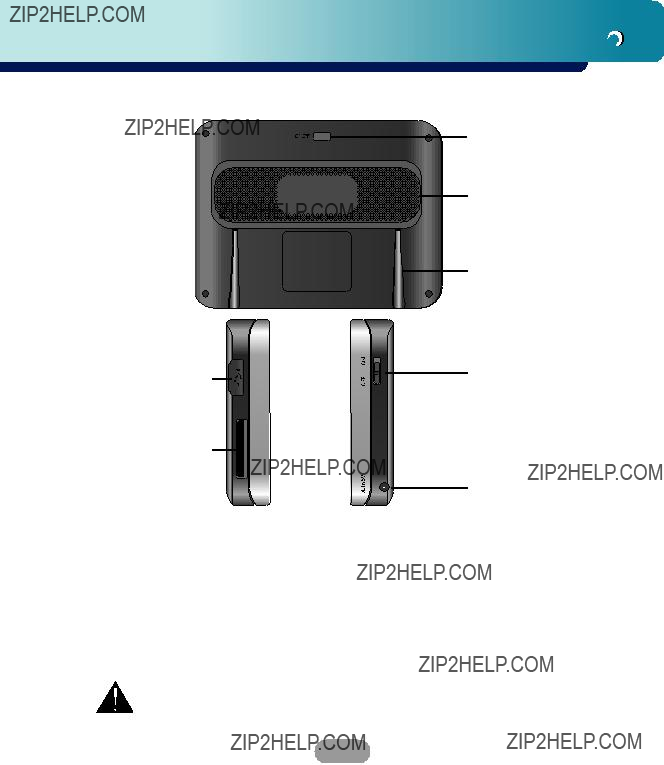
Part names
Rear / Side panel
1
2
3
4
5
1.External GPS Antenna Port (Optional)
2.Speaker
Gives voice guidance service.
3.Docking connector
4.USB port
6
7
5.Memory Card Slot
Insert an SD Memory Card.
6.Power ON / OFF button
ON: Slide switch up.
OFF: Slide switch down.
7.Power supply connector
DC 5V
Deleting or altering the map data in the
13

Connecting devices
Installation sequence for the
1.Select the most suitable position on the windscreen.
2.Clean the surface of the windscreen, to remove any dust and grease.
3.Place the
4.Push back the lever to the left until you hear a click, fixing the
5.Align the docking connector at the
Standard operation temperature of the suction mount is between
14

Connecting devices
6.Plug the small end of the cigarette lighter adapter into the power supply connector at the side of the unit.
7.Plug the other end into your vehicle???s 12V (cigarette lighter) socket.
8.To adjust the angle of the mount, slacken the adjustable knobs at the
9.When you finish, tighten up the knobs again.
???This unit and its cigarette lighter adapter are designed for use in vehicles that have 12 volt, negative ground electrical systems.
(This is a standard for most vehicles.)
If your vehicle has a different type of electrical system, the DC power system cannot be used.
???When attaching the mount, remove impurities from the surface before attaching, and press the lever to avoid falling.
???Adjust the direction of the mount to prevent it from disturbing the driving.
???Adjust it to an angle you can see well.
???Be careful of not to make the unit fall from windscreen when you drive.
???The arm of the mount may vibrate. Attach the mount close to the dashboard as much as you can.
15

Connecting devices
Detaching the
1.To separate the mount, pull the lever to the right.
2.If the mount still doesn???t detach from the windscreen, pull up handle of suction cup to move the suction rubber.
Installing the external GPS antenna (Optional)
This unit has a
The external GPS antenna is sold separately and may improve the receiving condition of satellite signals when the signals are poor.
1.Select the place to attach the external GPS antenna.
2.Plug the jack end of the GPS antenna into the socket on the backside of the unit.
16

Connecting devices
When Installing the antenna inside the vehicle (on the dashboard or shelf)
Affix the external GPS antenna on as level a surface as possible where the external GPS antenna faces outside the window. (The GPS antenna is fastened with
???Make sure the surface is free of moisture, dust, grime, oil, etc., before affixing the sheet.
???The
???Some vehicles use window glass that does not allow signals from GPS satellites to pass through. On such vehicles, install the GPS antenna on the outside of the vehicle.
When installing the antenna outside the vehicle (on the body)
Place the external GPS antenna in a position as level as possible, such as on the roof or trunk lid.
(The GPS antenna is fastened with a magnet.)
When routing the lead in from the top of the door
Make a
(The GPS antenna is fastened with a magnet.)
17

Connecting devices
Installing Microsoft ActiveSync
In order to synchronize your data between your PC and the unit, you need the Microsoft ActiveSync program.
1.Click ActiveSync ???setup.exe???.
2.Click ???Next??? to install Microsoft ActiveSync on your PC.
3.Read the following license agreement carefully and select ???I accept the terms in the license agreement???.
4.Click ???Next???.
5.Enter your information.
6.Click ???Next???.
7.Click ???Next??? to install to this folder, or click ???Change??? to install to a different folder.
8.Click ???Install???.
9.Setup is ready to begin installing Microsoft ActiveSync.
10.The installation is in progress.
11.When the Setup Wizard has successfully installed, click ???Finish???.
12.When prompted, connect your unit to your PC.
Connecting the USB cable
1.Connect the unit's power supply connector and wall outlet using AC adapter.
2.Switch the unit on.
3.Connect one end to the USB port on your PC and then plug the other end into your unit's USB port.
4.The icon is displayed in the system tray if successfully connected.
18

Connecting devices
5.The ???Add New Hardware Wizard??? should automatically install the USB drivers.
6.Follow the on screen instructions to establish a partnership and synchronize your unit with your PC.
Downloading files: ActiveSync
1.Open Windows Explorer on your PC.
The Mobile Device is displayed in Window explorer.
2.Create the folder you want to use.
3.Select the file you want to save, then drag and drop it to the removable disk.
???ActiveSync installation is required for USB operation. Download the latest version of Microsoft ActiveSync for your unit. ActiveSync is a very convenient Microsoft program for synchronizing data between your unit and your PC.
It loads itself automatically, syncs your unit with your PC and then sits there, patiently waiting to synchronize any piece of data that you change.
???The tray icon may be hidden in some Windows XP systems according to your settings.
???50Mbytes of the available memory capacity is used for the working software. Be careful not to use the 50M Byte of the memory space at any time.
19

Connecting devices
Data exchange via card reader.
You can transfer data via ActiveSync.
However, if you wish to copy large quantities of data (Music and Photo files) to the memory card these can also be stored directly to the memory card.
1.Insert the SD card into your card reader.
2. Insert the card reader into your computer's USB
port.
3. An icon is displayed in the system tray if successfully connected.
Not supplied.
Downloading files: Removable disk
1.Open Windows Explorer on your PC.
The removable disk is displayed in Window explorer.
2.Create the folder you want to use.
3.Select the file you want to save, then drag and drop it to the removable disk.
Don???t remove the USB cable while uploading or downloading files.
20
Connecting devices
Disconnecting the USB device
Wait until you get a message that you can safely unplug the device before disconnecting the USB device.
1.The safe to remove icon is in the system tray.
2.Click on the icon to eject the unit from the PC and select the ???Safely remove??? message.
3.A message will appear indicating that it is now safe to disconnect the unit.
4.You can now go ahead and unplug the memory card reader from the PC.
21

Before operation
Starting up
The navigation software and the digital map material are supplied in the
Installation is fairly automatic.
The application and maps are stored in the
Push the Power button up to turn on the device. The Map screen is displayed
It may take some time until the GPS receiver initially acquires enough satellites' data during the first use of the GPS navigation equipment.
22

Before operation
Navigation features
The Navigation System provides the following features for easy navigation:
???Route calculation within seconds.
???High quality 2D/3D maps with display of street names.
???Address input via a
???Storing of any location one click away.
???Cross border navigation without switching maps.
???Address retrieval from History, Favourites, Points of Interest (POI) or Microsoft?? Outlook?? contacts.
???Planning and optimizing of
???Car navigation with fastest or shortest route.
???Pedestrian navigation in parks and town centers.
???Fast installation, no activation.
???Short tutorial for an easy start.
???Day and night views or
23

Getting started with navigation
Navigation Menu
Tapping ???Navi menu  ??? button brings up a menu that allows you to access some of the most frequently used functions of the navigator.
Address Screen
The ???Address??? button lets you navigate to an address.
For a complete description of how to navigate to an address, see "Enter Address" on the page 31.
Recent Places Screen
The ???Recent Places??? button lets you navigate to a previously visited destination.
For a complete description of how to navigate to a recent location, see "Recent Places" on the page 34.
My Places Screen
The ???My Places??? button lets you navigate to a favourite location.
For a complete description of how to navigate to a favourite location, see "My Places" on page 35.
24

Getting started with navigation
POI Screen
When you tap the ???POI??? button, the first screen of popular place categories appears.
The ???POI??? button lets you navigate to thousands of interesting places, such as beaches, parks, hotels, museums, and restaurants.
For more information, see "POI" on the page 38.
Route Manager Screen
You can tap the ???Route Manager??? button to determine the map display and to show the generated route after you have selected a location.
For more information, see "Route Manager" on the page 41.
Setup Screen
The ???Setup??? button provides several settings in order to let you customize the functions of the program. The ???Setup??? screen can be accessed directly from the Main menu screen.
For more information, see "Setup" on the page
25

Getting started with navigation
Menu Buttons
Tap this button to go to the Main Map screen.
Tap this button to configure the settings options.
Tap this button to open the Media Player.
Tap this button to recalculate the route.
The Cancel Route button, on the Route Manager menu, stops the current navigation and clears the route. This feature is active only after a destination has been set.
Tap this button to move between the Setup and Extras menus.
Tap this button to display software???s version and copyright information.
26

Getting started with navigation
Main Map
When you tap the ???Map??? button on the Navigation menu screens, the Main Map screen appears. You can use the icons displayed on this screen to view your route.
Tap ???Zoom Out??? or ???Zoom In??? buttons to increase or decrease the detail of the map view. When tapping the ???Zoom Out??? button, the map displays more of the route.
Tap the compass to change the map view display as follows:
2D map view with the forward direction at the top.
3D map view with the forward direction at the top.
2D map view with North at the top.
Tap this button to go to the Menu screen.
Current location in Vehicle (Pedestrian) Mode.
Last known location when GPS signal is unreliable.
Generated route.
When you have calculated a route, the Directions bar displays the direction arrow and the distance to the set destination.
The street name at the top of the map screen is the street that you will turn on with the next turn manouevre.
27

Getting started with navigation
The GPS bar is a toggle button that displays the remaining travel distance and travel time, and estimated time of arrival.
Point on the Map
You can navigate to any point by tapping its location directly on the Main Map screen in both 2D and 3D map view.
This feature is especially helpful when you want to navigate to a specific point on the map, but you don???t have the street address. When you tap on a point of the main map, another map appears, displaying the map, which is marked by a checkered flag.
This button lets you save a point on the map as a favourite destination. This is helpful if you see a location that you want to return to later.
This button lets you cancel the map point request and returns you to the main map.
This button lets you calculate a route to the map point.
28

Getting started with navigation
Screen Buttons
The following buttons appear on many of the navigation screens.
When you tap the ???OK??? button for a selected address, group, or place, Navigator automatically opens the next screen in the sequence.
When you tap the ???Back??? button, the navigation returns you to the previous screen.
When you tap the ???Go??? button, the navigation calculates the route to your selected destination.
The Options button provides a list of command options available for the selected address or place.
The ???Save???, ???OK???, or ???Done??? buttons confirm your value preferences and returns you to the menu or map.
29

Getting started with navigation
Cycling Through Screens
Every navigation function in the system, such as Address, POI, or My Favourites consists of a sequence of screens.
You can cycle through the screen sequences by either:
???Selecting an item from the list and tapping it.
???Selecting an item from the list and tapping the ???OK??? button.
The sequence ends with the Show on Map screen, where the destination is displayed and the ???Go??? button is available for you to calculate a route.
Note: You must first select an item for Options, ???OK??? and ???Back??? buttons to be enabled.
30
Getting started with navigation
Enter Address
When you tap the ???Address??? button, the ???Select State??? screen appears.
You can use the keyboard to enter the characters of the state name. For more information, see "Address screen" on the page 32.
After you have selected a state, the Navigator displays the ???Mode??? screen.
This sequence displays the following address screens: City, Street, Address Number.
You can also navigate a city or a street only.
When you have selected a city, the first entry of the Street Name list is City Centre. When you have selected a street, the first entry in the Address Number list is Street Midpoint.
This sequence displays the following address screens: Street, City, Address Number.
Lets you enter a street name without having to first designate a city. Useful when you're looking for an address in a metropolitan area where there are many cities and towns.
This sequence displays the following address screens: City, Street, Cross Street.
It also lets you locate an intersection or junction by entering the names of two intersecting streets.
This sequence displays the following address screens: Zip Code, Street, Address Number. This mode lets you locate a street address by
entering the zip code, without entering a city name. Useful when you have no city information or if the city has multiple zip codes.
31

Finding a location with navigation
Address Screen
1.You can use the keyboard to enter the characters of the address name.
2.The characters appear in the Address field.
The Navigator automatically searches the Address list for the first occurrence of the entered characters.
3.After you have selected a city, the Navigator displays the next address field, such as street and address number.
4.You can also tap the ???OK??? button to move through the sequence of address screens.
The ???Scroll??? buttons let you move up or down the list of address items, such as town or street names.
The ???Hide/Show Keyboard??? toggle button lets you extend or shorten the address list by hiding or displaying the keyboard.
When the number of address search results fit on a single screen, the keyboard is automatically
hidden, displaying the address list only. If the search results do not display the desired address, display the keyboard and enter additional search characters.
The ???Numeric/Umlauts/Alphabetic??? toggle button lets you display lowercase, numeric, and special characters.
This button also displays different alphabet characters (for example, Greek).
The operating system installed on the device must be able to support these characters.
The ???Erase??? button lets you delete the last character in an address field.
32

Finding a location with navigation
You can change your address search method by tapping the Mode button to select from a variety of address formats, as described in Address Modes (See "Enter Address" on page 31).
???If the entered characters are not found at the beginning of the name in the Address list, the Smart Search System automatically searches for the entered characters throughout the entire list, for example, in the middle or the end of the name.
???The navigator lets you search for city and street names without having special characters, such as umlauts or accent marks, which are used in many European languages.
Go to your Destination
1.After you have specified the address, tap the ???OK??? button.
2.The navigator shows your destination on Map screen before calculating a route. Check that the destination address is correct at the top of the screen.
3.If you want to change the destination, tap the ???Back??? button and change your address entries.
When you are ready, tap the ???Go??? button to create a route to your selected destination.
33

Finding a location with navigation
Add to My Places
Lets you add an address to your list of favourite locations, as shown in the figure below.
For more information, see ???My Places??? on page 35.
Recent Places
The Recent Locations screen lets you select an existing destination from a list of destinations that you have previously travelIed to.
1.To navigate to a recent destination, tap the ???Recent Places??? button.
2.From the Recent Locations screen, select a location and tap the ???OK??? button.
3.A map appears showing the specified location.
4.Tap the ???Go??? button to calculate the route.
???The Navigator automatically stores the last 64 destinations in memory.
???As each new route is added to the top of the list, the older destinations at the bottom are erased.
Lets you clear all locations in the Recent places screen.
Lets you delete a recent location.
34

Finding a location with navigation
My Places
A Favourite is a destination that you have stored for easy retrieval.
1.To access a favourite destination, open the Navigations menu and tap the ???My Places??? button.
2.The My Favourites screen displays your favourites groups.
3.When you tap on a selected group, the Navigator automatically displays its stored locations.
4.Tap the selected location to show your destination on a map.
5.Tap the ???Go??? button to calculate your route.
The My Favourites folder is the default folder where all favourites are stored if not assigned to a group.
35

Finding a location with navigation
Favourite Groups
You can tap the ???Edit??? button from the ???My Places??? screen to add, edit, or delete groups, as described below.
Enter the group name and select an icon to identify the group.
The icon identifies all destinations located in that group, as displayed on the map.
You can change the name and icon. The My Friends group cannot be edited.
When you tap this button, the selected group and its associated entries are removed. The My Friends group cannot be deleted.
Favourite Alerts
The ???Alerts??? button let you know that you are within a certain distance of a favourite location.
You can tap the ???Alerts??? button to set the distances for the 1st and 2nd Alerts. When you travel closer than the designated distance, the alert will sound.
36

Finding a location with navigation
You can disable the alerts for all groups by selecting the 1st Alert setting to Off.
You can disable the alerts for a particular group by clearing the checkbox next to the selected group. Activate that disabled alert by selecting the checkbox next to the group.
Favourite Alert settings affect all Favourites group. The 2nd Alert must be set to go off at closer distance than the 1st Alert.
Alerts can be set for a group but not for individual locations. Of course, you can always create a group that has just one location.
Add Favourite Locations
Tap My Favourites or any selected group that you have created to display its locations.
You can save a location to your Favourites group from the Address, Recent Locations, or POI (Point Of Interest) screens. For more information, see "Add to My Places" on the page 35.
Favourite Options
From this screen, you can tap the ???Options??? button to display the following commands.
Lets you see the map with the selected favourite destination for you to review before creating a route.
Lets you change the name, comment, or group location for the selected location.
Tap the button to remove the selected location.
37

Finding a location with navigation
POI (Points of Interest)
The POI list is a collection of hundreds of interesting or useful places organized by
1.From the Navigations menu, tap the ???POI??? button.
2.The POI Popular Category screen appears, which lets you quickly select from common points of interest.
3.When selecting a category, the Navigator automatically displays the category entries and the distance each entry is from your current position.
4.Select your entry and tap or click the ???OK??? button to display your selected destination on the map and then tap on the ???GO??? button to calculate your route.
For a full POI list, tap the ???More??? button.
???You can find a category by tapping the ???Hide/Show Keyboard???  button and entering text in the POI Category field. The Smart Search System automatically displays the POI categories that match the characters entered.
???From the Item Entries Options screen, click the ???Sort by ABC??? button to display the category entries in alphabetical order.
38
Finding a location with navigation
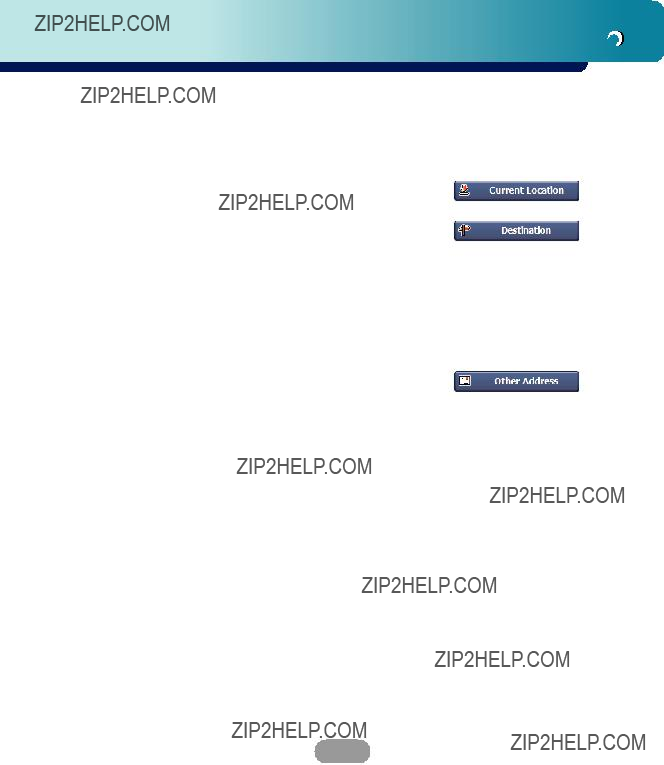
Search Near a Location
You can tap the ???Near??? button to determine the location area, where you want to search for a specific place, such as a gas station, hotel, or restaurant.
Lets you search near your current location. This is the default value.
Lets you search near a specified destination.
For example, you know your general destination, but not very much about interesting locations in the area. You can use the Navigator to locate the tourist attractions most appealing to yourself, family, or friends.
Note that this button is enabled only when a destination is entered.
Lets you search near another address.
For example, you have set a destination, but on the way you want to stop at another location.
You can use this feature to search near that location for restaurants, lodging, historical sites, or anything you want.
39

Finding a location with navigation
Enter the location distance to search for a designated place.
For example, if you enter 5 km, the Navigator only searches within a five kilometre radius.
When you select a large search radius, you risk the chance of finding too many locations, which makes it harder to find the place that you are searching for.
It is best to start with a small search radius size, and then make it larger if necessary.
If you don???t specify a search radius, the navigator searches the whole map.
Show or Hide Symbol on Map
You can select or clear the checkmarks next to a POI entry to show or hide the POI symbol on the Main Map screen.
POI Options
When you have selected a POI location, tap the ???Options??? button to display the commands listed below.
Lets you show the map with the displayed destination for you to review before creating a route.
Lets you add a POI entry to your list of favourite locations. For more information, see "My Places" on the page 35.
Lets you sort the entries of the selected category alphabetically or by distance from your current location.
The Navigator initially displays the entries by distance.
40
Finding a location with navigation
Route Manager
From the Navigations menu, tap the ???Route Manager??? button to display Navigator???s route navigation features, as described in the sections below.
After you have entered a destination and calculated a route, the Directions bar appears at the top of the Map screen, displaying the following information:
???The next turn direction
???The distance to the next turn
???The street name of the next turn
When you tap the Directions bar or click the
The following options are available:
The ???Route??? button displays your entire route on the Map screen, plus the travel distance and the Estimated Travel Time Remaining (ETR).
The ???Turn??? button displays the next turn on the Map screen, including the street name, the distance to it, and the direction of the turn.
The ???Avoid??? button lets you avoid the selected turn in the directions list. The Navigator recalculates the route automatically.
Note that when you exclude a turn, the recalculated route may take longer.
41

Finding a location with navigation
Route Summary
The ???Route Summary??? button lets you display an overview of your complete route on the Map screen, the total driving distance to your destination, the estimated travel time, and the complete destination address.
Detour
You can specify that certain roads be permanently excluded from your route calculations. Use this feature when you want to avoid congested roads, toll roads, or unsafe streets.
1.From the ???Route Manager??? menu, tap the ???Detour??? button.
2.The Detour screen appears, displaying the detour distance options to avoid a road event, such as an accident.
3.Select the Detour option that you want and tap the ???OK??? button to generate a detour for the distance specified.
For example, if you are travelling on Highway A4 and you are alerted by the news that there is a terrible traffic for the next 2 Km, you can calculate a detour that takes you off the highway and then returns you back to the highway after a distance of 2 Km.
Cancel Route
If you no longer need to travel to your destination or if you want to change your destination.
42

Finding a location with navigation
Route Playback
This feature lets you record your route as you???re driving and then to play it back on the Main Map screen.
1.To record a route, tap the ???Record??? button in the Route Playback screen. The navigator shows the Main Map screen and navigates you to the selected destination.
2.To stop recording, return to the Route Playback screen and tap the ???Stop??? button.
3.To playback your recording, select the data file, and tap the ???Play??? button.
The navigator plays the recorded route on the Main Map screen.
4.To stop the playback, return to the Route Playback screen and tap the ???Stop??? button.
Route Playback Options
You can tap the ???Options??? button to display the following commands:
???Delete Recording
This button lets you remove a selected recording.
???Clear List
This button removes all recordings.
???Playback Speed
Use the arrow keys to adjust the playback speed. The range is from 100% to 300%.
43
Finding a location with navigation
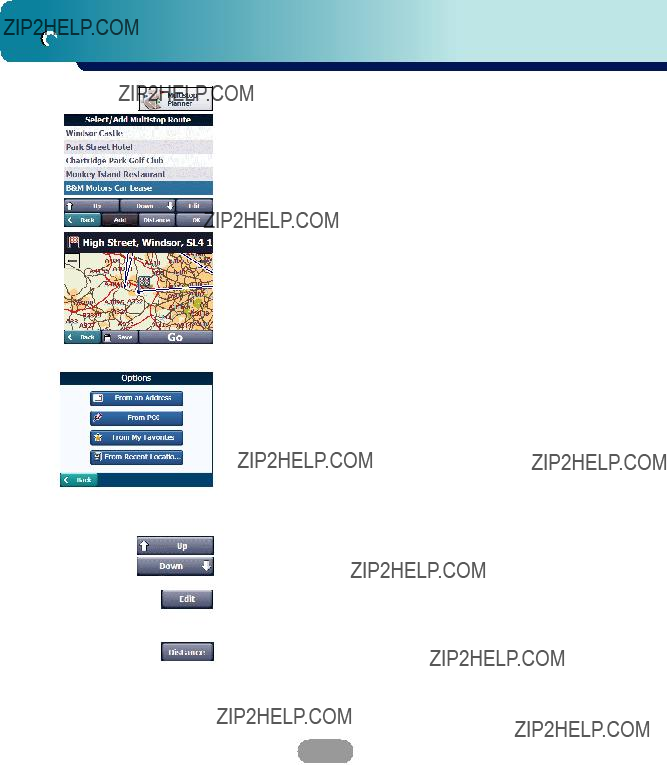
Multistop planner
Edit Way Points lets you plan a route with up to 5 stops.
When you tap the ???Go??? button, the route is calculated in stages, from the departure point to the first stop. When you reach the first stop, the route recalculates to the second stop, and so on.
Setting Stops Along the Route
1.From the ???Select/Add Multistop Route??? screen, tap the ???Add??? button to add a stop by Address, POI, My Favourites, or Recent Locations.
2.Select one of these options, specify a location, and tap the ???OK??? button.
3.The ???Select/Add Multistop Route??? screen appears with the selected location.
Use the ???Up??? or ???Down??? buttons to change the order of your itinerary.
Use the ???Edit??? button to show or delete a highlighted entry.
Use the ???Distance??? button to organize your entries from closest to farthest distance from your current location.
44

Finding a location with navigation
Route Options
You can use Route options to determine what road categories to avoid or allow and to set the default route type when Navigator calculates your selected destination.
Avoid Roads
Toll, Highway, and Ferry route sections are avoided or allowed as determined by whether they are selected, when Navigator calculates a route.
You cannot allow or avoid specific toll roads or ferry routes.
Route Condition
Fastest:
This option selects the route that takes the least amount of time.
Fastest is the default value.
Shortest:
This option selects the route that is the shorter distance. Remember, the shorter route may not always be the quickest, as you are able to travel faster on some roads than on others.
Route generation excludes any detours, stops or delays along the route.
45

Setup
Display
Tap the ???Display??? button to determine how Navigator???s map view is displayed, as shown below.
Dimension
The 2D and 3D Mode buttons lets you display the map view in
Day&Night
The Day and Night Mode buttons lets you display the map view for either day or night driving.
Map Display
The Pedestrian Mode button lets you toggle between travelling as a pedestrian or in a vehicle.
When in Pedestrian Mode, you can generate a route up to ten kilometres and you are not limited by vehicle constraints, such as one way streets.
When creating a pedestrian route, the Navigator avoids motorways or other roads where pedestrians would not travel.
Voice prompts are deactivated in this mode.
Brightness
You can use the Brightness slide bar to adjust the backlight level.
46

Setup
Map Views
The map views below let you see the differences between 2d/3d day/night conditions.
2D Day Mode Map View
2D Night Mode Map View
3D Day Mode Map View
3D Night Mode Map View
47

Setup
Units & Time
You can tap the ???Units & Time??? button to specify units of measure system and adjust the time as
displayed on your Navigator.
Distance Unit
Miles : Display and announce in miles
Kilometres : Display and announce in kilometres.
Adjust Hour
You will see the current values of GMT, and use one time zone, Greenwich Mean TIME (GMT).
Language
Lets you select the language for text and voice travel messages and driving directions.
Guidance
You can select the types of voice and visual notifications that you would like to use while navigating.
Speed Warning
Warns you when your car exceeds the speed limit. This prompt is not active by default.
Route Recalculation
Activated when the Navigator recalculates a new route.
This prompt is not active by default.
48

Setup
Unreliable GPS Signal
Warns that the GPS signal is too low and unreliable for navigation.
This prompt is automatically active by default.
Travelling to...
Reminder at the start of each journey.
This prompt is automatically active by default.
Say Rd
You can set the type of the guidance name that you will use to navigate the route.
GPS Status
The Navigator uses the GPS receiver to pinpoint your location. GPS signals are automatically acquired and your vehicle's location and position are constantly updated.
The GPS receiver may take a few minutes to find its initial location.
For best results, ensure that the GPS receiver has a clear view of the sky.
The following GPS information is displayed:
Longitude: The angular distance east or west on the earth's surface.
Latitude The location of a place north or south of the earth's surface.
Speed: The rate of movement, as expressed by kilometres or miles per hour.
Altitude: The height above sea level.
Number of Satellites: You can check reception signals from the GPS satellite.
If GPS signal can not be acquired for long, please restart whole navigation system by pressing Reset.
49
Setup
GPS Not Found
When you first start the Navigator you will hear the message ???Signal too low???. This message means that your navigation device hasn???t yet located a reliable GPS signal. Check that your device is connected to the cigarette lighter and has a clear view of the sky.
The ???GPS not found??? message means that there is no GPS antenna or the antenna is not properly installed.
Please check that:
???The GPS antenna has a clear view of the sky for uninterrupted GPS reception. The Navigator cannot calculate the route if there is no GPS reception
(for example, in a tunnel).
???The navigation device is charged or connected to the cigarette lighter.
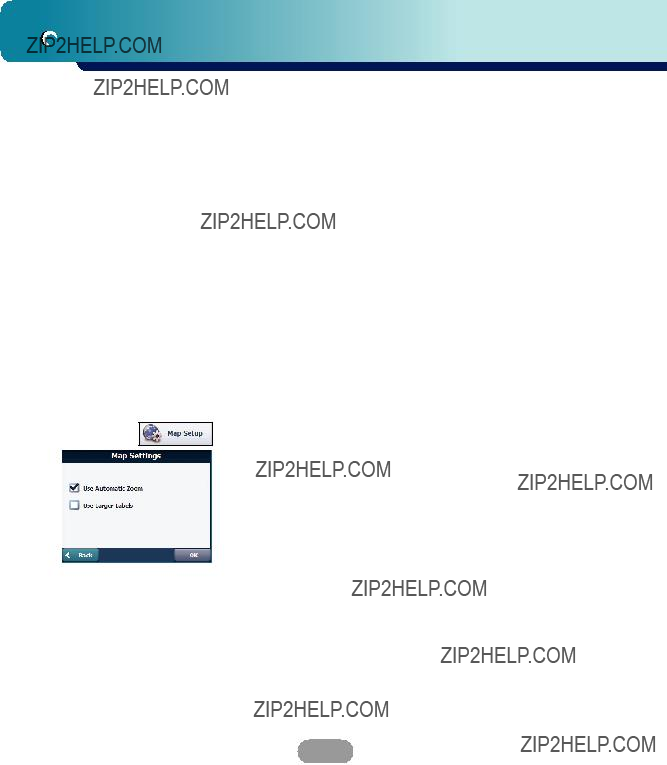
Map Setup
You can tap the ???Map Setup??? button to customize your map display.
Use Automatic Zoom
When this option is selected, the zoom is speed dependent. The map zooms out at higher speeds, displaying a larger map area, and zooms in at slower speeds, displaying a smaller map area.
If you manually change the zoom, the Automatic Zoom returns to a system defined zoom level after several seconds of inactivity.
Use Larger Labels
This option increases the size of street names to make the map easier to read.
50
Setup
From the Setup menu, tap the ???More??? button, to display the Navigator
Tutorial
When you first start the Navigator, a message box appears prompting you to open the Navigator Guided Tour program.
The Guided Tour is an excellent way of becoming familiar with the different navigation features available. You can also start the Navigator Guided Tour any time, by tapping the ???Tutorial??? button from the ???Extras??? menu.
Help
The ???Help??? button lets you display Navigator technical support information.
Start Demo
The ???Start Demo??? button lets the Navigator display a simulated route. Many of the navigation features are disabled when the Demo is running.
You can end the Demo by tapping the ???Stop Demo??? button.
51

Setup
Select Map
This feature lets you change the currently selected map to another map.
If you want to store additional maps on your memory card. You can tap the ???Select Map??? button to display the maps saved on your SD memory card. The Select Map screen displays map details and version numbers. The map currently used appears at the top of the list.
Lets you refresh the screen when a new memory card is inserted into the device.
Lets you permanently remove a selected map.
You cannot delete the current map.
Select Lets you designate a selected map as the current map.
Initialize
Clear Memory:
You can delete all listing from the memory.
Factory Settings:
You can set all the function to their factory settings.
52

Installation
Installing the Navigator ???PC Portal???
It should be install the Microsoft .Net Framework 2.0 from the install screen.
1.Insert the Navigator CD into the PC's
2.Read the Welcome message and click ???Next???.
3.From the Select Directory screen, either accept the recommended default directory or browse to a different directory to install the ???PC Portal???.
Click ???Next???.
4.If you want to change the language selection or the directory location before installing, click ???Back??? and change the language selection. When you are ready to install the ???PC Portal???, click ???Next???.
The Installation Status box displays the progress of the installation process.
5.When the installation is complete, click the ???Finish??? button.
6.After finish installing PC Portal, install the ???Maps installer??? program. This procedures are simillar to PC Portal install.
7.When the installation is complete, click the ???Finish???button, The Select Language box appears.
Please pay close attention to all the programs before installing the CD to your personal computer.
Please pay close attention especially for
53

Installation
8.From the Select Language dialog box, you can select the display language for the ???PC Portal???. Select the Launch ???PC Portal??? checkbox for ???PC Portal??? to immediately start and click ???OK???. Alternatively, you can start the ???PC Portal??? from the Microsoft?? Windows?? Programs menu.
9.Select from up to two connected devices. (LN500)
You can uninstall the ???PC Portal??? by opening the Microsoft?? Windows Programs menu, selecting LGE > Uninstall ???PC Portal???.
Recommended PC System
Requirements
Please review the following system requirements before installing ???PC Portal???:
???CPU: AMD/Intel?? Processor 300 MHz or faster
???Operating System: Windows?? 2000/XP/Vista
???Memory: 128 MB RAM (minimum)
???Hard drive free space: 500 MB (minimum)
???
???ActiveSync Version 3.8 to 4.2 supported under Windows 2000 and XP
???usb version 1.1 connection (compatible 2.0)
???Microsoft .Net Framework 2.0
54

Installation
Starting the ???PC Portal??? Wizard
The first time you start the ???PC Portal???, the ???PC Portal??? Wizard automatically starts, letting you install Navigator software, supported languages and
voice prompts, and maps.
For a complete description of the ???PC Portal???, see Using the ???PC Portal??? on page 56.
1.Click the Microsoft?? Windows?? Start button.
2.Click the Programs > LGE > ???PC Portal???. The ???PC Portal??? appears.
3.If this is your first time using ???PC Portal???, the ???PC Portal??? wizard automatically starts and displays the Welcome screen.
4.Make sure that your device is connected by USB cable to a port on your PC. You will see Connected on the ???PC Portal??? screen.
5.Click the  buttons to move to the previous or next screen.
6.Select software components to install to your device.
???If you want to start the wizard, click  from the ???PC Portal??? Main screen.
???If you want to stop the wizard, click  . The ???PC Portal??? Main screen is displayed.
???If after selecting component, software, and voice options, you want to return to the original selections, click  .
.
55
Using software
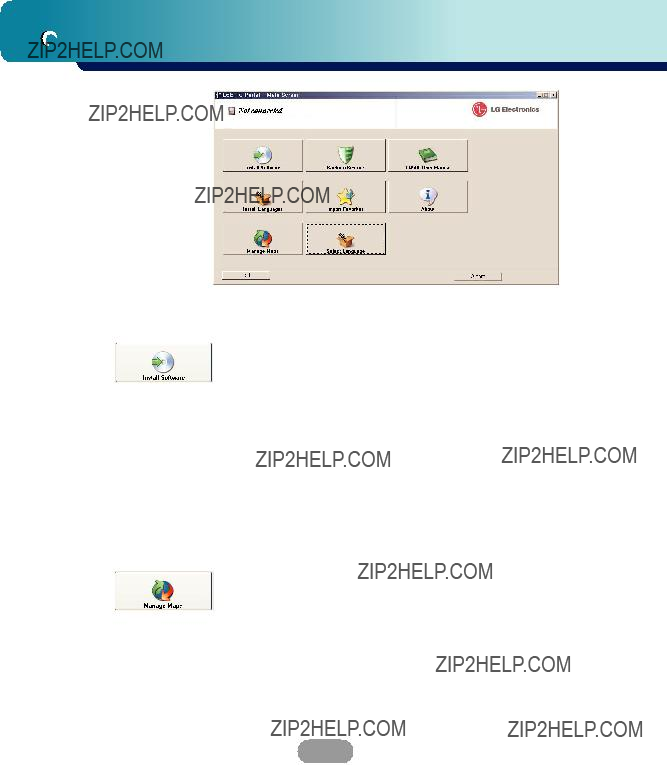
Using the ???PC Portal???
Click ???Install Software??? and select from the following components to install to your device:
???LGE: GPS navigation software
???Tutorial: Tutorial guide
To install Navigator components:
1.From the Install Software screen, select from the list of components, as described above.
2.Click the Install button.
3.Navigator ???PC Portal??? installs the selected components to the device???s main memory.
Click ???Manage Maps??? to install or remove a map. For more information, see ???Installing Maps??? on page 59.
56

Using software
Click the ???Backup/Restore??? button to backup the following Navigator items:
???Favorites: All locations that are displayed in Navigator???s Favorites screens.
???Trips: All locations that appear in Navigator???s Multistops screens.
???LGE Settings: Setting configurations, such as map views (2D/3D and Day/Night), prompts, units of measurement, and map and route setting preferences.
When you select Backup, ???PC Portal??? makes a copy and stores the information to your computer.
To backup Navigator data to your PC:
1.From the Backup/Restore screen, select Backup.
2.Select the items that you want to make a copy of and save to your computer.
3.Click the ???Backup??? button.
4.???PC Portal??? saves the selected items to your computer.
Click the Backup/Restore button to restore Favorites, Multistops, and My Navigator data to a navigation device. When you select Restore, ??????PC Portal??? recovers the information stored on your computer.
To restore stored Navigator data to a navigation device:
1.From the Backup/Restore screen, select Restore.
2.Select the items that you want to restore.
3.Click the ???Restore??? button.
4.???PC Portal??? restores the selected items.
57

Using software
Click to import favorite locations from your PC to the selected My Favorites group on your device.
For more information, see ???Importing Favorite Locations??? on page 60.
Click the ???Select Language??? button to show a list of languages that you can choose from to display the ???PC Portal???.
Click the ???About??? button to check software version.
Click the ???User Manual??? button to see a user manual.
Click Install Languages to install a language to your device.
To install languages:
1.From the Install Languages screen, select the languages to be installed to the device.
2.Click the ???Install??? button.
3.Navigator PC Portal installs the selected languages to the device???s main memory.
4.You can display the Navigator interface in the language of your choice by opening tapping the Language Settings button on the Setup menu and selecting the language in Navigator.
58

Using software
Installing Maps
1.From the Desktop Maps pane, select a map.
2.From the ???Target??? context box, select a target option, such as Storage Card or Main Memory.
3.When you select a Target option (Storage Card,
Main Memory) the ???PC Portal??? displays the following information:
???Required: The amount of free space necessary to install the map on the selected Target option.
???Available: The amount of free space available for the selected Target option.
Note: If the free space required is equal or greater than the free space available, ???PC Portal??? will not
install the selected map.
4.Click the ???Add/Remove??? button.
5.The selected map is installed and displayed in the Device Maps pane.
???Click the ???Refresh Targets??? button to update the target options.
???Click the ???Restore Default??? button to display the original options.
Speed of map installation : About 2Mbytes/minute
(It may be different depending on your computer circum- stances.)
59

Using software
Removing Maps
You can remove a map by selecting a map in the Device Maps pane and clicking the ???Add/Remove??? button.
Before removing maps, you must set in Media Player (Music, Photo) mode. And then, you can remove a map.
Importing Favorite Locations
Import Favorites lets you import content created externally as a new Favorites category.
You can download a category of favorite destinations from your PC to your device. Destination data must be contained in a
60
Using software
The .csv file contains the following fields:
???The longitude, latitude, and altitude are numerical values. All other fields contain string values.
???Even if the .csv file does not contain longitude, latitude, and altitude values, the separating commas must still be included.
???The .csv file contains the values in a table as a series of ASCII text lines, organized so that each column value is separated by a comma from the next column's value and each row starts a new line.
61

Using software
Lost connection transfer
General Warning Messages
The following warning messages can appear when you???re working with Navigator ???PC Portal???.
If at any point during the installation or data transfer, the connection to the device is lost, the following message is displayed:
"Connection to the device has been lost. Please check your connection."
Uninstalling
Navigator Console
When a version of Navigator programme (versions prior to the ???PC Portal???) is located on your computer, the following message is displayed:
"A previous version of ???PC Portal??? was found. Do you wish to uninstall?"
It is recommended to uninstall the previous progamme before installing ???PC Portal???.
Uninstalling
???PC Portal???
When an earlier version of Navigator ???PC Portal??? is located on your computer, the following message is displayed:
"A previous version of ???PC Portal??? was found. Do you wish to uninstall? "
It is recommended to uninstall a previous version of ???PC Portal??? before installing the current version.
Updates to ???PC Portal???
If there are updates in Navigator, you are prompted to download them in the following message: "There are updates to ???PC Portal???, do you wish to download and install them?"
62

Using software
If maps from a previous version is located on your computer, the following message is displayed: "Existing maps data found. Do you want to keep it?" Clicking ???Yes??? lets you install maps from previous versions.
The following message appears when you have selected an installed map and clicked the Actions button:
"Selected maps shall be removed from your device. Are you sure you wish to continue?"
If you close the PC Portal while install Navigator software, a map, importing or exporting a Favorite location, or backing up data. the following message appears. : ???if you will close the PC Portal now, the [process] shall not be completed. Are you sure you wish to close????.
If stored data is located on your computer, the following message appears:
"Navigator Backup data found. Do you want to keep it?" It is recommended to keep backup data.
Previous maps
Remove maps
Data Transfer
Backup Data
63
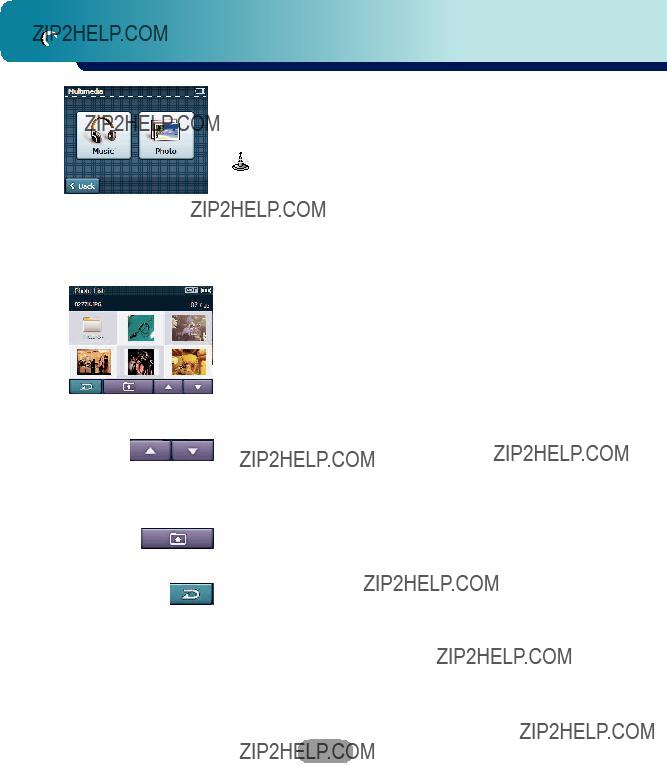
Photo Viewer
Getting Started
You can open the Photo Viewer by clicking the ???Photo??? button.
The Photo Viewer lets you view pictures from your unit. This application recognizes JPG and BMP files. The Photo Viewer???s main features let you zoom in or zoom out, rotate an image, and display a series of pictures through a slide show.
Browse to an Image
When you open the Photo Viewer, the Photo list screen is displayed, showing the top level folders on your device.
Click the folder icon to display its
You can tap the ???Page Up??? and ???Page Down??? arrow buttons to display the
You can tap the ???Directory Up??? button to display the folder immediately above in the folder hierarchy.
You can tap the ???Return??? button to close the Photo Viewer and return to the Source menu.
64

Photo Viewer
Viewing Image
Tap an image file icon in the Photo list screen to view. The image appears in the View Image screen, as shown below.
The following buttons are provided to let you display images from the View Image screen:
The m or M button lets you display the previous or next image in the sequence of image files located in the selected folder.
The X button lets you pause the slide show. To play again, touch the B button.
The B button lets you view all JPG and BMP images in the current folder in Slide Show mode. Photo Viewer shows all pictures in
The ???Rotate??? button lets you move the image clockwise. Each tap rotates the image 90 degrees.
The ???Repeat??? button lets you set the repeat playback mode.

 : Plays repeatedly within folder.
The ???Return??? button lets you return to the previous screen.
The ???Brightness??? button lets you set the LCD brightness.
(Dark : 0~100 : Light)
The ???List??? button lets you return to the Photo list screen.
65
Music Player
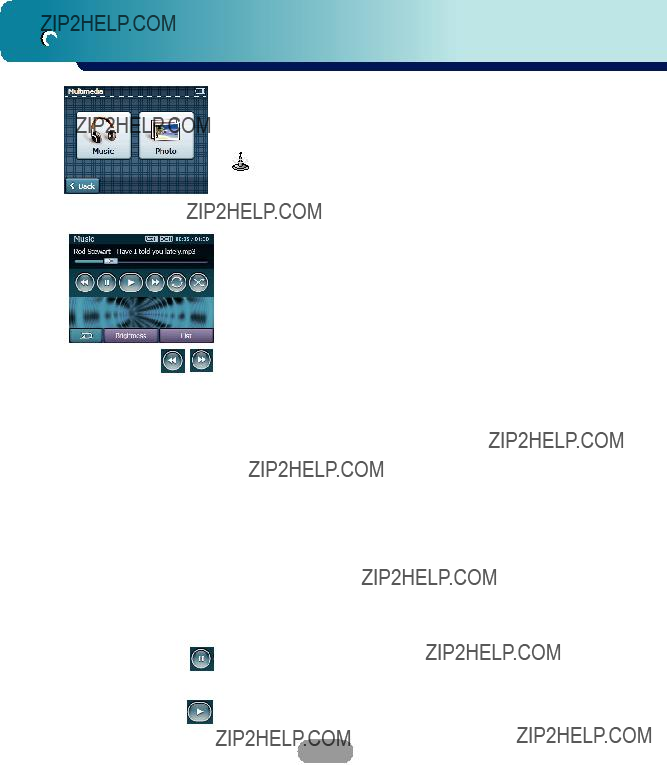
Getting Started
You can open the Music Player by clicking the ???Music??? button.
???Sampling Frequency: 8 - 48kHz (MP3)
???Bit rate: within 8 - 320 kbps (MP3) (include VBR)
Playing Music
Tap a music file in the Music list screen to listen.
The m or M button lets you select the skip or search in the music files located in the selected folder.
Skip the next track
Tap briefly the M button to select the next track.
Skip the previous track
Tap briefly the m button within 5 seconds of playing time.
Return the beginning of the current track
Tap briefly the m button after 5 seconds of playing time.
Search
Tap and hold the m or M button during playback and then release at the point you want.
You can use Slide bar to search the track.
The X button lets you pause the music.
To play again, touch the B button.
The B button lets you play all mp3 files in the current folder in Music mode.
66

Music Player
The ???Repeat??? button lets you set the repeat playback mode.

 : Plays repeatedly the current selected file.
 : Plays repeatedly within folder.
The ???Shuffle??? button lets you set the random playback mode.

 : Plays randomly within folder.
  : Plays randomly all files.
You can tap the ???Return??? button to close the Music Player and return to the Source menu.
The ???List??? button lets you return to the Music list screen.
You can select one of 2 modes. It displays the change of sound output during playback. tap the image.
Browse to a file
The Music list screen is displayed, showing the top level folders on your device.
Click the folder icon to display its
You can tap the ???Page Up??? and ???Page Down??? arrow buttons to display the
You can tap the ???Directory Up??? button to display the folder immediately above in the folder hierarchy.
The ???Return??? button lets you return to the previous screen.
67

Troubleshooting
Navigation program and map data protection
???If you want to operate this product properly, there should be the same programs (Contained in LGE folder) and maps (Contained in LGE folder) in the SD memory card
???Don't erase or modify the contents in the LGE folder!
(It contains important data for Navigation. Deleting this data will prevent the Navigator from operating correctly.)
???Don't delete inner data of the product by using ActiveSync.
(It contains important data for navigation. Deleting this data will prevent the Navigator from operating correctly.)
Picture format
???JPG: Image file size should be less than 1600 MP (megapixels).
???BMP: Image file size should be less than 500 MP (megapixels).
Cannot identify the current location. (GPS not receiving)
GPS cannot be used indoors and must be connected to the power with ACC to a vehicle in a location where the sky can be seen well.
When initially connecting the GPS, it usually takes about 10 minutes to operate normally, but the connection speed can differ depending on the weather condition, and surrounding obstacles.
If the GPS connection is unstable for a long period of time, try the following.
???Check if the power is connected to the product.
???Check if the back of the GPS product is in a location where the sky can be seen well.
???If there are high buildings or if you are under a tree, move to a location where there aren???t any obstacles.
???Check the GPS receiving condition from the GPS menu.
68
Troubleshooting
Cannot hear the voice guide.
You can hear the voice guide when you select ???Guidance??? in ???Setup???. But during actual driving, the voice guide is not heard.
If the volume is too low, adjust the volume on the right unit.
Cannot see the map.
This is when you cannot see the map even when you have executed the navigation menu.
This happens when the data within the memory is damaged. Delete all the data within the memory and reinstall the data.
If the problem persists after the installation, contact the Customer Service Centre.
Map data and dangerous area information are not updated.
You must periodically update the map data.
Refer to the homepage for details on how to update the data.
The path guide can be different from the actual path. (Path guide error)
???When the road is closely parallel.
???When the splitting road angle is very small.
???When there is an adjacent road when turning.
???When driving on a road that is narrowing fast.
???When driving through the mountain or where the road is too curvy.
???When the starting, passing and arriving locations are too close within 10 km.
???When you have set the starting, passing or arriving location more than 1 km away from the road.
???When driving through a tunnel.
???When driving between high buildings.
There is a difference between the driving road and the road on the map in the product.
Even though GPS is usually very accurate, it has an error range.
When GPS receiver is installed, there can be an error of about 5 to 15m. But for newly constructed roads, the problem could be from the data update to the map.
69

Troubleshooting
What is GPS?
The Global Positioning System (GPS) is a
GPS GPS
GPS
GPS
Map matching
The GPS used by this Mobile Navigation System is susceptible to certain errors. Their calculations may on occasion place you in a location on the map where no road exists. In this situation, the processing system
understands that vehicles travel only on roads, and is able to correct your position by adjusting it to a near road. This is called map matching.
70
Specifications
71

*You can download the Update Software from http://www.lge.com/support/software.jsp.
*You can purchase the Upgrade Map from LG Authorized Service Centres. For more information, contact Call Centre or Website.
* For the latest Call Center numbers, please visit Website (www.lge.com)