Function added in system version 2.0
E 1
Function added in system version 2.0
E 1
RADIAS synthesizer/vocoder
RADIAS operating system version 2.0 adds the following functions. Please read this document in conjunction with the ???RADIAS owner???s manual??? included with your RADIAS or
Virtual Patch
RADIAS version 2.0 adds the following parameters as virtual patch modulation destinations. This allows you even greater
???p.92 P11 PATCH page ???Dest (Destination)???
Portamnto
Modulation will be applied to the ???Portamnto??? (portamento time) parameter of the
OSC1Ctrl2
Modulation will be applied to the ???Control2??? parameter of the
Filt1EG1, Filt1KTrk
Modulation will be applied to the ???EG1 Int??? or ???KeyTrack??? parameter of the
Filt2Reso, Filt2EG1, Filt2KTrk
Modulation will be applied to the ???Resonance,??? ???EG1 Int,??? or ???KeyTrack??? parameter of the
EG1Attack, EG1Decay, EG1Sustain, EG1Releas
Modulation will be applied to the ???Attack,??? ???Decay,??? ???Sustain,??? or ???Release??? parameter of the
EG2Attack, EG2Decay, EG2Sustain, EG2Releas
Modulation will be applied to the ???Attack,??? ???Decay,??? ???Sustain,??? or ???Release??? parameter of the
EG3Attack, EG3Decay, EG3Sustain, EG3Releas
Modulation will be applied to the ???Attack,??? ???Decay,??? ???Sustain,??? or ???Release??? parameter of the
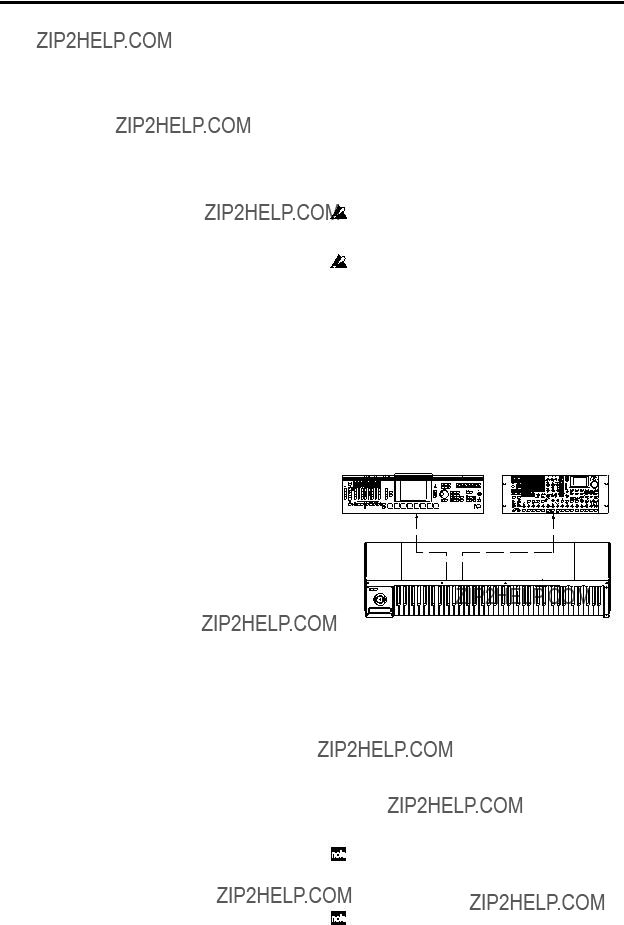
Connecting the
RADIAS version 2.0 allows you to connect the RADIAS tone module
When using the
If you???re connecting the
Keyboard Assembly 73/88
Patch1Int, Patch2Int, Patch3Int, Patch4Int,
Patch5Int, Patch6Int
Modulation will be applied to the ???Intensity??? parameter of the P11:
Joystick
X axis
This will operate in the same way as the PitchBend wheel of the
If you want to apply a pitch bend effect, set the Program Edit mode
If you want pitch bend change messages to be received and transmitted, set the Global mode P06: MIDI FILTER page ???PitchBend??? parameter to ???O??? (Enable).
2
Function added in system version 2.0
If you want to use the joystick
???Virtual patch P11 PATCH ???Source??? (RADIAS owner???s manual p.91)
???Vocoder P07: FILTER ???FcModSrc??? (RADIAS owner???s manual p.105)
???Effect control source (St.Filter ???Ctrl Src,??? etc.; RADIAS owner???s manual p.125)
In these cases, the parameter will be controlled with mm=64 and bb=00 as 0 (the center value), in a range of
+Y axis
This will operate in the same way as the Modulation wheel of the
If you want to apply a vibrato effect by moving the joystick in the +Y direction, set the Program Edit mode
If you want MIDI control change messages to be transmitted and received, set the Global mode P06: MIDI FILTER page parameter ???Ctrl Chg??? to ???O??? (Enable).
If you want to use the joystick +Y axis as a modulation source for another parameter, set the following parameters to M.Wheel according to the parameter that you want to control.
???Virtual patch P11 PATCH ???Source??? (RADIAS owner???s manual p.91)
???Vocoder P07: FILTER ???FcModSrc??? (RADIAS owner???s manual p.105)
???Effect control source (St.Filter ???Ctrl Src,??? etc.; RADIAS owner???s manual p.125)
By setting one of the Global mode P04: MIDI page parameters
???Modulation source for a virtual patch (RADIAS owner???s manual p.91)
???Modulation source for the vocoder ???lter (RADIAS owner???s manual p.105)
???Effect control source (St.Filter ???Ctrl Src,??? etc.; RADIAS owner???s manual p.125)
With the factory settings, ???MIDI2??? is set to #002.
When you operate the joystick in the
If you want to use the joystick
If you want MIDI control change messages to be transmitted and received, set the Global mode P06: MIDI FILTER page parameter ???Ctrl Chg??? to ???O??? (Enable).
SW1/SW2
By setting one of the Global mode P04: MIDI page parameters
???Modulation source for a virtual patch (RADIAS owner???s manual p.91)
???Modulation source for the vocoder ???lter (RADIAS owner???s manual p.105)
???Effect control source (St.Filter ???Ctrl Src,??? etc.; RADIAS owner???s manual p.125)
With the factory settings, ???MIDI3??? is set to #080 and ???MIDI4??? is set to #081.
On the
The lit/unlit status of the switch will depend on the connector to which you???ve connected the unit.
If the
If you connect the
If the
On the
The on/off status of the switch cannot be saved in the
3
RADIAS synthesizer/vocoder
When you operate a switch, a control change CC#80 (SW1) or CC#81 (SW2) will be transmitted on the MIDI channel of the timbre selected by TIMBRE SELECT.
If you want to apply an effect using SW1/SW2, set the Program Edit mode
If you want control change messages to be transmitted and received, set the Global mode P06: MIDI FILTER page parameter ???Ctrl Chg??? to ???O??? (Enable).
Keyboard aftertouch
Aftertouch from the keyboard is available only if the
If one of the Global mode P04: MIDI page parameters
???Modulation source for a virtual patch (RADIAS owner???s manual p.91)
???Modulation source for the vocoder ???lter (RADIAS owner???s manual p.105)
???Effect control source (St.Filter ???Ctrl Src,??? etc.; RADIAS owner???s manual p.125)
With the factory settings, ???MIDI5??? is set to A.Touch.
When you apply keyboard aftertouch, channel aftertouch messages will be transmitted on the MIDI channel of the timbre that is selected in TIMBRE SELECT. When channel aftertouch is received, the result will be the same as when you operate the keyboard.
If you want to use aftertouch to apply an effect, set the Program Edit mode
If you want aftertouch messages to be transmitted and received, set the Global mode P06: MIDI FILTER page parameter ???Ctrl Chg??? to ???O??? (Enable).
If you connect the
The aftertouch sensitivity of the
Ribbon controller
The ribbon controller is available only if the
If one of the Global mode P04: MIDI page parameters
???Modulation source for a virtual patch (RADIAS owner???s manual p.91)
???Modulation source for the vocoder ???lter (RADIAS owner???s manual p.105)
???Effect control source (St.Filter ???Ctrl Src,??? etc.; RADIAS owner???s manual p.125)
With the factory settings, ???MIDI1??? is set to #016.
If ???MIDI1??? is set to #016, the effect may not return to 0 when you take your hand off the ribbon controller. If you want the effect to return to 0 when you take your hand off the ribbon controller, set ???MIDI1??? to #016??.
When you operate the ribbon controller, control change CC#16 messages will be transmitted on the MIDI channel of the timbre that is selected in TIMBRE SELECT. When CC#16 is received, the result will be the same as when you operate the ribbon controller.
If you want to use the ribbon controller to apply an effect, set the Program Edit mode
If you want control change messages to be transmitted and received, set the Global mode P06: MIDI FILTER page parameter ???Ctrl Chg??? to ???O??? (Enable).
If you connect the
4
Function added in system version 2.0
Global parameters
So that you can connect the RADIAS to the
#016?? (CC#16??)
Select this if you want to use the ribbon controller of the keyboard assembly as a modulation source for the virtual patch.
The ribbon controller will produce a control change value of 64 when you release your hand.
When using the ribbon controller of the
#017?? (CC#17??), #019?? (CC#19??), #020?? (CC#20??), #021?? (CC#21??)
Select these if you want to use the MIDI control changes transmitted by the four user sliders (Modulation Sliders 5, 6, 7, and 8) of the M3 control surface as modulation sources for virtual patches.
For #017??, #019??, #020??, and #021??, the resulting modulation will be zero when the slider etc. is set to the center position (control change value of 064). For #017, #019, #020, and #021, the resulting modulation will be zero when the slider etc. is set to the ???0??? position (control change value of 0). Select the choice that will give you the desired type of change when you operate the slider or other controller.
Monitoring the audio output of the
If you would like an easy way to monitor the audio output of the
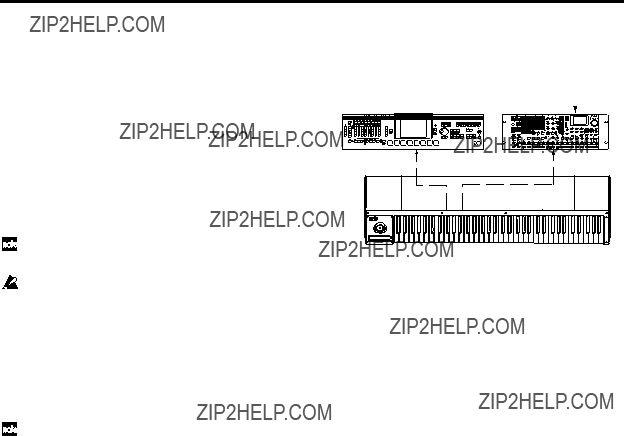
MIDI settings when using an
Keyboard Assembly 73/88
Preventing the
If you have made the connections shown
???
???
If you turn the
Preventing KARMA generated note data from being received by the
If you have made the connections shown above and are playing an
???
KARMA Module to MIDI OUT???: Off
???
With these settings, the
5

??? 2007 KORG INC.