i100 Series Scanners
User???s Guide
Part No. 9E3718
CAT No. 126 4951
i100 Series Scanners
User???s Guide
Part No. 9E3718
CAT No. 126 4951

Contents
Introduction . . . . . . . . . . . . . . . . . . . . . . . . . . . . . . . . . . . . . . . . . . . . . . . . . . . . 1
Scanner features . . . . . . . . . . . . . . . . . . . . . . . . . . . . . . . . . . . . . . . . . . . . . . 1
Paper transport features . . . . . . . . . . . . . . . . . . . . . . . . . . . . . . . . . . . . . . . . . 2
Speed/capacity (throughput) . . . . . . . . . . . . . . . . . . . . . . . . . . . . . . . . . . . 2
Image quality features . . . . . . . . . . . . . . . . . . . . . . . . . . . . . . . . . . . . . . . . . . 2
Maintenance . . . . . . . . . . . . . . . . . . . . . . . . . . . . . . . . . . . . . . . . . . . . . . . . . . 2
Preparing documents for scanning . . . . . . . . . . . . . . . . . . . . . . . . . . . . . . . . . 3
Recommended documents . . . . . . . . . . . . . . . . . . . . . . . . . . . . . . . . . . . . 3
Safety information . . . . . . . . . . . . . . . . . . . . . . . . . . . . . . . . . . . . . . . . . . . . . 4
Warning labels . . . . . . . . . . . . . . . . . . . . . . . . . . . . . . . . . . . . . . . . . . . . . . 4
User precautions . . . . . . . . . . . . . . . . . . . . . . . . . . . . . . . . . . . . . . . . . . . . . . 4
Safety and Regulatory Agency Approvals . . . . . . . . . . . . . . . . . . . . . . . . . . . 5
Environmental information . . . . . . . . . . . . . . . . . . . . . . . . . . . . . . . . . . . . . . . 5
Acoustic emission . . . . . . . . . . . . . . . . . . . . . . . . . . . . . . . . . . . . . . . . . . . . . . 5
Power system . . . . . . . . . . . . . . . . . . . . . . . . . . . . . . . . . . . . . . . . . . . . . . . . . 5
EMC statements . . . . . . . . . . . . . . . . . . . . . . . . . . . . . . . . . . . . . . . . . . . . . . . 6
United States . . . . . . . . . . . . . . . . . . . . . . . . . . . . . . . . . . . . . . . . . . . . . . . 6
Japan . . . . . . . . . . . . . . . . . . . . . . . . . . . . . . . . . . . . . . . . . . . . . . . . . . . . . 6
Installing the scanner . . . . . . . . . . . . . . . . . . . . . . . . . . . . . . . . . . . . . . . . . . . . 7
Site specifications . . . . . . . . . . . . . . . . . . . . . . . . . . . . . . . . . . . . . . . . . . . . . . 7
System requirements . . . . . . . . . . . . . . . . . . . . . . . . . . . . . . . . . . . . . . . . . . . 7
Minimum system configuration . . . . . . . . . . . . . . . . . . . . . . . . . . . . . . . . . 7
Recommended system configuration . . . . . . . . . . . . . . . . . . . . . . . . . . . . . 7
Unpacking the scanner . . . . . . . . . . . . . . . . . . . . . . . . . . . . . . . . . . . . . . . . . . 8
Registering your scanner . . . . . . . . . . . . . . . . . . . . . . . . . . . . . . . . . . . . . . . . 8
Removing the foam sheet . . . . . . . . . . . . . . . . . . . . . . . . . . . . . . . . . . . . . . . 9
Scanner components . . . . . . . . . . . . . . . . . . . . . . . . . . . . . . . . . . . . . . . . . . . 9
Front . . . . . . . . . . . . . . . . . . . . . . . . . . . . . . . . . . . . . . . . . . . . . . . . . . . . . . 9
Rear . . . . . . . . . . . . . . . . . . . . . . . . . . . . . . . . . . . . . . . . . . . . . . . . . . . . . 10
Side . . . . . . . . . . . . . . . . . . . . . . . . . . . . . . . . . . . . . . . . . . . . . . . . . . . . . 10
Internal . . . . . . . . . . . . . . . . . . . . . . . . . . . . . . . . . . . . . . . . . . . . . . . . . . . 11
Making connections . . . . . . . . . . . . . . . . . . . . . . . . . . . . . . . . . . . . . . . . . . . 12
Installing the
Installing the Kodak Driver Software . . . . . . . . . . . . . . . . . . . . . . . . . . . . 12
Installing the
Power setup . . . . . . . . . . . . . . . . . . . . . . . . . . . . . . . . . . . . . . . . . . . . . . . 13

Input and output trays . . . . . . . . . . . . . . . . . . . . . . . . . . . . . . . . . . . . . . . . . . 16
Attaching the input tray . . . . . . . . . . . . . . . . . . . . . . . . . . . . . . . . . . . . . . 16
Attaching the output tray . . . . . . . . . . . . . . . . . . . . . . . . . . . . . . . . . . . . . 16
Tray extenders and side guides . . . . . . . . . . . . . . . . . . . . . . . . . . . . . . . . 16
Adjusting the output tray . . . . . . . . . . . . . . . . . . . . . . . . . . . . . . . . . . . . . 17
Closing the input and output trays . . . . . . . . . . . . . . . . . . . . . . . . . . . . . . 17
Using the Scanner . . . . . . . . . . . . . . . . . . . . . . . . . . . . . . . . . . . . . . . . . . . . . . 18
Starting and stopping scanning . . . . . . . . . . . . . . . . . . . . . . . . . . . . . . . . . . 18
Automatic feeding . . . . . . . . . . . . . . . . . . . . . . . . . . . . . . . . . . . . . . . . . . . . . 18
Continuous feeding . . . . . . . . . . . . . . . . . . . . . . . . . . . . . . . . . . . . . . . . . 18
Manual feeding . . . . . . . . . . . . . . . . . . . . . . . . . . . . . . . . . . . . . . . . . . . . . . . 18
Damaged documents . . . . . . . . . . . . . . . . . . . . . . . . . . . . . . . . . . . . . . . . 19
Troubleshooting . . . . . . . . . . . . . . . . . . . . . . . . . . . . . . . . . . . . . . . . . . . . . . . 28
Indicator lights . . . . . . . . . . . . . . . . . . . . . . . . . . . . . . . . . . . . . . . . . . . . . . . 28
Service indicator lights . . . . . . . . . . . . . . . . . . . . . . . . . . . . . . . . . . . . . . . 28
Lamps . . . . . . . . . . . . . . . . . . . . . . . . . . . . . . . . . . . . . . . . . . . . . . . . . . . . . . 29
Clearing document jams . . . . . . . . . . . . . . . . . . . . . . . . . . . . . . . . . . . . . . . . 29
Adjusting the separator module tension . . . . . . . . . . . . . . . . . . . . . . . . . . . . 29
System is not responding . . . . . . . . . . . . . . . . . . . . . . . . . . . . . . . . . . . . . . . 30
Color image quality . . . . . . . . . . . . . . . . . . . . . . . . . . . . . . . . . . . . . . . . . . . . 30
Problem solving . . . . . . . . . . . . . . . . . . . . . . . . . . . . . . . . . . . . . . . . . . . . . . 31
Transporting the scanner . . . . . . . . . . . . . . . . . . . . . . . . . . . . . . . . . . . . . . . 33
Appendix A Specifications . . . . . . . . . . . . . . . . . . . . . . . . . . . . . . . . . . . . .
Appendix B Supplies and Accessories . . . . . . . . . . . . . . . . . . . . . . . . . . .

Introduction
Scanner features
Before you install and operate your Kodak i100 Series Scanner, take a few minutes to read through this guide. It contains important information about installing, using, and maintaining your scanner.
???Kodak i150 Scanner is a desktop simplex color scanner with an automatic document feeder.
???Kodak i160 Scanner is a desktop duplex color scanner with an automatic document feeder.
???Excellent paper handling, image quality, and reliability
???Color at the same speed as
???Simultaneous color and
???Aggressive cropping capability to eliminate residual black border on any image edges
???Easy to use and maintain
???Handles a broad range of paper weights and sizes
???Small footprint; fits easily on a desktop or table
???Low noise level
???Easy installation
???ISIS and TWAIN device drivers are included on a CD that is packed with each scanner
???International language support
???Automatic overlap/multifeed detection
???Both scanner models support multiple electrical power requirements for use worldwide
???Electronic red, green, and blue color dropout

Paper transport features
Speed/capacity
(throughput)
Image quality features
Maintenance
???Automatic and manual feeding
???Multifeed detection by document length and/or document thickness
???Automatic document feeder (ADF) with
The following speeds in pages per minute (ppm) are for color, grayscale, and
???iThresholding, Adaptive Threshold Processing (ATP), image compression, despeckle, and dithering for
???Image capture optical resolution: 300 dpi
???Image output resolution: 75/100/150/200/240/300/400/600 dpi for
NOTE: Throughput speed at 400 dpi and 600 dpi is dependent upon your PC configuration.
???
???Pixel and color correction for the best color image quality
???Five levels of JPEG compression allow images to be viewed in many image viewers
???Optional White Background Accessory with
???Easily replaceable feed module and separator module
???Easy
???LED indicators for power, ready, error, and operating conditions

Preparing documents for scanning
Recommended documents
???A batch of documents to be fed into the scanner must be arranged so that the leading edges of all documents are aligned and centered under the automatic document feeder. This allows the feeder to introduce documents into the scanner one at a time. Documents must be positioned face down for scanning.
???Staples and paper clips in documents may damage the scanner. Remove all staples and paper clips before scanning.
???Torn, damaged, or crushed pages can be transported successfully through the scanner. However, no scanner can transport every possible type of damaged paper. If in doubt about whether a specific damaged document can be transported through the scanner, place the document in a clear protective sleeve. Sleeves should be manually fed, one at a time, folded edge first, while lifting the gap release lever.
???When scanning documents in a clear protective sleeve, the input tray guides must be adjusted to accommodate the width of the sleeve.
NOTE: Kodak scanners have been tested with a range of documents that represent the broad spectrum of document types found in the most common business applications. Optimal scanner performance is achieved when scanning documents within the recommended document specifications. Scanning documents that are outside of these specifications may lead to undesirable results in terms of scanner reliability, image quality, and/or consumable life.
The following chart lists the recommended document attributes.
Safety information
???When placing the scanner, make sure that the electrical power outlet is located within 1.52 metres (5 feet) of the scanner and is easily accessible.
CAUTION: The scanner and power supply must only be used indoors in a dry location.
???Material Safety Data Sheets (MSDS) for information about chemicals used in Kodak products are available on the Kodak web site at www.kodak.com/go/MSDS. Refer to Appendix B, ???Supplies and Accessories,??? for catalog number information.
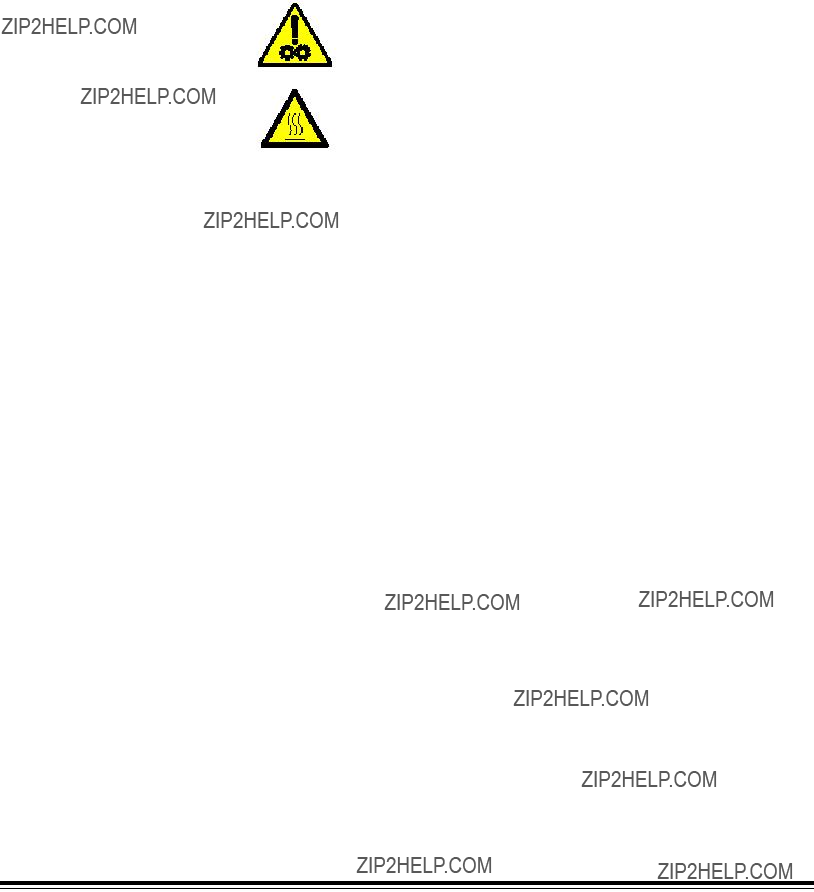
Warning labels
CAUTION: Moving parts. Avoid contact.
User precautions
CAUTION: Hot surface. Avoid contact.
WARNING: The scanner cover must be in place and closed during scanner operation.
Users and their employer need to observe the common sense precautions applicable to the operation of any machinery. These include, but are not limited to, the following:
???Do not wear loose clothing, unbuttoned sleeves, etc.
???Do not wear loose jewelry, bracelets, bulky rings, long necklaces, etc.
???Hair should be kept short, using a hair net if needed or by tying long hair up in a bundle.
???Remove all loose objects from the area that could be drawn into the machine.
???Take sufficient breaks to maintain mental alertness.
???Follow the recommended Kodak cleaning procedures. Do not use air, liquid or gas spray cleaners. These cleaners only displace the dust, dirt or debris to another location within the scanner, which could cause the scanner to malfunction.
Supervisors should review their practices and make the compliance with these precautions a part of the job description for the operator of the Kodak i100 Series Scanners and any other mechanical devices.

Safety and regulatory agency approvals
The Kodak i100 Series Scanners conform to applicable national and international product safety and electronic emission regulatory requirements. This includes, but is not limited to, the following:
Kodak i100 Series Scanners Regulatory Agency Approvals
Environmental information
Acoustic emission
???The Kodak i100 Series Scanners are designed to meet worldwide environmental requirements.
???The i100 Series Scanners??? power supply cord jacket and the solder on the circuit boards contain lead. Disposal of lead may be regulated due to environmental considerations. For disposal or recycling information, contact your local authorities, or in the U.S.A., visit the Electronics Industry Alliance web site at www.eiae.org.
???Guidelines are available for the disposal of consumable items that are replaced during maintenance or service; follow local regulations or contact Kodak locally for more information.
???The product packaging is recyclable.
???Parts are designed for reuse or recycling.
Maschinenl??rminformationverordnung ??? 3, GSGV
Der arbeitsplatzbezognene Emissionswert betr??gt <70 dB(A).
[Machine Noise Information Ordinance ??? 3, GSGV
The
EMC statements
United States

Installing the Scanner
Site specifications
Place the scanner:
???in a clean area with temperature and relative humidity typical of an office environment
CAUTION: The scanner and power supply must only be used indoors in a dry location.
???on a stable, level work surface capable of supporting the following weights:
-i150 Scanner: 10.80 kg (23.75 lb.)
-i160 Scanner: 12.61 kg (27 lb.)
???within 1.52 metres (5 feet) of an electrical power outlet
NOTE: For more information about the scanner specifications, refer to Appendix A, Specifications.
System requirements
Minimum system configuration
To operate the scanner, the following minimum configuration is required.
NOTE: The actual performance of the system depends upon the scanning application, choice of scanning parameters, and the host computer configuration. If the scanner is not performing at the optimal speed, a faster computer and/or more RAM may be necessary to obtain the rated throughput.
???IBM PC (or compatible) with a Pentium III 1 GHz processor
-i160 Scanner: for scanning at 300 dpi with deskew, you will need at least a 1.8 GHz processor for
???Microsoft Windows 98SE, Windows Millennium Edition (Me), Windows 2000 Professional, or Windows XP
???100 MB of available hard disk space (200 MB is recommended)
???128 MB of RAM
???Monitor (VGA)
???Mouse
Recommended system configuration
Unpacking the scanner
Registering your scanner
To operate the scanner at its optimum speed, the following configuration (or better) is recommended.
NOTE: The actual performance of the system depends on the scanning application, choice of scanning parameters, and the host computer configuration.
???IBM PC (or compatible) with a Pentium IV 2.5 GHz processor
???Microsoft Windows 98SE, Windows Millennium Edition (Me), Windows 2000 Professional, or Windows XP
???200 MB of available hard disk space
???512 MB of RAM
???Monitor (VGA)
???Mouse
The scanner box contains the following items:
???Kodak i100 Series Scanner
???Input tray
???Output tray
???Power supply
???Power cord(s)
???Installation CD
???Kodak Capture Software Lite CD
???Read Me Now sheet
???User???s Guide (printed English version; User???s Guide .pdf files in nine other languages are included on the Installation CD)
???Registration sheet
???IEEE FireWire Kit
NOTE: Save all packing materials for possible future use.
It is very important that you register your scanner so Kodak can provide you with the best possible service and support. Registering your scanner will help us provide you with firmware and hardware updates as they become available.
NOTE: The scanner must be registered before any service support can be provided.
You can register your scanner???s new equipment warranty online at www.kodak.com/go/DIwarrantyregistration.
For more information about Kodak???s service and support options, contact your reseller of Kodak Document Imaging products or visit us on the web at www.kodak.com/go/DIserviceandsupport.
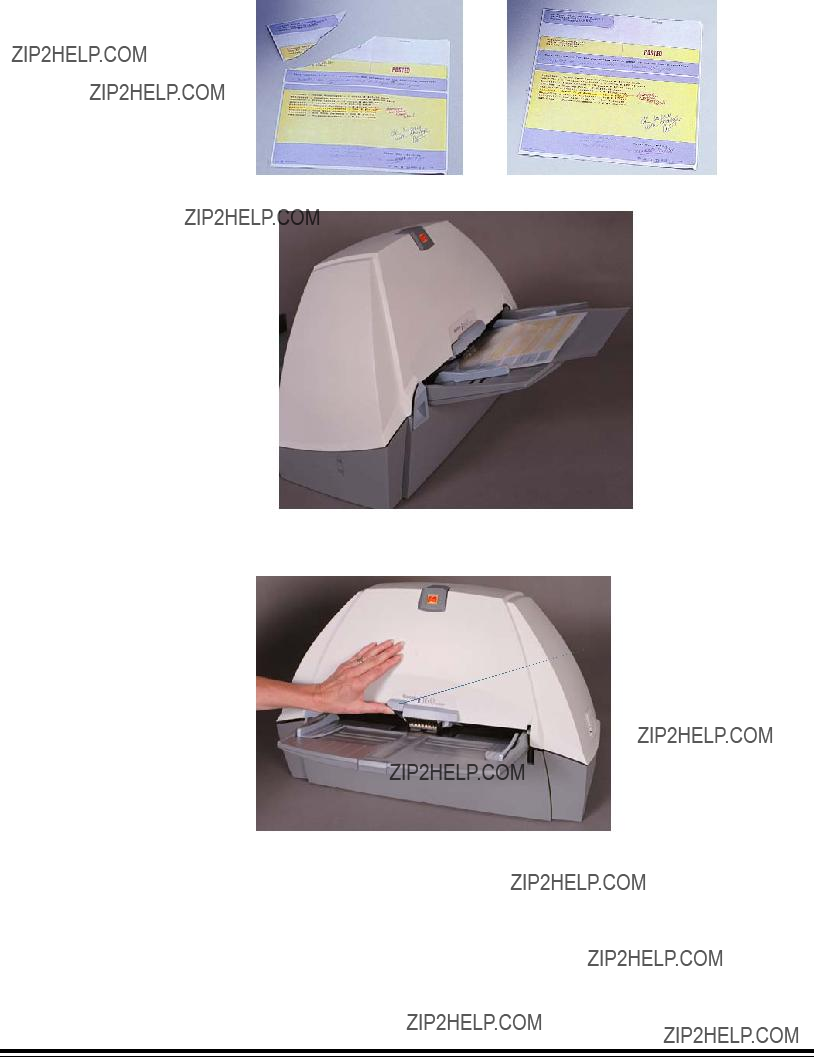
Removing the foam sheet
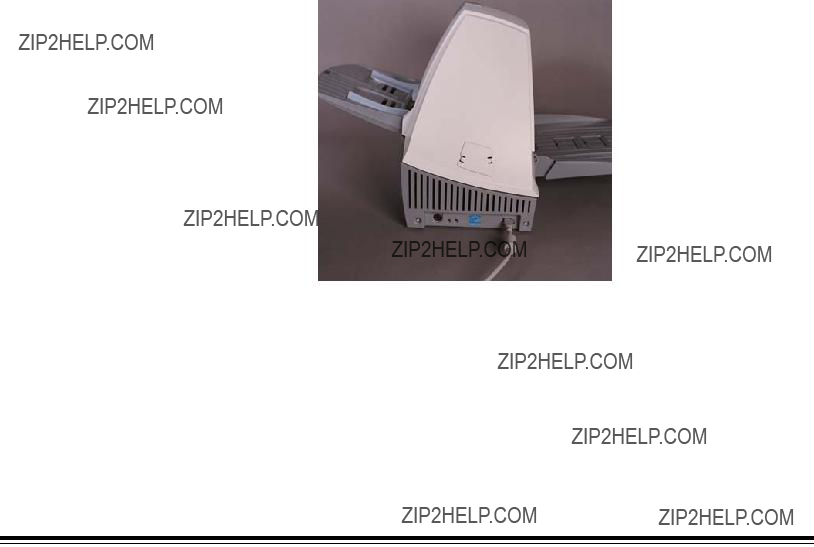
Scanner components
Front
1Scanner door
2Gap release lever
3Scanner door release
4LEDs
5Paper guides
6Input tray
7Input tray extender
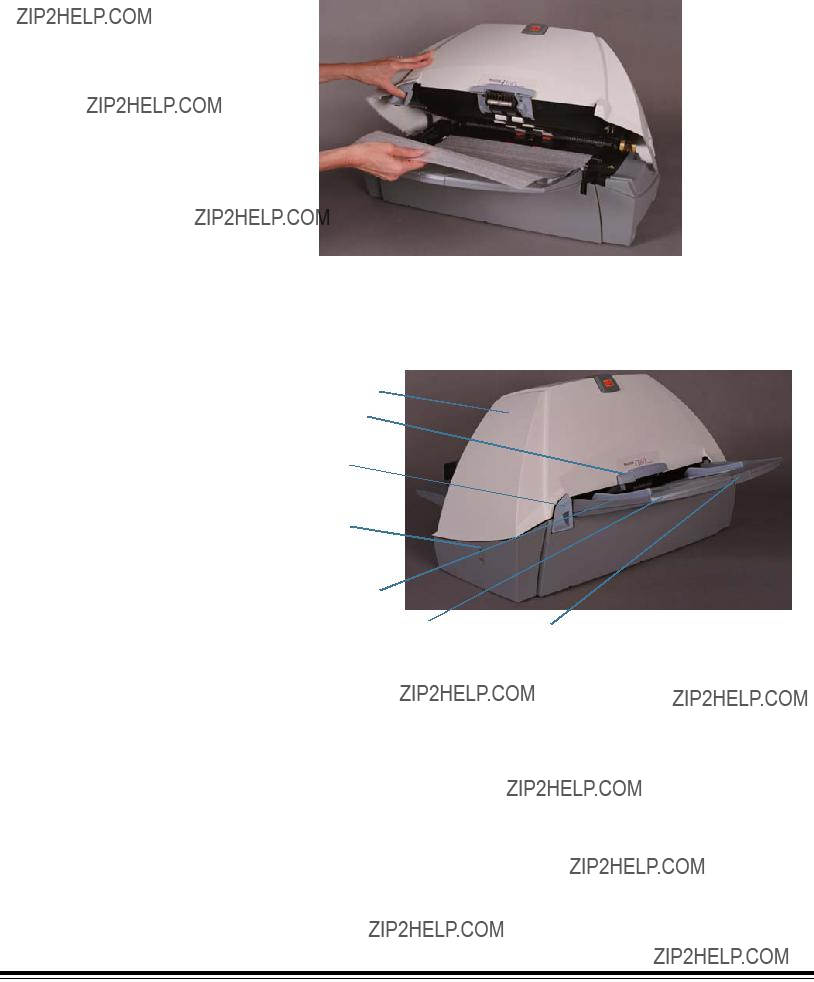
The scanner is packed with a foam sheet inside to protect the rollers during shipping. This foam sheet must be removed before you can begin scanning.
1.Lift the scanner out of the box and place it on a stable, level work surface that is capable of supporting it.
2.Lift up the scanner door release to unlatch and open the scanner door.
3.Remove the foam sheet.
4. Lower the scanner door and press it down firmly until it latches into place.
1 
2
3
4
5 
6 7
7

Rear
8Output tray
9Output tray extender
8
9
Side
6
1
5
 2
2
4
3
7 8
8
Side
1Red indicator
2Green indicator
See the section entitled, ???Indicator lights??? in the
Troubleshooting section
for more information regarding these indicators.
1 2

Internal
4 
5
Making connections
Installing the
Installing the Kodak
Driver Software
Installing the
Follow the instructions for installing the
IMPORTANT: You must install the software on the host computer before you install the scanner.
An
1.Install the
WARNING: Installation of the connector in the wrong orientation will damage the scanner and
IMPORTANT: Use proper precautions to avoid static when you install the
2.Power up the host computer after the
1.Insert the Kodak i100 Series Installation CD in the
2.Follow the
1.Attach the end of the
2.Attach the other end of the
WARNING: Make sure that the position of the
IMPORTANT: The i100 Series Scanner should be the only item plugged into the
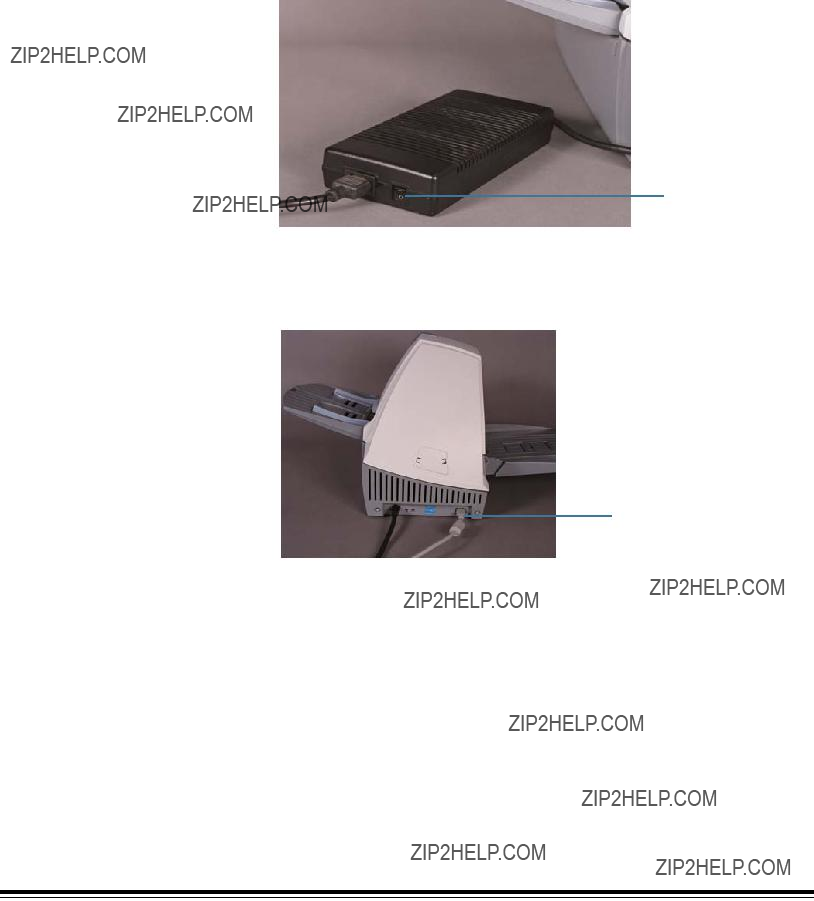
Power switch
NOTE: The power switch is on the power supply.
2.Attach the power cord for your power type to the power supply.
3.Attach the power supply to the power input on the back of the scanner.
Beaded end of
IEEE 1394 cable
4. Plug the power cord into a power outlet.
NOTE: Make sure that the power outlet is located within 1.52 metres (5 feet) of the scanner and is easily accessible.
5.Press the side labeled ???I??? on the power switch to power up the scanner.
After you power up the scanner, the red and green indicator lights will illuminate. After approximately one minute, both lights go out. When the green indicator light comes back on, the scanner is installed and ready to begin scanning. However, the host computer may require several seconds to detect the scanner.
For best calibration and scanning results, allow the scanner lamps to warm up for at least three minutes.
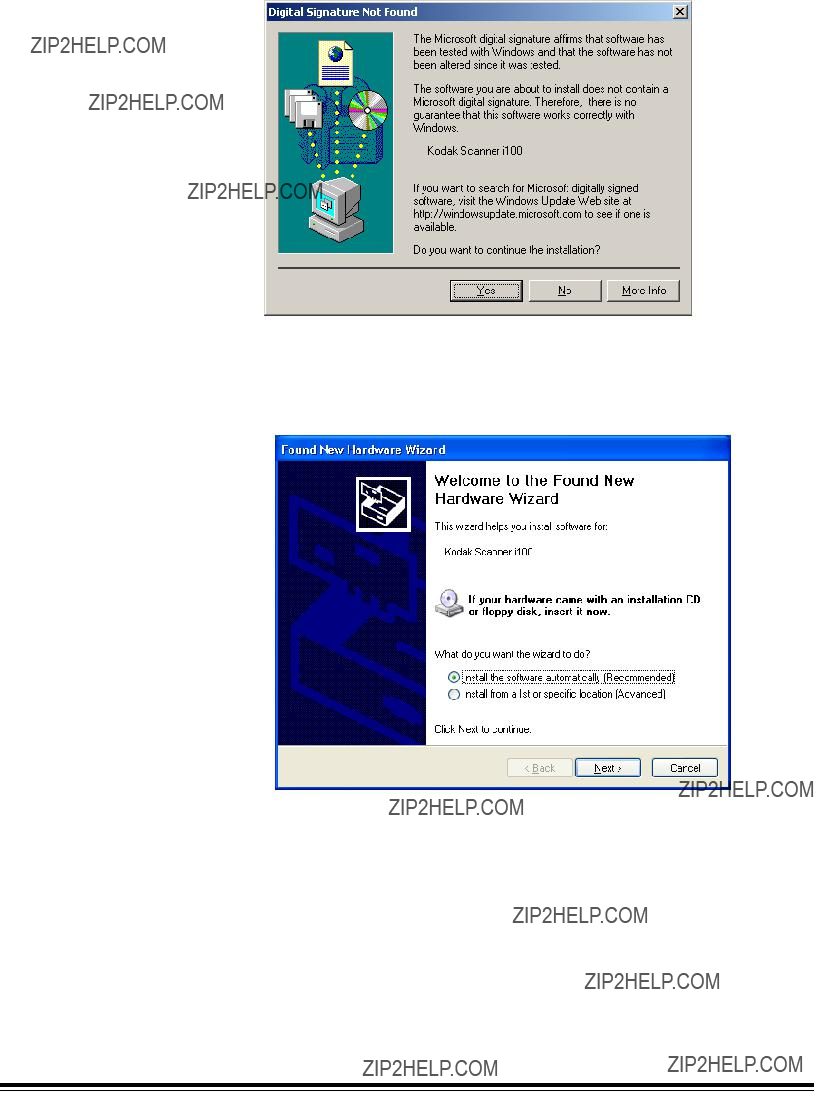
If you are installing the scanner on a computer that is running Windows 2000, the following screen may appear.
???Select Yes. Kodak has successfully tested the i100 Series Scanners with Windows 2000. Your scanner is now installed.
If you are installing the scanner on a computer that is running Windows XP, the following screen may appear.
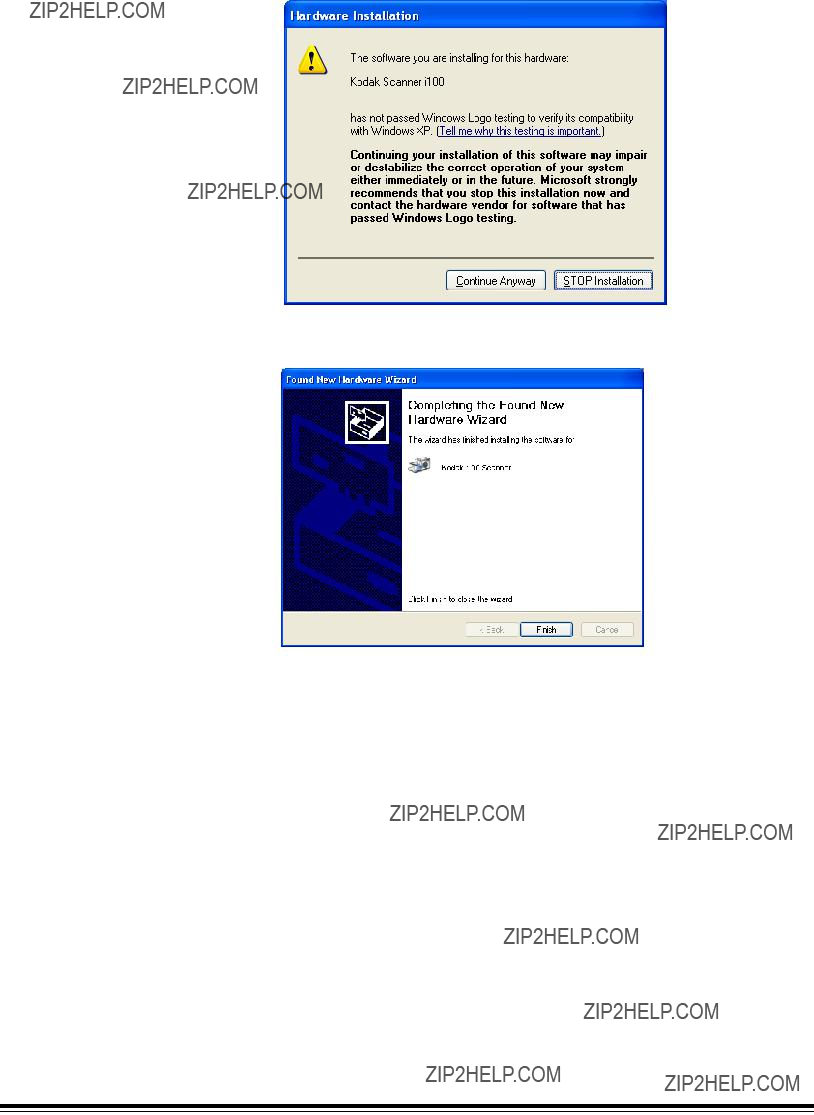
1. Select Next. The following screen appears.
2.Select Continue Anyway. Kodak has successfully tested the i100 Series Scanners with Windows XP. The following screen appears.
3. Select Finish. Your scanner is now installed.
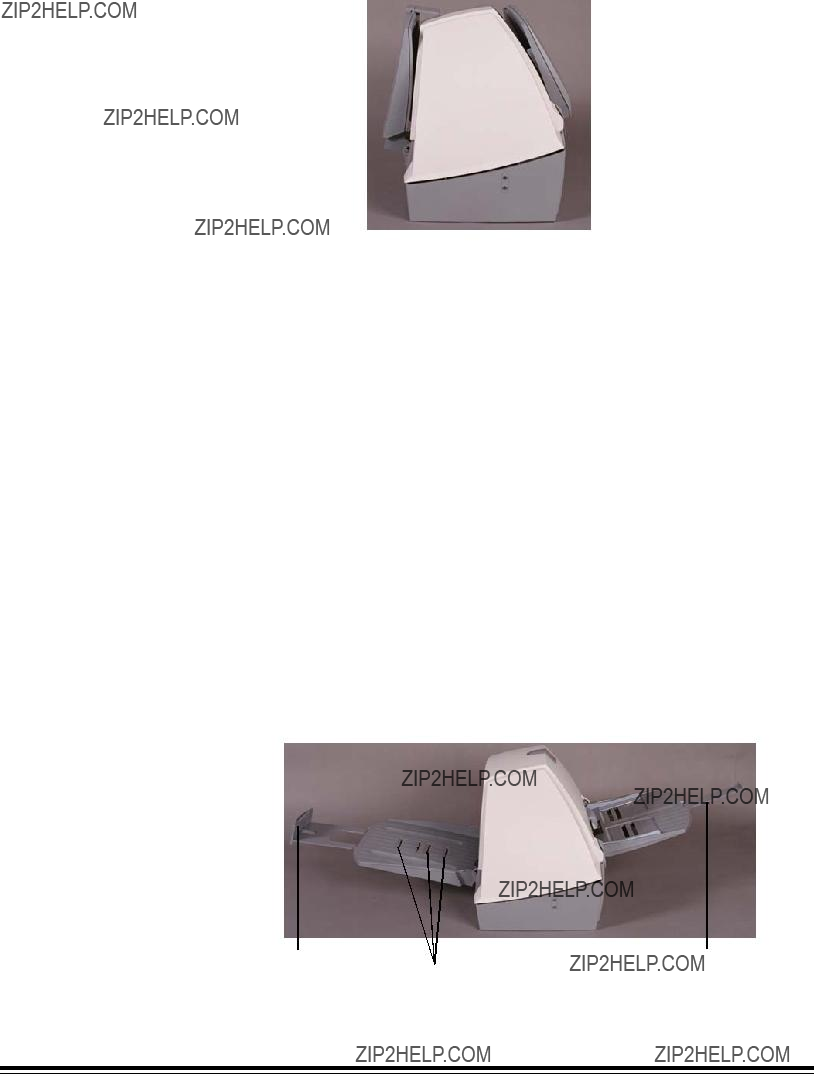
Input and output trays The input and output trays snap into place. They also may be adjusted to fit different document sizes. The input and output trays also may be folded flat up against the scanner to save space when the scanner is not in use.
Attaching the input tray 1. Locate the input tray slots (large holes) on the scanner.
2.Align the input tray pins with the slots.
3.Press the input tray until it snaps into place.
NOTE: Opening the scanner door may make it easier to see the slots and align and install the tray.
Attaching the output tray 1. Locate the output tray slots on the scanner.
2.Align the output tray pins with the slots.
3.Press the output tray until it snaps into place.
Tray extenders and side guides
???Both the input and output trays have extenders to accommodate long documents. Grasp the tray extender and pull it out to the desired position.
???The output tray has 3 document stops that can be raised to accommodate the collection of small documents after they have been scanned.
???The input tray has side guides that allow you to adjust the feeder to fit different document sizes. Grasp the side guides and slide them to the desired position.

Adjusting the output tray The adjustable output tray has three possible positions.
Closing the input and output trays
???Set the output tray to the lowest position when you are scanning long documents.
???Set the output tray to the middle position when you are scanning letter- or
???Set the output tray to the highest position with the first document stop raised when you are scanning checks.
???Use the highest position with the second document stop raised when you are scanning documents that are 14 cm (5.5 in.) long.
1.Grasp the tray on each side.
2.Lift up the tray and move it up or down to the desired position.
You can move the scanner trays out of the way when the scanner is not in use.
1.Grasp the input tray.
2.Lift up the input tray until it rests against the scanner front.
3.Grasp the output tray.
4.Lift up the output tray until it rests against the scanner back.
Using the Scanner
Starting and stopping scanning
Automatic feeding
Scanning is controlled by software developed for your application. To start and stop scanning, refer to the documentation provided with your software.
To scan a batch of documents, follow the guidelines for size, type, quantity, etc., in the Introduction section. For faster throughput, feed documents into the automatic document feeder (ADF) in landscape orientation (longer side as the leading edge).
IMPORTANT: Staples and paper clips in documents may damage the scanner. Remove all staples and paper clips before scanning.
1.Align the leading edges of the stacked documents.
2.Position the leading edge of the documents face down and centered in the ADF.
3.Adjust the document feeder guides.
4.Adjust the output tray position, if necessary.
5.Pull out the output tray extender, if necessary.
6.Start scanning.

Manual feeding
Follow the guidelines for document size, type, weight, quantity, etc., in the Introduction section. Position the leading edge of the document face down and centered in the ADF, then start scanning.
2. Position the sleeve face down, folded edge first, and centered in the ADF.
3.Lift the gap release lever, if necessary (this provides more clearance to ease document feeding).
Gap release lever
4. Start scanning.

Maintenance
Cleaning the scanner
The scanner will collect dust and other debris during routine scanning. For optimal scanner performance, follow the detailed cleaning instructions in this section and clean the feed module rollers, separator module rollers, imaging guides, transport area, and paper path at least once per week. Clean the scanner and paper path daily if you are scanning carbonless paper or newsprint.
Use only these cleaning materials:
IMPORTANT: Staticide Wipes contain isopropanol which can cause eye irritation and dry skin. Wash your hands with soap and water after performing maintenance procedures. Refer to the Material Data Safety Sheet (MSDS) for more information. The MSDS is available on the Kodak web site at www.kodak.com/go/MSDS.
The roller cleaning pad contains sodium lauryl ether sulfate and sodium silicate which can cause eye irritation. Refer to the MSDS for more information.
Allow all rollers to dry completely before using the scanner.
Use only
Do not use cleaners in confined areas, use with adequate ventilation.
Do not use cleaners on hot surfaces. Allow surfaces to cool to ambient temperature before use.
NOTES: The use of any other cleaning materials could damage your scanner. Use fresh cleaning material unless otherwise indicated.
In addition to the recommended cleaning supplies, you may use a vacuum cleaner to remove debris from the scanner.
Some debris from the rubber tires on the feed module and separator module is normal. Tire debris does not always mean that the tires are worn or damaged. After cleaning, inspect the tires for wear and replace the separator module or feed module if necessary.
To order cleaning supplies, refer to Appendix B, Supplies and Accessories.
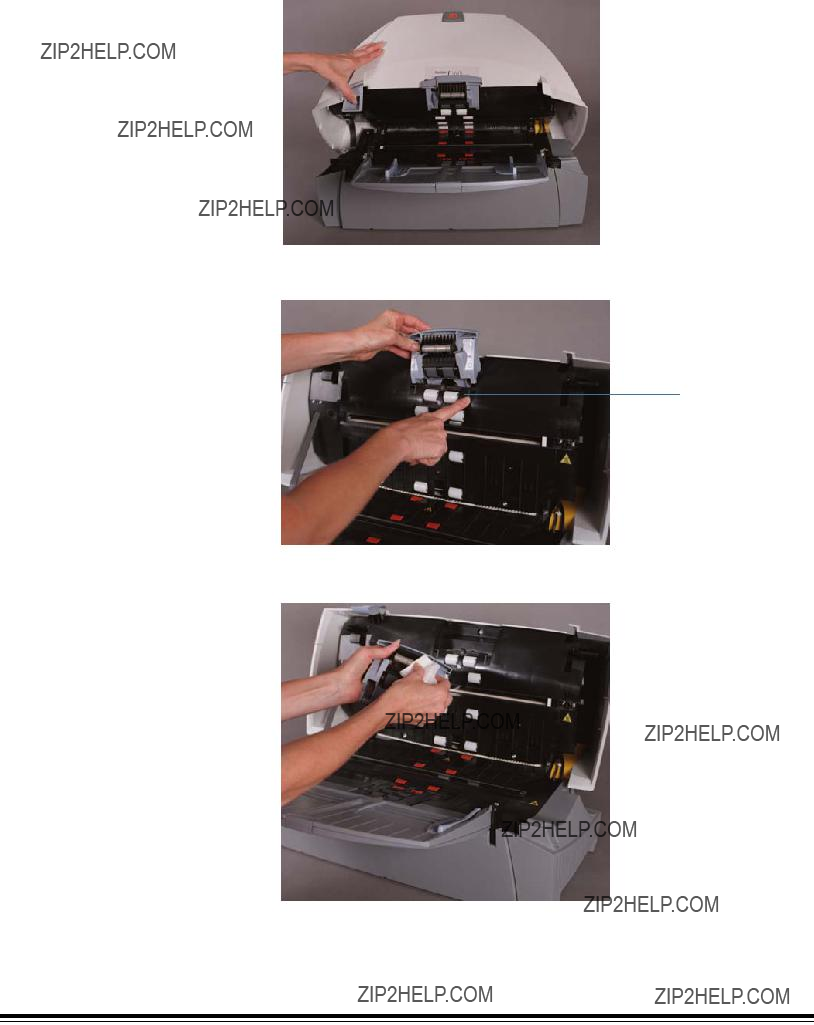
Cleaning the separator module
22
1.Power down the scanner.
2.Remove any documents from the feeder area.
3.Lift up the scanner door release to unlatch the scanner door.
4.Pull up to open the scanner door.
5. Remove the separator module by pulling it down and lifting it off.
Release separator module
6.Manually rotate and wipe the separator module rollers with a roller cleaning pad.
7.Inspect the rollers.
If the separator roller tires show signs of wear or damage, replace the tires or the separator module.
8.Insert the separator module and align the shaft ends.
9.Press until the separator module clicks into place.
10.Go to the next section to clean the feed module.
Cleaning the feed module 1. Push against the raised edge on the left side of the front drive roller cover to the side and pull the cover up and out to remove it.
Front roller cover
NOTE: You may need to lift the input tray slightly to remove the front roller cover.
2. Remove the feed module by pushing it to the right and lifting it out.
Feed module

3. Manually rotate and wipe the feed module rollers with a roller cleaning pad.
4.Inspect the feed module.
If the feed module tires show signs of wear or damage, replace the tires or the feed module.
5.Remove any dust or debris from the tray area under the feed module and the front roller cover.
6.Insert the feed module by aligning the pins and pushing it toward the right to fit it into position.
7.
8.Go to the next section to clean the drive rollers and transport area.
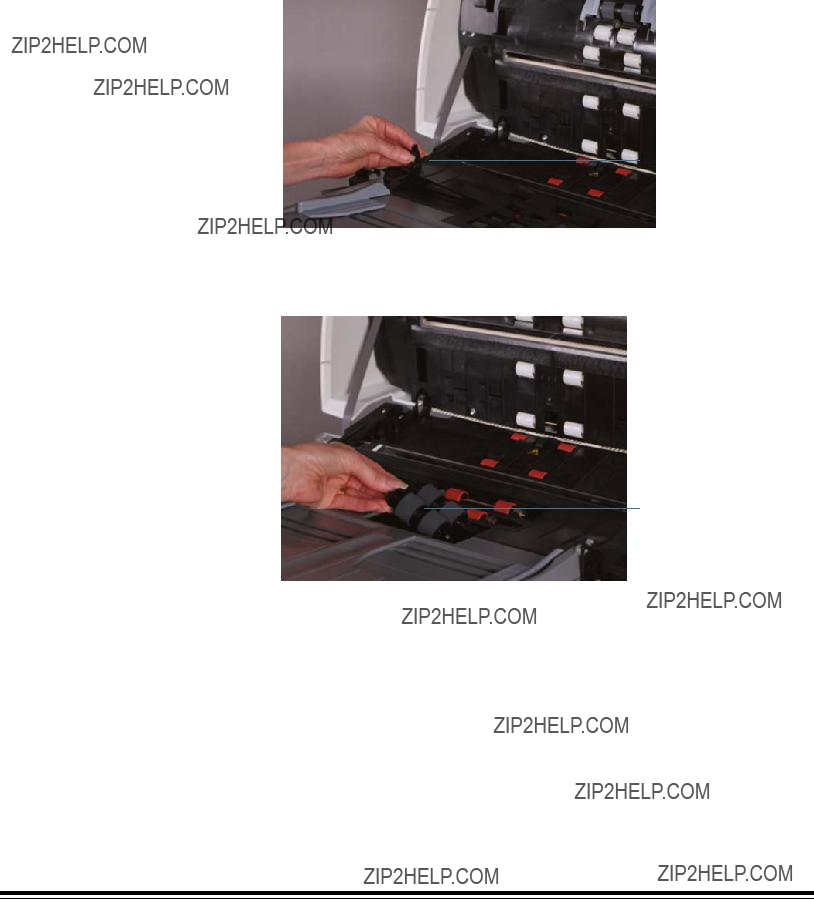
Cleaning the drive rollers 1. Manually rotate and wipe the drive rollers with a roller cleaning pad. and transport area
2. Clean any dust or debris in the slots around the drive rollers.
Cleaning the imaging guides
3. Wipe the upper and lower transport areas with a roller cleaning pad.
4.Dry the transport area with a dry Staticide Wipe.
5.Push against the raised edge on the left side of the rear roller cover and pull the cover up and out to remove it.
 Rear drive roller cover
6.Remove any dust or debris under the rear drive roller cover.
7.
8.Go to the next section to clean the imaging guides.
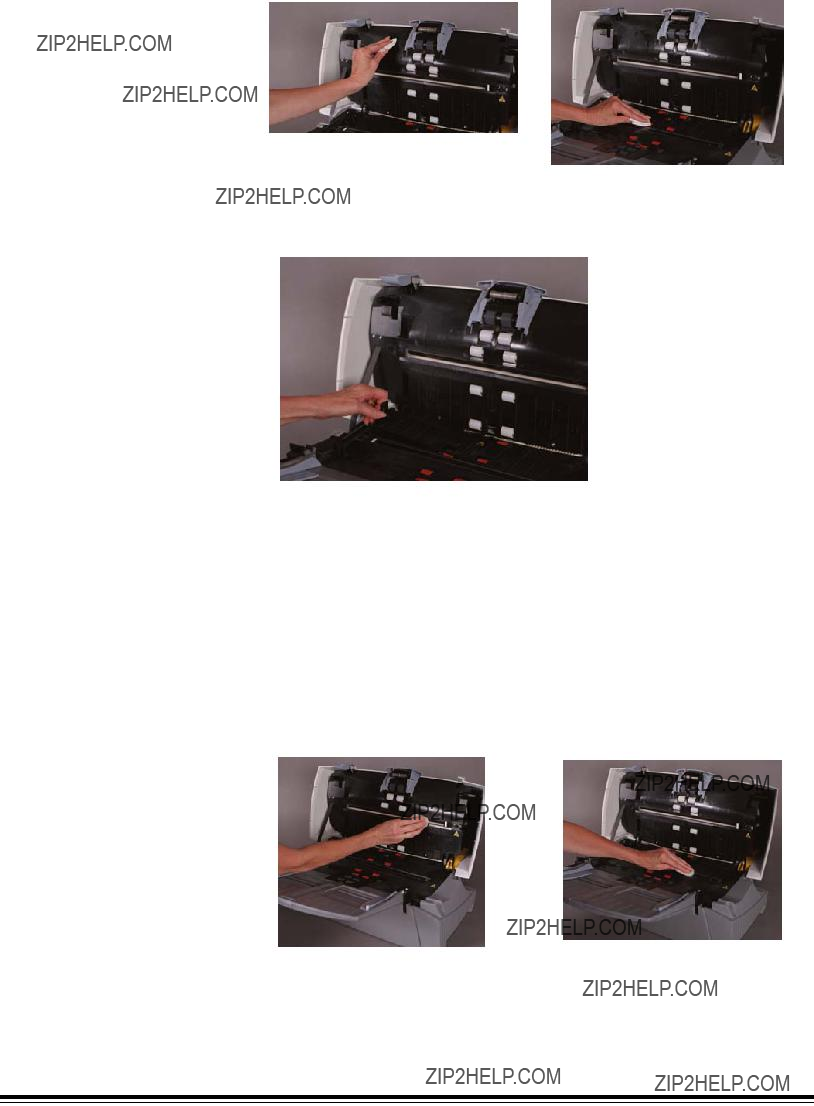
Clean the exposed (top side) surfaces of the imaging guides. You do not need to remove the imaging guides for cleaning unless there is dust or dirt on the underside of the imaging guide. If you need to remove the imaging guides, follow the instructions for ???Installing the Kodak Imaging Guide Set for i100 Series Scanners???.
1. Wipe the upper and lower imaging guides with a Staticide Wipe.
2.Dry the imaging guides with a dry Staticide Wipe.
3.Lower the scanner door and press it down firmly until it latches into place.
4.Go to the next section to clean the paper path.

The expected life of
??? Kodak Separator Module for i100 Series Scanners: 200,000 document pages
??? Kodak Feed Module for i100 Series Scanners: 500,000 document pages
??? Kodak Image Guides for i100 Series Scanners: replace when guides are scratched or damaged
NOTES: The composition of the roller materials was engineered to provide the ultimate in feeding reliability across the broadest range of document types, sizes, and thicknesses. Expected life figures are offered as guidelines for operations that follow the recommended scanner cleaning procedures in this section and that scan document types within the recommended paper types (refer to ???Preparing Documents for Scanning??? in the Introduction section).
Your experience may vary. Certain paper types (such as carbonless paper or newsprint), failure to clean regularly, and/or use of non- recommended cleaning solvents can shorten roller life.
To order replacement parts, refer to Appendix B, Supplies and Accessories.

Calibrating the scanner Calibration optimizes the optical system in your scanner in order to achieve the best overall quality of scanned images. Frequent calibration is not needed or recommended. Calibration instructions can be found in the Image Processing Guide for Kodak i100 Series Scanners. A copy of this guide (PDF file) can be found on the installation CD.
Troubleshooting
Indicator lights
There are two indicator lights ??? one red, one green ??? on the scanner that provides information about what the scanner is doing.
Red indicator
Green indicator
Green on ??? scanner is ready to scan Green flashing ??? scanner is busy
Red on ??? an error condition exists (refer to ???Problem solving??? in this section for help with some common error conditions)
Red and green on ??? scanner is powering up
After you power up the scanner, the red and green indicator lights will illuminate. After approximately one minute, both lights go out. When the green indicator light comes back on, the scanner is ready to begin scanning. However, the host computer may require several seconds to detect
the scanner.
Red ??? CPU not running code. The red indicator will go out after about 30 seconds. This indicator will always be off, unless you are downloading firmware or calibrating the scanner.
Green ??? the green indicator is on at all times.

Lamps
Clearing document jams
Adjusting the separator module tension
The scanner has a lamp saver feature to prolong lamp life. The lamps shut off after five minutes of scanner idle time.
1.Remove any documents from the feeder area.
2.Lift up the scanner door release to unlatch the scanner door.
3.Pull up to open the scanner door.
4.Locate the jammed document and remove it.
5.Lower the scanner door and press it down firmly until it latches into place.
Most documents will feed perfectly fine with the default separator module tension. However, there may be times when you are scanning documents that are lighter or heavier than normal. Two additional positions for the separator module spring allow you to adjust the tension to improve the scanning of these types of documents. The spring can be placed in one of the two channels or it can be released and left on the flat surface.
1.Power down the scanner.
2.Remove any documents from the feeder area.
3.Lift up the scanner door release to unlatch the scanner door.
4.Pull up to open the scanner door.
5.Remove the separator module by pulling it down and lifting it off.
6.Pull the spring gently into the position you want.
7.Insert the separator module and align the shaft ends.
8.Press until the separator module clicks into place.
9.Lower the scanner door and press it down firmly until it latches into place.

System is not responding
Color image quality
If the scanner and/or host computer are not responding, perform the following steps.
1.Power down the computer.
2.Power down the scanner.
3.Disconnect the
4.Power up the computer.
5.Power up the scanner.
After you power up the scanner, the red and green indicator lights will illuminate. After approximately one minute, both lights go out. When the green indicator light comes back on, the scanner is ready to begin scanning. However, the host computer may require several seconds to detect the scanner.
6.Wait until the scanner light is green and no longer in the
7.Attach the
8.Wait a few moments for the host computer???s operating system to recognize the scanner.
The scanner is now ready to use.
Color image quality is highly subjective. Here are some things to consider when scanning in color:
???The difference in the color outputs of scanners, printers, and monitors can affect the perception of the scanned document.
???Computer displays and printer output can vary from model to model, and from manufacturer to manufacturer. An image may be acceptable on one display and unacceptable on another.
???Area lighting (fluorescent, natural, incandescent) can affect color perception.
???The appearance of a colored area within an image can be perceived differently, based on what surrounds it.
???The characteristics and condition of a document can have an impact on color consistency.
???Color requirements may differ between environments (e.g., in a business document environment, images are generally viewed on a monitor, whereas in a ???print on demand??? environment, scanned images are printed).
To ensure that your scanner is delivering the best image:
???Clean the scanner. Contamination within the scanner degrades image quality. (Refer to the Maintenance section for cleaning information.)

Problem solving
Occasionally, you may experience a problem with your scanner. In many cases, you can easily fix the problem yourself. To perform suggested maintenance, refer to the Maintenance section. You may also need to check your scanning application.


Transporting the scanner
If it becomes necessary to transport the scanner after installation, you must repack the scanner using the original packaging materials. If you do not have the original packaging materials, contact your supplier.
1.Power down the computer.
2.Power down the scanner.
3.Disconnect the power cord from the back of the scanner.
4.Disconnect the
5.Place the foam end caps on each end of the scanner.
6.Place the scanner in the box.
7.Place the power cord and power supply in the box.
8.Tape down the input and output trays to secure them.
9.Close the box.
The scanner is now ready for moving.

Appendix A Specifications


Appendix B Supplies and Accessories
Contact your scanner supplier to order supplies.

EASTMAN KODAK COMPANY
Document Imaging
Rochester, New York 14650
Kodak and Ektamate are trademarks of Eastman Kodak Company.
Printed on recycled paper.
??Eastman Kodak Company, 2004
CAT No. 126 4951
DOCUMENT
I M A G I N G