??????DVD Logo??? is a trademark of DVD Format/Logo Licensing Corporation registered in the US, Japan and other countries.
???The ???AAC??? logo is a trademark of Dolby Laboratories.
???Microsoft and Windows Media are either registered trademarks or trademarks of Microsoft Corporation in the United States and/or other countries.
???Manufactured under license from Dolby Laboratories. Dolby and the double-D symbol are trademarks of Dolby Laboratories.
???Manufactured under license under U.S. Patent Nos: 5,956,674; 5,974,380; 6,487,535 & other U.S. and worldwide patents issued & pending. DTS, the Symbol, & DTS and the Symbol together are registered trademarks & DTS 2.0 Channel is a trademark of DTS, Inc. Product includes software. ?? DTS, Inc. All Rights Reserved.
??????Made for iPod,??? and ???Made for iPhone??? mean that an electronic accessory has been designed to connect specifically to iPod, or iPhone, respectively, and has been certified by the developer to meet Apple performance standards. Apple is not responsible for the operation of this device or its compliance with safety and regulatory standards. Please note that the use of this accessory with iPod or iPhone may affect wireless performance.
iPhone, iPod, iPod classic, iPod nano, and iPod touch are trademarks of Apple Inc., registered in the U.S. and other countries.
???iTunes is a trademark of Apple Inc.
???DivX??, DivX Certified?? and associated logos are trademarks of Rovi Corporation or its subsidiaries and are used under license.
ABOUT DIVX VIDEO: DivX?? is a digital video format created by DivX, LLC, a subsidiary of Rovi Corporation. This is an official DivX Certified?? device that plays DivX video. Visit divx.com for more information and software tools to convert your files into DivX videos.
ABOUT DIVX VIDEO-ON-DEMAND: This DivX Certified?? device must be registered in order to play purchased DivX Video-on-Demand (VOD) movies. To obtain your registration code, locate the DivX VOD section in your device setup menu. Go to vod.divx.com for more information on how to complete your registration.
???This item incorporates copy protection technology that is protected by U.S. patents and other intellectual property rights of Rovi Corporation. Reverse engineering and disassembly are prohibited.
???Pandora, the Pandora logo, and the Pandora trade dress are trademarks or registered trademarks of Pandora Media, Inc., used with permission.
???Sirius, XM and all related marks and logos are trademarks of Sirius XM Radio Inc. All rights reserved.
???Android is a trademark of Google Inc.
???BlackBerry??, RIM??, Research In Motion?? and related trademarks, names and logos are the property of Research In Motion Limited and are registered and/or used in the U.S. and countries around the world. Used under license from Research In Motion Limited.


 Familiarity with installation and operation procedures will help you obtain the best performance from your new DVD Receiver.
 English
 WARNINGS:
 Cautions on the monitor:
 How to reset your unit


 CAUTION
 English


 English


 (down) button (
 (up) button (
 MENU button
 English


 English


 English

 ] to return to the previous screen.

 English


 ??? appears on the screen, the unit cannot accept the operation you have tried to do.
 ,??? operations will not be accepted.
 English


 English
 Playing time
 Track/file information
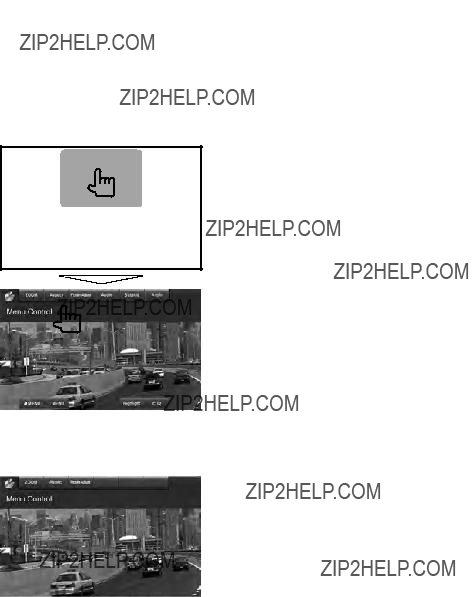
 Video menu operations
 English
 Selecting playback mode

 English
 Connecting a USB device

 picture is shown if the file has the tag data including the
 Playing time
 Track/file information (for MP3/WMA/WAV/ AAC)

 ] [
] [ ] Selects a folder.
 <USB Mode> settings
 English
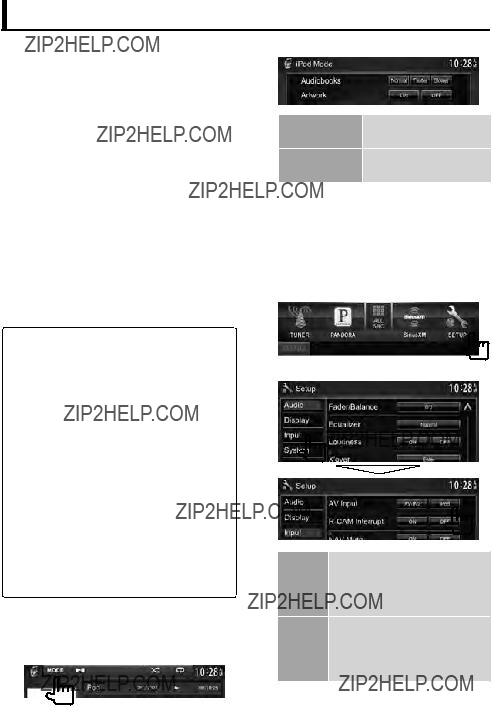
 Preparation

 is shown if the
 ] Selects Repeat playback mode.*
 English
 ) and video (
 )
)

 Text information
 English
 Selecting a preset station
 Storing stations in memory

 Searching for FM RBDS
  Activating/deactivating TI
 English
 if the current station is preset)/
 Text information

 Radio activation
 English
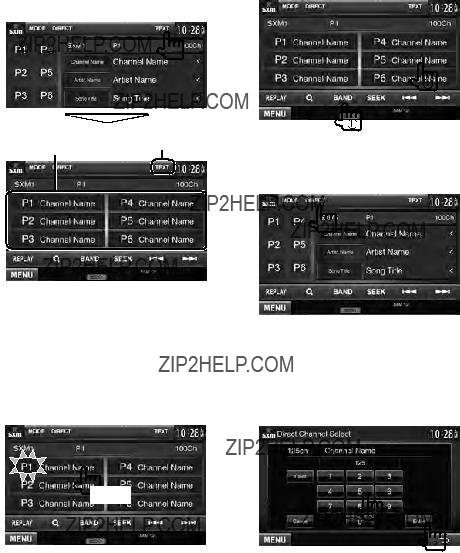
 Changing the display information
 Storing channels in memory
 Selecting a preset channel
 Selecting a channel directly

 Displaying information on channels
 English
 Using the Replay function

 Setting the reception restrictions
 English


 available from the
 English


 English


 To view the navigation screen
 Settings for navigation unit
 English
 Storing your own adjustment

 English


 ] Magnifies the scene. (<
 English


 English
 Displaying the picture from the rear view camera

 English
 English

 English


 Registering a new Bluetooth device
 English
 Connecting a registered Bluetooth device
 Deleting a registered Bluetooth device

 Displaying the <Bluetooth Setup> screen
 <Bluetooth Setup> menu items
 English
 Ending a call
 /
/  (for DDX790/DDX770/ DDX7070BT) or VOL/ATT/AUD knob (for DDX470/DDX4070BT) on the monitor panel.
 Switching between handsfree mode and phone mode
 : handsfree mode /
  : phone mode).
 Notifying SMS reception

 Making a call
 English

 Presetting the phone numbers
 Copying the phonebook
 English
 Deleting the phone number entries in the unit

 English
 Playing time*

 CAUTION
 English


 English


 or
or 
 or
or 
 English
 Caution on cleaning the unit
 Moisture condensation
 To keep discs clean
 To play new discs
 How to handle discs

 File playback
 English
 Sound signals emitted through the rear terminals
 Language codes (for DVD/DivX language selection)

 If the following messages appear
 English


 If there seems to be a problem
 English


 English
 WARNING

 English
 Accessory
 White
White 
 Gray
Gray 
 Green
Green 
 Purple

 Battery

 English
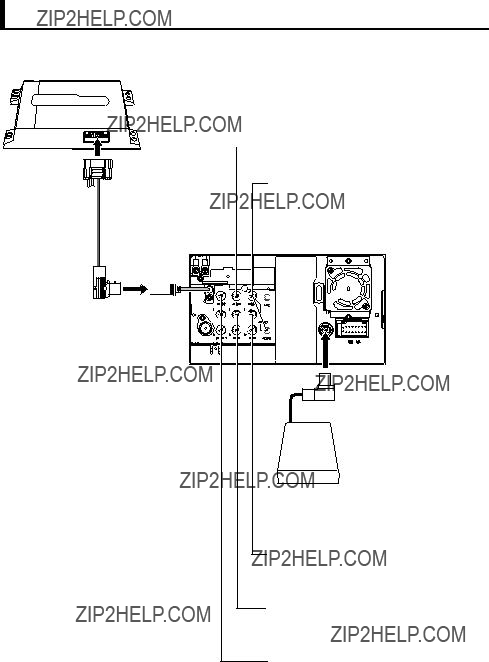
 Rear View Camera Input

 English


 1 A
1 A English

 English
 CAUTION

 CAUTION
 English