Owner's Manual
??
Vacuum Cleaner
Model116.32734
116.32735
_N
CAUTION:
Read and follow all
safety and operating instructions before first
use of this product??
Sears, Roebuck and Co., Hoffman Estates, IL 60179 U.S.A.
www.sears.com
Owner's Manual
??
Vacuum Cleaner
Model116.32734
116.32735
_N
CAUTION:
Read and follow all
safety and operating instructions before first
use of this product??
Sears, Roebuck and Co., Hoffman Estates, IL 60179 U.S.A.
www.sears.com
Please read this guide,. It will help you assemble and operate your new Kenmore vacuum in the safest and most effective way.
For more information about vacuum cleaner care and operation, call your nearest Sears store. You wild need the complete model and serial numbers when requesting information.Your vacu- um'smodel and serial numbers are located on the Model and Serial Number Plate.
Use the space below to record the model number and serial number of your new Kenmore vacu um.
Model Nee
Serial No_
Date of Purchase
Keep this book and your sales check (receipt) in a safe place for future reference-
.CUUMCLEANER
LIMITED ONEYEARWARRANTY ON KENMOREVACUUM CLEANER
This warranty is for one year from the date of purchase, and includes only private household vacuum cleaner use. During the warranty year, when this vacuum cleaner is operated and maintained according to the owner's manual instructions, Sears will repair any defects in material or workmanship free of charge??
This warranty excludes vacuum bags, belts, light bulbs, and filters, which are expendable parts and become worn during normal use??
For warranty service, return this vacuum cleaner to the nearest Sears Service Center in the United States,
This warranty applies only while this product is in use in the United States. This warranty gives you specific legal rights, and you may also have other rights which vary from state to state??
Sears, Roebuck and Co., D/817 WA, Hoffman Estates, IL 60179
2
WARNING
Your safety is important to us, To reduce to persons or damage when using your cautions including the following:
Read this manual before assembling or using your vacuum cleaner.
Use your cleaner only as described in
this manual?? Use only with Sears recom- mended attachments.
To reduce the risk of electrical shock - Do not use outdoors or on wet surfaces.
Disconnect electrical supply before any servicing or cleaning. Failure to do so
could result in electrical shock or person- al injury
Always turn cleaner off before unplug- ging.
Do not unplug by pulling on cord. To unplug, grasp the plug, not the cord??
Do not use with damaged cord or plug. If cleaner is not working as it should, has been dropped, damaged, left outdoors,
or dropped into water, return it to a Sears Service Center.
Do not pull or carry by cord, use cord as a handle, close door on cord, or pull
cord around sharp edges or corners. Do not run cleaner over cord, Keep cord away from heated surfaces,
Do not leave cleaner when plugged in. Unplug from outlet when not in use and before servicing.
Do not allow to be used as a toy, Close
attention is necessary when used by or near children.
Do not handle plug or cleaner with wet hands.
the risk of fire, electrical shock, injury
vacuum cleaner, follow basic safety pre-
Do not put any objects into openings. Do not use with any opening blocked; keep free of dust, lint, hair and anything that may reduce air flown
Keep hair, loose clothing, fingers, and all parts of body away from openings and moving parts.
Do not use cleaner without dust bin and/or filters in place,
Always clean the dust bin after vacuum- ing carpet cleaners or freshener, pow- ders and fine dust. These products clog the filters, reduce airflow and can cause damage to the cleaner. Failure to clean the dust bin could cause permanent damage to the cleaner.
Do not use the cleaner to pick up sharp hard objects, small toys, pins, paper
clips, etc, They may damage the cleaner or dust bin.
Do not pick up anything that is burning
or smoking, such as cigarettes, matches, or hot ashes??
Do not use cleaner to pick up flammable or combustible liquids (gasoline, cleaning fluids, perfumes, etc.), or use in areas where they may be present. The fumes from these substances can create a fire hazard or explosion.
Use extra care when cleaning on stairs. Do not put on chairs, tables, etc. Keep on floor.
You are responsible for making sure that your vacuum cleaner is not used by any- one unable to operate it properly.
SAVE THESE NSTRUCTIONS
Proper assembly and safe use of your vacuum cleaner are your responsibilities??Your cleaner is intended only for household use Read thisOwner'sManual carefully for impodant use and safety infermation.This guide contains safety statements under warning and caution symbols.. Please pay special attention to these boxes and foItow any instructions given, WARNING statements alert you to such dangers as fire,electrical shock, burns and personal injury.CAUTION statements alert you to such dangers as personal injury and/or property damage.

Selector Window
It is important to know your vacuum cleaner's parts and features to assure its proper and safe use, Review these before using your cleanerr
Power
Lower
Hook
Combination.
Brush
Latch
Dust Bin
Nozzle
i
Protector
BONUS HOSE KITS
Bonus Hose
Electrical Shock Hazard
Do not plug into the electrical sup- ply until the assembly is complete?? Failure to do so could result in elec- trical shock or injury.
Before assembling vacuum, check the PACKING LIST on the cover of the separate Repair Parts List, Use this list to verify that you have received all the components of your new Kenmore vacuum??
Remove shipping tape from dust bin latch, and belt cover_
HANDLE ASSEMBLY
Remove the two (2) handle screws located in the body
Position the handle as shown in the illustra-
Handle
Screw
t
CAUTION
Do not overtightem
Overtightening could strip the screw holes,
Do not operate the cleaner with-
out the screws in place.
CORD ASSEMBLY
Make sure the quick release upper cord hook is in the upright position. Remove the wire tie from the power cord,
Make sure the power cord is placed into the lock- ing notch on the body as shown, This
helps keep the
power cord out from Power under the vacuum
cleaner agitator,
Quick Release
Lower
Hook
Wrap the power cord around the upper and lower cord hooks and lock the power cord plug onto the power cord.
tion below
When installing the handle, firmly press the handle onto the body. Secure with handle screws provided??
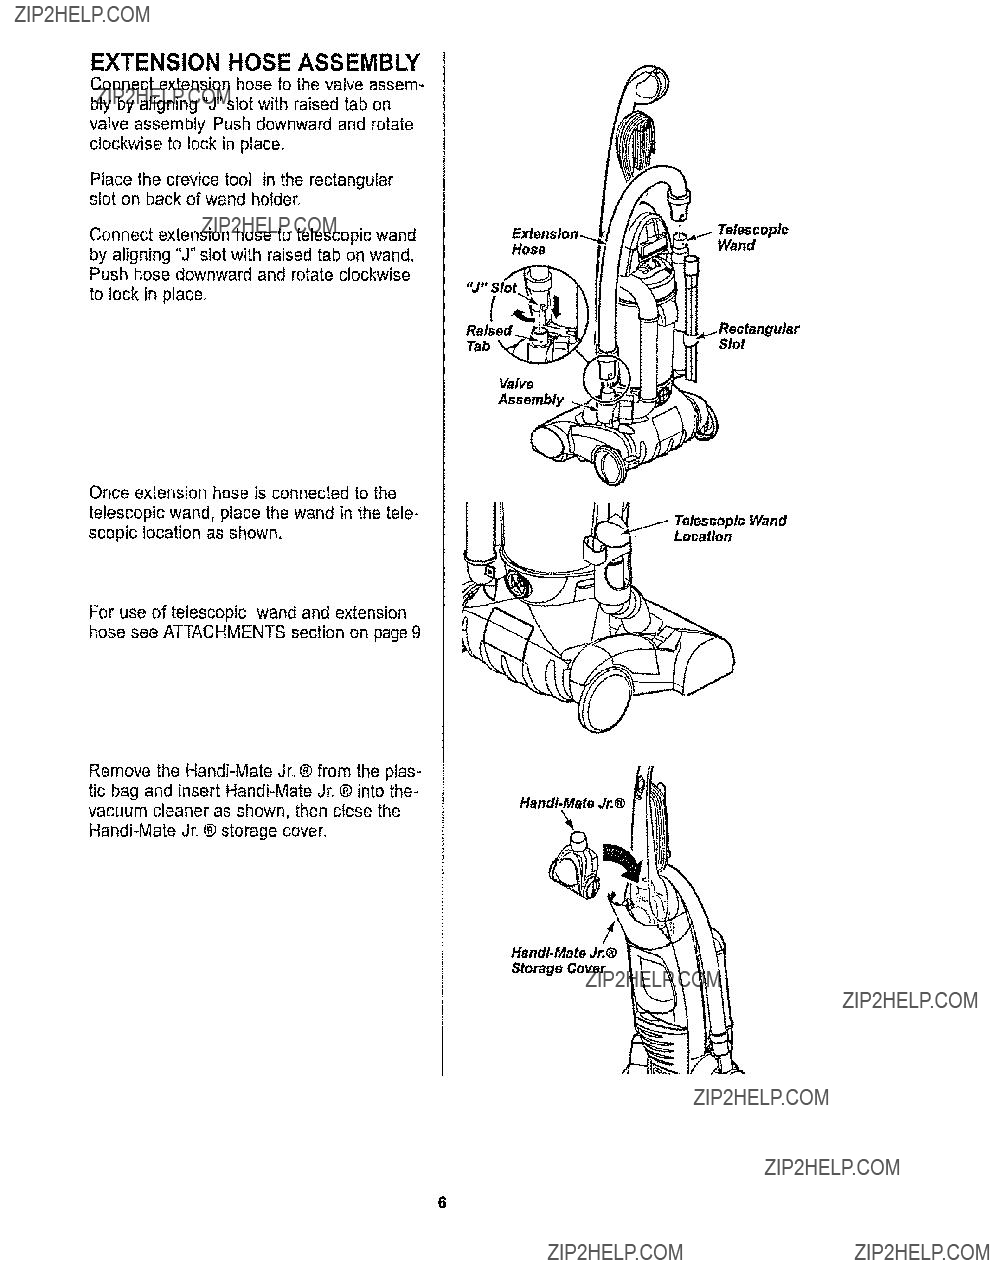
EXTENSION HOSE ASSEMBLY
Connect extension hose to the valve assem- bly by aligning "J" slot with raised tab on valve assembly,, Push downward and rotate clockwise to lock in place.
Place the crevice tool in the rectangular slot on back of wand holder,
Connect extension hose to telescopic wand by aligning "J" slot with raised tab on wand. Push hose downward and rotate clockwise to lock in placer
Once extension hose is connected to the telescopic wand, place the wand in the tele- scopic location as shown.
For use of telescopic wand and extension hose see ATTACHMENTS section on page 9
Remove the
Wand
LocaHon
Hand#Mete Jr.??
HandI.Mata Jr.??
Storage Cover
OPERATING INSTRUCTIONS
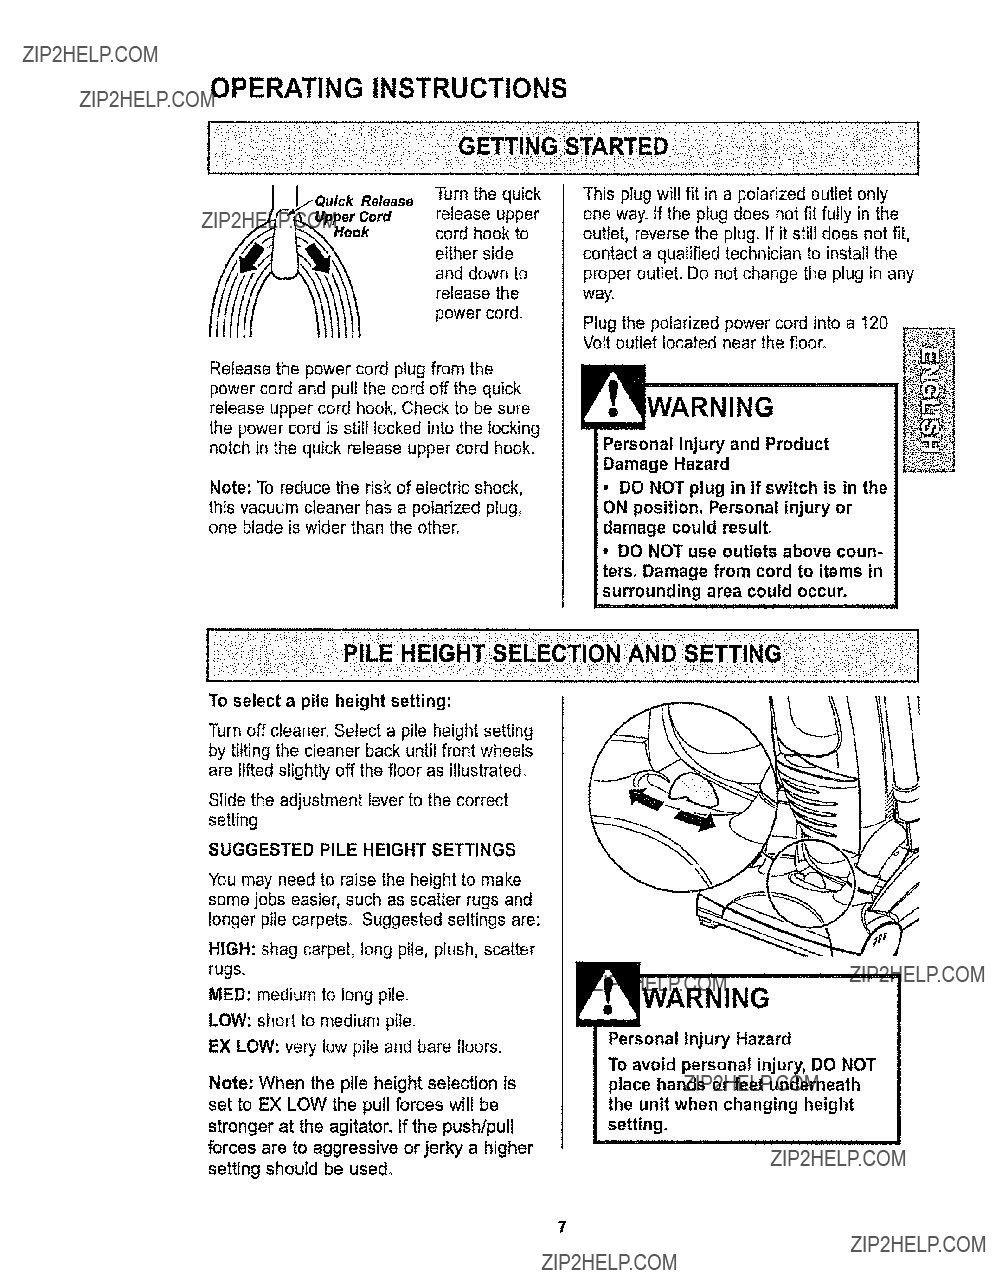
Qulck Release Turn the quick per Cord release upper
This plug will fit in a polarized outlet only one way. If the plug does not fit fully in the
k
cord hook to either side and down to
release the
power cord.
outiet, reverse the plug. If it still does not fit, contact a qualified technician to install the proper outlet. Do not change the plug in any way,.
Plug the polarized power cord into a 120 Volt outlet located near the floor,
Release the power cord plug from the power cord and pull the cord off the quick release upper cord hook. Check to be sure the power cord is still locked into the locking notch in the quick release upper cord hook.
Note: To reduce the risk of electric shock, this vacuum cleaner has a polarized plug, one blade is wider than the other,
Personal Injury and Product
Damage Hazard
DO NOT plug in if switch is in the ON position. Personal injury or damage could result.
??? DO NOT use outlets above coun- ters, Damage from cord to items in surrounding area could occur.
1"o select a pile height setting:
Turn off cleaner. Select a pile height setting by tilting the cleaner back until front wheels are lifted slightly off the floor as illustrated.
Slide the adjustment lever to the correct setting??
SUGGESTED PILE HEIGHT SETTINGS
You may need to raise the height to make some jobs easier, such as scatter rugs and longer pile carpets Suggested settings are:
HIGH: shag carpet, long pile, plush, scatter rugs.
MED: medium to long pile.
LOW: short to medium pile.
EX LOW: very low pile and bare floors.
Note: When the pile height selection is set to EX LOW the pull forces will be stronger at the agitator, If the push/pull forces are to aggressive or jerky a higher setting should be used,
WARNING
Personal Injury Hazard
To avoid personal injury, DO NOT place hands or feet underneath the unit when changing height setting.
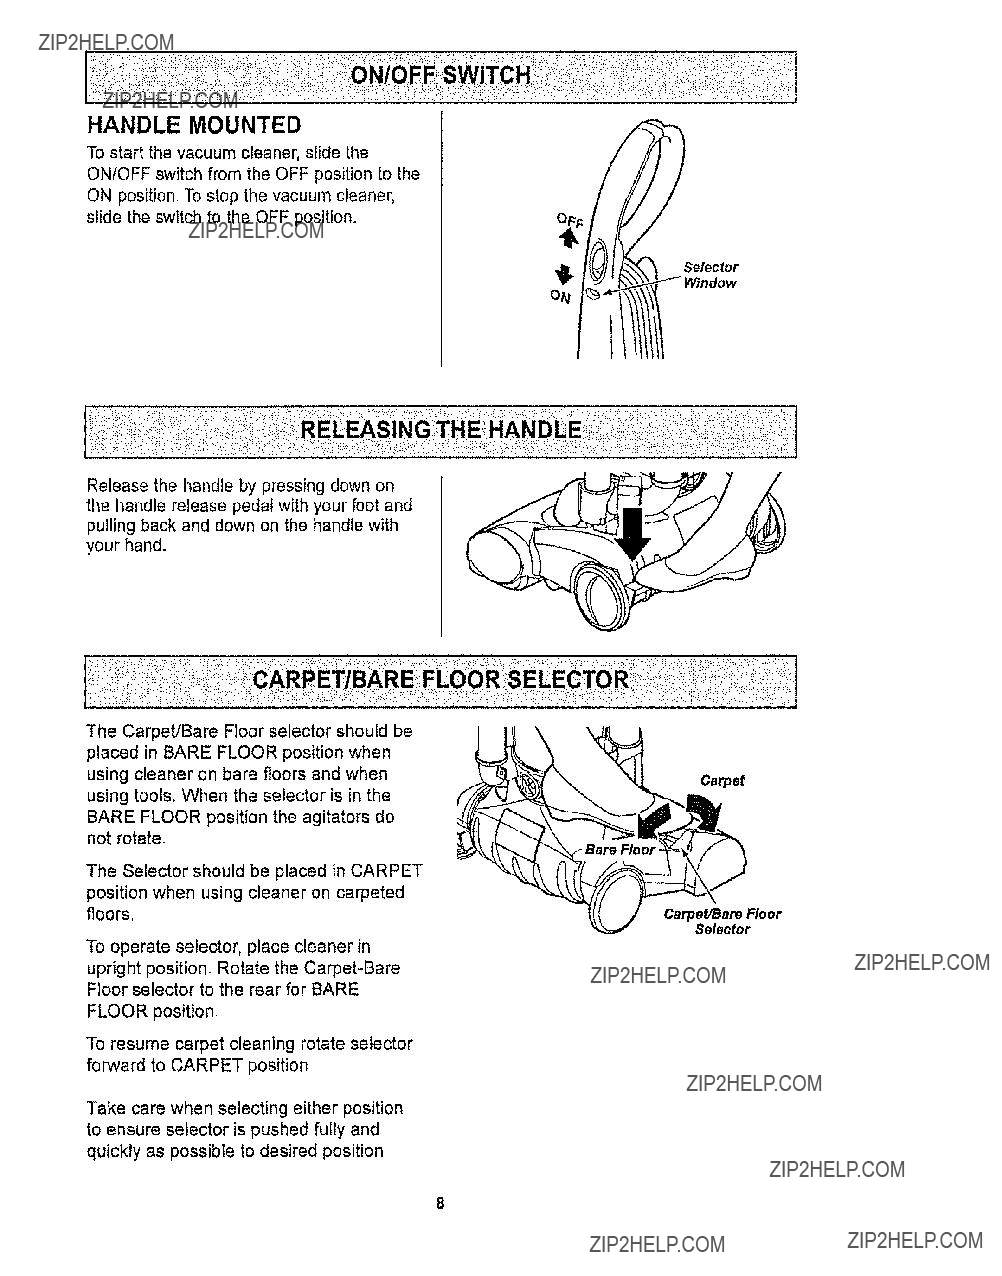
HANDLE MOUNTED
To start the vacuum cleaner, slide the ON/OFF switch from the OFF position to the ON position. To stop the vacuum cleaner, slide the switch to the OFF position.
Release the handle by pressing down on the handle release pedal with your foot and pulling back and down on the handle with your hand_
The Carpet/Bare Floor selector should be placed in BARE FLOOR position when using cleaner on bare floors and when using tools. When the selector is in the BARE FLOOR position the agitators do not rotate.
The Selector should be placed in CARPET position when using cleaner on carpeted floors.
To operate selector, place cleaner in upright position?? Rotate the
FLOOR position,
To resume carpet cleaning rotate selector forward to CARPET position
I_J l _._.'_ Selector
Carpet
Carpet/Bare Floor
Selector
Take care when selecting either position to ensure selector is pushed fully and quickly as possible to desired position

HandI.MataJr,??
CombinationExtension
Brush'__h_,_i_=_]/Telescoplc
/Wand
Identify each of the attachments shown above,
Remove the upper end of the hose that is attached to the telescopic wand by grasping the hose collar, twisting and pulling straight out. The attachments can now be added to the hose.
Note: The motor protector may open when using attachments or when cleaning new carpet, due to reduced airflow by the attachments themselves or by new carpet fuzz filling the dust bin quickly. See the TROUBLESHOOTING section.
Note: When using attachments make sure the cleaner is in the upright position and the Carpet/Bare Floor selector is in the Bare Floor position.
Electrical Shock And Personal Injury
Hazard
Disconnect electrical supply before
servicing or cleaning the unit, Failure to do so could result in electrical
shock or personal injury from cleaner suddenly starting,
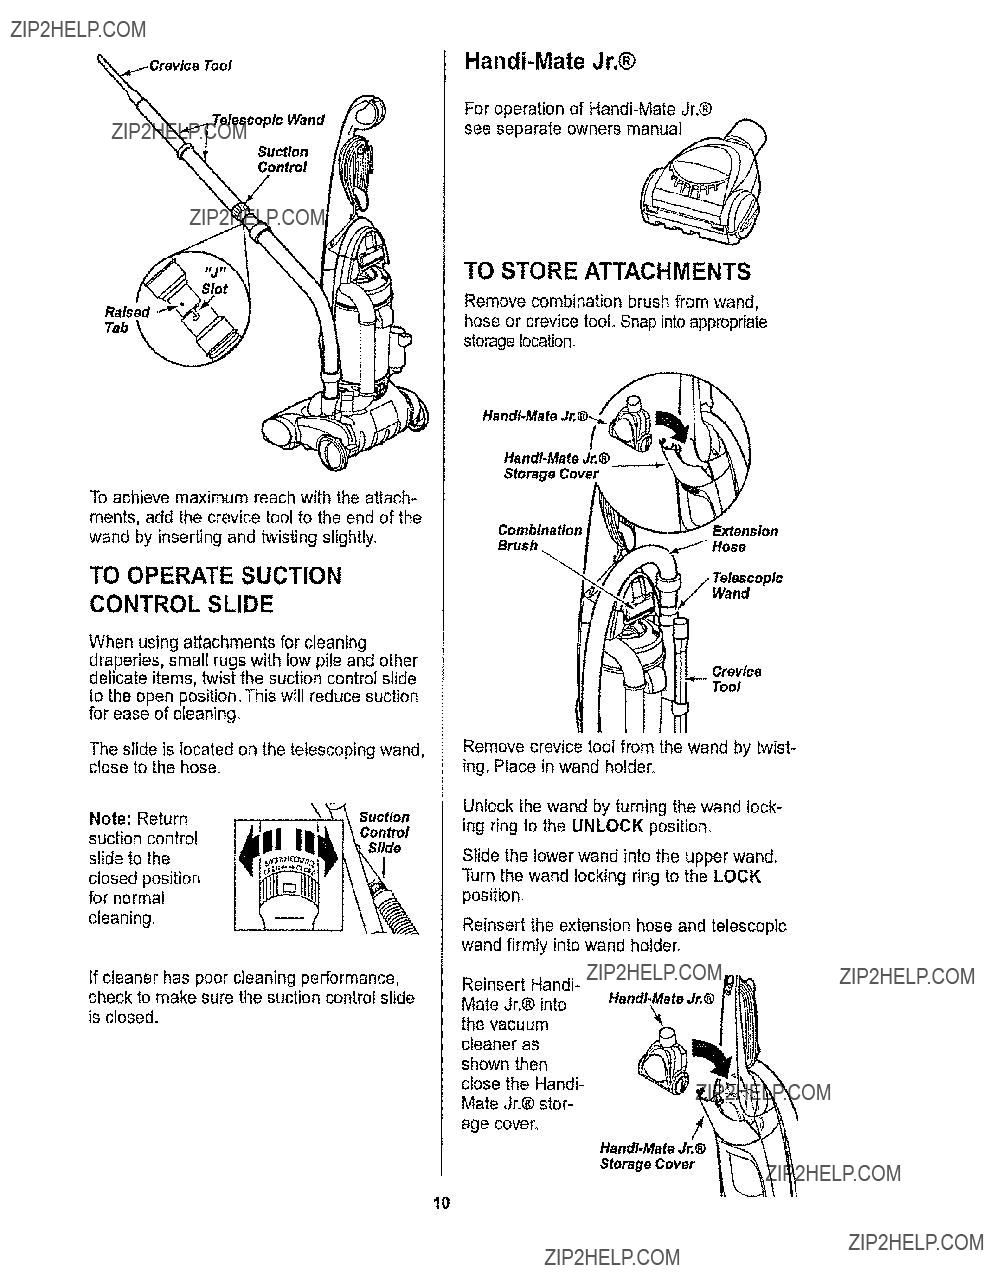
TELESCOPING WAND WITH
SUCTION CONTROL SLIDE
Remove the
telescoping wand from
its storage
/Telescopic Wand position ...........
by twist.............
ing and _
On the telescopic wand turn the lockingring clockwise to the UNLOCK position.
Suction
Wand _
Upper
Wand
Extend the wand to its futl length. Turn the locking ring
Remove the crevice tool from its storage
position on the wand holder Attach crevice tool to the extension wand??
CAUTION
When using attachments, be careful not to overextend the stretch hose
when reaching. Trying to reach beyond the hose stretch capability could cause the cleaner to tip over..
Tool
Telescopic Wand
Suction
Control
Raised
Tab
For operation of
TO STORE ATTACHMENTS
Remove combination brush from wand, hose or crevice tool. Snap into appropriate storage location
f
HandI.Mate Jr.??
Storage Cover
To achieve maximum reach with the attach- ments, add the crevice tool to the end of the wand by inserting and twisting slightly??
TO OPERATE SUCTION
CONTROL SLIDE
When using attachments for cleaning draperies, small rugs with low pile and other delicate items, twist the suction control slide to the open position. This will reduce suction for ease of cleaning.
Comblnatlo, [/
Brush
Extension
Wand
Crevice
Tool
The slide is located on the telescoping wand, close to the hose.
If cleaner has poor cleaning performance, check to make sure the suction control slide is closed??
Remove crevice tool from the wand by twist- ing. Place in wand holder.
Unlock the wand by turning the wand lock- ing ring to the UNLOCK position.
Slide the lower wand into the upper wand. Turn the wand locking ring to the LOCK position,
Reinsert the extension hose and telescopic wand firmly into wand holder.
Reinsert Handi-
Mate Jr,?? into HandI.Mate Jr.?? the vacuum
cleaner as shown then close the Handi- Mate ,Jr.?? stor- age cover.
HandI.Male Jr.??
Storage Cover
10
BONUS HOSE
hsert the two tabs on the end of the
extension hose into the two "J" shaped slots on the unit hose and twist to connect,
All attachments and the telescoping wand
can be attached to the open end of the hose.
ATTACHMENT
Furniture*
CREVICE TOOL _X
COMBINATION BRUSH
X
X *Always clean attachments before using on fabrics.
Carpet edges
Guide either side or the front of the nozzle along a baseboard, The full width agitator brushes help remove dirt at carpet edges_
Stairs
Put handle in full upright position?? Place pile height adjustment to HIGH when using attachments to prevent possible floor dam- age. Use the crevice tool or combo brush.
Note: When using attachments make sure the cleaner is in the upright position and the Carpet/Bare Floor selector is in the Bare Floor position,
Personal Injury Hazard
Do not place cleaner on stairs. If it falls, personal injury or property dam,- age could result.
i
When using the extension hose or
with the bonus hose attached, the cleaner should be on a solid surface on the same level or below the level of the user's feet, DO NOT use the hoses when the cleaner is above the level of the user's feet,
For best cleaning results, keep the airflow passage clear.
Occasionally, check each of the areas indi,- cated for c!ogs. (see page 18)
11
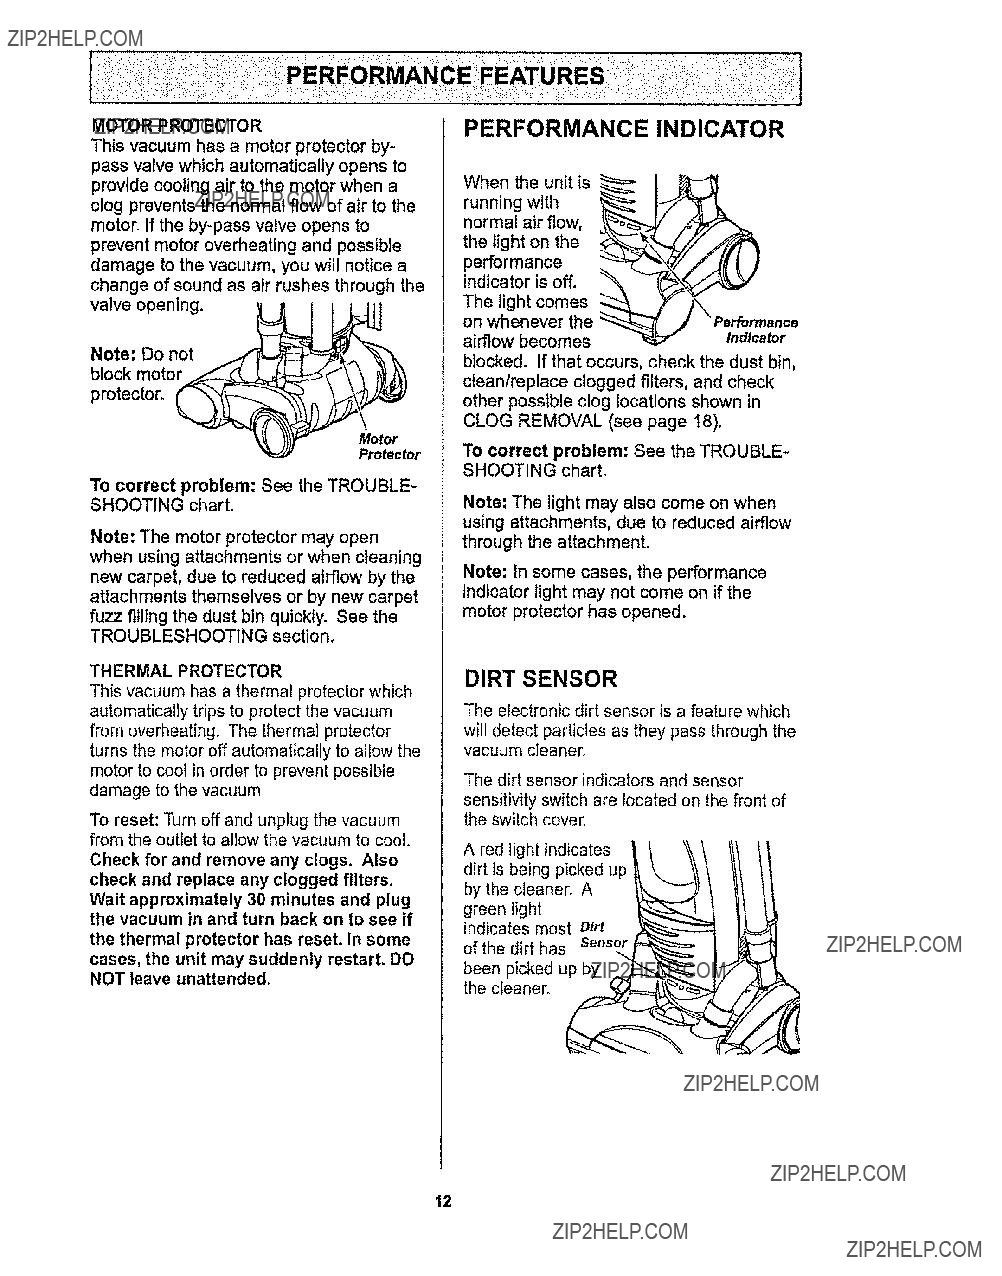
MOTOR PROTECTOR
This vacuum has a motor protector by- pass valve which automatically opens to provide cooling air to the motor when a clog prevents the normal flow of air to the motor. If the
Note: Do not
block motor
protector,
Motor
Protector
To correct problem: See the TROUBLE- SHOOTING chart.
Note: The motor protector may open when using attachments or when cleaning new carpet, due to reduced airflow by the
attachments themselves or by new carpet
fuzz filling the dust bin quickly. See the
TROUBLESHOOTING section.
THERMAL PROTECTOR
This vacuum has a thermal protector which automatically trips to protect the vacuum from overheating. The thermal protector turns the motor off automatically to allow the motor to cool in order to prevent possible damage to the vacuum,
To reset: Turn off and unplug the vacuum from the outlet to allow the vacuum to cool
Check for and remove any clogs, Also check and replace any clogged filters, Wait approximately 30 minutes and plug the vacuum in and turn back on to see if the thermal protector has reset. In some
cases, the unit may suddenly restart. DO NOT leave unattended.
When the unit is
blocked, if that occurs, check the dust bin, clean/replace clogged filters, and check other possible clog locations shown in CLOG REMOVAL (see page 18).
To correct problem: See the TROUBLE- SHOOTING chart.
Note: The light may also come on when using attachments, due to reduced airflow through the attachment.
Note: In some cases, the performance indicator light may not come on if the motor protector has opened.
DIRT SENSOR
The electronic dirt sensor is a feature which
will detect particles as they pass through the vacuum cleanen
The dirt sensor indicators and sensor sensitivity switch are located on the front of the switch cover,
the cteanen
12
OPERATION
As you vacuum, the red indicator light will come on and stay on as long as the sensor detects a high concentration of particles passing through the cleaner.
The green light indicatesthat most of the cleaning is complete_
The sensor switch allows you to select the sensitivity of the dirt sensor_ The switch can be set to HI (+) or LO
Set the sensor switch to the H1(+) position when:
???Cleaning bare floors,
???Cleaning carpet with low pile heighL
Set the sensor switch to the LO
???Cleaning heavily soiled areas_
???Cleaning carpet with deep pile.
???Cleaning new carpets.
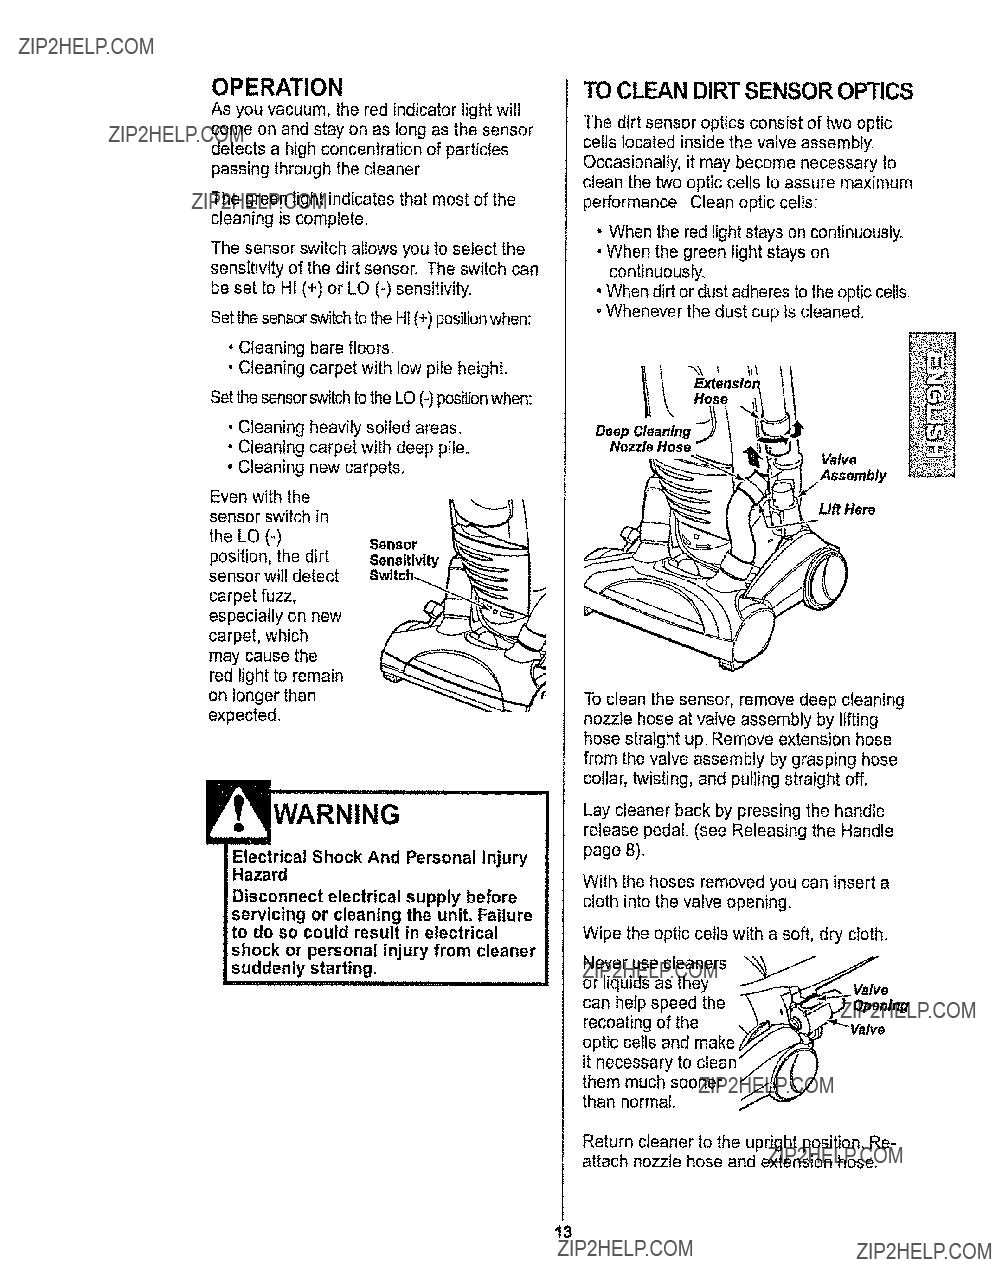
TO CLEAN DIRT SENSOR OPTICS
The dirt sensor optics consist of two optic cells located inside the valve assembly. Occasionally, it may become necessary to clean the two optic cells to assure maximum performance Clean optic cells:
, When the red light stays on continuously.
???When the green tight stays on continuously.
???When dirt or dust adheres to the optic ceils.
???Whenever the dust cup is cleaned.
\9
Hose
Deep Cleaning
Nozzle Hose
Valve
Assembly
Even with the sensor switch in the LO
may cause the red light to remain on longer than expected.
Ssrleor
Sensitivity ,_
Swltch_
Llft Hem
To clean the sensor, remove deep cleaning nozzle hose at valve assembly by lifting hose straight up_ Remove extension hose from the valve assembly by grasping hose collar, twisting, and pulling straight off.
WARNING
Electrical Shock And Personal Injury
Hazard
Disconnect electrical supply before
servicing or cleaning the unit. Failure to do so could result in electrical
shock or personal injury from cleaner suddenly starting.
Lay cleaner back by pressing the handle release pedal (see Releasing the Handle page 8)_
With the hoses removed you can insert a cloth into the valve opening.
Wipe the optic ceils with a soft, dry cloth..
than normal??
Return cleaner to the upright position. Re- attach nozzle hose and extension hose.
13
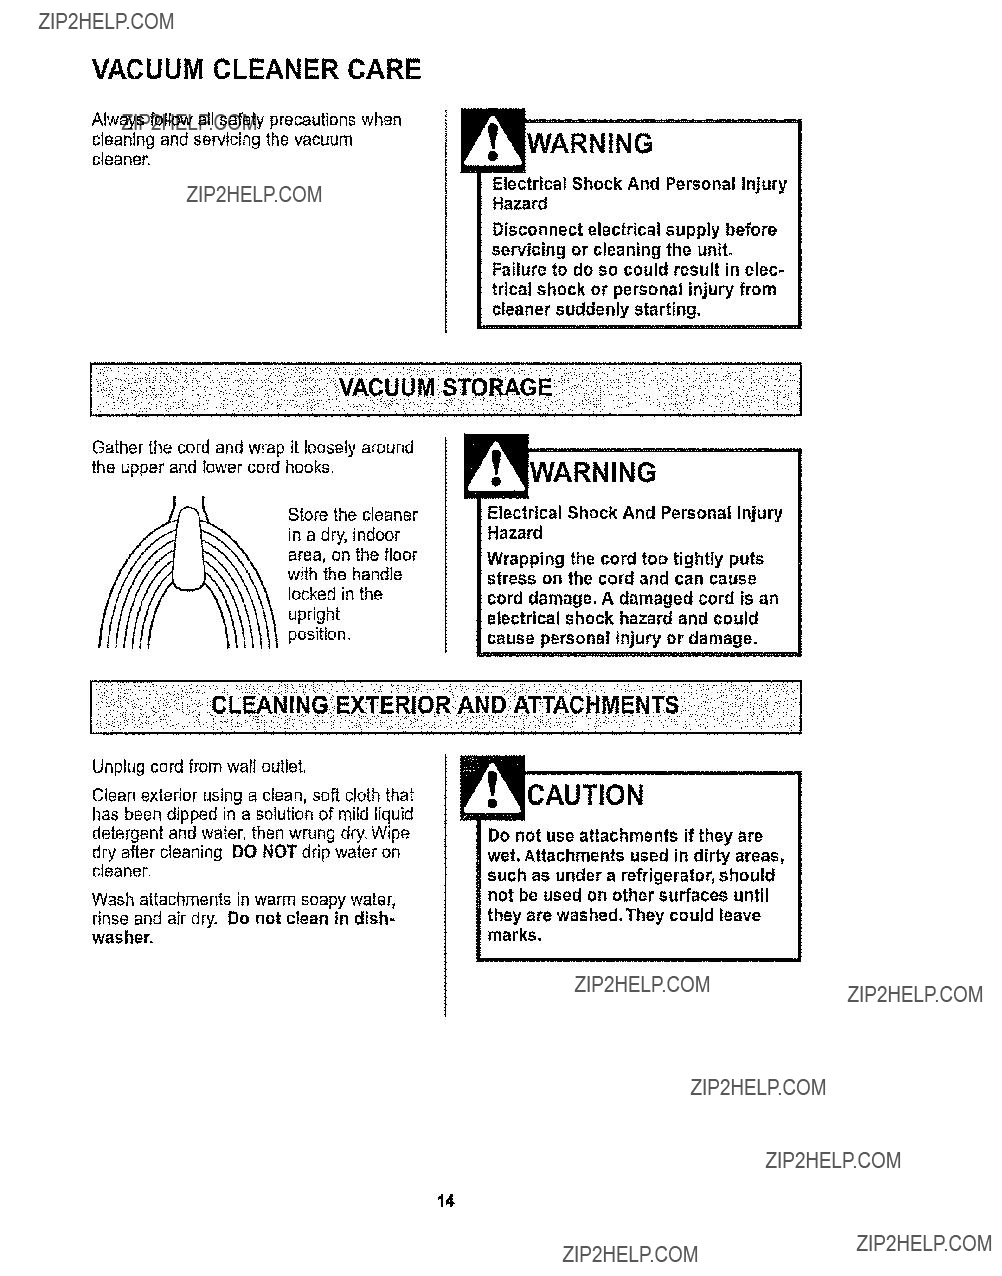
VACUUM CLEANER CARE
Always follow all safety precautions when cleaning and servicing the vacuum cleaner.
Gather the cord and wrap it loosely around the upper and lower cord hooks.
Store the cleaner in a dry, indoor area, on the floor with the handle locked in the upright
position,
Unplug cord from wall outlet,
Clean exterior using a clean, soft cloth that has been dipped in a solution of mild liquid detergent and water, then wrung dry?? Wipe
dry after cleaning DO NOT drip water on cleaner.
Wash attachments in warm soapy water,
rinse and air dry. Do not clean in dish- washer.
WARNING
Electrical Shock And Personal Injury
Hazard
Disconnect electrical supply before servicing or cleaning the unit.
Failure to do so could result in elec-
trical shock or personal injury from cleaner suddenly starting.
Electrical Shock And Personal Injury
Hazard
Wrapping the cord too tightly puts stress on the cord and can cause
cord damage. A damaged cord is an electrical shock hazard and could
cause personal injury or damage.
Do not use attachments if they are wet, Attachments used in dirty areas, such as under a refrigerator, should not be used on other surfaces until
they are washed.They could leave marks.
14
...... ! b: i: ??!< : : ......
Always empty the dust bin when dirt level reaches the "MAXIMUM FILU' line.
TO REMOVE DUST BIN
WARNING
Electrical Shock And Personal Injury
Hazard
Always unplug power cord from elec,
trical outlet before performing any
service on vacuum.
Dust Bin
Raise Latch the dust
bin
latch_ Dust Bin
Grasp
the handle locat- ed at the
side,Lift up and out to remove
dust bin from cteaner_
Remove
any clogs Filter
that might
be
the dust bin
portlocatedor thein (_ filter screen.
CAUTION
Do not use dust bin handle to carry unit,
Do not carry dust bin by dust bin lid,
Every time dust Cleanlng bin is removed, Knob
rotate cleaning knob on top of dust bin until fil- ter is clean to maintain clean- ing performance,
TO EMPTY DUST CUP
Hold dust bin over a trash container. Lift dust bin lid directly off the dust cup.
Dustq
Pour dust cup contents into a trash container.
TO CLEAN FILTER
See Filter Changing/Cleaning page 17
Filter
15
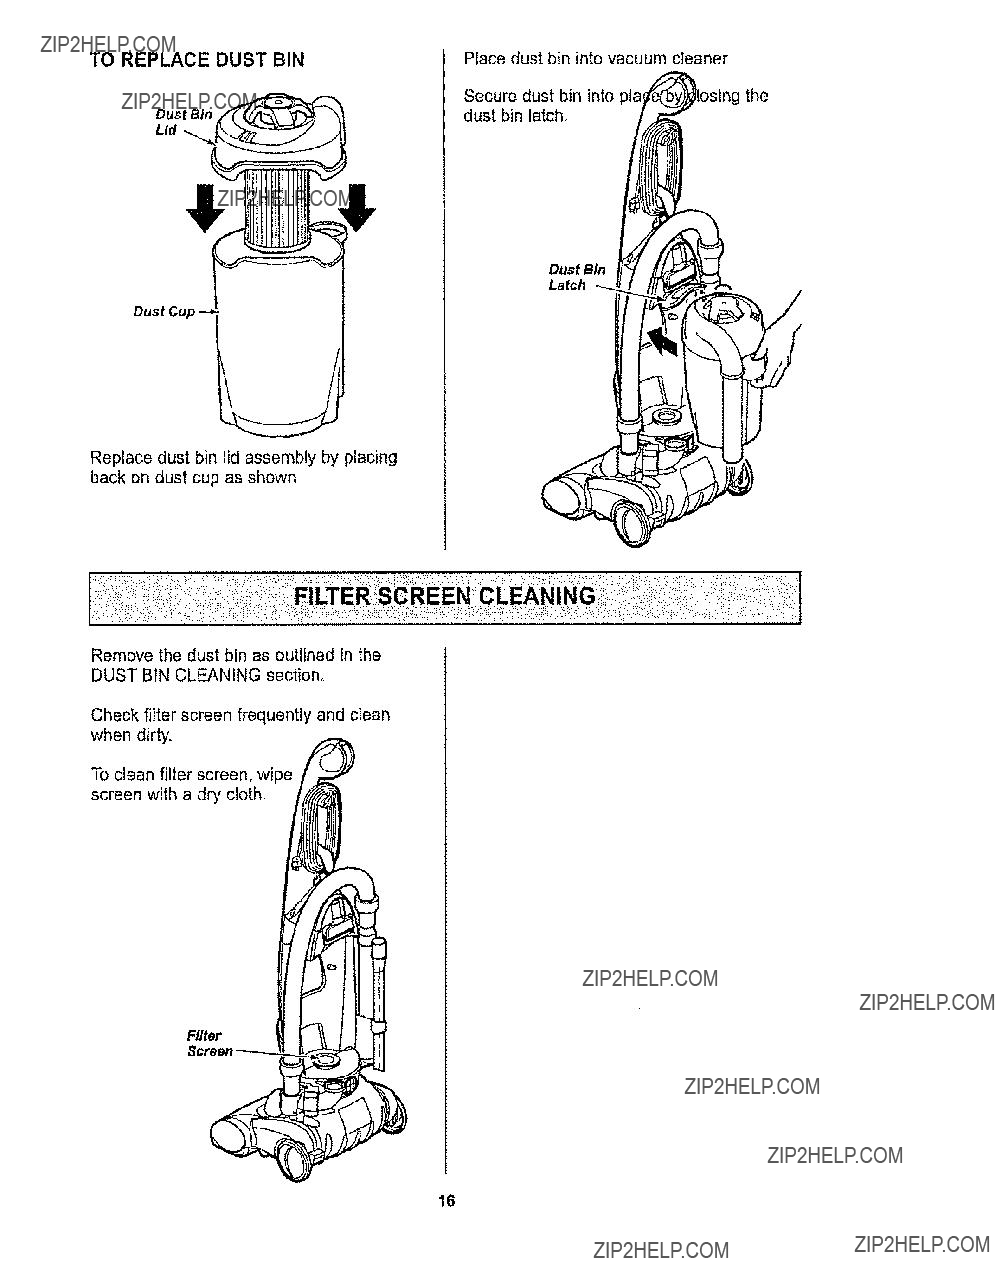
Duet Bin
Latch
Dust Cup
Replace dust bin lid assembly by placing back on dust cup as shown.
Remove the dust bin as outlined in the
DUST BIN CLEANING section,
Check filter screen frequently and clean when dirty.
To clean filter screen, wipe screen with a dry cloth.
Filter
16
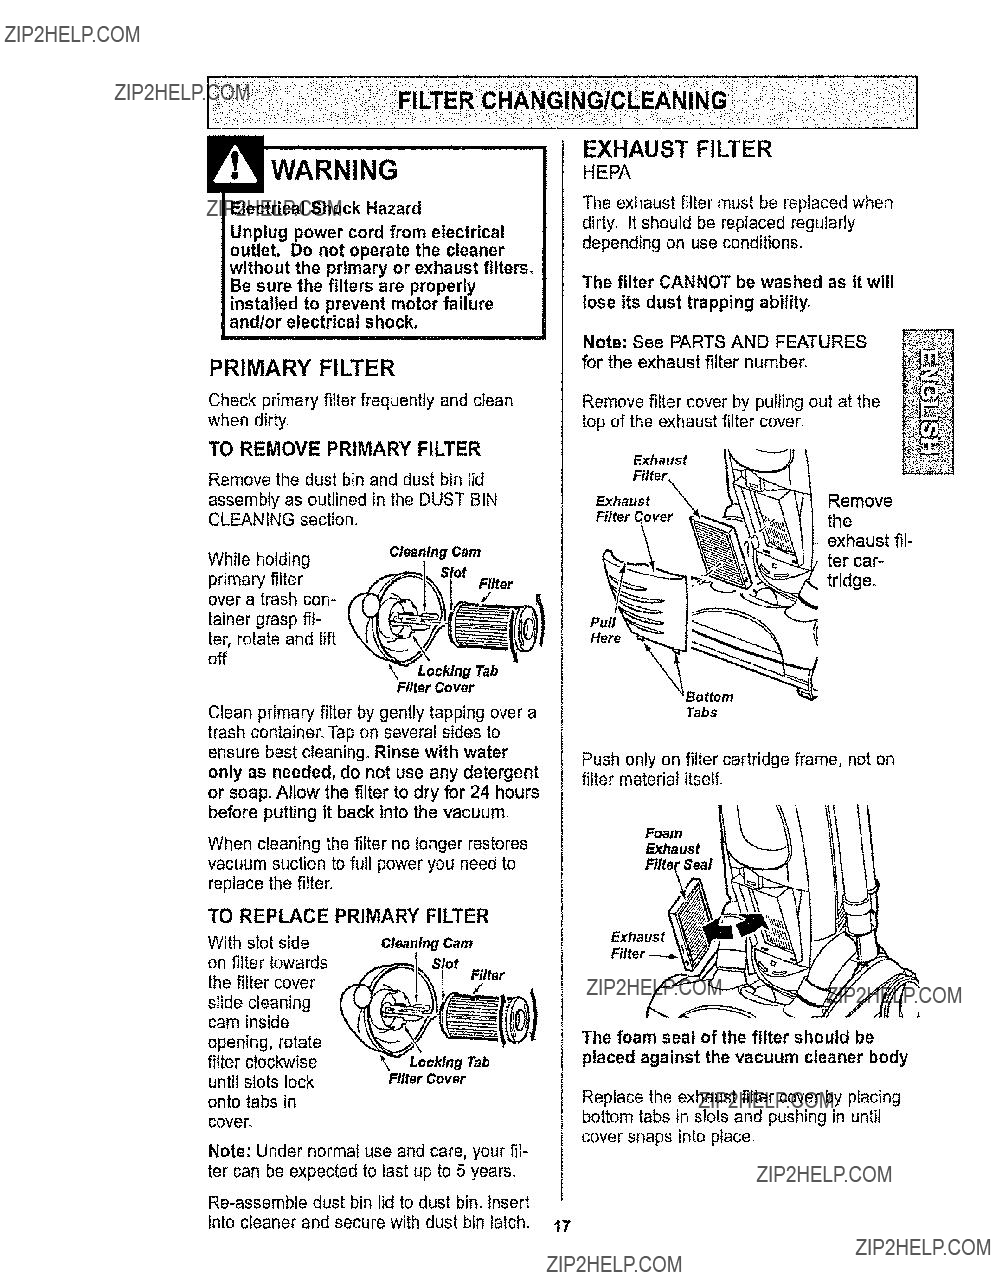
WARNINGHEPA
Electrical Shock Hazard
Unplug power cord from electrical outlet, Do not operate the cleaner without the primary or exhaust filters_ Be sure the filters are properly
installed to prevent motor failure and/or electrica! shock,
PRIMARY FILTER
Check primary filter frequently and clean
when dirty.
TO REMOVE PRIMARY FILTER
Remove the dust bin and dust bin lid
assembly as outlined in the DUST BIN CLEANING section??
The exhaust filter must be replaced when dirty. It should be replaced regularly depending on use conditions.
The filter CANNOT be washed as it will lose its dust trapping ability,
Note: See PARTS AND FEATURES for the exhaust filter number.
Remove filter cover by pulling out at the top of the exhaust filter cover,,
Exhaust
Filter
While holding
primary filter over a trash con-
tainer grasp fil- ter, rotate and lift
Cleaning Cam
Slot
Filter
Locking Tab
Filter Cover
Here
Clean primary filter by gently tapping over a trash container,,Tap on several sides to ensure best cleaning_ Rinse with water only as needed, do not use any detergent or soap. Allow the filter to dry for 24 hours before putting it back into the vacuum_
When cleaning the filter no longer restores vacuum suction to full power you need to replace the filter,
TO REPLACE PRIMARY FILTER
Tabs
Push only on filter cartridge frame, not on filter material itseE
Foam
Exhaust
Filter Seal
cover.
Note: Under normal use and care, your fil- ter can be expected to last up to 5 years.
into cleaner and secure with dust bin latch. 17
The foam seal of the filter should be placed against the vacuum cleaner body
Replace the exhaust filter cover by placing bottom tabs in slots and pushing in until cover snaps into place
Always follow all safety precautions when cleaning and servicing the vacuum cleaner.
Electrical Shock Or Personal Injury
Hazard
Disconnect electrical supply before servicing or cleaning the unit. Failure to do so could result in elec-
trical shock or personal injury from cleaner suddenly starting.
If the cleaner does not seem to have ade- quate suction, first check if the dust bin is full or if a filter is clogged, See DUST BIN CLEANING and FILTER CHANGING??
If the dust bin and filter areas are free of clogs, check the hose area?? Remove exten- sion hose from the valve assembly by grasping the hose collar, twisting, and pulling straight off.
Remove dust bin and check dust bin port
and secondary screen for clogs. If the dust bin and filter areas and the hose areas are
free of clogs, check the nozzle area. To check this area, see the section on AGITA-
TOR CLEANING.
Secondary
Dust Bin
Port
Return the cleaner to the upright position before plugging into an electrical outlet.
\ H??s??!II
DeepClea,,l,,g' J
Visually inspect the hose and the base area into which the hose is connected.
Remove any visible clog.
Re*connect the extension hose to the valve assembly. Plug in the vacuum and turn it on. Stretch the hose to maximum length and then allow the hose to return to its storage length,
Turn the unit off and unplug the unit.
Personal Injury Hazard
DO NOT place hands or feet under- neath the unit at any time, The agita-
tor will be revolving rapidly when the vacuum is turned on and is in
the carpet setting,
iii
18
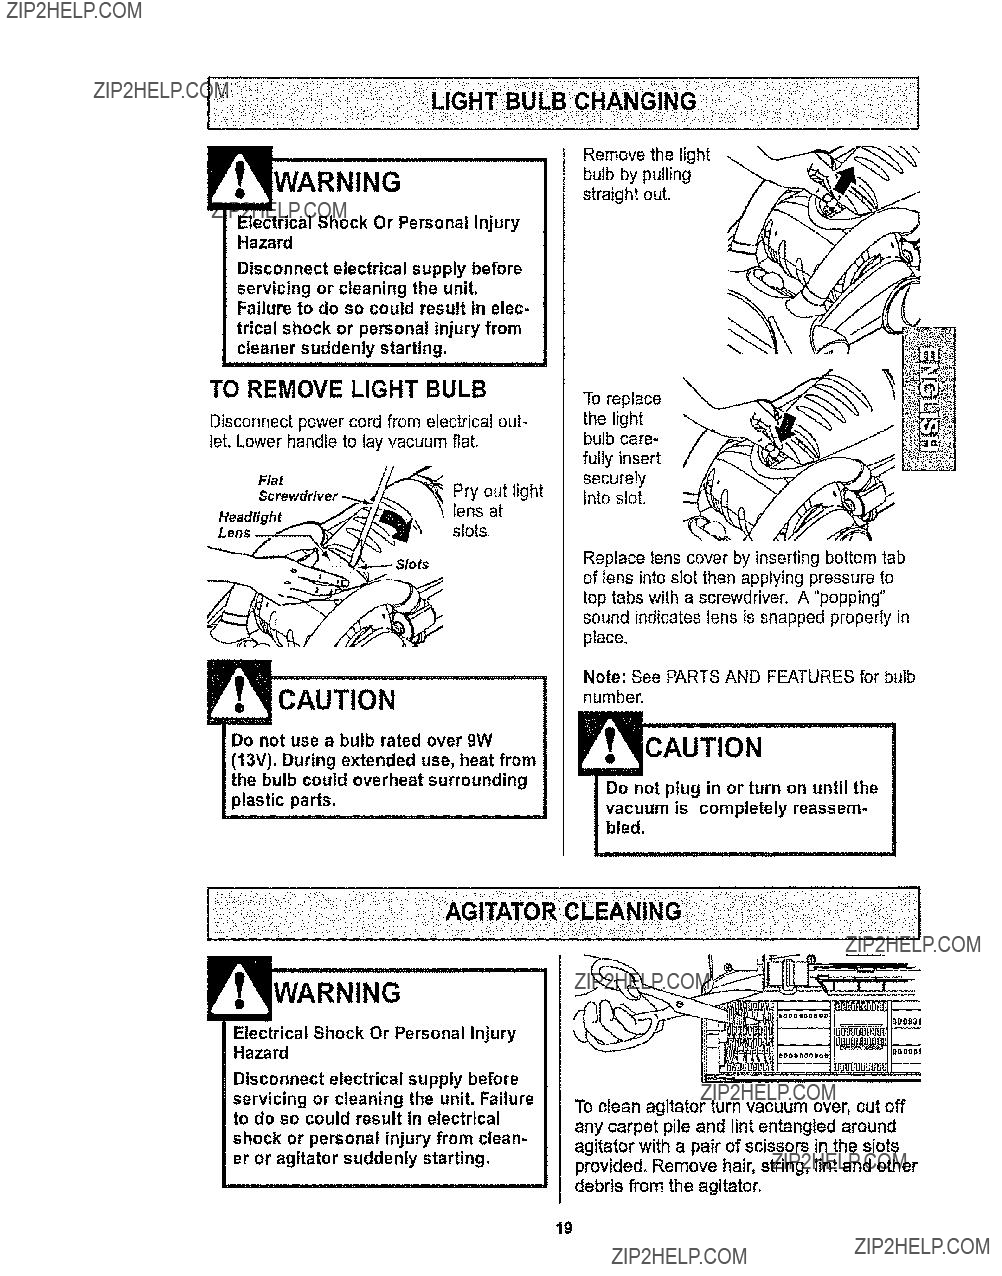
Electrical Shock Or Personal Injury
Hazard
Disconnect electrical supply before servicing or cleaning the unit. Failure to do so could result in elec-
trical shock or personal injury from cleaner suddenly starting.
TO REMOVE LIGHT BULB
Disconnect power cord from electrical out- let. Lower handle to lay vacuum flat,
Flat
Pry out light
Headfightlens at slots
CAUTION
Do not use a bulb rated over 9W
(13V). During extended use, heat from the bulb could overheat surrounding plastic parts.
Electrical Shock Or Personal Injury
Hazard
Disconnect electrical supply before servicing or cleaning the unit. Failure to do so could result in electrical
shock or personal injury from clean- er or agitator suddenly starting,
Remove the light bulb by pulling straight out.
To replace the light bulb care- fully insert securely into slot.
Replace lens cover by inserting bottom tab of lens into slot then applying pressure to top tabs with a screwdriver. A "popping" sound indicates lens is snapped properly in place,
Note: See PARTS AND FEATURES for bulb number.
To clean agitator turn vacuum over, cut off
any carpet pile and lint entangled around agitator with a pair of scissors in the slots
provided, Remove hair, string, lint and other debris from the agitator,
19
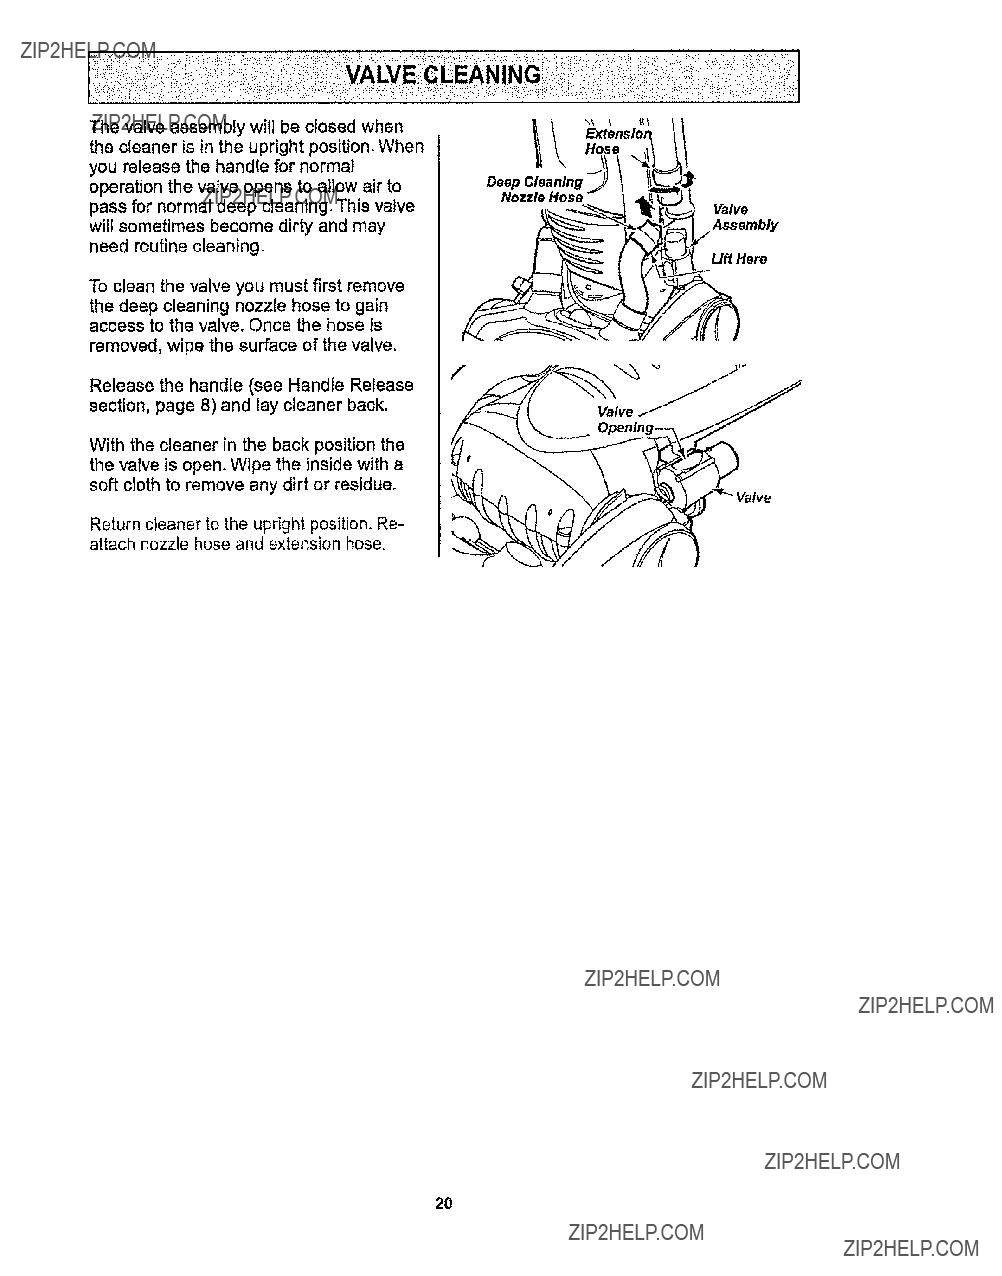
The valve assembly will be closed when the cleaner is in the upright position?? When you release the handle for normal operation the valve opens to allow air to pass for normal deep cleaning. This valve will sometimes become dirty and may need routine cleaning.
To clean the valve you must first remove the deep cleaning nozzle hose to gain access to the valve. Once the hose is
removed, wipe the surface of the valve.
Release the handle (see Handle Release section, page 8) and lay cleaner back,
With the cleaner in the back position the the valve is open. Wipe the inside with a soft cloth to remove any dirt or residue,
Return cleaner to the upright position. Re- attach nozzle hose and extension hose??
Hose
Deep Cleaning _
Nozzle Hose
Valve
Assembly
Ll_Here
2O
Electrical Shock And Personal Injury
Hazard
Disconnect electrical supply before servicing or cleaning the unit. Failure to do so could result in elec- trical shock or personal injury from cleaner suddenly starting.
Replace belt whenever a burning rubber smell caused by excessive slippage occurs??
CAUTION
BELT AND MOTOR SHAFT
MAY BE HOT!
Make sure the vacuum has complete- ly cooled prior to replacing belt.
To remove the belt cover, depress the tab and lift off. Remove worn or broken belt.
Place CARPET/FLOOR selector in the BARE FLOOR position,
Loop new belt around the motor shaft. Hold the inside of the belt
against the top of
the large pulley and rotate the
pulley cloc .kwise until the belt is
completely on the pulley.
Note: See PARTS AND FEATURES for belt number_
Rotate the pulley and the motor shaft to ensure that belt is not twisted or pinched??
Tab
Large
PulleyBelt
Reinstall belt cover and securely snap into place.
DO NOT operate cleaner without belt cover in place,
21
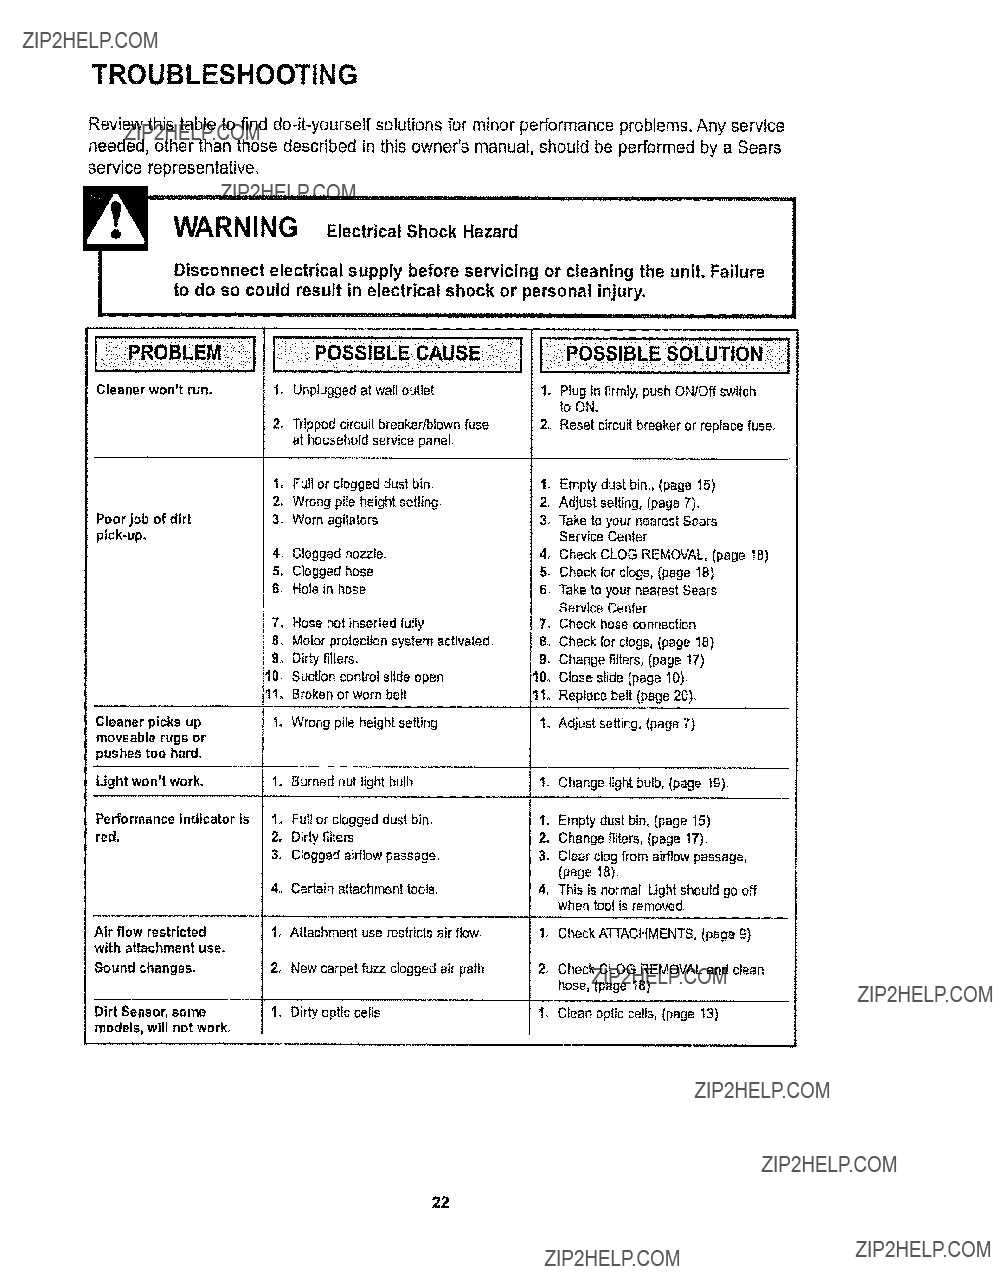
TROUBLESHOOTING
Review this table to find
I
Disconnect electrical supply before servicing or cleaning the unit. Failure
to do so could result in electrical shock or personal injury.
Cleaner won't run,
Poor job of dirt
Cleaner picks up moveable rugs or pushes too hard.
Light won'twork.
Performance indicator is
red,
Air flow restricted with attachment use.
Sound changes.
Dirt Sensor, some models, wtll not work??
1?? Unplugged at wall oullet
2.Tripped ctrcuil breaker/blown fuse at household service panel
% Full or clogged dust bin
2.Wrong pile height setting
3.Worn agilalors
4.Clogged nozzle.
5.Clogged hose
6o Hole in hose
7_ Hose not inserted fully
8. Motor protection system activated. 9, Dirty filters.
t0, Suction control slide open 11, Broken or worn beit
I. Wrongpile height setting,
1. Burned out light bulb
1,, Full or clogged dust bin,
2, Dirty filters
3, Clogged airflow passage
4. Certain altachment tools,
1.Attachment use restricts air flow
2.New carpet fuzz clogged air path
1. Dirty optic cells
I.Ptug tn firmly, push ON/Off swilch to ON,.
2o Reset circuit breaker or replace fuse??
1, Empty dust bin,, (page 15)
2o Adjust setting, (page 7).
3_ Take to your nearest Sears Service Center,
4_ Check CLOG REMOVAL, (page tB)
5_ Check for clogs, (page 18)
6_ Take to your nearest Sears
Service Center
7. Check hose connection
B?? Check for clogs, (page 18) 9, Change filters, (page 17) 10?? Close slide (page 10), 11o Replace belt (page 20).
1. Adjust setting, (page 7)
I. Change lightbulb, (page I9),
t_ Empty dust bin, (page 15) 2o Change filters, (page 17),
3.Clear clog from airflow passage, (page 18)
4.This is normal Light should go off when tool is removed.
Check ATTACHMENTS, (page 9)
2_ Chock CLOG REMOVAL and clean hose, (page 18)
1. Clean optic ceils, (page 13)
22

Your Home
For repair- In your heine- o1_all m_j_r brand app!i_,nces,
no matter who made ii_ no m_er who sok! It!
For th_ r_pl_m_nt p_ts, accassorie_ and ??'_,_ne['sman_LJgJs1hat y_u need t_
For S_at_ ptof_ion_ in_ll_t:_n ol home ap,pi_a_??_ _nd items I_kegora_e door openem and! water heaie[s,
Out Horr_
For rep_.ir of ,_
S_ar_ P_tts _d Ft_pafr C_nl_t.
To
or mainl_n_ agt_._m_t {C__n&da)on a pcoduct _rv,_ by Se&P_: