Ken ore
MODELS 15821, 15825, 15828
3373964 Rev. A
S_ars, Roebuck _nd Co. Hotfman Estates. IL 50179 U S_,
Ken ore
MODELS 15821, 15825, 15828
3373964 Rev. A
S_ars, Roebuck _nd Co. Hotfman Estates. IL 50179 U S_,

Con n
Thank you for selecting this KENMORE dishwasher.. To ensure that you will enjoy many years of
Also, please fill in the spaces below You can find this information on the model and serial number label (see diagram on page 5)_Keep this book and the sales slip together in a safe place for future reference_
Model Number
Serial Number
Purchase Date
Dishwasher Safety
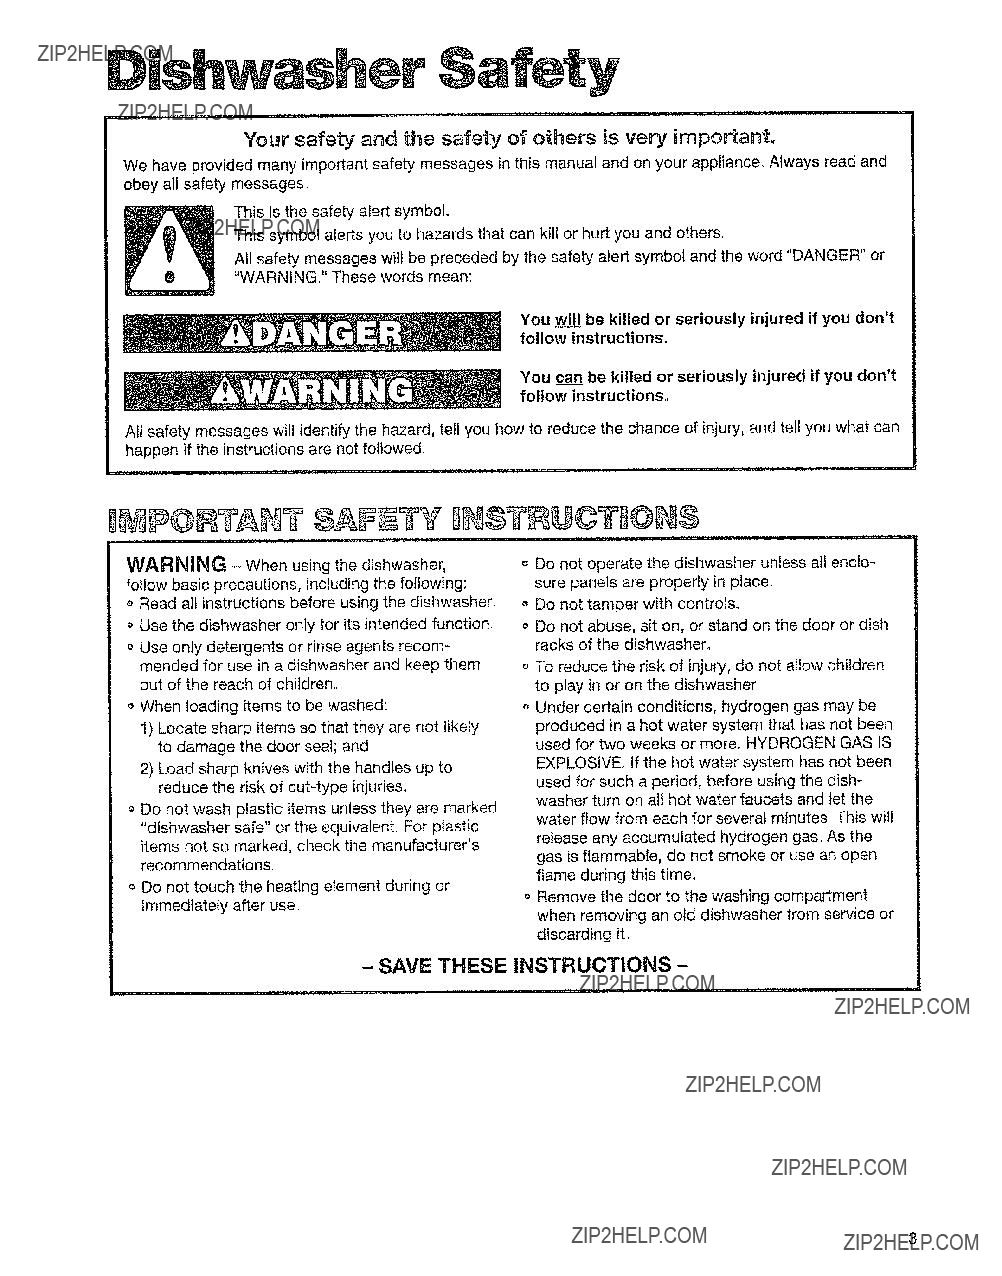
Your safety and the safety of others is very important.
We have provided many important safety messages in this manual and on your appliance. Always read and obey all safety messages
This is the safety alert symbol..
This symbol alerts you to hazards that can kilt or hurt you and others..
All safety messages will be preceded by the safety alert symbol and the word "DANGER" or "WARNING." These words mean:
You will be killed or seriously injured if you don't follow instructions.
You can be killed or seriously injured if you don't follow instructions??
All safety messages will identify the hazard, tell you how to reduce the chance of injury, and tell you what can happen if the instructions are not followed.
WARNING - When using the dishwasher,
follow basic precautions, including the following: Read all instructions before using the dishwasher
o Use the dishwasher only for its intended function
o Use only detergents or rinse agents recom- mended for use in a dishwasher and keep them out of the reach of children.
When loading items to be washed:
1)Locate sharp items so that they are not/keiy to damage the door seal; and
2)Load sharp knives with the handles up to reduce the risk of
Do not wash plastic items unless they are marked "dishwasher safe" or the equivalent. For'plastic items not so marked, check the manufacturer's recommendations.
Do not touch the heating element during or immediately after use
o Do not operate the dishwasher unless all enclo- sure panels are properly in place.
Do not tamper with controls.
o Do not abuse, sit on, or stand on the door or dish racks of the dishwasher.
oTo reduce the risk of injury, do not allow children to play zn or on the dishwasher.
o Under certain conditions, hydrogen gas may be
produced in a hot water system that has not been used for two weeks or more. HYDROGEN GAS IS
EXPLOSIVE. If the hot water system has not been used for such a period, before using the dish- washer turn on all hot water faucets and let the water flow from each for several minutes This will release any accumulated hydrogen gas. As the gas is flammable, do not smoke or use an open flame during this time.
o Remove the door to the washing compartment when removing an old dishwasher from service or discarding it.
- SAVE THESE INSTRUCTIONS -
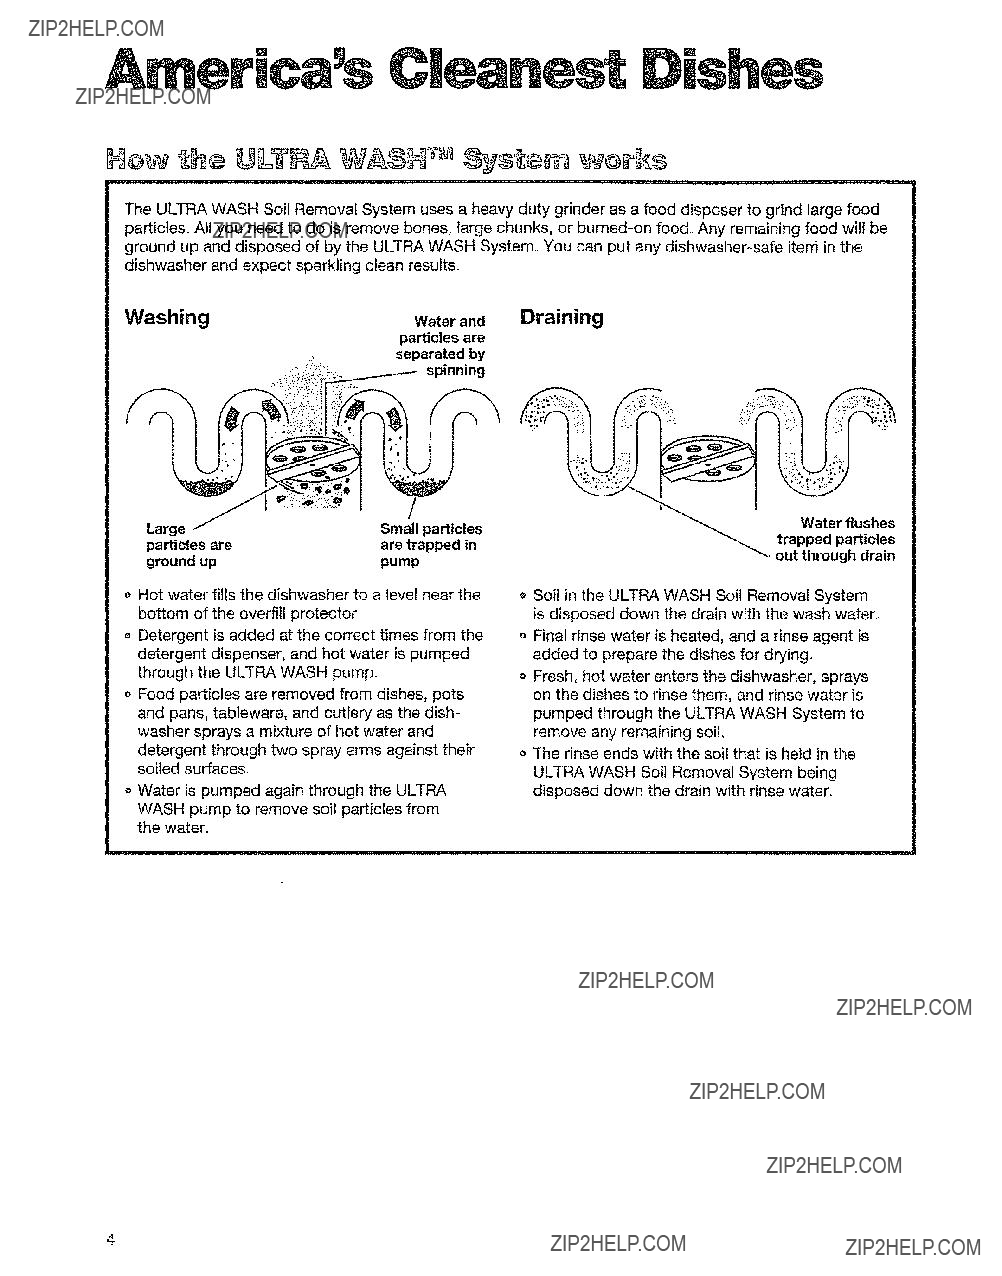
America s
The ULTRA WASH Soil Removal System uses a heavy duty grinder as a food disposer to grind large food particles,. All you need to do is remove bones, large chunks, or
o Hot water fills the dishwasher to a level near the bottom of the overfill protector.
o Detergent is added at the correct times from the detergent dispenser, and hot water is pumped through the ULTRA WASH pump.
o Food particles are removed from dishes, pots and pans, tableware, and cutlery as the dish- washer sprays a mixture of hot water and detergent through two spray arms against their soiled surfaces.
o Water is pumped again through the ULTRA
WASH pump to remove soil particles from the water.
Water flushes
trapped particles out through drain
o Soil in the ULTRA WASH Soil Removal System is disposed down the drain with the wash water..
Final rinse water is heated, and a rinse agent is added to prepare the dishes for drying,
o Fresh, hot water enters the dishwasher, sprays on the dishes to rinse them, and rinse water is
pumped through the ULTRA WASH System to remove any remaining soil.
The rinse ends with the soil that is held in the ULTRA WASH Soil Removal System being disposed down the drain with rinse water.
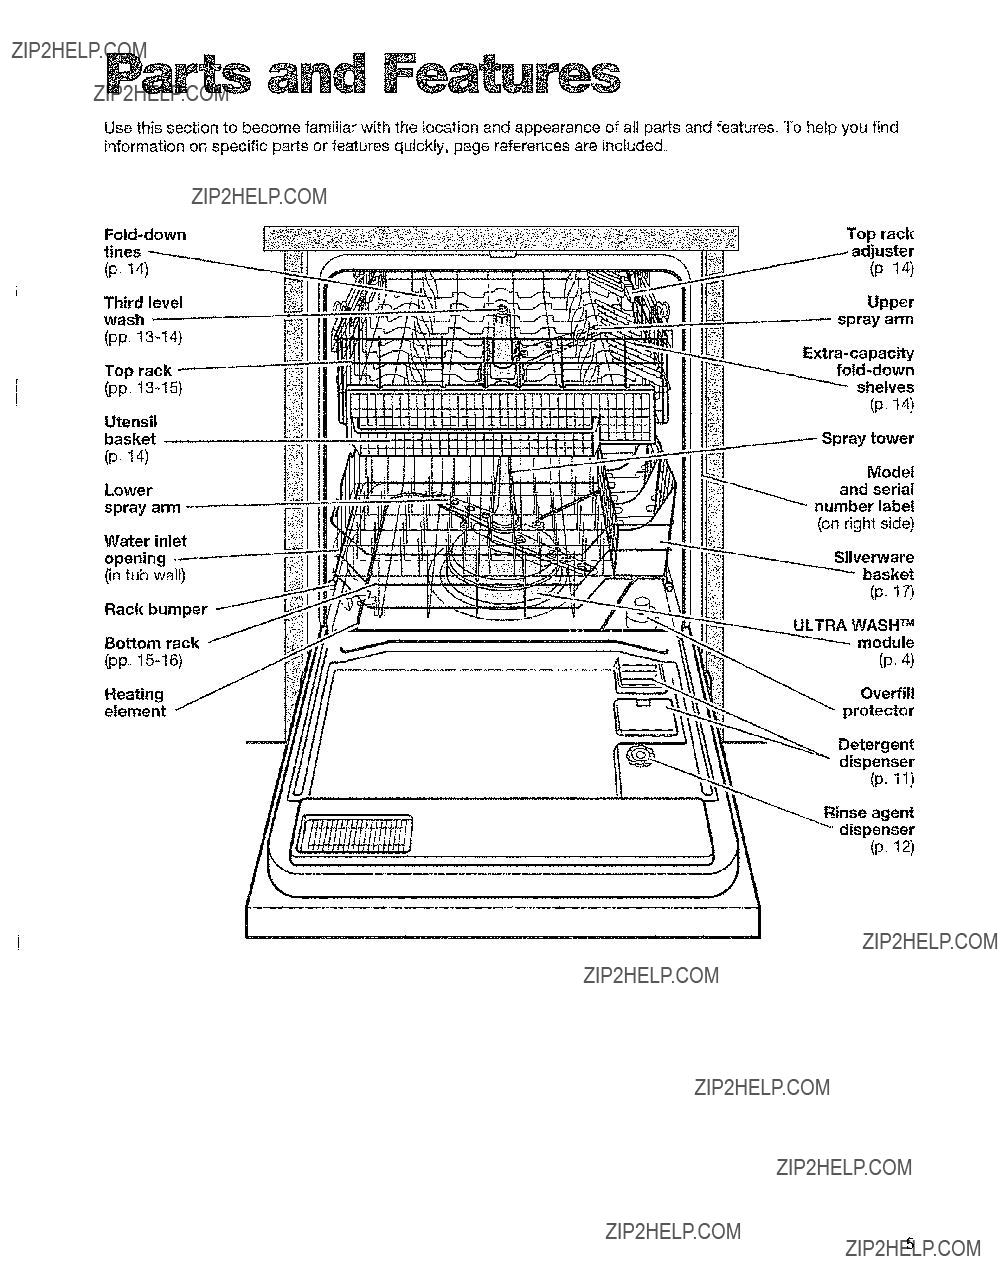
Parts and Feat
Use this section to become familiar with the location and appearance of all parts and features. To help you find information on specific parts or features quickly, page references are included
Quick Reference
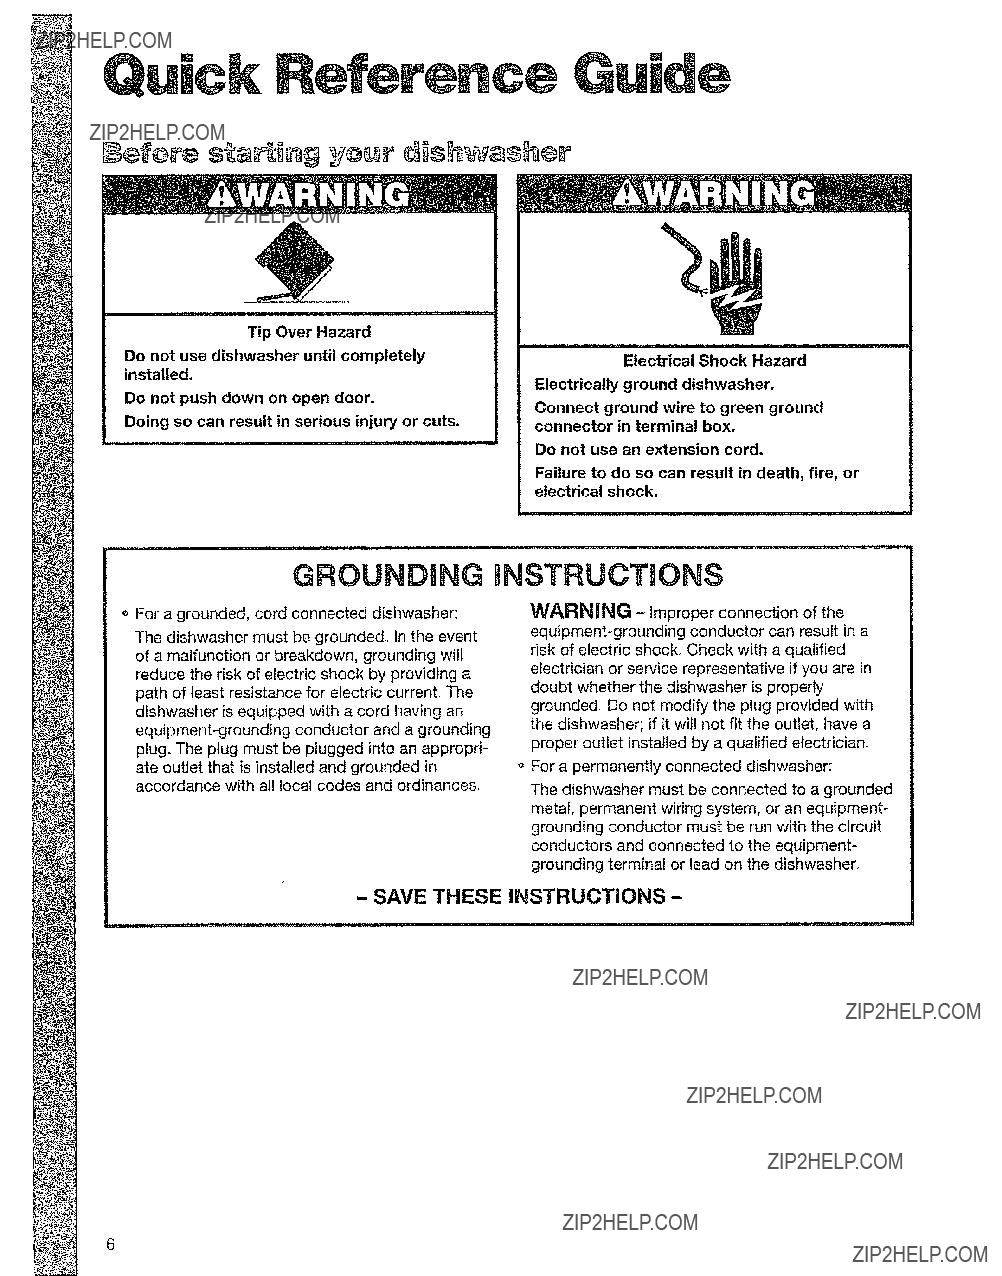
Tip Over Hazard
Do not use dishwasher until completely installed.
Do not push down on open door.
Doing so can result in serious injury or cuts.
For a grounded, cord connected dishwasher:
The dishwasher must be grounded, In the event of a malfunction or breakdown, grounding will reduce the risk of electric shock by providing a path of least resistance for electric current?? The dishwasher is equipped with a cord having an
ate outlet that is installed and grounded in accordance with all local codes and ordinances.
Electrical Shock Hazard
Electrically ground dishwasher.
Connect ground wire to green ground connector in terminal box.
Do not use an extension cord.
Failure to do so can result in death, fire, or electrical shock.
WARNING - Improper connection of the
o For a permanently connected dishwasher:
The dishwasher must be connected to a grounded metal, permanent wiring system, or an equipment- grounding conductor must be run with the circuit conductors and connected to the equipment- grounding terminal or lead on the dishwasher
- SAVE THESE INSTRUCTIONS -
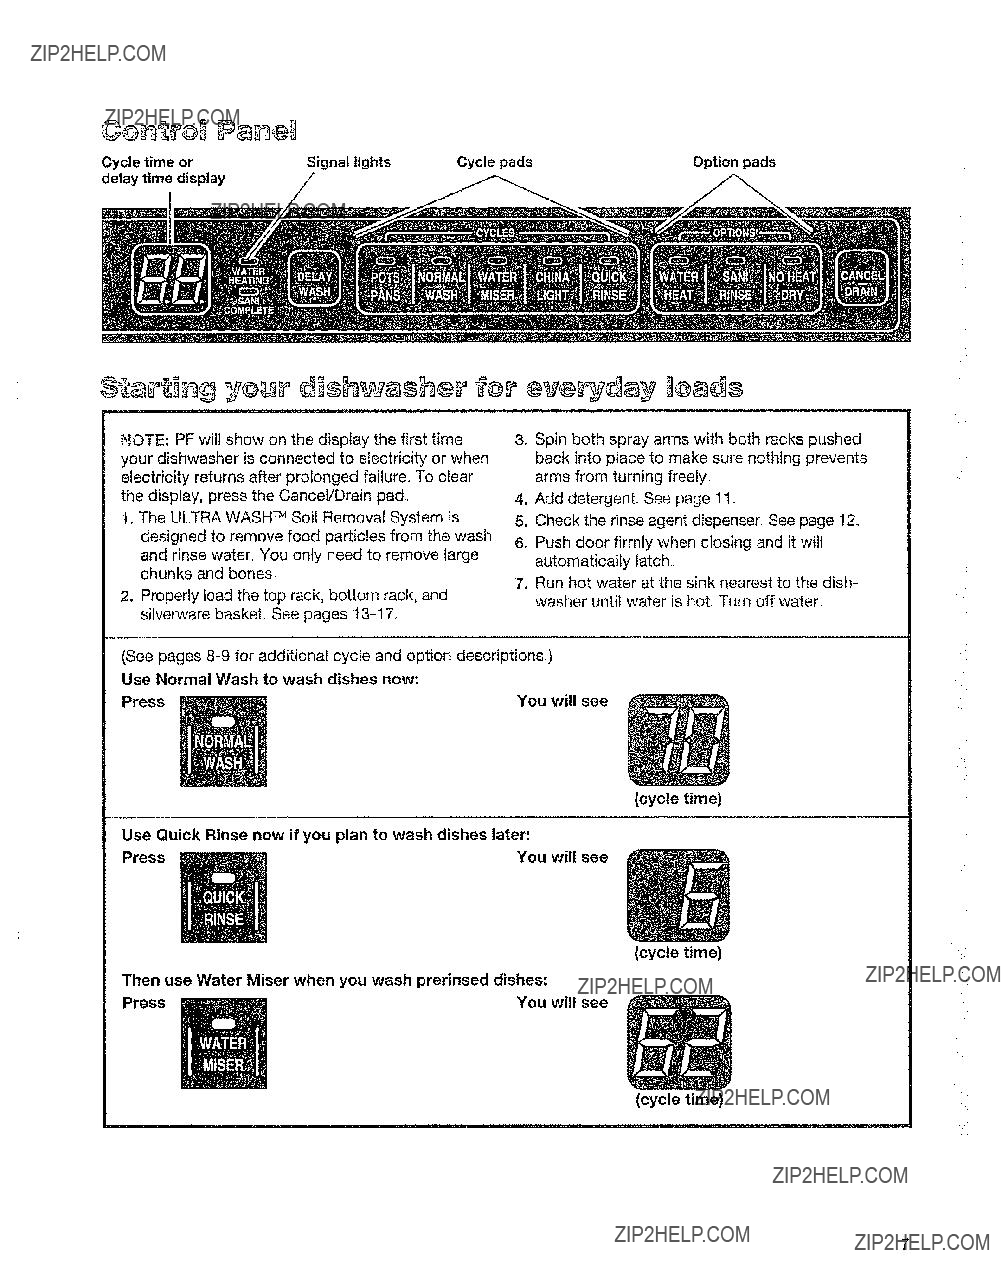
NOTE: PF will show on the display the first time your dishwasher is connected to electricity or when electricity returns after prolonged failure. To clear the display, press the Cancel/Drain pad,
t, The ULTRA WASH TMSoi! Removal System is designed to remove food particles from the wash and rinse water, You only need to remove large chunks and bones
2, Properly load the top rack, bottom rack, and silverware basket,, See pages
3_ Spin both spray arms with both racks pushed back into place to make sure nothing prevents arms from turning freely,
4, Add detergent?? See page 11.
5. Check the rinse agent dispenser. See page 12, 6, Push door firmly when closing and it wilt
automatically latch
7.Run hot water at the sink nearest to the dish- washer until water is hot Turn off water.
(See pages
Use Normal Wash to wash dishes now:
PressYou will see
(cycle time)
Use Quick Rinse now if you plan to wash dishes later:
PressYou will see
(cycle time)
Then use Water Miser when you wash prerinsed dishes:
PressYou will see
(cycle time)
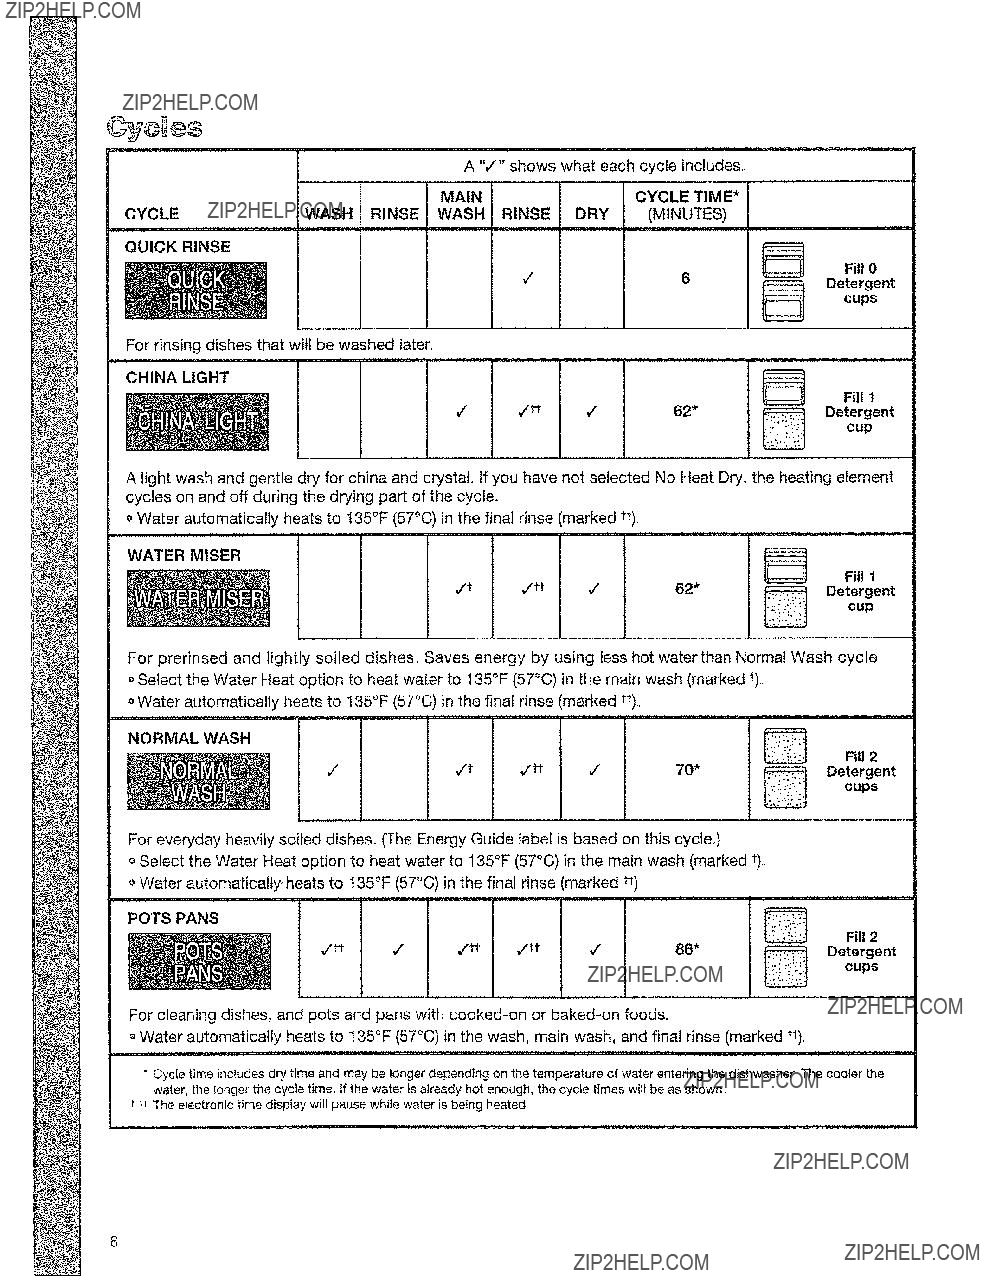
A light wash and gentle dry for china and crystal. If you have not selected No Heat Dry, the heating element cycles on and off during the drying part of the cycle.
o Water automatically heats to 135??F (57??C) in the final rinse (marked _).
WATER MISER
Fill 1
,/62*
cup
_Detergent
For prerinsed and lightly soiled dishes Saves energy by using less hot water than Normal Wash cycle oSelect the Water Heat option to heat water to 135??F (57??C) in the main wash (marked t)..
oWater automatically heats to 135??F (57??C) in the final rinse (marked t_).
NORMAL WASH
For everyday heavily soiled dishes.. (The Energy Guide label is based on this cycle.) oSelect the Water Heat option to heat water to 135??F (57??C) in the main wash (marked t)
Water
POTS PANS
For cleaning dishes, and pots and pans with
oWater automatically heats to 135??F (57??C) in the wash, main wash, and final rinse (marked tt).
. i uu..uuu...u,u
???Cycle time includes dry time and may be longer depending on the temperature of water entering the dishwasher The cooler the water, the longer the cycle time, tf the water is already hot enough, the cycle times will be as shown
tttThe electronic time display will pause while water is being heated
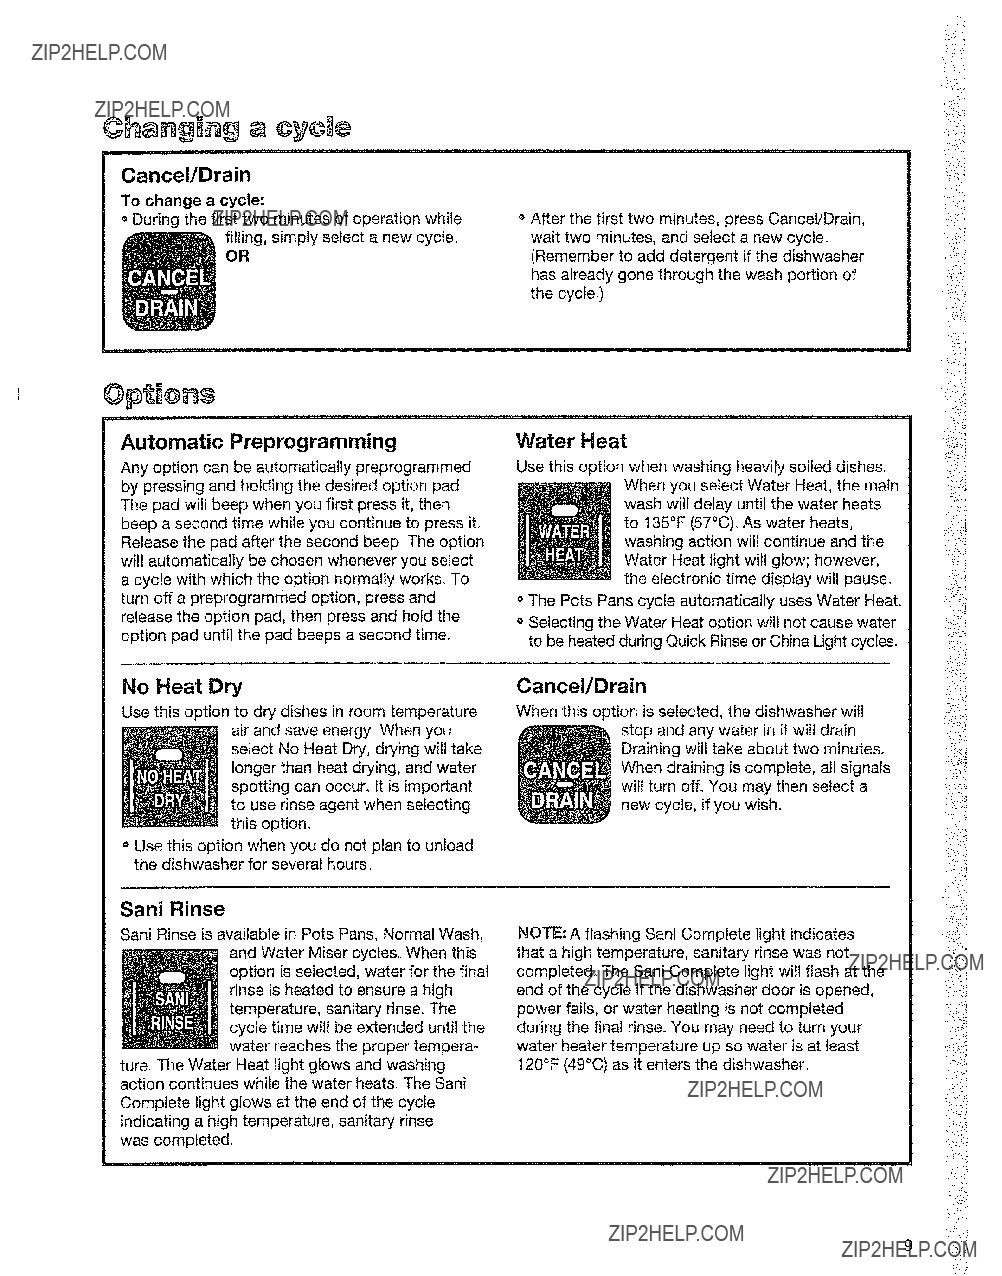
Cancel/Drain
To change a cycle:
o During the first two minutes of operation while filling, simply select a new cycle.
OR
Automatic Preprogramming
Any option can be automatically preprogrammed by pressing and holding the desired option pad. The pad will beep when you first press it, then beep a second time while you continue to press ito Release the pad after the second beep. The option will automatically be chosen whenever you select a cycle with which the option normally works. To turn off a preprogrammed option, press and release the option pad, then press and hold the option pad until the pad beeps a second time..
o After the first two minutes, press Cancel/Drain, wait two minutes, and select a new cycle. (Remember to add detergent if the dishwasher has already gone through the wash portion of the cycle,)
Water Heat
Use this option when washing heavily soiled dishes. When you select Water Heat, the main wash will delay until the water heats to 135??F (57??C). As water heats, washing action will continue and the Water Heat light will glow; however, the electronic time display will pause.
o The Pots Pans cycle automatically uses Water Heat. o Selecting the Water Heat option will not cause water to be heated during Quick Rinse or China Ught cycle&
='t
!
;i
;4
:2:)::
!
No Heat Dry
Use this option to dry dishes in room temperature air and save energy When you select No Heat Dry, drying will take longer than heat drying, and water spotting can occur.. It is important to use rinse agent when selecting this option??
=Use this option when you do not plan to unload the dishwasher for several hours.
Sani Rinse
Sani Rinse is available in Pots Pans, Normal Wash, and Water Miser cycles.. When this option is selected, water for the final rinse is heated to ensure a high temperature, sanitary rinse. The cycle time will be extended until the water reaches the proper tempera-
ture. The Water Heat light glows and washing action continues while the water heats.. The Sani
Complete light glows at the end of the cycle indicating a high temperature, sanitary rinse was completed.
Cancel/Drain
When this option is selected, the dishwasher will stop and any water in it wilt drain. Draining will take about two minutes?? When draining is complete, all signals will turn off. You may then select a new cycle, if you wish..
i
NOTE: A flashing Sani Complete light indicates that a high temperature, sanitary rinse was not completed, The Sani Complete light will flash at the end of the cycle if the dishwasher door is opened, power fails, or water heating is not completed
during the final rinse, You may need to turn your water heater temperature up so water is at least 120??F (49??C) as it enters the dishwasher,
:;t;
i !i
%??????!
$ig sal " ??
, ,un,,
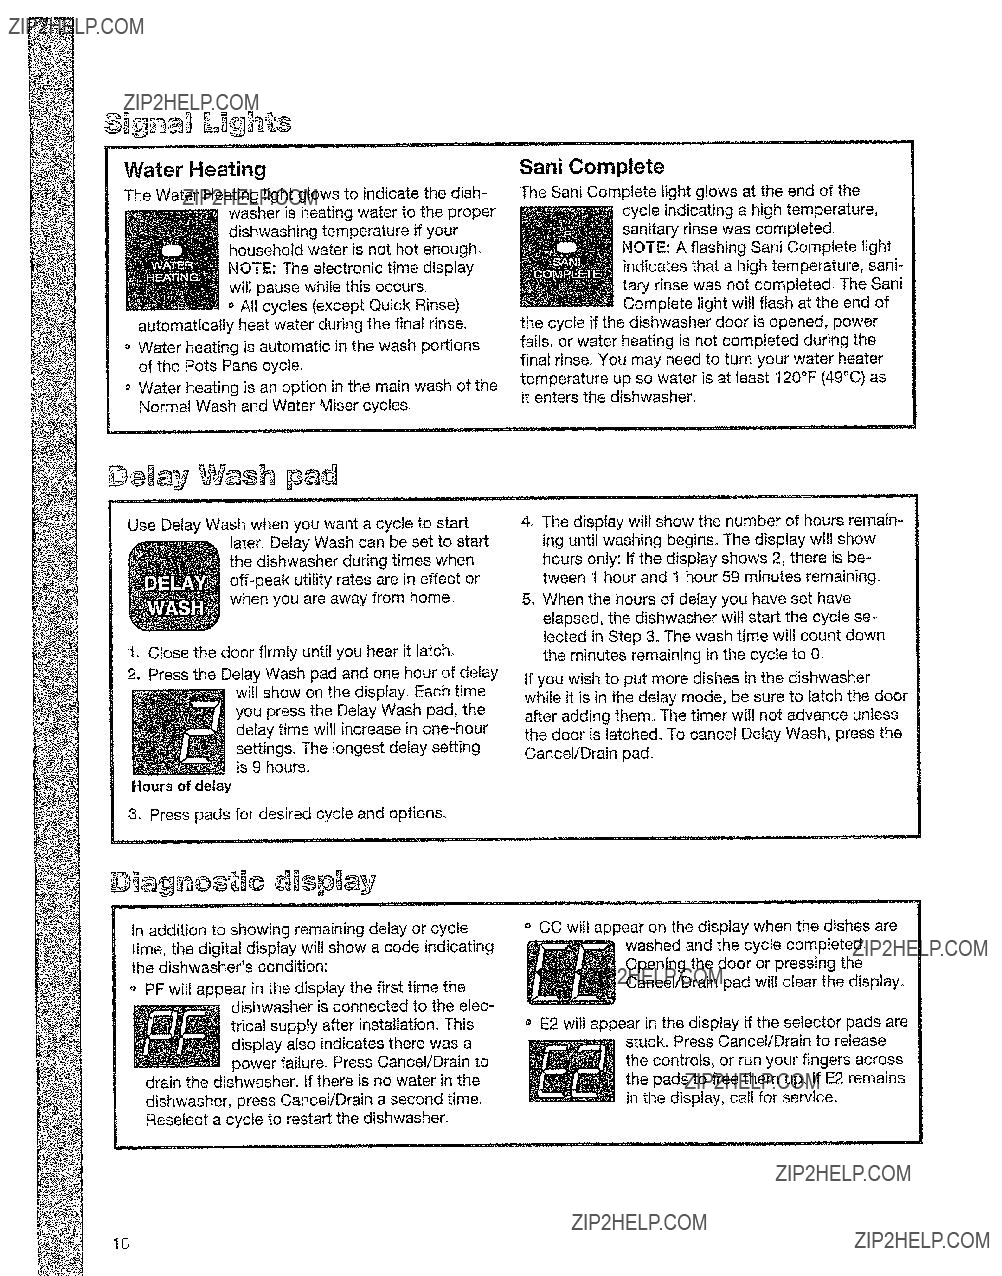
Water Heating
The Water Heating fight glows to indicate the dish- washer is heating water to the proper dishwashing temperature if your household water is not hot enough NOTE: The electronic time display will pause whife this occurs??
o All cycles (except Quick Rinse) automatically heat water during the final rinse.
Water heating is automatic in the wash portions of the Pots Pane cycle,
Water heating is an option in the main wash of the Norma! Wash and Water Miser cycles,
#etaj ??atasi l??ast
...................lU,
Use Delay Wash when you want a cycle to start later, Delay Wash can be set to start the dishwasher during times when
'1. Close the door firmly until you hear it latch..
2. Press the Delay Wash pad and one hour of delay will show on the display. Each time you press the Delay Wash pad, the delay time will increase in
is 9 hours.,
Hours of delay
3. Press pads for desired cycle and options.
i Ul,, ii,,,,ll
In addition to showing remaining delay or cycle time, the digital display will show a code indicating the dishwasher's condition:
?? PF will appear in the display the first time the dishwasher is connected to the elec-
trical supply after inetallation_ This display also indicates there was a power failure. Press Cancel/Drain to
drain the dishwasher. If there is no water in the dishwasher, press Cancel/Drain a second time, Reselect a cycle to restart the dishwasher.
Sani Complete
The Sani Complete light glows at the end of the cycle indicating a high temperature, sanitary rinse was completed??
NOTE: A flashing Sani Complete light indicates that a high temperature, sani- tary rinse was not completed, The Sani Complete light will flash at the end of
the cycle if the dishwasher door is opened, power fails, or water heating is not completed during the final rinse. You may need to turn your water heater temperature up so water is at least 120??F (49??C) as it enters the dishwasher.
4_ The display will show the number of hours remain- ing until washing begins. The display will show hours only: If the display shows 2, there is be- tween 1 hour and 1 hour 59 minutes remaining.,
&When the hours of delay you have set have elapsed, the dishwasher will start the cycle se- lected in Step 3oThe wash time wi!l count down the minutes remaining in the cycle to O.
If you wish to put more dishes in the dishwasher
while it is in the delay mode, be sure to latch the door after adding them The timer wil! not advance unless the door is latched. To cancel Delay Wash, press the CanceVDrain pad.
?? CC will appear on the display when the dishes are washed and the cycle completed, Opening the door or pressing the Cancel/Drain pad wifl dear the display.
E2 witl appear in the display if the selector pads are stuck. Press CanceVDrain to release
the controls, or run your fingers across the pads to free them up. If E2 remains in the display, call for service.
10
Your Part ?? Cleaning
Operating your dishwasher properly enables you to obtain the best possible results, This section explains proper dishwasher operation,,
o Use automatic dishwashing detergent only, Other detergents are too mild and much too sudsy.
o Add detergent just before starting cycle.
??Store tightly closed detergent in a cool, dry place. Fresh automatic dishwasher detergent results in better cleaning.
cover and one withouL Push cover down firmly until it latches. Detergent in the open section fails into the dishwasher when closing the door The
covered section opens automatically for the main wash
HOTE: It is normal for cover to open partially when dispensing detergent.
How much detergent to use
o The amount of detergent to use depends on the hardness of your water and the type of detergent If you use too little, dishes won't be clean?? If you use too much in soft water, glassware wilt etch,
o Different brands of dishwasher detergent have different amounts of phosphorus for softening water. ]f you have hard water and use a detergent with a phosphorous content of less than 8.7%, you may need to use more detergent, or use a
detergent with a phosphorous content higher than 8_7%.
o Find out your water's hardness by asking your local water department or water softener company.
NOTE: Fill amounts shown are for standard pow- dered detergent, Amounts may vary if you use liquid or concentrated powdered detergent,. Follow manufacturer's directions when using liquid dishwasher detergent or concentrated powdered detergent.
11
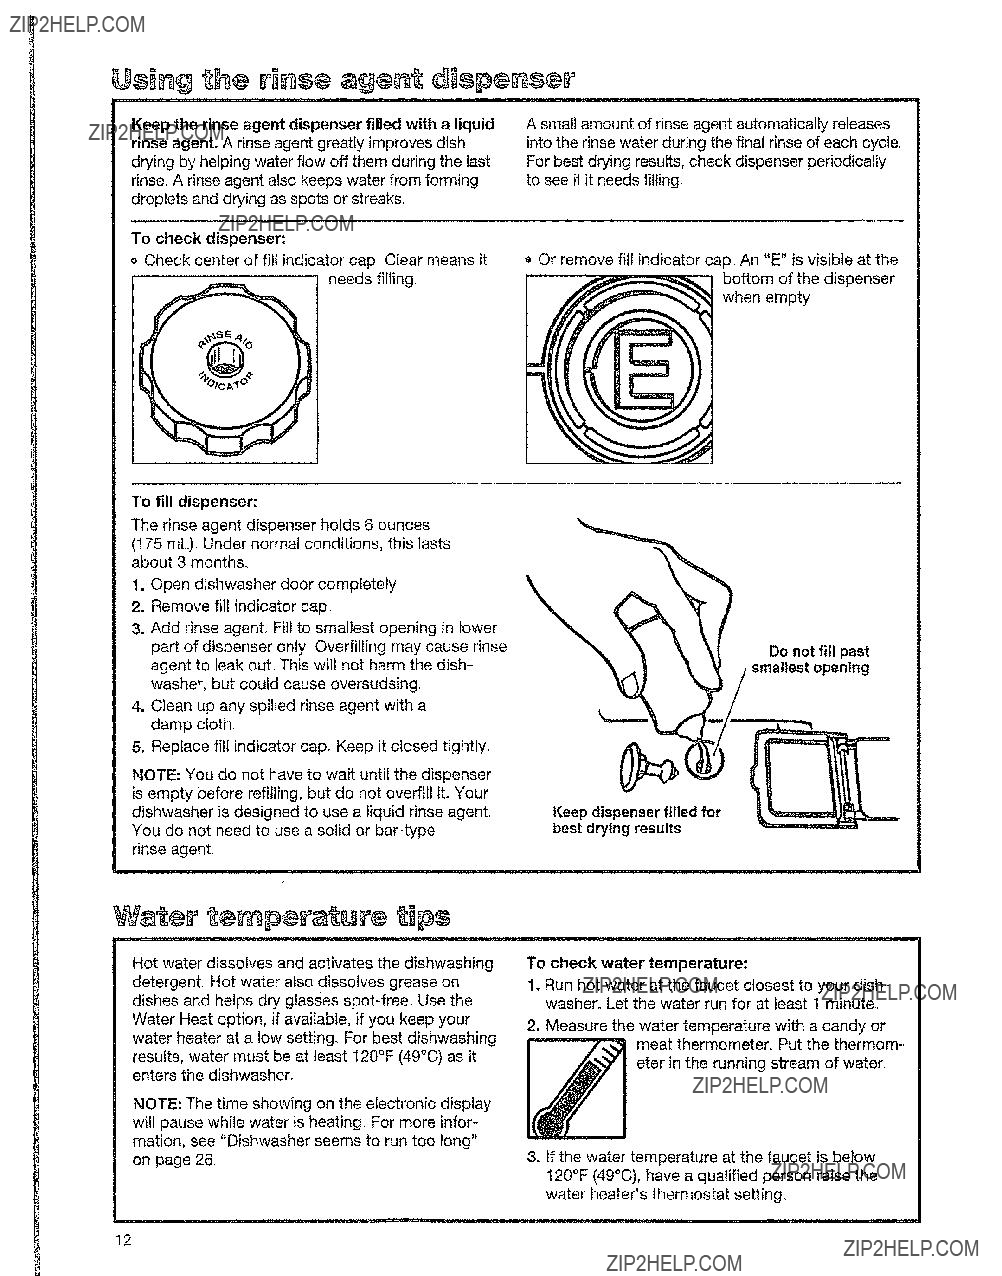
Keep the rinse agent dispenser filled with a liquid
rinse agent. A rinse agent greatly improves dish drying by helping water flow off them during the last rinse, A rinse agent also keeps water from forming droplets and drying as spots or streaks??
To check dispenser:
o Check center of fill indicator cap. Clear means it needs filling,
A small amount of rinse agent automatically releases into the rinse water during the final rinse of each cycle. For best drying results, check dispenser periodically
to see if it needs filling.
o Or remove fill indicator cap. An "E" is visible at the bottom of the dispenser when empty,
To fill dispenser;
The rinse agent dispenser holds 6 ounces
(! 75 mL), Under normal conditions, this lasts about 3 months.
1.Open dishwasher door completely
2.Remove fill indicator cap1
rinse agent
Hot water dissolves and activates the dishwashing detergent. Hot water also dissolves grease on dishes and helps dry glasses
NOTE: The time showing on the electronic display will pause while water is heating, For more infor- mation, see "Dishwasher seems to run too long" on page 26.
To check water temperature:
1oRun hot water at the faucet closest to your dish- washer?? Let the water run for at least 1 minute.
2. Measure the water temperature with a candy or meat thermometer,, Put the thermom- eter in the running stream of water.
3.If the water temperature at the faucet is below 120??F (49??C), have a qualified person raise the water heater's thermostat setting.
t2
L@ad ng Your D sh asher
This section tells you how to load your dishwasher properly for the best washing and rinsing results.
Mixed load
continued on next page
13
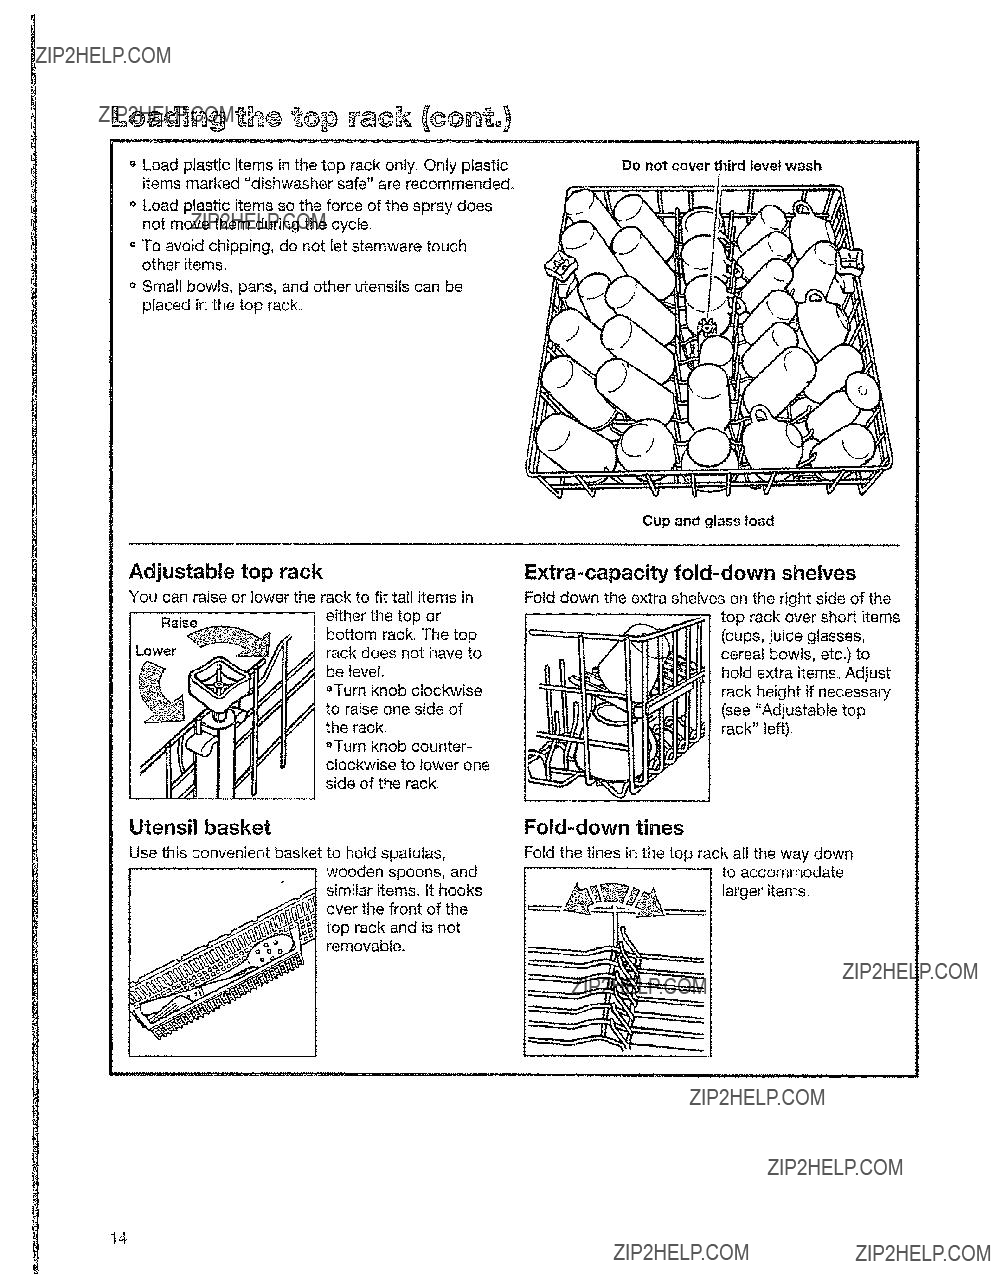
Adjustable top rack
You can raise or lower the rack to fit tall items in
Utensil basket
Use this convenient basket to hold spatulas, wooden spoors, and
over the front of the
similar items. It hooks top rack and is not
_%_%_._0 =o..,>".._ removable.
Cup and glass toad
Fold down the extra shelves on the right side of the top rack over short items (cups, juice glasses, cereal bowls, etc.) to hold extra items. Adjust rack height if necessary (see "Adjustable top rack" left),
Fold the tines in the top rack all the way down to accommodate
larger items.
14

Removethetop rackwhenyouneedmorespaceto loadtallitemsinthebottomrack.
t, Remove all toaded items from top rack.
2_ Gently pull out and up on left end cap tab.. 3o Slide end cap up and off of guide rail.
4.Repeat Steps 1 and 2 to remove right end cap.
5.Hold top rack with both hands and pull rack forward until guide wheels are out of guide rail..
End cap tab
To replace the top rack:
1.Position top rack with the rear guide wheels next to guide rails??
2.Slide guide wheels of rack into the guide rails. Push top rack into dishwasher,
30 Slide end caps into the holes in guide rails. You will hear the end cap "snap" into place,
Items with cooked=on or
NOTE: The top rack can be removed if more space is needed for tall items in the bottom rack. See "Removing the top rack.."
o Do not load glasses, cups, or plastic items in the bottom rack..
a Load plates, soup bowls, etc., between prongs and facing inward to the spray.
o Overlap edges of plates for large loads?? Secure heavily soiled cookware face down in the rack.
:I
i,li
i! ??,
!:!
t5
............................i .. H..I..,..I
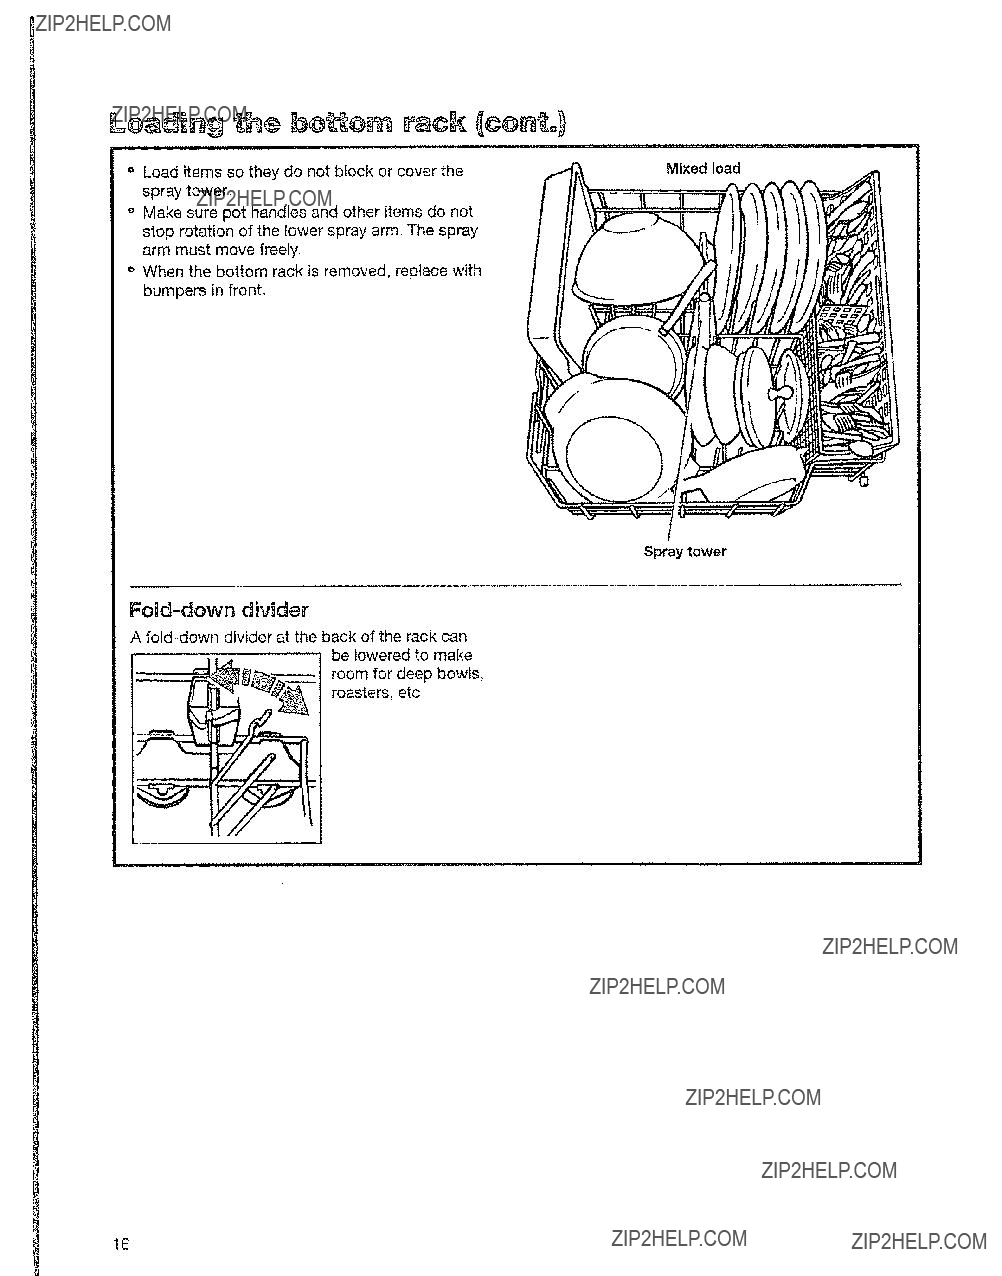
o Load items so they do not block or cover the spray tower
o Make sure pot handles and other items do not stop rotation of the iower spray arm_ The spray arm must move freely.
o When the bottom rack is removed, replace with bumpers in front.
A
roasters, etc
Mixed load
Spray tower
16
....................................................
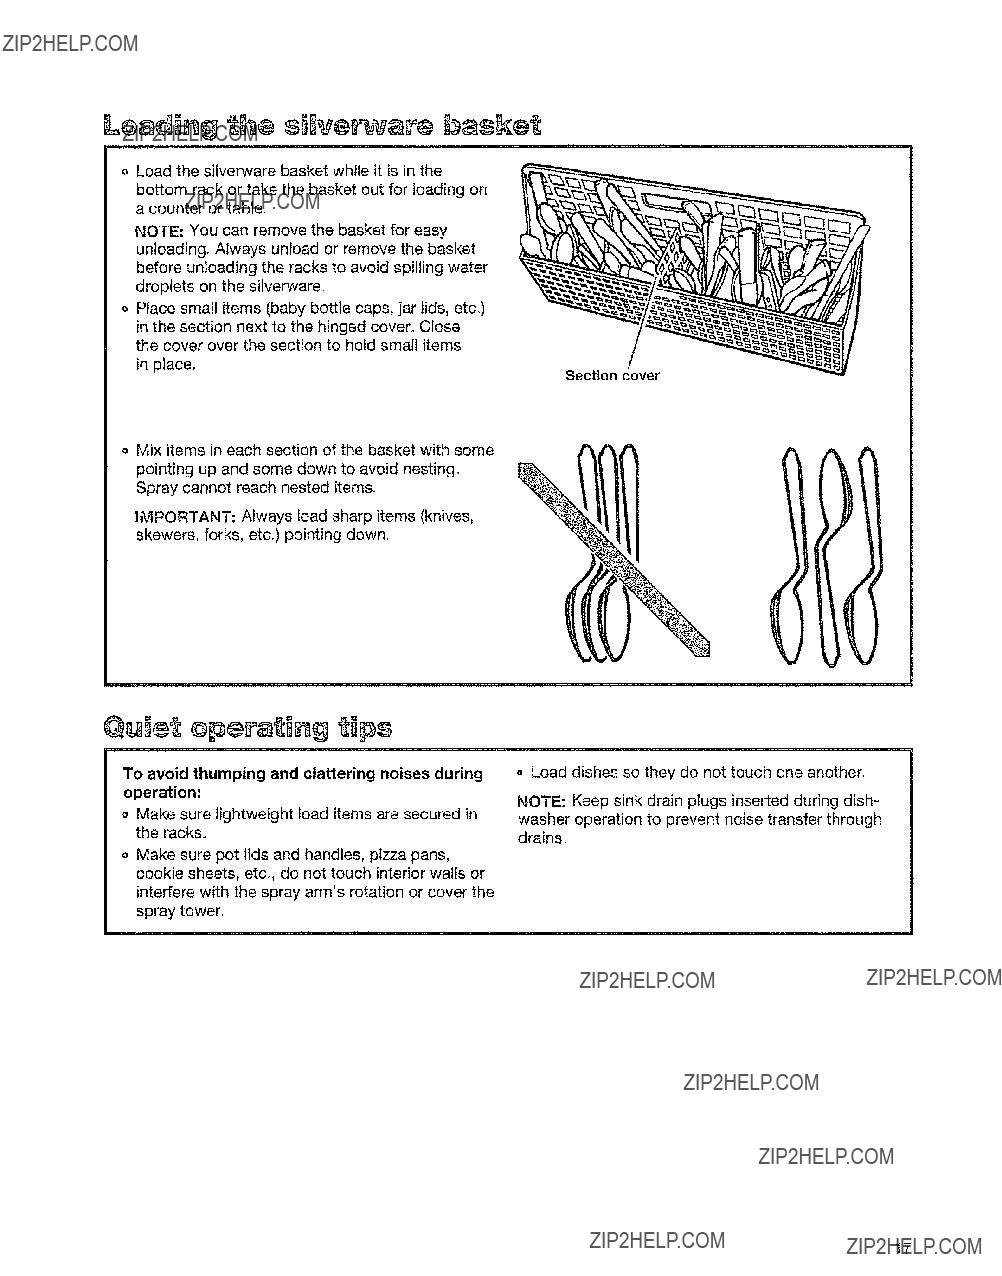
o Load the silverware basket while it is in the bottom rack or take the basket out for loading on a counter or table.
NOTE: You can remove the basket for easy unloading?? Always unload or remove the basket before unloading the racks to avoid spilling water droplets on the silverware??
???Place small items (baby bottle caps, jar lids, etc.)
in the section next to the hinged cover. Close the cover over the section to hold small items
in place.
Mix items in each section of the basket with some pointng up and some down to avoid nesting. Spray cannot reach nested items.
iMPORTANT: Always load sharp items (knives, skewers, forks, etc.) poinfng down
To avoid thumping and clattering noises during operation:
Make sure lightweight load items are secured in the racks.
o Make sure pot lids and handles, pizza pans, cookie sheets, etc.., do not touch interior walls or interfere with the spray arm's rotation or cover the spray tower.
i
Section cover
o Load dishes so they do not touch one another.
NOTE: Keep sink drain plugs inserted during dish- washer operation to prevent noise transfer through drains..
17
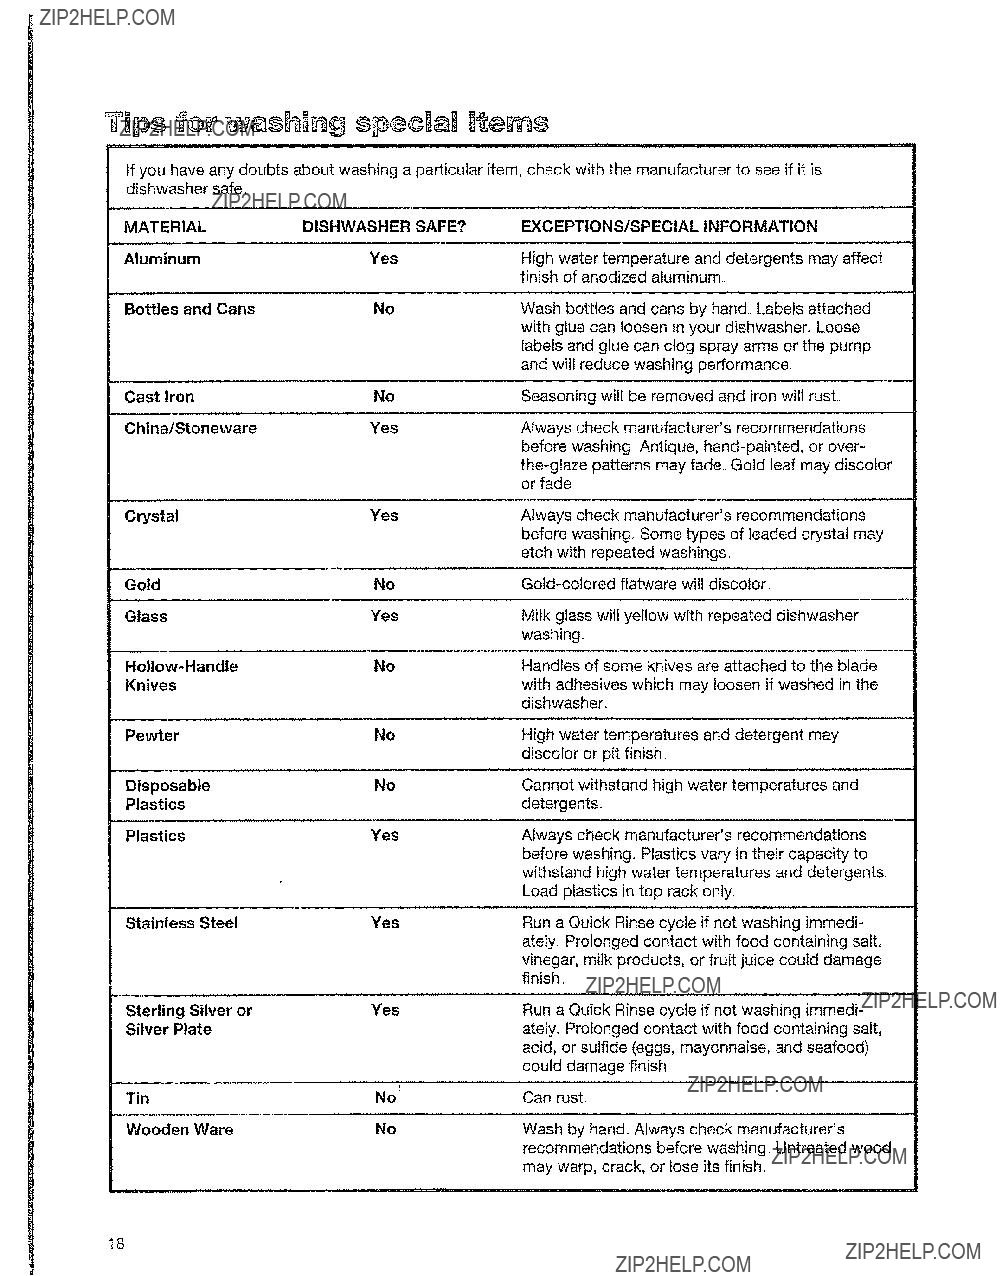
Ifyouhaveanydoubtsaboutwashingaparticularitem,checkwiththemanufacturerto seeif it is dishwashersafe,
t8
@ar ng ??@
Your new dishwasher is designed to give you many years of dependable service. There are a few things you can do to maintain your dishwasher properly, This section tells you how to clean and care for your dishwasher. Refer to "Solutions to Common Problems" on pages
Cleaning the exterior
In most cases, regular use of a soft, damp cloth or
sponge and a mild detergent is al! that is
necessary to keep the outside of your dish-
washer nice looking and clean,
Cleaning the interior
Hard water minerals may cause a white film to build up on the inside surfaces,
especially just beneath the door area. To clean
interior:
_Apply powdered dish- washer detergent to a damp sponge to make a paste,
OR
oUse liquid automatic dishwasher detergent
and clean with damp sponge
Do not clean the dishwasher interior until it has cooled.
Wear rubber gloves. Do not use any type of cleanser other than dishwasher detergent because it may cause foaming or sudsing.
NOTE: Some
that you prerinse concentrated amounts of soil from the dishes before loading.
Moving or winterizing your
dishwasher
Protect your dishwasher and home against water damage due to freezing water lines. If your dish- washer is left in a seasonal dwelling or could be exposed to near freezing temperatures, have a qualified person do the following:
1.Disconnect power supply to the dishwasher.
2.Turn off water supply to the dishwasher.
3.Remove the 4 screws on the lower access panel and remove the tower access panel,
4.Place a shallow pan under the water supply valve. Then, use a wrench to disconnect the water inlet from the water supply valve, Sepa- rate the water inlet from the water supply valve and drain water into the pant
5.Remove the spring clamp from the water outlet and separate from the water supply valve; drain water into pan,
/
continued on next page
19
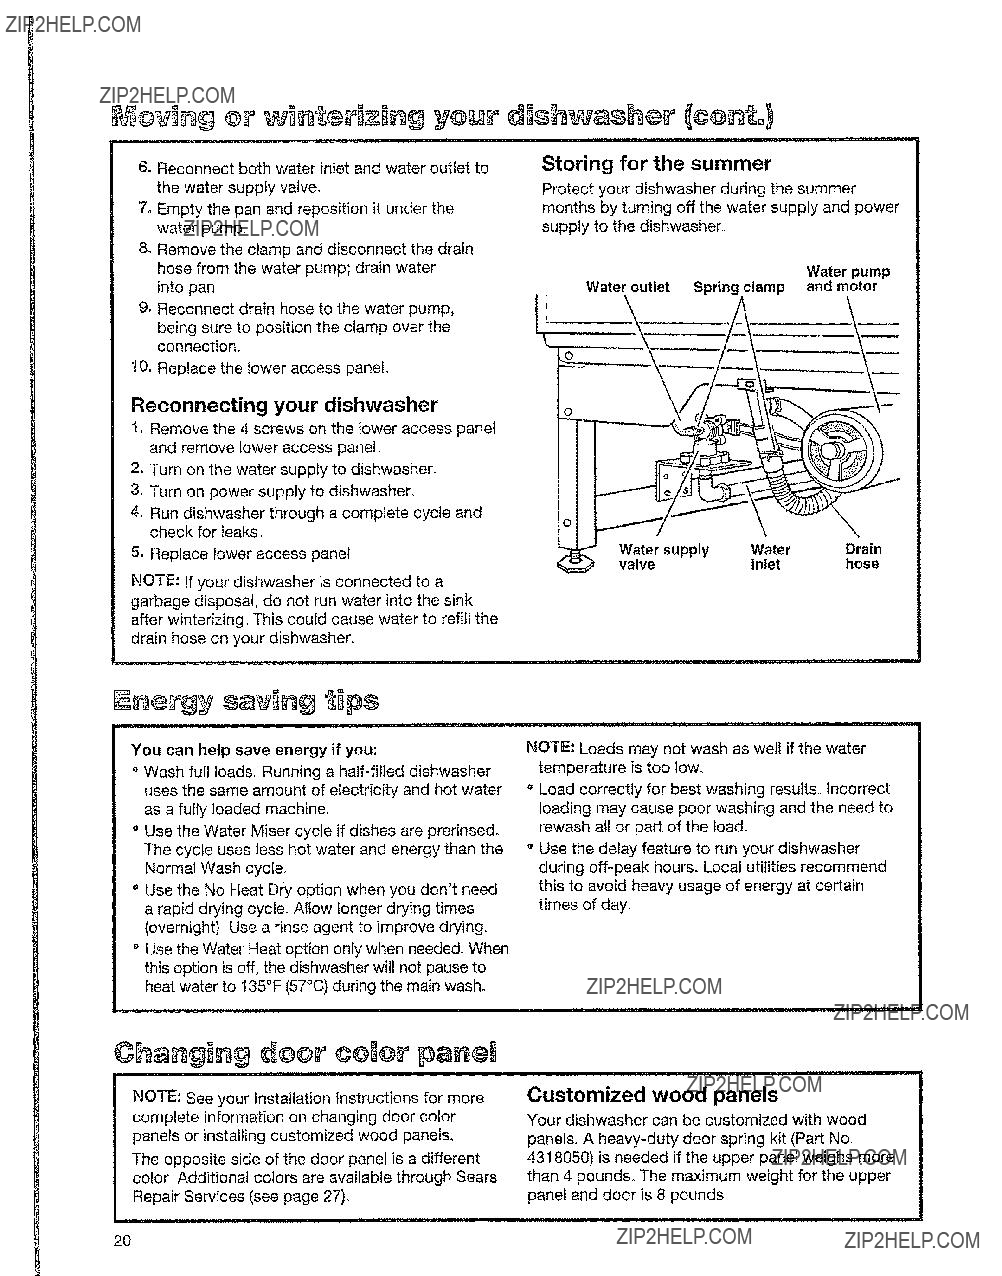
connection.
10.Replacetheloweraccesspanel.
Reconnecting your dishwasher
1.Remove the 4 screws on the lower access panel and remove lower access panel,
2.Turn on the water supply to dishwasher.
3.Turn on power supply to dishwasher.
4, Run dishwasher through a complete cycle and check for leaks,
5. Replace lower access panel,
NOTE: If your dishwasher is connected to a garbage disposal, do not run water into the sink after winterizing, This could cause water to refill the drain hose on your dishwasher.
N
Water supply Water Drain valveinlethose
You can help save energy if you;
??Wash full loads, Running a
??Use the Water Miser cycle if dishes are prerinsed. The cycle uses Jess hot water and energy than the Normal Wash cycle.
o Use the No Heat Dry option when you don't need a rapid drying cycle. Allow longer drying times (overnight) Use a rinse agent to improve drying.,
??Use the Water Heat option only when needed. When this option is off, the dishwasher will not pause to heat water to 135??F (57??C) during the main wash.,
NOTE: Loads may not wash as welt if the water temperature is too low.
Load correctly for best washing results. Incorrect loading may cause poor washing and the need to rewash all or part of the loado
Use the delay feature to run your dishwasher during
i ii i II'l'M'llllm'lllllllll.I
NOTE; See your Installation Instructions for more complete information on changing door color panels or installing customized wood panels??
The opposite side of the door panel is a different color, Additional colors are available through Sears Repair Services (see page 27)??
Customized wood panels
Your dishwasher can be customized with wood
panels, A
2O
Upper panel
t. Insert a finger under one end of the retainer, Pull the retainer towards you
in a peeling action. Set retainer aside
2, Lift color panels at outer edges. Use one hand to
???bow bottom of panel
Do not remove spacer,
Remove color panel(s)_
5, Push in on color panel(s) near the top and slide panel(s) and spacer up inside bottom of control
panel. Let color panel(s) rest on channel at bottom of doors.
3, With desired color facing out, insert one side of
color panel into door frame,.
4, Bow color panel and insert other side into
!door frame..
panel
Channel
in
along full
SpacerSnapintolength of channelretainer
2t
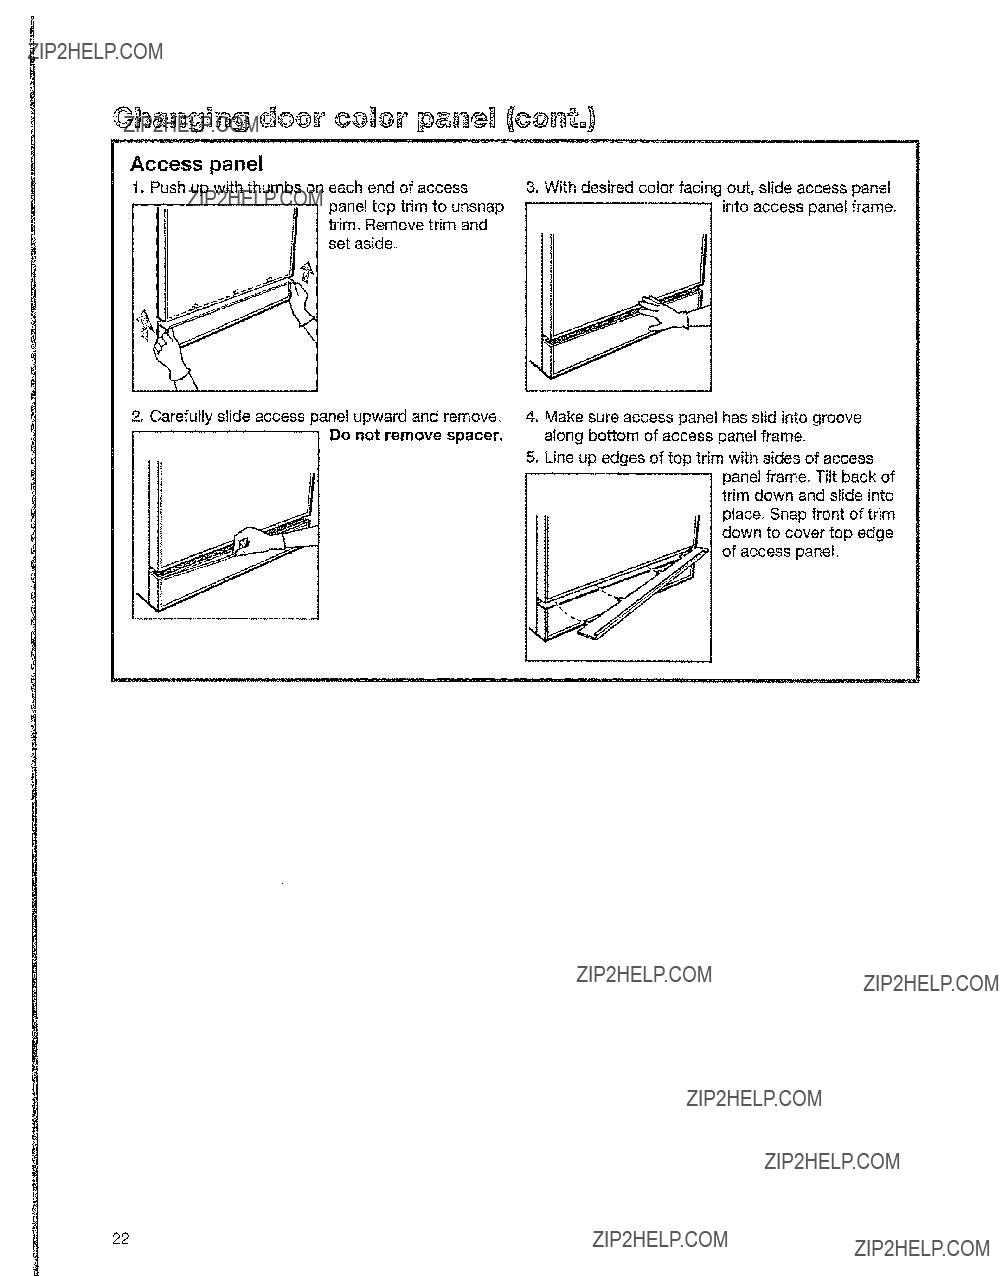
Access panel
%
2. Carefully slide access oanel upward and remove. Do not remove spacer.
4.Make sure access panel has slid into groove along bottom of access panel frame.
5.Line up edges of top trim with sides of access
panel frame. Tilt back of trim down and slide into placer Snap front of trim down to cover top edge of access panel,
22
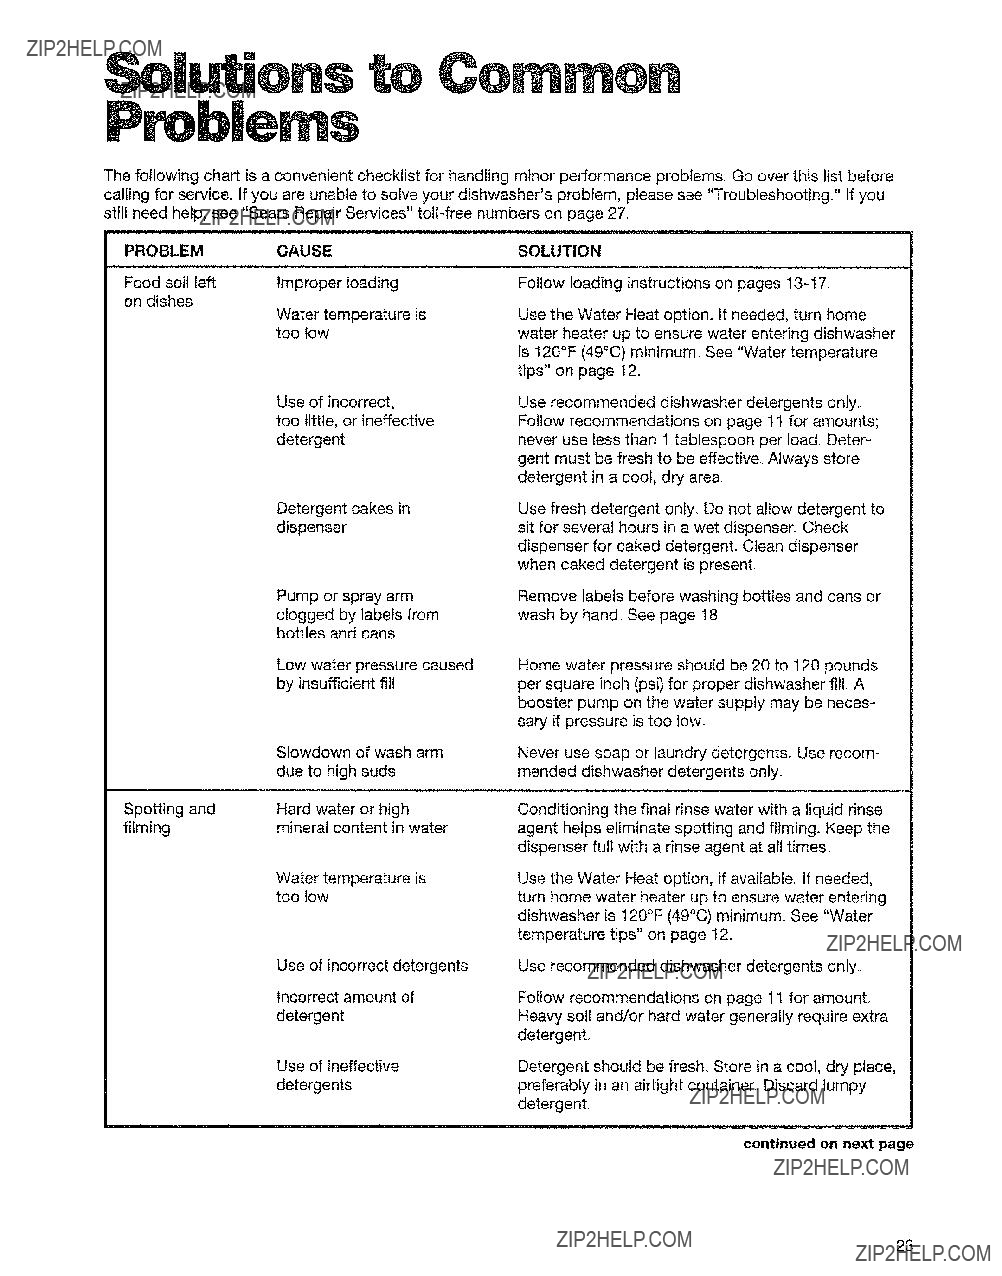
ThefollowingchartisaconvenientchecklistforhandlingminorperformanceproblemsGooverthislistbefore. callingforserviceIfyouareunableto. solveyourdishwasher'sproblem,pleasesee"TroubleshootingIfyou."
PROBLEM
Food soil left on dishes
Spotting and filming
CAUSE
Improper loading
Water temperature is too low
Use of incorrect,
too little, or ineffective detergent
Detergent cakes in dispenser
Pump or spray arm clogged by labels from bottles and cans
Low water pressure caused by insufficient fill
Slowdown of wash arm due to high suds
Hard water or high mineral content in water
Water temperature is too low
Use of incorrect detergents
Incorrect amount of detergent
Use of ineffective detergents
SOLUTION
Follow loading instructions on pages
Use the Water Heat option.. If needed, turn home water heater up to ensure water entering dishwasher is 120??F (49??C) minimum See "Water temperature tips" on page 12.
Use recommended dishwasher detergents onlyo Follow recommendations on page 11 for amounts; never use less than 1 tablespoon per load. Deter- gent must be fresh to be effective. Always store detergent in a cool, dry area.
Use fresh detergent only. Do not allow detergent to sit for several hours in a wet dispenser. Check dispenser for caked detergent?? Clean dispenser when caked detergent is present.
Remove labels before washing bottles and cans or wash by hand?? See page 18.
Home water pressure should be 20 to 120 pounds per square inch (psi) for proper dishwasher fill. A booster pump on the water supply may be neces- sary if pressure is too low.
Never use soap or laundry detergents. Use recom- mended dishwasher detergents only.
Conditioning the final rinse water with a liquid rinse agent helps eliminate spotting and filming. Keep the dispenser full with a rinse agent at ail times.
Use the Water Heat option, if available.. If needed, turn home water heater up to ensure water entering dishwasher is 120??F (49??C) minimum. See "Water temperature tips" on page 12.
Use recommended dishwasher detergents oniy
Follow recommendations on page 11 for amount, Heavy soil and/or hard water generally require extra detergent.
Detergent should be fresh. Store in a cool, dry place, preferably in an airtight container. Discard lumpy detergent..
continued on next page
23

PROBLEM
Spotting and filming (cont.)
Cycle takes
extremely long time
Dishes do not dry completely
Silica film or
etching (silica film is a white iridescent
deposit; etching is
a cloudy film)
Black or gray marks on dishes
Brown stains on dishes and dishwasher interior
CAUSE
Insufficient fill caused by tow water pressure
Water temperature is too low
Dishes do not drain properly
Plastics
Rinse agent dispenser is empty
A water chemical reaction with certain types of glassware.
Usually caused by some combination of
soft or softened water, alkaline washing solutions, insufficient
rinsing, overqoading the dishwasher, and
heat of drying.
Aluminum items
High iron content in water supply
SOLUTION
Home water pressure should be 20 to 120 psi for proper dishwasher fill. A booster pump on the water supply may be necessary if pressure is too low
NOTE:To remove spots and film from dishes, try a vinegar rinse
1.Wash and rinse as usual using the Air Dry option.
2.Remove a!f metal items
3.Put 2 cups (500 mL) white vinegar in a container on the bottom rack.
4.Run dishwasher through complete washing cycle_ Vinegar will mix with wash water??
If needed, turn home water heater up to ensure water entering dishwasher is 120??F (49??C) minimum. See "Water temperature tips" on page t2.
Dishes must have proper water drainage. Do not overload. Follow instructions for loading dishwasher on pages
Some plastics, due to material, may need to be towel dried.
Fit! rinse agent dispenser, See page 12.
It may not be possible to prevent problem, except by hand washing. To slow this process, use a minimum amount of detergent but not less than
1 tablespoon per load. Use a liquid rinse agent and underload the dishwasher to allow thorough rinsing. Silica film and etching are permanent and cannot be removed. Use the Air Dry option_
Aluminum items should be loaded so that they will
not rub against dishes during washing Throwaway aluminum items should not be washed in the dish-
washer because they may break down and cause marking, Aluminum markings can be removed by using a mild abrasive cleanser.
Remove by washing dishes (after food soil has been removed) with 1 teaspoon to 1 tablespoon of citric acid crystals added to covered section of detergent dispenser. Do not use detergent_ Follow with a Normal cycle with detergenL If treatment is needed
more often than every other month, the installation of an iron removal unit is recommended.
24
25
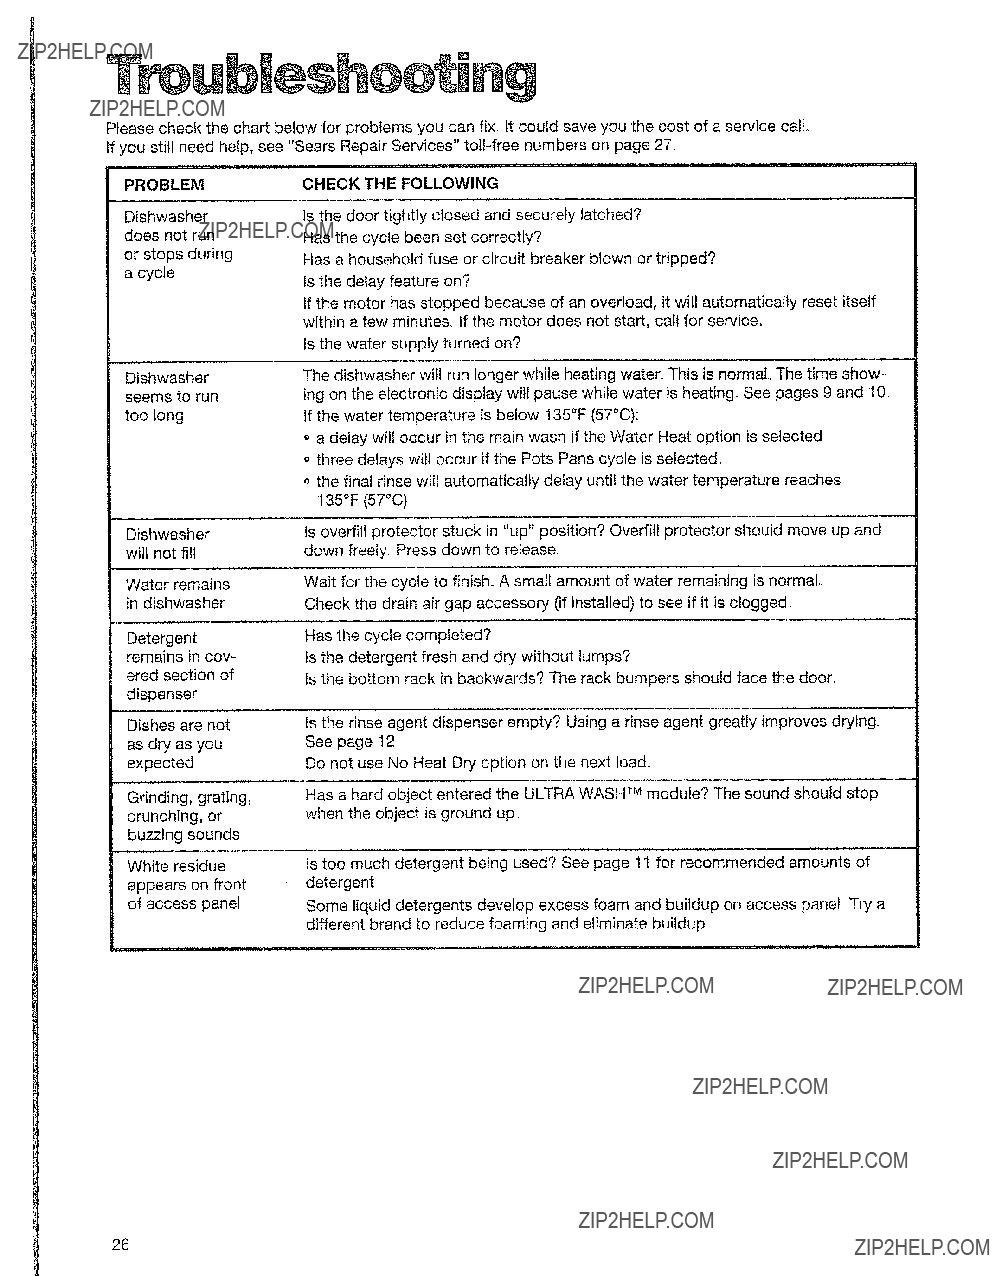
T oub ??shoo ng
Please check the chart below for problems you can fix. it could save you the cost of a service call. If you still need help, see "Sears Repair Services" tofFfree numbers on page 27_
26
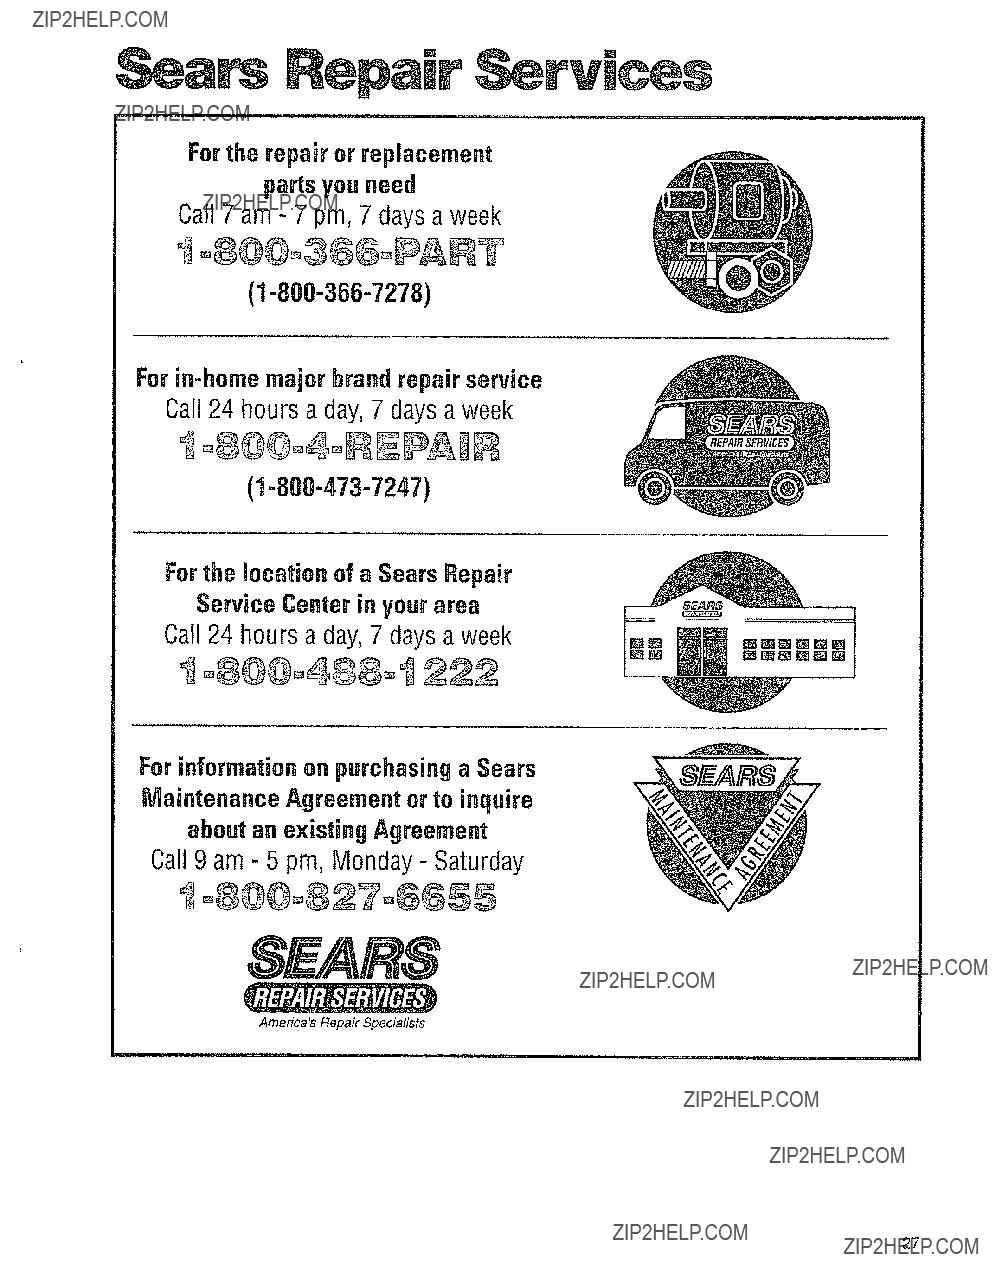
Forthe repair or replacement parts you need
Call 7 am - 7 pm, 7 days a week
For
Call 24 hours a day, 7 days a week
Forthe location of a Sears Repair
Service Center in your area
Call 24 hours a day, 7 days a week
Forinformationon purchasinga Sears Maintenance Agreement or to inquire about an existing Agreement
Call 9 am - 5 pm, Monday - Saturday
America's Repair Specialists
27

FULL
For one year from the first day of use in your home, Sears will repair, free of charge, defects in materials or workmanship.
LIMITED WARRANTY ON THE ULTRA WASH TM WASH SYSTEM
After the first year and through two years from the first day of use in your home, Sears will furnish, free of charge, replacement parts for any part of the ULTRA WASH wash system (motor, pump, spray arms, nozzle cap, spray tower, motor seals, and pump gasket) which is defective in materials or workmanship. YOU PAY THE LABOR,
FULL
For two years from the first day of use in your home, Sears will repair or replace, free of charge, the electronic module and power supply board, if defective in materials or workmanship.
FULL WARRANTY FOR THE LIFE OF THE DISHWASHER ON ULTRA LIFE" rM TUB MODELS
AGAINST LEAKS IN THE TUB AND INNER DOOR PANEL
For the life of the dishwasher if a leak should occur as a result of failure of the polypropylene inner door panei or tub due to cracking, chipping, or peeling, Sears will replace, free of charge, the tub or inner door panel.
If the dishwasher is subjected to other than private family use, the above warranty coverage is effective for only ninety days
WARRANTY SERVICE IS AVAILABLE BY CONTACTING THE NEAREST SEARS SERVICE CENTER/DEPARTMENT IN THE UNITED STATES. This warranty applies only while this product is in use in the United States??
This warranty gives you specific legal rights, and you may also have other rights which vary from state to state. Sears, Roebuck and Co., Dept. 817WA, Hoffman Estates, IL 60179
"We Service What We Sell" is our assurance you can depend on Sears for service.. Your dishwasher has added value when you consider that Sears has service units nationwide, staffed with professional technicians specifically trained on
Sears appliances and having the parts, tools, and equipment to ensure that we meet our pledge to you ....."We Service What We SelL"
Sears Maintenance Agreement
Maintain the value of your KENMORE Dishwasher with a Sears Maintenance Agreement, Sears dishwashers are
designed, manufactured, and tested for years of dependable operation_ Yet, any modern appliance may require service from time to time,
The Sears Maintenance Agreement:
o Is your way to buy tomorrow's service at today's prices,, o Eliminates repair bills resulting from normal use??
o Allows for as many service calls as required,
o Provides for service by professional Sears Trained Technicians,
o Even if you don'tneed repairs, the Maintenance Agreement offers an annual preventative maintenance
This Maintenance Agreement does not cover original installation, reinstallation, or damage resulting from external causes such as acts of abuse, theft, fire, flood, wind, lightning, freezing, power failure, power reduction, etc,
1/97