_ EEE_UseJENNand
Gas
MODELS CG106, CG205,CG206 CVG316 SERIES
Model CG206B
Model CG206B
_ EEE_UseJENNand
Gas
MODELS CG106, CG205,CG206 CVG316 SERIES
Model CG206B
Model CG206B
WARNING: If the information in this manual
is not followed exactly, a fire or explosion may
result causing property damage, personal
injury or death.
m Do not store or use gasoline or other flammable vapors and liquids in the vicinity of this or any other appliance.
WHAT TO DO IF YOU SMELL GAS
???Do not try to light any appliance.
???Do not touch any electrical switch; do not use any phone in your building.
???Immediately call your gas supplier from a neighbor'sphone. Follow the gas supplier's instructions.
???If you cannot reach your gas supplier, call the fire department.
???Extinguish any open flame.
Installation and service must be performed by a qualified installer, service agency or the gas supplier.

SAFETY
PRECAUTIONS
Read before operating your cooktop
All appliances
lems. Therefore the following safety precautions should be observed:
1.Be sure your appliance is properly installed and grounded by a qualified technician.
2.Never use your appliance for warming or heating the room. This warning is based on safety considerations.
3.Children should not be left alone or unattended in area where appliance is in use. They should never be allowed to sit or stand on any part of the appliance.
4. Wear proper apparel.
5.Do not repair or replace any part of the appliance unless
specifically recommended in this manual. All other servicing should be referred to an authorized
6.Do not store combustible materials, gasoline or other flammable vapors and liquid near cooktop.
7.Do not use water on grease fires. Smother fire or flame or
use dry chemical or
8.Use only dry potholders. Moist or damp potholders on hot surfaces may result in burns from steam. Do not use a towel or other bulky cloth.
9.Select cookware large enough to properly contain food and avoid boil overs or spillovers. This will save on cleaning and prevent hazardous accumulations of food, since heavy splattering or spillovers left on a cooktop can ignite. Pan size is especially important in deep fat frying.
10.Never leave cooktop unattended at Hi heat settings. Boil over causes smoking and greasy spillovers that may ignite.
11. TYPE OF COOKWARE

12.HANDLES
INWARD AND NOT EXTEND OVER ADJACENT SUR- FACE BURNERS to minimize burns, ignition of flammable
materials, and spillage due to unintentional contact with the cookware.
13.CAUTION
14.Do not touch grill and surface burner areas or perimeter trim around cooktop. During and after use, these areas may be hot enough to cause burns. Avoid contact with these
areas by clothing or other flammable materials until they have had sufficient time to cool.
15.Do not heat unopened food containers.
16. Keep all controls "OFF" when unit is not in use.
17. Keep vent ducts unobstructed.
18. GREASE
carefully. Never leave any cooking operation unattended. Let fat cool before attempting to handle it. Do not allow
grease to collect around the cooktop or in the vents. Wipe up spillovers immediately.
19.If the cooktop is installed near a window, proper precau- tions should be taken to prevent curtains from blowing over burners creating a FIRE HAZARD.
20.Do not use aluminum foil to line aeration tray or burner basin. Restriction of normal air flow may result in unsafe operation.
21.Do not use cookware on the grill section of this appliance.
22.Before servicing your appliance, disconnect power to the cooktop at the main fuse or circuit breaker panel and at the electrical receptacle.
23.Always allow hot pans to cool in a safe place out of the reach of small children.
24.A faint gas odor may indicate a gas leak. If a gas odor is detected, cut off the gas supply to the cooktop. Call
your installer or local gas company to have the possible leak checked. Never use a match or other flame to locate
a gas leak.
IMPORTANT SAFETY NOTICE AND WARNING
The California Safe Drinking Water and Toxic Enforcement Act of 1986 (Proposition 65) requires the Governor of California to publish a list of substances known to the State of California to cause cancer or reproductive
harm, and requires businesses to warn customers of potential exposure to such substances.
Users of this appliance are hereby warned that the burning of gas can result in
WARNING
ElectricalGroundingInstructions
This appliance is equipped with a
Congratulations on your choice of a
Before you begin cooking with your new cooktop, please take a few minutes to read and become familiar with the instructions in this book, Should you have any questions about using your
Consumer Relations Department
3035 Shadeland
Indianapolis, IN

Ventilation System
The
prepared on the cooktop, grill and grill accessories.
Regular use of this system will insure a more comfortable is free of heavy cooking odors and fumes that normally
and less humid kitchen which create a frequent need for
cleaning and redecorating.
Using the Ventilation System
???To operate the ventilation system manually, push the on/off switch located in front of the air grille.
???The ventilation system will operate automatically when the grill burner is in use.
???The ventilation system can be used to remove strong odors from the kitchen as when chopping onions.
Cleaning the Ventilation System
Air Grille: The air grille lifts off easily. Wipe clean or wash in sink with mild household detergents. To prevent scratching the surface, do not use abra- sive cleansers or scrubbing pads. May be cleaned in dishwasher.
Filler: Turn off ventilation system be- fore removing. Turn filter retainer clip to
remove filter. The filter is a permanent type and should be cleaned when soiled.
Clean in sink with warm water and liquid dishwashing detergent or in dishwasher.
IMPORTANT: Filter should always be
placed at an angle. As you face the front of the cooktop, the top of the filter should rest against the left side of the vent open- ing and the bottom of the filter should rest against the right side of the ventilation chamber at the bottom. DO NOT OPER-
ATE SYSTEM WITHOUT FILTER. If filter
is flat against the fan wall, ventilation effectiveness is reduced.
event of spills or whenever it becomes coated with a film of grease. May be cleaned with paper towel, damp cloth or sponge and mild household detergent.
Cookware Selection
Size of Cookware
Flame size should be adjusted so it does not extend beyond the edge of the cookware.
This instruction is based on safety considerations. Adjusting the size of the flame to fit the size of the cookware also helps to save fuel.
CAUTION: Do NOT allow large pans to contact or extend over the control knobs.
Heat trapped between large pans and control knobs could possibly cause damage to the control knobs.
IMPORTANT: Leave a minimum of 11/2" between side of pan and surrounding surfaces, such as countertop backsplash or side walls, to allow heat to escape to avoid possible damage to these areas.
Cookware Materials
Stainless steel, porcelain enamelware, glass, and glass ceramic cookware designed for surface cooking usually heat slowly and conduct heat poorly when a large flame size is used. Turn the knob to adjust the flame size to extend only halfway between center and edge of the cookware bottom for better cooking results. Aluminum cookware conducts heat more evenly; therefore, a slightly larger flame size can be used. The flame can be adjusted so it comes to the edge of the cookware. The flame should NEVER be adjusted so that it extends beyond the bottom of the cookware.
Covered Cookware
If the cookware is covered, less fuel will be needed; therefore, a lower flame size can be used.
NOTE: Food will not cook any faster when more than the amount of heat needed to maintain a gentle boil is used.
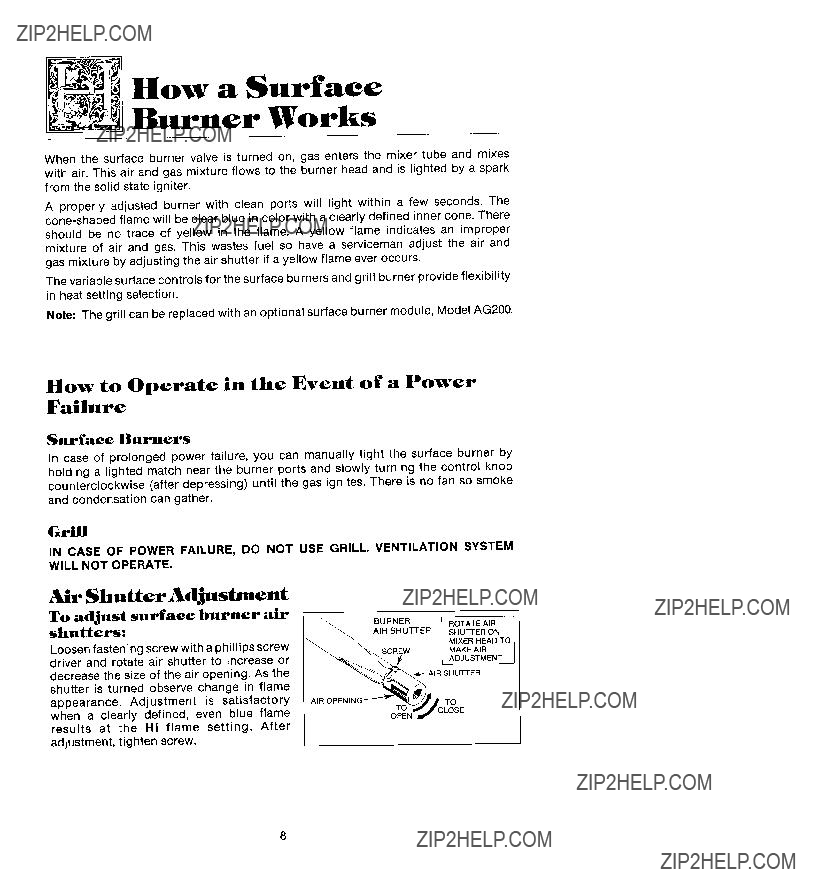
BurnerHow a SurfaceWorks
When the surface burner valve is turned on, gas enters the mixer tube and mixes with air. This air and gas mixture flows to the burner head and is lighted by a spark from the solid state igniter.
A properly adjusted burner with clean ports will light within a few seconds. The
The variable surface controls for the surface burners and grill burner provide flexibility in heat setting selection.
Note: The grill can be replaced with an optional surface burner module, Model AG200.
How to Operate in the Event of a Power
Failure
Surface Burners
In case of prolonged power failure, you can manually light the surface burner by holding a lighted match near the burner ports and slowly turning the control knob counterclockwise (after depressing) until the gas ignites. There is no fan so smoke and condensation can gather.
Grill
IN CASE OF POWER FAILURE, DO NOT USE GRILL. VENTILATION SYSTEM
WILL NOT OPERATE,
results at the Hi flame setting. After adjustment, tighten screw.

increase or decrease the size of the air open- ing. Air shutters fit snugly on the grill burner,
so a screwdriver blade may be required to make this adjustment. Observe change in flame appearance as the air shutter is moved.
AIR SHUTTER _ L ,_'_=_
INSERTSCREWDRIVERBLADE
IN SLOT AND TWIST WITH
SLIGHTPRESSURETOALLOW
A_SHUTTERTOSLIDEEASILY.
Adjustment is satisfactory when a clearly defined, even blue flame results at the Hi flame setting. The snug fit of the air shutter assures it will remain positioned correctly.
On any burner, closing the air shutter too far will cause the flame to become soft and yellow tipped. Opening the air shutter too wide will cause the flame to blow away from the burner ports. Proper adjustment will produce a sharp, clearly defined, even, blue flame.
Lo Flame Adjustment
This appliance has been shipped from the factory with Lo and Meal flame settings adjusted for use with natural gas and average installations. There is a wide variety of conditions caused by altitude and gas mixtures controlled by utility companies, which will vary and affect the gas flame and performance. Adjustments should be made at time of installation. If conditions change, follow the procedures outlined below to adjust the Lo setting.
To adjust the Lo setting:
1.Light burner and set control knob for low flame.
2.Remove control knob from valve stem.
CAUTION:
Never use a metal blade to pry knob off. If knob cannot be easily removed, tuck the folds of a cloth dishtowel under the knob skirt and pull the towel
upward with steady, even pressure.
Proper adjustment will produce a stable, steady blue flame of minimum size. The final adjustment should be checked by turning knob from Hi to Lo several times without extinguishing the flame.
This adjustment, at the Lo setting, will automatically provide the proper flame size at Med setting.
9

Surface Controls
To Set Controls
???Since the controls are a
ignition, turn knob clockwise to desired setting.
???Igniter will continue to spark until knob is turned clockwise back to or past Hi position on knob.
Control Locations
Left Side or Single Grill
The Lo Controls are set for the grill burner. Thus, when using a surface burner, the control knob may be turned to a position lower than the Lo setting.
Right Side
Only surface burners may be used on the right side. Use the right surface burners on Hi for large quantity cooking and canning because the BTU rate is higher. Also use the right surface burners on Lo for sauces and delicate items because the Lo setting has a lower BTU rate.
NOTE CVG316 MODELS: "The center bay is designated for surface burners only. (SeeRight Side notes above.)
CAUTION" Do NOT allow large pans to extend over the control knobs. Heat trapped between large pans and control knobs could possibly cause damage to the control knobs.
Suggested Control Settings for Surface Burners
The size and type of cookware and the amount and type of food being cooked will influence the setting needed for best cooking results. The setting indicated should serve as a guide while you become familiar with your cooktop.
Use Lo setting to keep food at serving temperatures without further cooking. You
may find that some cooking may take place if the cookware is covered.
10
ModuleSurface Burner
To Install Burner Module
1.Be sure control knobs are turned off.
2.If the grill burner and grill grates are in place, remove before installing a surface burner module. Clean burner basin of any grease accumulation. (See page 18 for cleaning recommendations.)
3. Position the burner assembly with the mixer tube openings toward the orifices. Slide the burner assembly toward the orifices until opening for igniter is over the igniter. Lower into place until side openings are resting on the burner supports and igniter is centered between the two flash tubes.
4.Install the aeration tray by inserting the prong at the end of the pan into the opening in the end of the burner basin. Lower the opposite end into the cooktop.
To Remove Burner Module
1. Control knobs should be in the OFF position and the cooktop should be cool.
2.Remove the aeration tray by lifting up the front end on the right side (back end on the left side) until the top clears the opening of the cooktop by about 5 inches.
3.Hold aeration tray by the sides and slide away to remove the prong from the opening and clear the surface burners.
4.Lift up on the sides of the surface burner assembly bracket about 2 inches. Slide away from the orifices.
Note: Optional surface burner assembly, Model AG200, can replace the grill burner assembly. Model AG200 air shutters have been adjusted for compatibility on the left side.
11

The grill consists of two black grill grates and a grill burner. Note for CG206 and CVG316: only install the grill on the left side of your cooktop. Note CG205 Owners: An optional grill accessory, AG150, may be used on the left side only.
To Install Grill Module
1. Before installing grill components, be certain control knobs are in the OFF position.
2. Position the grill burner with mixer tube openings toward the orifices. Slide the burner toward the orifices until igniter is in between front and rear grill sections. Lower into place until side openings are resting on the burner support pins.
3. Place the grill grates on the top of the cooktop.
Note: Before using the grill for the first time, heat the
To Remove Grill Module
1.Remove grill components once they are cool. Be sure control knobs are in the OFF position.
2.Remove grill grates.
3.Remove grill burner.
12
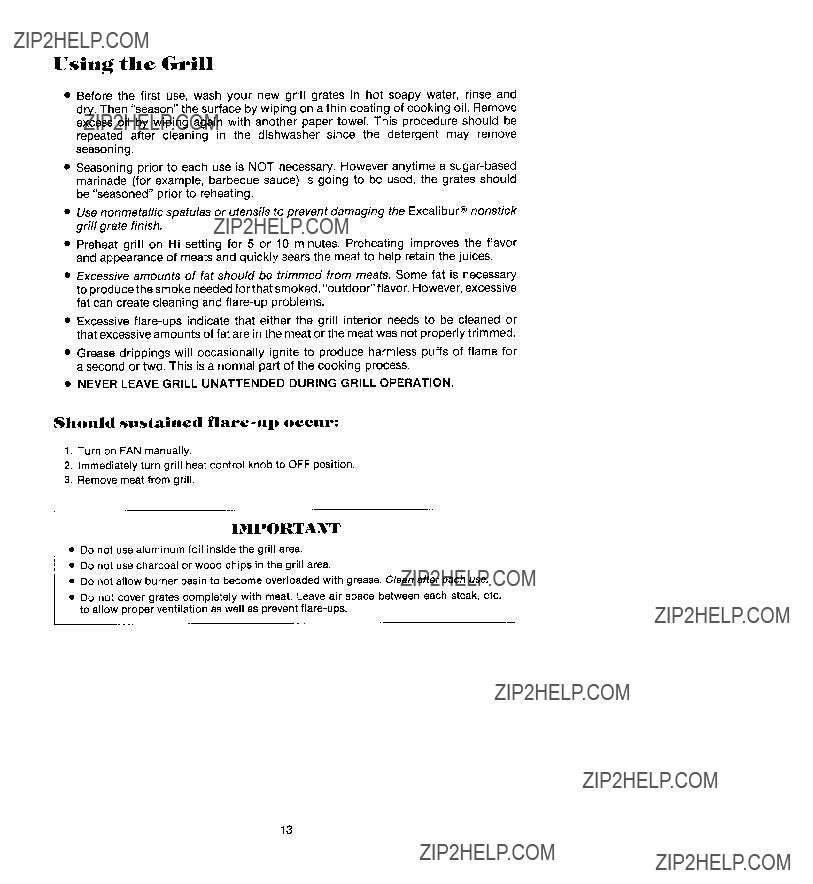
Using the Grill
???Before the first use, wash your new grill grates in hot soapy water, rinse and dry. Then "season" the surface by wiping on a thin coating of cooking oil. Remove excess oil by wiping again with another paper towel. This procedure should be repeated after cleaning in the dishwasher since the detergent may remove seasoning.
???Seasoning prior to each use is NOT necessary. However anytime a
???Use nonmetallic spatulas or utensils to prevent damaging the Excalibur?? nonstick grill grate finish.
???Preheat grill on Hi setting for 5 or 10 minutes. Preheating improves the flavor and appearance of meats and quickly sears the meat to help retain the juices.
???Excessive amounts of fat should be trimmed from meats. Some fat is necessary
to produce the smoke needed for that smoked, "outdoor" flavor. However, excessive fat can create cleaning and
???Excessive
???Grease drippings will occasionally ignite to produce harmless puffs of flame for a second or two. This is a normal part of the cooking process.
???NEVER LEAVE GRILL UNATTENDED DURING GRILL OPERATION.
Should sustainedflare-up occur:
1.Turn on FAN manually.
2.Immediately turn grill heat control knob to OFF position.
3.Remove meat from grill.
IMPORTANT
???Do not use aluminum foil inside the grill area.
???Do not use charcoal or wood chips in the grill area.
???Do not allow burner basin to become overloaded with grease. Clean after each use.
???Do not cover grates completely with meat. Leave air space between each steak, etc. to allow proper ventilation as well as prevent
13
14

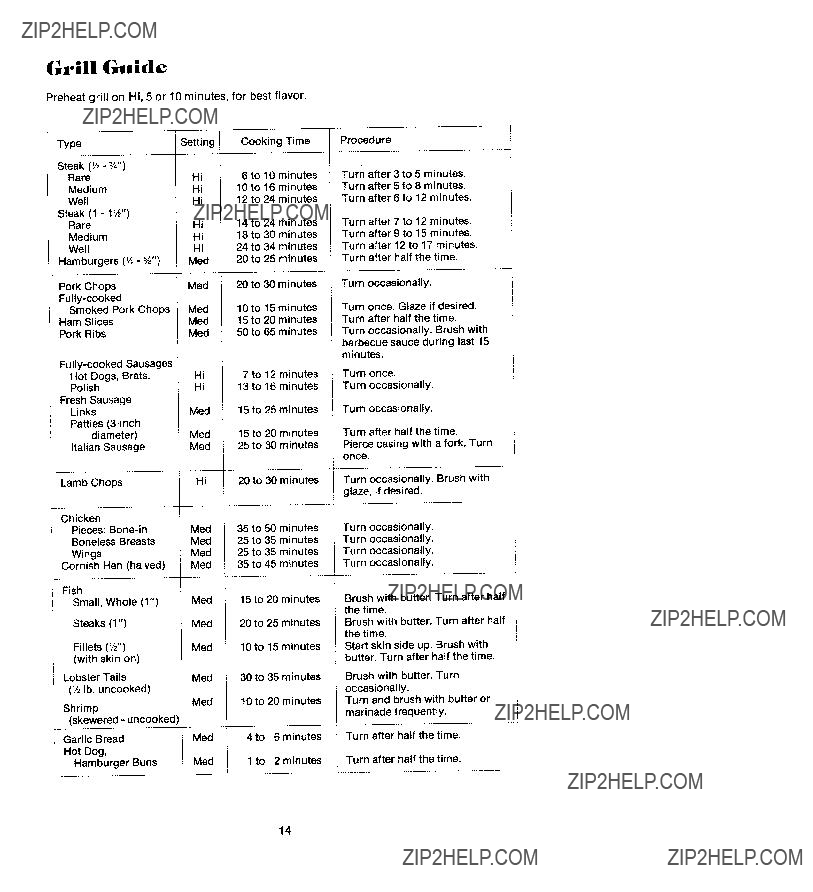
Grilling Tips
With your
The following suggestions are good rules to follow and will increase your enjoyment of the equipment.
??? Be sure to follow directions on page 13 for using the grill.
??? Suggested cooking times and control settings are approximate due to variations in meats. Experience will quickly indicate cooking times as well as which settings work best.
??? For best results, buy top grade meat.
??? Score fat on edges of steak, but do not cut into meat, to prevent curling while cooking.
??? For the attractive "branded" look on steaks, be sure grill is preheated. Allow one side of meat to cook to desired doneness, or until juices appear on the top surface, before turning. It takes fewer minutes to cook the second side. Turn steaks and hamburgers just once. Manipulating food causes loss of juices.
e When basting meats or applying sauces to foods, remember that excessive amounts wind up inside your grill and do not improve the food flavor. Apply sauces during the last 15 to 20 minutes of cooking time unless recipe specifies otherwise. Plus, anytime a
???There are many meat marinades which will help tenderize less expensive cuts of meat for cooking on the grill.
???Certain foods, such as poultry and
???Use tongs with long handles or spatulas for turning meats. Do not use forks as these pierce the meat, allowing juices to be lost.
?? To help retain meat juices, salt after turning meat or after cooking is completed.
15
Cleaning Parts of
Your Cooktop
Control Bmobs
The knobs on the control panel can be removed with the controls in the OFF position. Pull each knob straight from the shaft. Wash knobs in warm soapy water or dishwasher; do not use abrasive cleansers or materials. To replace each knob, match flat part of knob opening with the flat of the shaft, returning in OFF position.
IMPORTANT: Never use a metal blade to pry knob off. If knob cannot be easily removed, tuck the folds of a cloth dishtowel under the knob skirt and pull the towel upward with steady, even pressure.
Control Knob Area
Use mild cleansers, such as soapy water or mild liquid sprays, such as 409. Wipe with sponge, damp cloth or paper towel. Do not scrub with S.O.S. pads or abrasive cleansers.
Grill Grates
These are made from cast aluminum and are coated with the Excalibur?? nonstick finish.
???After the grill gates have cooled, wipe off grates with a paper towel. Wash cool grates (DO NOT IMMERSE HOT GRILL GRATES IN WATER) with soap or detergent in hot water in the sink or wash them in the dishwasher. Be sure to remove all food residue before cooking on the grill grates again.
???Remove stubborn spots with a plastic mesh puff or pad. For best results, use only those cleaning products which state they are recommended for use when cleaning nonstick surfaces.
???If grates were washed in the dishwasher, season with oil prior to grilling.
???Do not use metal brushes or abrasive scouring pads or other scrubbers intended to clean outdoor charcoal grills. These will remove the finish as well as scratch the grates. Do not clean in the
GriH Burner
The grill burner should be cleaned after each use. It can be cleaned with a soapy S.O.S. pad or in the dishwasher. Rinse and dry thoroughly before using again. For heavy soil, burner should be cleaned first with a soapy S.O.S. pad, rinsed and dried. Then it can be cleaned in a
t
Note: Check to be sure all ports are open. To open clogged ports, insert a toothpick directly into each port.
Surface Burner Assembly:
The surface burner assembly can be cleaned with mild detergents and a plastic scrubber
16
Cooktop
Stainless Steel Cooktop
???To clean light soil, wipe with soapy cloth or nonabrasive cleanser, such as Soft Scrub. Rinse, buff with soft cloth; polish with glass cleaner if necessary.
???To clean moderate soil or discoloration of the surface (excessive heat will cause
a golden discoloration), clean with Zud, Bar Keepers Friend, or Luneta (Jenn- Air Model A912, Part No. 712191). With a sponge or cloth, rub cleanser with the grain to avoid streaking the surface. Rinse well, buff dry; polish with a glass cleaner if necessary to remove cleanser residue and smudge marks.
???Heavy soil, such as burned on food soil, can be removed by first cleaning as per the instructions for moderate soil. Stubborn stains can be removed with
a damp
???Stubborn food stains may also be removed by spraying with
mended cleansers such as Zud, Luneta
manufacturer'sprecautions on using oven cleaners. Hint:
PorcelainizedSteel Cooktop
???Never wipe a warm or hot porcelain enamel surface with a damp cloth.
???For general daily cleaning and light soil, wash with warm soapy water and rinse. Polish with a dry cloth.
???For stubborn stains, clean with Cooktop Cleaning Creme (Part No. 20000001) and a sponge.
???Do NOT use abrasive or caustic cleaning agents which may permanently damage the finish.
Note: The porcelain enamel used on your cooktop is acid resistant, not acid
proof. Therefore, acid foods (such as vinegar, tomato, milk, etc:) spilled on the cooktop should be wiped up immediately with a dry cloth.
Igniters
???It is important to keep igniter port openings clear and free of obstructions
to avoid ignition failure and possible gas buildup. If the port openings are blocked, use a toothpick to remove food particles.
???The igniter cap and stem can be cleaned with warm soapy water and a plastic scrubber. The wire electrode inside the cap can be cleaned with a small brush. Rinse and dry.
17

Porcelain Burner Basin
This area, located under the grill burner should be cleaned after each use of the grill.
???To remove light soil, clean area with soapy water or spray with cleansers such as 409 or Grease Relief. For easier
cleanser, lay in burner basin, and soak for at least a
???To remove moderate soil, scrub with Comet, Bon Ami, a soft scrub cleanser or plastic scrubber.
???To remove stubborn soil, spray with an oven cleaner such as
Under Counter
Drain Jar: A drain jar is located below each burner basin (under the coun- ter). Check periodically to prevent spill- overs. Unscrew and remove. If jar is broken, replace with any heat tempered jar, such as a canning jar, which has a standard screw neck.
18
DuctingInformation.
from any place on the grill surface. If the system does not, these are some ducting installation situations to check:
???6" diameter round or 31/ ''x 10" rectangular ducting should be used for duct
lengths
???No more than three 90 ?? elbows should be used. Distance between elbows should be at least 18".
???Recommended
???There should be a minimum clearance of 6" for cooktop installed near a side wall.
If there is not an obvious improper installation, there may be a concealed problem such as a pinched joint, obstruction in the pipe, etc. Installation is the responsibility of the installer and questions should be addressed first by the installer. The installer should very carefully check the ducting installation instructions.
19
BeforeServnceYou Call
Check the following list to be sure a service call is really necessary.
If grill or surface burner fails do liglnt:
???check to be sure unit is properly connected to power supply.
???check for a blown circuit fuse or a tripped main circuit breaker.
???check to be sure burner ports or ignition ports are not clogged.
???check to be sure regulator is set for the correct fuel.
???check to be sure inlet pressure is adequate.
???clean igniter (see p. 17).
If tint |lann_ is uneven:
???burner ports may be clogged.
???flame setting may need to be adjusted (see p. 9).
If grill or sunri'ace burner ilanle iif|s off tlne ports:
???shutter on the mixer tube needs to be closed until flames settle on the burner ports (see pp.
If grill or surface burner flame is yellow in color:
???shutter on the mixer tube needs to be opened until yellow disappears (see pp.
If You Need Service
???call the dealer from whom your appliance was purchased or the authorized
???if the dealer or service company cannot resolve the problem, write to MAYCOR Parts and Service Co., P.O. Box 2370, Cleveland, TN
???use and care manuals, service manuals, and parts catalogs are available from MAYCOR for a nominal charge.
All specifications subject to change by manufacturer without notice.
20
Accessories
Griddle
lets you cook several pancakes, hamburgers, or grilled sandwiches at the
Note CG205 Owners: Griddle must be 'samefoods timeeasier. to fix.
used with the grill burner (part of the AG150 accessory).
Grill Accessory
Grill accessory includes grill burner and two grill grates to convert the left side of a CG204 or CG205 to a grill,
Wok
I_
, I
._
i',_
i1
grates.
Grill Cover
Attractive grill cover protects grill when not in use. Textured steel with molded
handles.
Note: Only these accessories are approved for use with your gas
23