
 WARNINGS
FCC Warning: This equipment may generate or use radio frequency energy. Changes or modifications to this equipment may cause harmful interference unless the modifications are expressly approved in this User Guide. The user could lose the authority to operate this equipment if an unauthorized change or modification is made.
Note: This equipment has been tested and found to comply with the limits for a Class B digital device, pursuant to part 15 of the FCC Rules. These limits are designed to provide reasonable protection against harmful interference in a residential installation. This equipment generates, uses and can radiate radio frequency energy and, if
1
not installed and used in accordance with the instructions, may cause harmful interference to radio communications. However, there is no guarantee that interference will not occur in a particular installation. If this equipment does cause harmful interference to radio or television reception, which can be determined by tuning the equipment off and on, the user is encouraged to try to correct the interference by one or more of the following measures:
Reorient or relocate the receiving antenna.
Increase the separation between the equipment and receiver.
Connect the equipment into an outlet on a circuit different from that to which the receiver is connected.

Consult the dealer or an experienced radio/TV technician for help.
Operating Temperature
The receiver is designed to operate between
Avoid leaving the receiver in a vehicle or elsewhere where the temperature may fall outside this range. Extreme temperatures or extreme temperature fluctuations can degrade the performance of the LCD display screen, and possibly damage it.
Cleaning and Maintenance
If the receiver or accessories become dirty, turn the power off and wipe it clean with a soft cloth. Do not use hard
cloths, strong cleaning fluids, paint thinner, alcohol, or other volatile solvents to clean. These may cause damage to the receiver.
Caution:
Changes or modifications not approved by JVC could void the user???s authority to operate the equipment.
2

 CAUTIONS
This symbol means important instructions. Failure to heed them can result in injury or material property damage.
Liquid Crystal Precautions
If the liquid crystal fluid comes in contact with your skin, wipe the skin area with a cloth and then wash the skin thoroughly with soap and running water.
If the liquid crystal fluid gets into your eye, flush the eye with clean water for at least 15 minutes. Seek medical care.
If the liquid crystal fluid is ingested, flush your mouth thoroughly with water. Drink large quantities of water and induce vomiting. Seek
3
medical care.
Safety Precautions
Be sure to observe the following warnings. Failure to follow these safety instructions and warnings may result in a serious accident.
Do not operate the receiver in a way that might divert your attention from driving safely. As a driver, you alone are responsible for safely operating your vehicle in accordance with traffic safety laws at all times.
Do not install the receiver where it may obstruct your view through the windshield, or of your vehicle???s indicator displays.
Do not install the receiver where it may hinder the function of safety
turn the power off immediately, and disconnect the receiver from
any power source.
 [European Union only]
4

Index

6

Package Contents
3. Remote control with battery
1. HD Radio receiver
2. Cigarette lighter adapter
For
This product contains a CR Coin Cell Lithium Battery which contains Perchlorate Material special handling may apply.
See www.dtsc.ca.gov/hazardouswaste/perchlorate
7
Warning
???Do not install any battery other than CR2025 or its equivalent; otherwise, it may explode.
???Store the battery in a place where children cannot reach to avoid risk of accident.
???To prevent the battery from
Note! You will need to purchase an additional Home or Car installation kit to use your
8
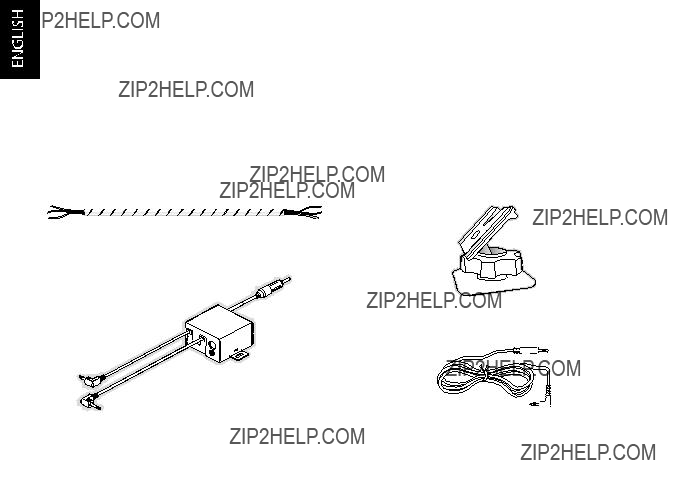
2. Car Kit
???Do it Yourself??? Installation Kit (Optional)
(b) Output antenna (Sleeve type)
(e) Audio cable
(c) Cable clip
10


Installation for Car Use
There are two ways for installation: ???Professional??? installation and ???Do it Yourself??? installation.
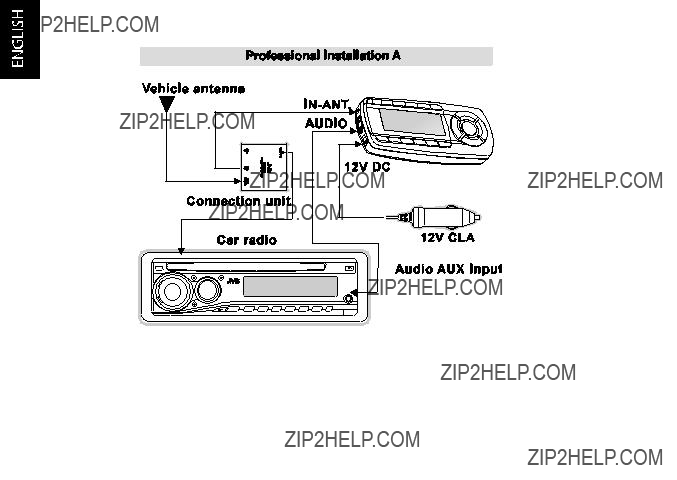
???Professional??? Installation
Professional installation requires an experienced technician to install this product in your vehicle, and provides advice for selecting a suitable mounting location, installation of the antenna, and routing all the necessary wires and cables.
???Professional ??? Installation- Type (A)
Professional
12
Note! Some motorized vehicle antennas will automatically retract down when
13
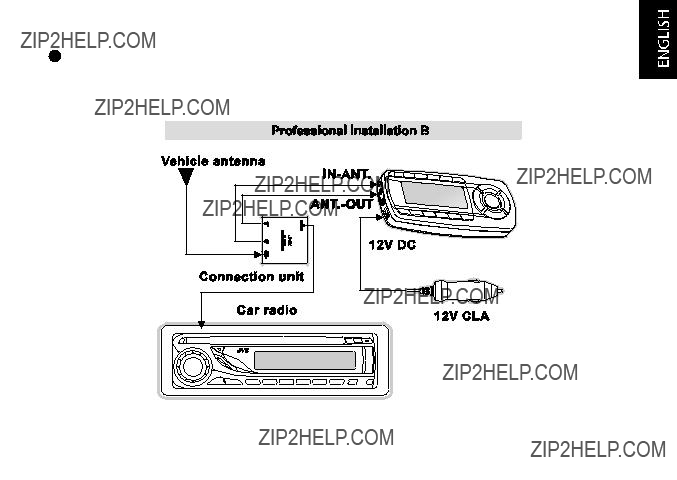
???Professional ??? Installation- Type (B)
Professional
14

???Do it Yourself??? Installation
???Do it Yourself??? installation facilitates you to set up your device in convenient and quick ways.
???Do it Yourself??? Installation- Type (A)
Do it Yourself
15

???Do it Yourself ??? Installation- Type (B)
Do it Yourself
16
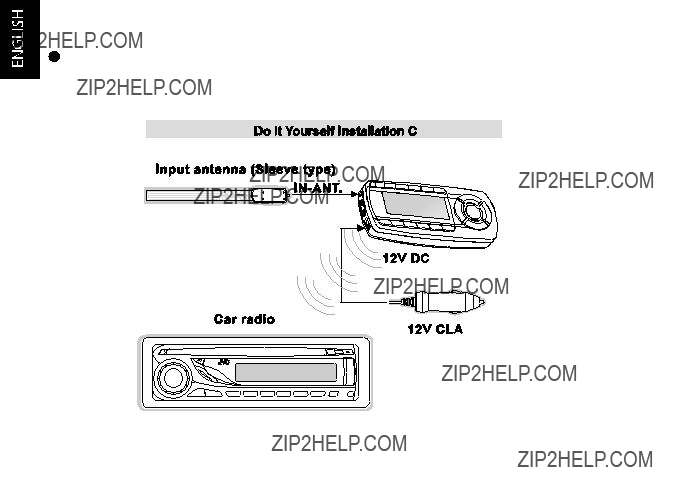
???Do it Yourself ??? Installation- Type (C)
Do it Yourself
17

Installation for Home Use
Your transportable HD Radio receiver can be also used while at home.
18

Connecting the Cigarette Lighter Adapter
Connect the provided cigarette lighter adapter (12V CLA) to the 12V DC connection at the side of the receiver.
Changing Fuse
Replace the fuse with one of the specified rating (2A).
19
Controls
Getting to Know Your HD Radio Receiver
20

1.POWER Button: Turns the receiver On or Off.
2.DISP (Display) Button: Switches
3.BAND Button: Switches FM1, FM2, FM3, AM.
4.VOL(Volume) Button: Adjusts the volume (down - or up +) of the receiver.
5.MENU Button: Select menu and configuration options. Once the menu options are displayed, use this button to return to the previous menu screen or station display. To return from any menu screen to the station display, press and hold the menu button.
6.Screen: Indicates information of Artist/ Category/ Song Title, etc.
7.Preset Button: Holds your favorite radio stations in memory. Once a preferred station is tuned, press and hold one of the six preset keys
8.HD Radio Button: Seeks for an HD Radio station upward or downward.
21

9.ENTER Button:
(1)In the station display mode, enables information scrolling feature. Press the ENTER button to scroll and view additional information characters. If song, artist or any other information is too long to fit on the display, use this function to display the additional information.
(2)In Menu settings mode, selects the option high lighted on the screen. Once an option is selected, this button functions as Save and Exit.
(3)In seek mode, stops the ???Seek??? operation.
10.Seek Button: Seeks radio station downward/ upward. Press and hold will tune radio frequency up/down.
22
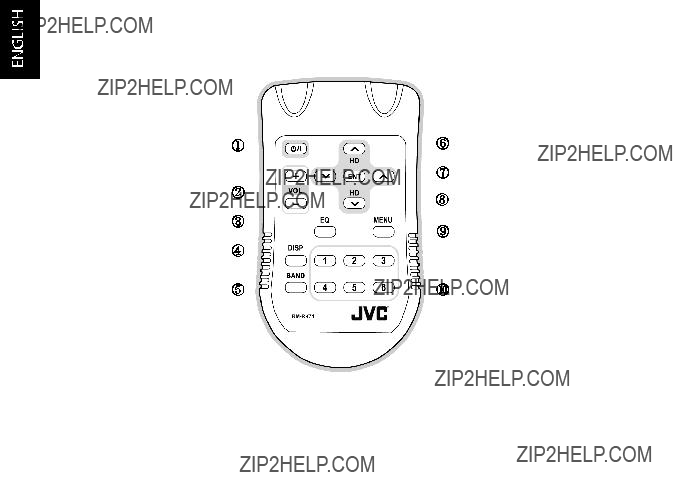
Getting to Know Your Remote Control
1.POWER Button: Turns the receiver On or Off.
2.VOL (Volume) Button: Adjusts the volume (down - or up +) of the receiver.
23

3.EQ Button: Adjusts the equalizer.
4.DISP (Display) Button: Switches
5.BAND Button: Switches FM1, FM2, FM3, AM.
6.HD Radio Button: Seeks for an HD Radio station upward or downward.
7.Seek Button: Seeks radio station downward/ upward. Press and hold will tune radio frequency up/down.
8.ENTER Button:
(1)In the station display mode, enables information scrolling feature. Press the ENTER button to scroll and view additional information characters. If song, artist or any other information is too long to fit on the display, use this function to display the additional information.
(2)In Menu settings mode, selects the option high lighted on the screen. Once an option is selected, this button functions as Save and Exit.
(3)In seek mode, stops the ???Seek??? operation.
24

9.MENU Button: Selects menu and configuration options. Once the menu options are displayed, use this button to return to the previous menu screen or station display. To return from any menu screen to the station display, press and hold the menu button.
10.Preset Button: Holds your favorite radio stations in memory. Once a preferred station is tuned, press and hold one of the six preset keys
25

During HD Radio Mode
When your HD Radio receiver receives a digital (HD Radio) signal, the following information is indicated:
HD indicator
Artist
Program
Type
Song title
26
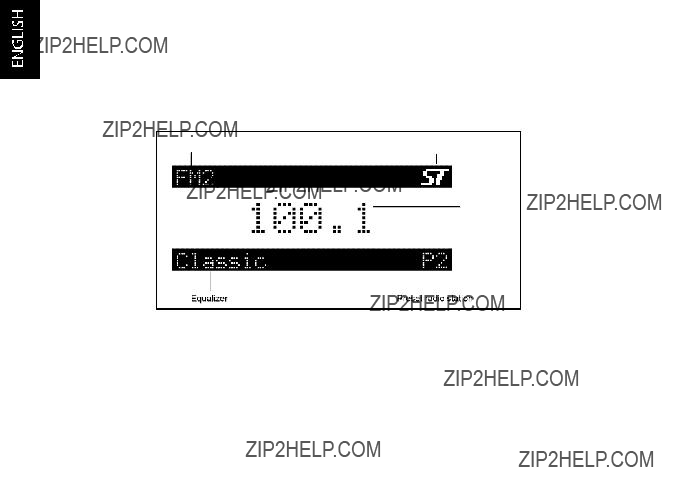
During FM/AM Mode
When your HD Radio receiver receives a stereo or analog signal, the following information is indicated:
Frequency
27

Menu Options
To enter the Menu Options page of the receiver, press the MENU button. The Menu Options list will be displayed.
To select a menu option, use the HD Radio up
 and down
 buttons to highlight the option you wish to adjust.
To exit the Menu Options screen, or any of the other menu option screens, press and hold the MENU button to return to the default display screen.
28
Operations
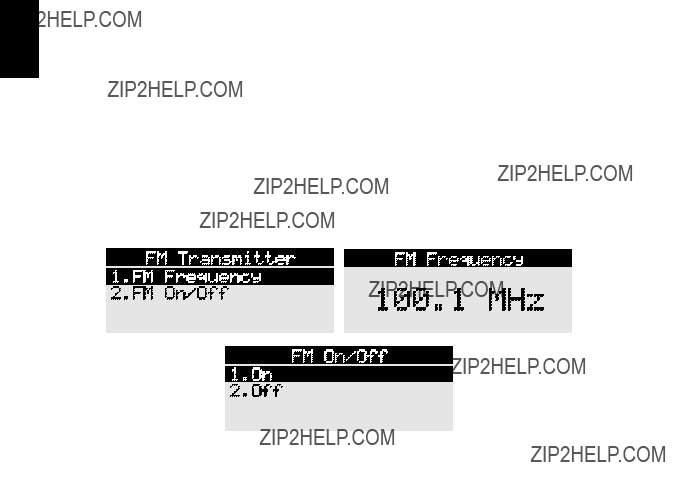
FM Transmitter
The FM Transmitter feature allows you to create suitable FM frequencies between your HD Radio receiver and the car radio. Set the FM Transmitter frequency setting to unused FM station frequency. You can also turn the FM transmitter On and Off. FM/AM reception of adjacent frequency (+/- 0.2 MHz) could cause interference (ie. No sounds or having noise) when you set the FM transmitter at a certain frequency. If interference is experienced, set the FM Transmitter to a different frequency setting.
29
Display Options
The receiver???s display screen can be adjusted for brightness, contrast and LCD type using the Display Options.
Brightness adjusts the overall intensity of the LCD display to help with viewing in different lighting conditions. Contrast adjusts the relationship between the
background and the text on the LCD display. Use the Seek buttons (
 or
or 
 ), to adjust the brightness/contrast. The bar graph will move to indicate the change.
Use the HD Radio up 
 and down
 buttons, to select Positive or Negative for LCD display Type.
30

Audio Control
The Audio Level setting adjusts the level of the audio output of the receiver.
To adjust the audio level, use the Seek buttons (
 or
or 
 ) to change the audio level. The bar graph will move to indicate the change.
The Audio Level setting can also adjust Equalizer, Tone Control, Balance and Loudness.
31

Equalizer
While choosing ???User???, users can define the equalizer level between
Tone Control
You can adjust Bass and Treble for Tone Control settings. Use the Seek buttons
(
 or
or 
 ) to change Bass or Treble level. The bar graph will move to indicate the change.
32

Balance
Use the Seek buttons (
 or
or 
 ) to change Balance level. The bar graph will move to indicate the change.
Loudness
You can set Loudness On or Off.
33
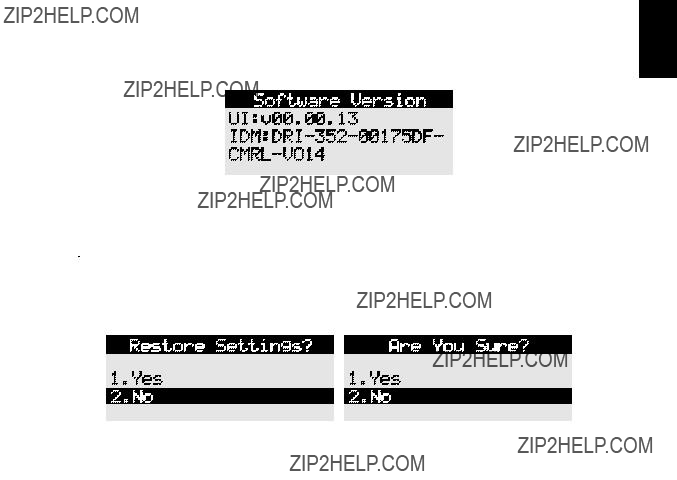
Software Version
The latest software version will be indicated by using this option.
Factory Default
The Factory Default option will restore most features of the receiver to the original factory settings.
When ??? Restore Settings? ??? is displayed, use the HD Radio buttons (
 or
or

 ) to select Yes to restore all factory settings, or select No to leave them as present and return to the Menu Options. Once you select Yes, a message ???Are You Sure???? indicates on the screen to ask for final confirmation.
34

Specifications
Power Requirements..................???????????????????????????...12Volt DC
(5??? x
(2??? x
Digital Audio Stereo Separation @1KHz.?????????????????????????????????..???.???...>70dB
35

HD RadioTM Technology Manufactured Under License From iBiquity Digital Corporation. iBiquity Digital and the HD Radio and HD Symbols are registered trademarks of iBiquity Digital Corporation. U.S. and Foreign Patents.
36
