DIGITAL VIDEO CAMERA
GR-DVL9000
Please visit our CyberCam Homepage on the World Wide Web and answer our Consumer Survey (in English only):
http://www.jvc-victor.co.jp/index-e.html
For Customer Use:
Enter below the Model No. and Serial
No. which is located on the bottom of
INSTRUCTIONS cabinet. Retain this information for future reference.
Model No.
Serial No.

USE
1. Accessories
To avoid personal injury:
???Do not place this product on an unstable cart, stand, tripod, bracket or table. It may fall, causing serious injury to a child or adult, and serious damage to the product.
???Use only with a cart, stand, tripod, bracket, or table recommended by the manufacturer or sold with the product.
???Use a mounting accessory recommended by the manufacturer and follow the manufacturer???s instructions for any mounting of the product.
???Do not try to roll a cart with small casters across thresholds or deep-pile carpets.
2. Product and Cart Combination
A product and cart combination should be moved with care. Quick stops, excessive force, and uneven surfaces may cause the product and cart combination to overturn.
3. Water and Moisture
Do not use this product near water???for example, near a bath tub, wash bowl, kitchen sink or laundry tub, in a wet basement, or near a swimming pool and the like.
PORTABLE CART WARNING (Symbol provided by RETAC)
SERVICING
1. Servicing
If your product is not operating correctly or exhibits a marked change in performance and you are unable to restore normal operation by following the detailed procedure in its operating instructions, do not attempt to service it yourself as opening or removing covers may expose you to dangerous voltage or other hazards. Refer all servicing to qualified service personnel.
2. Damage Requiring Service
Unplug this product from the wall outlet and refer servicing to qualified service personnel under the following conditions:
a.When the power supply cord or plug is damaged.
b.If liquid has been spilled, or objects have fallen into the product.
c.If the product has been exposed to rain or water.
d.If the product does not operate normally by following the operating instructions. Adjust only those controls that are covered by the operating instructions as an improper adjustment of other controls may result in damage and will often require extensive work by a qualified technician to restore the product to its normal operation.
e.If the product has been dropped or damaged in any way.
f.When the product exhibits a distinct change in performance???this indicates a need for service.
4. Object and Liquid Entry
Never push objects of any kind into this product through openings as they may touch dangerous voltage points or short-out parts that could result in a fire or electric shock. Never spill liquid of any kind on the product.
3. Replacement Parts
When replacement parts are required, be sure the service technician has used replacement parts specified by the manufacturer or have the same characteristics as the original part. Unauthorized substitutions may result in fire, electric shock or other hazards.
4. Safety Check
Upon completion of any service or repairs to this product, ask the service technician to perform safety checks to determine that the product is in safe operating condition.
5. Attachments
Do not use attachments not recommended by the manufacturer of this product as they may cause hazards.
6. Cleaning
Unplug this product from the wall outlet before cleaning. Do not use liquid cleaners or aerosol cleaners. Use a damp cloth for cleaning.
7. Heat
The product should be situated away from heat sources such as radiators, heat registers, stoves, or other products (including amplifiers) that produce heat.
Tape direction
Sub-Code Area
Video Area
Audio Area
ITI Area
Head tracking direction
1 Sub-Code Area
The Time Code and Date/Time data are written here, separate from the video data. This enables you to display the date and time during playback, even if they weren???t displayed while recording.
2 Video Area
3 Audio Area
The digital audio signal is recorded here.
4 ITI (Insert and Tracking
Information) Area
Insert editing and post-recording editing tracking signals are recorded here.
The digital video signal is recorded here.
Charging The Battery Pack
You can charge one battery pack at a time, or two consecutively.
1 SUPPLY POWER TO CHARGER
Plug the AC Adapter/Charger???s power cord in to an AC outlet. The power lamp comes on.
facing down and aligned with the correspond- ing marks on the AC Power Adapter/Charger.
???The Charger Indicator (1 or 2) begins blinking to indicate charging has started.
3 CONFIRM STATUS
When the charger indicator stops blinking but stays lit, charging is finished.
???If two batteries are attached to the charger, they will be charged in the order that they were attached.
4 DETACH BATTERY/BATTERIES
Slide the battery or batteries in the direction of the arrow and lift off.
???Remember to unplug the AC Adapter/Charger???s power cord from an AC outlet.
CHARGING TIME
NOTES:
cIf you connect the camcorder???s DC cord to the adapter during battery charging, power is supplied to the camcorder and charging stops.
cWhen using the AC Power Adapter/Charger, be sure to use the supplied power cord only.
cThe AC Power Adapter/Charger is for use with the BN-V814U Battery Pack only.
cWhen charging the Battery Pack for the first time or after a long storage period, the Charger Indicator may not light. In this case, remove the Battery Pack from the AC Power Adapter/Charger, then try charging again.
cSince the AC Power Adapter/Charger processes electricity internally, it becomes warm during use. Be sure to use it only in well-ventilated areas.
cIf the battery operation time remains extremely short even after having been fully charged, the battery is worn out and needs to be replaced.
Please purchase a new one.
OPEN BATTERY COVER
Slide the open switch.
INSERT CHARGED BATTERY
Insert the 
 mark end of the battery first until you hear a click. The hook rises. Inserting the battery backwards will result in malfunction.
NOTES:
cTo remove the battery, turn off the camcorder, open the battery cover and push down the hook.
cBe careful not to drop the battery pack.
cThe hook is tight to prevent the battery from dropping.
1 SUPPLY POWER TO ADAPTER
Plug the AC Adapter/Charger???s power cord in to an AC outlet.
2 SUPPLY POWER TO CAMCORDER
Connect the AC Adapter to the camcorder.
Using The Power Pack
NOTE:
When using the provided DC cord, make sure you connect the end of the cable with the core filter to the camcorder. The core filter improves perform- ance of equipment.
For extended use, prepare the Power Pack (included in the optional Power Pack Kit VU-P810K1U or VU- P810K2U), which can be loaded with one battery pack. This Power Pack can be used together with the battery installed in the camcorder.
first. Close the battery cover.
2 ATTACH TO CAMCORDER
Align the connector and screw on the Power Pack while inserting the camcorder connector. Turn the spring-loaded screw head at the Power Pack's bottom inward and turn it clockwise to attach.
???To detach the Power Pack, turn the screw counterclockwise.
NOTES:
cWhen the battery remaining power indicator
appears as  , that means the battery power is close to nil. When the battery power is exhausted, power turns off automatically.
cEach time you start shooting, the camcorder chooses the battery pack that has more remaining power, and uses that as the power supply. That means both battery packs will be exhausted at roughly the same time.
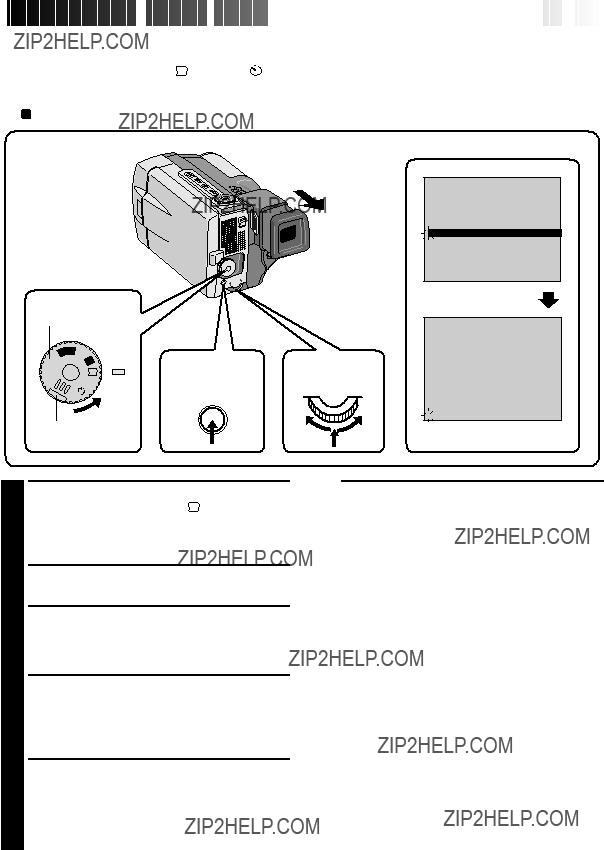
Power lamp
Power Dial
Lock button
1 SELECT OPERATION MODE
Set the Power Dial to ??? M ??? while pressing down the lock button located on the dial, and open the LCD monitor fully.
???The power lamp comes on and the camcorder is turned on.
???The LCD monitor can be tilted upward up to 180 degrees and downward up to 90 degrees.
2 ACCESS RECORDING MENU
Press MENU. The Recording Menu appears.
3 ACCESS DATE/TIME MENU
Move the pointer and highlight bar to ???TO DATE/TIME MENU??? by rotating the Select Dial. Press the Select Dial and the Date/Time Menu appears.
4 INPUT DATE AND TIME
Move the pointer and highlight bar to ???DATE/ TIME??? by rotating the Select Dial. Press the Select Dial and ???month??? is highlighted and begins blinking.
Rotating the Select Dial to the right or left, input the month. Press the Select Dial. Repeat the procedure to input the day, year, hour and minute.
???Press the Select Dial twice when the pointer and highlight bar are set to ???RETURN??? to exit.
Regarding Built-in Rechargeable Battery
To store the date/time in memory, a rechargeable clock lithium battery is integrated in the camcorder. While the camcorder is connected to an AC outlet using the AC Power Adapter/Charger, or while the battery pack installed in the camcorder continues to supply power to the camcorder, the clock lithium battery is always charged. However, if the camcorder is not used for approx. 3 months, the clock lithium battery will become discharged and the date/time stored in memory will be lost. When this occurs, first connect the camcorder to an AC outlet using the AC Power Adapter/Charger etc. for over 24 hours to charge the clock lithium battery. Then perform the date/time setting before using the camcorder.
It is also possible to use the camcorder without the date/time setting.
NOTE:
If you don???t exit the Date/Time Menu, the clock display will not move but the camcorder???s internal clock continues to operate. Once you close the menu, the date and time begin operation from the current date and time, with no delay or loss.
Loading/Unloading A Cassette
The camcorder needs to be powered up to load or eject a cassette.
 Erase protection switch**
1 OPEN LCD MONITOR
Press the PUSH-OPEN button and open the LCD monitor up to an angle of 90 degrees.
2 OPEN CASSETTE COVER
Turn on the power, then slide the OPEN/EJECT switch in the direction of the arrow. The cassette cover releases. Open the cover in the direction of the arrow until it locks. The holder opens automatically.
??? Do not touch internal components.
3 INSERT/REMOVE TAPE
Insert or remove a tape and press ???PUSH HERE??? to close the cassette holder.
???Once the cassette holder is closed, it recedes automatically. Wait until it recedes completely before closing the cassette cover.
???When the battery???s charge is low, you may not be able to close the cover. Do not apply force. Replace the battery with a fully charged one before continuing.
Recording time
NOTES:
cIt takes a few seconds for the cassette holder to open. Do not apply force.
cIf you wait a few seconds and the cassette holder does not open, close the cassette cover and try again.
cBe careful not to get your fingers caught in the holder when it???s closing. If this happens, the holder will open automatically after a few seconds.
cWhen the camcorder is suddenly moved from a cold place to a warm environment, wait a short time before opening the cover.
cClosing the cassette cover before the cassette holder comes out may cause damage to the camcorder.
cWhen shooting again after already shooting a scene, a blank portion is recorded on the tape or a previously recorded scene is erased (recorded over) if you open the cassette cover, regardless of whether the cassette holder comes out or not. See page 22 for information about recording from the middle of a tape.
** To protect valuable recordings . . .
.... slide the erase protection switch on the back of the tape in the direction of ???SAVE???. This prevents this tape from being recorded over. If you decide later that you do want to record on this tape, slide the switch back to ???REC??? before loading the tape.
PLAY
OFF
A
M
5S
Lock button
 PAUSE
PAUSE 
Diopter adjust lever
SELECT OPERATION MODE
TURN ON CAMCORDER
Pull out the viewfinder fully.
3 ADJUST DIOPTER
Slide the diopter adjust lever located on the bottom of the viewfinder.
???Slide in either direction, while looking at the viewfinder display, until it looks best to you.
SHIFT Button (Z pg. 54, 64)
SLOW Rewind/Forward Buttons (Z pg. 53)
Left/Right Buttons (Z pg. 54)
FADE/WIPE Button (Z pg. 66)
EFFECT Button (Z pg. 55)
EFFECT ON/OFF Button (Z pg. 55)
MBR SET Button (Z pg. 64)
A. DUB Button (Z pg. 70)
Down Button (Z pg. 54)
INSERT Button (Z pg. 71)
Up Button (Z pg. 54)
Operation Buttons (Z pg. 54, 62, 70, 71)
R.A. EDIT Buttons (Z pg. 67)
Installing The Battery
The RM-V711U uses one lithium battery (CR2025).
1 PULL OUT BATTERY HOLDER
Pull out in the direction of the arrow while pressing the knob as shown.
2 INSERT BATTERY IN HOLDER
Insert the battery in the holder, and be sure to have the ???+??? mark visible.
3 RE-INSERT HOLDER
Slide the holder back in until you hear a click.
Knob
???Read the caution concerning lithium batteries (Z pg. 2).
Tuning the Power Dial allows you to
M
choose the appropriate operation mode among the following modes: ), 5 second mode recording (5S), Self-Timer mode ( ) and ???PLAY???.
According to the Power Dial position you have selected, ???F.AUTO??? or ???MANUAL??? appears in the upper left corner.
F . AUTO
 PAUSE
PAUSE 
MANUAL
 PAUSE
PAUSE 
To turn on the camcorder, first turn the Power Dial to any operation mode except ???OFF???, then pull out the viewfinder fully or open the LCD monitor. When turning the Power Dial from ???OFF??? to any other position, press and hold the lock button located on the dial.
Power Dial Position
Full Auto: A
Manual: M
5 second mode recording: 5S
Self-Timer: 
Playback: PLAY
OFF
Function
Allows you to record using NO special effects or manual adjust- ments. Suitable for standard recording.
Allows you to set various recording functions using the Menus. If you want more creative capabilities than Full Auto recording, try this mode.
Allows you to record in 5-second clips to keep the action moving. Other menu settings are the same as Full Auto mode, however manually adjusted White Balance Adjustment settings are effective.
Allows you (camcorder operator) to become part of the scene once the camcorder is set. This mode is similar to the Self-Timer on film cameras.
Allows you to play back a recording, Z pg. 52 ??? 61.
Allows you to switch off the camcorder. After setting to this position, Manual Focus and Exposure Control are automatically reset to ???AUTO???.
You should already have performed the necessary preparations (Z pgs. 10 ??? 19). Set the Power Dial to ??? and try recording that way before attempting to use more advanced features.
NOTE:
Before starting recording, make sure you set the date and time (Z pg. 13). Even if they don???t appear during recording, you can display them during playback (Z pg. 57).
During recording
ON/OFF
Tally lamp
Power Dial
PLAY
OFF
A
M
5S
Power lamp Lock button
Display
 PAUSE
PAUSE 
Record-Standby
Stop button
Play/Pause button
Rewind button
Fast-forward button
Lock button
Power lamp
Power Dial
START/STOP button
PLAY
OFF
A
M
5S
1 SELECT OPERATION MODE
Turn the Power Dial to ???PLAY??? while pressing down the lock button located on the dial.
???The power lamp comes on.
2 PULL OUT VIEWFINDER OR OPEN
LCD MONITOR
Pull out the viewfinder fully or open the LCD monitor to approx. 90?? degrees.
3 START SEARCH
Press 4/6, then press 2or 3. Watch in the viewfinder or the LCD monitor for the spot where you want to begin recording.
4 ENGAGE STILL MODE
Once you find the spot at which you want to start recording, press 4/6twice to engage the Still mode.
5 START RECORDING
Turn the Power Dial to any operation mode except ???PLAY??? and ???OFF???, then press START/ STOP.
???Start recording from a point prior to the end of the last recording. A few seconds of the end of the last recording will be erased.
NOTE:
If you start recording from the end of the previous recording leaving no blank space, there may be situations where a clean transition is not possible.
???After playing back the recorded tape, when you shoot again.
???When power shuts off during shooting. ???When a tape is removed and re-inserted
during shooting.
???When shooting using a partially recorded tape. ???When shooting on a blank portion located
partway through the tape.
???When shooting again after already shooting a scene and opening/closing the cassette cover.
NOTES:
cThe Time Code cannot be reset.
cDuring fast-forwarding and rewinding, time code indication does not move smoothly.
When blank portion is recorded on a tape
You can adjust the brightness of the LCD monitor by rotating the Select Dial.
You can make the LCD monitor/Viewfinder indications appear/disappear.
1 ADJUST BRIGHTNESS
Rotate the Select Dial to the right or left until the brightness indicator moves and the LCD monitor reaches its appropriate brightness.
???The brightness indication appears in the LCD monitor.
1 PRESS ON/OFF BUTTON
When you do not want the indications to appear, press the ON/OFF button for longer than approximately 1 second. Certain indications disappear.
Press again for longer than approx. 1 second to make the indicaitons reappear.
NOTE:
It is impossible to make the tape running indicator and warnings etc. disappear from the LCD monitor or the viewfinder. For the indications that can be removed, Z pg. 81.


 EN
EN 25
25

Journalistic shooting
In some situations different angles of shooting may be required for more dramatic results.
1 OPEN LCD MONITOR
Make sure the viewfinder is pushed back and the LCD monitor is fully open (approx. 90??).
2 TILT LCD MONITOR
Tilt the LCD monitor in the most convenient direction.
???The LCD monitor can rotate almost full circle (270??: 90?? downward, 180?? upward).
Interface Shooting
The person you are shooting can view himself/ herself in the LCD monitor, and you can even shoot yourself while viewing your own image in the LCD monitor.
1 TILT LCD MONITOR UPWARD
Open the LCD monitor and tilt it upward to 180 degrees so that it faces forward.
2 START RECORDING
Point the lens towards the subject (yourself when self-recording) and start shooting.
???During Interface Shooting, the ???Tape Running??? indicator and warning indications (Z pg. 83) are the only ones that are shown; they appear
Self-recordingreversed in the display as they would when viewing a mirror, but are not reversed in the
recording.
NOTE:
The tape remaining indicator does not appear during interface shooting. However, when the remaining time reaches 2 minutes, the indicator appears showing the remaining time: ??? ??? ???
Zoom
Select any one of the three powers of magnification and get ???closer??? to the subject (Z pg. 35).
Simply set the zoom switch to either zoom in (towards ???T???) or zoom out (towards ???W???). The zoom speed is variable ??? the quicker you set the zoom switch, the quicker the zoom action.
NOTES:
cZoom magnification of over 10X is done through Digital image processing, and is therefore called Digital Zoom.
cDuring Digital Zoom, the quality of image may suffer.
cDigital zoom cannot be used while the Video Echo effect (Z pg. 45), the Picture Wipe/Dissolve function (Z pg. 40) or the 5SD mode (Z pg. 28) are activated.
cMacro shooting (as close as approx. 1.5 cm to the subject) is possible when the zoom switch is set all the way to ???W???.
W
Zoom in (T: Telephoto)
T
Zoom out (W: Wide angle)
T
Zoom switch
zoom zone
Zoom display
down the lock button located on the dial, make sure the LCD monitor is open fully or the viewfinder is pulled out.
2 ACCESS RECORDING MENU
Press MENU. The Recording Menu appears.
3 ACCESS DATE/TIME MENU
Move the pointer and highlight bar to ???TO DATE/TIME MENU??? by rotating the Select Dial. Press it and the Date/Time Menu appears.
4 SELECT FUNCTION
Move the pointer and highlight bar to ???DISPLAY??? by rotating the Select Dial, then press it. The pointer stops blinking, indicating that the function has been selected.
5 SET FUNCTION PARAMETERS
Cycle through the available settings of the selected functions by rotating the Select Dial and stop when the one you want is displayed. Then press it and the pointer and highlight bar automatically move to ???RETURN???.
6 CLOSE RECORDING MENU
Press the Select Dial twice. Selection is complete and the menu disappears.
NOTES:
cConnect the camcorder to a TV and set ???ON SCREEN??? to ???ON??? in the Date/Time Menu. The display appears on the connected TV .
cThe Indicator/Display function overrides these settings. Even if you have set ???ON SCREEN??? to ???ON???, pressing the ON/OFF button for longer than 1 second removes the indications from the screen. Pressing it for longer than 1 second again makes the indications re-appear.
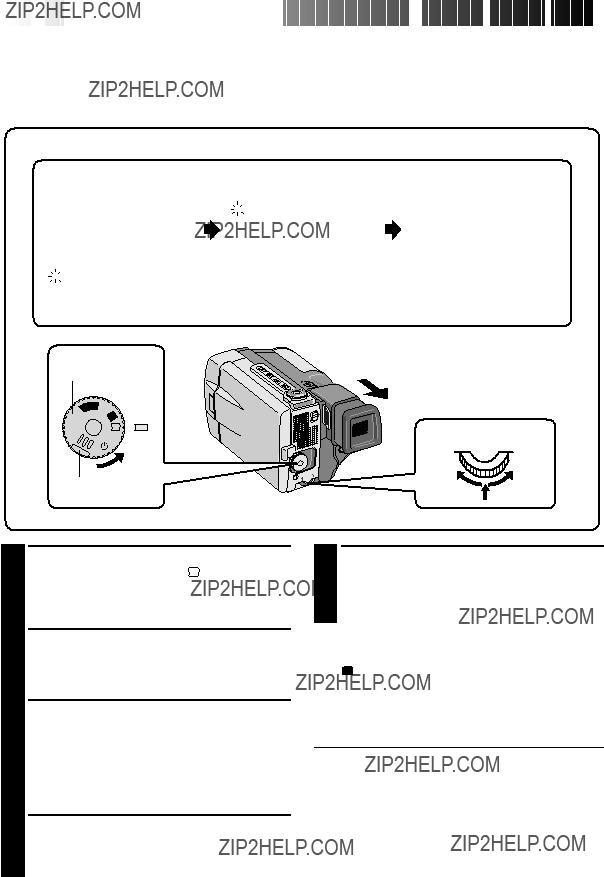
Power Dial
Lock button
Dissolves during 5 second mode recording
Before performing the following procedure, make sure that the Digital Image Stabilizer (DIS) is set to ???OFF??? (Z pg. 33).
Select ???5SD??? at the System Menu (Z pg. 36). ???5SD MODE??? appears in step 2 below. Record one
5-second clip, and the image at the end of the clip is stored. If you record the next clip within 5 minutes,
the previous scene dissolves as the new scene appears.
???If you turn the power off, the stored image will be lost.
START/STOP button
Display
MANUAL
REC PAUSE 444
5S MODE
After 5 sec.
MANUAL
REC
 PAUSE
PAUSE 
1 SELECT OPERATION MODE
Turn the Power Dial to ???5S??? while pressing down the lock button located on the dial.
2 PULL OUT VIEWFINDER OR OPEN
LCD MONITOR
Pull out the viewfinder fully. ???5S MODE??? appears.
3 ENGAGE 5S MODE
Then press START/STOP. The tally lamp lights and beep sounds to indicate the start of recording, and after 5 seconds the camcorder enters Record-Standby mode.
???If you press and hold START/STOP within 5 seconds after recording starts, Record- Standby mode is not engaged.
4 END 5-SECOND MODE RECORDING
Set the Power Dial to the ??? A ???, ???M ??? or ???OFF??? position.
To Take A Pro Snapshot In The 5-Second Mode . . .
.... turn the Progressive Dial to any Pro Snapshot mode and instead of pressing START/STOP in step 3, press the Progressive Button. The camcorder records a 5-second still with the shutter sound (Z pg. 30). But when the Scene is set to animation (Z pg. 37) this function is not available.
NOTE:
When ???SCENE??? is set to ???ANIM.??? in the System Menu, the 5-second recording funcion is not available. Animation recording of a 1/8-second clip is taken instead (Z pg. 37).
When the START/ STOP button is pressed, the tally lamp changes as shown at right:
1 SELECT OPERATION MODE
Turn the Power Dial to ??? ??? while pressing down the lock button located on the dial.
2 PULL OUT VIEWFINDER OR OPEN
LCD MONITOR
Pull out the viewfinder fully.
???The camcorder enters the Record-Standby mode.
???You can tilt the LCD monitor upward to 180 degrees so that it faces forward and view yourself while self-recording (with the viewfinder pushed back).
3 ENGAGE SELF-TIMER MODE
Press START/STOP.
After 15 seconds, the beep sounds and recording begins.
4 STOP SELF-TIMER RECORDING
Press START/STOP.
???The camcorder re-enters Record-Standby mode.
5 END SELF-TIMER RECORDING
Set the Power Dial to the ??? A ???, ???M ??? or ???OFF??? position.
???When turning to ???OFF???, it is not necessary to press down the lock button.
To Take A Pro Snapshot In The Self-Timer Mode . . .
.... in step 3, turn the Progressive Dial to any Pro Snapshot mode, then press the Progressive Button (Z pg. 30). After approx. 15 seconds, a snapshot will be taken.
NOTE:
When the Progressive Dial is set to ???VIDEO???, the Self-Timer records using the Progressive Mode.
Display
PHOTO
During snapshot
1 SELECT OPERATION MODE
First turn the Power Dial to ??? A ???, ???M ???, ???5S??? or ??? ??? while pressing down the lock button located on the dial. Make sure the viewfinder is pulled out or the LCD monitor is open fully.
2 SELECT PRO SNAPSHOT MODE
Choose the appropriate mode among six Pro Snapshot modes (Z pg. 31) by turning the Progressive Dial (SNAPSHOT Dial).
3 TAKE PRO SNAPSHOT
Press the Progressive Button (SNAPSHOT
Button).
If you press during Record-Standby . . .
.... ???PHOTO??? appears and a still image will be recorded for approx. 6 seconds, then the camcorder re-enters the Record-Standby mode.
If you press during Recording . . .
.... ???PHOTO??? appears and a still image will be recorded for approx. 6 seconds, then the normal recording resumes.
To Perform Pro Snapshot Recording During Progressive Video Recording (Z pg. 46) . . .
.... turn the Progressive Dial to the Pro Snapshot mode you want, then press the Progressive Button. To end recording, set the Progressive Dial to ???VIDEO??? again, then press the Progres- sive Button.
Motor Drive mode:
Keeping the Progressive Button pressed provides an effect similar to serial photography. (The interval between the still pictures: approx. 0.7 seconds.)
To Remove The Shutter Sound . . .
.... when you don't want to hear the shutter sound, set BEEP/TALLY to ???OFF??? in the system menu (Z pg. 37). Though the sound is not heard from the speaker, it is recorded on the tape.
Progressive Mode:
This mode enables recording a jitter-free still image with superior quality, using the Progressive Scan CCD (Z pg. 32).
The Progressive Mode is activated during Pro Snapshot recordings (except Multi-Analyzer 4 & 9) and Progressive Video Recording (Z pg. 46).
A recorded high-resolution still image can be transferred to a personal computer and processed using the provided software, or can be printed out using the optional digital printer GV-DT1.
During playback as well, all Pro Snapshot modes except Nega/Posi mode are available. The shutter sound is not heard.
Description of Progressive Scan CCD
Progressive Scan is a special image sensing method which, unlike conventional interlace scanning, is able to pick up all the lines of picture information in one Scan. Since the Progressive Scan CCD is capable of outputting 60 full Frames* per second ??? twice the amount of conventional systems ??? it is able to deliver a high quality picture even when its output signal is converted to a format that can be viewed on a TV screen.
* A NTSC TV screen image is composed of 30 Frames per second. 1 Frame is made up of 2 Fields.
1. Regular shooting of moving images
2.Progressive mode shooting of moving images (Progressive Video Recording Z pg. 46)
Scan A is recorded, divided into an odd- and even-number Field, and then Scan B is skipped. Scans C and D are handled in the same way as Scans A and B, as illustrated above, thereby recording 30 Frames per second.
Since each recorded odd- and even-number Field originates from the same Scan there is no time lag between them, and so when they are combined into a Frame and a still image is displayed on a TV or PC monitor the picture does not look jittery. However, when moving images are played back, the picture can look unnatural.
3. Pro Snapshot recording (Z pg. 30)
When the Progressive button is pressed, the current frame will be recorded for about 6 seconds in the Progressive mode (except when a Multiple picture mode is being used).


 EN
EN 33
33

Menus
The Recording Menu allows you to set these functions:
Recording Mode, Wide Mode, Zoom Magnification, Digital Image Stabilizer, Gain Up, Date/Time Menu, System Menu. The following selection procedure applies to Recording Mode, Wide Mode, Zoom Magnifica- tion, Stabilization and Gain Up.
Please refer to pages 34, 35 for details.
Display
TO DATE / TIME MENU
TO SYSTEM MENU
END
Recording Menu
1 SELECT OPERATION MODE
First turn the Power Dial to ??? M ???, ???5S??? or ??? ??? while pressing down the lock button located on the dial, make sure the LCD monitor is open fully or the viewfinder is pulled out.
2 ACCESS RECORDING MENU
Press MENU. The Recording Menu appears.
3 SELECT FUNCTION
Move the pointer and highlight bar to the desired function by rotating the Select Dial, then press it. The pointer stops blinking, indicating that the function has been selected.
4 SET FUNCTION PARAMETERS
Cycle the available settings of the selected function by rotating the Select Dial. Stop when the one you need is displayed. Then press it, the pointer and highlight bar automatically move to ???END???.
???To set the parameters for a different function, repeat steps 3 and 4.
5 CLOSE RECORDING MENU
Press the Select Dial. Selection is complete and the menu disappears.

REC MODE (Recording mode)
You can change the tape recording speed. LP tape speed is slower than SP, allowing LP to record 1.5 times longer than SP. If you have shot in SP mode Audio Dubbing and Insert Editing will be possible later.
NOTE:
Tapes shot in LP mode are recommended to be played back on this unit. Playback may not be successful on other units.
WIDE MODE
This recording mode is compatible with wide-screen TVs (16:9 aspect ratio). When using this mode, please refer to your wide-screen TV???s instruction manual.
SQUEEZE  ???For playback on TVs with an aspect ratio of 16:9. Naturally expands the image to fit the screen without distortion.
  appears. During playback/recording on 4:3 TVs/LCD monitor/viewfinder, the image is elongated vertically.
CINEMA 
 ???Inserts black bands at the top and bottom of the screen. During playback on wide-screen TVs, the black bands at the top and bottom of the screen are cut and the screen ratio becomes 16:9. During playback/recording on 4:3 TVs/LCD monitor/viewfinder, black bands are inserted at the top and bottom of the screen and the image appears like a letterboxed 16:9 movie.
OFF???Select ???OFF??? when you don???t want to use either of the above modes.
A discriminating signal is automatically recorded when you select either ???SQUEEZE??? or ???CINEMA??? for recording. If your wide TV has the automatic discriminating function, connect an S-Video cable between S2 connector on the TV and the S-Video output connector on the camcorder. During playback, the image is naturally expanded to fit the wide screen, with no proportional distortion.
If your wide screen TV has no S2 connector, automatic signal discrimination can not be performed, and it should be done manually.
NOTES:
cWhen playing back through a video cassette recorder, or to a wide-screen TV, that does not have the automatic discriminating function, change the setting on the TV manually.
cWhen playing back a tape recorded in Squeeze and Cinema, Squeeze cannot be distinguished from Cinema during fast-forward or rewind.
cDuring Full-Auto operation, both Squeeze and Cinema modes are unusable.


 EN
EN 35
35

ZOOM (Zoom magnification)
You can select 10X, 40X, or 200X maximum zoom magnifications.
10X???Optical zoom that does not degrade the quality of the recording. 40X???Electronic processing (Digital zoom) that lets you get closer up. 200X???Electronically-processed images at 200-times magnification.
NOTES:
cEven if 40X or 200X is selected, Digital zoom (magnification of over 10X) cannot be used while the Video Echo effect (Z pg. 45), the Picture Wipe/Dissolve function (Z pg. 40) or the 5SD mode (Z pg. 28) are activated.
cDuring Full-Auto mode, 40X is selected automatically.
DIS (Digital Image Stabilizer)
When recording while holding the camcorder in your hand, or when shooting a subject with little or no contrast, subtle hand movements will cause shakiness in the recorded image.
ON 
 ???Compensates for relatively small shakes that occur when shooting close up. ???
 ??? appears during recording.
OFF???When shooting with the camcorder in a fixed position or on a tripod, set the Stabilizer to ???OFF???.
If you leave it on and then move or turn the camera to follow a moving subject, unnecessary compensation occurs and this can result in an unnatural recorded image.
NOTES:
cEven if the stabilizer is set to ???ON??? in Manual mode, it is automatically set to ???OFF??? in Full Auto Mode.
cThe Stabilizer cannot compensate for drastic hand movements while shooting.
cThe Stabilizer will not work if the scene has little or no contrast.
cThe ???
 ??? indicator appears blinking if the Stabilizer cannot be used.
GAIN UP
Bright, natural recordings can be taken even in areas with low or poor lighting.
AGC???This is the factory setting, and is automatically activated during Auto operation. The overall appear- ance is jagged, but the image is bright.
OFF???Select this setting when lighting is not a problem. Enables recording of the actual brightness you see.
Display
TO DATE / TIME MENU
4TO SYSTEM MENU
END
Recording Menu
System Menu
1 SELECT OPERATION MODE
First turn the Power Dial to ??? M ???, ???5S??? or ??? ??? while pressing down the lock button located on the dial, make sure the LCD monitor is open fully or the viewfinder is pulled out.
2 ACCESS RECORDING MENU
Press MENU. The Recording Menu appears.
3 ACCESS SYSTEM MENU
Move the pointer and highlight bar to ???TO SYSTEM MENU??? by rotating the Select Dial, then press it. The System Menu appears.
4 SELECT FUNCTION
Place the pointer and highlight bar to the desired function by rotating the Select Dial, then press it. The pointer stops blinking, indicating that the function has been selected.
5 SET FUNCTION PARAMETERS
Rotate the Select Dial to cycle through the available settings for the selected function, and stop when the desired setting appears. Then press it, and the pointer and highlight bar automatically move to ???RETURN???.
???To set the parameters for a different function, repeat steps 4 and 5.
6 CLOSE SYSTEM MENU
Press the Select Dial twice. Setting is complete and the System Menu disappears.
5S???Pressing START/STOP allows you to take a 5- second ???clip???. Press repeatedly for a succession of short recordings.
5SD???If you record a 5-second clip within 5 minutes after the previous one, the end of the old scene dissolves and is replaced by the new scene over a 2-second period.
ANIM. (Animation)???Each time you press START/ STOP, a 1/8-second recording is taken. By using an inanimate object and changing its position between shots, you can record the subject as though it???s moving.
???Animation is not available in the LP mode. If you tried to record in the LP mode after setting ANIM., the recording mode indicator "LP" begins to blink, and recording goes on in the SP mode.
NOTE:
During use of SCENE effect, focus (Z pg. 47) and exposure control (Z pg. 48) enter Full Auto operation.
When activated, this mode helps cut down on noise created by wind.
ON???When shooting in high winds, noise is automatically reduced.
?????? ??? appears.
???The quality of the sound will change. This is normal. OFF???This function is disabled.
NOTE:
The Wind Cut mode is disabled during Full Auto operation.
SOUND MODE
Sound signals can be sampled at 32 kHz or 48 kHz.
32 kHz???The camcorder is factory-preset for 32 kHz. This setting enables recording of stereo sound on four separate channels, and is recommended for use when performing Audio Dubbing.
48 kHz???This setting enables recording of stereo sound on two separate channels.
BEEP/TALLY
The beep sounds when the power is turned on or off, and at the beginning and end of recording. Tally lamp lights up during recording.
The following three Pro Snapshot modes (Z pg. 30) have a shutter sound effect: Pro Snapshot mode with no frame, Pro Snapshot mode with frame and Nega/Posi mode.
ON???To activate the beep/shutter sounds and tally lamp.
OFF???To turn off the beep/shutter sounds and tally lamp. Even though not heard while shooting, shutter sound is recorded on the tape.
NOTE:
NOTE:
A tape recorded at 48 kHz cannot be used for Audio Dubbing.
Beep/Tally is automatically turned on during Full Auto operation.
FADE
Example WH FADER ??? WHITE
Fade In
Fade Out
WIPE
Example  WIPE ??? SCROLL
Wipe In
Wipe Out
1 ACTIVATE FADE IN OR WIPE IN
Press START/STOP to start recording, and the Fade In or Wipe In occurs automatically.
2 ACTIVATE FADE OUT OR WIPE OUT
When you want to stop recording the scene, press START/STOP. Before the camcorder enters the Record-Standby mode, the Fade Out or Wipe Out occurs automatically.
NOTE:
You can extend the length of a fade or wipe by pressing and holding the START/STOP button.
Picture Wipe/Dissolve
Combine the Picture Wipe and Dissolve functions for a professional transition effect. There are 6 Picture Wipe effects and 1 Dissolve effect. Select the Picture Wipe effect at the Fader/Wipe Menu (Z pg. 38).
START/STOP button
Wipe In
1 START RECORDING
Press START/STOP.
2 ENGAGE RECORD-STANDBY MODE
Press START/STOP when one scene is finished. The point at which the scene ended is stored in memory.
3 RESUME RECORDING
If you start recording a new scene within 5 minutes of the end of the previous recording (without having turned the camcorder???s power off), the previous scene wipes out, revealing the new scene.
NOTES:
cIf you turn off the power after having finished recording a scene, the stored point is erased. This disables the Picture Wipe/Dissolve combination. When this happens, the Picture Wipe/Dissolve indicator blinks. Try recording again, but don???t turn the power off when you???re finished. Please be advised that power also shuts off automatically if 5 minutes elapse in the Record-Standby mode. The camcorder stores the end point of the last recorded scene, and you can use Picture Wipe/Dissolve between the last scene and the next one.
cThe sound at the end of the last recorded scene is not stored.
The indicator for the selected mode appears, and the selected mode is engaged.
Power Dial
Lock button
1 SELECT OPERATION MODE
First turn the Power Dial to ??? M ??? while pressing down the lock button located on the dial, make sure the LCD monitor is open fully or the viewfinder is pulled out.
2 ACCESSMENU MANUAL MODE ITEM
Press the Select Dial and move the pointer and highlight bar to "P.AE/EFFECT" by rotating the Select Dial.
3 ACCESS P.AE/EFFECT SELECT MENU
Press the Select Dial. The P.AE/Effect Menu appears.
4 SELECT EFFECT
Move the pointer and highlight bar to the desired effect by rotating the Select Dial, then press it.
???The P.AE/Effect Menu disappears and the selected mode is activated. The symbol of the
selected mode appears.
Select Dial
5 START RECORDING
Press START/STOP. The image begins with the selected effect.
6 DISABLE P.AE/EFFECT
To turn off the selected effect, re-access the P.AE/Effect Menu and move the pointer and highlighlt bar to ???OFF??? by rotating the Select Dial. Then press it.
NOTE:
P.AE/Effects can be changed during recording or during Record-Standby.
IMPORTANT:
cIf certain Fades or Wipes (Z pg. 38 ??? 43) are activated or if the Progressive Dial is set to "VIDEO", some P.AE/Effects cannot be used. If you select a P.AE/Effect that is unusable in the current situation, the effect???s symbol begins flashing.
cWhen the Digital Image Stabilizer is activated, the P. AE/Effects other than "SHUTTER" are not available.
Progressive Video Recording
If an image is recorded using the Progressive Mode, it is possible to play back a jitter-free still image with superior quality. A high-resolution still image can also be processed on a personal computer or can be printed out (Z pg. 60, 61).
Progressive Dial VIDEO mode
VIDEO
OT
H
S
P
A
N
S
Progressive Button
Power Dial
PLAY
OFF
A
M
5S
Power lamp Lock button
Display
F. AUTO
 PAUSE
PAUSE 
Progressive mode display
1 SELECT OPERATION MODE
Turn the Power Dial to ??? A ???, ???M ???, ???5S??? or ??? while pressing down the lock button located on the dial. Make sure the LCD monitor is open fully or the viewfinder is pulled out.
??? The power lamp comes on.
2 SELECT PROGRESSIVE MODE
Turn the Progressive Dial to ???VIDEO???. ???PS??? (Progressive Mode Display) comes on.
3 START RECORDING
Press the Progressive Button located on the Progressive Dial. The tally lamp comes on.
4 END RECORDING
Press the Progressive Button. The camcorder enters Record-Standby mode.
To Perform Pro Snapshot Recording during Progressive Video Recording . . .
.... first turn the Progressive Dial to the Pro Snapshot Mode you want, then press the Progressive Button. To end recording, turn the Progressive Dial to ???VIDEO???, then press the Progressive Button again.
NOTES:
cTo perform Progressive Video Recording, the Progressive Button should be pressed during Record-Standby; it cannot be activated during recording.
cIf START/STOP is pressed instead of the Progres- sive Button, the camcorder starts recording using
the operation mode to which the Power Dial is set at that moment (Z pg. 19). ???PS??? disappears.
IMPORTANT:
cWhen an image recorded using the Progressive Mode is played back, the image may not look natural.
cWhen the Progressive Dial is set to ???VIDEO???, Wipe/Dissolve (Z pg. 43) Effects and some P.AE/Effects
(Z pg. 45) cannot be used.
Power Dial
Lock button
Select Dial
RETURN
Manual Mode Item
Menu
FOCUS
Focus zone
(Focus is adjusted at the center of the screen)
down the lock button located on the dial, make sure the LCD monitor is open fully or the viewfinder is pulled out.
2 ACCESSMENU MANUAL MODE ITEM
Press the Select Dial. The Manual Mode Item Menu appears.
3 ACCESS MANUAL FOCUS
Move the pointer and highlight bar to ???FOCUS??? by rotating the Select Dial, then press it. Rotate the Select Dial to display ???MANUAL???, then press it. The Manual Mode Item Menu disap- pears and ???FOCUS??? is displayed in the upper left corner. The focus is locked at this point.
4 ADJUST FOCUS
Rotate the Select Dial.
?????? ??? blinks while rotating the Select Dial to the right to focus on faraway targets, and ???
 ??? blinks while rotating the Select Dial to the left to
focus on closer targets. Press the Select Dial at your desired focus.
???When the focus reaches its near or far limit, the ??? ??? or ???
 ??? will begin blinking.
???When focus cannot be adjusted manually, try zooming in or out, then try the manual focus adjustment again.
5 END ADJUSTMENT OF FOCUS
Press the Select Dial. Focus adjustment is complete. The indication changes from ???FOCUS??? to ???MANUAL???.
???If you want to reset the focus, repeat from step 2.
To Change To Auto Focus . . .
.... rotate the Select Dial to display ???AUTO??? then press it in step 3. The manual focus indicators
NOTES:
cWhen ???FOCUS??? is not displayed, Manual Focus Adjustment is not available. To make it appear, press ON/OFF for longer than 1 second or repeat from step 2.
cManual focus is recommended in the following situations:
???When shooting a flat wall, a blue sky or an object with little or no contrast.
???When wire or other obstacles come between the camcorder and the subject.
???When shooting objects with a detailed design or pattern.
???When shooting under flourescent or flickering
lighting.
Exposure Control
Usually this is adjusted automatically. However, when the background is too bright or too dark in compari- son with the subject, the exposure could be corrected manually. Factory preset is ???AUTO???.
Display
Power Dial
Lock button
Select Dial
RETURN
Manual Mode Item
Menu
EXP.
 0
0
Exposure control indicator
down the lock button located on the dial, make sure the LCD monitor is open fully or the viewfinder is pulled out.
2 ACCESSMENU MANUAL MODE ITEM
Press the Select Dial. The Manual Mode Item Menu appears.
3 ACCESS EXPOSURE CONTROL
Move the pointer and highlight bar to ???EXPO- SURE??? by rotating the Select Dial, then press it. Rotate the Select Dial to display ???MANUAL???, then press it. The Manual Mode Item Menu disappears and ???EXP.??? and the Exposure Control indicator are displayed.
4 ADJUST EXPOSURE
Rotate the Select Dial to the right/left to brighten or darken the image. Press the Select Dial at your desired exposure.
??? The adjustment range is from ???6 to +6.
5 END ADJUSTRMENT OF EXPOSURE
Press the Select Dial. Exposure adjustment is complete. The indication ???EXP.??? changes to ???MANUAL???.
??? If you want to reset the exposure, repeat step 2.
To Return To Automatic Exposure Control . . .
.... rotate the Select Dial to display ???AUTO??? then press it in step 3. The Exposure Control indicator disappears. Or set the Power Dial to
NOTES:
cWhen ???EXP.??? is not displayed, Manual Exposure Control is not available. To make it appear, press ON/OFF for longer than 1 second or repeat from step 2.
cManual exposure adjustment is recommended in the following situations:
???When shooting using reverse lighting or when the background is too bright.
???When shooting on a reflective natural back- ground such as at the beach or when skiing.
???When the background is overly dark or the subject light.
Brightness control of the LCD monitor
To adjust the brightness of the LCD monitor, rotate the Select Dial (Z pg. 24). Note that the actual recorded image's brightness can not be changed by rotating this dial.
Display
Manual Mode Item Menu
down the lock button located on the dial, make sure the LCD monitor is open fully or the viewfinder is pulled out.
2 ACCESSMENU MANUAL MODE ITEM
Press the Select Dial. The Manual Mode Item Menu appears.
3 ACCESS EXPOSURE CONTROL
Move the pointer and highlight bar to ???EXPO- SURE??? by rotating the Select Dial and then press it. Rotate the Select Dial to display ???MANUAL???, then press it. ???EXP.??? is displayed.
4 CENTER SUBJECT, LOCK IRIS
Adjust zoom so that the subject fills the LCD monitor or the viewfinder, then press and hold the Select Dial for over 2 seconds. The exposure setting display and ??? L ??? appear, indicating that the iris is locked.
Press the Select Dial. The indication displayed in the upper left corner changes from ???EXP.??? to ???MANUAL???.
To Return To Automatic Iris Control . . .
.... rotate the Select Dial to display ???AUTO??? then press it in step 3. The Exposure Control indicator and ??? L ??? disappear. Or set the Power Dial to
NOTES:
Iris lock is recommended in the following situa- tions:
cWhen shooting on a reflective natural background such as at the beach or when skiing.
cWhen shooting objects under a spotlight.
cWhen the subject is backing away.
cWhen zooming.
To lock the exposure control and the iris . . .
.... after step 3, adjust the exposure rotating the Select Dial. Then lock the iris in step 4. For automatic locking, rotate the Select Dial to display "AUTO", then press it in step 3. The iris becomes automatic after about 2 seconds.
Iris
Works like the pupil of the human eye. In a well-lit environment, the human pupil contracts to keep too much light from enterintg. In low lighting, the pupil dilates to allow more light in.
1 SELECT OPERATION MODE
First turn the Power Dial to ??? M ??? while pressing down the lock button located on the dial, make sure the LCD monitor is open fully or the viewfinder is pulled out.
2 ACCESSMENU MANUAL MODE ITEM
Press the Select Dial. The Manual Mode Item Menu appears.
3 ACCESSMENT WHITE BALANCE ADJUST-
Move the pointer and highlight bar to ???W.BALANCE??? by rotating the Select Dial. Then press it. The Manual Mode Item menu disappears and ???W.BAL.??? appears in the upper left corner and ???AUTO??? appears on the screen.
4 SET FUNCTION PARAMETERS
Cycle through the available settings of the selected functions by rotating the Select Dial, and stop when the one you want is displayed.
5 CLOSEMENT WHITE BALANCE ADJUST-
Press the Select Dial again. Selection is complete. The indication ???W. BAL.??? changes to ???MANUAL???.
To Return To Automatic White Balance . . .
.... select ???AUTO??? in step 3. Or set the Power Dial to
NOTE:
White balance cannot be used when P.AE/Effects Sepia or Monotone are activated.
AUTO???The white balance is adjusted automatically. This is the factory preset position.
??? ?????? When using a video light or other similar type of lighting.
??? ?????? When shooting outdoors on a cloudy day. ???
 ?????? When shooting outdoors on a sunny day.
??? ?????? When shooting with the white balance already having been set on the subject (Z pg. 51).
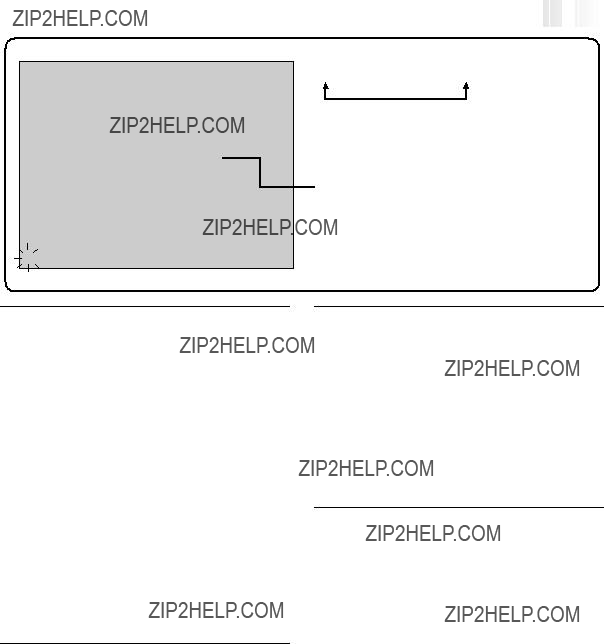
Display
White paper
RETURN
Manual Mode
Item Menu
MANUAL
PAUSE
Select Dial
Manual White Balance
Adjustment
1 SELECT OPERATION MODE
Follow steps 1 through 4 of the white balance adjustment (Z pg. 50), select ??? MAN.???.
2 SET MANUAL WHITE BALANCE
Hold a sheet of plain white paper in front of the subject. Adjust zoom or position yourself so that the white paper fills the screen.
3 ENTER SETTING
Press the Select Dial until the  begins blinking.
???When the setting is completed, the  stops blinking.
4 EXIT MANUAL WHITE BALANCE
ADJUSTMENT
Press the Select Dial. The indication ???W.BAL.??? changes to ???MANUAL??? and only the Manual White Balance indicator  is displayed.
To Change The Tint For Recording . . .
.... in step 2, substitute colored paper for white. The white balance is adjusted based on the color, changing the tint. Red paper ??? deeper green; blue paper ??? orange; yellow paper ??? deeper purple.
NOTES:
cA subject can be shot under various types of lighting conditions indoors (natural, flourescent, candlelight, etc.). Because the color temperature is different depending on the light source, the tint of the subject will differ depending on the white balance settings. Use this function for a more natural result.
cOnce you adjust white balance during Manual White Balance operation, the setting is retained even if the power is turned off or the battery removed.
1 SELECT OPERATION MODE
Turn the Power Dial to ???PLAY??? while pressing down the lock button located on the dial. The Power lamp comes on.
2 OPEN LCD MONITOR
Open the LCD monitor.
???When the viewfinder is pulled out, the LCD monitor cannot be used.
3 REWIND TAPE
Press 2. 2is displayed. If you rewind all the way to the end of the tape, it stops automatically.
4 VIEWING RECORDING
Press 6/4. 4appears and the recorded footage can be viewed. The sound is heard from the speaker.
5 END PLAYBACK
Press 5. Set the Power Dial to ???OFF???.
???When turning to ???OFF???, it is not necessary to press down the lock button.
 5S
5S
1 FIND THE SCENE OF INTEREST
Press the Play button to start playback.
2 ACTIVATE ZOOM
Press the zoom buttons (T/W) on the remote control. Make sure the remote control is pointed at the camcorder's remote sensor.
??? Pressing T zooms in.
3 LOCATESCENE PORTION OF MAGNIFIED
You can move the image on screen around to find a particular portion of the picture. While holding down SHIFT, press ?? (Left),
?? (Right), ?? (Up) and ?? (Down).
4 END ZOOM
Press and hold W until magnification returns to normal. Or, press STOP and then press PLAY.
NOTES:
cZoom can also be used during slow-motion and still playback.
cIf the Video Echo effect (Z pg. 55) is selected during playback zoom, playback zoom is cancelled.
cDuring digital image processing, the quality of the image may suffer.
1 START PLAYBACK
Press the Play button (4).
2 ACCESS P.AE/EFFECT SELECT MENU
Point the remote control at the camcorder???s remote sensor and press EFFECT. The P.AE/ EFFECT Select Menu appears.
3 SELECT P.AE/EFFECT
Move the pointer and highlight bar to the desired effect by pressing EFFECT. The selected function is activated and after 2 seconds the menu disappears.
NOTES:
cTo deactivate the selected effect, press EFFECT ON/OFF on the remote control. Pressing it again re-activates the selected effect.
cRepeat from step 2 when you want to change the selected effect.
cWhen a Playback Effect is activated, Pro Snapshot modes (Z pg. 31) are not possible.
The effects that can be used during playback are
Classic Film, Monotone, Sepia, Strobe and Video Echo. The effects work the same in playback as they did in recording. Refer to page 45 for more information.
Lock button
Power Dial
Select Dial
1 SELECT OPERATION MODE
First turn the Power Dial to ???PLAY??? while pressing down the lock button located on the dial. Open the LCD monitor fully.
2 ACCESS PLAYBACK MENU
Press MENU. The Playback Menu appears in the LCD monitor and on the connected TV.
3 SELECT FUNCTION
Move the pointer and highlight bar to the desired function by rotating the Select Dial. Press the Select Dial to activate.
4 SET FUNCTION PARAMETERS
Rotate the Select Dial to cycle through the available settings for the selected function, and stop when the desired setting appears. Then press the Select Dial, and the pointer and highlight bar automatically move to ???END???.
???To set parameters for other functions, repeat steps 3 and 4.
5 CLOSE MENU
Press the Select Dial again, and the menu disappears.


 EN
EN 57
57

Playback Sound
During playback, the camcorder detects the sound mode in which the recording was made, and plays the sound back. Select the type of sound to accompany your playback picture. (32 kHz is preset to ???SOUND 1??? and 48 kHz is preset to ???FULL SOUND???.)
When watching a tape recorded at 32 kHz, if you want to change the output sound, access the Playback Menu and, in step 3 on page 56, select ???32kHz MODE??? and set it for ???FULL SOUND???, ???SOUND 1??? or ???SOUND 2???. When playing back a tape recorded at 48kHz, set in the same manner. For information on output sound during Audio Dubbing, see page 70.
NOTES:
cYou can also use the RM-V711U remote control???s AUDIO MONITOR button to change the output sound (without having to access the Playback Menu). Make sure you point the remote control at the camcorder???s remote sensor.
cDuring playback, the camcorder detects the sound mode in which the recording was made. This detection cannot be made during fast-forward or rewind. During playback the sound mode is displayed in the upper left corner.
*30 frames = 1 second
TIME CODE
(Displaying The Time Code During Playback)
You can display the Time Code on screen during playback. This is especially useful for editing. This function is preset to ???OFF???. To turn it on, select ???TIME CODE??? at the Playback Menu and change the setting (Z pg. 56).
ON??? The Time Code is displayed on the playback screen.
OFF??? The Time Code does not appear.
DISPLAY
(Displaying the Date During Playback)
If the time has been set, the date is automatically recorded separately from the recorded video signal. You can display or remove the date anytime during playback. This function is preset to ???ON???. To turn it off, select ???DISPLAY??? at the Playback Menu and change the setting (Z pg. 56).
ON??? The date is displayed on the playback screen. OFF??? The date is not displayed.
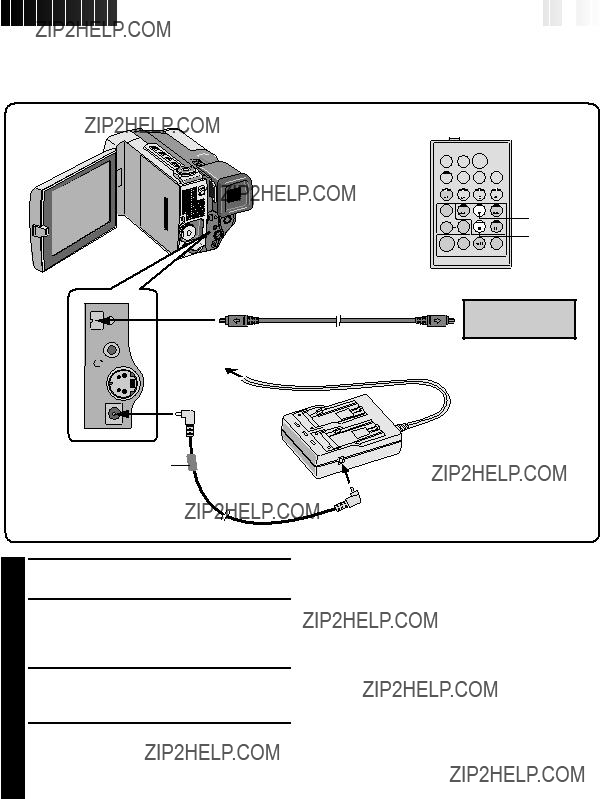
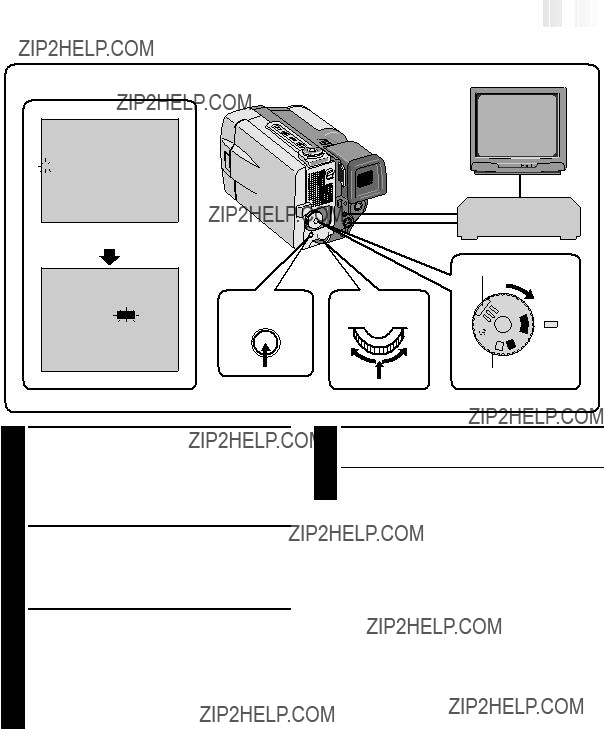
VCR/TV Connection
Please refer to your VCR and/or TV instruction manual(s) when connecting.
Core filter
 To AV OUT connector
Core filter
To S-VIDEO
OUT connector
To DC IN jack
Core filter
DC cord
Connect when the
S-VIDEO cable is not used
AC Power
Adapter/Charger
 To DC OUT jack

1 CONFIRM POWER-OFF STATUS
Make sure the camcorder and PC are turned off.
2 CONNECT CAMCORDER TO PC
Pull out the connector cover and open it. Connect the camcorder to a PC using the cable according to your PC type as shown in the illustration.
3 SUPPLY POWER
Connect the camcorder to the AC Power Adapter/Charger using the DC cord, then plug the AC Power Adapter/Charger's power cord into an AC outlet.
4 TURN ON POWER
Turn the camcorder's Power Dial to "PLAY" while pressing down the lock button located on the dial and turn on the PC.
NOTES:
cWhen transferring still images, never use the battery pack installed in the camcorder as the power supply. Use the provided AC Power Adapter/Charger.
cNever connect the JLIP-PC connection cable and the DV cable simultaneously to the camcorder. Connect only the cable you wish to use to the camcorder.
cThe date/time information cannot be captured into PC.
cAlso refer to the instruction manuals of the provided Software and the DV connector-equipped capture board.
To AC outlet
AC Power
Adapter/
Charger
To DC OUT jack
To DV IN connector
To DC IN jack
To PARALLEL connector
Core
filter  To DV OUT
connector
Printer cable (commercially available) 2 way-Parallel Interface
To DV connector
To PARALLEL (PRINTER) connector
Video unit equipped with a DV input connector
PC
1 CONFIRM POWER-OFF STATUS
Make sure all the units are turned off.
2 CONNECT CAMCORDER TO PRINTER
OR VIDEO UNIT EQUIPPED WITH DV
INPUT CONNECTOR
Pull out the connector cover and open it. Make connections to the device you want to connect to using the DV cable, as shown in the illustration.
3 CONNECT PRINTER TO PC
Connect the printer cable to the printer's PARALLEL connector and the PC's PARALLEL (PRINTER) connector.
4 SUPPLY POWER
Connect the camcorder to the AC Power Adapter/Charger using the DC cord, then plug the AC Power Adapter/Charger's power cord into an AC outlet.
button located on the dial and turn on the other units.
NOTES:
cYou cannot use the battery pack installed in the camcorder as the power supply since a digital signal is output from the DV OUT connector only when using the AC Power Adapter/Charger.
cWhen using the camcorder for dubbing, be sure to use it as a player. The camcorder's DV connector is only for output.
cAlso refer to the instruction manuals of the
connected units.
END RECORDING
Press the Stop button (5) to stop the source tape, and engage the VCR???s stop mode.
Dubbing
You can copy recorded scenes from the camcorder onto a videotape. Refer to your VCR???s instruction manual for details.
 Remote sensor
Play button Stop button
Lock button
Power Dial
VCR (Recording deck)
T W
DISPLAY
ON/OFF button
1 MAKE CONNECTIONS
Connect the camcorder to your VCR as shown in the illustration on page 58.
Please also refer to your VCR's instruction manual before dubbing.
2 START PLAYBACK
Press the Play button (4) to play back the source tape.
3 START RECORDING
While watching on the connected TV, engage your VCR???s record mode from the spot on the source tape you want to begin recording.
4 PAUSE RECORDING
Engage your VCR???s pause mode to stop recording a segment.
5
NOTES:
cYou can use Playback Zoom (Z pg. 54) or Playback Effects (Z pg. 55) in step 2.
cBefore you start dubbing, make sure that the indications do not appear on the connected TV. If they do appear during dubbing, they are being recorded onto the new tape.
To clear the Playback Sound Mode Display, press DISPLAY on the RM-V711U Remote Control.
cSelect ???DISPLAY??? and ???TIME CODE??? from the Playback Menu (Z pg. 56) to show or hide the Date/Time and the Time Code on the recording.
cTo show or hide all indications, press the ON/OFF button on the camcorder for longer than 1 second.
1 CONFIRM POWER-OFF STATUS
Make sure the camcorder's power is off.
2 MAKE CONNECTIONS
Connect the camcorder to your video unit equipped with a DV connector using the DV cable (optional) as shown in the illustration.
3 START PLAYBACK
Press the Play button (4) to play back the source tape.
4 START RECORDING
While watching the playback on the LCD monitor, engage the DV connector-equipped video unit's record mode from the spot on the source tape you want to begin recording.
NOTES:
cYou cannot use the battery pack installed in the camcorder as the power supply since a digital signal is output from the DV OUT connector only when using the AC Power Adapter/Charger.
cWhen using the camcorder for dubbing, be sure to use it as a player. The camcorder's DV connector is only for output.
cIf a blank portion is played back during dubbing, an unusual image may be dubbed.
cEven though the DV cable is connected correctly, sometimes the image may not appear in step 3. If the above occurs, turn off power and make connections again.
cThe image with Fade/Wipe Effects and P.AE/ Effects is not output from the DV OUT connector. Only the original playback image is output from it.
SET REMOTE/VCR CODE
Before operation, make sure the lithium battery is installed in the remote control RM-V711U
(Z pg. 18).
1 SET REMOTE TO OPERATE VCR
Turn off the power to the VCR and point the remote towards the VCR???s infrared sensor. Then, referring to the VCR CODE LIST on the left, press and hold MBR SET, and press button
(A) and then (B).
???The code is automatically set once you release the MBR SET button, and the VCR???s power comes on.
2 OPERATE THE VCR
Make sure the VCR???s power is on. Then, while holding SHIFT, press the button on the remote for the desired function. The functions the remote can control are PLAY, STOP, PAUSE, FF, REW and VCR REC STBY (you don???t need to press SHIFT for this one).
You???re now ready to try Random Assemble Editing.
IMPORTANT
Although the MBR is compatible with JVC VCRs and those of many other makers, it may not work with yours or may offer limited functions.
NOTES:
cIf the VCR???s power doesn???t come on in step 1, try another code from the VCR CODE LIST.
cSome brands of VCR don???t come on automati- cally. In this case, turn the power on manually and try step 2.
cIf the RM-V711U is not able to control the VCR, use the controls on the VCR.
cWhen the remote control's battery runs out, the VCR brand you have set will be erased.
In that case, replace the old battery with a new one to reset the VCR brand.

1 MAKE CONNECTIONS
Make sure that the playback picture and sound are available on the connected TV (Z pg. 58).
???Connections should be made while the power is off. Making connections with the power on can lead to electrical shock or malfunctions.
2 START SOURCE PLAYBACK
First turn the Power Dial to ???PLAY??? while pressing down the lock button located on the dial. Press PLAY and then press R.A. EDIT ON/ OFF on the remote control. Make sure to point the remote control at the camcorder???s remote sensor.
???The Random Assemble Editing Menu appears on the TV screen or the LCD monitor.
3 EXECUTE FADE/WIPE IN
(IF NECESSARY)
Press FADE/WIPE on the remote control.
???Cycle through the effects by pressing repeatedly, and stop when the one you want is displayed.
???You can???t use a Picture Wipe/Dissolve at the beginning of Program 1.
NOTES:
cWhen using a JVC VCR with a remote pause terminal, connect the EDIT jack on the camcorder to the VCR???s remote pause terminal using an editing cable.
cIf you use a JVC VCR not equipped with a remote pause terminal or a non-JVC VCR, connect the camcorder's EDIT jack to the remote control's remote pause connector using an editing cable.
cBefore Random Assemble Editing, make sure the indications don't appear on the TV monitor. If they appear during Random Assemble Editing, they will be recorded onto the new tape. To clear the Playback Sound Mode Display, press DISPLAY on the RM-
V711U Remote Control. Select ???DISPLAY??? and ???TIME CODE??? from the Playback Menu (Z pg. 56) to show or hide the Date/Time and the Time Code on the recording. To show or hide all indications except for the Random Assemble Editing Menu, press ON/OFF on the camcorder for longer than 1 second. When Random Assemble Editing starts, its indications disappear and are not recorded on the new tape.
CONTINUED ON NEXT PAGE
Rewind button
Pause button
Stop button
START/STOP button
Random Assemble Editing menu
8 REGISTER ADDITIONAL SCENES
Repeat steps 4 ??? 7 (Z pg. 66).
???To change previously registered points, press CANCEL on the remote control. The registered points disappear, one at a time, from the most recently registered point.
???If you're not using Fade/Wipe or P.AE/Effects, repeat steps 4 and 5 only.
9 PREPARE SOURCE TAPE
Rewind the tape in the camcorder to the beginning of the scene you want to edit and press the Pause button (6).
10 ENGAGEMODE VCR'S RECORD-PAUSE
Point the remote control towards the VCR???s remote sensor and press VCR REC STBY, or manually engage the VCR???s Record-Pause mode.
11 START EDITING
Press the START/STOP button on the camcorder. Editing proceeds as programed, right through to the end of the last registered scene.
???When dubbing is complete, the camcorder enters the Pause mode, and the recorder enters its Record-Standby mode.
???If you don???t register an Edit-Out point, the tape will be dubbed all the way to the end automatically.
12 STOP EDITING
Engage the Stop modes for the camcorder and the VCR.
To make the R.A. Edit counter display disap- pear, press R.A. EDIT ON/OFF on the remote control.
NOTES:
cPressing R.A. EDIT ON/OFF on the remote control clears all settings registered during Random Assemble Editing.
cWhen the editing cable is connected to the Pause terminal during dubbing, make sure the remote control is pointed at the VCR???s sensor, and that the path between the two is unobstructed.
cIf, during Random Assemble Editing, you press any button on the camcorder, its Record-Standby mode is automatically engaged.
cRandom Assemble Editing may not function properly when using a tape including several duplicated Time
Diagnosing VCR???s against Camcorder Timing
Remote sensor
Power Dial

 R.A.EDIT ON/OFF
RM-V711U (provided)
1 ??? ??? ??? ??? : ??? ??? ~
2~
3~
4~
5~
6~
7~
8~
Random Assemble Editing Menu
Perform Random Assemble Editing on Program 1 only. In order to check VCR and camcorder timing, select the beginning of a scene transition as your Edit-In point.
4 ACCESS PLAYBACK MENU
Point the remote control at the camcorder???s remote sensor and press R.A. EDIT ON/OFF to make the Random Assemble Editing menu disappear, then press MENU. The Playback Menu appears on the TV screen.
5 SELECT FUNCTION
Move the pointer and highlight bar to ???SYNCHRO??? by rotating the Select Dial, then press it. The value for ???SYNCHRO??? is high- lighted.
6 INPUT CORRECTION DATA
Based on the diagnostics performed (Z pg. 68), you can now increase the VCR???s speed by rotating the Select Dial to the right. You can also slow down the VCR???s speed by rotating the Select Dial to the left. The adjustment range is from ???1.3 to +1.3 seconds, in 0.1-second increments.
7 CLOSE MENU
Press the Select Dial twice.
???Now perform Random Assemble Editing beginning with step 2 on page 65.
NOTES:
cBefore performing actual Random Assemble Editing, do a few Random Assemble Editing trial runs to check whether the value you have input is appropriate or not, and make adjustments accordingly.
cDepending on the recorder, there may be situations where the timing difference cannot be fully corrected.
1 FIND EDIT-IN POINT
Play back the tape to locate the point where editing will start, then press PAUSE.
2 ENGAGE AUDIO DUB STANDBY
While holding A. DUB on the remote control, press PAUSE. ???6e??? appears.
NOTES:
3 BEGIN DUBBING
Press PLAY, then begin ???narrating???.
???Speak into the microphone.
4 PAUSE DURING DUBBING
Press PAUSE.
5 STOP DUBBING
Press STOP.
cAudio dubbing is possible using an optional microphone connected to the external microphone input connector (MIC).
cWhile an optional microphone is connected, the built-in microphone is disabled.
cWhen editing onto a tape that was recorded at 32 kHz, the old and new soundtracks are recorded separately.
cTo select the desired sound for playback, press AUDIO MONITOR on the remote control.
cIf you dub onto a blank space on the tape, the sound may be disrupted. Make sure you only edit recorded areas.
cIf feedback or howling occurs during TV Playback, move the camcorder???s microphone away from the TV, or turn down the TV???s volume.
cSound is not heard from the speaker during Audio Dubbing. To hear sound, connect optional headphones to the AV OUT (headphones) connector.
cIf you change from 32 kHz to 48 kHz in mid-recording and then use the tape for Audio Dubbing, it is not effective from the point where 48 kHz recording began.
cDuring Audio Dubbing, when the tape moves to scenes recorded in the LP mode, scenes recorded at 48 kHz or a blank portion, Audio Dubbing stops and ???ERROR! REFER MANUAL??? appears.
6w
TC 12 : 34
Lock button
Power Dial
 Remote sensor
RM-V711U (provided)
 START/STOP
T W
DISPLAY
INSERT
1 FIND EDIT OUT POINT
Playback the tape to locate the point where you want to stop editing. Confirm the time code at this point (Z pg. 57).
2 FIND EDIT IN POINT
Press REW until the point is located, then press
PAUSE.
3 PREPARE FOR INSERT EDITING
Press and hold INSERT on the remote control, then press PAUSE. ???6w??? and the Time Code (min.:sec.) appear and the camcorder enters Insert-Pause mode.
4 START RECORDING
Press START/STOP to begin editing.
???Confirm the insert at the time code you checked in step 1.
5 PAUSE DURING EDITING
Press START/STOP. The camcorder re-enters Insert Pause mode. Press again to resume editing.
6 STOP EDITING
Press STOP while the camcorder is in the Insert-Pause mode.
NOTES:
cP.AE/Effects (Z pg. 44) can be used to spice up the scenes being edited during Insert Editing.
cTo display the Time Code during Insert Editing, Z pg. 56.
cWhen performing Insert Editing, the tape???s Video Area and Sub-Code Area (Z pg. 8) are rewritten, so the date and time information changes.
cIf you perform Insert Editing onto a blank space on the tape, the audio and video may be disrupted. Make sure you only edit recorded areas.
cDuring Insert Editing, when the tape moves to scenes recorded in the LP mode or a blank portion, Insert Edting stops and ???ERROR! REFER MANUAL??? appears.
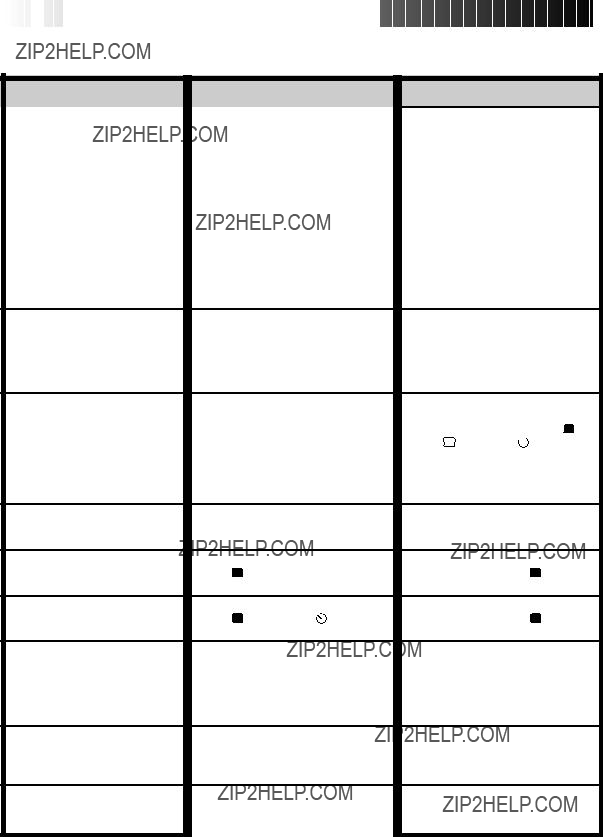
properly.
???The battery is dead. ???The LCD monitor is not
open fully or the viewfinder is not pulled out when recording.
CORRECTIVE ACTION
1.??? Connect the AC Adapter securely (Z pg. 12).
???Replace the dead battery
with a fully charged one (Z pg. 11).
???Open the LCD monitor fully or pull out the viewfinder. The LCD monitor turns on/off when it is opened/closed at approx. 90?? while the Power Dial is set to any position except ???OFF??? if the viewfinder is not fully pulled out.
2.??? Connect the camcorder to an AC outlet using the AC Power Adapter/Charger etc. for over 24 hours to charge
the clock lithum battery (Z pg. 13).
3.??? Set the tape???s record safety tab to ???REC??? (Z pg. 12).
???Set the Power Dial to ??? A ???, ??? M ???, ???5S??? or ??? ???
???
(Z pg. 19).
???Replace with new cassette (Z pg. 14).
???Close the cassette's cover.
4.??? Turn the camcorder???s power off and on again (Z pg. 21).
5.??? Set the Power Dial to any
position except ??? A ??? (Z pg. 19).
6.??? Set the Power Dial to any
position except ??? A ???, ???5S??? and ??? ??? (Z pg. 19).
7.??? Set Focus to ???AUTO???
(Z pg. 47).
???Clean the lens and check the focus again (Z pg. 77).
8.??? Set it in the right position
(Z pg. 14).
???Install a fully charged battery (Z pg. 10).
9.??? Set the Power Dial to ???PLAY??? (Z pg. 52).
18.The Picture Wipe and Dissolve functions don???t work.
18. ???The last selected editing scene is ending.
???At the end of the last selected scene for editing, the Power Dial was set to ???OFF???.
???The power is off.
18.??? Select Picture Wipe or Dissolve before beginning recording. The effects are
then automatically activated (Z pg. 40).
???Do not turn off the camcorder???s power after setting Edit-In and Edit-Out
points, as they will all be erased (Z pg. 40).
???The camcorder automatically shuts off after 5 minutes have elapsed in the Record- Standby mode. Make sure you continue operations within
5 minutes after engaging
Record-Standby mode (Z pg. 40).
red or black for an instant.
35.??? Re-read the sections covering FADE/WIPE, P.AE/
Effects and DIS
(Z pgs. 35, 38 ??? 45).
the monitor fully (Z pg. 25).
43. When the image is 43. ???This is not a malfunction. printed from the printer, a
black bar appears at the bottom of the screen.
43.??? By recording with Digital
Image Stabilizer set to ???ON??? (Z pg. 35) this can be avoided.
tLCD monitor (Z pg. 24)
The image appears during recording or play- back.
oDC IN jack (Z pg. 12)
The DC cord of an AC Power Adapter can be connected.
y Cassette cover (Z pg. 14)
uDV OUT connector (Z pg. 60, 61, 63)
Connect to a video unit equipped with a DV connector.
iVideo/audio output connector or head- phones connector ( /AV-OUT)
(Z pg. 58, 70)
The provided VIDEO/AUDIO cable (??3.5) can be connected to a television etc. Using optional headphones, you can listen to the sound. However, headphones equipped with volume control cannot be used.
pS-VIDEO OUT connector (Z pg. 58, 65)
Connect to a video unit equipped with an S- Video connector.
QBattery cover (Z pg. 11)
Open the battery cover to insert the battery.
WBattery cover open switch (BATTERY) (Z pg. 11)
Slide in the direction of the arrow to open the battery cover.
EPower Pack (MULTI) connector (Z pg. 12)
Attach to the Power Pack (optional).
RTripod mounting socket (Z pg. 16)
* :Pressing ON/OFF for longer than 1 second lets you remove indications marked with * from the screen.
Specifications shown are for SP mode unless otherwise indicated. E & O.E. Design and specifications subject to change without notice.

Iris
Works like the pupil of the human eye. In a well-lit environment, the human pupil contracts to keep too much light from entering. In low lighting, the pupil dilates to allow more light in.
Color temperature
A measurement in Kelvin degrees which indicates the color contents of a light source; bluish light has a higher color temperature than reddish light. To reproduce white as white under different types of lighting, the chrominance signal must be adjusted to match the light source???s color temperature.
(See ???White Balance???.)
AC Adapter
Used when charging the battery. Or, when connected directly to the camcorder, it can be used as a power supply.
Auto focus
Focus can be set for automatic adjustment, for beginners who find the adjustment difficult.
On-screen display
Displays in the viewfinder or the LCD monitor can be shown on a connected TV.
Strobe
In the early days of movie making, 1-second strobes were uncommon, so movies didn???t have the smooth movement they have today. This function gives movies the old-film flicker effect.
Record-Standby
Engage this mode by pressing START/STOP during Stop or Record modes. It means that the camcorder, or your VCR, is paused and ready to record.
CCD (Charge coupled device)
Solid-state imaging device used in camcorders as the camera???s image pickup; analogous to the eye???s retina except that picture information is output as electric signals.
Dew sensor
If condensation forms inside the unit due to a temperature change, the indicator appears in the viewfinder or the LCD monitor, and the camcorder becomes unusable.
Digital zoom
10X Optical zoom image is taken and digitally processed to provide 40X or 200X magnified images.
Digital Image Stabilizer
When shooting while holding the camcorder in your hand, even if you think you???re perfectly still, there is slight movement. This function compensates for that movement.
Fade
An effect used in scene transitions. Like movies or TV, the scene gradually goes black or white (fade out), or comes in from a black or white screen (fade in).
White balance
A term that refers to the correctness of color reproduction under various lighting. If the white balance is correct, all other colors will be accurately reproduced.
Wipe
An effect used in scene transitions. A scene disappears as though it???s being wiped off the screen (wipe out), or appears as though it???s wiped on (wipe in).
DVL9000-GR
VICTOR COMPANY OF JAPAN, LIMITED
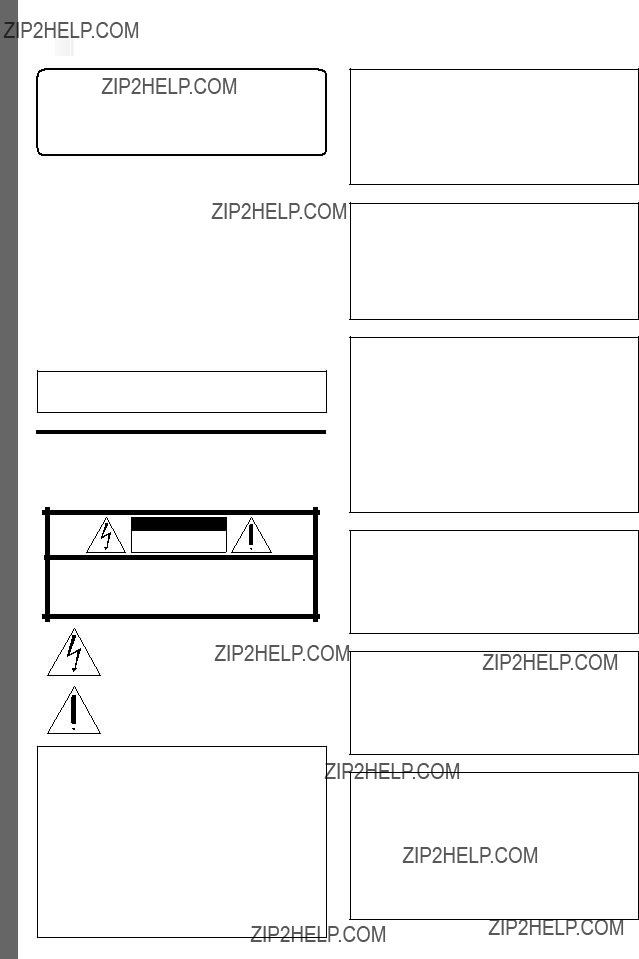

 EN
EN


 EN
EN

 EN
EN


 digital video cassette. Only cassettes marked
 can be used with this unit.


 EN
EN


 PROVIDED

 ACCESSORIES


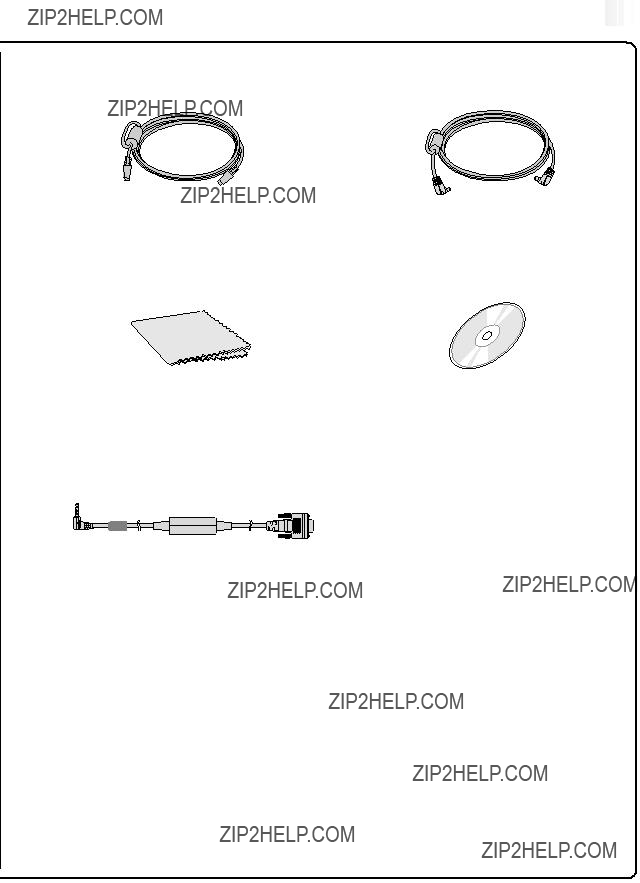


 EN
EN
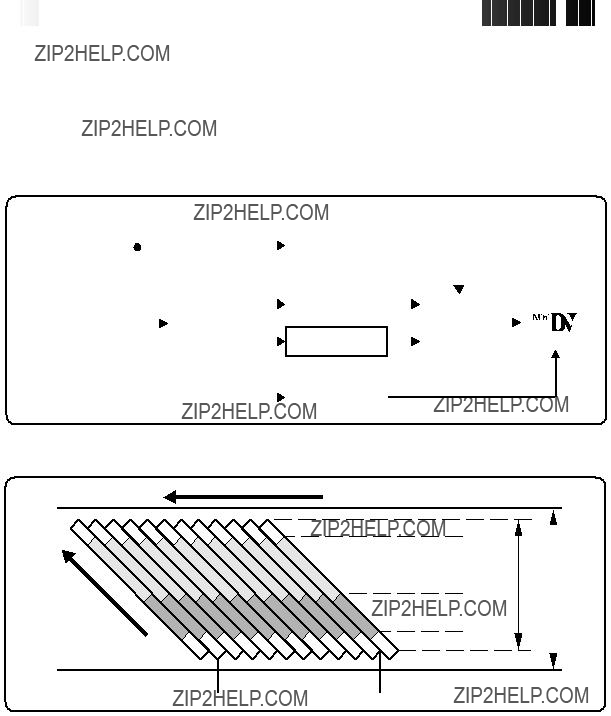


 ABOUT
ABOUT
 DV
DV


 GETTING

 STARTED


 EN
EN


 GETTING
 STARTED


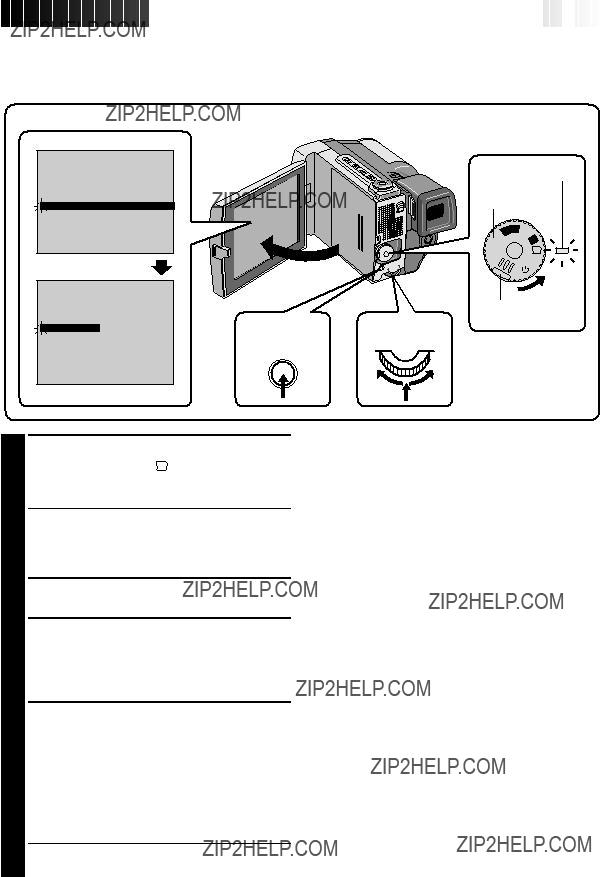


 EN
EN


 GETTING
 STARTED


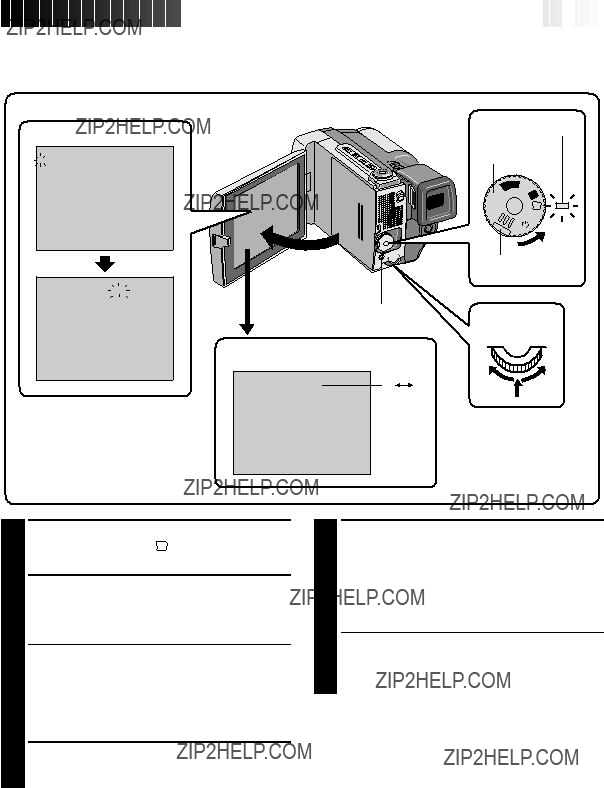


 EN
EN


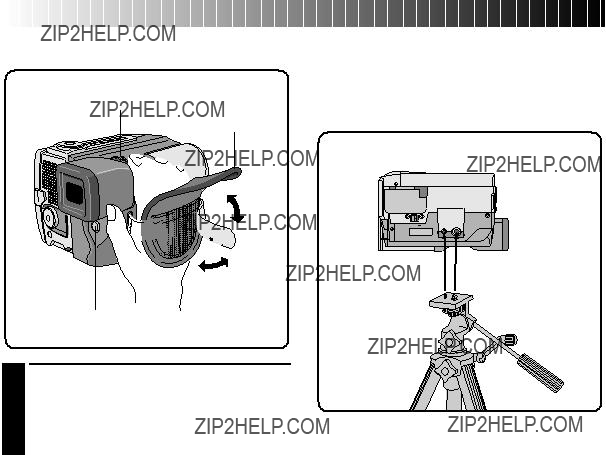
 1
1


 3
3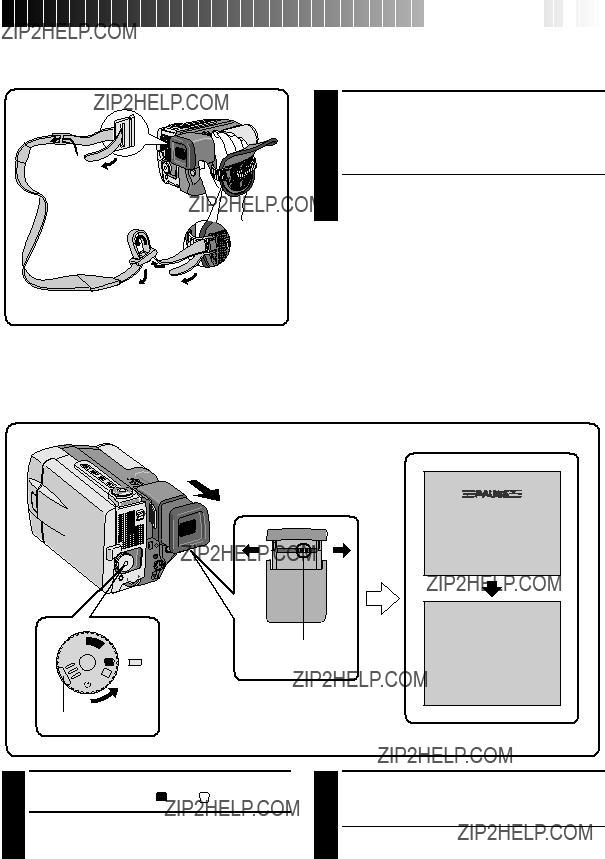


 EN
EN


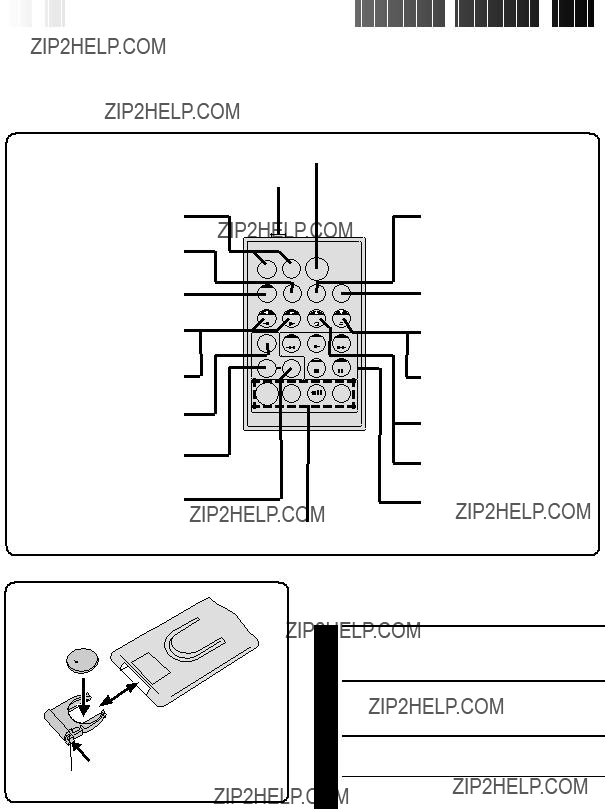


 GETTING
 STARTED


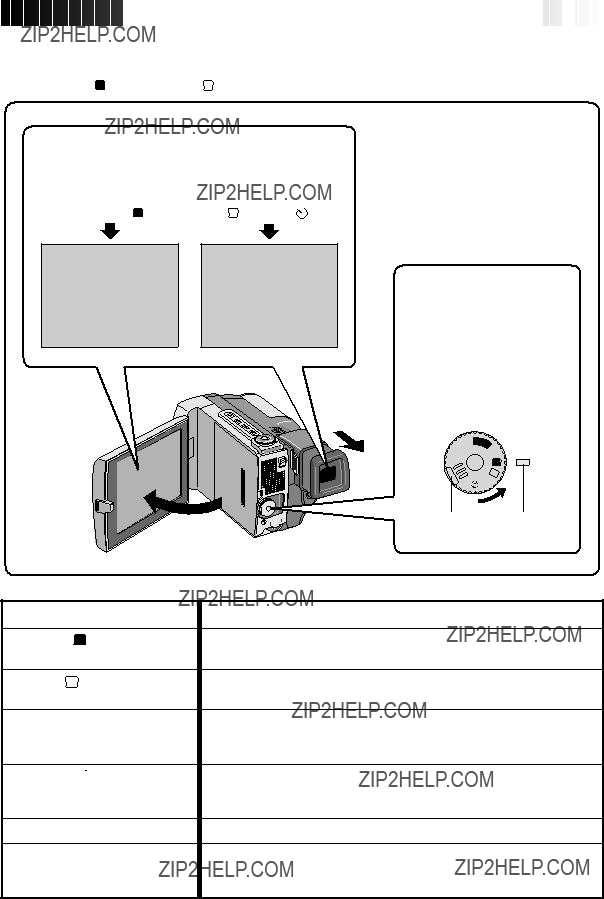


 EN
EN


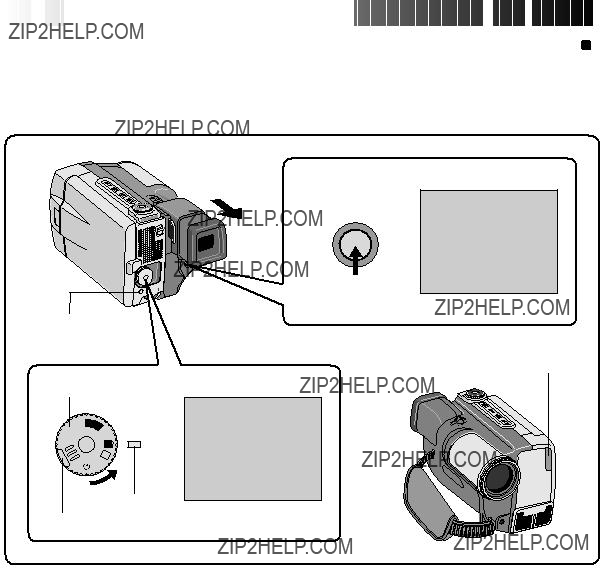


 Basic
Basic
 Recording


 EN
EN


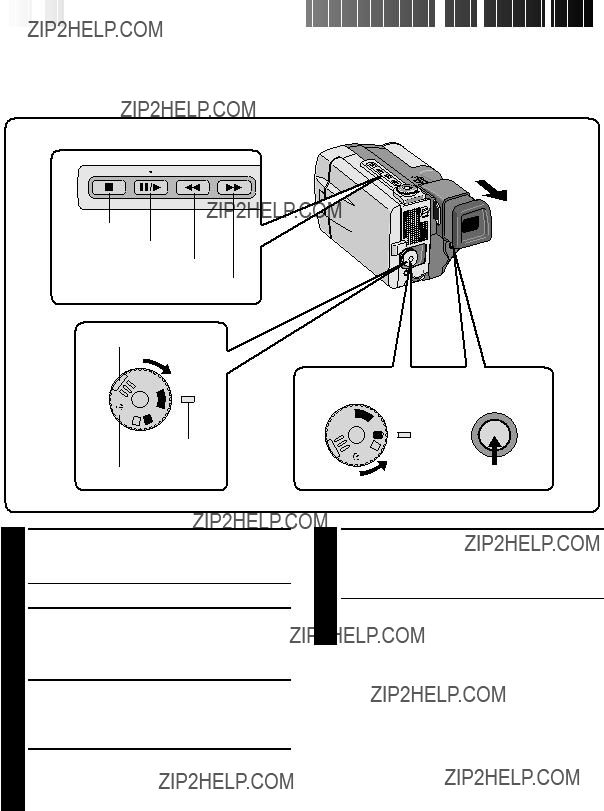


 Basic
Basic Recording
 (Cont.)


 EN
EN


 Basic
Basic Recording
 (Cont.)


 89 min
  3 min
3 min  2 min
2 min
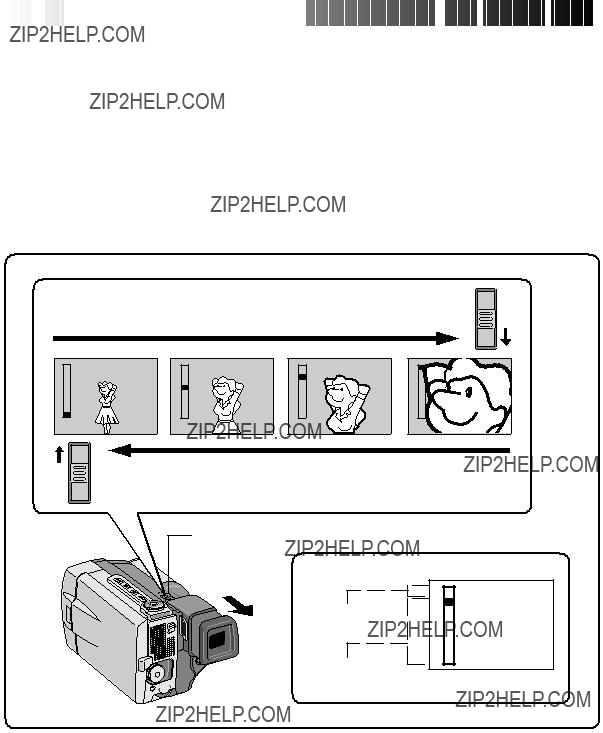


 Basic
Basic Recording
 (Cont.)


 Advanced
 Features


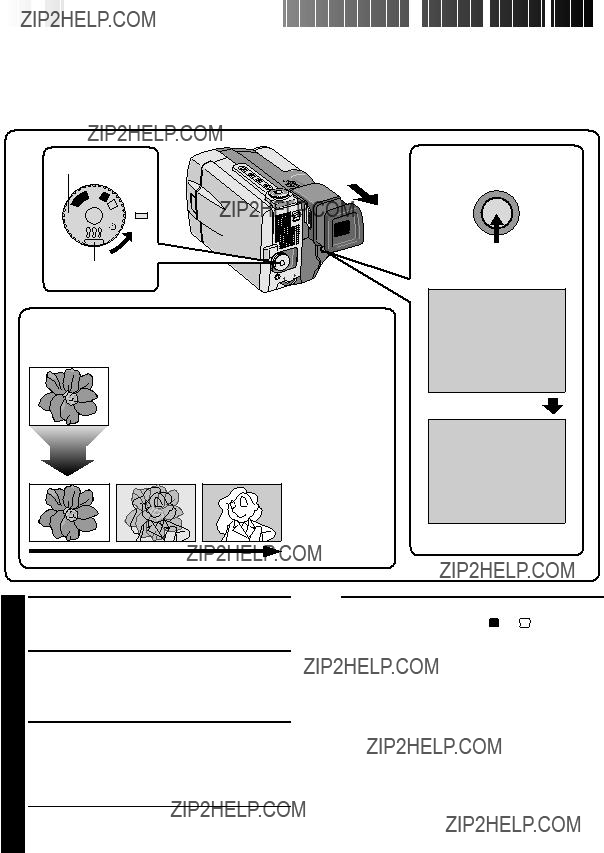


 Advanced
 Features
 (Cont.)


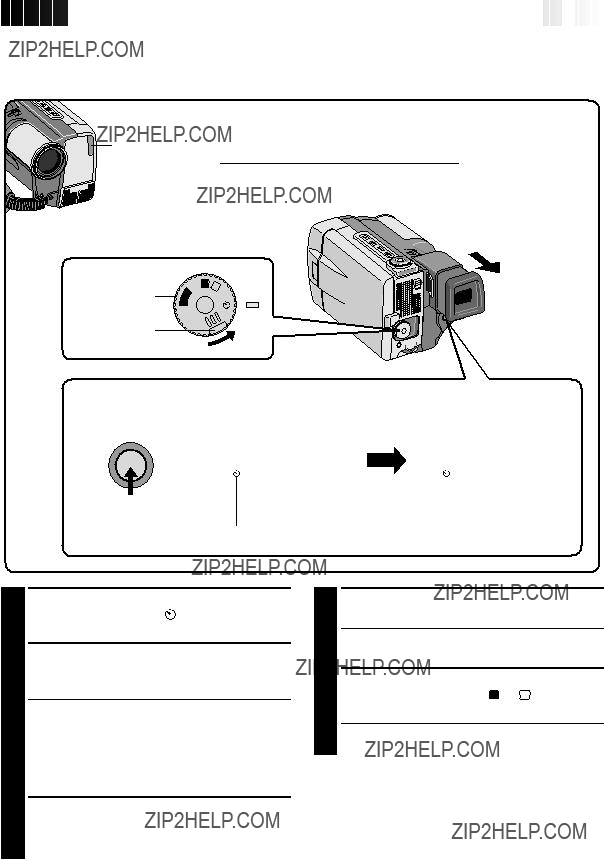


 EN
EN


 Advanced
 Features
 (Cont.)


 EN
EN


 Advanced
 Features
 (Cont.)


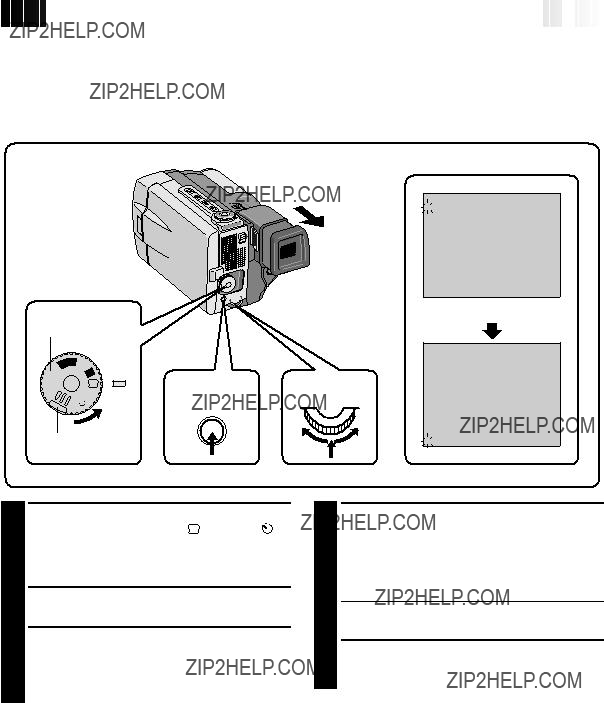


 Advanced
 Features
 (Cont.)


 ON
ON


 AGC
AGC
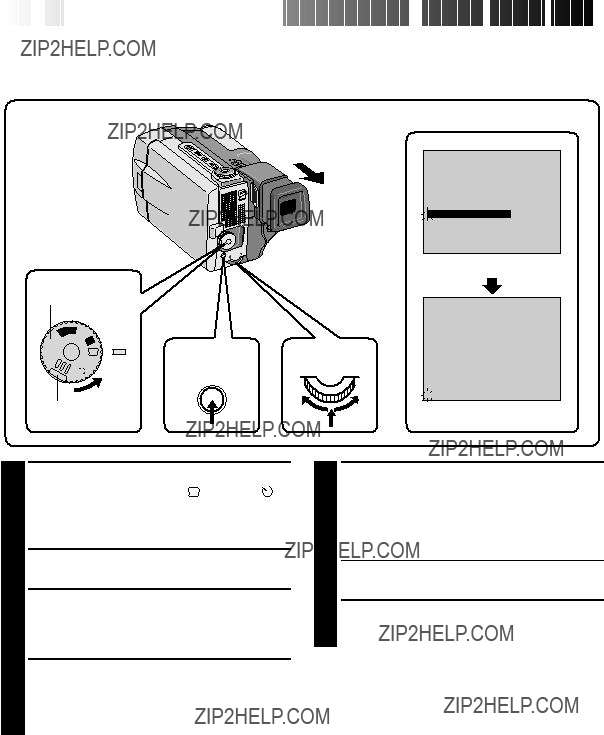


 Advanced
 Features
 (Cont.)


 EN
EN


 5SD
5SD
 ANIM.
ANIM.
 OFF
OFF
 OFF 32kHz
 48kHz
48kHz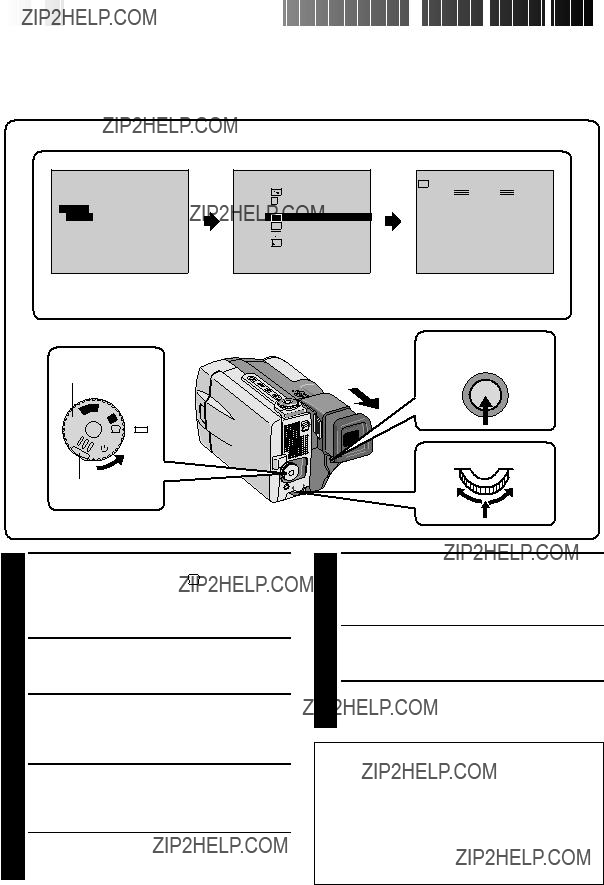


 Advanced
 Features
 (Cont.)


 EN
EN


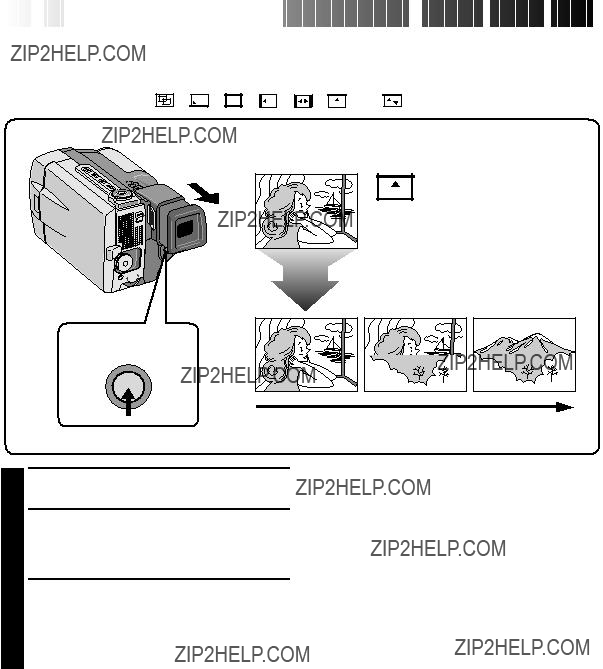


 Advanced
 Features
 (Cont.)


 EN
EN


 EN
EN


 Advanced
 Features
 (Cont.)


 EN
EN


 , but can be changed to your desired setting. Also when Twilight is chosen, the manual focus indication appears.
 SLOW SHUTTER
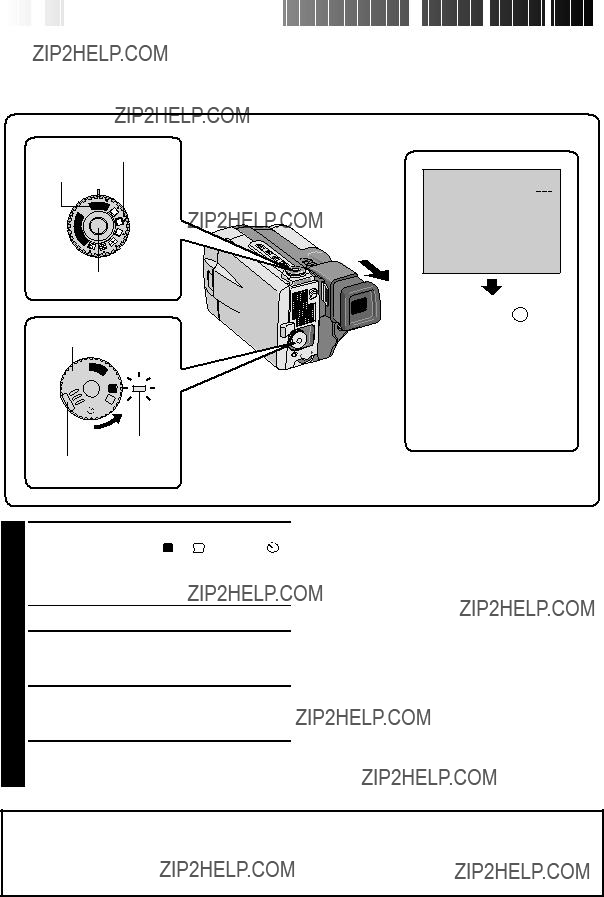


 Advanced
 Features
 (Cont.)


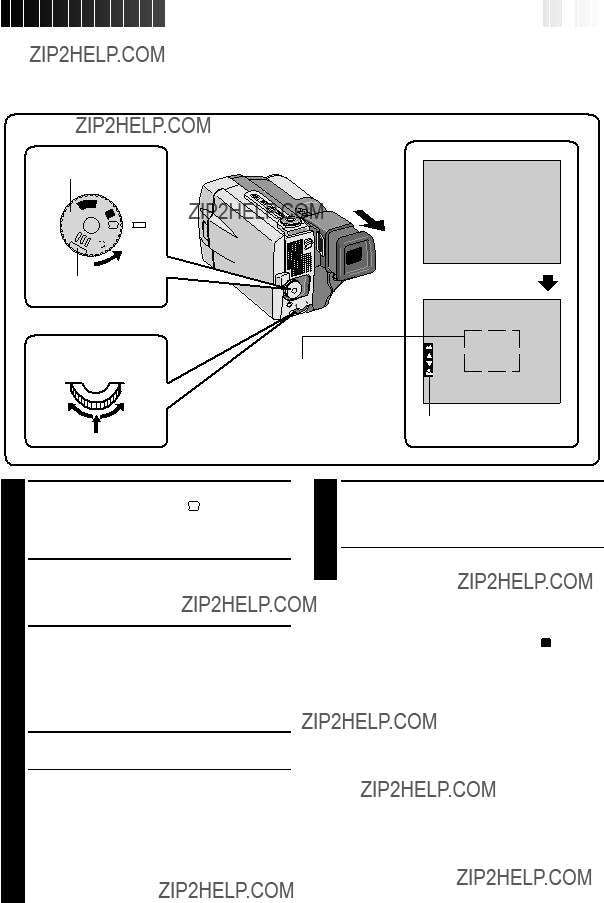


 EN
EN


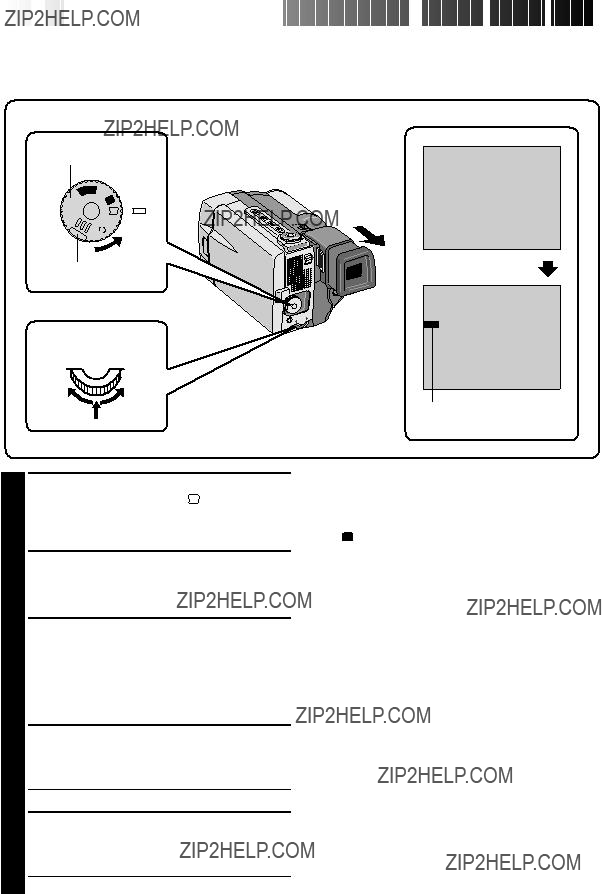


 Advanced
 Features
 (Cont.)


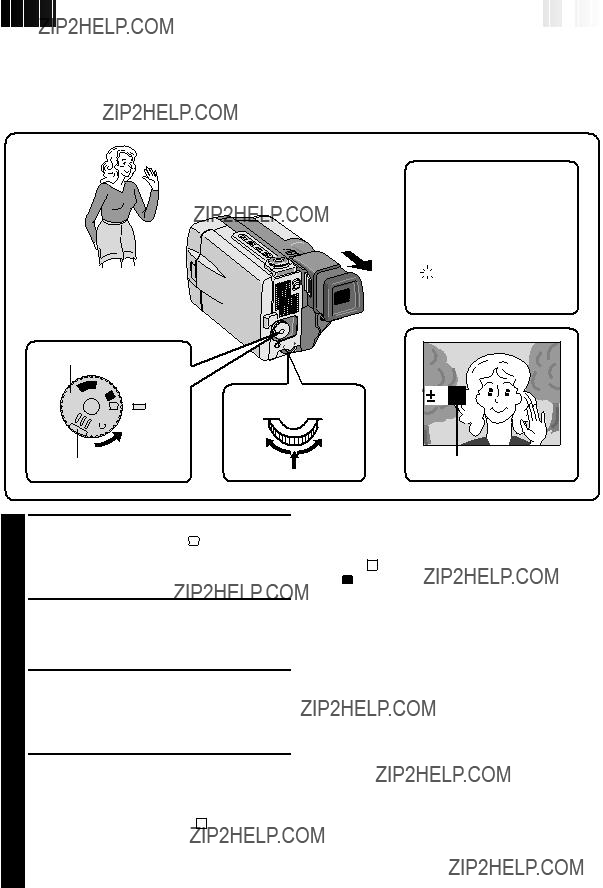


 EN
EN


 Advanced
 Features
 (Cont.)


 EN
EN


 Basic
Basic Playback


 W
W


 EN
EN


 Advanced
 Features


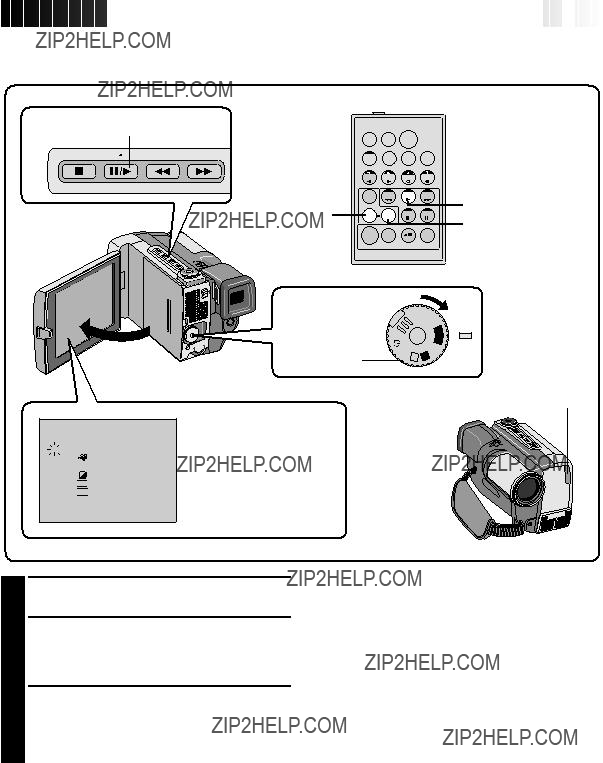


 EN
EN


 STROBE
 VIDEO ECHO
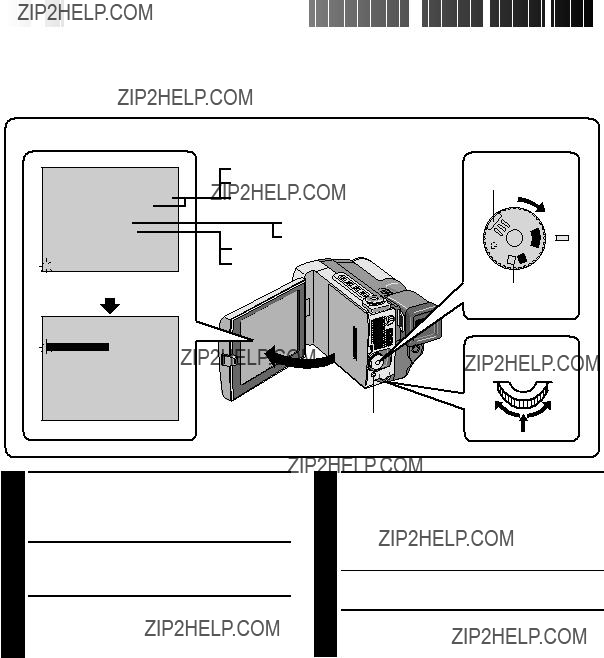


 Advanced
 Features
 (Cont.)


 Basic
Basic Connections


 EN
EN


 Advanced
 Connections


 EN
EN


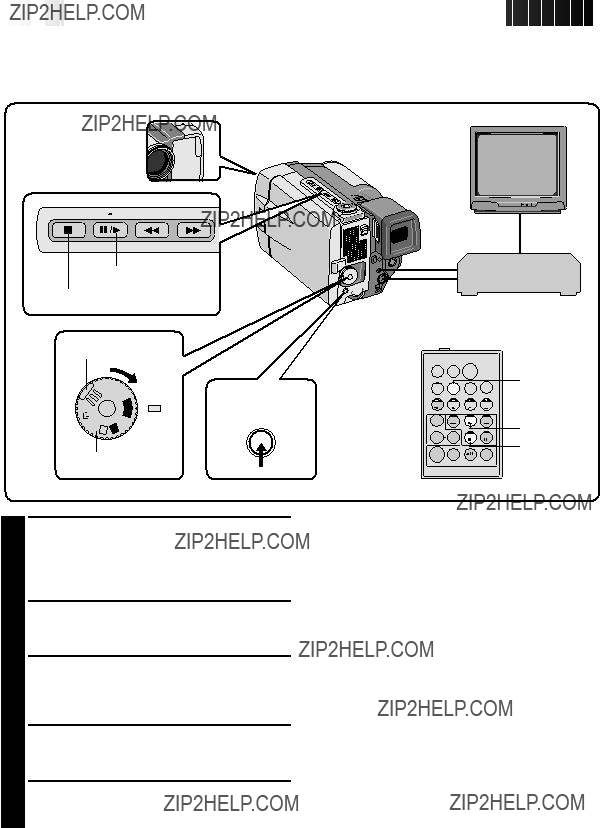


 EDITING


 EN
EN


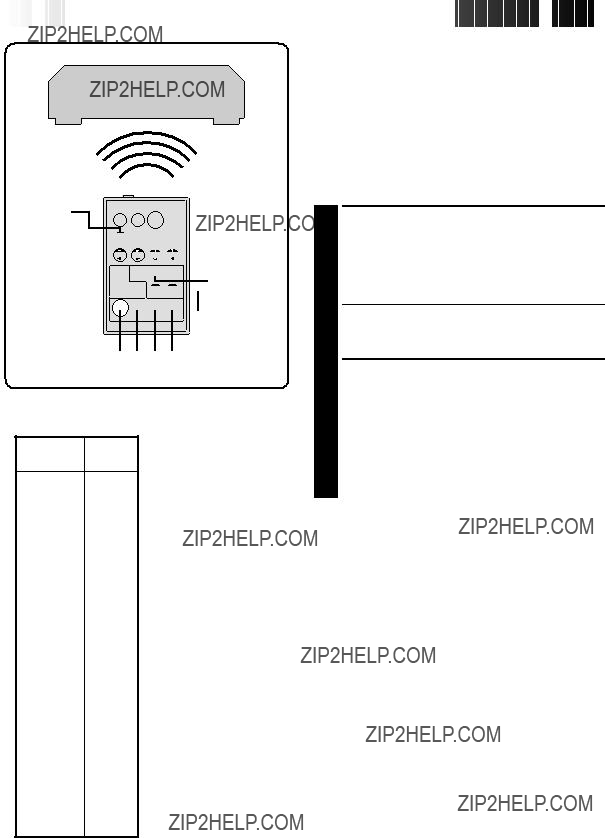


 EDITING


 MBR SET

 2 6
2 6

 4
4 


 5
5


 EN
EN


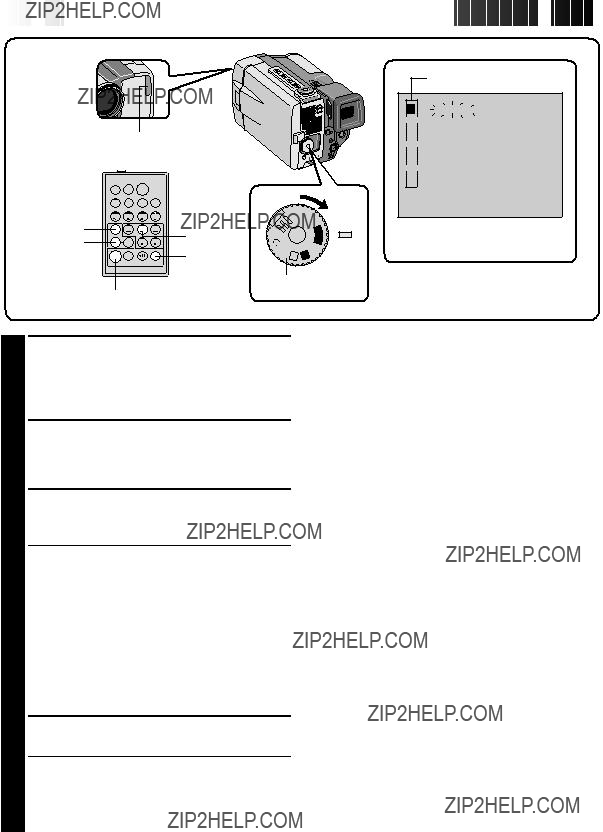


 EDITING


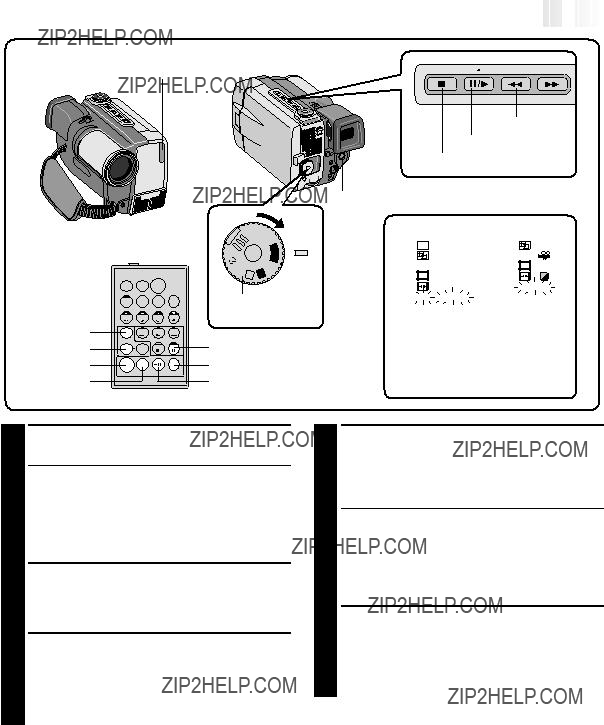


 EN
EN


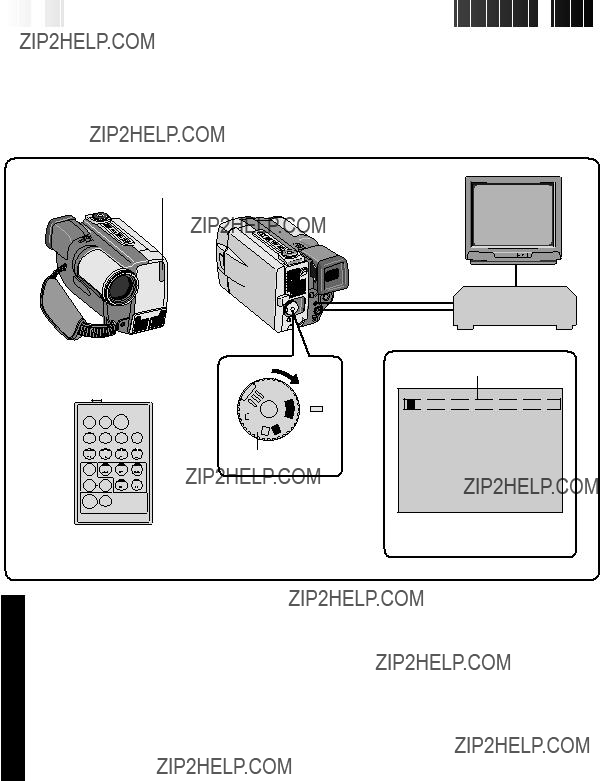


 EDITING


 EN
EN


 EDITING


 EN
EN


 TROUBLESHOOTING


 EN
EN


 TROUBLESHOOTING


 EN
EN


 TROUBLESHOOTING


 AFTER
AFTER
 USE
USE


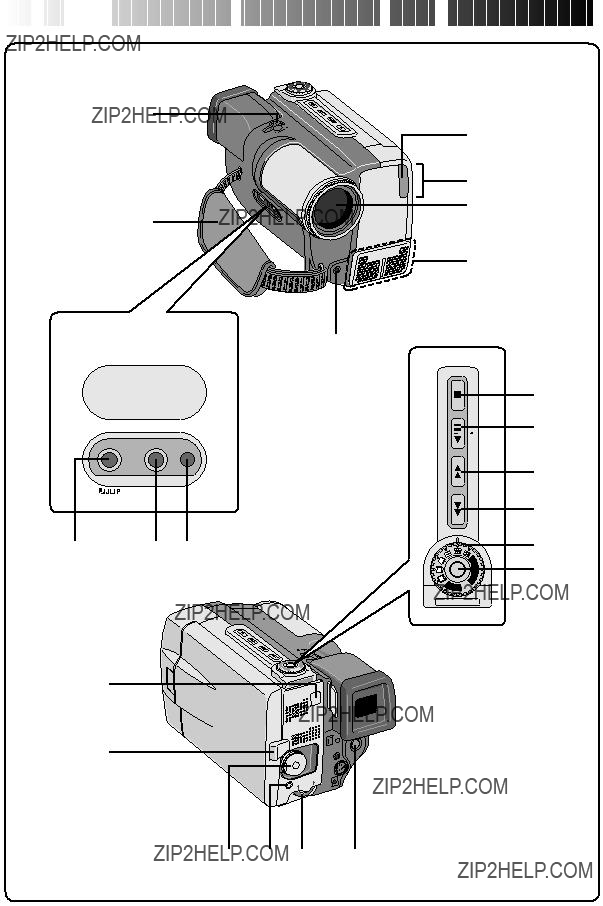


 CONTROLS,
 INDICATIONS
 AND
AND
 CONNECTORS


 r *
r *


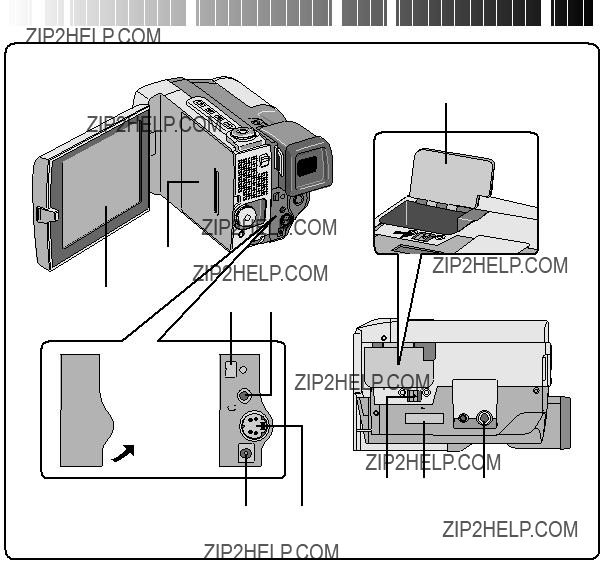


 CONTROLS,
 INDICATIONS
 AND
AND
 CONNECTORS


 EN
EN


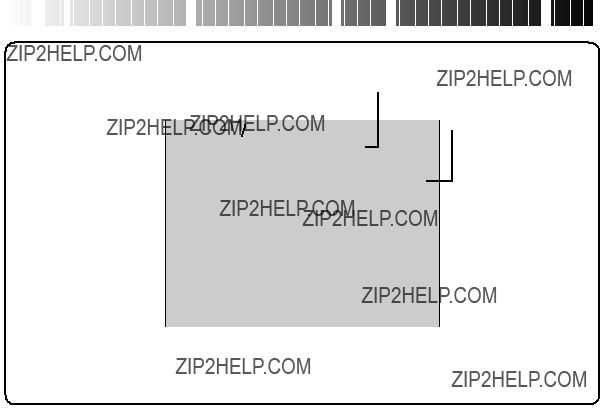


 CONTROLS,
 INDICATIONS
 AND
AND
 CONNECTORS


 EN
EN


 blinks. When the battery power is exhausted, power turns off automatically.
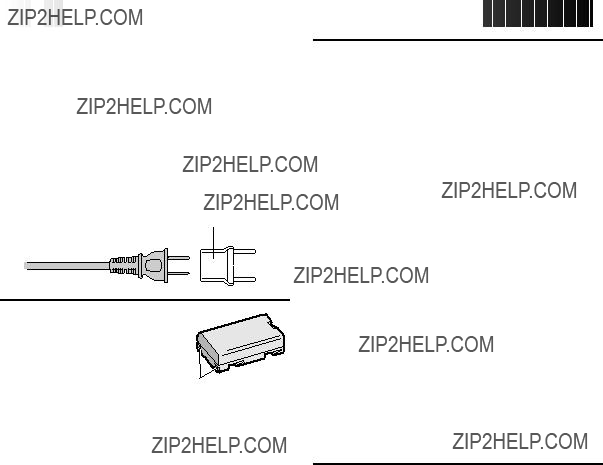


 CAUTIONS


 EN
EN


 ??? appears.


 CAUTIONS


 GLOSSARY
 OF
OF
 TERMS
TERMS


 INDEX
INDEX