DIGITAL STILL CAMERA
ENGLISH
STILL CAMERA
INSTRUCTIONS
DIGITAL STILL CAMERA
ENGLISH
STILL CAMERA
INSTRUCTIONS

2
 EN
EN


Dear Customer,
Thank you for purchasing the Digital Still Camera. Before use, please read the safety information and precautions contained in the following pages to ensure safe use of your new camcorder.
Using This Instruction Manual
???All major sections and subsections are listed in the Table Of Contents (Z pg. 8, 9). ???Notes appear after most subsections. Be sure to read these as well.
???Basic and advanced features/operation are separated for easier reference.
It is recommended that you . . .
.... refer to ???CONTROLS, CONNECTORS AND INDICATORS??? (Z pg. 10 ??? 17) and familiarize yourself with button locations, etc. before use.
.... read thoroughly the Safety Precautions and Safety Instructions that follow. They contain extremely important information regarding the safe use of your new camcorder.
You are recommended to carefully read the cautions on pages 88, 89 before use.
SAFETY PRECAUTIONS
IMPORTANT (For Customers in U.K.)
Connection to the mains supply in the United Kingdom.
DO NOT cut off the mains plug from this equipment. If the plug fitted is not suitable for the power points in your home or the cable is too short to reach a power point, then obtain an appropriate safety approved extension lead or consult your dealer.
BE SURE to replace the fuse only with an identical approved type, as originally fitted, and to replace the fuse cover.
If nonetheless the mains plug is cut off ensure to remove the fuse and dispose of the plug immediately, to avoid a possible shock hazard by inadvertent connection to the mains supply. If this product is not supplied fitted with a mains plug then follow the instructions given below: DO NOT make any connection to the Larger Terminal coded E or Green.
The wires in the mains lead are coloured in accordance with the following code:
 Blue to N (Neutral) or Black
Brown to L (Live) or Red
If these colours do not correspond with the terminal identifications of your plug, connect as follows:
Blue wire to terminal coded N (Neutral) or coloured black.
Brown wire to terminal coded L (Live) or coloured Red.
If in doubt ??? consult a competent electrician.
WARNING:
TO PREVENT FIRE OR SHOCK
HAZARD, DO NOT EXPOSE
THIS UNIT TO RAIN OR
MOISTURE.
CAUTIONS:
nTo prevent shock, do not open the cabinet. No user serviceable parts inside. Refer servicing to qualified personnel.
nWhen you are not using the AC Power Adapter for a long period of time, it is recommended that you disconnect the power cord from AC outlet.
NOTES:
cThe rating plate (serial number plate) and safety caution are on the bottom and/or the back of the main unit.
cThe rating plate (serial number plate) of the AC Power Adapter is on its bottom.
This camera is designed to be used with PAL- type colour television signals. It cannot be used for playback with a television of a different standard. However, shooting and LCD monitor playback are possible anywhere.


 EN
EN 3
3
This unit is produced to comply with Standard
IEC Publ. 65.
SOME DO???S AND DON???TS ON THE SAFE USE
OF EQUIPMENT
This equipment has been designed and manufactured to meet international safety standards but, like any electrical equipment, care must be taken if you are to obtain the best results and safety is to be assured.
DO read the operating instructions before you attempt to use the equipment.
DO ensure that all electrical connections (including the mains plug, extension leads and interconnections between pieces of equipment) are properly made and in accordance with the manufacturer???s instruc- tions. Switch off and withdraw the mains plug when making or changing connections.
DO consult your dealer if you are ever in doubt about the installation, operation or safety of your equip- ment.
DO be careful with glass panels or doors on equipment.
DON???T continue to operate the equipment if you are in any doubt about it working normally, or if it is damaged in any way ??? switch off, withdraw the mains plug and consult your dealer.
DON???T remove any fixed cover as this may expose dangerous voltages.
DON???T leave equipment switched on when it is unattended unless it is specifically stated that it is designed for unattended operation or has a standby mode. Switch off using the switch on the equipment and make sure that your family knows how to do this. Special arrangements may need to be made for infirm or handicapped people.
DON???T use equipment such as personal stereos or radios so that you are distracted from the requirements of road safety. It is illegal to watch television whilst driving.
DON???T listen to headphones at high volume, as such use can permanently damage your hearing.
DON???T obstruct the ventilation of the equipment, for example with curtains or soft furnishings. Overheating will cause damage and shorten the life of the equipment.
DON???T use makeshift stands and NEVER fix legs with wood screws ??? to ensure complete safety always fit the manufacturer???s approved stand or legs with the fixings provided according to the instructions.
DON???T allow electrical equipment to be exposed to rain or moisture.
ABOVE ALL
???NEVER let anyone especially children push anything into holes, slots or any other opening in the case
??? this could result in a fatal electrical shock;
???NEVER guess or take chances with electrical equipment of any kind ??? it is better to be safe than sorry!

4
 EN
EN


 QUICK
QUICK
 START
START

Power cord
Power outlet


Power lamp
AC adapter
Connect the Camera to a Power
Outlet. (Z pg. 20)
1
2
3
4
Open the connector cover on the rear of the camera.
Connect the DC cord to the DC input connector.
Connect the DC cord to the DC input connector on the AC adapter.
Connect the power cord to a power outlet.
???The power lamp lights.


 EN
EN 5
5
Knob
Memory card cover
Memory card (3.3V type)
Insert the Memory card. (Z pg. 22)
1
2
3
Open the Memory card cover.
???Slide the knob to the open position.
Insert the Memory card.
???Insert the card so that the contact surface is facing up and the notch on the card is on the right.
Close the Memory card cover.
???Slide the knob to the close position.

6
 EN
EN


 QUICK
QUICK

 START
START

 (cont.)


Power dial
SET
4 OFF
V M
Shoot a Picture. (Z pg. 30)
1 Turn the Power dial to ???A??? (full auto mode).
???Hold the Lock button down while turning the Power dial.
2 Point the lens at the subject and
???Look through the finder.
???The focus is attained when the shoot standby lamp (green) changes from flashing to steadily on.
3 Press the Shutter button all of the way to take the picture.
???The picture image is stored in the Memory card.
Play back a Picture. (Z pg. 31)
1 Turn the Power dial to ???B???.
???Hold the Lock button down while turning the Power dial.
2 Select ???STILL PB??? with the MODE switch.
3 Press the w e button to select the picture that you wish to view.

 MAJOR
MAJOR
 FEATURES


 EN
EN 7
7
Three
1. 6M
This mode collects twice as much image data by using two exposures (with the CCD shifted one pixel for the second exposure), resulting in an image consisting of 6 million pixels, or twice as many in normal mode.
2. DR
This mode uses two exposures, one with the exposure adjusted for the dark portions of the image, and one with the exposure adjusted for the bright portions of the image. By using the image data from both exposures, it is possible to achieve a wide dynamic range that was previously impossible. This mode avoids pictures where part of the image is blacked out or whited out, which occurs easily with conventional digital cameras.
3. NR
This mode uses several exposures to collect a large amount of image information, then extracts the signal components and eliminates the noise components. This mode eliminates electronic noise, which occurs easily with conventional digital cameras.
This unit is compatible with SmartMedia??? cards* (optional), which can be used to increase the number of pictures that can be taken.
*???SmartMedia??? card??? (which is described as ???Memory card??? in this instruction manual) is a trademark of Toshiba Corporation.
Before taking important photos
cWhen you need to take an important photo, always take a test photo first and confirm that the camera is operating normally.
cMemory card is not installed when this unit is purchased. Be sure to install a Memory card before taking photos.
cBefore shooting, always confirm how much memory is remaining from the memory card.
cWe cannot bear any responsibility for an inability to shoot, record, or playback material normally in the event of a problem with a digital video camera, Memory card, etc.
cStore backups of important photos on a personal computer, etc. We cannot bear any responsibility for pictures stored in memory that are lost or altered.
Video Shooting
This feature is useful, if you want to send a short video by
Collage shooting
This feature allows you to combine a subject with a previously photographed background with a simple operation.
Copyrights
You may only use material that you photograph or record with this digital camera for your own personal use, and not in any way that infringes on the copyrights of a third party. (Note that some performances and exhibits have restrictions against photography, even if only for your personal use.)


PROVIDED ACCESSORIES

10
 EN
EN


 CONTROLS,
 CONNECTORS

 AND
AND
 INDICATORS

Front View
1 2 3
4
Top View
6 7 8 9 0 !
Front View
Use the flash when shooting in dark conditions.
2Flash sensor
This sensor is needed for adjusting the brightness when using the flash.
Blinks when the self timer is running.
Point the lens towards the subject when taking a picture. Because the lens is extremely vulnerable to damage from physical impacts, handle it very carefully. Striking or dropping the lens can damage the lens.


 EN
EN 11
11
Top View
Press this button to check the brightness setting and to change the brightness setting for shooting photos.
Press this button to check the current focus mode or to change the focus mode.
Press this button to check the current iris mode or to change the iris mode.
This button has two modes: press it half way to focus on the subject; press it all of the way to shoot a photo.
Press this button to change the flash mode.
Press this button to change the time setting for the self timer.
Press this button to set macro mode.
9 Directional button (r t w e) ..... Z pg. 23
Press this button to make various settings and selections.
Use this for zoom shooting and to adjust the brightness of the LCD screen.
Use this switch to change shooting and playback modes.

12
 EN
EN
 CONTROLS,
 CONNECTORS
 AND
AND

 INDICATORS
 (cont.)

Rear View
Bottom View
12
3

Rear View
1Viewfinder
Look through here when framing and focusing your shot.
Press this button to turn the LCD screen on and off, and to select the menu display in camera mode and the index display in playback mode.
This button is used to finalize selections on each menu, and also serves as a video playback button.
Hold down this button in order to turn the Power dial.
Hold down the Lock button and turn this dial to turn the power on and off and to change the mode of the camera.
The camera is ready to shoot a photo when this lamp changes from flashing to steadily on.
7Connectors cover
Refer to the ???Connectors??? on the right.
The flash is ready when this lamp changes from flashing to steadily on.
This is used to attach the hand strap or a lens cover.


 EN
EN 13
13
Bottom View
Open this cover to replace the battery.
Use this hole to mount the camera on a tripod. Use a tripod that does not have a rotation stopper.
Open this cover to install/remove a
Memory card.
Connectors
Pull the cover to open.
1 VIDEO output connector ............ Z pg. 58
This is to connect to view picture on a TV.
This is to connect an optional printer (GV- SP2) to the camera via an optional cable.
3 DIGITAL output connector ... Z pg. 68, 76
This is to connect the camera to a personal computer.
Power from the provided AC adapter (AA- V37) is input here through a DC cord.

14
 EN
EN
 CONTROLS,
 CONNECTORS
 AND
AND

 INDICATORS
 (cont.)

LCD Panel
12
3 4 5 6 7
1Indicator of initial settings having been changed
This indicator is displayed if the initial settings have been changed.
2Mode display
Displays the current mode.
3Remaining battery power indicator
This bar graph gives a rough indication of how much battery power is remaining.
4Flash indicator ............................ Z pg. 33 This indicator is displayed if the flash button has been pressed and a mode that generates a flash (auto, forced on, or red- eye prevention) has been set.
5Timer mode indicator ................. Z pg. 32 This indicator is displayed if the Self timer button has been pressed and the timer mode has been set to either ???1 second??? or ???8 seconds???.
6Macro mode indicator ................ Z pg. 36 This indicator is displayed if the macro button has been pressed and the macro mode has been turned on.
7Remaining photos counter
This indicates how many photos can still be taken.
Power Dial and Mode Display
The mode display appears on the LCD panel and screen, when the Power dial is set to certain position. Refer to the chart below for each mode. Press the DSP button to display the image, when the Power dial is set to ???A???, ???M??? or ???V???. Hold the Lock button down while turning the Power dial.


 EN
EN 15
15
 2 0 0 0 . 1 2 . 2 4
During Shooting
Appears when the flash button has been pressed and a mode that generates a flash (auto, forced on, or
Appears when the macro button has been pressed and the macro mode has been turned on.
3Indicator of initial settings having been changed 

Appears when the initial settings have been changed. When the EXE button is pressed, the changed settings are displayed.
Appears when the Self timer button has been pressed and the timer mode has been set to either ???1 second??? or ???8 seconds???.
Depending on the setting, there are three different types of date displays: Year/ Month/Day, Month/Day/Year, and Day/ Month/Year.
During Playback
3Image position indicator
Indicates the current position of the displayed image in the memory.
Appears for a picture for which DPOF was set.
Appears for a picture selected for deletion.
Appears for a protected picture.

16
 EN
EN
 CONTROLS,
 CONNECTORS
 AND
AND

 INDICATORS
 (cont.)

Menu Screens
SET UP Menu Screen
Turn the Power dial to ???SET??? to display the SET UP screen.
Refer to the following pages for a detailed description of operation.
 Z pg. 28
 Z pg. 29
 Z pg. 65
 Z pg. 65
 Z pg. 23
 Z pg. 66
CAMERA SETTING Menu Screen
Turn the Power dial to ???M???, then press the DSP button until the CAMERA SETTING screen appears.
To turn off the menu screen, press the DSP button.
CAMERA SETTING
Refer to the following pages for a detailed description of operation.
 Z pg. 38
 Z pg. 40
 Z pg. 41
 Z pg. 42
 Z pg. 43
 Z pg. 44
CAMERA SETTING Confirmaton Screen
Turn the Power dial to ???M???, then press the DSP button to turn on the LCD screen and hold down the EXE button. The CAMERA SETTING confirmation screen is displayed while the EXE button is held down. The confirmation screen will not appear when the LCD screen is turned on without
Iris (Z pg. 35) 
Focus (Z pg. 34)
Shutter speed (automatic setting)
Exposure (Z pg. 37)


 EN
EN 17
17
Playback Menu Screens
Turn the Power dial to ???B??? (playback), and then select each mode with the MODE switch.
The selected mode appears on the LCD screen.
VIDEO PROTECT
NOTE:
cIt is not possible to change the settings on the menu screen when the item's letters appear gray.

18
 EN
EN


 GETTING
 STARTED

Charging the Battery
Charge the battery with the AC adapter (provided).
1 Connect the AC adapter's power cord to a power outlet.
???The ???Power??? lamp lights.
2 Install the battery.
???The ???Charging??? lamp lights.
???Charging is complete when the ???Charging??? lamp turns off and the ???Finish??? lamp lights.
3 Remove the battery.
Approximate number of pictures that can be taken with a fully charged battery
Maximum number:
50 pictures
(when shooting every 30 seconds at normal temperature, with the flash, zooming, auto focus and the LCD screen turned on)
NOTE:
NOTES:
cApproximate charging time is 90 minutes for one battery
cCharging is not possible if the DC cord is connected to the AC adapter.
cThe battery is no longer usable, if the shooting time is short with the battery fully charged. Replace the battery with new one.
cThe Power dial can be turned to ???ON??? acciden- tally, when you put the camera in a bag, etc.
If the camera is left turned on, the battery will be used up and you will not be able to shoot a photo. It is recommended to remove the battery from the camera when you carry the camera.
cDepending on the settings of the flash, zooming, etc., the number of pictures that can be taken may decrease.


 EN
EN 19
19
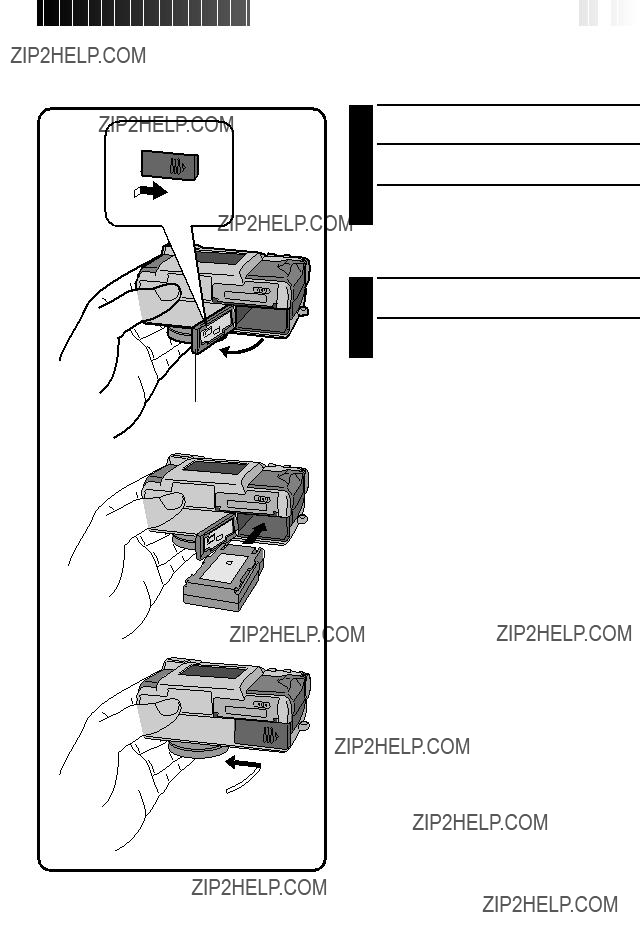
Installing a Charged Battery
The battery (provided) is not charged when the camera is purchased. Be sure to charge the battery with the AC adapter before using the camera.
1 Slide the battery cover slightly to open.
2 Insert a charged battery, making sure that it is oriented correctly.
3 Close the battery cover and slide it back.
Removing the Battery
1 Slide the battery cover slightly to open.
2 Remove the battery.
Battery cover

20
 EN
EN


 GETTING
 STARTED
 (cont.)


Connecting the Camera to a Power Outlet
The AC adapter (provided) is useful when shooting photos indoors for an extended period of time. The adapter can also be used overseas if you use a conversion plug.
Power cord
Power outlet 


Power lamp
AC adapter
1
2
3
4
Open the connector cover on the rear of the camera.
Connect the DC cord to the DC input connector.
Connect the DC cord to the DC input connector on the AC adapter.
Connect the power cord to a power outlet.
???The power lamp lights.
NOTES:
cMake sure to use the provided AC adapter (AA- V37).
cDo not attempt to use an AC adapter for a video camera or other electronic device with this camera. Differences in voltage levels can damage the camera.
cUse the AC adapter in order to safely format Memory cards, delete pictures or send pictures to a connected personal computer.
Attaching the Hand strap
1 Pass one end of the hand strap through the mounting hole.
2 Pass the other end through the loop.


 EN
EN 21
21
Attaching the Lens Cover
1
2 Pass the other end through the loop.
3 Attach the strap of the lens cover to the hand strap.
NOTES:
cDo not turn on the camera when the lens cover is attached. Doing so could result in the damage to the lens part.
cMake sure to attache the lens cover when the camera is not in use.
cMake sure to use the optional lens cleaning paper to clean fingerprints from the lens surface, and to clean the lens after shooting with the camera in warm, humid locations (by the seaside, in the mountains, etc.). Store the camera in a well- ventilated location with little dust or debris.

22
 EN
EN


 GETTING
 STARTED
 (cont.)


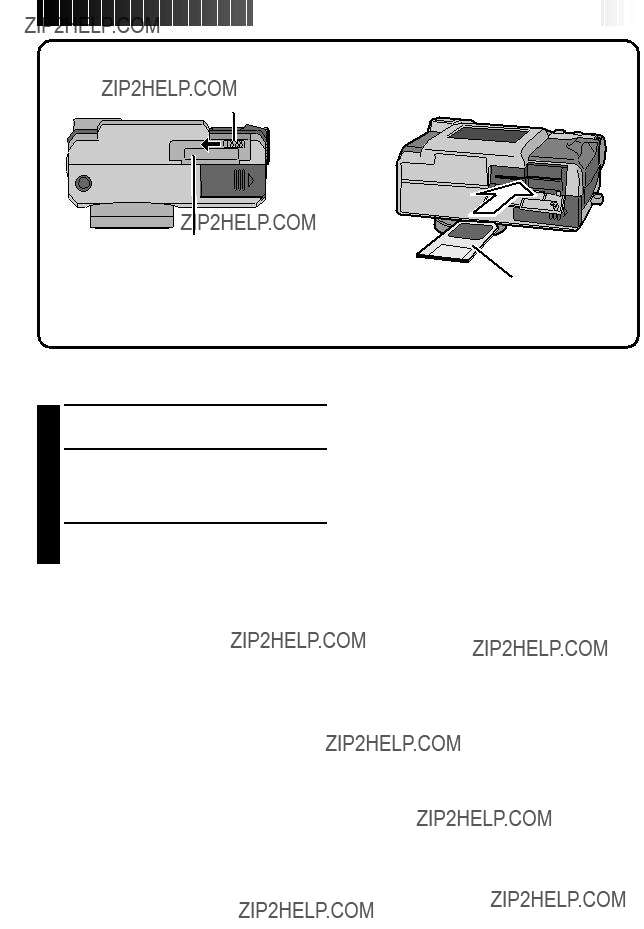
Inserting the Memory Card
Make sure to turn the Power dial to ???OFF???, when inserting a Memory card. Memory card is not loaded in the camera, when purchasing the camera.
1 Open the Memory card cover.
???Slide the knob and then pull the cover.
2 Insert the Memory card.
???Insert the card so that the contact surface is facing up and the notch on the card is on the right.
???Do not touch the contact surface on the card.
3 Close the Memory card cover.
???Slide the knob to lock the cover.
NOTES:
cThere are two types of Memory cards (the 3.3V type which is indicated by a notch on the right side, and the 5V type which is indicated by a notch on the left side). This camera uses only Memory cards (3.3V) with a notch on the right side.
cThe maximum memory card capacity that can be used with this camera is 64MB.
cTo avoid damage to the Memory card, do not drop or strike the Memory card against hard objects.
cTo protect the entire content of the Memory card after shooting, peel and stick a write protect sticker as shown in the right.
Contact surface
Where the write protect sticker is placed
3.3V5V
Removing the Memory Card
1
2
Open the Memory card cover.
???Slide the knob and then pull the cover.
Remove the Memory card.
???Push on the card to remove it.


 EN
EN 23
23
Formatting a Memory Card
If your Memory card has not been formatted, it must be formatted before it can be used. When a Memory card is formatted, all pictures in the card will be lost.
V
SET
4 OFF
M
Make sure to use the provided AC adapter (AA- V37) to power the camera, when formatting a Memory card. (Z pg. 20)
1 When the message ???FORMAT MEMORY CARD??? appears, turn the Power dial to ???SET???.
???Hold the Lock button down while turning the Power dial.
???The SET UP screen appears.
2 Press the r t button to select ???FORMAT???.
3 Press the EXE button.
4 Press the r t button to select ???YES???.
5 Press the EXE button.

24
 EN
EN


 BASIC
BASIC
 OPERATION

This camera is equipped with an optical viewfinder.
Normal Shooting
To focus, point the camera so that the subject appears within the finder, and then press the shutter button.
Macro Shooting
When shooting
Not pressed
NOTES:
cIn
cIt is recommended to view the subject with the LCD screen for an important shooting.
The camera???s Shutter button is a
Once the camera is focused, the photo standby lamp (green) lights steadily. Pressing the Shutter button halfway (to the first step) is called a ???half- press.??? Pressing the button from the
NOTES:
cSuddenly pressing the Shutter button with your finger or pressing too strongly can result in a picture that is at an angle or which is blurry. Press the button smoothly from the
cIf you have pressed the Shutter button halfway and then release it, the camera will perform the autofocus operation again the next time that you press the Shutter button halfway.
cIf you press the Shutter button all the way instead of halfway, a picture can be taken after focusing automatically.


 EN
EN 25
25
Good Photography Posture
With your left hand firmly supporting the camera to the left of and below the lens, support the camera body with your right hand.
Next, look for your subject and determine the camera position.
You can change the angle of the subject and the background by changing the direction in which you point the camera.
You then frame the shot by using the zoom function, etc., to enlarge or reduce the subject to the desired size within the shot.
Use your left hand to hold the camera also.
Hold your arms firmly against your body.
Spread your legs apart slightly and adopt a firm stance.
Mounting the Camera on a Tripod
1
2
Align the screw hole on the bottom of the camera with the screw on the tripod.
Turn the screw on the tripod to secure the camera in place.
???Adjust the screw and the length of the legs so that the camera does not wobble at all.
c Use only tripods not equipped with a stud that prevents the camera from rotating.
Using a Tripod
We recommend use of a tripod in the circumstances described below in order to avoid problems caused by shaky hands.
We especially recommend the use of a tripod when using pixel shift mode, wide range mode, or noise reduction mode.
???Low shots
Because it is difficult to assume a steady posture for a low shot, the shot will frequently be on a slant or blurred by shaky hands.
???Dark locations
When shooting in a location that prohibits the use of a flash (such as in a museum), the shutter speed is reduced, which increases the likelihood of problems caused by shaky hands.
???Shooting a distant object through the telephoto feature
Because the telephoto feature makes a small, distant space appear larger, even the slightest movement of the camera can cause blurring.
???Shooting an extreme closeup
Because a nearby object appears very large when shot in a closeup, the slightest movement in your body or hand can result in a blurred image.

26
 EN
EN


 BASIC
BASIC

 OPERATION
 (cont.)


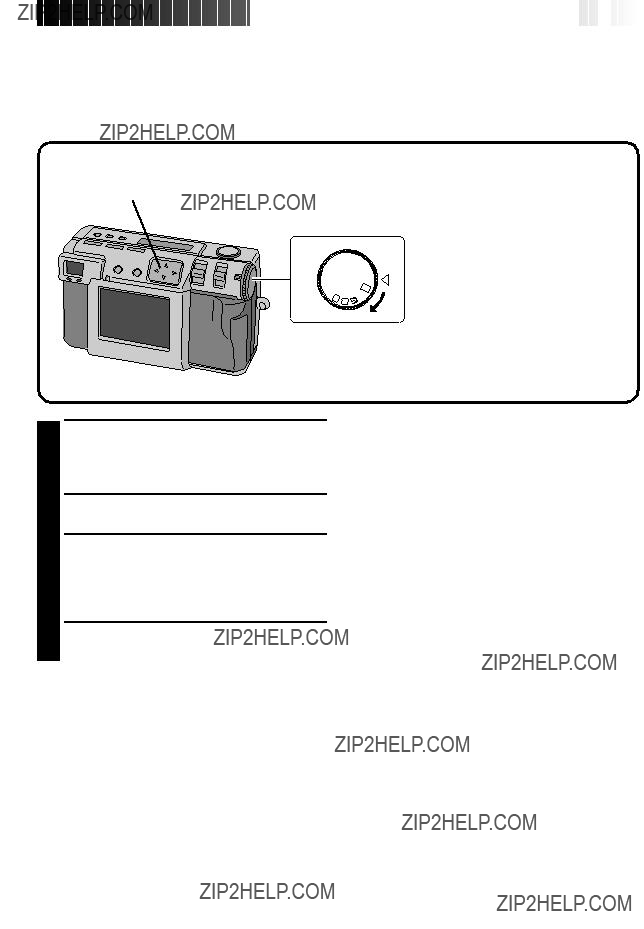
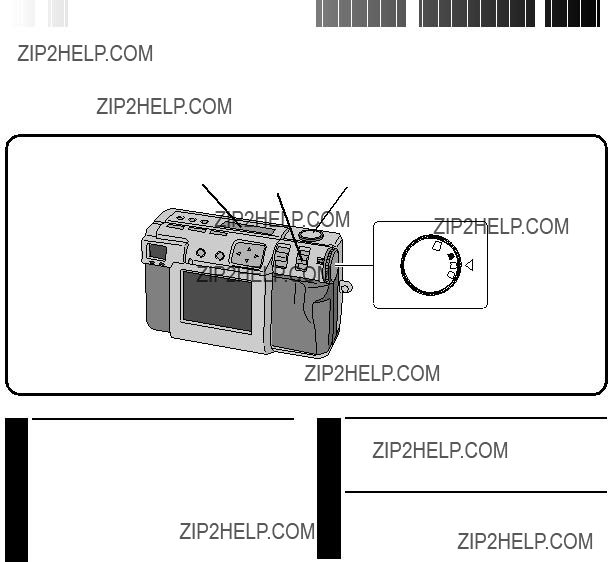
Selecting the Shooting Mode
The Power dial is used to switch among three shooting modes: ???A???, ???M??? and ???V???.
LCD panel
Mode display
A: CAM AUTO
M: MANUAL
V: VIDEO
Lock button
Power dial
1 Select the shooting mode with the Power dial.
???Hold the Lock button down while turning the Power dial.
Turn the Power dial to one of the following modes, depending on your needs:
???A???: To shoot photos in full auto mode
In this mode, the camera automatically sets the brightness, the shutter speed, the focus, and the white balance.
???M???: To shoot photos in manual mode
In this mode, you can set the brightness, the shutter speed, the focus, and the white balance manually.
???V???: To shoot video
You can shoot up to 20 seconds of video with a screen size of 160 x 120. This feature is useful if you want to send a short video by


 EN
EN 27
27
Zoom Shooting
The camera incorporates a 2.3X zooming function that corresponds to a 37 mm to 86 mm lens of a 35 mm camera. Zooming allows you to shoot wide areas, as well as
ZOOM lever
T
W
Set ZOOM lever to ???W??? (wide angle).
You can shoot a wider angle.
Set ZOOM lever to ???T??? (telephoto).
You can shoot a distant subject in closeup.
NOTE:
cWith this camera, you can set the ???AF??? (autofocus)/???AE??? (auto exposure) sensor point to either ???SPOT??? or ???MULTI???. Switch to ???SPOT??? if the camera focuses on the background when you zoom in for a closeup. (Z pg. 43)

28
 EN
EN


 BASIC
BASIC

 OPERATION
 (cont.)


Selecting the Picture Size
There are three picture sizes, starting with the highest resolution: 2032 x 1536 (QXGA)
1024 x 768 (XGA)
640 x 480 (VGA)
Select the resolution that best fits your needs.
2,3
1,4
SET
4 OFF
M
1 Turn the Power dial to ???SET???.
???Hold the Lock button down while turning the Power dial.
???The SET UP screen appears.
2 Press the r t button to select ???FRAME???.
3 Press the w e button to select either 2032 x 1536, 1024 x 768, or 640 x 480.
???The frame size is set.
???Turn the Power dial for shooting or other operations.
4 Turn the Power dial to ???A??? or ???M??? for shooting.
Approximate number of pictures that can be stored (when using 8MB/16MB Memory card):
NOTE:
cThe number of pictures that can be stored varies depending on the shooting condition.


 EN
EN 29
29
Selecting the Picture Quality
You can select the picture quality according to the purpose for which you want to use the picture. There are three levels of picture quality, starting from the highest quality:
NO COMP. (uncompressed) FINE (fine)
STANDARD (standard)
2,3
1,4
SET
4 OFF
M
1 Turn the Power dial to ???SET???.
???Hold the Lock button down while turning the Power dial.
???The SET UP screen appears.
2 Press the r t button to select ???QUALITY???.
3 Press the w e button to select either ???FINE???, ???STANDARD???, or ???NO COMP.??? mode.
???The new picture quality mode is set. ???Turn the Power dial for shooting or other
operations.
4 Turn the Power dial to ???A??? or ???M??? for shooting.
NOTE:
cThe number of pictures that can be stored will vary according to the images that are shot, the conditions under which the camera was used, the temperature when used, and the batteries that were used.
30
 EN
EN


 BASIC
BASIC

 OPERATION
 (cont.)


Full Auto Shooting
This mode allows you to take photos with little effort, since the camera automatically adjusts the focus, the shutter speed, the brightness and the white balance.
Shoot standby lamp (green)
1 Turn the Power dial to ???A???.
2 Point the lens at the subject and
???Look through the finder.
???The camera will automatically focus on the subject while the shutter button is half- pressed.
???The shoot standby lamp (green) flashes. Once focus is attained, the lamp changes from flashing to on.
???To display the image on the LCD screen while shooting, press the DSP button.
3 Press the Shutter button all the way to take the picture.
???The picture image is stored in the Memory card.
???The shoot standby lamp (green) goes off when the recording has finished.
Lock button
Shutter button
Power dial
NOTES:
cThe image on the LCD screen becomes still while the shoot standby lamp (green) flashes.
cIt takes a little while to store the picture in the Memory card.


 EN
EN 31
31
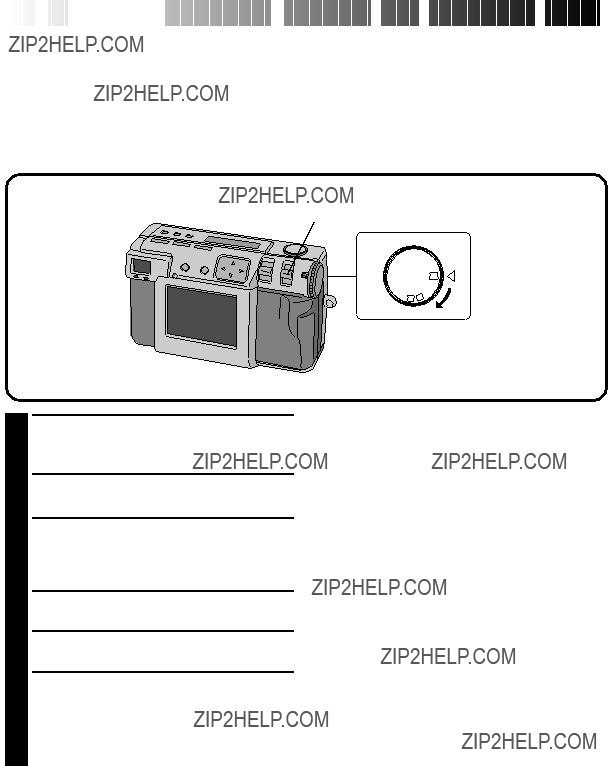
Playing Back Still Pictures
Each picture that you shoot is numbered and saved.
You can then view these saved pictures in sequence, one by one.
SET
4 OFF
V
M
Normal Playback
1 Turn the Power dial to ???B???.
???Hold the Lock button down while turning the Power dial.
2 Select ???STILL PB??? with the MODE switch.
??????STILL PB??? appears on the LCD panel.
3 Press the DSP button to select the display mode.
4 Press the w e button to select the picture that you wish to view.
NOTES:
cTo change the display mode during playback, press the DSP button.
Press the DSP button repeatedly to cycle through the following modes:
???Full size screen (with
???Full size screen (without
???6 indexed picture screen
cPlayback is not possible if the picture has been processed by a personal computer, other models of camera, etc. or the picture size is other than 2032 x 1536, 1024 x 768 or 640 x 480.
cIt takes a little while to display the photographed image on the LCD screen if a lot of images are recorded on the Memory card.
Auto Playback
1 Turn the Power dial to ???B???.
???Hold the Lock button down while turning the Power dial.
2 Select ???STILL PB??? with the MODE switch.
??????STILL PB??? appears on the LCD panel.
3 Press the DSP button to select the display mode.
4 Press and hold the w e button for more than 2 seconds.
???e???: Displays pictures in order.
???w???: Displays pictures in reverse order.
5 Press the w e button again to stop Auto
Playback.

32
 EN
EN


 BASIC
BASIC

 OPERATION
 (cont.)


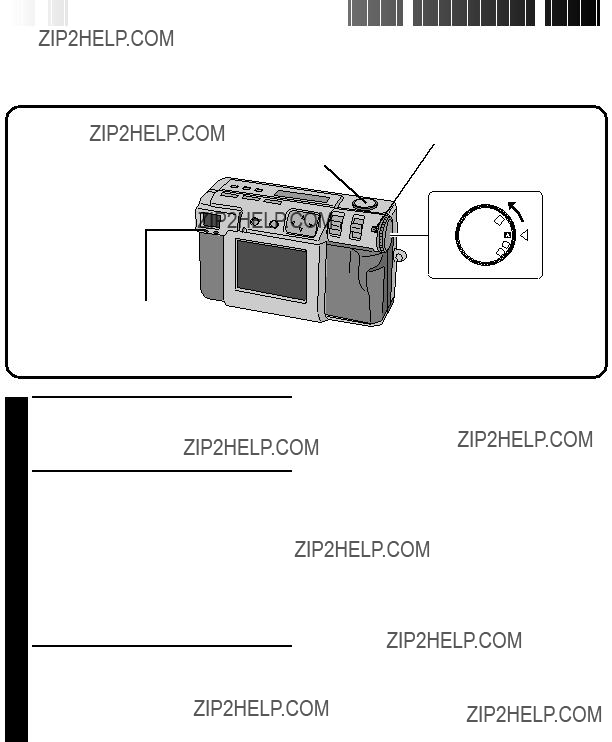
Self Timer
The self timer clicks the shutter automatically after either 1 second or 8 seconds after the timer has been set. Use the self timer to take your own picture, or if you are worried that you will shake the camera too much when you press the Shutter button. Turn the Power dial to ???A???, ???M??? or ???V??? when using the Self timer.
Self timer button
1 Press the Self timer button and set the time.
???Press the Self timer button repeatedly to cycle through the following settings:
Off ??? 8 seconds ??? 1 second ??? Off ???The ??? ??? (8 seconds) or ???1
 ??? (1 second)
mark appears on the LCD panel.
2 Point the lens at the subject and
???The camera will continue to focus on the subject while the button is
???To display the image on the LCD screen while shooting, press the DSP button.
3 Press the Shutter button all the way to take the picture.
???The self timer lamp and the ??? ??? on the LCD panel will begin to flash.
The shutter will click after either 1 second or 8 seconds.
NOTES:
cWhen there is less than three seconds remaining until the shutter clicks for 8 seconds self timer, the self timer lamp will begin to flash rapidly.
cTo cancel the self timer before it runs out, press the Self timer button again.
cFocusing occurs when the Shutter button is half- pressed.


 EN
EN 33
33
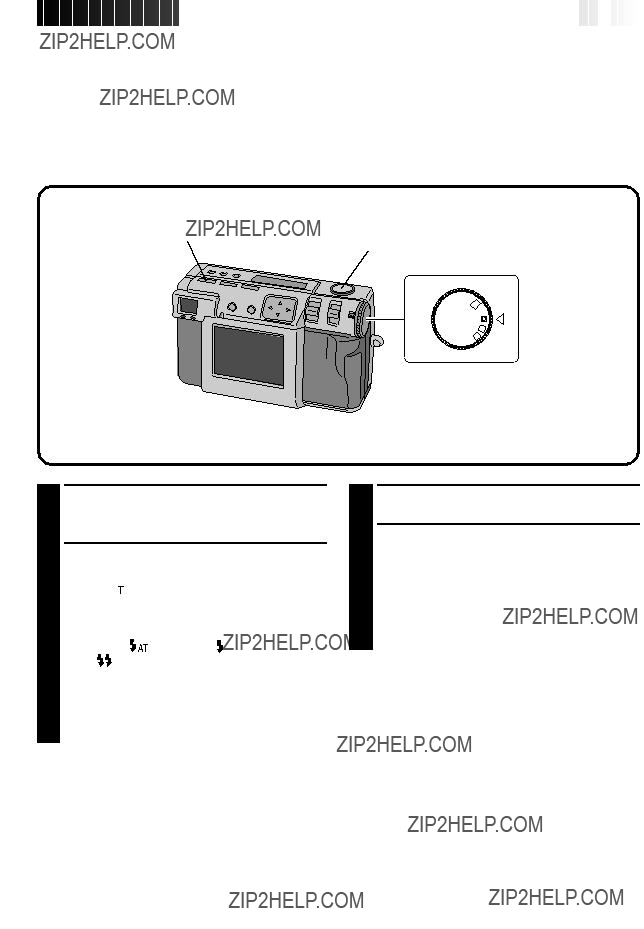
Flash Shooting
There are four flash modes:
2 3,4
1
SET
4  OFF
OFF
M
V
1 Turn the Power dial to ???A??? or ???M???.
2 Press the Flash button and select the flash mode.
???The ??? ??? indicator appears on the LCD panel.
???Press the Flash button repeatedly to cycle through the following modes:
???If the mode is set to any mode other than ???Off???, charging starts and the flash standby lamp (red) flashes. When the flash standby lamp remains lit steadily, charging is complete.
3 Point the lens at the subject and
4 Press the Shutter button all the way to take the picture.
???The flash lights and the flash standby lamp (red) begins flashing.
???In
NOTES:
cThough the image on the LCD screen may appear dark, there is no problem with the recorded image.
cWhen the flash is turned on, the iris value is set to F2.8/3.8 automatically.
cWhen shooting with the flash, it is not possible to set the iris and exposure manually.
cDo not press the Shutter button while the flash is being charged.

34
 EN
EN


 MANUAL

 SHOOTING

Manual Focus
You can focus to the subject manually.
2 3,4  1
1
OFF M
M
V
1 Turn the Power dial to ???M???.
2 Press the FOCUS button, and then press the w e button within two seconds.
???Press the w e button repeatedly to cycle through the following modes:
When the Shutter button is
MF (Manual Focus):
You can focus to the subject manually. Press the r t button to focus.
Press the r button to lengthen the focal distance.
Press the t button to reduce the focal distance.
2.4m/8ft:
Sets the focus to this distance.
???:
Sets the focus to infinity.
While the Shutter button is
3 Point the lens at the subject and
???To display the image on the LCD screen while shooting, press the DSP button.
4 Press the Shutter button all the way to take the picture.
NOTES:
Focus manually in the following circumstances:
cWhen shooting a
cWhen there is an obstacle such as a wire fence between a subject and the camera.
cWhen shooting a subject that has a very fine pattern, or a perfectly regular pattern.
cWhen shooting a subject under flickering illumination, including fluorescent light, or when dark.


 EN
EN 35
35
Iris Setting
You can adjust the depth of field and the shutter speed by setting the F value manually.
2 3,4  1
1
OFF M
M
V
1 Turn the Power dial to ???M???.
2 Press the Iris button, and then press the w e button within two seconds.
???Press the w e button repeatedly to cycle through the following modes:
PROGRAM ??? F2.8/3.8 ??? F5.6 ??? F8 ??? F11
??? PROGRAM
???The F value is the iris value, which controls the amount of light that reaches the camera???s image sensor.
???Smaller the F value is, faster the shutter speed becomes. Larger the F value is, slower the shutter speed becomes.
???Larger the F value is, deeper the depth of field becomes.
???In PROGRAM mode, the iris value and the shutter speed are calculated and set auto- matically by the camera.
3 Point the lens at the subject and
???The camera will continue to focus on the subject while the button is
4 Press the Shutter button all the way to take the picture.
NOTE:
cWhen shooting a night scene, select ??? ??? for ???W. BALANCE???. (Z pg. 38)

36
 EN
EN


 MANUAL
 SHOOTING

 (cont.)


Macro Shooting
Use Macro mode to shoot a subject at a distance of 2 to 50 cm. This mode is appropriate for a
2 3 4,5
1
OFF M
M
V
4
1
2
3
Turn the Power dial to ???A???, ???M??? or ???V???.
???Hold the Lock button down while turning the Power dial.
Press the Macro button.
?????? ??? is displayed on the LCD panel. ???The zooming is set to the widest angle
automatically.
???The subject is displayed on the LCD screen. ???To turn off the Macro mode, press the Macro
button again.
Use the ZOOM lever to adjust the size of the subject.
4
5
Point the lens at the subject and
???The camera will continue to focus on the subject while the button is
Press the Shutter button all the way to take the picture.


 EN
EN 37
37
Exposure Control
If the subject is predominantly white, black, red, etc., the resulting picture may be underexposed (too dark). In such a case, it is necessary to use the exposure control to restore the picture to a more realistic image. With this camera, you can make this adjustment by up to
2 3,4  1
1
OFF M
M
V
1 Turn the Power dial to ???M???or ???V???.
2 Press the Exposure control button
???Press the e button to cycle through the following modes:
(Darker to brighter)
???Press the w button to cycle through the modes in the opposite direction.
(+2EV)
3 Point the lens at the subject and
???The camera will continue to focus on the subject while the button is
4 Press the Shutter button all the way to take the picture.

38
 EN
EN


 MANUAL
 SHOOTING
 (cont.)


White Balance Adjustment
The white balance adjustment needs to be made when a picture is greenish, or when there is blue or red ghosting around an image. If there are no problems with the colors in a picture, select ???AUTO???.
OFF M
M
V
CAMERA SETTING
1 Turn the Power dial to ???M???.
2 Select ???MANUAL??? with the MODE switch.
3 Press the DSP button until the CAMERA SETTING screen appears.
4 Press the r t button to select ???W. BALANCE???.
5 Press the w e button to select from among ???AUTO???, ??? ???, ???
 ???, ???
 ???, ???MWB??? or ???
 ???.
???.
???Select the preset that produces the best color for the subject that you wish to photograph. AUTO: Adjusts the white balance automati-
cally.
 : Select this option when shooting outside on a sunny day.
 : Select this option when shooting outside on a cloudy day.
 : Select this option when shooting with video lights, etc.
MWB: Select this opotion to photograph a subject with a white balance that was preset for that subject. (Z pg. 39)
 : Select this opotion when shooting a night scene. The shutter speed is automatically set to 1/750 seconds to 1 second.
6 Press the DSP button to turn off the menu screen.
NOTES:
cWhen shooting a night scene with ??? ??? mode, focus to the subject manually. It may not be able to attain focus in the auto focus mode.
cIf the shooting location is changed, for example from indoors to outdooors, it may take a little while for the white balance adjustment.


 EN
EN 39
39
Manual White Balance Adjustment
If you cannot achieve natural looking colors even after selecting the preset options (??? ???, ???
 ???, ???
 ???, ???
 ??? or ???AUTO???) for the white balance adjustment, follow the procedure described below to adjust the white balance manually.
4 3
CAMERA SETTING
1 Select ???MWB??? in step 5 on page 38.
2 Place a white sheet of paper about 30cm in front of the lens.
???The white paper should fill the screen.
3 Hold down the EXE button until the shoot standby lamp (green) starts flashing.
???The setting is completed when the shoot standby lamp (green) has stopped flashing.
???To redo the setting, simply hold down the EXE button again.
4 Press the DSP button to turn off the menu screen.
NOTE:
cThe color balance that you set is retained in memory until you set a different white balance under the ???MWB??? setting.

40
 EN
EN


 MANUAL
 SHOOTING
 (cont.)


Sensitivity Setting
You can change the camera's sensitivity setting when shooting at dark place or where you can not use the flash.
OFF M
M
V
CAMERA SETTING
1
2
3
4 Press the r t button to select ???SENS.???.
5 Press the w e button to select ???80???, ???160??? or ???320???.
6
NOTES:
cThe sensitivity settings are ISO compliant.
cThe noise may appear and increase on the LCD screen at the shooting if the sensitivity setting has changed.


 EN
EN 41
41
Changing the Zoom Power While Shooting
Depending on the image size, it is possible to enlarge a subject without sacrificing the current image quality. Because the zoom power cannot be changed in some instances if the image is large, reduce the image size (Z pg. 28) before changing the zoom power.
1
CAMERA SETTING
6
7
Press the DSP button to turn off the menu screen.
Point the lens at the subject and
???The camera will continue to focus on the subject while the button is
8 Press the Shutter button all the way to take the picture.

42
 EN
EN


 MANUAL
 SHOOTING
 (cont.)


Shooting Continuous Photos
With this mode you can shoot 2 continuous photos.
3,6 4,5
1
CAMERA SETTING
1
2
3 Press the DSP button until the CAMERA SETTING screen appears.
4 Press the r t button to select ???M. DRIVE???.
5 Press the w e button to select ???ON???.
6 Press the DSP button to turn off the menu screen.
7 Point the lens at the subject and
???The camera will continue to focus on the subject while the button is
???To display the image on the LCD screen while shooting, press the DSP button.
8 Press the Shutter button all the way for over 1 second to take the picture.
???If the flash is set, it will only flash for the first photo.
NOTES:
cIt is not possible to shoot continuous photos if the uncompressed picture quality is selected.
cThe picture appears dark when shooting at dark location inside a room, etc.


 EN
EN 43
43
Changing the AE/AF Area
Normally, in this camera this setting is ???MULTI??? in order to prevent the subject from being out of focus while the background is in focus. If the camera does not focus on the point that you want it to, change this setting to ???SPOT???.
1
CAMERA SETTING
1
2
3
4 Press the r t button to select ???AE/AF???.
5 Press the w e button to select ???SPOT???.
6 Press the DSP button to turn off the menu screen.
NOTE:
MULTI: A precise exposure setting is made by dividing the scene into several sections and then measuring the light in each section.
SPOT: The exposure is set by measuring the light in a small spot in the center of the scene. Use this mode when you want to shoot a subject with a large difference between dark and bright area, such as someone on a skihill, or someone standing in a spotlight in a darkened theater.
cIf ???SPOT??? is selected for shooting, press the DSP button until ??? ??? appears on the LCD screen.

44
 EN
EN


 MANUAL
 SHOOTING
 (cont.)


Restoring the Default Settings
Perform the procedures described below to return the camera settings to the default settings. The settings on the SET UP screen does not return to the default settings.
OFF M
M
V
CAMERA SETTING
1
2
3
4
Turn the Power dial to ???M???.
???Hold the Lock button down while turning the Power dial.
Select ???MANUAL??? with the MODE switch.
??????MANUAL??? appears on the LCD panel.
Press the DSP button until the CAMERA SETTING screen appears.
Press the r t button to select ???CLEAR???.
5
6
Press the EXE button.
???The camera settings return to the default settings.
Press the DSP button to turn off the menu screen.


 EN
EN 45
45
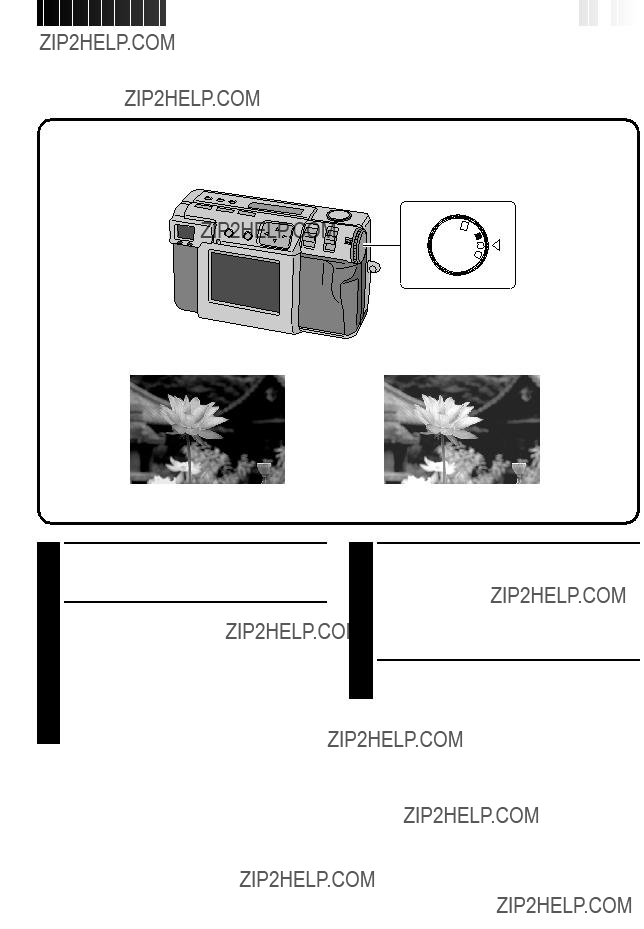
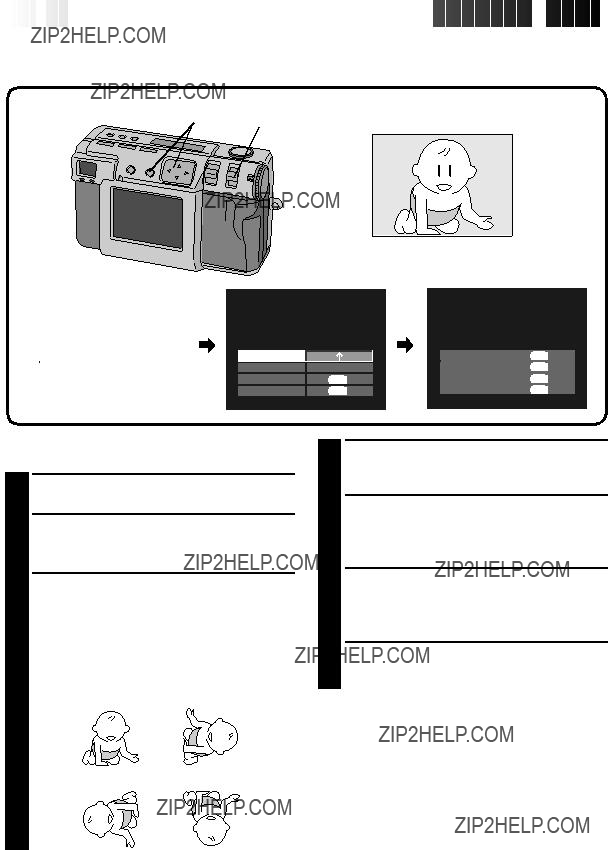
Collage Mode
This camera is able to combine images. For example, you can combine an existing picture (as background) with a picture of a person standing in front of a white wall, etc.
3,4 2 5
1
OFF M
M
V
1 Turn the Power dial to ???M???.
2 Select ???COLLAGE??? with the MODE switch.
3 Press the w e button to select a background, and then press the EXE button.
???The frame size is automatically selected for the background.
???You can select the frame size (2032 x 1536, 1024 x 768 or 640 x 480) for a background.
???To change the backgrounds, press the EXE button agian.
???It is not possible to use the collage function with pictures photographed by other models of camera.
4 Point the lens at the subject, and then press the w e button to adjust the level of composi- tion .
???The subject should be located in front of a white background such as a white wall.
???You can also use the zoom function.
5 Press the Shutter button all the way to take the picture.
???The composed image is stored in the Memory card.
NOTES:
cDue to large memory files created when shooting a picture of uncompressed quality in this mode, it is recommended to use a Memory card with the capacity more than 16MB.
cIf any portion of the subject is white (clothing, for example), that portion of the subject will also be replaced with the background picture.
cIf the subject is dark, the region that is combined with the background may appear to change when the Shutter button is pressed. However, the actual image that is recorded conforms with the composition settings that were in effect before the Shutter button was pressed.

46
 EN
EN


 MANUAL
 SHOOTING
 (cont.)


6M
The camera can achieve double its normal resolution by taking two pictures consecutively, shifting the CCD pixels one pixel row in the vertical direction between the two shots.
This mode uses the self timer to shoot a still picture. Use a tripod to prevent problems caused by shaky hands.
3 2 4,5
1
OFF M
M
V
3 Confirm that the self timer is set to ???1 second???.
Point the lens at the subject and
???To display the image on the LCD screen while shooting, press the DSP button.
Press the Shutter button all the way to take the picture.
???The shoot standby lamp (green) goes off when the shooting has finished.
NOTES:
cThe picture size is automatically set to 2032 x 1536 with this mode.
cDue to large memory files created when shooting a picture of uncompressed quality in this mode, it is recommended to use a Memory card with the capacity more than 16MB.
cIt takes a few seconds until the shooting finishes because this mode uses the exposure twice. Do not move the object and the camera until the shooting finishes completely.


 EN
EN 47
47
DR
The camera can expand its apparent dynamic range by combining different exposures of an extremely high contrast subject.
This mode uses the self timer to shoot a still picture. Use a tripod to prevent problems caused by shaky hands.
3 2 4,5
1
OFF M
M
V
3 Confirm that the self timer is set to ???1 second???.
Point the lens at the subject and
???To display the image on the LCD screen while shooting, press the DSP button.
Press the Shutter button all the way to take the picture.
???The shoot standby lamp (green) goes off when the shooting has finished.
NOTES:
cDue to large memory files created when shooting a picture of uncompressed quality in this mode, it is recommended to use a Memory card with the capacity more than 16MB.
cIt takes a few seconds until the shooting finishes because this mode uses the exposure twice. Do not move the object and the camera until the shooting finishes completely.
48
 EN
EN


 MANUAL
 SHOOTING
 (cont.)


NR
This mode reduces electronic noise in a photograph by layering several copies of the same image. This mode is ideal for shooting works of art in dark surroundings.
This mode uses the self timer to shoot a still picture. Use a tripod to prevent problems caused by shaky hands.
3 2 4,5
1
OFF M
M
V
3 Confirm that the self timer is set to ???1 second???.
Point the lens at the subject and
???To display the image on the LCD screen while shooting, press the DSP button.
Press the Shutter button all the way to take the picture.
???The shoot standby lamp (green) goes off when the shooting has finished.
NOTES:
cDue to large memory files created when shooting a picture of uncompressed quality in this mode, it is recommended to use a Memory card with the capacity more than 16MB.
cIt takes a few seconds until the shooting finishes because this mode uses the exposure 8 times. Do not move the object and the camera until the shooting finishes completely.


 EN
EN 49
49
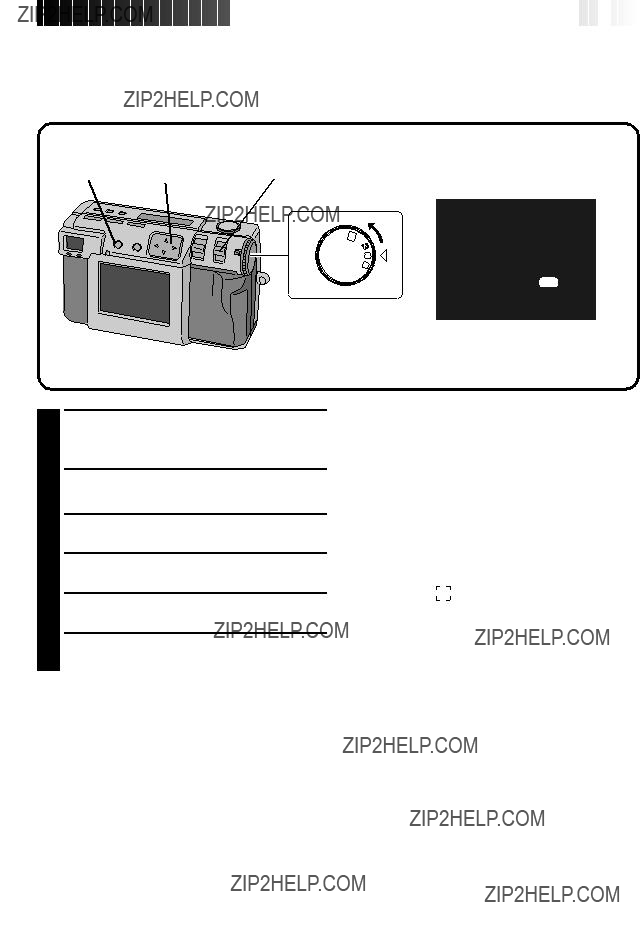
Video Shooting
The camera can record a maximum of 20 seconds of video. The size of the recorded video file is approxi- mately 200 KB. This feature is useful if you want to send a short video by
1 Turn the Power dial to ???V???.
2 Press the Shutter button all the way to shoot the video.
???The flash standby lamp (red) lights during the video shooting.
???Video shooting will stop automatically after about 20 seconds.
3 Press the Shutter button again to stop the video shooting before 20 seconds are up.
???While the video file is stored in the Memory card, the flash standby lamp (red) flashes, and then goes off when the recording has finished. Do not operate the camera while the light flashes.
2,3  1
1
NOTES:
cIt is not possible to record the sound when shooting video.
cIt is not possible to use the flash for video shooting.
cIt will take for a while to store a video file on a Memory card.
cYou can change the settings of ???Manual Focus??? (Z pg. 34), ???Iris Setting??? (Z pg. 35), ???Exposure Control??? (Z pg. 37), ???Macro Shooting??? (Z pg. 36) and ???Self Timer??? (Z pg. 32).
cYou can change the settings of ???White Balance Adjustment??? (Z pg. 38), ???Sensitivity Setting???
(Z pg. 40), ???Changing the AE/AF Area??? (Z pg. 43)
and ???Restoring the Default Settings??? (Z pg. 44).

50
 EN
EN


 PLAYBACK

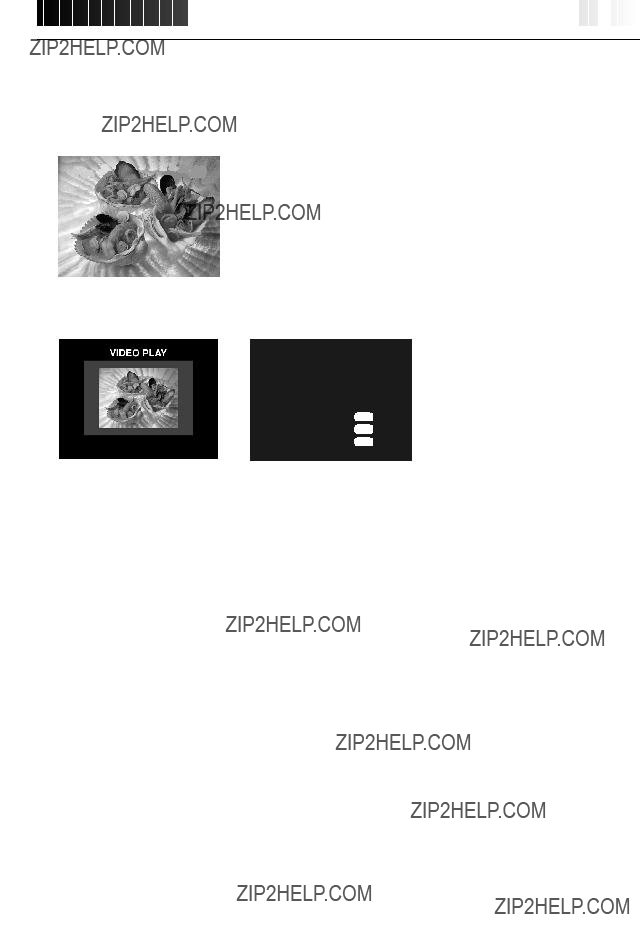
Video Playback
You can watch the recorded video on the camera's LCD screen.
VIDEO PLAY
V
SET
4 OFF
M
1
2
3
4
Turn the Power dial to ???B???.
???Hold the Lock button down while turning the Power dial.
Select ???VIDEO PB??? with the MODE switch.
??????VIDEO PB??? appears on the LCD panel. ???The first frame of the video (which has been
most recently recorded) appears on the LCD screen.
Press the DSP button to switch to an indexed display.
Press the r t w e button to select the video, and then press the EXE button.
???The still image of the selected video appears.
5 Press the EXE button to start playback.
???Playback of the video starts.
???To stop playback, press the EXE button again. ???To select and play back another video, press
the DSP button while playback is in stop mode. The indexed display will appear.
NOTES:
cThe camera may not be able to play back a video recorded by other models of camera.
cThe camera expands and plays back data that was compressed and stored in a memory card. The data format is our own proprietary format.
cThe image may have a mosaic appearance.
cWhen playing back a video that is shorter than 2 seconds, the video is displayed as a still image. This not a malfunction.


 EN
EN 63
63


 EN
EN 65
65
SET UP Menu
NOTES:
cThis camera has the power save function. The camera goes in the power save mode after 3 minutes of no activity. Within 7 minutes after the camera enters the power save mode, power can be restored by pressing any of the button on the camera.
cAfter 7 minutes has elapsed, the camera shuts off the power automatically. To turn the camera on again, turn the Power dial to ???OFF??? first and then to ???A???, ???M???, ???V??? or ???B???.
cTo immediately view images that you have shot, set ???Q. REVIEW??? to ???ON???.


70
 EN
EN


 SOFTWARE
 SECTION
 FOR
FOR
 Windows
 ??
?? (cont.)


Installing the Video Player
For details on the basic operation of Windows?? 98, refer to the instruction manual provided with your computer or Windows?? 98.
Preparation
Start Windows?? 98.
cIf you are running other software, close that software. (Make sure that there are no other application icons open on the task bar.)
1 Load the provided
2 Double click on the
???The Vplay folder opens.
3 Double click on the ???Vpw100e??? icon.
4 Click the ???Next??? button.
5 Click the ???Yes??? button.
6 Click the ???Next??? button.
7 Restart the computer.

72
 EN
EN


 SOFTWARE
 SECTION
 FOR
FOR
 Windows
 ??
?? (cont.)


Basic Playback
There are several different methods for playing back a video on the Video Player, depending on how you load the file.
Preparation
Start Windows?? 98.
cSend the video file that you want to play back to the computer. (Z pg. 71)
1 Click the ???Start??? button.
???The Start Menu bar appears.
2 Point the cursor to ???Program???.
3 Point the cursor to ???Video Player???.
4 Click the ???Video Player???.
5
6
Pause button


74
 EN
EN


 SOFTWARE
 SECTION
 FOR
FOR
 Windows
 ??
?? (cont.)


Uninstalling the Software
When you don't need to use the Video Player, uninstall the program.
Preparation
Start Windows?? 98.
cIf you are running other software, close that software. (Make sure that there are no other application icons open on the task bar.)
2 Point the cursor to ???Settings???.
3 Click the ???Control Panel???.
4 Double click on the ???Add/Remove Programs???.
5 Click the ???Video Player???, then click the ???Add/Remove??? button.
6 Click the ???Yes??? button.
7 After confirming that the Video Player is removed, click the ???OK??? button.


 EN
EN 77
77
Installing the JVC Video Decoder
For details on the basic operation of Mac OS, refer to the instruction manual provided with your Macintosh?? or Mac OS.
Preparation
Start Macintosh??.
cIf you are running other software, close that software.
1
2 Double click on the loaded
3 Drag the ???JVC Video Decoder??? icon to the ???System Folder???, then drop the icon there.
4
5


84
 EN
EN


 TROUBLE

 SHOOTING

 (cont.)


Error Messages (for the camera)
Error messages appear on the LCD screen.


 EN
EN 85
85
Error Messages (for the printer)
Error messages appear on the LCD screen. For details, refer to the printer's instruction manual.


 EN
EN 87
87
AC Power Adapter/Charger
E. & O. E. Design and specifications subject to change without notice.


MEMO

EN
VICTOR COMPANY OF JAPAN, LIMITED


 EN
EN

 1 0 0 - 0 0 0 3


 PLAYBACK

 (cont.)


 ??? with the MODE switch.
 ???. The VIDEO PROTECT screen will appear.
 ??? (protection indicator) appears. ???To unlock the protection, press the EXE
 ??? (protection indicator) appears.


 EN
EN

 ??? (deletion indicator) appears.
 ??? (deletion indicator) appears.


 PLAYBACK

 (cont.)


 EN
EN


 PLAYBACK

 (cont.)


 EN
EN


 PLAYBACK

 (cont.)


 PRINT
PRINT


 PRINT
PRINT

 (cont.)


 EN
EN


 PRINT
PRINT

 (cont.)


 SUBSIDIARY
 SETTINGS


 SUBSIDIARY

 SETTINGS
 (cont.)


 EN
EN


 EN
EN


 EN
EN


 EN
EN


 EN
EN


 SOFTWARE

 SECTION
 FOR
FOR

 Macintosh
 (cont.)


 SOFTWARE

 SECTION
 FOR
FOR

 Macintosh
 (cont.)


 EN
EN


 SOFTWARE

 SECTION
 FOR
FOR

 Macintosh
 (cont.)


 EN
EN


 TROUBLESHOOTING


 EN
EN


 SPECIFICATIONS


 CAUTIONS


 EN
EN


 INDEX
INDEX
