???When a disc is inserted upside down, ???PLEASE??? and ???EJECT??? appear alternately on the display. Press 0 to eject the disc.
Playing a disc
???While fast-forwarding or reversing on an MP3 or WMA disc, you can only hear intermittent sounds.
Playing a CD-R or CD-RW
???Use only ???finalized??? CD-Rs or CD-RWs.
???This unit can play back only files of the same type which are first detected if a disc includes both audio CD (CD-DA) files and MP3/ WMA files.
???This unit can play back multi-session discs; however, unclosed sessions will be skipped while playing.
???Some CD-Rs or CD-RWs may not play back on this unit because of their disc characteristics, or for the following reasons:
???Discs are dirty or scratched.
???Moisture condensation occurs on the lens inside the unit.
???The pickup lens inside the unit is dirty.
???CD-R/CD-RW on which the files are written with ???Packet Write??? method.
???There are improper recording conditions (missing data, etc.) or media conditions (stained, scratched, warped, etc.).
???CD-RWs may require a longer readout time since the reflectance of CD-RWs is lower than that of regular CDs.
???Do not use the following CD-Rs or CD-RWs:
???Discs with stickers, labels, or a protective seal stuck to the surface.
???Discs on which labels can be directly printed by an ink jet printer.
Using these discs under high temperatures or high humidities may cause malfunctions or damage to the unit.
Playing an MP3/WMA disc
???This unit can play back MP3/WMA files with the extension code <.mp3> or <.wma> (regardless of the letter case???upper/lower).
???This unit can show the names of albums, artists (performer), and Tag (Version 1.0, 1.1, 2.2, 2.3, or 2.4) for MP3 files and for WMA files.
???This unit can display only one-byte characters. No other characters can be correctly displayed.
???This unit can play back MP3/WMA files meeting the conditions below:
???Bit rate: 8 kbps ??? 320 kbps
???Sampling frequency:
48 kHz, 44.1 kHz, 32 kHz (for MPEG-1) 24 kHz, 22.05 kHz, 16 kHz (for MPEG-2)
???Disc format: ISO 9660 Level 1/Level 2, Romeo, Joliet, Windows long file name
???The maximum number of characters for file/ folder names vary among the disc format used (includes 4 extension characters???<.mp3> or <.wma>).
???ISO 9660 Level 1: up to 12 characters
???ISO 9660 Level 2: up to 31 characters
???Romeo*: up to 128 (72) characters
???Joliet*: up to 64 (36) characters
???Windows long file name*: up to 128 (72)
characters
*The parenthetic figure is the maximum number of characters for file/folder names in case the total number of files and folders is 313 or more.
???This unit can play back files recorded in VBR (variable bit rate).
Files recorded in VBR have a discrepancy in elapsed time display, and do not show the actual elapsed time. Especially, after performing the search function, this difference becomes noticeable.
???This unit can recognize a total of 512 files, of 200 folders, and of 8 hierarchies.
???This unit cannot play back the following files:
??? MP3 files encoded with MP3i and MP3 PRO format.
??? MP3 files encoded in an inappropriate format.
??? MP3 files encoded with Layer 1/2.
??? WMA files encoded with lossless, professional, and voice format.
??? WMA files which are not based upon Windows Media?? Audio.
Continued on the next page...


 6
6

 How to reset your unit
 How to forcibly eject a disc
 How to use the MODE button
 How to read this manual
 : External CD changer operations. : External USB memory operations.
 How to detach/attach the control panel


 (standby/on attenuator) button 3 DISP (display) button
 (control panel release) button w SEL (select) button
 (track/file),
  (folder)
 (disc),
 (folder), RPT (repeat)
 lights up for the selected item.
 Installing the lithium coin battery (CR2025)
 (standby/on/attenuator)


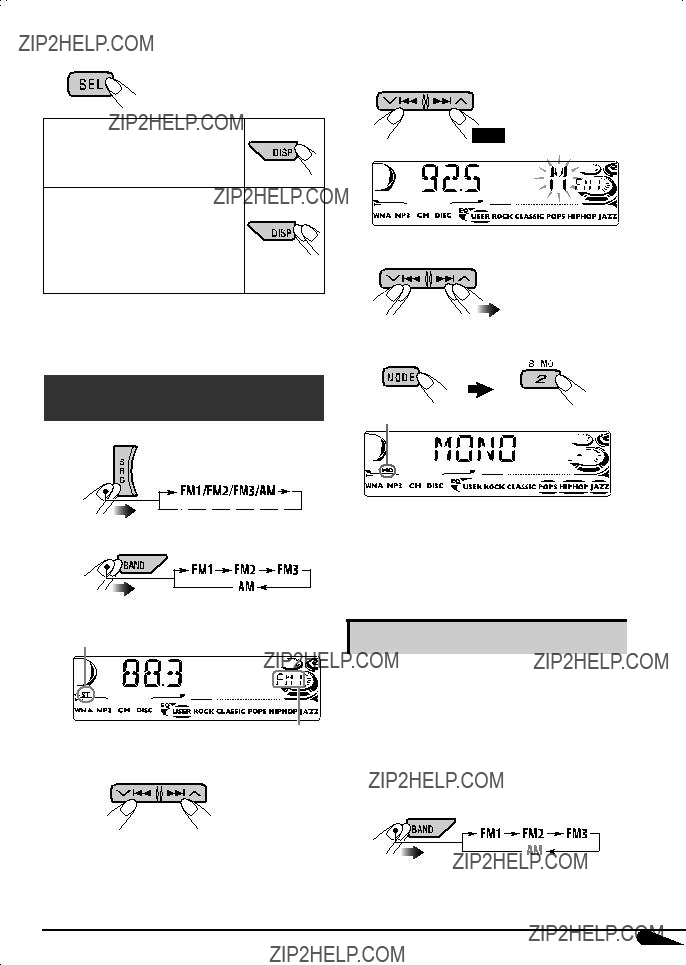
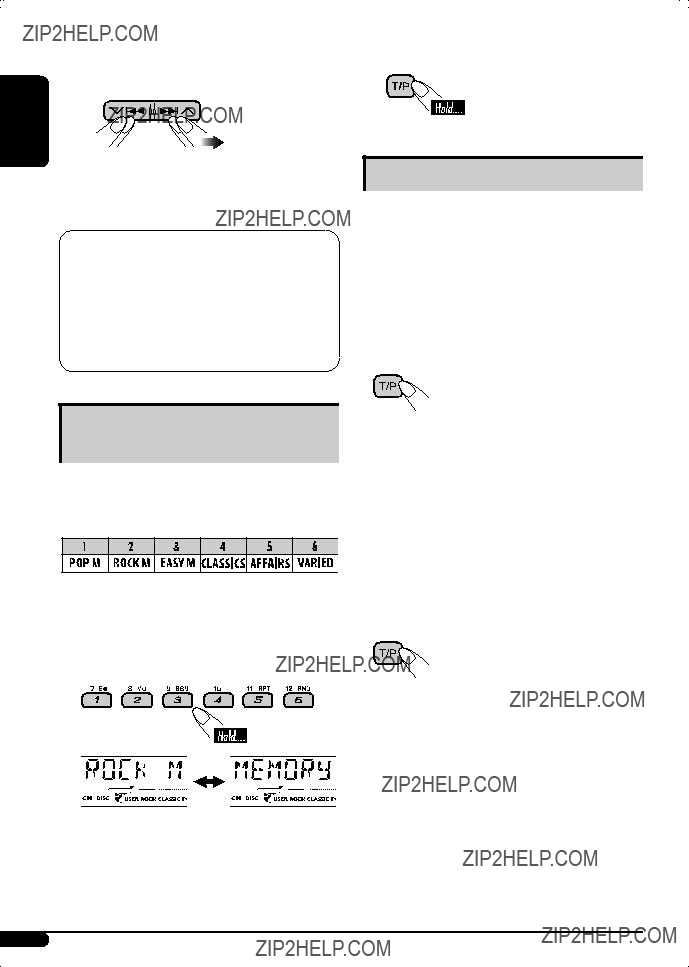
 FM station automatic presetting??? SSM
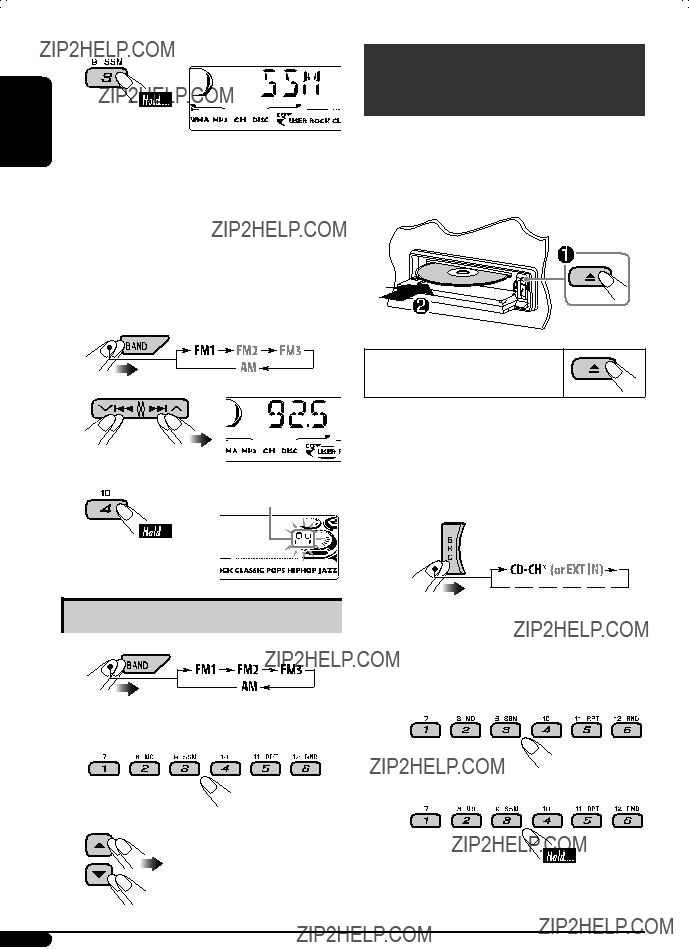
 Manual presetting


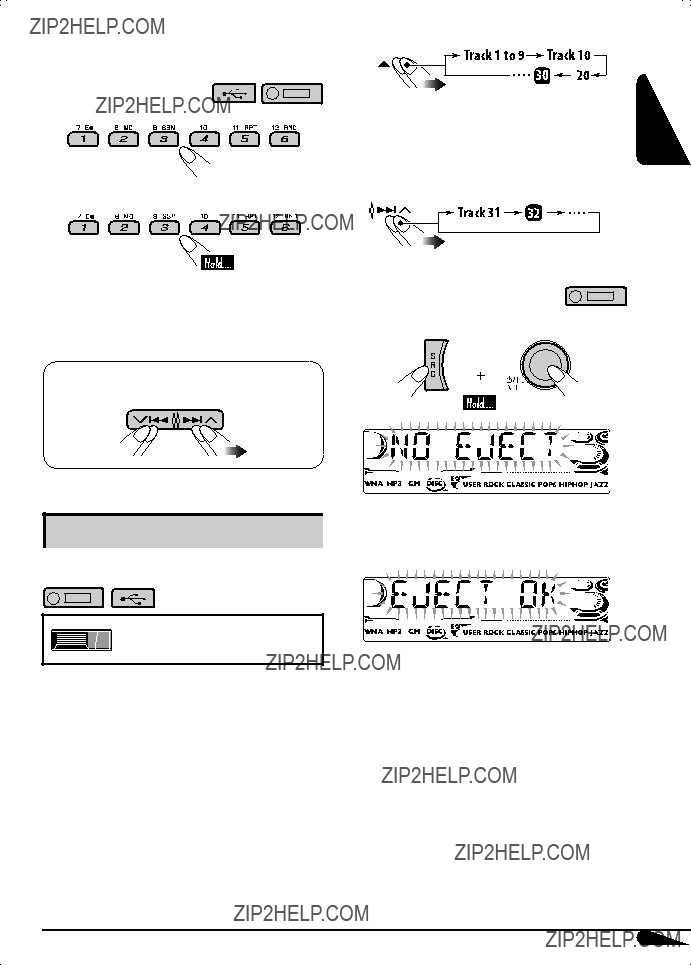
 For WMA tracks:

 Skipping tracks quickly during play


 Prohibiting disc ejection
 While playing an audio CD or a CD Text
 While playing an MP3/WMA

 : Clock with the current track number


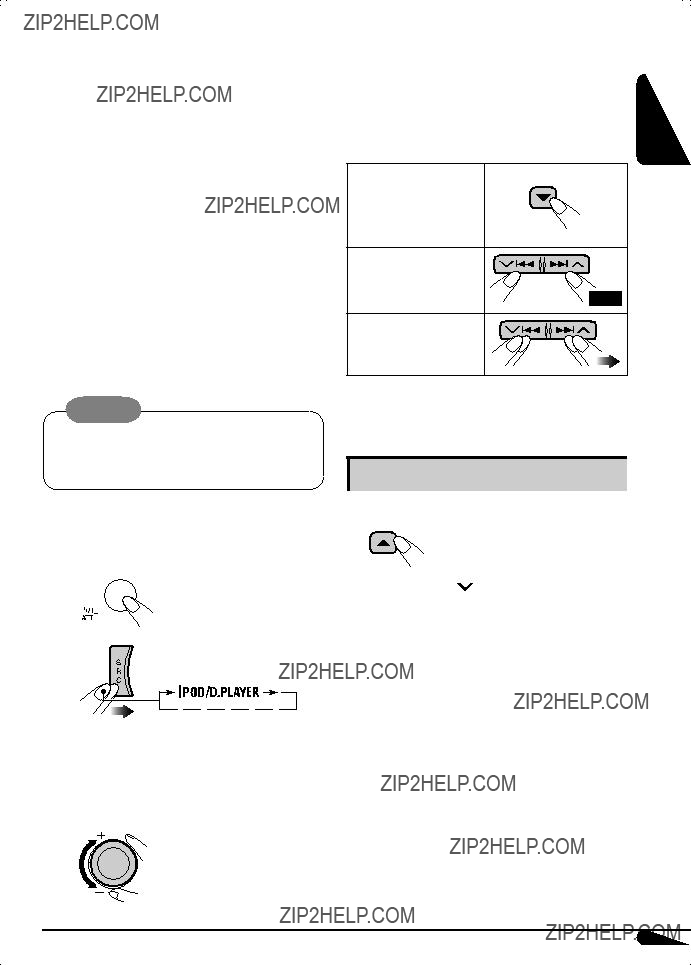
 buttons work as the menu selecting buttons
 4/??
4/?? can skip 10 items at a time.


 How to clean the connectors
 Moisture condensation
 How to handle discs
 To keep discs clean
 To play new discs


 AUDIO AMPLIFIER SECTION
 TUNER SECTION
 CD PLAYER/USB MEMORY SECTION
 GENERAL


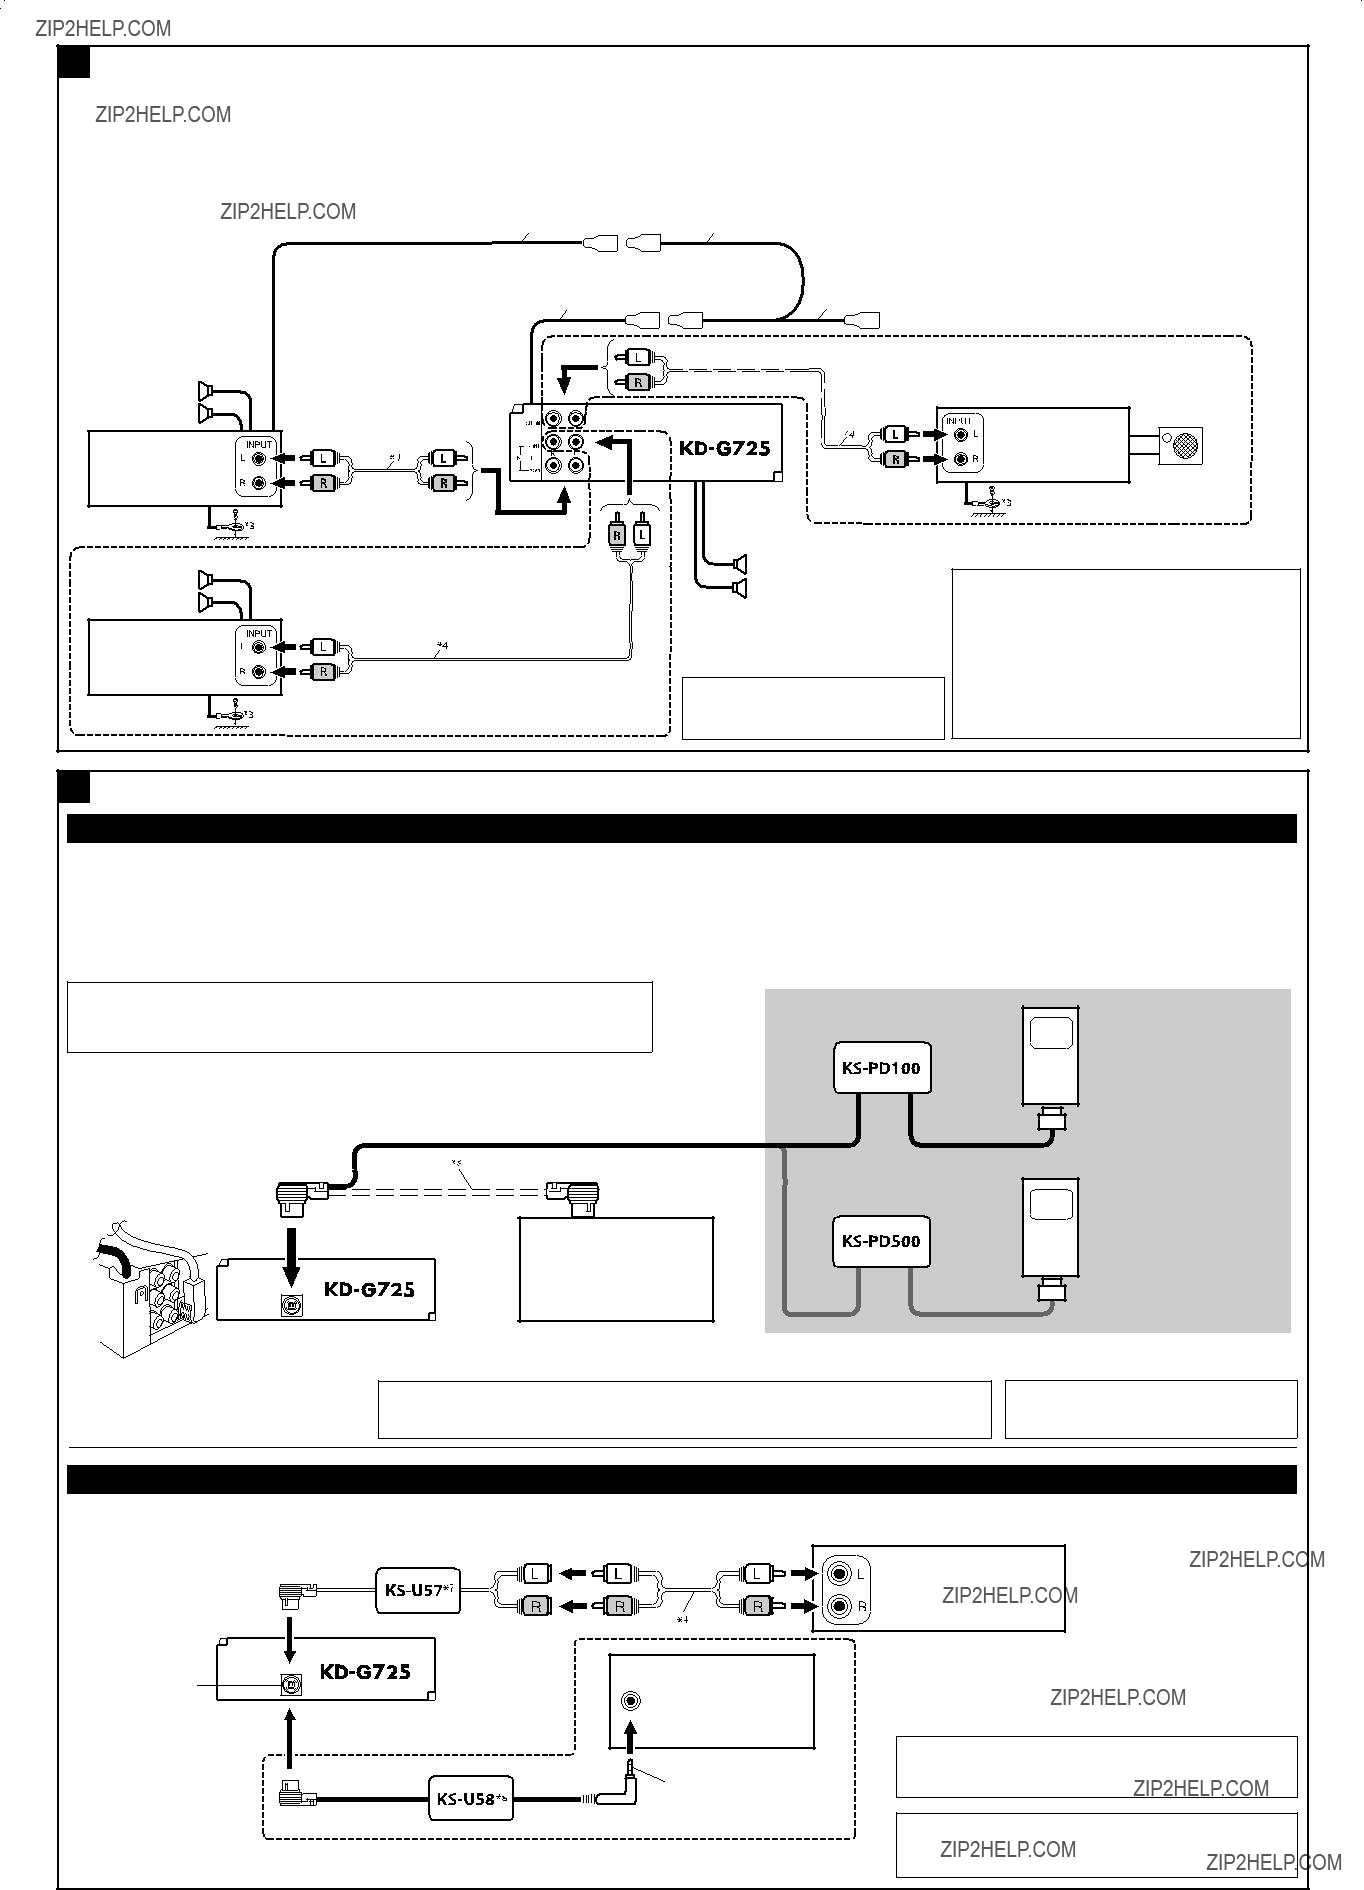
 To car light control switch
 How to reset your unit
 How to forcibly eject a disc
 How to use the MODE button
 How to read this manual
 :
:  : External CD changer operations. : External USB memory operations.


 (standby/on attenuator) button 3 DISP (display) button
 (control panel release) button w SEL (select) button
 4/??
4/?? buttons
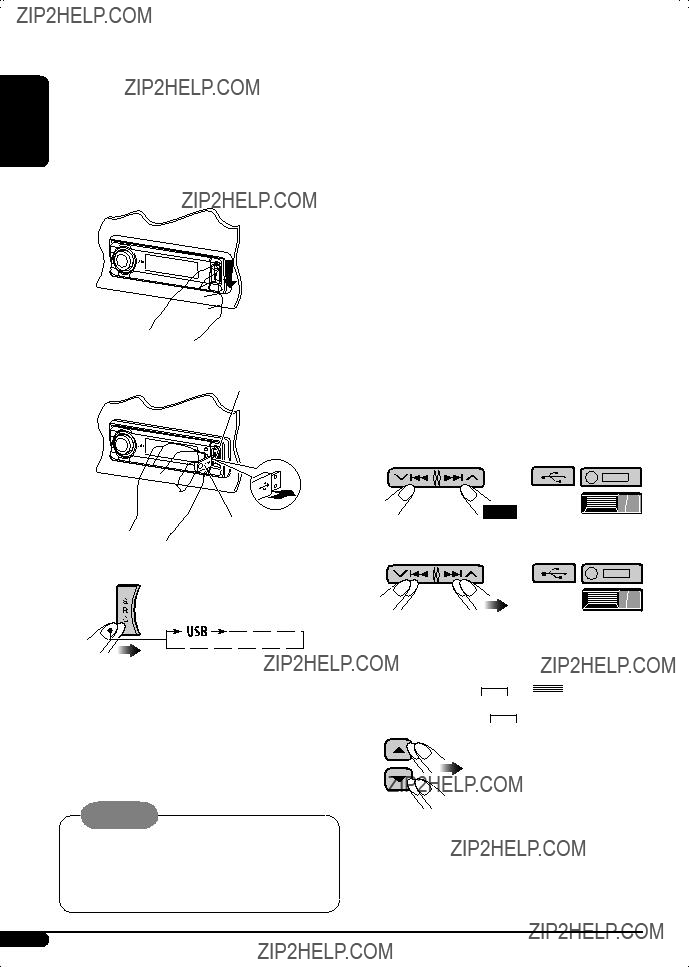
 How to detach/attach the control panel
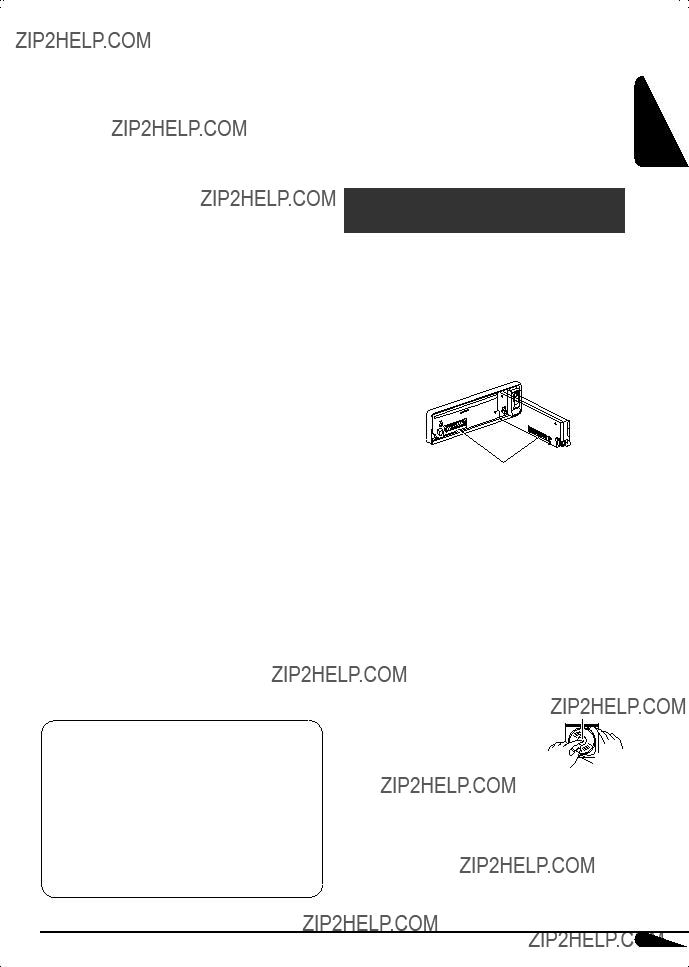
 The lever comes out if you pressed the 0button while the panel is detached. If this happens, push the lever back into lock position before attaching the panel.
 (track/file),
  (folder)
 (disc),
  (folder), RPT (repeat)
 lights up for the selected item.

 (standby/on/attenuator)


 Manual presetting
 FM station automatic presetting??? SSM


 For WMA tracks:

 Skipping tracks quickly during play


 Prohibiting disc ejection
 While playing an audio CD or a CD Text
 While playing an MP3/WMA

 : Clock with the current track number


 Listening to the satellite radio
 Searching for category/channel
 Checking the XM Satellite radio ID


 4/??
4/?? can skip 10 items at a time.


 How to clean the connectors
 Moisture condensation
 How to handle discs
 To keep discs clean
 To play new discs
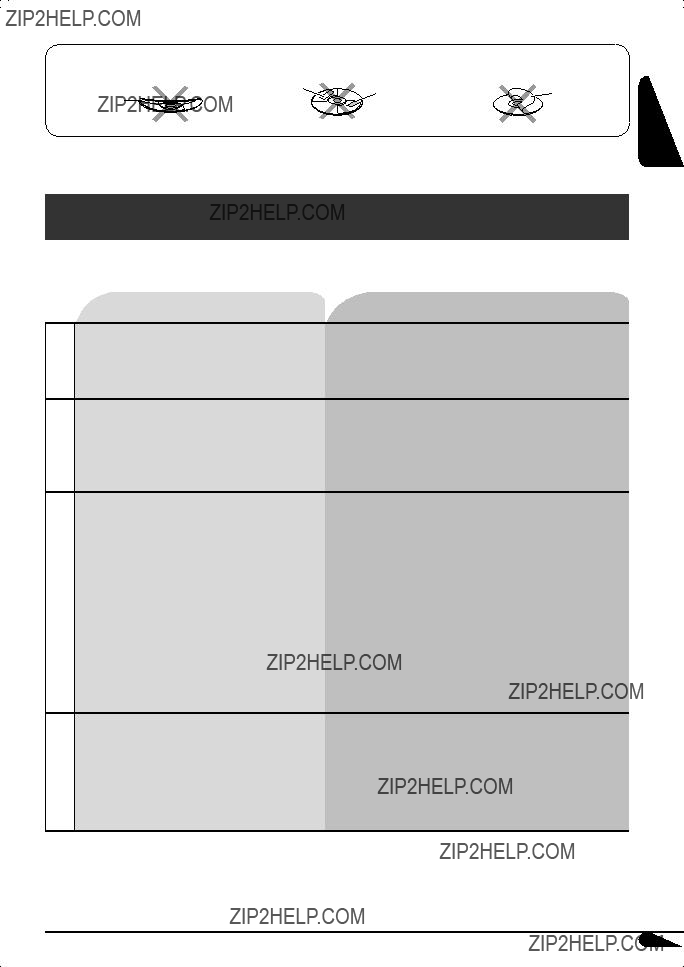


 AUDIO AMPLIFIER SECTION
 TUNER SECTION
 CD PLAYER/USB MEMORY SECTION
 GENERAL


 )
) )
) )
) )
) )
) )
) )
)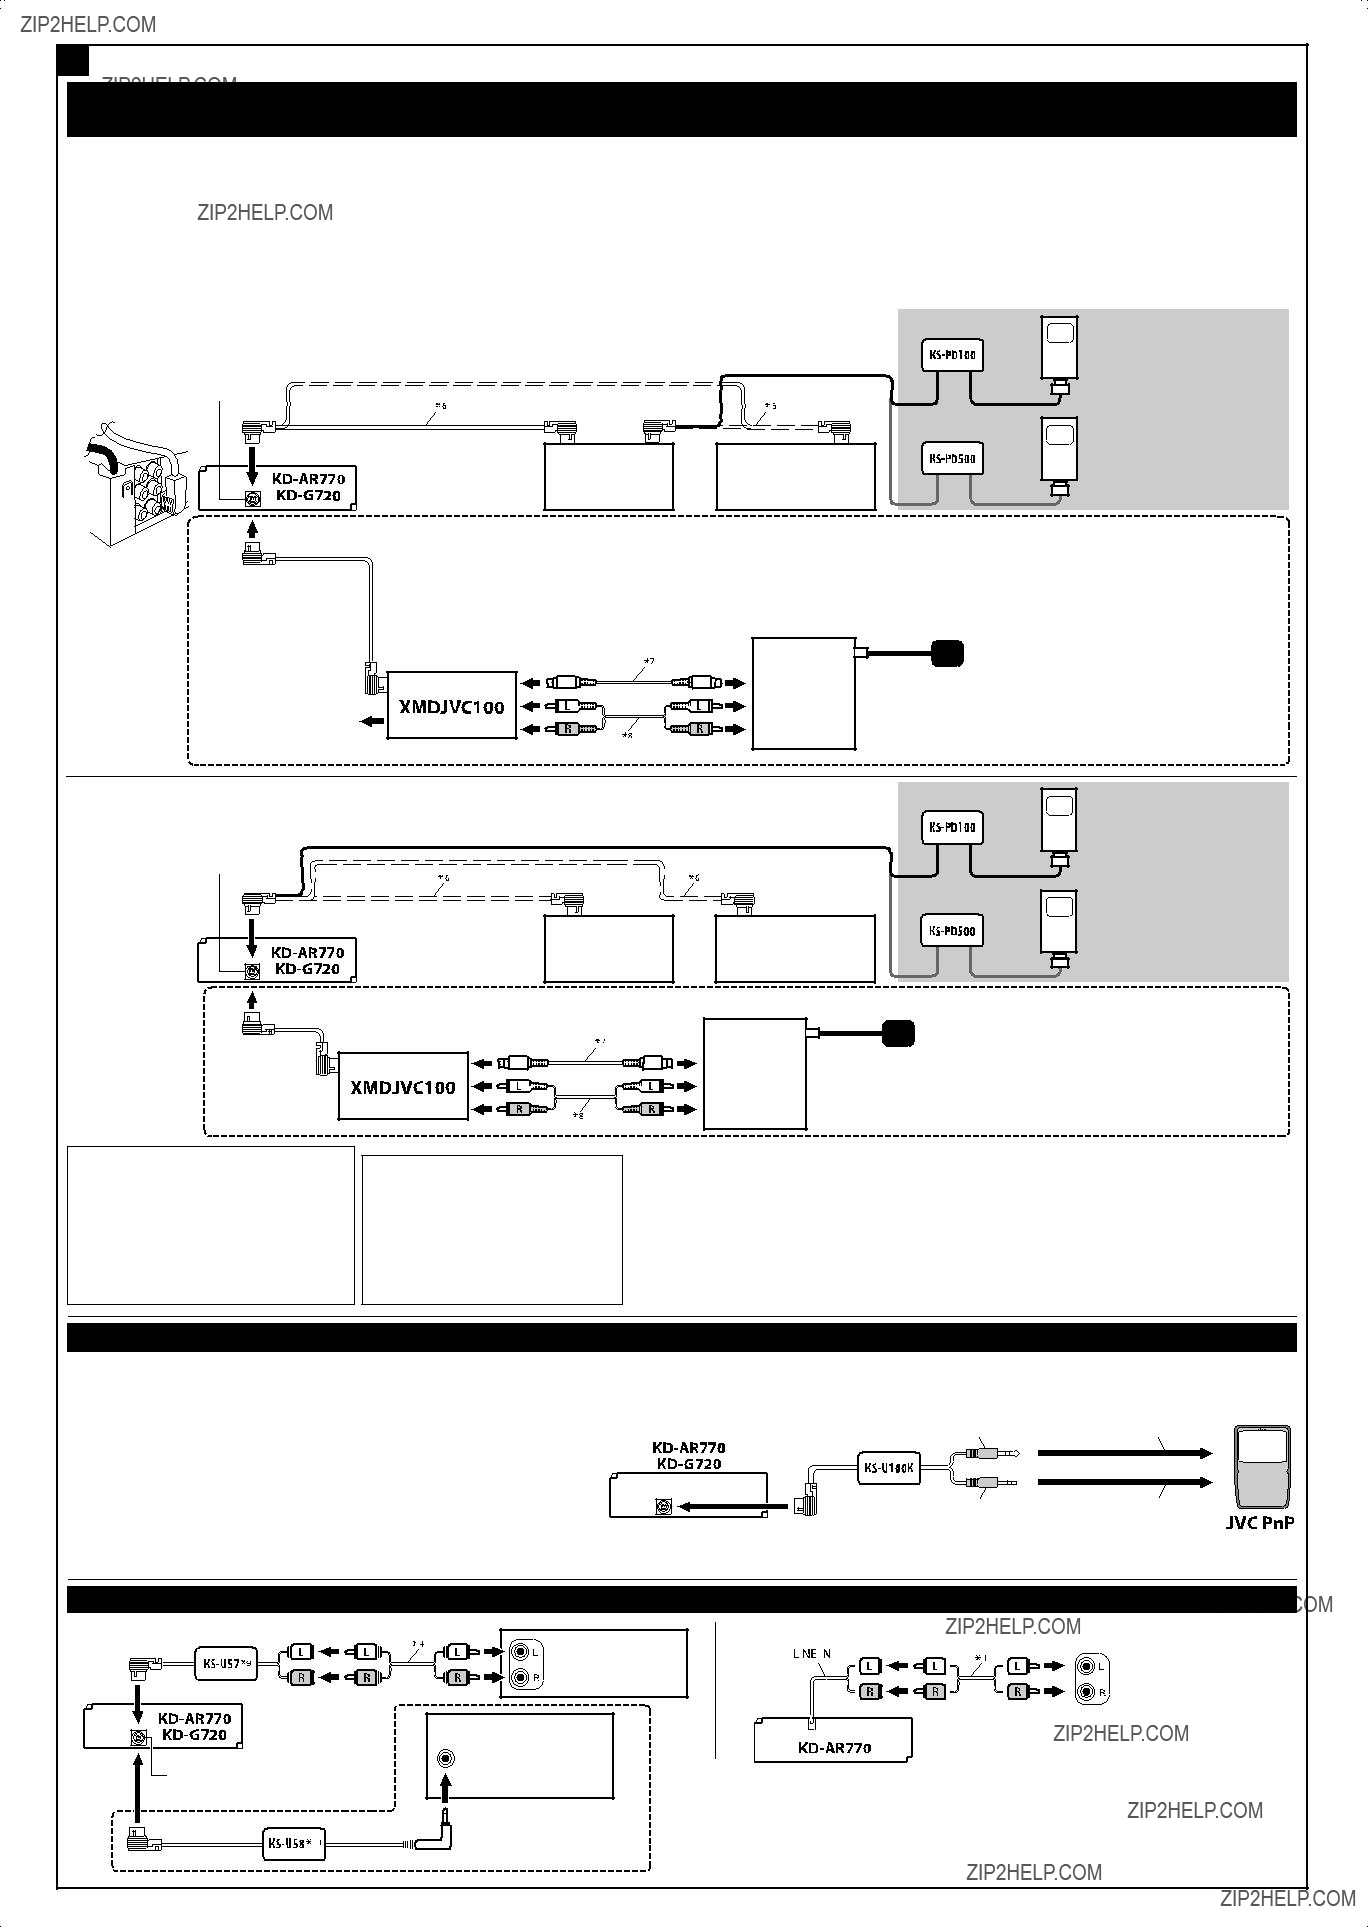

 3.5 mm stereo mini plug

 6
6


 How to reset your unit
 How to forcibly eject a disc
 How to use the MODE button
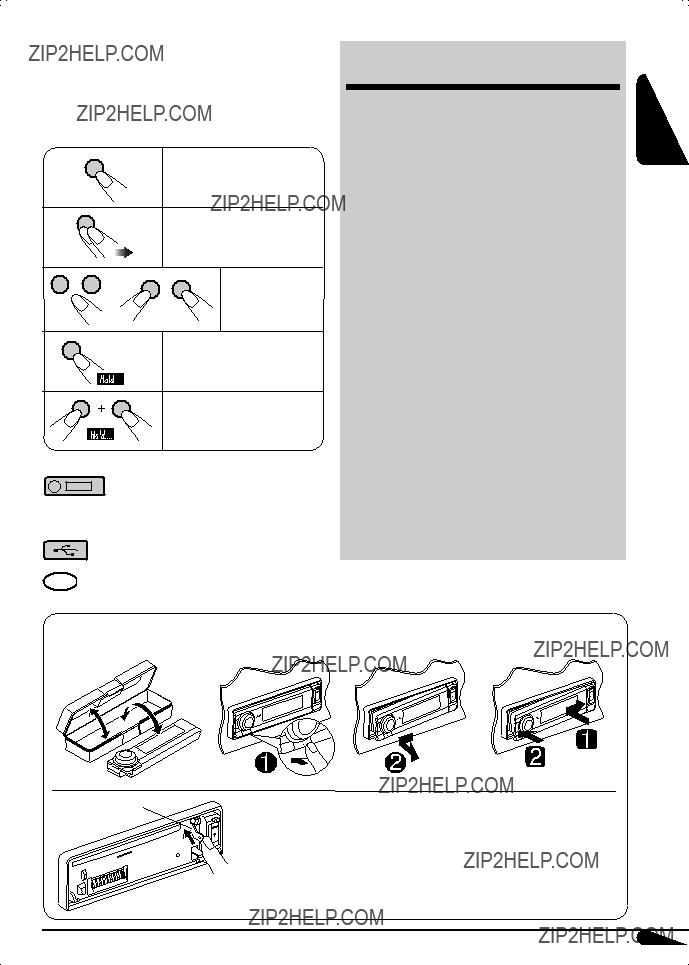
 How to read this manual
 : External CD changer operations. : External USB memory operations.
 How to detach/attach the control panel


 (standby/on attenuator) button 3 DISP (display) button
 (control panel release) button w SEL (select) button
 (track/file),
  (folder)
 (disc),
 (folder), RPT (repeat)
 lights up for the selected item.
 Installing the lithium coin battery (CR2025)
 (standby/on/attenuator)


 FM station automatic presetting??? SSM

 Manual presetting


 For WMA tracks:

 Skipping tracks quickly during play


 Prohibiting disc ejection
 While playing an audio CD or a CD Text
 While playing an MP3/WMA

 : Clock with the current track number


 buttons work as the menu selecting buttons
 4/??
4/?? can skip 10 items at a time.


 How to clean the connectors
 Moisture condensation
 How to handle discs
 To keep discs clean
 To play new discs


 AUDIO AMPLIFIER SECTION
 TUNER SECTION
 CD PLAYER/USB MEMORY SECTION
 GENERAL


 )
)
 )
) )
)


 How to reset your unit
 How to forcibly eject a disc
 How to use the MODE button
 How to read this manual
 : External CD changer operations. : External USB memory operations.
 How to detach/attach the control panel


 (standby/on attenuator) button 3 DISP (display) button
 (control panel release) button w SEL (select) button
 (track/file),
  (folder)
 (disc),
 (folder), RPT (repeat)
 lights up for the selected item.
 Installing the lithium coin battery (CR2025)
 (standby/on/attenuator)


 FM station automatic presetting??? SSM

 Manual presetting


 For WMA tracks:

 Skipping tracks quickly during play


 Prohibiting disc ejection
 While playing an audio CD or a CD Text
 While playing an MP3/WMA

 : Clock with the current track number


 buttons work as the menu selecting buttons
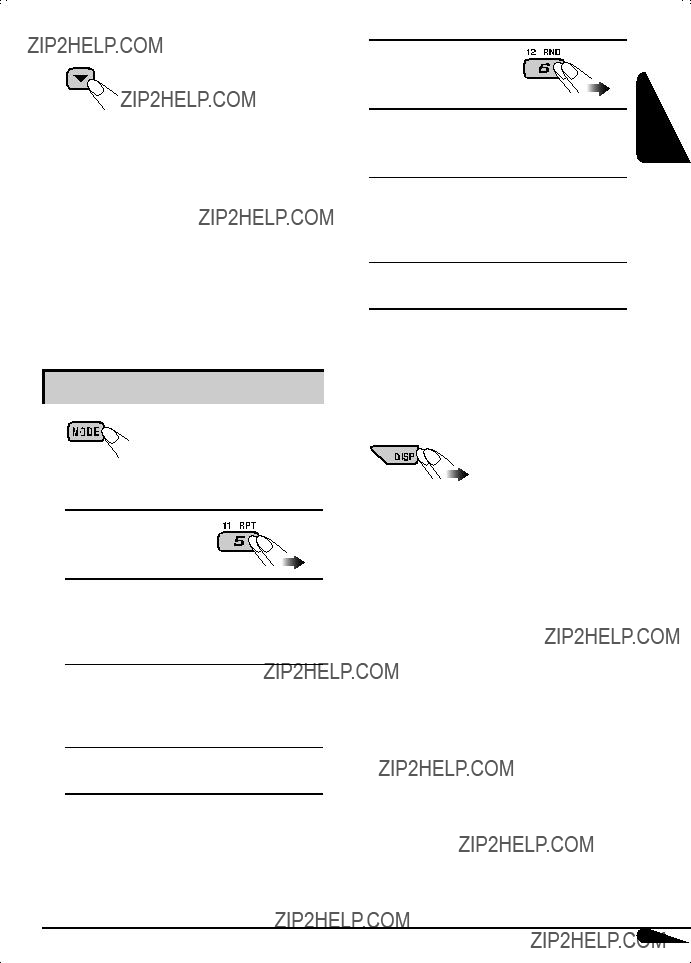
 4/??
4/?? can skip 10 items at a time.


 How to clean the connectors
 Moisture condensation
 How to handle discs
 To keep discs clean
 To play new discs


 AUDIO AMPLIFIER SECTION
 TUNER SECTION
 CD PLAYER/USB MEMORY SECTION
 GENERAL


 )
) )
) )
) )
)


 How to forcibly eject a disc
 How to read this manual
 : External CD changer operations. : External USB memory operations.
 How to detach/attach the control panel


 (standby/on attenuator) button 3 DISP (display) button
 (control panel release) button w SEL (select) button
 (track/file),
  (folder)
 (disc),
 (folder), RPT (repeat)
 lights up for the selected item.
 Installing the lithium coin battery (CR2025)
 (standby/on/attenuator)


 FM station automatic presetting??? SSM

 Manual presetting


 For WMA tracks:

 Skipping tracks quickly during play


 Prohibiting disc ejection
 While playing an audio CD or a CD Text
 While playing an MP3/WMA

 : Clock with the current track number


 buttons work as the menu selecting buttons
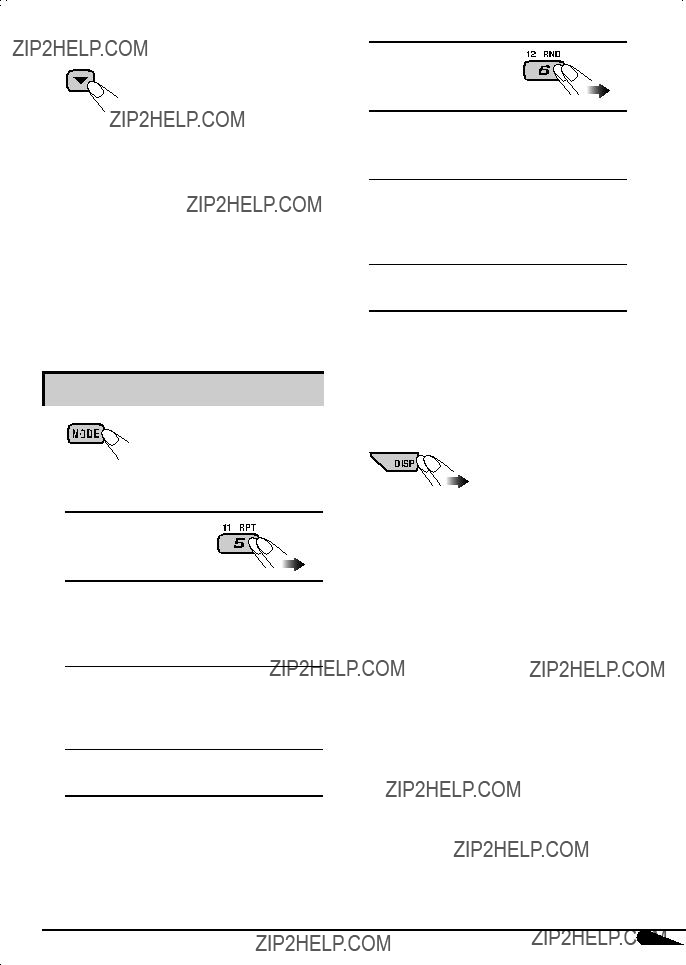
 4/??
4/?? can skip 10 items at a time.


 How to clean the connectors
 Moisture condensation
 How to handle discs
 To keep discs clean
 To play new discs


 AUDIO AMPLIFIER SECTION
 TUNER SECTION
 CD PLAYER/USB MEMORY SECTION
 GENERAL


 )
) )
)


 How to reset your unit
 How to forcibly eject a disc
 How to use the MODE button
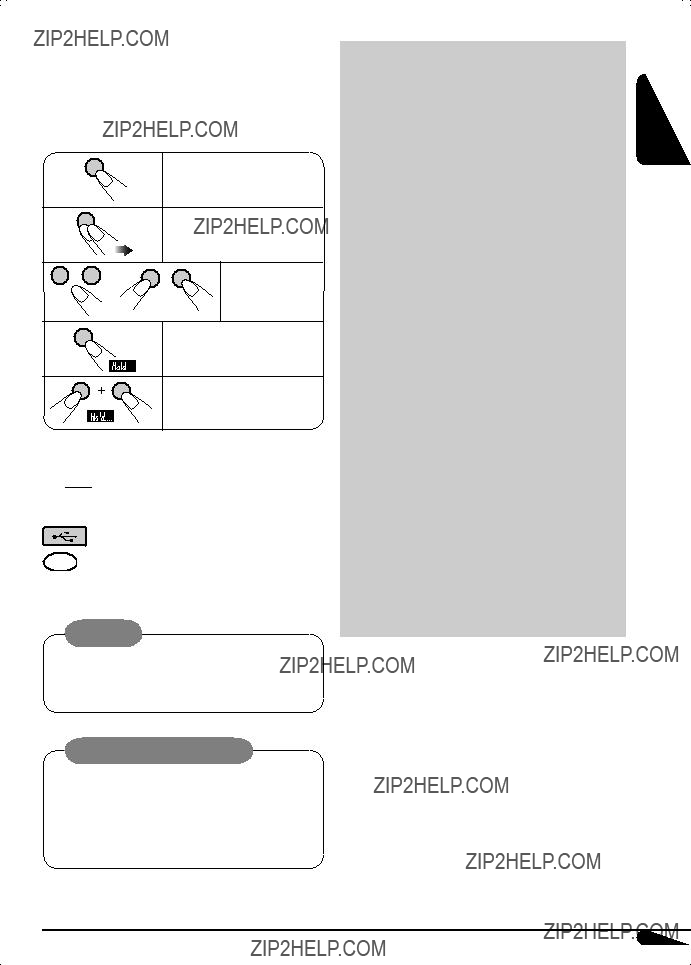
 How to read this manual
 :
:  : External CD changer operations. : External USB memory operations.
 How to detach/attach the control panel
 The lever comes out if you pressed the 0button while the panel is detached. If this happens, push the lever back into lock position before attaching the panel.
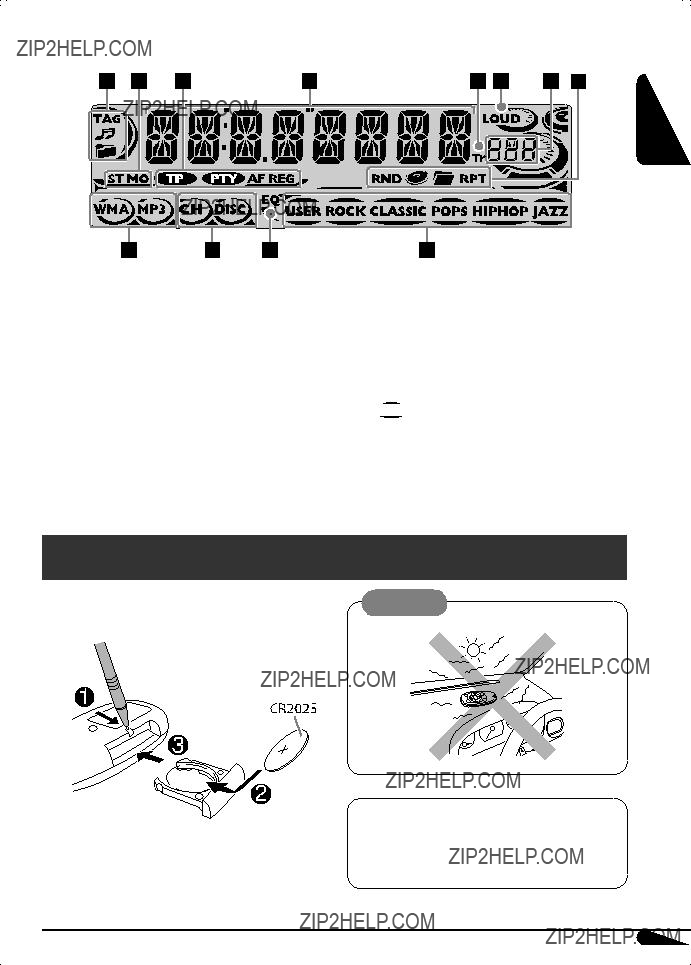
 (track/file),
  (folder)
 (disc),
  (folder), RPT (repeat)
 lights up for the selected item.

 (standby/on/attenuator)


 FM station automatic presetting??? SSM

 Manual presetting

 TA Standby Reception
 PTY Standby Reception


 For WMA tracks:


 Skipping tracks quickly during play

 Prohibiting disc ejection
 While playing an audio CD or a CD Text
 While playing an MP3/WMA

 : Elapsed playing time with the current track number

 : Clock with the current track number


 buttons work as the menu selecting buttons
 4/??
4/?? can skip 10 items at a time.


 How to clean the connectors
 Moisture condensation
 How to handle discs
 To keep discs clean
 To play new discs

 AUDIO AMPLIFIER SECTION
 TUNER SECTION
 CD PLAYER/USB MEMORY SECTION
 GENERAL


 )
) ) Connecteur d???antenne
 )
) )
) )
) )
)
 )
) )
)

 How to reset your unit
 How to forcibly eject a disc
 How to use the MODE button
 How to read this manual
 :
:  : External CD changer operations. : External USB memory operations.
 How to detach/attach the control panel
 The lever comes out if you pressed the 0button while the panel is detached. If this happens, push the lever back into lock position before attaching the panel.
 (track/file),
  (folder)
 (disc),
  (folder), RPT (repeat)
 lights up for the selected item.

 (standby/on/attenuator)


 FM station automatic presetting??? SSM

 Manual presetting

 TA Standby Reception
 PTY Standby Reception


 For WMA tracks:


 Skipping tracks quickly during play

 Prohibiting disc ejection
 While playing an audio CD or a CD Text
 While playing an MP3/WMA

 : Elapsed playing time with the current track number

 : Clock with the current track number


 buttons work as the menu selecting buttons
 4/??
4/?? can skip 10 items at a time.


 How to clean the connectors
 Moisture condensation
 How to handle discs
 To keep discs clean
 To play new discs


 AUDIO AMPLIFIER SECTION
 TUNER SECTION
 CD PLAYER/USB MEMORY SECTION
 GENERAL

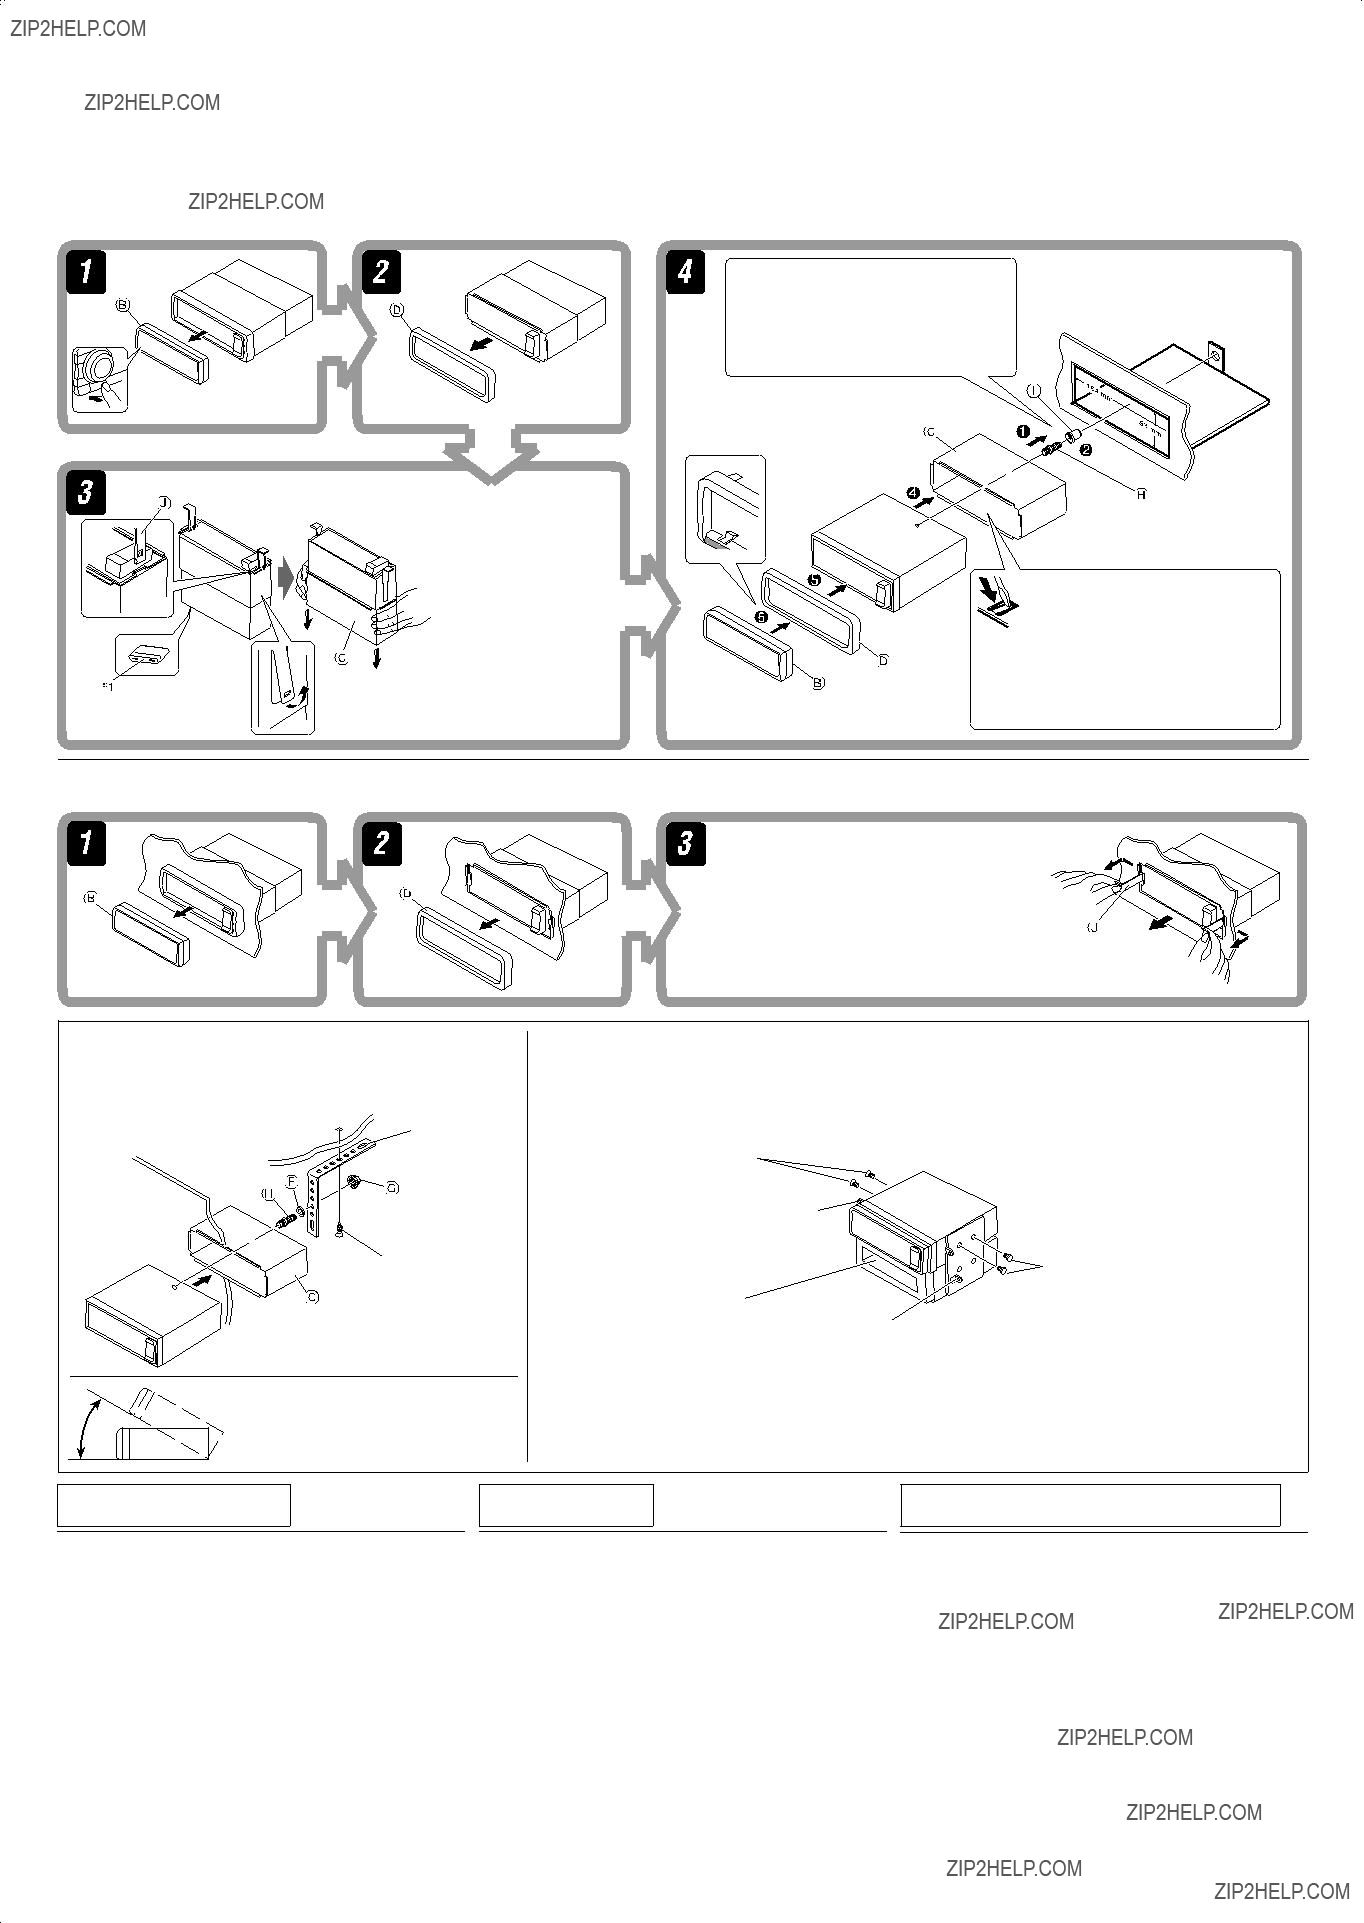
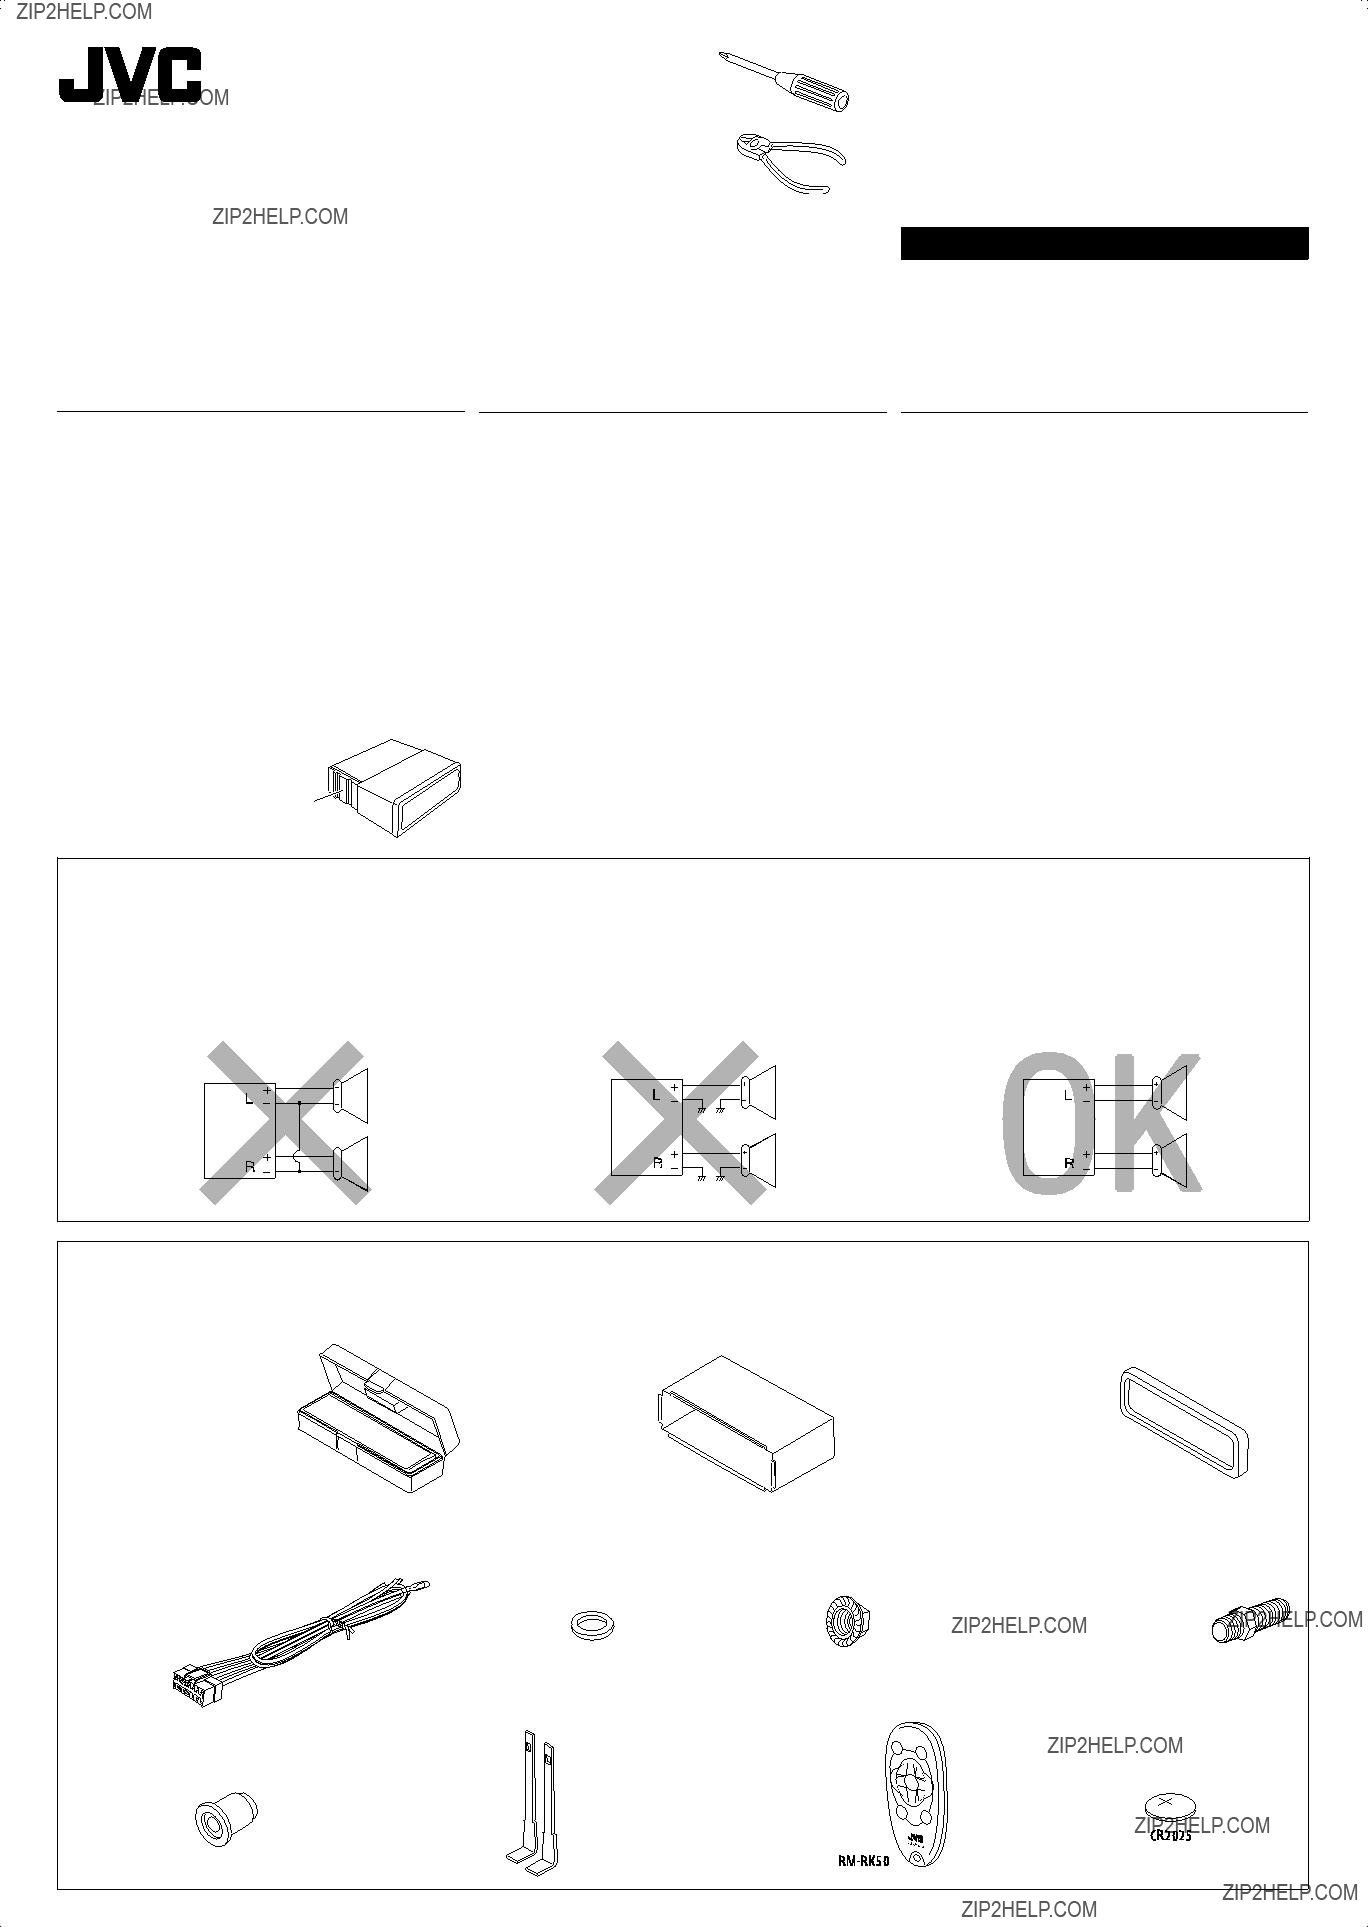
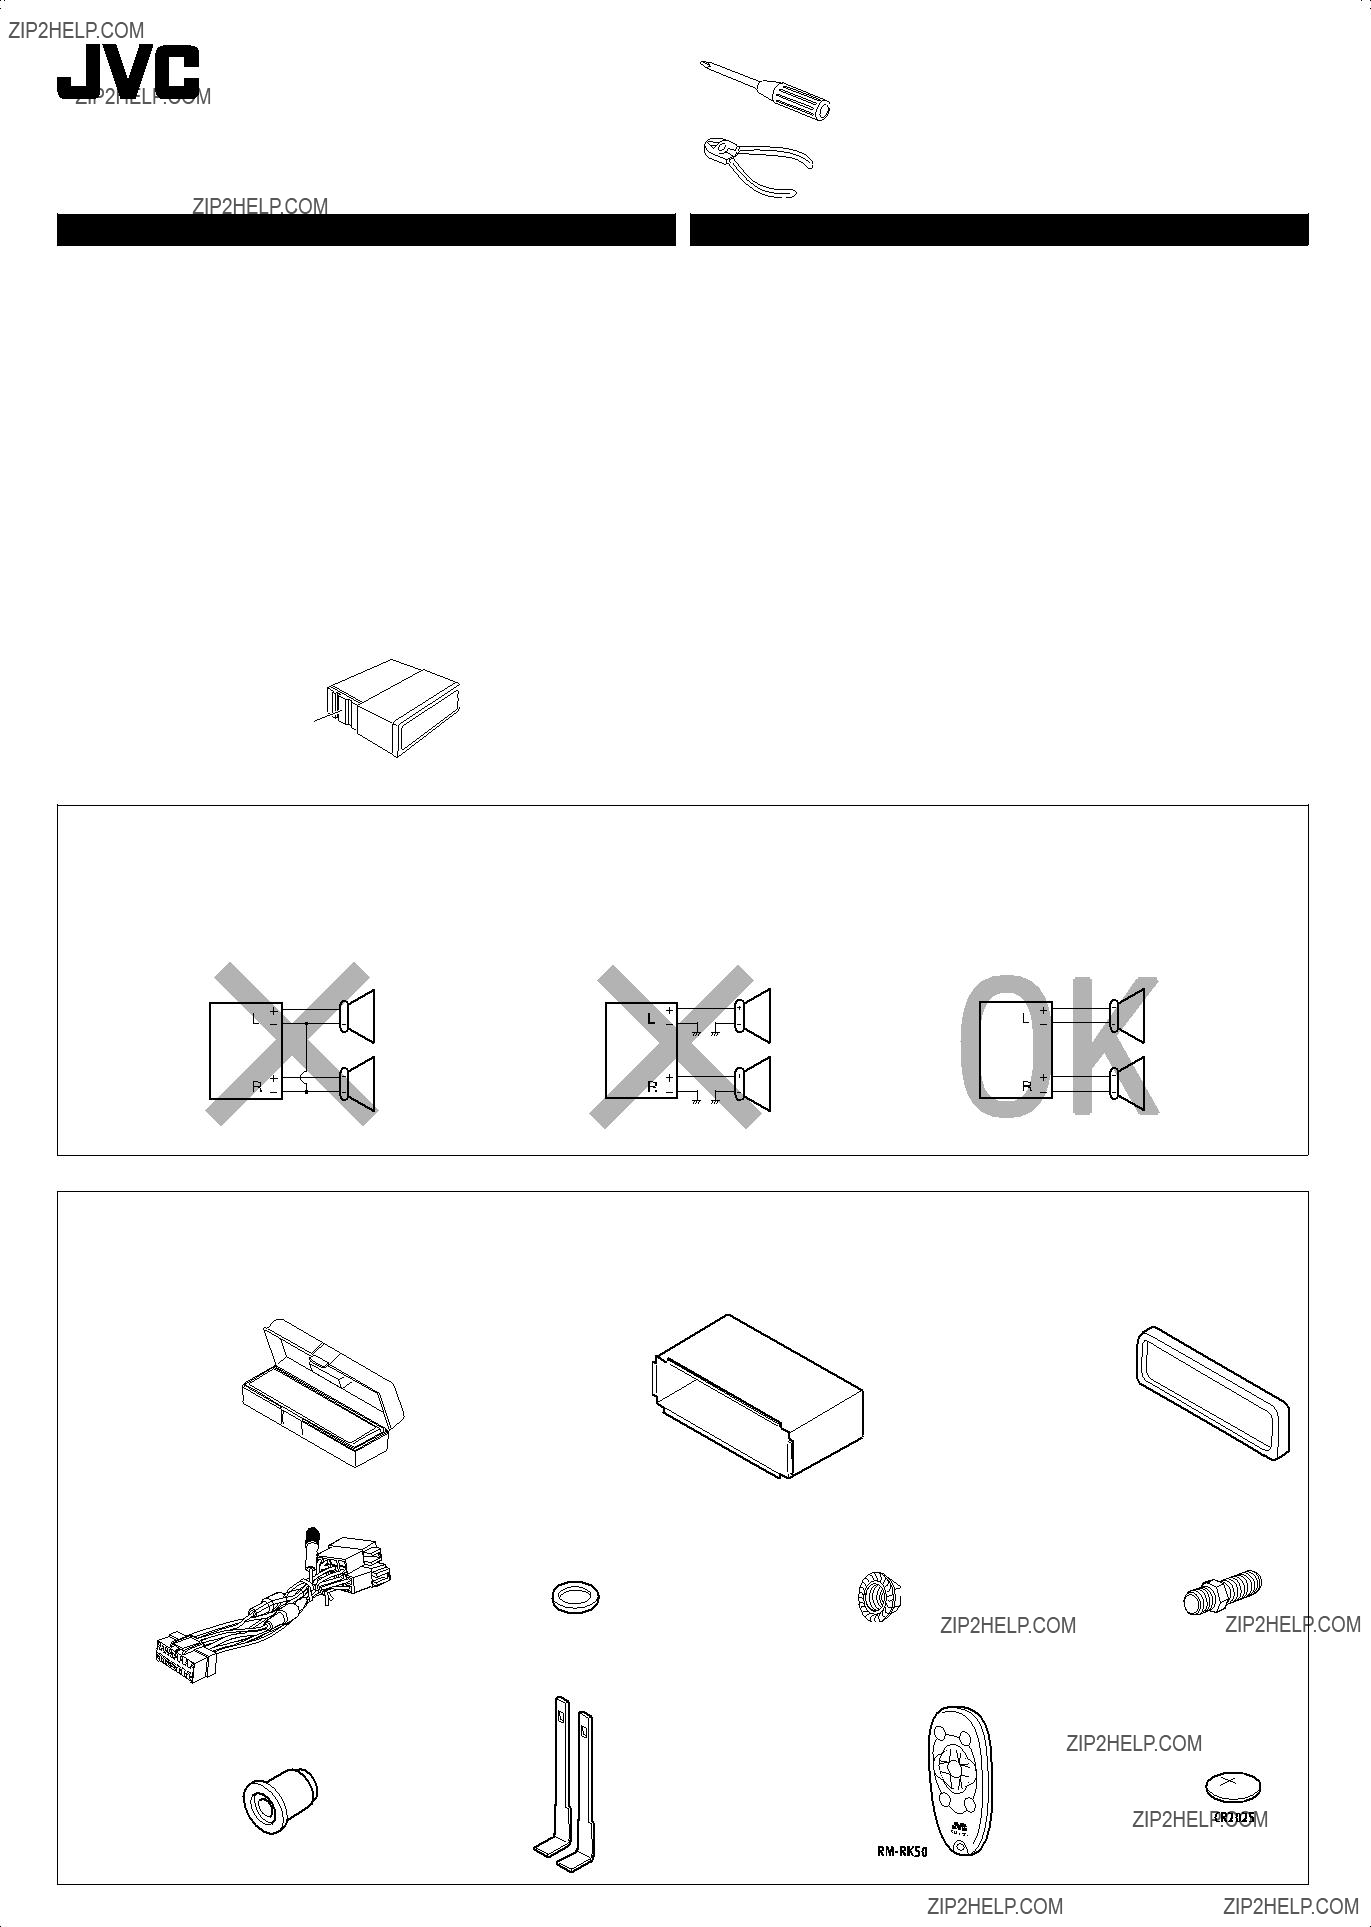
 Do the required electrical connections.
 )
) )
) )
) )
)
 An Lenkradfernbedienung (siehe Schaltplan
  )
) )
) )
) )
) )
) )
) )
) )
)


 How to reset your unit
 How to forcibly eject a disc
 How to use the MODE button
 How to read this manual
 :
:  : External CD changer operations. : External USB memory operations.
 How to detach/attach the control panel
 The lever comes out if you pressed the 0button while the panel is detached. If this happens, push the lever back into lock position before attaching the panel.
 (track/file),
  (folder)
 (disc),
  (folder), RPT (repeat)
 lights up for the selected item.
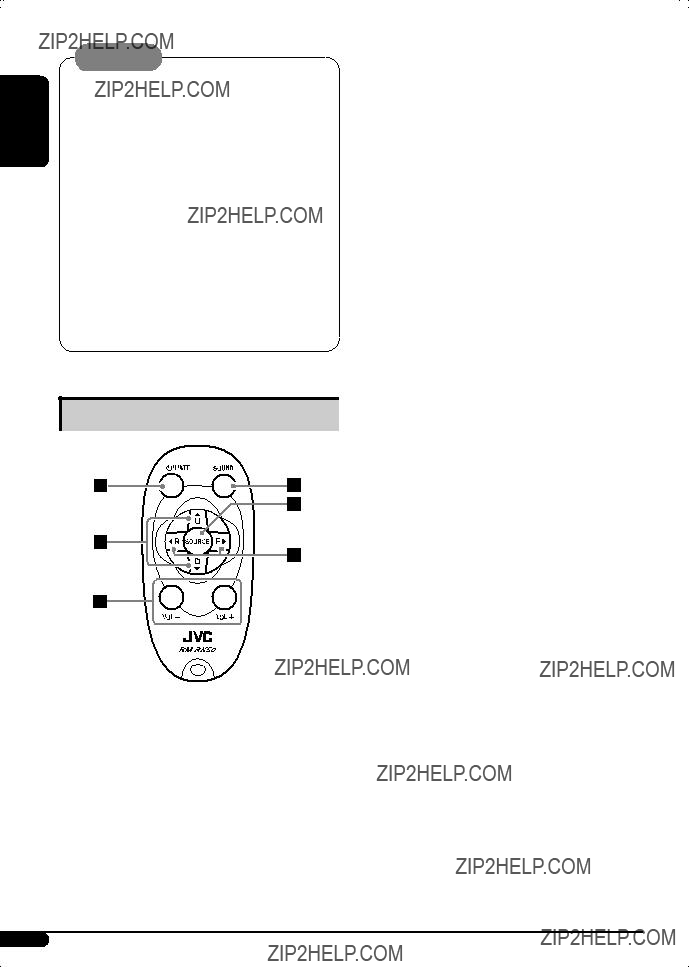

 (standby/on/attenuator)


 FM station automatic presetting??? SSM
 Manual presetting
 TA Standby Reception
 PTY Standby Reception


 For WMA tracks:


 Skipping tracks quickly during play

 Prohibiting disc ejection
 While playing an audio CD or a CD Text
 While playing an MP3/WMA

 : Elapsed playing time with the current track number

 : Clock with the current track number


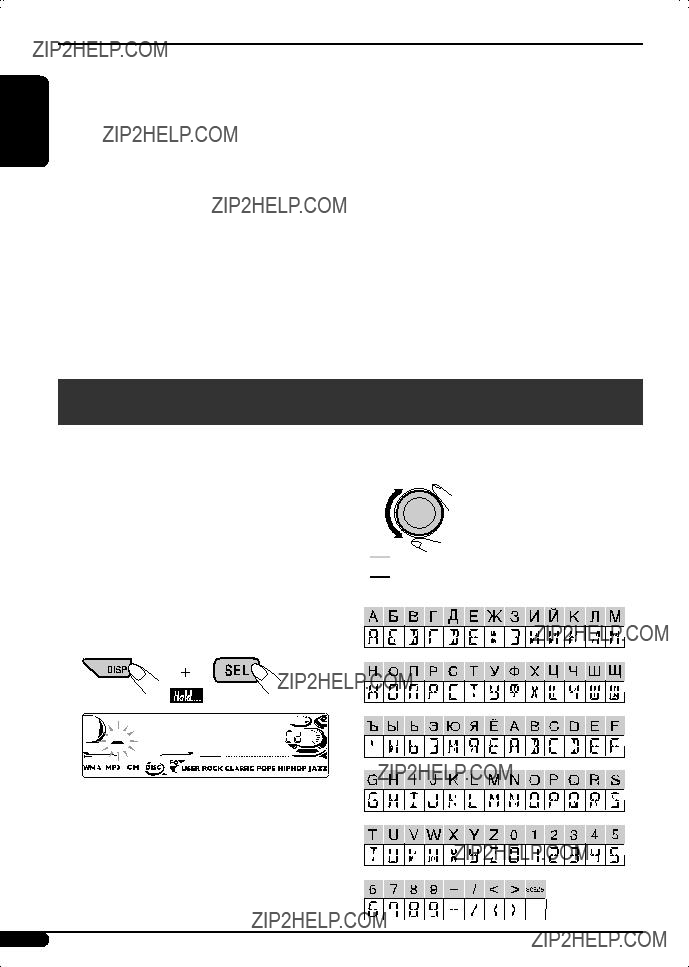
 Available characters
 Display indications
 4/??
4/?? can skip 10 items at a time.


 How to clean the connectors
 Moisture condensation
 How to handle discs
 To keep discs clean
 To play new discs

 AUDIO AMPLIFIER SECTION
 TUNER SECTION
 CD PLAYER/USB MEMORY SECTION
 GENERAL


 )
) )
) )
) )
) )
) )
)

 3.5 mm stereo mini plug