DVD DIGITAL CINEMA SYSTEM
Consists of
Consists of
INSTRUCTIONS
DVD DIGITAL CINEMA SYSTEM
Consists of
Consists of
INSTRUCTIONS

Warnings, Cautions and Others
IMPORTANT for the U.K.
DO NOT cut off the mains plug from this equipment. If the plug fitted is not suitable for the power points in your home or the cable is too short to reach a power point, then obtain an appropriate safety approved extension lead or consult your dealer.
BE SURE to replace the fuse only with an identical approved type, as originally fitted.
If nonetheless the mains plug is cut off ensure to remove the fuse and dispose of the plug immediately, to avoid a possible shock hazard by inadvertent connection to the mains supply.
If this product is not supplied fitted with a mains plug then follow the instructions given below:
IMPORTANT.
DO NOT make any connection to the terminal which is marked with the letter E or by the safety earth symbol or coloured green or
The wires in the mains lead on this product are coloured in accordance with the following code:
Blue: Neutral
Brown: Live
As these colours may not correspond with the coloured markings identifying the terminals in your plug proceed as follows:
The wire which is coloured blue must be connected to the terminal which is marked with the letter N or coloured black.
The wire which is coloured brown must be connected to the terminal which is marked with the letter L or coloured red.
IF IN DOUBT - CONSULT A COMPETENT ELECTRICIAN.
CAUTION
To reduce the risk of electrical shocks, fire, etc.:
1.Do not remove screws, covers or cabinet.
2.Do not expose this appliance to rain or moisture.
CAUTION ??? 
 button!
Disconnect the mains plug to shut the power off completely (the STANDBY lamp goes off).
The 
 button in any position does not disconnect the mains line.
???When the system is on standby, the STANDBY lamp lights red.
???When the system is turned on, the STANDBY lamp goes off. The power can be remote controlled.
CAUTION
The power supply to the subwoofer is linked to the center unit. The POWER ON lamp on the subwoofer lights green when the power is turned on.
CAUTION
???Do not block the ventilation openings or holes.
(If the ventilation openings or holes are blocked by a newspaper or cloth, etc., the heat may not be able to get out.)
???Do not place any naked flame sources, such as lighted candles, on the apparatus.
???When discarding batteries, environmental problems must be considered and local rules or laws governing the disposal of these batteries must be followed strictly.
???Do not expose this apparatus to rain, moisture, dripping or splashing and that no objects filled with liquids, such as vases, shall be placed on the apparatus.
IMPORTANT FOR LASER PRODUCTS
1.CLASS 1 LASER PRODUCT
2.CAUTION: Do not open the top cover. There are no user serviceable parts inside the unit; leave all servicing to qualified service personnel.
3.CAUTION: Visible and invisible laser radiation when open and interlock failed or defeated. Avoid direct exposure to beam.
4.REPRODUCTION OF LABEL: CAUTION LABEL,
PLACED INSIDE THE UNIT.
CAUTION!
To avoid personal injury or accidentally dropping the
unit, have two persons
the unit.

Warnings, Cautions and Others
Caution: Proper Ventilation
To avoid risk of electric shock and fire and to protect from damage, place the apparatus on a level surface. The minimal clearances are shown below:
Wall or obstructions
SAFETY INSTRUCTIONS
???SOME DOS AND DON???TS ON THE SAFE USE OF EQUIPMENT???
This equipment has been designed and manufactured to meet international safety standards but, like any electrical equipment, care must be taken if you are to obtain the best results and safety is to be assured.
Do read the operating instructions before you attempt to use the equipment.
Do ensure that all electrical connections (including the mains plug, extension leads and interconnections between pieces of equipment) are properly made and in accordance with the manufacturer???s instructions. Switch off and withdraw the mains plug when making or changing connections.
Do consult your dealer if you are ever in doubt about the installation, operation or safety of your equipment.
Do be careful with glass panels or doors on equipment.
DON???T continue to operate the equipment if you are in any doubt about it working normally, or if it is damaged in any way ??? switch off, withdraw the mains plug and consult your dealer.
DON???T remove any fixed cover as this may expose dangerous voltages.
DON???T leave equipment switched on when it is unattended unless it is specifically stated that it is designed for unattended operation or has a standby mode.
Switch off using the switch on the equipment and make sure that your family know how to do this. Special arrangements may need to be made for infirm or handicapped people.
DON???T use equipment such as personal stereos or radios so that you are distracted from the requirements of traffic safety. It is illegal to watch television whilst driving.
DON???T listen to headphones at high volume as such use can permanently damage your hearing.
DON???T obstruct the ventilation of the equipment, for example with curtains or soft furnishings.
Overheating will cause damage and shorten the life of the equipment.
DON???T use makeshift stands and NEVER fix legs with wood screws ??? to ensure complete safety always fit the manufacturer???s approved stand or legs with the fixings provided according to the instructions.
DON???T allow electrical equipment to be exposed to rain or moisture.
ABOVE ALL
???NEVER let anyone, especially children, push anything into holes, slots or any other opening in the case ??? this could result in a fatal electrical shock.;
???NEVER guess or take chances with electrical equipment of any kind ??? it is better to be safe than sorry!

Table of contents
1

Introduction
Notes on handling
7 Important cautions
Installation of the system
???Select a place which is level, dry and neither too hot nor too cold; between 5??C and 35??C.
???Leave sufficient distance between the system and the TV.
???Do not use the system in a place subject to vibration.
Power cord
???Do not handle the power cord with wet hands!
???A small amount of power is always consumed while the power cord is connected to the wall outlet (center unit only).
???When unplugging the power cord from the wall outlet, always pull on the plug, not the power cord.
To prevent malfunctions of the system
???There are no
???Do not insert any metallic object into the system.
???Do not use any
???Do not use a disc with tape, stickers, or paste on it, because it may damage the system.
Label sticker
Sticker 
Paste
Note about copyright laws
Check the copyright laws in your country before recording from the discs. Recording of copyrighted material may infringe copyright laws.
Note about copyguard system
The discs are protected by copyguard system. When you connect the system to your VCR directly, the copyguard system activates and the picture may not be played back correctly.
7 Safety precautions
Avoid moisture, water and dust
Do not place the system in moist or dusty places.
Avoid high temperatures
Do not expose the system to direct sunlight and do not place it near a heating device.
When you are away
When away on travel or for other reasons for an extended period of time, disconnect the power cord plugs from the wall outlet.
Do not block the vents
Blocking the vents may damage the system.
Care of the cabinet
When cleaning the system, use a soft cloth and follow the relevant instructions on the use of
If water gets inside the system
Turn the system off and disconnect the power cord plug from the wall outlet, then call the store where you made your purchase. Using the system in this condition may cause fire or electrical shock.
Supplied accessories
Check to be sure you have all of the supplied accessories.
The number in parentheses is the quantity of the pieces supplied. If anything is missing, contact your dealer immediately.
???Remote control (1)
???Batteries (2)
???FM antenna (1)
???AM (MW) loop antenna (1)
???Power cord (1)
???System cord (1)
???Speaker cords
For satellite (front left/right) and center speakers (3) For satellite speakers (surround left/right) (2)
???Screws
For satellite speakers (4)
???Bottom covers
For satellite speakers (front and surround) (4)
???Core filter (1)
2

About discs
Playable disc types
This system has been designed to play back the following discs:
???DVD Logo is a trademark of DVD Format/Logo Licensing Corporation.
???The
???This system accommodates the PAL system, and also can play discs recorded with NTSC system. Note that an NTSC video signal on a disc is converted to the PAL60 signal and output.
???On some DVD VIDEOs, DVD AUDIOs, VCDs or SVCDs, their actual operation may be different from what is explained in this manual. This is due to the disc programming and disc structure, not a malfunction of this system.
???Before playing back discs, read their instructions or cautions carefully.
Region code of DVD VIDEO
This system can play back DVD VIDEO discs whose Region Code numbers include the system???s Region Code, which is indicated on the rear panel.
Example of playable DVD:
If a DVD with an improper Region Code number is loaded, ???REGION CODE ERROR!??? appears on the TV screen and playback cannot start.
Notes on
???This system can also play finalized
???This system can also play
This system does not support
Notes on
???This system can also play
???This system supports
???This system cannot play ???packet write??? discs.
Some discs may not be played back because of their disc characteristics, recording conditions, or damage or stain on them.
Unplayable discs:
SACD,
Playing back these discs will generate noise and damage the speakers.
3

About discs
Notes on file types
For all playable files
???The system can only recognize and play files with one of the following extensions, which can be in any combination of upper and lower case;
MP3: ???.MP3???, ???.mp3???
WMA: ???.WMA??? , ???.wma???
JPEG: ???.JPG???, ???.JPEG???, ???.jpg???, ???.jpeg???
DivX: ???.DIVX???, ???.DIV???, ???.divx???, ???.div???, and ???.AVI???, ???.avi???
???The system recognizes up to 150 tracks (files) per group, 99 groups per disc, and the total number of the tracks (files) that the system can play is 4000.
???Some files may not be played back normally because of their disc characteristics or recording conditions.
For MP3/WMA files
???The system supports MP3/WMA files recorded with a bit rate of 32 ??? 320 kbps and a sampling frequency of 16 kHz, 22.05 kHz, 24 kHz*, 32 kHz, 44.1 kHz, or 48 kHz.
???If the tag information (album name, artist, and track title, etc.) is
recorded on a disc, it appears in the file control display on the TV screen. (A pg. 28)
???We recommend to record each piece of material (song) at a sample rate of 44.1 kHz and at a data transfer rate of
128 (96*) kbps.
*For WMA only
For JPEG files
???We recommend to record a file at 640 x 480 resolution.
???This system can only play baseline JPEG files.
For
???The system supports the types of the advanced simple profile as
???The system supports
For DivX files
???The system supports DivX 5.x, 4.x and 3.11.
???The system supports the DivX files whose resolution is 720 x 480 pixels or less (30 fps), and 720 x 576 pixels or less (25 fps).
???Audio stream should conform to MPEG 1 Audio
???The system does not support GMC (Global Motion Compression).
???The file encoded in the interlaced scanning mode may not be played back correctly.
???The system has its own Registration Code for DivX playback.
If necessary, you can confirm the Registration Code of your system using the OTHERS menu. (A pg. 38)
??????Official DivX CertifiedTM product???
???Plays DivX?? 5, DivX?? 4, DivX?? 3, and DivX?? VOD video content (in compliance with DivX CertifiedTM technical requirements)??? ???DivX, DivX Certified, and associated logos are trademarks of DivXNetworks, Inc. and are used under license.???
4

Description of parts and controls
The illustrations of the center unit, the subwoofer and satellite speakers used in this manual are of
Front panel (center unit)
Rear panel (center unit)
ANTENNA
AUX IN
5
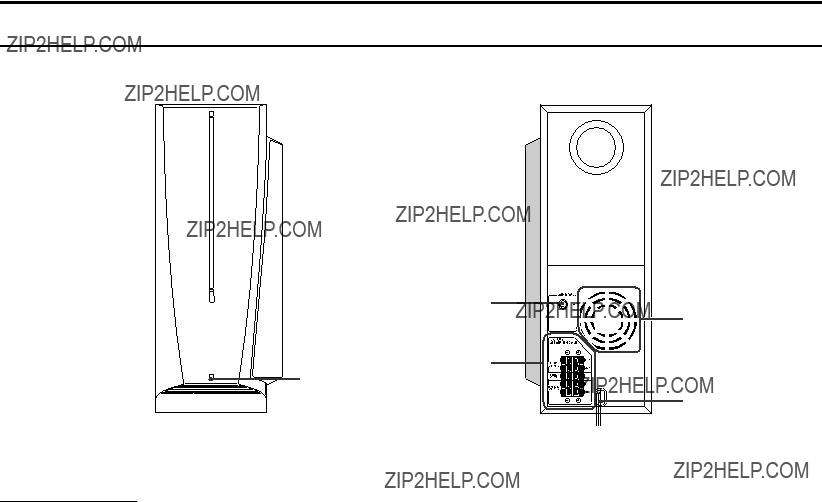
Description of parts and controls
Powered subwoofer
Do not block the ventilation openings.
Power cord:
pg. 13
NOTE
???For safety reasons, always ensure that there is sufficient space behind the powered subwoofer.
6
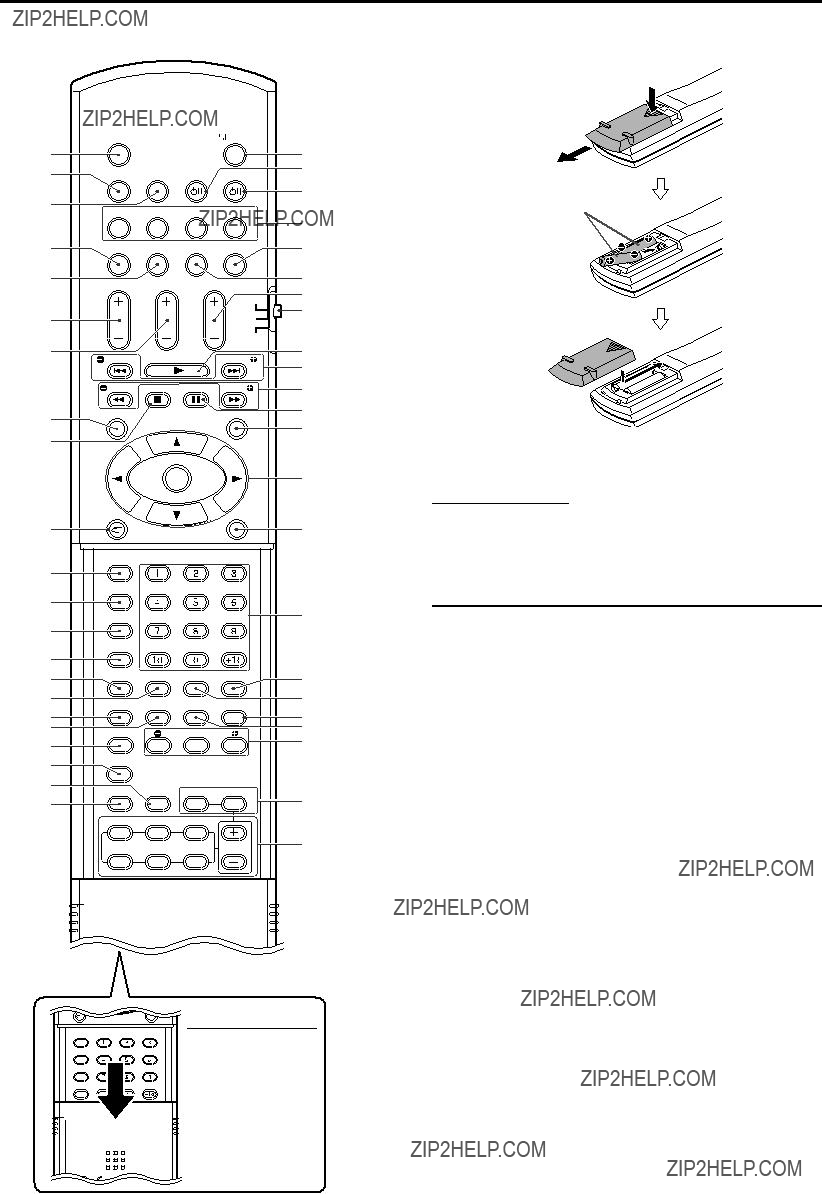
Description of parts and controls
VCR
pg. 14
pg. 16 pg. 14
pg. 15
pg. 17
pg. 21, 40
pg. 25
pg. 17
pg. 14 ??? 42
pg. 20 pg. 22, 39
pg. 22, 30 pg. 20, 40 pg. 27
pg. 18, 36
pg. 25
Number buttons:
pg. 22
pg. 32
pg. 32, 33 pg. 18, 31 pg. 27
pg. 41
pg. 18
pg. 18
R6P
If the range or effectiveness of the remote control decreases, replace both batteries.
CAUTION
??? Do not expose batteries to heat or flame.
Operating the system from the remote control
Aim the remote control directly to the front panel of the center unit.
??? Do not hide the remote sensor.
NOTE
???To use the buttons under the cover, slide down the cover.
7
Connections
Do not connect the power cord until all other connections have been made.
Connecting the FM and AM (MW) antennas
7 AM (MW) loop antenna
Setting up supplied AM (MW) loop antenna
If the antenna cord is covered with the insulation coat, twist and pull the insulation coat off and remove.
If reception is poor
Center unit
AM (MW) loop antenna
Outdoor single
7 FM antenna
Center unit
FM antenna (supplied)
Connecting AM (MW) loop antenna
1
Center unit
2
 Antenna cord
Extend the supplied FM antenna horizontally.
If reception is poor
Center unit
???Turn the loop antenna until you have the best reception during AM (MW) broadcast program reception.
NOTE
???Make sure the antenna conductors do not touch any other terminals, connecting cords and power cords. This could cause poor reception.
8
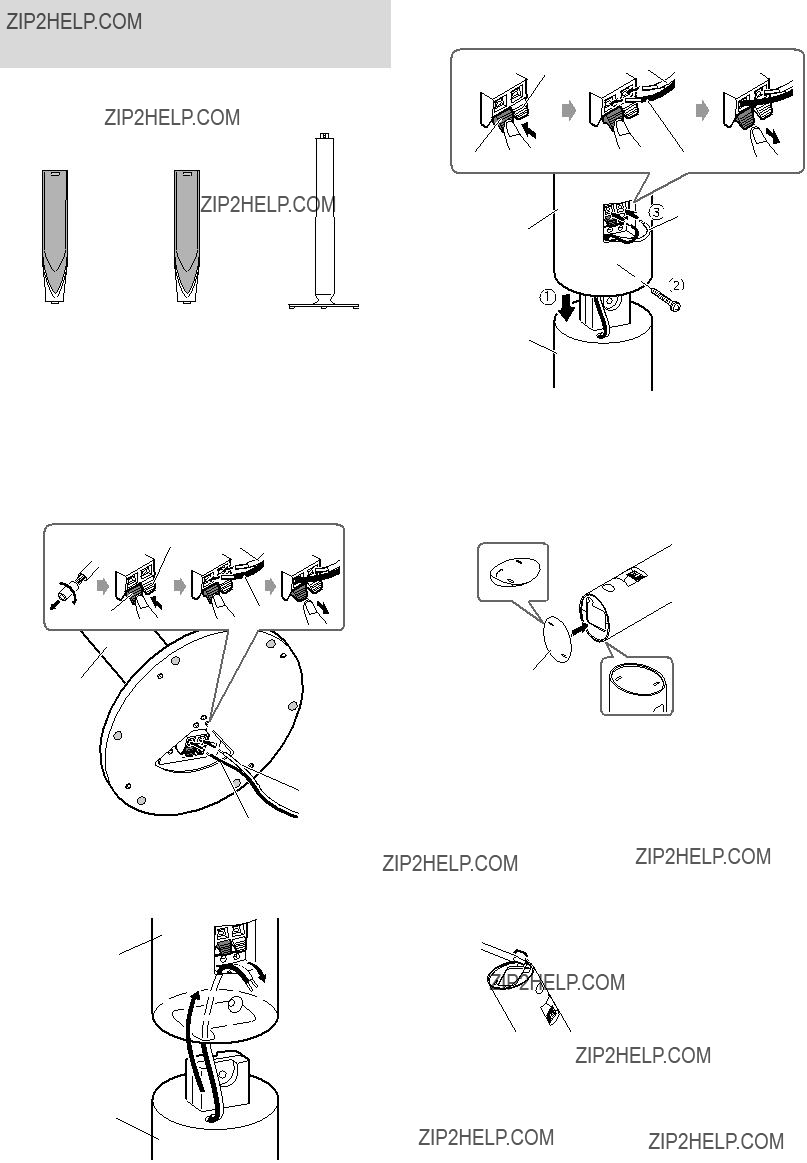
Assembling the front and surround speakers
3
RedWhite
The following procedure explains the front speaker assembly. The assembly of both the front and surround speakers are done in the same manner.
White
Speaker

 Black
Black
Screw (supplied)
Stand
Before assembling ???
???Prepare a Phillips screwdriver (not supplied).
???Take care not to drop any component part while assembling; otherwise, it may cause damage to the floor or injury.
1
Stand
White
Black
2
Speaker
Stand
When installing the front and surround speakers on the wall;
???Attach the supplied bottom cover on the bottom of each speakers as illustrated.
Bottom
cover
???Be sure to have them installed on the wall by a qualified personnel.
???DO NOT install the satellite speakers on the wall by yourself to avoid unexpected damage from their falling off the wall due to incorrect installation or weakness in wall structure.
???Care must be taken in selecting a location for speaker installation on a wall. Injury to personnel or damage to equipment may result if the speakers installed interfere with daily activities.
???If attaching the stand to the speaker, remove the bottom cover by inserting a
9

Connecting the satellite (front, center, surround) speakers
Before connecting the speaker cords;
Twist and pull the insulation coat off and remove.
Red
Black
CAUTION
???When you connect speakers other than the supplied ones, use speakers of the same speaker impedance (SPEAKER IMPEDANCE) indicated near the speaker terminals on the rear of the powered subwoofer.
???DO NOT connect more than one speaker to one speaker terminal.
Precautions for daily use
???When moving the speakers, do not pull the speaker cords; otherwise, the speakers may fall over, causing damage or injury.
???When holding a speaker, always grasp the lower portion.
???Do not lean against the speakers, as the speakers could fall down or break, possibly causing an injury. Especially be careful that children do not lean against them.
???Do not reproduce sounds at so high a volume that they are distorted; otherwise, the speakers may be damaged by internal heat buildup.
10
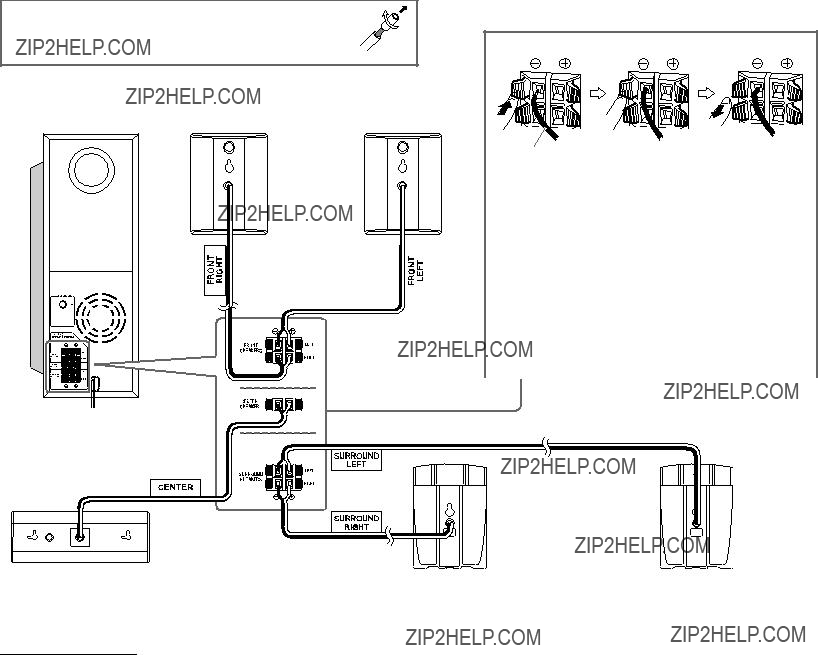
The satellite speakers are equipped with their speaker cords attached directly to their speaker unit instead of having speaker terminals on their cabinet.
Before connecting the speaker cords;
Twist and pull the insulation coat off and remove.
Front speakers
Speaker cord
???Connect the black cords to the black (r) terminals.
???Connect the white cords to the (q) terminals referring to the table below:
Powered subwoofer
Center speaker
CAUTION
???When you connect speakers other than the supplied ones, use speakers of the same speaker impedance (SPEAKER IMPEDANCE) indicated near the speaker terminals on the rear of the powered subwoofer.
???DO NOT connect more than one speaker to one speaker terminal.
Surround speakers
Precautions for daily use
???When moving the speakers, do not pull the speaker cords; otherwise, the speakers may fall over, causing damage or injury.
???Do not reproduce sounds at so high a volume that they are distorted; otherwise, the speakers may be damaged by internal heat buildup.
11

Speaker layout
Powered subwoofer
???Place the satellite speakers on a flat and level surface.
???The front and center speakers are magnetically shielded to avoid color distortions on TVs. However, if not installed properly, they may cause color distortions. So, pay attention to the following when installing the speakers.
???When placing the speakers near a TV set, turn off the TV???s main power switch or unplug it before installing the speakers. Then wait at least 30 minutes before turning on the TV???s main power switch again.
Some TVs may still be affected even though you have followed the above. If this happens, move the speakers away from the TV.
???The surround speakers are not magnetically shielded.
If it is located nearby the TV or monitor, it will probably cause color distortion on the screen. To avoid this, do not place the speaker nearby the TV or monitor.
???Be sure to place the powered subwoofer to the TV???s right. If you place the powered subwoofer to the TV???s left, keep sufficient distance between them to prevent the TV screen from appearing mottled.
Connecting a TV
???Distortion of picture may occur when connecting to the TV via a VCR, or to a TV with a
???You need to set ???MONITOR TYPE??? in the PICTURE menu correctly according to the aspect ratio of your TV. (A pg. 37)
7To connect a TV equipped with the component video input jacks
To component video input
Component video cord (not supplied)
NOTE
???If your TV supports progressive video input, you can enjoy a high
quality picture by setting the progressive scan mode to active. (A pg. 18)
???If the component video input jacks of your TV are of the BNC type, use a plug adapter (not supplied) to convert the pin plugs to BNC plugs.
???The component video signals can be output only when you select ???DVD??? as the source to play. (A pg. 17)
7 To connect a TV with the SCART connector
Center unit
TV
AV
To SCART connector*
SCART cable (not supplied)
*Some TV???s SCART connectors output audio signal. In such a case, you can enjoy the TV sound through this system.
NOTE
???No sound signal comes out from ???AV??? (SCART) connector.
???Select the appropriate scan mode according to your TV. See ???Changing the scan mode??? (A pg. 18).
12

Connecting the powered subwoofer
Connecting to an analog component
You can enjoy the sound of an analog component.
Center unit
LEFT
RIGHT
AUX IN
 RCA pin plug cord (not supplied)
To audio output
VCR
TV
Cassette recorder
NOTE
???If you connect a
???When playing a video component such as a VCR;
???To listen to the sound, select ???AUX??? as the source to play. (A pg. 17)
???To see the picture, connect the video output jack of the component to the video input jack of the TV directly, and select the correct input mode on the TV.
Connecting to a digital component
You can enjoy the sound of a digital component.
Center unit
* DBS = Direct Broadcasting Satellite
NOTE
When playing a video component such as a DBS tuner;
???To listen to the sound, select ???AUX D??? as the source to play. (A pg. 17)
???To see the picture, connect the video output jack of the component to the video input jack of the TV directly, and select the correct input mode on the TV.
Connecting the power cord
Make sure that all other connections have been completed.
Plug into AC outlets.
CAUTION
???Disconnect the power cord before cleaning or moving the system.
???Do not pull on the power cord to unplug the cord. When unplugging the cord, always grasp and pull the plug so as not to damage the cord.
13

Operating external components with the remote control
The buttons described below are used on pages 14 and 15.
TV 
 Remote control
VCR mode selector
(play button)
ENTER
REC
Number buttons
NOTE
???Manufacturers??? codes are subject to change without notice.
???Set the codes again after replacing the batteries of the remote control.
Operating the TV
7 To set the manufacturer???s code
You can operate a JVC TV without setting the manufacturer???s code.
1 Slide the remote control mode selector to TV.
2 Press and hold 
 TV.
TV.
Keep the button pressed until step 4 is finished.
3 Press ENTER.
4 Press number buttons
Examples:
For a Hitachi TV:
Press 0, then 7.
For a Toshiba TV:
Press 2, then 9.
5 Release 
 TV.
TV.
If there is more than one code listed for corresponding brand, try each one until you enter the correct one.
7 Operation
Aim the remote control at the TV.
IMPORTANT
14

Operating external components with the remote control
See page 14 for button locations.
Operating the VCR
7 To set the manufacturer???s code
You can operate a JVC VCR without setting the manufacturer???s code.
1 Slide the remote control mode selector to VCR.
2 Press and hold 
 VCR.
VCR.
Keep the button pressed until step 4 is finished.
3 Press ENTER.
4 Press number buttons
Examples:
For a Panasonic VCR:
Press 2, then 1.
For a Philips VCR:
Press 0, then 5.
5 Release 
 VCR.
VCR.
If there is more than one code listed for your brand, try each one until you enter the correct one.
7 Operation
Aim the remote control at the VCR.
IMPORTANT
Before using the remote control to operate a VCR; Set the remote control mode selector to VCR.
recording.
CHANNEL
15

Basic operations
The buttons on the remote control are used to explain most of the operations in this manual. You can use the buttons on the center unit same as on the remote control for operations unless otherwise noted.
IMPORTANT
Before using the remote control for the following operation;
??? Set the remote control mode selector to AUDIO.
The buttons described below are used on pages 16 to 19.
AUDIO VOL
AUDIO
Remote control mode selector
Turning the system on/off
On the remote control:
Press 
 AUDIO.
On the center unit:
Press 
 .
.
When DVD is selected as the source (A pg. 17), the following messages will appear on the TV screen.
Cursor
(3/2/Y/5)/
ENTER
Speaker
buttons
BASS/
LEVEL

NOTE
???The STANDBY lamp turns on when the power is turned off and turns off when the power is turned on.
???The power supply to the subwoofer is linked to the center unit. The POWER ON lamp on the subwoofer lights green when the power is turned on.
???A small amount of the power is consumed even when the power is turned off (center unit only). This is called standby mode and the STANDBY lamp lights in this mode. Unplug the power cord from the AC outlet to turn the power off completely.
???You can also turn on the system by pressing the following buttons;
???OPEN/CLOSE on the remote control or 0on the center unit
???One of the source selecting buttons on the remote control
???3on the center unit. You can use the same buttons on the remote control.
STANDBY
PHONES
16

Basic operations
See page 16 for button locations.
Selecting the source to play
On the remote control:
Press one of the source selecting buttons (DVD, FM/AM, AUX or TV SOUND).
DVD: To play back a disc (DVD VIDEO, VCD etc.). (A pg. 20)
FM/AM: To tune in an FM or AM (MW) station. (A pg. 39) Each time you press the button, the band alternates between FM and AM (MW).
AUX: To select the source from a component connected to the AUX IN jacks or DIGITAL IN jack. (A pg. 13) Each time you press the button, the source alternates between ???AUX??? and ???AUX D???.
TV SOUND: To select the TV (that outputs sound signals) connected to the AV (SCART) connector. (A pg. 12)
On the center unit:
Press SOURCE repeatedly until the source name you want appears on the display window.
NOTE
???When a source except DVD is selected, this system does not output video signals.
???It may take time to change the source.
Adjusting the volume [VOLUME]
CAUTION
???Always set the volume to minimum level before starting any source. If the volume is set at its high level, the sudden blast of sound could permanently damage your hearing and/or blow out the speakers.
On the remote control:
Press AUDIO VOL
On the center unit:
Press VOLUME
Listening with headphones (not supplied)
CAUTION
Be sure to turn down the volume;
???Before connecting or putting on headphones as high volume may damage both the headphones and your hearing.
???Before disconnecting headphones as high volume may be suddenly output from the speakers.
While connecting a pair of headphones to the PHONES jack on the center unit, the system automatically cancels the surround mode (A pg. 24) currently selected, deactivates the speakers, turns the subwoofer???s power off, and activates the headphone mode. ???H. PHONE??? appears on the display window.
Headphone mode
When using the headphones, the following signals are output regardless of your speaker setting;
???For 2 channel sources, the front left and right channel signals are output from the headphones.
???
???(For DVD AUDIO) When the disc prohibits
Turning off the sound temporarily [MUTING]
Press MUTING.
To restore the sound
Perform one on the following:
???Press MUTING again.
???Press AUDIO VOL +/??? (or press VOLUME +/??? on the center unit).
Adjusting the brightness of the indications [DIMMER]
Press DIMMER.
Each time you press the button, the brightness level changes.
17
Basic operations
See page 16 for button locations.
Sleep Timer [SLEEP]
The system turns off automatically when the specified period of time has passed.
Press SLEEP.
Each time you press the button, the
Example:
minutes
To check the remaining time
Press SLEEP once.
To change the remaining time
Press SLEEP repeatedly.
To cancel
Press SLEEP repeatedly until ???SLEEP ???
??? Turning off the power also cancels the Sleep Timer.
Adjusting the output level of the subwoofer and speakers
Press each speaker button you want to adjust the output level and then LEVEL
???FRONT L: Front Left speaker
???FRONT R: Front Right speaker
???SURR. L: Surround Left speaker
???SURR. R: Surround Right speaker
NOTE
???You can also make adjustments by using the setup menu shown on the TV screen. (A pg. 37)
???The adjustments take effect for all sources.
???You cannot make this adjustment when FM or AM is selected as the source and ???SURR OFF??? is selected as the surround mode.
Adjusting the treble sound [TREBLE]
Press TREBLE and then LEVEL
NOTE
??? The adjustments take effect for all sources.
Adjusting the bass sound [BASS]
Press BASS and then LEVEL
NOTE
??? The adjustments take effect for all sources.
Changing the scan mode
The system can be accommodated to your TV???s scan mode.
NOTE
???To use the system in PROGRESSIVE mode, it is required that the
center unit is connected to the TV by using a component video cord (not supplied). (A pg. 12)
7 While DVD is selected as the source and stopped
1 Press and hold SCAN MODE for
2 seconds.
???RGB???, ???Y/C???, or ???PROGRESS??? appears on the display window.
2 Press Cursor 3/2to select the desired mode.
video input.
You can get better picture quality in the order ??? ???PROGRESSIVE??? > ???RGB??? > ???Y/C??? > Composite.
3 Press ENTER while the selected mode is displayed.
When ???PROGRESS??? is selected, the PROGRESSIVE indicator lights on the display window.
NOTE
???Although the picture may be distorted when you press ENTER, this is not a malfunction of the system.
??????RGB??? is selected at your purchase.
???There are some progressive TVs and
???All JVC progressive TVs and
18
Basic operations
See page 16 for button locations.
Optimizing the speaker settings [Smart Surround Setup]
NOTE
???When you change the positioning of the speakers or listener, or replace the supplied speakers with other ones, perform Smart Surround Setup again.
7 While DVD is selected as the source and stopped
1 Take your position where you listen to the sound.
2 Press and hold SMART S. SETUP.
???SETTING??? appears on the display window.
3 Clap your hands over your head once.
4 Make sure that ???COMPLETED !??? appears on the TV screen, then press
SMART S. SETUP.
The system detects your clapping sound through the satellite speakers, then automatically makes the best settings for each speaker. ???COMPLETED !??? appears on the TV screen when Smart Surround Setup completes.
When ???FAILED !??? appears on the TV screen
The system could not detect the clapping sound correctly. In such a case, follow the instructions that appear on the TV screen.
???When the system detects the clapping sound as ???FAILED !??? three
times, set the delay time (DELAY) and the output level (LEVEL) manually. (A pg. 37)
To cancel
Press SMART S. SETUP.
NOTE
???You need to set the subwoofer???s output level (LEVEL) manually. (A pg. 18)
???In step 2, ???SW ERROR??? appears on the display window if the center unit and the powered subwoofer are not connected correctly by using the supplied system cord.
19
Playback
???The icon such as  VIDEODVD shows the disc formats or file types the operation is available for.
IMPORTANT
Before using the remote control for the following operation;
1 Set the remote control mode selector to
AUDIO.
2 Press DVD.
The buttons described below are used on pages 20 to 23.
OPEN/CLOSE
DVD
FL DISP.
Basic playback
3 Press 3(play button).
(play button)
TOP MENU/PG
For MP3/WMA files
The file control display (A pg. 28) appears on the TV screen.
For JPEG files
Each file (still pictures) is shown on the TV screen for about 3 seconds
For
Pressing TOP MENU/PG or MENU/PL shows the file control display (A pg. 28) on the TV screen during playback.
For DivX files
During a readout time, ???READING INDEX??? may appear on the TV screen.
Pressing TOP MENU/PG or MENU/PL shows the file control display (A pg. 28) on the TV screen during playback.
For DVD VR disc
Pressing TOP MENU/PG or MENU/PL shows the control display on the TV screen. (A pg. 23)
7 To pause playback
Press 8.
To return to playback, press 3(play button).
7To stop
Press 7.
7
During DVD VIDEO playback, the following guide icons may appear for a while on the TV screen;
??? : appears at the beginning of a scene containing multi- subtitle languages.
??? : appears at the beginning of a scene containing
??? : appears at the beginning of a scene containing
??? (Play),
  (Pause),
  /
/ (Fast forward/
Continued on next page
20

Playback
See page 20 for button locations.
NOTE
???(For JPEG) The system cannot accept operations even though you press any buttons before the entire picture appears on the TV screen.
???If you do not want the
7 Playback information on the display window
DVD VIDEO
Example:
When a DVD VIDEO encoded with Dolby Digital 5.1ch is played
Signal and speaker indicators (A pg. 25) Surround mode and digital signal format (A pg. 25)
Pressing FL DISP.
SURR T 1 5. C 2 4
DVD AUDIO
VCD/SVCD/CD
Example:
When a CD is played back
Elapsed playing time (minute:second)
NOTE
???When a VCD or SVCD with PBC function is played, the elapsed playing time does not appear, but ???PBC??? appears.
MP3/WMA file
Example:
When an MP3 is played back
Pressing FL DISP.
Group number
G 1 2. T 1 2 3
MP3
Track number
*1 WMA indicator lights for WMA disc.
JPEG file
File number
1 2 3. J P E G
Pressing FL DISP. twice
G 1 2. F 1 2 3
Example:
When an
Track number
1 2 3. 1 0: 3 1
Elapsed playing time (minute:second) (during playback only)
Pressing FL DISP.
G 1 2. T 1 2 3
Signal and speaker indicators
21

Playback
See page 20 for button locations.
DVD VR disc
Example:
During playback on the Original program*
Example:
During playback on the Playlist*
*Pressing TOP MENU/PG or MENU/PL, you can change the play mode. (A pg. 23)
NOTE
???You can change the time information mode (except for MP3/WMA/
???You can also check the playback information on the TV screen. (A pg. 25)
7 Screen saver
A TV screen may burn out if a static picture is displayed for a long time. To prevent this, the system automatically dims the screen if a static picture is displayed for over 5 minutes (the screen saver function).
???Pressing any button will cancel the screen saver function.
???If you do not want to use the screen saver function, see page 37.
One Touch Replay
To return to normal speed playback
Press 3(play button).
Press and hold xor 4.
Continuously pressing xor 4increases the
NOTE
???When a DVD VIDEO, DVD VR, VCD, SVCD or
???When a DVD AUDIO or CD is played back, sound is intermittent and low during
???This feature may not work for some discs.
Skip to the beginning of a desired selection
During playback without PBC function
For DVD
Press xor 4repeatedly.
NOTE
???When playing back an MP3/JPEG file, you can make operations using the file control display. (A pg. 28)
???When playing back a DivX file, pressing Cursor 3/2may skip the scene a few minutes forward/backward.
???This feature may not work for some discs.
7Using number buttons on the remote control
7For DVD VIDEO/DVD VR (title, chapter):
While stopped, the title number is selected. During playback, the chapter number is selected.
For DVD AUDIO (track): During playback or while stopped For VCD/SVCD (track):
During playback without PBC function
For
You can move back the playback position by 10 seconds from the current position.
7 During playback
On the remote control:
Press .
NOTE
DVD DVD
VIDEO VR
Press number buttons
???For details on using the number buttons, see ???How to use the number buttons??? below.
How to use the number buttons
???This function works in the same title.
???This function is not available during the repeat playback.
???This feature may not work for some discs.
22

Playback
See page 20 for button locations.
Locating a desired title/ group using number buttons
7 During playback or while stopped
1 Press TITLE/GROUP.
???_ _??? or ???_??? is shown in the title/group display area in the display window.
Example:
During DVD VIDEO playback
_ _. 1: 2 3: 4 5
2 While the display window shows ???_ _??? or ???_???, use number buttons
The system starts playback from the first chapter/track/file of the selected title/group.
???For details on using the number buttons, see ???How to use the number buttons??? (A pg. 22).
NOTE
??? This feature may not work for some discs.
Playing back a bonus group
Some DVD AUDIOs have a special group called ???bonus group??? whose contents are not open to the public. The bonus group is always assigned to the last group of a disc.
To play back a bonus group, you have to enter the specific ???key number??? (a password). The way of getting the key number depends on the disc. After getting the key number, you can play back the bonus group by following the procedure below.
7 While the BONUS indicator lights up on the display window
1 Select the bonus group.
For selecting the group, see ???Locating a desired title/group using number buttons??? described above.
The key number entry indication appears.
On the TV
On the display window
K E. Y : _ _: _ _
BONUS
2 Press number buttons
When you enter the correct key number, playback starts and the BONUS indicator goes off.
??? If you enter the wrong number, reenter the correct number.
To clear the key number entry
Perform whichever one of the following:
???Open the disc tray.
???Turn off the system.
Selecting the desired title/playlist from the control display
7 During playback or while stopped.
1 Press TOP MENU/PG or MENU/PL.
The control display is shown on the TV screen, and the system starts playback of the first title/playlist.
???The PLAY LIST is shown only when the playlist is on the DVD VR disc.
TOP MENU/PG: shows the ORIGINAL PROGRAM. Example:
*1: Title number
*2: Recording date
*3: Recording source (TV station, the input terminal of the recording equipment etc.)
*4: Start time of recording
*5: Title of the original program/playlist (The title may not be displayed depending on the recording equipment.)
*6: Current title
MENU/PL: shows the PLAY LIST.
Example:
*7 *8 *9 *10*5*11
*7: Playlist number
*8: Creating date of playlists
*9: Number of chapters *10:Total playing time *11:Current playlist
2 Press Y/5to select the desired title/ playlist.
The system starts playback of the selected title/playlist.
To clear the control display
??? Press ENTER.
About the play mode on a DVD VR disc
???Original program (ORIGINAL PROGRAM):
The system can play back the original picture in the recorded order.
???Playlist (PLAY LIST):
The system can play back the playlist edited by the recording equipment.
23

Advanced operations
??? The icon such as DVD shows the disc formats or file types the
VIDEO
operation is available for.
IMPORTANT
Before using the remote control for the following operation;
??? Set the remote control mode selector to AUDIO.
???There are exceptions in the operation mentioned above. In such a case, follow each instruction.
The buttons described below are used on pages 24 to 35.
Using the surround mode
7 Auto Surround (AUTO SUR)
Used to reproduce the sound as it is recorded without any conversion (downmixing or simulation, etc.). For example, a multichannel source is automatically reproduced in multichannel audio.
7 Dolby Surround
Dolby Pro Logic II*1
(play button)
SLOW / 


 /PG
/PG
Cursor
(3/2/Y/5)/
ENTER
Remote control mode selector
/PL
Number buttons
Dolby Pro Logic II has a newly developed multichannel playback format to decode all 2 channel sources ??? stereo source and Dolby Surround encoded source ??? into a 5.1 channel.
Dolby Pro Logic II has two modes ??? Movie mode and Music mode:
??? Pro Logic II Movie (MOVIE)
Suitable for reproduction of Dolby Surround encoded sources bearing the mark 

 .
.
??? Pro Logic II Music (MUSIC)
Suitable for reproduction of any 2 channel stereo music sources.
Dolby Digital*1
Used to reproduce multichannel soundtracks of the software encoded with Dolby Digital ( ).
).
7 DTS Digital Surround*2
Used to reproduce multichannel soundtracks of the software encoded with DTS Digital Surround ( ).
).
DTS Digital Surround (DTS) is another discrete multichannel digital audio format available on CD and DVD software.
Available Surround modes for each input signal
The B marks show available surround modes.
*1
*2
*3
Manufactured under license from Dolby Laboratories. ???Dolby???, ???Pro Logic???, ???MLP Lossless???, and the
???DTS??? and ???DTS Digital Surround??? are registered trademarks of Digital Theater Systems, Inc.
You can select these modes by pressing
SURROUND.
(A pg. 25)
Continued on next page
24

Advanced operations
See page 24 for button locations.
7 All Channel Stereo (DSP)
All Channel Stereo (ALL ST) mode can reproduce a larger stereo sound field using all the connected (and activated) speakers.
All Channel Stereo can be used while reproducing 2 channel stereo source.
7 Indicators on the display window
Digital signal format indicators
Dolby Surround/DSP mode indicators
GPLII, SURR: Lights when Dolby Pro Logic II mode is activated.
SURR: Lights when All Channel Stereo mode is activated.
Source signal indicators, etc.
Light to indicate the incoming signals. a: Lights when the left channel signal comes
in.
b: Lights when the center channel signal comes in.
c: Lights when the right channel signal comes in.
d: Lights when the LFE channel signal comes in.
g: Lights when the surround left channel signal comes in.
i: Lights when the surround right channel signal comes in.
h: Lights when the monaural surround channel signal or 2 channel Dolby Surround signal comes in.
SW : Always lights.
The channel with ???  ??? shows that the corresponding speakers are reproducing the channels??? sound.
If the channels??? sound decoded into 5.1 channel is reproduced, only ???  ??? lights.
Selecting the surround mode
The system is set up to automatically select the optimal surround mode for input signal from digital multichannel software.
When playing back 2 channel source, you can select the desired surround mode manually.
IMPORTANT
Before using the remote control for the following operation;
??? Set the remote control mode selector to AUDIO.
7 When playing back digital multichannel software (except during SURR OFF mode)
The appropriate multichannel surround mode (DOLBY D, DTS Digital Surround or Linear/Packed PCM) is automatically selected.
7 When playing back 2 channel source
You can select either mode of Dolby Pro Logic II (MOVIE/ MUSIC) or the DSP (ALL ST) mode.
Press SURROUND repeatedly to select the desired mode.
The surround mode is turned on and the current surround mode appears on the display window.
Each time you press the button, the surround mode changes.
For details on each mode, see page 24.
To turn off the surround mode
Press SURROUND repeatedly until SURR OFF appears on the display window.
Storing adjustments ??? auto memory
When you turn the power off, the system memorizes the current surround mode. The memorized mode is automatically recalled when you turn the power on.
NOTE
???When FM or AM is selected as the source, you can select All Channel Stereo (ALL ST) and SURR OFF mode.
???Note that the surround mode takes no effect on
???For a
Using the
You can check disc information and you can use some functions using the
Showing the
Press ON SCREEN.
changes as follows on the TV screen. Example:
During DVD VIDEO playback
Dolby D 2/0 . 0ch
Dolby D 2/0 . 0ch
OFF
(The
(back to the beginning)
??? The currently selected item shows green.
25

Advanced operations
See page 24 for button locations.
7 Contents of the
DVD VIDEO
Dolby D 2/0 . 0ch
DVD AUDIO
Dolby D 2/0 . 0ch
VCD
SVCD
CD
* 7 ??? N are not available.
DVD VR disc*
AShows disc type.
BShows audio information.
CShows current title (for DVD VIDEO), group (for DVD AUDIO) number or play mode (for DVD VR).
DShows current chapter number (for DVD VIDEO and DVD VR) or track number (for other type of discs).
EShows time information. See ???Changing the time information???.
F Shows playback status.
 : appears during playback.
 /
/  : appears during fast forward/reverse.
 /
/  : appears during playback in forward
 : appears when paused.
  : appears when stopped.
GSelect this to change time information (E). See ???Changing the time information??? below.
HSelect this for Repeat Playback. (A pg. 33)
ISelect this for time search function. (A pg. 28)
JSelect this for chapter (for DVD VIDEO and DVD VR) or track (for DVD AUDIO) search function. (A pg. 27)
KSelect this to change audio language, channel, or stream. (A pg. 30)
LSelect this to change subtitle language and subpicture. (A pg. 29)
MSelect this to change view angle. (A pg. 29)
NSelect this to change the page. (A pg. 31)
OShows Playback Mode status.
PROGRAM: appears during Program Playback. (A pg. 32)
RANDOM: appears during Random Playback. (A pg. 33)
PShows Repeat Mode status. (A pg. 33)
Changing the time information
You can change the time information in the on-
DVD DVD DVD
screen bar on the TV screen and the display VIDEO AUDIO VR window of the center unit.
7 During playback
1 Press ON SCREEN twice.
The
2 Press Cursor 3/2to highlight  .
.
3 Press ENTER repeatedly to select the desired information.
Example:
When elapsed playing time of disc is selected.
???TOTAL: Elapsed time of disc
???T. REM: Remaining time of disc
4 Press ON SCREEN.
The
NOTE
??? When playing back DVD VR, ???TIME??? and ???REM??? cannot be shown.
26

Advanced operations
See page 24 for button locations.
Playing from a specified position on a disc
You can start playing a title, chapter or track you specify. You can also play a disc from specified time.
Locating a desired scene from the DVD menu
DVD VIDEOs generally have their own menus which show
DVD
disc contents and you can display them on the TV screen. VIDEO You can locate a desired scene by using these menus.
7 Whenever a DVD VIDEO is loaded
1 Press TOP MENU/PG or MENU/PL.
The menu appears on the TV screen.
Example:
Normally, a DVD VIDEO which contains more than one title will have a ???top??? menu which lists the titles. Press
TOP MENU/PG to show the title menu.
Some DVD VIDEO may also have a different menu which is shown by pressing MENU/PL.
See the instructions for each DVD VIDEO regarding its particular menu.
2 Use Cursor 3/2/Y/5to select a desired item.
3 Press ENTER.
???With some discs, you can also select items by entering the corresponding number using number buttons.
Locating a desired scene using a VCD/ SVCD menu with PBC
A VCD or SVCD recorded with PBC has its own menus such as a list of contained songs. You can locate a specific scene by using these menus.
7 During playback with PBC function
1 Press RETURN repeatedly until the menu appears on the TV screen.
Example:
2 Press number buttons
???For details on using the number buttons, see ???How to use the number buttons??? (A pg. 22).
To return to the menu
Press RETURN.
When ???NEXT??? or ???PREVIOUS??? is shown on the TV screen:
???To go to the next page, press x.
???To return to the previous page, press 4.
NOTE
???If you want to play a
???Start playback by pressing number buttons while stopped.
???Press xrepeatedly until the desired track number is displayed, then start playback by pressing 3(play button).
The track number appears on the display window instead of ???PBC???.
???To activate the PBC function when playing a
???Press TOP MENU/PG or MENU/PL.
???Press 7twice to stop playback, then press 3(play button).
Locating a desired chapter/track using the

 .
.
3 Press ENTER.
Example:
During DVD VIDEO playback
Dolby D 2/0 . 0ch
4 Press number buttons
To correct a misentry
Repeat step 4.
5 Press ENTER.
6 Press ON SCREEN.
The
NOTE
??? You can select up to the 99th chapter/track.
27
Advanced operations
See page 24 for button locations.
Locating a desired position by specifying the time
Using the file control display
You can search and play desired groups and
For VCD/SVCD:
While stopped or during playback without PBC
tracks/files using the file control display on the TV screen.
DivX
function
For CD:
During playback or while stopped
7 When specifying the elapsed playing time from the beginning of the disc
Perform the following procedure while stopped.
7 When specifying the elapsed playing time from the beginning of the current title/track
Perform the following procedure during playback.
1 Press ON SCREEN twice.
The
2 Press Cursor 3/2to highlight  .
.
3 Press ENTER.
Dolby D 2/0 . 0ch
4 Use number buttons
Example:
To play back from a point 2 (hours): 34 (minutes): 08 (seconds) elapsed
Press 8
To cancel a misentry
Press Cursor 2repeatedly.
5 Press ENTER.
6 Press ON SCREEN.
The
NOTE
???You can specify time in hours/minutes/seconds for DVD VIDEO/ DVD AUDIO/DVD VR and in minutes/seconds for VCD/SVCD/CD.
Playback status
*(For MPEG 4/DivX) The Program and Random mode are not available.
The file control display appears automatically during playback (MP3/WMA) or while stopped.
7For MP3/WMA:
During playback or while stopped For
While stopped
1 Press Cursor 3/2/Y/5to select the desired group/track/file.
??? For MP3/WMA, playback starts from the selected track.
2 Press 3(play button) or ENTER.
???Track
???When you press ENTER for JPEG, only the selected file is played back.
NOTE
???(For MP3/WMA) During playback, you can locate the desired track/ file by pressing x/4or Cursor 5/Y.
???You can also check playback information on the display window. (A pg. 21)
???Some group, track and file names may not be displayed correctly depending on recording conditions.
???The order of groups, tracks and files may be displayed differently from the order displayed on your personal computer.
28

Advanced operations
See page 24 for button locations.
Resume Playback
When Resume Playback is set to ???ON??? (A pg. 38) and you stop playback by the following operations, the position where playback has been stopped is stored. (???RESUME??? appears on the display window.)
???Turning off the power (A pg. 16)
???Pressing 7once
???Changing the source (A pg. 17)
DVD DVD DVD
VIDEO AUDIO VR
DivX
Selecting the subtitle
Example (DVD VIDEO):
???ENGLISH??? is selected out of 3 subtitle languages recorded.
To start playback from the stored position
Press 3(play button) or DVD.
???There may be a case where 3(play button) does not work after changing the source.
To clear the stored position
Press 7again or open the disc tray.
NOTE
???(For DivX) The beginning of a scene where playback has been stopped may be stored.
Selecting a view angle
When using the ANGLE button:
1 Press ANGLE.
Example:
The first view angle is selected out of 3 view angles recorded.
2 Press ANGLE repeatedly or press Cursor Y/5to select the desired view angle.
When using the
1 Press ON SCREEN twice.
The
2 Press Cursor 3/2to highlight  .
.
3 Press ENTER.
Dolby D 2/0 . 0ch
4 Press Cursor Y/5to select the desired view angle.
5 Press ENTER.
6 Press ON SCREEN.
The
NOTE
???During DVD AUDIO playback, this feature is available only for the video part.
2 Press Cursor Y/5to select the desired subtitle.
For DVD VR
???Pressing SUBTITLE activates the subtitles (subpictures) regardless of whether the subtitles are recorded or not. (subpictures will not change if no subpictures is recorded.)
For SVCD
???An SVCD can contain up to four subtitles. Pressing SUBTITLE changes the subtitles regardless of whether the subtitles are recorded or not. (Subtitles will not change if no subtitle is recorded.)
NOTE
???To clear the subtitle, press SUBTITLE. Each time you press SUBTITLE, subtitle appears and disappears alternately.
When using the
1 Press ON SCREEN twice.
The
2 Press Cursor 3/2to highlight 

 .
.
3 Press ENTER.
Dolby D 2/0 . 0ch
4 Press Cursor Y/5repeatedly to select the desired subtitle.
5 Press ENTER.
6 Press ON SCREEN.
The
NOTE
???To clear the subtitle, press SUBTITLE. Each time you press SUBTITLE, subtitle appears and disappears alternately.
???Some subtitle or audio languages are abbreviated in the
???During DVD AUDIO playback, this feature is available only for the video part.
29

Advanced operations
See page 24 for button locations.
Example (DVD VIDEO):
???ENGLISH??? is selected out of 3 audio languages recorded.
2 Press AUDIO repeatedly or press Cursor Y/5to select the desired audio.
When using the
1 Press ON SCREEN twice.
The
2 Press Cursor 3/2to highlight  .
.
3 Press ENTER.
4 Press Cursor Y/5to select the desired audio.
5 Press ENTER.
6 Press ON SCREEN.
The
NOTE
???Some subtitle or audio languages are abbreviated in the
??????ST???, ???L??? or ???R??? is displayed when playing a VCD, SVCD or DVD VR respectively representing ???stereo???, ???left sound??? and ???right sound???.
Special picture playback
Playing back in
The system pauses playback.
2 Press SLOW 9.
??? Playback in forward
For DVD VIDEO/DVD AUDIO only:
??? To play back in reverse
Each time you press the button, the playback speed become faster.
Example: On the TV
To return to normal playback
Press 3(play button).
NOTE
???Sound cannot be heard during
???During DVD AUDIO playback, this feature is available only for the video part.
30
Advanced operations
See page 24 for button locations.
Selecting browsable still picture recorded on DVD AUDIO
Most DVD AUDIOs include browsable still pictures (B.S.P.), which usually appear by turns automatically during playback according to the playback sequence. You
can change the picture (turn the page) manually when the current group/track has selectable pictures (pages).
7During playback and while the B.S.P. indicator lights up on the display window
When using the PAGE button:
Press PAGE repeatedly to select a desired still picture.
NOTE
???The number of the magnification steps varies depending on the disc type.
???During
???During DVD AUDIO playback, this feature is available only for the video part.
???During
Changing the VFP setting
The VFP (Video Fine Processor) function enables
DVD DVD DVD
you to adjust the picture character according to the VIDEO AUDIO VR type of programming, picture tone or personal
When using the
preference.
7 During playback
DivX
1 Press ON SCREEN twice.
The
2 Press Cursor 3/2to highlight  .
.
3 Press ENTER.
Dolby D 2/0 . 0ch
4 Press Cursor 5/Yto select the desired still picture.
5 Press ENTER.
6 Press ON SCREEN.
The
Zooming in
7 During playback or while paused
DVD DVD DVD
VIDEO AUDIO VR
1 Press ZOOM.
2 While zoomed in, press Cursor 3/2/Y/ 5to move
To return to normal playback
Press ZOOM repeatedly to select ZOOM OFF.
1 Press VFP.
The current VFP settings appear on the TV screen.
Example:
2 Press Cursor 3/2repeatedly to select the VFP mode.
???NORMAL:Normally select this.
???CINEMA: Suitable for movies.
When you select ???NORMAL??? or ???CINEMA???, press VFP to complete the setting.
??? USER 1 and USER 2:
You can adjust parameters that affect picture appearance.
Only when selecting ???USER 1??? or ???USER 2??? in step 2, proceed to perform the following operation;
3 Press Cursor Y/5repeatedly to select a parameter you want to adjust.
Adjust gradually and confirm picture appearance results are as preferred.
???GAMMA:
Controls brightness of neutral tints while maintaining brightness of dark and bright portions.
???BRIGHTNESS:
Controls screen brightness.
???CONTRAST:
Controls screen contrast.
???SATURATION:
Controls screen color depth.
???TINT:
Controls screen tint.
???SHARPNESS:
Controls screen sharpness.
31
Advanced operations
See page 24 for button locations.
4 Press ENTER.
Example:
5 Press Cursor Y/5to change the setting.
6 Press ENTER.
The current VFP settings appear again.
7 Repeat steps 3 to 6 to adjust other parameters.
8 Press VFP.
NOTE
???Although the setting display disappears in the middle of the procedure, the setting at that time will be stored.
Program Playback
7 While stopped
DVD DVD
VIDEO AUDIO
1 Press PLAY MODE repeatedly until program
window appears on the TV screen.
2 Follow the instructions that appear on the TV screen to program the desired chapters/tracks.
???For details on using the number buttons, see ???How to use the number buttons??? (A pg. 22).
???The content???s numbers that you have to specify for
programming varies depending on the disc type:
??? DVD AUDIO, MP3, WMA:
Groups and tracks
???Before you program the tracks in bonus group on a DVD
AUDIO, perform the procedure of ???Playing back a bonus group??? (A pg. 23) to turn off the BONUS indicator on the display window.
???You can specify the chapters/tracks whose number is up to 99.
???(For CD, SVCD or VCD) When the total playback time exceeds 99 minutes 59 seconds,
???(For DVD VIDEO, DVD AUDIO, MP3 or WMA) When you press ENTER instead of the number buttons in the Track/Chapter column, ???ALL??? appears and all the tracks or chapters on the selected group or title are programmed as a step.
To clear the programs one by one from the last entered number
Press CANCEL repeatedly.
To clear all programs
Press 7.
You can also clear the program by turning off the system.
3 Press 3(play button).
If all of the programmed tracks/files have been played back, playback stops and the program window appears again. Note that program setting remains.
To check the program contents
During playback, press 7. Playback stops and the program window appears.
To quit the Program mode
While stopped, press PLAY MODE repeatedly until both program window and  disappear from the TV screen.
NOTE
???The Resume function cannot be used with Program Playback.
???Program Playback may not work for some discs.
32

Advanced operations
See page 24 for button locations.
Random Playback
You can play titles or tracks on a disc in random order.
7 While stopped
1 Press PLAY MODE repeatedly until  appears on the TV screen.
DVD DVD
VIDEO AUDIO
2 Press 3(play button).
To quit Random mode
While stopped, press PLAY MODE repeatedly until both program window and  disappear from the TV screen.
You can also clear the Random mode by turning off the system.
NOTE
???The same title/track will not be played back more than once during Random Playback.
Repeat Playback
Repeating the current selection
7For DVD VIDEO/DVD VR: During playback
For VCD/SVCD:
During playback without PBC function or stopped
For DVD AUDIO/CD/MP3/JPEG/
During playback or stopped
When using the REPEAT button:
Press REPEAT.
DVD DVD DVD
VIDEO AUDIO VR
DivX
NOTE
???For DVD VIDEO and DVD AUDIO, REPEAT ALL may not be available depending on the disc.
When using the
1 Press ON SCREEN twice.
The
2 Press Cursor 3/2to highlight 

 .
.
3 Press ENTER.
Dolby D 2/0 . 0ch
Repeat mode indicator
Each time you press REPEAT, the Repeat mode changes.
4 Press Cursor Y/5repeatedly to select the Repeat mode.
5 Press ENTER.
6 Press ON SCREEN.
The
To cancel Repeat Playback
Select ???OFF??? in step 4.
33
Advanced operations
See page 24 for button locations.
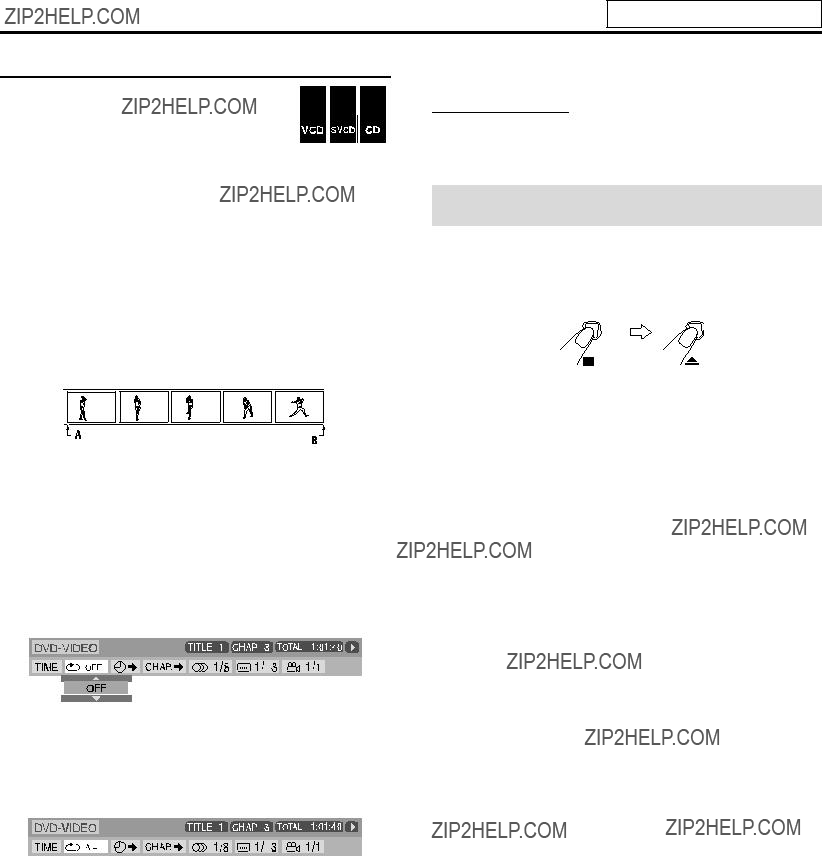
Repeating a desired part
You can repeat playback of a desired part by
DVD DVD DVD
specifying the beginning (point A) and ending VIDEO AUDIO VR (point B).
7 During playback
When using the
1 Press
The repeat mode indicator ???
 ??? appears on the display window.
2 Press
The repeat mode indicator on the display window changes to ???

 ??? and
To cancel
Press
When using the
1 Press ON SCREEN twice.
The
2 Press Cursor 3/2to highlight 

 .
.
3 Press ENTER.
Dolby D 2/0 . 0ch
4 Press Cursor Y/5repeatedly to select
5 Press ENTER at the beginning of the part you want to repeat (point A).
Dolby D 2/0 . 0ch
6 Press ENTER at the end of the part you want to repeat (point B).
7 Press ON SCREEN.
The
To cancel
Select ???OFF??? in step 4, then press ENTER.
NOTE
???When playing back a DVD VIDEO,
???
Tray lock
You can lock the tray and prohibit the unwanted disc ejection.
On the center unit ONLY:
While the system is turned off
Press and hold
???The system turns on and ???LOCKED??? appears on the display window.
???If you try to eject the disc, ???LOCKED??? appears to indicate that the tray is locked.
To cancel
Carry out the same operation again.
???The system turns on and ???UNLOCKED??? appears on the display window.
34

Advanced operations
See page 24 for button locations.
Sound and other settings
IMPORTANT
Before using the remote control for the following operation;
??? Set the remote control mode selector to AUDIO.
NOTE
Before you start operation;
???There is a time limit when doing the following steps. If the setting is cancelled before you finish, start from step 1 again.
1 Press SETTING.
Example:
D E C. A / P C M
2 Press Cursor Y/5to select the item you want to set.
???DEC (Decode):
When you play an external source (AUX DIGITAL is selected as a source) that was encoded with DOLBY D or DTS Digital Surround, the following symptoms may occur;
???No sound comes out at the beginning of playback.
???Noise comes out while searching for or skipping chapters
or tracks.
A/PCM (Auto/PCM):
Normally select this. The system automatically detects the incoming signals.
DD:Select this if the symptoms above occur when playing a disc (or software) encoded
with DOLBY D.
DTS: Select this if the symptoms above occur when playing a disc (or software) encoded with DTS Digital Surround.
???BAL (Balance):
You can adjust the balance between the front left and front right speakers.
3 Press Cursor 3/2to make an adjustment or selection.
Example:
D E C. D D
The adjustment is set and the display automatically disappears a few seconds later.
NOTE
???When ???DD??? or ???DTS??? is selected, if a signal encoded with another digital format comes in, you cannot listen to the sound. (The GDIGITAL or Cindicator flashes.)
35
Setting DVD preferences
Using the setup menus
???You can change the language used in the setup menus. See ???Menu description??? below.
Basic operation on the setup menus
NOTE
???See the following ???The language codes list??? for the code of each language, such as ???AA???, etc.
The language codes list
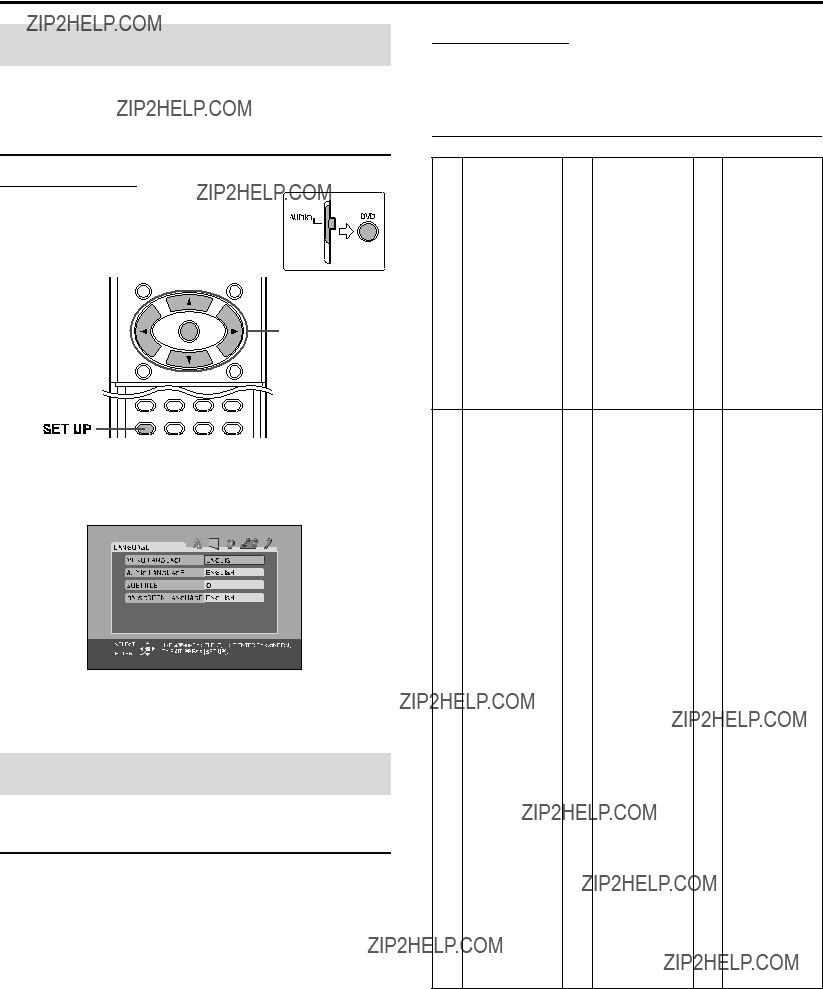
IMPORTANT
Before using the remote control for the following operation;
1Set the remote control mode selector to
AUDIO.
2Press DVD.
ENTER
Cursor
(3/2/Y/5)/
ENTER
SET UP
7While stopped
1 Press SET UP.
2 Follow the instructions that appear on the TV screen.
Menu description
 :Language menu (LANGUAGE)
7 MENU LANGUAGE
Some DVDs have their own menus in multiple languages.
??? Select the initial language*.
7 AUDIO LANGUAGE
Some DVDs have multiple audio languages.
??? Select the initial audio language*.
7 SUBTITLE
Some DVDs have multiple subtitle languages.
??? Select the initial subtitle language*.
7 ON SCREEN LANGUAGE
???Select the language shown on the TV screen when operating this system.
*When the language you have selected is not recorded to a disc, the original language is automatically used as the initial language.
36

Setting DVD preferences
 : Picture menu (PICTURE)
7 MONITOR TYPE
You can select the monitor type to match your TV when you play DVDs recorded in the picture???s height/width ratio of 16:9.
???16:9 (Wide television conversion)
Select this when the aspect ratio of your TV is fixed on 16:9 (wide TV).
When you play DVDs recorded in the picture???s height/width ratio of 4:3, the system adjust the ratio of output signal automatically.
???4:3 LB (Letter Box conversion)
Select this when the aspect ratio of your TV is 4:3 (conventional TV). While viewing a wide screen picture, the black bars appear on the top and the bottom of the screen.
???4:3 PS (Pan Scan conversion)
Select this when the aspect ratio of your TV is 4:3 (conventional TV). While viewing a wide screen picture, the black bars do not appear, however, the left and right edges of the pictures will not be shown on the screen.
NOTE
???Even if ???4:3 PS??? is selected, the screen size may become ???4:3 LB??? with some DVDs. This depends on how DVDs are recorded.
7 PICTURE SOURCE
When you set the scan mode to ???PROGRESS??? (A pg. 18), you can obtain optimal picture quality by selecting whether the content on the disc is processed by frame (film source) or by field (video source) .
Normally set to ???AUTO???.
???AUTO
Used to play a disc containing both video and film source materials.
This system recognizes the source type (video or film) of the current disc according to the disc information.
???If the playback picture is unclear or noisy, or the oblique lines of the picture are rough, try to change to other modes.
???FILM
Suitable for playing back a film source disc.
???VIDEO
Suitable for playing back a video source disc.
7 SCREEN SAVER (A pg. 22)
You can activate or deactivate Screen Saver function.
7 FILE TYPE
When several types of files are recorded on a disc, you can select which files to play.
???AUDIO
Select this to play MP3/WMA files.
???STILL PICTURE
Select this to play JPEG files.
???VIDEO
Select this to play
 : Audio menu (AUDIO)
7D. RANGE COMPRESSION
(Dynamic range compression)
You can enjoy low level recorded sound clearly at night even at a low volume when listening to the sound with Dolby Digital.
???AUTO
Select this when you want to enjoy surround sound with its full dynamic range (no effect applied).
???ON
Select this when you want to fully apply the compression effect (useful at midnight).
NOTE
???When you play a multichannel Dolby Digital source with the surround mode is off, the setting of D. RANGE COMPRESSION is set to ON automatically.
 : Speaker setting menu (SPK. SETTING)
7Level menu (LEVEL)
FRONT LEFT SPEAKER/FRONT RIGHT SPEAKER/
CENTER SPEAKER/SURROUND RIGHT SPEAKER/
SURROUND LEFT SPEAKER
While monitoring the test tone, adjust the center and surround speakers volume as much as that of the front speakers.
TEST TONE*
Outputs the test tone.
*The test tone comes out of all of the activated speakers in the following sequence:
s Front left speaker s Center speaker s Front right speaker s Surround right speaker s Surround left speaker s (back to the beginning)
7Delay menu (DELAY)
Example:
In this case, set the delay time of each speaker as follows;
???Delay time of front speakers: 0 ms
???Delay time of center speaker: 1 ms
???Delay time of surround speakers: 2 ms
FRONT LEFT SPEAKER/FRONT RIGHT SPEAKER/
CENTER SPEAKER/SURROUND RIGHT SPEAKER/
SURROUND LEFT SPEAKER
Adjust the distance from the listening position to the speakers.
Within the range from 0 ms to 15 ms. (by 1 ms)
37
Setting DVD preferences
7Subwoofer menu (SUBWOOFER)
LEVEL
You can set the output level of the subwoofer in the
CROSS OVER
The signals below the preset frequency level will be sent to and be reproduced by the subwoofer.
Select one of the cross over frequency levels according to the bass sound quality from the front/center/surround speakers.
 : Other setting menu (OTHERS)
7RESUME
You can activate or deactivate Resume Playback function. (A pg. 29)
7ON SCREEN GUIDE
You can activate or deactivate the
7DivX registration menu (DivX REGISTRATION)
The system has its own Registration Code for DivX playback. You can confirm the code of your system.
???Once you played back a disc created by using the Registration Code, the system???s code is overwritten by a totally different new one for copyright protection purpose.
38
Tuner operations
IMPORTANT
Before using the remote control for the following operation;
1 Set the remote control mode selector to
AUDIO.
2 Press FM/AM.
NOTE
???When FM or AM is selected as the source, you can select All Channel Stereo (ALL ST) and SURR OFF mode.
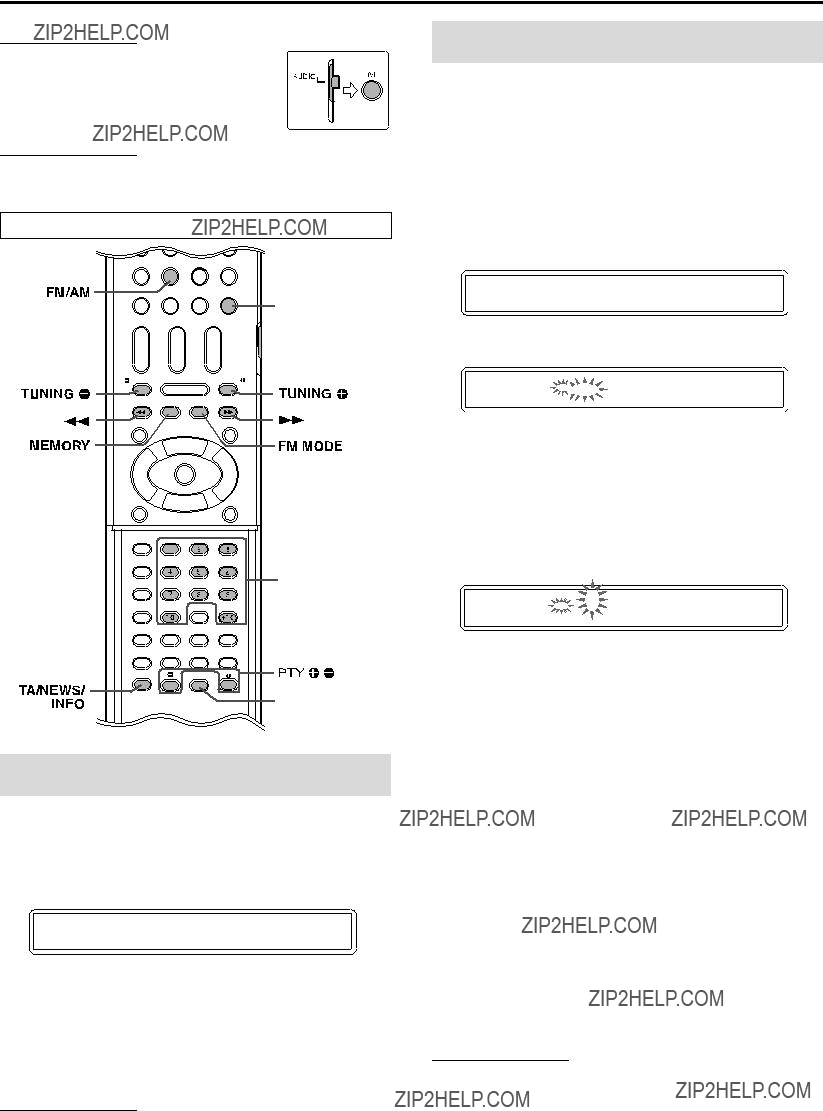
The buttons described below are used on pages 39 to 42.
FM/AM
FL DISP.
FL DISP.
AUDIO Remote control 

 mode selector
Number buttons
PTY SEARCH
TREBLE
Manual tuning
1 Press FM/AM repeatedly to select the band.
Example:
When the system is tuned in to 810 kHz.
2 Press TUNING 9/(repeatedly until you find the frequency you want.
When you hold down the button until the system starts searching for stations and then release it, the system stops searching automatically when a station of sufficient signal strength is tuned in to.
NOTE
???When an FM stereo program is received, the ST indicator lights on the display window.
Preset tuning
Once a station is assigned to a channel number, the station can be quickly tuned in. You can preset 30 FM and 15 AM (MW) stations.
7 To preset the stations
1 Tune in the station you want to preset.
???If you want to store the FM reception mode for an FM
station, select the reception mode you want. See ???Selecting the FM reception mode??? (A pg. 40).
Example:
When the system is tuned in to 103.5 MHz.
2 Press MEMORY.
7 While ???CH??? and ??????
3 Press number button(s)
???For details on using the number buttons, see ???How to use the number buttons??? (A pg. 22).
Example:
When the preset channel 1 is selected.
If the setting is cancelled before you finish, start from step 2 again.
7 While the selected number is flashing
4 Press MEMORY.
The selected number stops flashing.
The station is assigned to the selected preset number.
If the setting is cancelled before you finish, start from step 2 again.
5 Repeat steps 1 to 4.
???Storing a new station to a used number erases the previously stored one.
7 To tune in to a preset station
1 Press FM/AM repeatedly to select FM or AM.
2 Press number button(s)
???For details on using the number buttons, see ???How to use the number buttons??? (A pg. 22).
NOTE
??? You can also select a preset number by pressing y/1.
39

Tuner operations
See page 39 for button locations.
Selecting the FM reception mode
When the stereo FM program currently tuned in is noisy, you can change the FM reception mode to improve the reception.
7 While listening to an FM station
Press FM MODE.
The FM reception mode appears on the display window.
Each time you press the button, the FM reception mode changes.
???AUTO:
When a program is broadcast in stereo, you will hear stereo sound. (The ST indicator lights on the display window.) When in monaural, you will hear monaural sound. This mode is also useful to suppress static noise between stations.
???MONO:
Reception will be improved although you will lose the stereo effect. (The MONO indicator lights on the display window.) In this mode, you will hear noise until you are tuned in to a station.
Reducing the noise of AM (MW) broadcast
When listening to an AM (MW) broadcast with a lot of noise interference, you can change the Beat Cut mode to reduce the noise.
7 While listening to an AM (MW) station
Press FM MODE.
The current Beat Cut mode appears on the display window. Each time you press the button, the Beat Cut mode changes.
???Choose ???BEATCUT1??? or ???BEATCUT2??? according to which gives clearer sound.
Using the RDS (Radio Data System) when receiving FM stations
RDS allows FM stations to send an additional signal along with their regular program signals. For example, the stations send their station names, as well as information about what type of program they broadcast, such as sports or music, etc.
When tuned in to an FM station which provides the RDS service, the RDS indicator lights up on the display window.
RDS
RDS indicator
With the system, you can receive the following types of RDS signals:
Enhanced Other Network: See page 42.
NOTE
???RDS is not available for AM (MW) broadcasts.
???RDS may not operate correctly if the station tuned is not transmitting RDS signal properly or if the signal strength is weak.
IMPORTANT
Before using the remote control for the following operation;
1 Set the remote control mode selector to
AUDIO.
2 Press FM/AM.
7To show the RDS signals information
Press FL DISP. while listening to an FM station.
Each time you press the button, the indication on the display window changes.
PS (Program Service):
While searching, ???PS??? appears and then the station names will be displayed. ???NO PS??? appears if no signal is sent.
PTY (Program Type):
While searching, ???PTY??? appears and then the type of the broadcast program will be displayed. ???NO PTY??? appears if no signal is sent. RT (Radio Text):
While searching, ???RT??? appears and then text messages the station sends will be displayed. ???NO RT??? appears if no signal is sent. Frequency:
Station frequency
About characters shown on the display window
When PS, PTY, or RT signals appear on the display window, some special characters and marks may not be displayed correctly.
NOTE
???If searching finishes at once, ???PS???, ???PTY???, and ???RT??? will not appear on the display window.
40

Tuner operations
See page 39 for button locations.
Searching for a program by PTY codes
One of the advantages of the RDS service is that you can locate a particular kind of program from the preset channels (A pg. 39) by specifying the PTY codes.
7 To search for a program using the PTY codes
NOTE
Before you start operation;
???The PTY Search is only applicable to preset stations.
???To stop searching any time during the process, press PTY SEARCH while searching.
???There is a time limit in doing the following steps. If the setting is canceled before you finish, start from step 1 again.
1 Press PTY SEARCH while listening to an FM station.
???PTY??? and ???SELECT??? flashes alternately on the display window.
7 While ???PTY??? and ???SELECT??? is flashing alternately:
2 Press PTY 9or PTY (until the PTY code you want appears on the display window.
??? For details, see ???Description of the PTY codes???.
While the PTY code selected in step 2 is still on the display window:
3 Press PTY SEARCH again.
While searching, ???SEARCH??? and the selected PTY code alternate on the display window.
The system searches 30 preset FM stations, stops when it finds the one you have selected, and tunes in that station.
To continue searching after the first stop
Press PTY SEARCH again while the indications on the display window are flashing.
If no program is found, ???NO FOUND??? appears on the display window.
Description of the PTY codes
NOTE
???Classification of the PTY codes for some FM stations may be different from the above list.
41

Tuner operations
See page 39 for button locations.
Switching to broadcast program of your choice temporarily
Another convenient RDS service is called ???Enhanced Other Network???.
This allows the system to switch temporarily to a broadcast program of your choice (TA, NEWS, and/or INFO) from a different station except in the following cases;
???When you are listening to
???When the system is in standby mode.
NOTE
Before you start operations;
???The Enhanced Other Network function is only applicable to preset stations.
IMPORTANT
Before using the remote control for the following operation;
1 Set the remote control mode selector to
AUDIO.
2 Press FM/AM.
Press TA/NEWS/INFO
repeatedly until the program type indicator (TA/NEWS/INFO) you want appears on the display window.
Each time you press the button, the indicator on the display window changes.
To stop listening to the program selected by Enhanced Other Network
Press TA/NEWS/INFO repeatedly again so that the program type indicator (TA/NEWS/INFO) goes off from the display window. The system exits from Enhanced Other Network standby mode and goes back to the previously selected station.
When an emergency broadcast (ALARM signal) is sent from an FM station
The system automatically tunes in to the station and ???ALARM??? appears on the display window while the system receiving the emergency broadcast.
Note that an emergency broadcast cannot be received in the following cases;
???When you are listening to
???When the system is in standby mode.
The TEST signal is used for equipment test ??? whether it can receive the Alarm signal correctly
The TEST signal makes the system work in the same way as the Alarm signal does. If the TEST signal is received, the system automatically switches to the station broadcasting the TEST signal. While receiving the TEST signal, ???TEST??? appears on the display window.
7How the Enhanced Other Network function actually works
Case 1
If there is no station broadcasting the program you have selected
The system continues tuning in to the current station.
???
When a station starts broadcasting the program you have selected, the system automatically switches to the station. The indicator of received PTY code starts flashing.
???
When the program is over, the system goes back to the previously tuned station, but the Enhanced Other Network function still remains activated.
Case 2
If the FM station you are listening to is broadcasting the program you have selected
The system continues to receive the station but the indicator of received PTY code starts flashing.
???
When the program is over, the indicator of received PTY code stops flashing and remains lit, but the Enhanced Other Network function still remains activated.
NOTE
???In Enhanced Other Network standby mode, if you change the source to play, Enhanced Other Network standby mode is canceled temporarily.
If you change the source to FM again, the system returns to Enhanced Other Network standby mode.
???Enhanced Other Network data sent from some stations may not be compatible with this system.
???Enhanced Other Network does not function for some FM stations with RDS service.
???While listening to a program tuned in by the Enhanced Other Network function, the station does not change even if another network station starts broadcasting a program of the same Enhanced Other Network data.
???While listening to a program tuned in by the Enhanced Other Network function, you can only use TA/NEWS/INFO and FL DISP. as the tuner operation buttons.
42

References
Maintenance
7 Handling Discs
??? Remove the disc from its case by holding it at the edge while pressing the center hole lightly.
??? Do not touch the shiny surface of the disc or bend the disc.
??? Put the disc back in its case after use to prevent warping.
??? Be careful not to scratch the surface of the disc when placing it back in its case.
??? Avoid exposure to direct sunlight, temperature extremes and moisture.
To clean the disc
Wipe the disc with a soft cloth in a straight line from center to edge.
???DO NOT use any solvent ??? such as conventional record cleaner, spray, thinner or benzine ??? to clean the disc.
7 Cleaning the system
???Stains on the system should be wiped off with a soft cloth. If the system is heavily stained, wipe it with a cloth soaked in water- diluted neutral detergent and wrung well, then wipe clean with a dry cloth.
???Since the system may deteriorate in quality, become damaged or get its paint peeled off, be careful about the following.
???DO NOT wipe it with a hard cloth.
???DO NOT wipe it strong.
???DO NOT wipe it with thinner or benzine.
???DO NOT apply any volatile substance such as insecticides to it.
???DO NOT allow any rubber or plastic to remain in contact with it for a long time.
Troubleshooting
43

References
Specifications
7 Center unit
Audio section
Total Harmonic Distortion 0.02 %
NOTE: This value is measured at System cord CONNECTOR for reference.
7 Subwoofer
7 Satellite Speakers
Front speakers
44

References
7 Satellite Speakers
Front speakers
Designs & specifications are subject to change without notice.
45

SYSTEM CINEMA DIGITAL DVD