Note:
Before using this information and the product it supports, be sure to read the general information under ??Notices??.
First Edition: January 2002
The following paragraph does not apply to the United Kingdom or any country where such provisions are inconsistent with local law: INTERNATIONAL BUSINESS MACHINES CORPORATION PROVIDES THIS
MANUAL ??AS IS?? WITHOUT WARRANTY OF ANY KIND, EITHER EXPRESSED OR IMPLIED, INCLUDING,
BUT NOT LIMITED TO, THE IMPLIED WARRANTIES OF MERCHANTABILITY AND FITNESS FOR A PARTICULAR PURPOSE. Some states do not allow disclaimer of express or implied warranties in certain transactions. Therefore, this may not apply to you.
IBM does not warrant that the contents of this publication or the accompanying source code examples, whether individually or as one or more groups, will meet your requirements or that the publication or the source code is error-free.
Requests for copies of this publication and for technical information about IBM products should be made to your IBM authorized Dealer, your IBM Marketing Representative, or your IBM Software Solutions Representative.
IBM Printing Systems welcomes your comments. For your convenience, a form for reader's comments is provided at the back of this publication. You may send your comments by fax to 1-800-524-1519 within the U.S., by fax to 1-303-924-6873 outside the U.S., by e-mail to printpub@us.ibm.com, or mail your comments to:
INFORMATION DEVELOPMENT
IBM PRINTING SYSTEMS
DEPARTMENT H7FE BUILDING 004M
PO BOX 1900
BOULDER CO 80301-9191
Note: Visit our home page at http://www.ibm.com/printers
When you send information to IBM, you grant IBM a nonexclusive right to use or distribute the information in any way it believes appropriate without incurring any obligation to you.
However, the following copyright notice protects this documentation under the Copyright laws of the United States and other countries which prohibit such actions as, but not limited to, copying, distributing, modifying, and making derivative works.
?? Copyright International Business Machines Corporation 2001. All rights reserved.
US Government Users Restricted Rights ?? Use, duplication or disclosure restricted by GSA ADP Schedule Contract with IBM Corp.
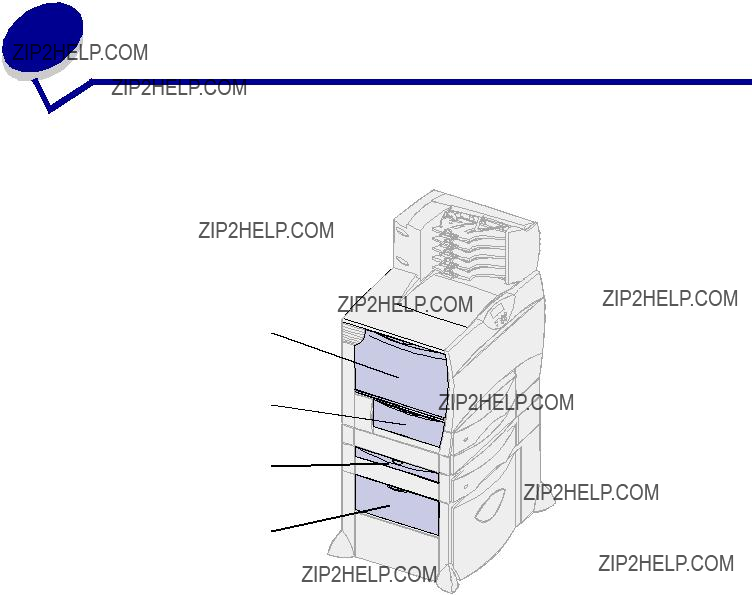
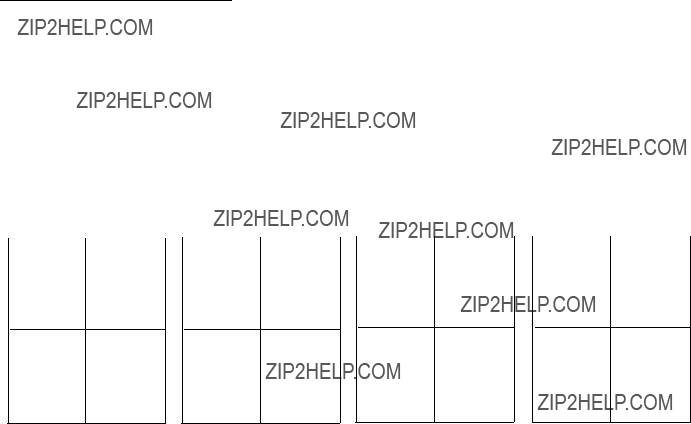
The following illustration shows the printer configured with a duplex unit and three optional 500-sheet drawers.
Duplex unit
500-sheet drawers
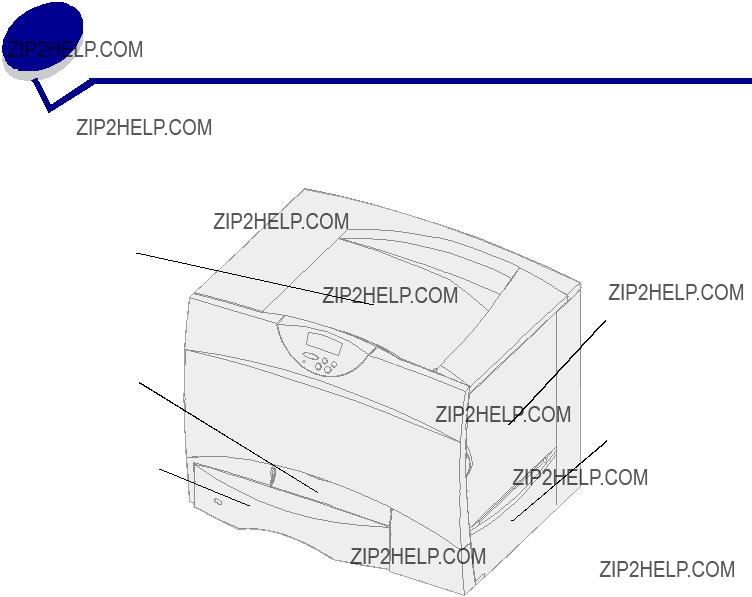
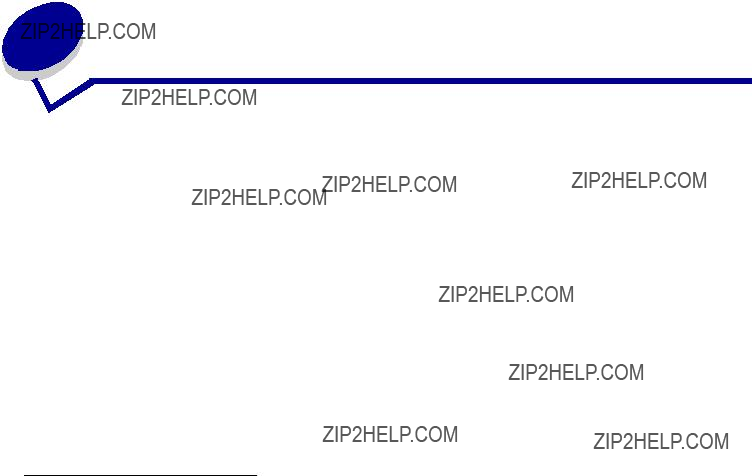
The following illustration shows the printer configured with a duplex unit, one optional 500-sheet drawer, and one optional 2000-sheet drawer.
Duplex unit
500-sheet drawer
2000-sheet drawer
2  Understanding the printer operator panel
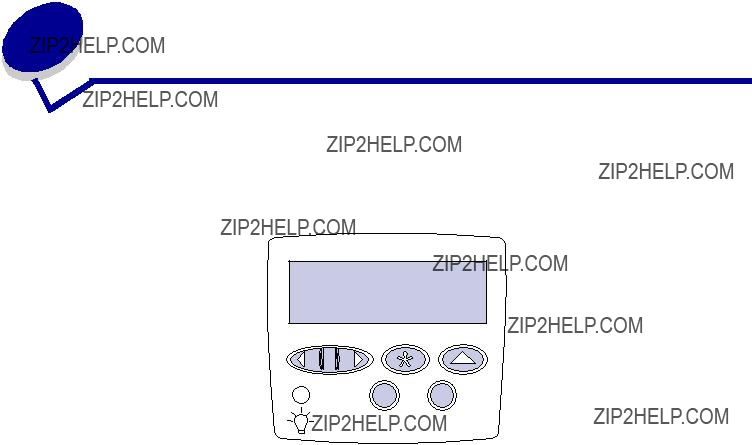
The operator panel has five buttons, a display, and a light that flashes when the printer is processing a job indicated by the Busy message.
Ready
Display
1 Menu 2 Select 3 Return4
Go5 Stop 6
Operator panel buttons
See the menu map for a brief overview of the printer menus available from the operator panel.
To print a job from a typical Windows application:
1Open the file you want to print.
2From the File menu, select Print.
3Verify that the correct printer is selected in the dialog box.
4Modify the printer settings as appropriate (such as the pages you want to print or the number of copies).
Note: Click Properties or Setup to adjust printer settings not available from the first screen, and click OK.
5 Click OK or Print to send the job to the selected printer.

Cancel a job from the printer operator panel
If the job you want to cancel is printing, and Busy appears on the display:
1Press Menu until you see Job Menu, and then press Select.
2Press Menu until you see Cancel Job, and then press Select.
Cancel a job from the Windows taskbar
When you send a job to print, a small printer icon appears in the right corner of the taskbar.
1Double-click the printer icon. A list of print jobs appears.
2Select the job you want to cancel.
3Press Delete on your keyboard.
Cancel a job from a Windows desktop
1Minimize all programs to reveal the contents of the desktop.
2Double-click My Computer.
3Double-click Printers. A list of available printers appears.
4Double-click the printer you selected when you sent the job. A list of print jobs appears.
5Select the job you want to cancel.
6Press Delete on your keyboard.
Cancel a job from a Macintosh computer
When you send a job to print, the icon for your selected printer appears on the desktop.
1Double-click the printer icon on your desktop. A list of print jobs appears.
2Press Control and click the print job you want to cancel.
3Select Stop Queue from the pop-up menu that appears.
Several settings in your application software or on the display let you conserve toner and paper:

When sending a job to the printer, you can specify in the driver that you want the printer to hold the job in memory. When you are ready to print the job, you must go to the printer and use the operator panel menus to identify which held job you want to print.
Note: Print and Hold functions require a minimum of 16MB available printer memory. We recommend a minimum of 32MB available printer memory and a hard disk.
To learn more about this function, click a topic:
Printing and deleting held jobs
Once held jobs are stored in printer memory, you can use the printer operator panel to specify what you want to do with one or more of the jobs. You can select either Confidential Job or Held Jobs (Repeat Print, Reserve Print, and Verify Print jobs) from the Job Menu. If you select Confidential Job, you must enter the personal identification number (PIN) you specified in the driver when you sent the job. See Confidential jobs for more information.
From either the Confidential Job or the Held Jobs menu items, you have five choices:
???Print All Jobs
???Print A Job
???Delete All Jobs
???Delete A Job
???Print Copies

Accessing held jobs from the operator panel
1To access held jobs from the operator panel:
???If the printer is Busy, press Menu and the Job Menu appears.
???If the printer is Ready, continue to step 2.
2Press Menu until you see Held Jobs or Confidential Job on the operator panel display, depending on the type of job you want to access.
3Press Select.
User Name appears on the first line of the operator panel. The second line displays the names of users currently associated with Print and Hold jobs.
4Press Menu until you see your user name.
Note: If you are looking for a Confidential Job, you are prompted to enter your PIN. See Confidential jobs for more information.
5Press Select.
6Press Menu until the action you want to take is on the second line of the operator panel (Print A Job, Delete A Job, and so on).
7Press Select.
???If you are looking for a particular job, press Menu to scroll through the list of available jobs, and press Select when the correct job is displayed. An asterisk (*) appears next to the job name indicating you have chosen to print or delete that job.
???If you are prompted to enter the number of copies you want to print, use the Menu button to increase or decrease the number on the display, and then press Select.
8Press Go to print or delete specific jobs you have marked.
The printer briefly shows messages indicating what Print and Hold functions it is performing.
Recognizing when format errors occur
If the  symbol appears on the display, it indicates that the printer had trouble formatting one or more of the held jobs. These formatting problems are most commonly the result of insufficient printer memory or invalid data that might cause the printer to flush the job.
When a symbol appears next to a held job, you can:
???Print the job. Be aware, however, that only part of the job may print.
???Delete the job. You may want to free up additional printer memory by scrolling through the list of held jobs and deleting others you have sent to the printer.
If formatting errors are a recurring problem with held jobs, your printer may require more memory.

Repeat Print
If you send a Repeat Print job, the printer prints all requested copies of the job and stores the job in memory so you can print additional copies later. You can print additional copies as long as the job remains stored in memory.
Note: Repeat Print jobs are automatically deleted from printer memory when the printer requires extra memory to process additional held jobs.
Reserve Print
If you send a Reserve Print job, the printer does not print the job immediately, but stores the job in memory so you can print the job later. The job is held in memory until you delete it from the Held Jobs menu. Reserve Print jobs may be deleted if the printer requires extra memory to process additional held jobs.
See Printing and deleting held jobs for information.
Verify Print
If you send a Verify Print job, the printer prints one copy and holds the remaining copies you requested from the driver in printer memory. Use Verify Print to examine the first copy to see if it is satisfactory before printing the remaining copies.
See Printing and deleting held jobs if you need help printing the additional copies stored in memory.
Note: Once all copies are printed, the Verify Print job is deleted from printer memory.

Confidential jobs
When you send a job to the printer, you can enter a personal identification number (PIN) from the driver. The PIN must be four digits using the numbers 1???6. The job is then held in printer memory until you enter the same four-digit PIN from the printer operator panel and choose to print or delete the job. This ensures that the job does not print until you are there to retrieve it, and no one else using the printer can print the job.
When you select Confidential Job from the Job Menu and then select your user name, the following prompt is displayed:
Enter PIN: =____
Use the buttons on the operator panel to enter the four-digit PIN associated with your confidential job. The numbers next to the button names identify which button to press for each digit (1???6). As you enter the PIN, asterisks are displayed on the operator panel to ensure confidentiality.
Enter PIN
=****
If you enter an invalid PIN, the message No Jobs Found. Retry? appears. Press Go to reenter the PIN, or press Stop to exit the Confidential Job menu.
When you enter a valid PIN, you have access to all print jobs matching the user name and PIN you entered. The print jobs matching the PIN you entered appear on the display when you enter the Print A Job, Delete A Job, and Print Copies menu items. You can then choose to print or delete jobs matching the PIN you entered. (See Printing and deleting held jobs for more information.) After printing the job, the printer deletes the confidential job from memory.
7  Paper and specialty media specifications
The following table lists supported paper and specialty media sizes and types for the standard and optional trays, as well as for the multipurpose feeder. We recommend that you try a limited sample of any paper or specialty media you are considering using with the printer before purchasing large quantities.
1Supported as selected paper with tray size sensing turned off in the appropriate trays.
2When selected, the page is formatted for 215.9 x 355.6 mm (8.5 x 14 in.) unless otherwise specified.
3Load narrow media with the length in the feed direction (portrait).
4If you print large quantities of labels or other glossy print media, replace the fuser housing with a web oiler field upgrade kit. Contact your point of purchase for more information.
Loading the 500-sheet trays
Follow these instructions to load any of the 500-sheet trays.
1 Remove the tray.
2 Squeeze the front guide lever and slide the guide to the front of the tray.
3Squeeze the side guide lever and slide the guide to the correct position for the size paper you are loading.
Icons along the back of the tray indicate paper sizes.
4Flex the sheets back and forth to loosen them, and then fan them.
Do not fold or crease the paper. Straighten the edges of the stack on a level surface.
5Place the paper against the back left corner of the tray, print side down. Do not load bent or wrinkled paper.
Note: Do not exceed the maximum stack height. Overfilling the tray may cause jams.
6 Squeeze the front guide lever and slide the guide until it lightly touches the stack of paper.
7Reinstall the tray.
Make sure the tray is pushed completely into the printer.
Loading the 2000-sheet tray
Follow these instructions to load a 2000-sheet tray. Do not load any print media other than paper in the 2000-sheet tray.
1 Pull open the tray.
2Squeeze the side guide lever, lift the guide, and place it into the appropriate slot for the size paper you are loading.
3Squeeze the two front guide levers and slide the guide to the correct position for the size paper you are loading.
4 Slide the bottom support toward the front of the tray until it touches the front guide.
5Flex the sheets back and forth to loosen them, and then fan them.
Do not fold or crease the paper. Straighten the edges of the stack on a level surface.
6Place the paper against the back left corner of the tray, print side down. Do not load bent or wrinkled print media.
7Close the tray.
Make sure the tray is pushed completely into the printer.
Note: Do not exceed the maximum stack height. Overfilling the tray may cause paper jams.
You can use the multipurpose feeder one of two ways:
???Paper tray??? As a paper tray, you can load print media in the feeder with the intention of leaving the media in the feeder.
???Manual bypass feeder??? As a manual bypass feeder, you send a print job to the feeder while specifying the type and size of media from your computer. The printer then prompts you to load the appropriate print media before it prints.
Follow these instructions to load the multipurpose feeder.
1 Open the multipurpose feeder.
2 Squeeze the paper guide lever and slide the guide all the way toward the front of the printer.
3Flex the sheets back and forth to loosen them, and then fan them.
Do not fold or crease the print media. Straighten the edges of the stack on a level surface.
4 Arrange the stack of print media correctly for the size, type, and print method you are using.
5Place the print media, print side up, along the left side of the multipurpose feeder, and then push it in as far as it will go.
Do not force the print media.
Note: Do not exceed the maximum stack height. Overfilling the feeder may cause jams.
6 Squeeze the paper guide lever and slide the guide until it lightly touches the side of the stack.
???If you load the same size and type of paper or specialty media in more than one tray, the printer automatically links the trays. This means that when one tray is empty, it feeds from the next linked tray.
For example, if you have the same size and type of paper or specialty media loaded in tray 2 and tray 4, the printer feeds from tray 2 until it becomes empty, and then it feeds from the next linked tray??? tray 4.
???If you load the same size paper or specialty media in each tray, make sure it is also all the same type to link the trays.
Once the trays you selected are loaded with the same size and type of paper or specialty media, select the same Paper Type setting in the Paper Menu for these sources.
???To disable tray linking, set the Paper Type to a unique value in each one of the trays.
Note: To link trays loaded with Executive, Legal, JIS B4, or JIS B5 size paper, see Size Sensing.
If you attach an optional finisher or mailbox to your printer, you can link output bins, or otherwise specify how the printer sends jobs to the bins, by changing the Configure Bins settings in the Paper Menu.
Only available if you have attached an optional mailbox.
To change the Configure Bins setting:
1Press Menu until you see Paper Menu, and then press Select.
2Press Menu until you see Configure Bins, and then press Select. Mailbox appears on the second line of the display.
3Press Menu until you see the value you want, and then press Select to save the value as the bin configuration default.
4Press Go to return the printer to the Ready state.
For more information, see Configure Bins and Bin <x> Full.

Storing paper
Use the following guidelines to avoid paper feeding problems and uneven print quality.
???Store paper in an environment where the temperature is approximately 21??C (70??F) and the relative humidity is 40%.
???Store cartons of paper on a pallet or shelf rather than directly on the floor.
???If you store individual packages of paper out of the original carton, make sure they rest on a flat surface so the edges do not buckle or curl.
???Do not place anything on top of paper packages.
Storing supplies
Choose a cool, clean storage area for your printer supplies. Store supplies right side up in their original packaging until you are ready to use them.
Do not expose supplies to:
???Direct sunlight
???Temperatures above 35??C (95??F)
???High humidity (above 80%)
???Salty air
???Corrosive gases
???Heavy dust
Avoiding jams
You can avoid most paper jams by correctly loading paper and specialty media in the printer.
See the following for loading instructions:
???Loading the 500-sheet trays
???Loading the 2000-sheet tray
???Loading the multipurpose feeder
The following hints can help you avoid paper jams:
???Use only recommended paper.
???Do not load wrinkled, creased, or damp paper.
???Flex, fan, and straighten paper before you load it.
???Do not overload the trays or the multipurpose feeder. Make sure the stack height does not exceed the maximum height indicated.
???Push all trays firmly into the printer after loading them.
???Make sure the guides in the trays are properly positioned for the size paper you have loaded.
???Do not load paper in a tray while a job is printing. Wait for a Load Tray <x> message before you remove the tray from the printer.
You may remove another tray and load it so long as the print job is not selecting the paper from it.
???Do not send jobs to staple, hole punch, or offset for transparencies, labels, or card stock.
???We recommend that transparencies, labels, card stock, and envelopes not be sent to the optional mailbox or optional finisher. These specialty media types should be sent to the standard bin.
???If an optional finisher or mailbox is attached to your printer, make sure the printer and option are correctly aligned. Refer to the Setup Guide for alignment instructions.
???Make sure all cables that connect the duplex unit, high capacity feeder, finisher, or mailbox to the printer are correctly attached. Refer to the Setup Guide for more information.
???If a jam should occur, clear the entire paper path. See Clearing the paper path for more information.
13 Checking an unresponsive printer
Sometimes printer problems are very easy to solve. If your printer is not responding, first make sure:
???The power cord is plugged into the printer and a properly grounded electrical outlet.
???The electrical outlet is not turned off by any switch or breaker.
???Other electrical equipment plugged into the outlet is working.
???The printer is turned on.
???The printer cable is securely attached to the printer and the host computer, print server, option, or other network device.
Once you have checked each of these possibilities, turn the printer off and back on. This often fixes the problem.
14 Understanding jam messages
Always clear the entire paper path when you receive any jam message.
Multipurpose feeder
250 Paper Jam
Left access door (beside tray 1)
200 Paper Jam
500-sheet drawer
24x Paper Jam
2000-sheet drawer
24x Paper Jam
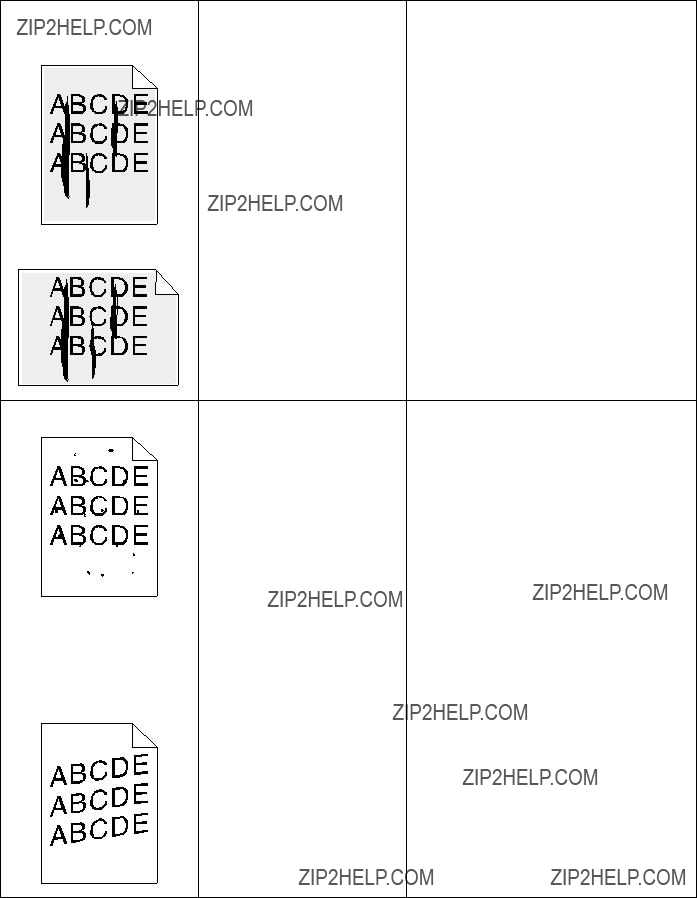
You can solve many print quality problems by replacing a supply or maintenance item that has reached the end of its intended life. Check the operator panel for a message about a printer consumable. See Determining the status of supplies for information about other ways to identify consumables that need to be replaced.
Use the following table to find solutions to print quality problems.
???The fuser is worn or defective.
17 Solving mailbox problems
When you call for printer service, describe the problem you are experiencing, the message on the display, and the troubleshooting steps you have already taken to find a solution.
You need to know your printer model type and serial number. Refer to the label on the back of the printer near the power cord for this information.
Note: The serial number is also listed on the menu settings page you can print from the Utilities Menu. See Printing a menu settings page for more information.
Contact your point of purchase for more information.

You can configure the printer several ways to let you know when it requires attention.
Using the Setup Menu
If multiple attendance conditions are pending, the alarm only sounds when the first message is displayed. No additional alarms sound as subsequent attendance conditions arise.
Selecting Auto Continue may affect how the printer alerts execute. This setting defines how long the printer waits after displaying a message before it resumes printing.
Using MarkVision Professional
MarkVision??? Professional, the network printer management utility, indicates when it is time to replace supplies and points out actual or potential problems. When a printer needs attention, it alerts the network administrator with a detailed graphic of the printer showing the cause for the alert (for example, an empty paper tray). For more information about MarkVision Professional, refer to the drivers CD that shipped with your printer.
Using MarkVision Messenger
MarkVision Messenger lets you create Actions that execute specific commands whenever messages like Tray x Missing or 88 Toner Low appear on the display. For example, you can create an Action that sends an e-mail to the administrator when the printer runs out of paper.
Actions can be set up to occur automatically, as well as conditionally or repeatedly. For more information about MarkVision Messenger, refer to the drivers CD that shipped with your printer.
22 Determining the status of supplies
To determine the status of all of the consumables installed in your printer, print the menu settings page.
See Printing a menu settings page for detailed instructions.
One or two pages print depending on the number of menu settings you have. Look for ???Consumable Status??? on the page; the percentage of life remaining for each of the items is indicated.

The Size Sensing menu item lets you disable or enable auto size sensing on trays. Size Sensing also lets the printer detect the difference between similar paper sizes that it otherwise cannot.
Note: If you load both Executive and JIS B5 size paper, or Legal and JIS B4 size paper, load one size in the multipurpose feeder. Do not use two trays when you load these similar sizes of paper.
Enabling size sensing
To instruct the printer to sense Executive or JIS B5:
1Turn the printer off.
2Press and hold the Select and Return buttons, and then turn the printer on.
3Release the buttons when Performing Self Test appears on the display. When the printer self test completes, Config Menu appears.
4Press Menu until you see Size Sensing, and then press Select.
5Press Menu until you see Executive/B5. Make sure the one you want to select is on the second line of the display, and then press Select. The operator panel displays two choices: Sense Executive and Sense JIS B5.
6Press Menu until you see the size you want, and then press Select.
Saved briefly appears. Config Menu appears again with Size Sensing on the second line.
7Press Return.
8Press Menu until you see Exit Config Menu, and then press Select.
Activating Menu Changes briefly appears, followed by Performing Self Test. The printer returns to the Ready message.
Size sensing and tray linking
If you want to link printer trays and have selected to load Executive or JIS B5 size paper, complete the steps beginning on page 48 of this topic to specify the size you want the printer to sense. Then, if you load JIS B5 in trays 1 through 3, for example, those trays are linked. If one tray runs out of JIS B5, the printer automatically selects JIS B5 from another one of these trays. See Linking trays for more information.
Disabling size sensing
To disable auto size sensing:
1Turn the printer off.
2Press and hold the Select and Return buttons, and then turn the printer on.
3Release the buttons when Performing Self Test appears on the display. When the printer self test completes, Config Menu appears.
4Press Menu until you see Size Sensing, and then press Select.
Note: Only paper trays that support auto size sensing are displayed on the operator panel.
5Press Menu until you see Tray x Sensing, where x represents the number of the tray for which you want to disable size sensing, and then press Select.
Repeat for other trays, if necessary.
6Press Menu until you see Off, and then press Select.
Saved briefly appears. Config Menu appears again with Size Sensing on the second line.
7Press Return.
8Press Menu until you see Exit Config Menu, and then press Select.
Activating Menu Changes briefly appears, followed by Performing Self Test. The printer returns to the Ready message.
24 Orderingitems supplies and maintenance

For best print quality, make sure you align the image transfer unit after replacement or if colors print too lightly.
To align the image transfer unit:
1On the printer operator panel, press and hold Select and Return while turning the printer on.
2When Performing Self Test appears, release the buttons.
3When Config Menu appears, press Menu until you see ITU Alignment, and then press
Select.
A test page prints.
4Look at the test page and select a number value for each of the twelve settings where the color is most intense. Select a value in the range of -10 to +10 to the nearest .5 increment. For example, you may find for the Test A alignment that your color is most intense at the 4.5 value.
It is helpful to write all twelve alignment values in the lines provided on the test page before going on to step 5. You must select a value for all twelve settings.
5When you see Test A Alignment, press Menu until you find the number value you want to use, and then press Select. A Saved message briefly appears and then the next test alignment displays.
6After you have completed all twelve settings, Config Menu appears. Press Menu until you see
Exit Config Menu, and then press Select. The printer returns to the Ready state.
26 Other maintenance and troubleshooting documents
Consult the following table to determine the name of the PDF file associated with a particular maintenance or troubleshooting task. You can then share the file with other printer users by copying it to a shared drive or to an intranet site.
1Check the Fit to page box in Acrobat and print on Legal size paper.
2Check the Fit to page box in Acrobat and print on Letter size paper.
If some maintenance and troubleshooting documents do not print, do the following:
1Open the document you want to print in Adobe Acrobat.
2Click the printer icon.
The Print dialog box appears.
3Check the Print as image box.
4Click OK.
1 Turn the printer off. Open the front cover.
2Remove all the print cartridges.
a Pull up slightly on the cartridge handhold.
b Pull the cartridge straight out and use the handle to lift it off the guides. c Place the cartridges on a clean flat surface out of direct light.
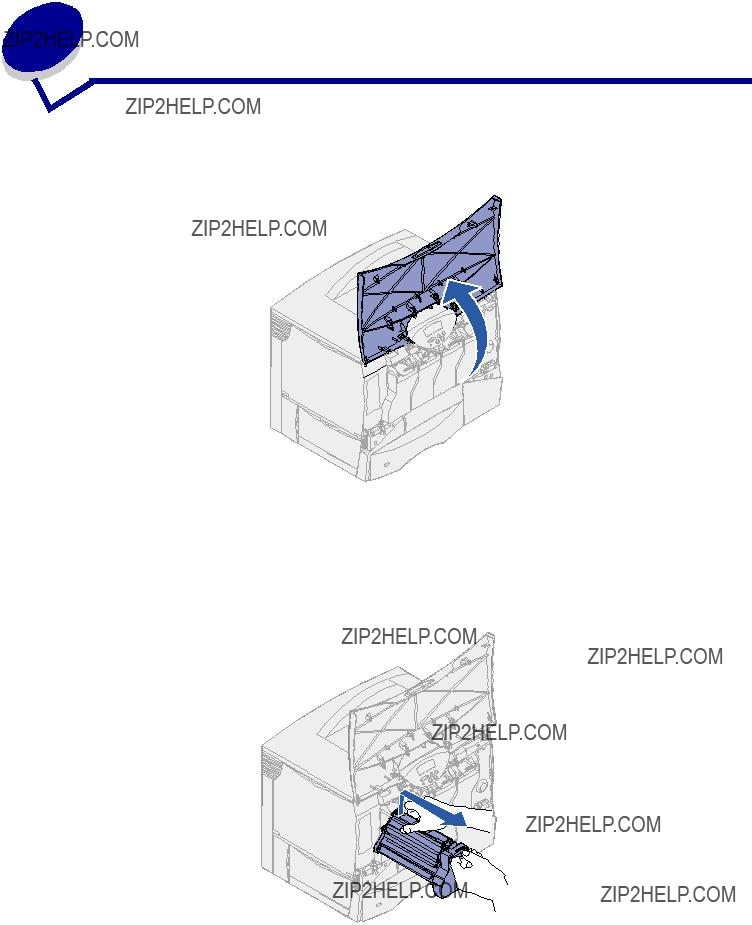
3 Release the latches to open the multipurpose feeder all the way.
4Remove the image transfer unit.
a Raise the lever to unlock the image transfer unit.
b Pull down on the handle.
c Slide the image transfer unit out and place it on a clean, flat surface.
WARNING: Do not touch the transfer belt. Touching the belt will damage the image transfer unit.
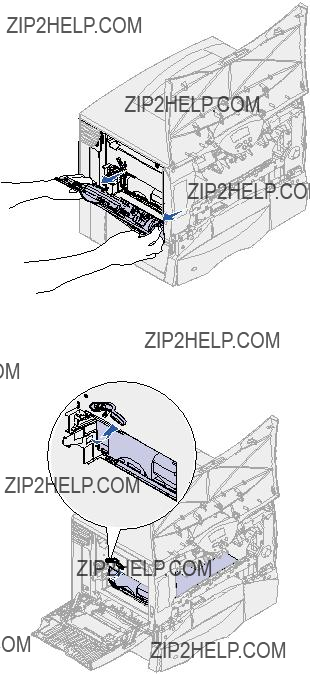
5 Look inside the printer. Remove all torn paper or other jams.
6Insert the image transfer unit back into the printer. a Align the guides with the insertion grooves.
b Push the handle up using both hands, and gently slide the unit in.
c Lower the lever to lock the image transfer unit into place.
7Return the multipurpose feeder to its working position.
Reinstall all the print cartridges. For helping installing the print cartridges, refer to the printer
Setup Guide or Publications CD.
8 Close the printer door.
9 Turn the printer on. The printer returns to a Ready state.
These instructions can help you remove memory or option cards. Use the following illustration to locate the connector for the card you want to remove.
Hard disk connector
Accessing the printer system board
1Turn the printer off.
2Unplug the printer power cord.
3Disconnect all cables from the back of the printer.
4Locate the access cover on the back of the printer.
5Loosen the four screws at the top of the access cover, but do not remove the screws completely.
6Remove the four screws at the bottom of the cover.
7Slide the cover down to remove it.
Removing memory cards
Complete the following steps to remove printer memory or flash memory cards.
WARNING: Printer memory and flash memory cards are easily damaged by static electricity. Touch something metal on the printer before you touch a memory card.
1Remove the system board access cover. See Accessing the printer system board.
2Locate the memory card you want to remove.
3Push open the latches on both ends of the connector away from the card.
4Pull the card straight out of the connector.
5Place the card in its original packaging, or wrap the card in paper and store it in a box.
6Reinstall the system board access cover. See Reinstalling the system board access cover.

Removing an option card
Complete the following steps to remove an internal print server, Tri-Port Adapter, Infrared Adapter, Coax/Twinax Adapter, or USB/Parallel Interface Card.
WARNING: Option cards are easily damaged by static electricity. Touch something metal on the printer before you touch an option card.
1Remove the system board access cover. See Accessing the printer system board.
2Locate the option card.
3Remove the screw that secures the card to the system board connector slot.
4Gently pull the card out of the connector.
5If you saved the metal plate that covers the connector slot and you do not plan to insert another card, attach the plate:
a Slide the clip side of the plate in first, making sure the clip end covers the groove on the system board.
b Use the screw to secure the other end of the metal plate to the system board.
6Place the card in its original packaging, or wrap the card in paper and store it in a box.
7Replace the system board access cover. See Reinstalling the system board access cover.
Removing a hard disk
Complete the following steps to remove a hard disk. If an option card has been installed, you must remove it before removing the firmware card. See Removing an option card.
WARNING: Hard disks are easily damaged by static electricity. Touch something metal on the printer before you touch a disk.
1Remove the system board access cover. See Accessing the printer system board.
2Locate the hard disk.

3Gently pull the three posts on the hard disk mounting plate out of the holes on the system board.
4Gently pull the ribbon cable connector out of the connector on the system board.
5Place the disk in its original packaging, or wrap the disk in paper and store it in a box.
6Replace the system board access cover. See Reinstalling the system board access cover.
Removing a firmware card
Complete the following steps to remove a firmware card. If an option card has been installed, you must remove it before removing the firmware card. See Removing an option card.
WARNING: Optional firmware cards are easily damaged by static electricity. Touch something metal on the printer before you touch an optional firmware card.
1Remove the system board access cover. See Accessing the printer system board.
2Grasp the firmware card gently and pull it straight out in one motion. Do not pull one side and then the other.
3Place the card in its original packaging, or wrap the card in paper and store it in a box.
4Replace the system board access cover. See Reinstalling the system board access cover.
Reinstalling the system board access cover
1Align the slots at the top of the access cover with the screws near the top of the printer.
2Slide the cover up under the top cover lip as far as it will go, and then tighten the screws at the top of the cover.
3Insert and tighten the four screws to the bottom of the cover.
4Reconnect all cables on the back of the printer.
5Plug in the printer power cord.
6Turn the printer on.
29 Restoring factory default settings
1Make sure the printer is on and the Ready message appears.
2Press Menu until you see Utilities Menu, and then press Select.
3Press Menu until you see Factory Defaults, and then press Select.
4When Restore appears, press Select. The message Restoring Factory Defaults appears followed by the Ready message.
When you select Restore:
???No other button actions are available on the operator panel while Restoring Factory Defaults appears.
???All downloaded resources (fonts, macros, and symbol sets) in printer memory (RAM) are deleted. (Resources residing in flash memory or on the optional hard disk are unaffected.)
???All menu settings are returned to the factory default values, except:
???The operator panel Display Language setting in the Setup Menu.
???All settings in the Parallel Menu, Serial Menu, Network Menu, Infrared Menu, LocalTalk Menu, and USB Menu.
If you need more information about changing menu settings or selecting new user default settings, see
Changing menu settings.

A network administrator can lock the printer menus to keep others from changing default menu settings from the operator panel.
To disable the menus:
1Turn the printer off.
2Press and hold the Select and Return buttons, and then turn the printer on.
3Release the buttons when Performing Self Test appears on the display. When the printer self test completes, Config Menu appears.
4Press Menu until you see Panel Menus, and then press Select.
5Press Menu until you see Disable, and then press Select.
Saved briefly appears, followed by Disabling Menus. Config Menu appears again with Panel Menus on the second line.
6Press Menu until you see Exit Config Menu, and then press Select.
Activating Menu Changes briefly appears, followed by Performing Self Test. The printer returns to the Ready message.
Note: Once this procedure is completed, if the Menu button is pressed when the printer displays the Ready status message, the message Menus Disabled appears. If the printer is holding a confidential job or held job (Reserve Print, Repeat Print, or Verify Print), you can still access these jobs through the Job Menu.
Enabling the menus
To enable the menus, repeat the steps in Disabling the operator panel menus. However, in step 5 on page 65, select Enable instead of Disable. After you press Select, Enabling Menus is displayed.

Disabling Power Saver in the Setup Menu helps keep your printer ready to print without delays.
1Press Menu until you see Setup Menu, and then press Select.
2Press Menu until you see Power Saver, and then press Select.
3Press Menu until you see Disabled, and then press Select.
If the Disabled value is not available, first change the Energy Conserve setting to Off in the Config Menu:
1Turn the printer off.
2Press and hold the Select and Return buttons, and then turn the printer on.
3Release the buttons when Performing Self Test appears on the display. When the printer self test is done, Config Menu is displayed.
4Press Menu until you see Energy Conserve, and then press Select.
5Press Menu until you see Off, and then press Select.
Energy Conserve SAVED briefly appears, and then Config Menu is displayed.
6Press Menu until you see Exit Config Menu, and then press Select.
Activating Menu Changes briefly appears, followed by Performing Self Test. The printer returns to the Ready message.
Now you can select the Disabled value from the Power Saver menu item.
Note: You can also disable Power Saver by issuing a Printer Job Language (PJL) command.

You can use the operator panel to change printer menu settings and customize your printer to meet your specific needs.
Note: Changes to specific print jobs made from a software application override the settings made from the operator panel.
See the menu map for a list of the menus and their menu items.
To select a new value:
1Press Menu until you see the menu you need, and then press Select.
The menu opens and the first menu item in the menu appears on the second line of the display.
2Press Menu until you see the menu item you need, and then press Select. An asterisk (*) appears beside the current default setting for that menu item. A value can be:
???An On or Off setting.
???A phrase or word that describes a setting.
???A numerical value that you can increase or decrease.
When you press Select, an asterisk (*) appears beside the new value to indicate that it is now the default setting. The Saved message appears, then the previous list of menu items appears on the display.
Note: Some menu items have submenus. For example, if you select Paper Menu, and then select the Paper Type menu item, you must select another menu (such as Tray 1 Type) before the available values display.
3Press Return to go back to previous menus or menu items and set new default settings.
4Press Go to return to the Ready message if this is the last printer setting you want to change.
Note: User default settings remain in effect until you save new settings or restore the factory defaults.
33 Printing a menu settings page
Print the menu settings page to review the printer settings and to verify that printer options are installed correctly.
Note: See Understanding the printer operator panel to identify the display and operator panel buttons if you need help.
1Make sure the printer is on and the Ready message appears.
2Press Menu until you see Utilities Menu, and then press Select.
3Press Menu until you see Print Menus, and then press Select to print the page. The message Printing Menus is displayed.
Note: If any other message appears when you print this page, see Understanding printer messages for more information.
4Verify that the options you installed are correctly listed under ???Installed Features.???
If an option you installed is not listed, turn the printer off, unplug the power cord, and reinstall the option.
5Verify the amount of memory installed is correctly listed under ???Printer Information.???
6Verify that the paper trays are configured for the sizes and types of paper you loaded.
Your printer has resident fonts stored permanently its memory. Different fonts may be available in PCL and PostScript emulations.
To print samples of all the fonts currently available for your printer:
1Make sure the printer is on and Ready appears on the display.
2Press Menu until you see Utilities Menu, and then press Select.
3Press Menu until you see Print Fonts, and then press Select.
4Press Menu to display either PCL Fonts or PS Fonts.
???Select PCL Fonts to print a listing of the fonts available in PCL emulation.
???Select PS Fonts to print a listing of the fonts available in PostScript 3 emulation.
5Press Select.
The message Printing Font List remains on the display until all pages print. The printer returns to the Ready message after the font sample list prints.
Activating Menu
Changes
What this message means:
The printer is activating changes made to the printer settings.
What you can do:
Wait for the message to clear.
See also:
Disabling the operator panel menus
<x> Alignment
What this message means:
An image transfer unit alignment procedure is in progress and the user is being prompted for a series of alignment values. The values range from A to L.
What you can do:
???Enter the alignment value, and then press Select to continue to the next alignment value.
???Press Go or Return to cancel the alignment procedure.
See also:
Aligning the image transfer unit
Bin <x> Full
What this message means:
The specified bin is full.
What you can do:
Remove the stack of paper from the bin to clear the message. If you assigned the bin a name, the bin name is displayed instead of the bin number.
Busy
What this message means:
The printer is busy receiving, processing, or printing data.
What you can do:
???Wait for the message to clear.
???Press Menu to open the Job Menu and cancel the current job.
Calibrating Tray <x>
What this message means:
A tray calibration procedure is in progress.
What you can do:
???Wait for the message to clear.
See also:
Load <x> Plain Letter; Tray <x> Not Calibrated
Cancelling Fax
What this message means:
The printer is processing a request to cancel a fax job.
What you can do:
Wait for the message to clear.
Cancelling Job
What this message means:
The printer is processing a request to cancel the current print job.
What you can do:
Wait for the message to clear.
See also:
Canceling a print job
Change <x>
What this message means:
The printer is requesting that a different type of paper be loaded in one of the input sources.
What you can do:
Change the paper type in the specified source.
See also:
Loading the trays; Setup Guide
Change <x> Invalid Refill
What this message means:
The printer has detected a refilled Prebate cartridge.
What you can do:
Remove the indicated print cartridge and install a new one.
See also:
Replacing print cartridges
Check <device>
Connection
What this message means:
The specified device is either not fully connected to the printer or is experiencing a hardware failure.
What you can do:
???Reestablish communication by removing the specified device and reattaching it to the printer.
???Press Go to clear the message and continue printing.
???In the case of a hardware failure, turn the printer off and back on. If the error recurs, turn the printer off, remove the specified device, and call for service.
Clearing Job
Accounting Stat
What this message means:
The printer is deleting all job statistics stored on the hard disk.
What you can do:
Wait for the message to clear.
Close Door
What this message means:
The printer front cover is open.
What you can do:
???Close the printer front cover to clear the message.
Close Finisher Door
What this message means:
The finisher top cover is open.
What you can do:
Close the finisher top cover to clear the message.
Close Tray X Door
What this message means:
The 2000-sheet drawer is open.
What you can do:
Close the 2000-sheet drawer to clear the message.
Copying
What this message means:
The printer is processing a copy job originating from an OptraImage??? scanner.
What you can do:
Wait for the message to clear.
Defragmenting
What this message means:
The printer is defragmenting the flash memory to reclaim storage space occupied by deleted resources.
What you can do:
Wait for the message to clear.
WARNING: Do not turn the printer off while this message is displayed.
Delete All Jobs
What this message means:
The printer is requesting confirmation to delete all held jobs.
What you can do:
???Press Go to continue. The printer deletes all held jobs.
???Press Stop to cancel the operation.
Deleting Jobs
What this message means:
The printer is deleting one or more held jobs.
What you can do:
Wait for the message to clear.

Disabling Menus
What this message means:
The printer is responding to a request to disable the menus.
What you can do:
Wait for the message to clear.
Note: While the menus are disabled, you cannot change the printer settings from the operator panel.
See also:
Disabling the operator panel menus
Disk Corrupted.
Reformat?
What this message means:
The printer has attempted a disk recovery process and cannot repair the disk.
What you can do:
???Press Go to reformat the disk and delete all files currently stored on the disk.
???Press Stop to clear the message without reformatting the disk. The printer may display Disk Recovery and attempt to recover the disk.
See also:
Disk Recovery x/5 yyy%
Disk Recovery x/5 yyy%
What this message means:
The printer is attempting to recover the hard disk. Disk recovery takes place in five phases; the second line on the operator panel display shows the percent complete of the current phase.
What you can do:
Wait for the message to clear.
WARNING: Do not turn the printer off while this message is displayed.
Enabling Menus
What this message means:
The printer is responding to a request to make the menus available to all users.
What you can do:
Wait for the message to clear, then press Menu to view the menus from the operator panel.
See also:
Enabling the menus
Engine Warming
What this message means:
The printer is warming the fuser assembly to prepare for printing.
What you can do:
Wait for the message to clear.
Enter PIN: =___
What this message means:
The printer is waiting for you to enter your four-digit personal identification number (PIN).
What you can do:
Use the operator panel buttons to enter the PIN you identified in the driver when you sent the confidential job to the printer.
See also:
Holding a job in the printer
Fax <x>
What this message means:
The printer is processing an incoming fax.
What you can do:
Wait for the message to clear.
Flushing Buffer
What this message means:
The printer is flushing corrupted print data and discarding the current print job.
What you can do:
Wait for the message to clear.
Formatting Disk
What this message means:
The printer is formatting the hard disk.
What you can do:
Wait for the message to clear.
WARNING: Do not turn the printer off while this message is displayed.
Formatting Disk yyy%
What this message means:
The printer is formatting the hard disk. When formatting takes longer than usual, the second line of the display shows the percent complete.
What you can do:
Wait for the message to clear.
WARNING: Do not turn the printer off while this message is displayed.
Formatting Flash
What this message means:
The printer is formatting the flash memory.
What you can do:
Wait for the message to clear.
WARNING: Do not turn the printer off while this message is displayed.
Held Jobs may be lost
What this message means:
The printer memory is too full to continue processing print jobs.
What you can do:
???Press Go to clear the message and continue printing. The printer frees memory by deleting the oldest held job and continues deleting held jobs until there is enough printer memory to process the job.
???Press Stop to clear the message without deleting any held jobs. The current job may not print correctly.
???Press Menu to open the Job Menu and cancel the current job.
???To avoid this error in the future:
???Delete fonts, macros, and other data stored in printer memory.
???Install more printer memory.
Note: The messages 37 Insufficient Memory and Held Jobs may be lost alternate on the display.
See also:
Holding a job in the printer; 37 Insufficient Memory
Held Jobs May
Not Be Restored
What this message means:
The printer memory cannot restore Print and Hold jobs from the printer hard disk.
What you can do:
Press Go to clear the message. Some of the Print and Hold jobs stored on the disk will not be restored.
See also:
37 Insufficient Memory
Hole Punch Waste Full
What this message means:
The hole punch box in the finisher is full.
What you can do:
Empty the hole punch box.
Incorrect Media
What this message means:
The printer detects a media type mismatch feeding from the multipurpose feeder.
What you can do:
???Replace the media in the multipurpose feeder with the requested media and press Go.
???Press Menu to access the Busy/Waiting Menu group, and select one of the following options:
???Cancel Job
???Reset Printer
???Reset Active Bin
Infrared <x>
What this message means:
An infrared interface is the active communication link.
Insert Staple Cartridge
What this message means:
The staple cartridge in the finisher is missing or is installed incorrectly.
What you can do:
???Correctly install the staple cartridge to clear the message.
???Press Go to ignore the message and continue printing without stapling.
Insert Tray <x>
What this message means:
The specified tray is either missing or not fully inserted into the printer.
What you can do:
Insert the specified tray completely into the printer.
See also:
Loading the trays
Install <device> or Cancel Job
What this message means:
The printer is requesting that a specified device be installed so it can print a job.
What you can do:
???Turn the printer off, install the specified device, and restart the printer.
???Press Menu to open the Job Menu and cancel the current job.
Invalid Engine Code
What this message means:
The printer engine code has not been programmed or is not valid.
What you can do:
Call for service.
See also:
Calling for service
What this message means:
The code in an internal print server is not valid. The printer cannot receive and process jobs until valid code is programmed into the internal print server.
What you can do:
Download valid code to the printer internal print server.
Note: You can download network code while this message is displayed.
ITU/Fuser Maint
What this message means:
The counters that track wear on the image transfer unit and fuser have reached their limit.
What you can do:
Replace the image transfer unit and fuser.
See also:
Replacing the fuser; Replace the image transfer unit and transfer roller

Load Manual
What this message means:
A request for a manual feed job has been sent to the printer. The printer is ready for insertion of a single sheet into the manual feed slot.
What you can do:
???Load a sheet of the paper specified in the second line of the display in the manual feed tray or multipurpose feeder.
???Press Select or Go to ignore the manual feed request and print on paper already installed in one of the input sources. If the printer finds a tray that has paper of the correct type and size, it feeds paper from that tray. If the printer cannot find a tray with the correct paper type and size, it prints on whatever paper is installed in the default input source.
???Press Menu to open the Job Menu and cancel the current job.
See also:
Loading the multipurpose feeder
Load <x>
Plain Letter
What this message means:
Someone has initiated a tray calibration procedure.
What you can do:
???Load paper into <x> and press Go to continue the calibration process.
See also:
Calibrating Tray <x>; Tray <x> Not Calibrated
Load Staples
What this message means:
The printer is trying to staple a print job, but the stapler is empty.
What you can do:
???Install a new staple cartridge in the stapler.
???Press Go to clear the message and continue printing without stapling.
???Press Menu to open the Job Menu and cancel the current job.
Load Tray <x>
What this message means:
The printer is trying to feed paper from a source it detects is empty.
What you can do:
???Load paper of the size and type requested in the second line of the display in the specified tray. The printer automatically clears the message and continues printing the job.
???Press Menu to open the Job Menu and cancel the current job.
See also:
Loading the trays
LocalTalk <x>
What this message means:
A LocalTalk interface is the active communication link.
Menus Disabled
What this message means:
The printer menus are disabled. You cannot change the printer settings from the operator panel.
What you can do:
You can still open the Job Menu to cancel a job that is printing or to select a confidential job or a held job that you want to print. If you need access to the printer menus, contact your network administrator.
See also:
Disabling the operator panel menus
Network Card
Busy
What this message means:
An internal print server (also called an internal network adapter or INA) is being reset.
What you can do:
Wait for the message to clear.
Network <x>
What this message means:
A network interface is the active communication link.
Network <x>, <y>
What this message means:
A network interface is the active communication link, where <x> represents the active communication link and <y> represents the channel.
No DRAM Installed
What this message means:
No DRAM is installed in the printer.
What you can do:
Turn the printer off, install DRAM and turn the printer back on.
No Jobs Found.
Retry?
What this message means:
The four-digit personal identification number (PIN) you entered is not associated with any confidential print job.
What you can do:
???Press Go to enter another PIN.
???Press Stop to clear the PIN entry prompt.
See also:
Holding a job in the printer
Not Ready
What this message means:
The printer is not ready to receive or process data. Someone pressed Stop to take the printer offline.
What you can do:
Press Go to make the printer ready to receive jobs.
Ovrflow Bin Full
What this message means:
The mailbox???s designated overflow bin is full.
What you can do:
Remove the stack of paper from the bin to clear the message.
Parallel <x>
What this message means:
A parallel interface is the active communication link.
Performing
Self Test
What this message means:
The printer is running the series of start-up tests it performs after it is turned on.
What you can do:
Wait for the message to clear.
See also:
Aligning the image transfer unit
Power Saver
What this message means:
The printer is ready to receive and process data. It is reducing its electricity consumption while idle. If the printer remains inactive for the period of time specified in the Power Saver menu item (20 minutes is the factory default), the Power Saver message replaces the Ready message on the display.
What you can do:
???Send a job to print.
???Press Go to quickly warm the printer to normal operating temperature and display the Ready message.
Printer Calibrating
What this message means:
The printer is adjusting the color tables to correct variations caused by environmental conditions.
What you can do:
Wait for the message to clear.
See also:
Color Menu
Print Jobs on
Disk
What this message means:
Jobs that were spooled to the hard disk before the printer was last turned off have not yet printed.
What you can do:
???Press Go to print the jobs.
???Press Return or Stop to delete the jobs from the hard disk without printing them.
Printing Alignment Page
What this message means:
The printer is processing or printing a test page that shows alignment values.
What you can do:
Wait until the page has completed printing.
See also:
<x> Alignment
Printing
Directory List
What this message means:
The printer is processing or printing a directory of all files stored in flash memory or on a hard disk.
What you can do:
Wait for the message to clear.
See also:
Print Directory
Printing
Font List
What this message means:
The printer is processing or printing a list of all available fonts for the specified printer language.
What you can do:
Wait for the message to clear.
See also:
Print Fonts
Printing Job
Accounting Stat
What this message means:
The printer is processing or printing all job accounting statistics stored on the hard disk.
What you can do:
Wait for the message to clear.
See also:
Job Acct Stat
Printing Menu
Settings
What this message means:
The printer is processing or printing the menu settings page.
What you can do:
Wait for the message to clear.
See also:
Print Menus; Printing a menu settings page
Prog Engine Code
What this message means:
The printer is programming new code into the flash memory.
What you can do:
Wait for the message to clear.
WARNING: Do not turn the printer off while this message is displayed.
Prog System Code
What this message means:
The printer is programming new system code.
What you can do:
Wait for the message to clear and the printer to reset.
WARNING: Do not turn the printer off while this message is displayed.
Program Flash
What this message means:
The printer is storing resources, such as fonts or macros, in flash memory.
What you can do:
Wait for the message to clear.
WARNING: Do not turn the printer off while this message is displayed.
Programming Disk
What this message means:
The printer is storing resources, such as fonts or macros, on the hard disk.
What you can do:
Wait for the message to clear.
WARNING: Do not turn the printer off while this message is displayed.
Programming Error P<x>
What this message means:
An error occurred while the printer was programming code into memory.
What you can do:
Correct the problem specified on the second line of the display:
Queuing and
Deleting Jobs
What this message means:
The printer is deleting one or more held jobs and sending one or more jobs to print.
What you can do:
Wait for the message to clear.
See also:
Printing and deleting held jobs
Queuing Jobs
What this message means:
The printer is sending one or more held jobs to print.
What you can do:
Wait for the message to clear.
See also:
Holding a job in the printer

Ready
What this message means:
The printer is ready to receive and process print jobs.
What you can do:
Send a job to print.
Ready Hex
What this message means:
The printer is in Hex Trace mode and is ready to receive and process print jobs.
What you can do:
???Send a job to print. All data sent to the printer is printed in hexadecimal and character representation. Control strings are printed, not executed.
???Turn the printer off and then on to exit Hex Trace mode and return to Ready status.
Reattach <device>
What this message means:
The specified device is either not fully connected to the printer or is experiencing a hardware failure.
What you can do:
???Reestablish communication by removing the specified device and reattaching it to the printer.
???Press Go to clear the message and continue printing without using the device.
???In the case of a hardware failure, turn the printer off and back on. If the error recurs, turn the printer off, remove the specified device, and call for service.
See also:
Calling for service
Remove Paper <specified bin>
What this message means:
The specified output bin, or bins, is full.
What you can do:
Remove the stack of paper from the specified bin(s) to clear the message.
Resetting
Active Bin
What this message means:
The printer is resetting to the active bin in a linked set of bins.
What you can do:
Wait for the message to clear.
Resetting
Fuser Cnt Value
What this message means:
The printer is resetting the counter that tracks wear on the fuser.
What you can do:
Wait for the message to clear.
Resetting the
Printer
What this message means:
The printer is resetting to the current default settings. Any active print jobs are cancelled.
What you can do:
Wait for the message to clear.
See also:
Changing menu settings

Restore Held
Jobs. Go/Stop?
What this message means:
Someone reset the printer or turned it on, and the printer detects Print and Hold jobs stored on the hard disk.
What you can do:
???Press Go. All Print and Hold jobs on the hard disk are restored to printer memory.
???Press Return or Stop. No Print and Hold jobs are restored to printer memory. The printer returns to the Ready state.
See also:
Holding a job in the printer
Restoring Factory
Defaults
What this message means:
The printer is restoring the factory default printer settings. When factory default settings are restored:
???All downloaded resources (fonts, macros, symbol sets) in the printer memory are deleted.
???All menu settings return to the factory default setting except:
???The Display Language setting in the Setup Menu.
???All settings in the Parallel Menu, Serial Menu, Network Menu, Infrared Menu, LocalTalk Menu, USB Menu, and Fax Menu.
What you can do:
Wait for the message to clear.
See also:
Restoring factory default settings
Restoring
Held Job xxx/yyy
What this message means:
The printer is restoring held jobs from the hard disk.
Note: xxx represents the number of the job being restored. yyy represents the total number of jobs to be restored.
What you can do:
???Wait for the message to clear.
???Select the Abort Restore menu item in the Job Menu.
See also:
Holding a job in the printer
Restoring Held Jobs
What this message means:
The printer is restoring held jobs from the hard disk.
What you can do:
Wait for the message to clear.
See also:
Holding a job in the printer
Serial <x>
What this message means:
A serial interface is the active communication link.
Setup Required
What this message means:
???When you unpacked the printer, you left a piece of packing material inside.
???A hardware component, such as an optional paper drawer, has not been installed correctly.
What you can do:
???Remove all packing material from inside the printer.
???Correctly install the component.
See also:
Setup Guide
Staples Low
What this message means:
The stapler has only a few staples remaining.
What you can do:
???Press Go to continue printing.
???Install a new staple cartridge to clear the message.
Std Bin Full
What this message means:
The standard bin is full.
What you can do:
Remove the stack of paper in the bin to clear the message.
Supplies
What this message means:
At least one of the printer supplies requires attention. For example, you may have a toner cartridge that is low on toner.
What you can do:
Press Menu to open the Supplies Menu and identify which supply item needs replacing. Replace the appropriate printer supplies.
Tray <x> Empty
What this message means:
The specified tray is out of paper.
What you can do:
Load paper in the tray to clear the message.
See also:
Loading the trays
Tray <x> Low
What this message means:
The specified tray is low on paper.
What you can do:
Add paper to the tray to clear the message.
See also:
Loading the trays
Tray <x> Missing
What this message means:
The specified tray is either missing or not fully inserted into the printer.
What you can do:
Insert the tray completely into the printer.
See also:
Loading the trays
Tray <x> Not Calibrated
What this message means:
The transparency sensor (in trays that have transparency sensing capability) is not calibrated.
What you can do:
???Press Go to clear the message.
Note: Paper will not be fed from the tray until the tray has been calibrated.
???Calibrate the tray in the Configuration Menu.
<type>
in <source>. Go?
What this message means:
The printer detects a type change in a type-sensing tray. The types are:
What you can do:
???Press Go to clear the message.
???Remove the tray and change the paper to a desired type.
USB <x>
What this message means:
The printer is processing data through the specified USB port.
Waiting
What this message means:
The printer has received a page of data to print but is waiting for an End of Job command, a Form Feed command, or additional data.
What you can do:
???Press Go to print the contents of the buffer.
???Press Menu to open the Job Menu and cancel the current job.
See also:
Canceling a print job
100???199 Service <message>
What these messages mean:
Messages labeled 100???199 relate to printer problems that may require printer service.
What you can do:
Turn the printer off and check all cable connections. Turn the printer back on. If the service message recurs, call for service and report the message number and description of the problem.
See also:
Calling for service
1565 Emul Error
Load Emul Option
What this message means:
The download emulator version on the firmware card does not match the printer code version.
This error can occur if you update printer firmware or move a firmware card from one printer to another.
What you can do:
The printer automatically clears the message in 30 seconds, and then disables the download emulator on the firmware card.
Obtain the correct download emulator version.
2<xx> Paper Jam
What this message means:
The printer detects a paper jam.
What you can do:
Clear the paper path.
See also:
Clearing the paper path
30 ITU Missing
What this message means:
The image transfer unit (ITU) is not installed or is installed incorrectly.
What you can do:
Turn the printer off, correctly install the image transfer unit, and then turn the printer on.
See also:
Replace the image transfer unit and transfer roller
30 <color> Toner Cart Missing
What this message means:
The specified toner cartridge is either missing or incorrectly installed.
What you can do:
Insert the toner cartridge completely into the printer. The printer automatically clears the message.
See also:
Replacing print cartridges
31 Defective <x> Cartridge
What this message means:
A defective print cartridge is installed.
What you can do:
Remove the specified print cartridge and install a new one.
See also:
Replacing print cartridges
32 Unsupported <color> Cartridge
What this message means:
An unsupported print cartridge is installed.
What you can do:
Remove the specified print cartridge and install a new one.
See also:
Replacing print cartridges
33 Calibration Error <x>
What this message means:
The printer detects a calibration error for a particular color.
What you can do:
Press Go to continue printing.
34 Short Paper
What this message means:
The printer has determined that the length of the paper in the source specified on the second line of the display is too short to print the formatted data. For auto-size sensing trays, this error occurs if the paper guides are not in the correct position.
What you can do:
???Press Go to clear the message and continue printing. The printer does not automatically reprint the page that prompted the message.
???Make sure the Paper Size setting in the Paper Menu is correct for the size paper you are using. If MP Feeder Size is set to Universal, make sure your paper is large enough for the formatted data.
???Press Menu to open the Job Menu and cancel the current job.
See also:
Paper and specialty media specifications

35 Res Save Off
Deficient Memory
What this message means:
The printer lacks the memory needed to enable Resource Save. This message usually indicates too much memory is allocated for one or more of the printer link buffers.
What you can do:
???Press Go to disable Resource Save and continue printing.
???To enable Resource Save after you get this message:
???Make sure the link buffers are set to Auto, and exit the menus to activate the link buffer changes.
???When Ready is displayed, enable Resource Save from the Setup Menu.
???Install additional memory.
37 Insufficient
Collation Area
What this message means:
The printer memory (or hard disk, if installed) does not have the free space necessary to collate the print job.
What you can do:
???Press Go to print the portion of the job already stored and begin collating the rest of the job.
???Press Menu to open the Job Menu and cancel the current job.
See also:
Canceling a print job
37 Insufficient
Defrag Memory
What this message means:
The printer cannot defragment flash memory, because the printer memory used to store undeleted flash resources is full.
What you can do:
???Delete fonts, macros, and other data in printer memory.
???Install additional printer memory.

37 Insufficient
Memory
What this message means:
The printer memory is full and cannot continue processing current print jobs.
What you can do:
???Press Go to clear the message and continue the current print job. The printer frees memory by deleting the oldest held job and continues deleting held jobs until there is enough printer memory to process the job.
???Press Stop to clear the message without deleting any held jobs. The current job may not print correctly.
???Press Menu to open the Job Menu and cancel the current job.
???To avoid this error in the future:
???Delete fonts, macros, and other data in printer memory.
???Install additional printer memory.
Note: The messages 37 Insufficient Memory and Held Jobs may be lost alternate on the display.
See also:
Holding a job in the printer; Held Jobs may be lost
38 Memory Full
What this message means:
The printer is processing data, but the memory used to store pages is full.
What you can do:
???Press Go to clear the message and continue printing the job. The job may not print correctly.
???Press Menu to open the Job Menu and cancel the current job.
???To avoid this error in the future:
???Simplify the print job by reducing the amount of text of graphics on a page and deleting unnecessary downloaded fonts or macros.
???Install additional printer memory.
See also:
Canceling a print job

39 Complex Page
What this message means:
The page may not print correctly because the print information on the page is too complex.
What you can do:
???Press Go to clear the message and continue printing the job. The job may not print correctly.
???Press Menu to open the Job Menu and cancel the current job.
???To avoid this error in the future:
???Reduce the complexity of the page by reducing the amount of text or graphics on the page and deleting unnecessary downloaded fonts or macros.
???Set Page Protect to On in the Setup Menu.
???Install additional printer memory.
See also:
Setup Menu
4<x> Unsupported Firmware Card
What this message means:
The printer detects an unsupported version of firmware on the installed firmware card.
What you can do:
???Turn the printer off, and then press and hold Go while turning it on. The printer reads the code on the system card and bypasses the code on the firmware card.
???Remove the firmware card.
See also:
Setup Guide
51 Defective Flash
What this message means:
The printer detects defective flash memory.
What you can do:
Press Go to clear the message and continue printing. You must install different flash memory before you can download any resources to flash.

52 Flash Full
What this message means:
There is not enough free space in the flash memory to store the data you are trying to download.
What you can do:
???Press Go to clear the message and continue printing. Downloaded fonts and macros not previously stored in flash memory are deleted.
???Delete fonts, macros, and other data stored on the flash memory.
???Install flash memory with more storage capacity.
53 Unformatted
Flash
What this message means:
The printer detects unformatted flash memory.
What you can do:
???Press Go to clear the message and continue printing. You must format the flash memory before you can store any resources on it.
???If the error message remains, the flash memory may be defective and require replacing.
What this message means:
The printer has detected a serial interface error on a serial port.
What you can do:
???Make sure the serial link is set up correctly and you are using the appropriate cable.
???Press Go to clear the message and continue printing. The job may not print correctly.
???Press Menu to open the Job Menu and reset the printer.
What these messages mean:
The printer cannot establish communications with an installed network port.
What you can do:
???Press Go to clear the message and continue printing. The job may not print correctly.
???Program new firmware for the network interface by way of the parallel port.
???Press Menu to open the Job Menu and reset the printer.
What this message means:
The printer has lost the connection to an external print server (also called an external network adapter or ENA).
What you can do:
???Make sure the cable connecting the ENA and the printer is securely attached. Turn the printer off and then on to reset the printer.
???Press Go to clear the message. The printer erases any reference to the ENA and then resets.
What this message means:
Data has been sent to the printer through a serial port, but the serial port is disabled.
What you can do:
???Press Go to clear the message. The printer discards any data received through the serial port.
???Make sure the Serial Buffer menu item in the Serial Menu is not set to Disabled.
See also:
Serial Buffer
What this message means:
Data has been sent to the printer through a parallel port, but the parallel port is disabled.
What you can do:
???Press Go to clear the message. The printer discards any data received through the parallel port.
???Make sure the Parallel Buffer menu item in the Parallel Menu is not set to Disabled.
See also:
Parallel Buffer
What this message means:
Data has been sent to the printer through a USB port, but the USB port is disabled.
What you can do:
???Press Go to clear the message. The printer discards any data received through the USB port.
???Make sure the USB Buffer menu item in the USB Menu is not set to Disabled.
See also:
USB Buffer
58 Input
Config Error
What this message means:
Too many drawers with matching trays are installed on the printer.
What you can do:
Turn off and unplug the printer. Remove the additional drawers. Plug in the printer and turn it on.
See also:
Setup Guide
58 Too Many
Disks Installed
What this message means:
Too many hard disks are installed on the printer. The printer only supports one hard disk at a time.
What you can do:
Turn off and unplug the printer. Remove the excess hard disks from the printer. Plug in the printer and turn it on.
See also:
Removing memory and option cards
58 Too Many
Flash Options
What this message means:
Too many flash memory options are installed on the printer.
What you can do:
Turn off and unplug the printer. Remove the excess flash memory. Plug in the printer and turn it on.
See also:
Removing memory and option cards
59 Incompatible <device>
What this message means:
You have installed an incompatible device.
What you can do:
???Remove the device and press Go to clear the message.
61 Defective Disk
What this message means:
The printer detects a defective hard disk.
What you can do:
???Press Go to clear the message and continue printing.
???Install a different hard disk before you perform any operations that require one.
See also:
Setup Guide
62 Disk Full
What this message means:
There is not enough memory on the hard disk to store the data sent to the printer.
What you can do:
???Press Go to clear the message and continue processing. Any information not previously stored on the hard disk is deleted.
???Delete fonts, macros, and other data stored on the hard disk.
63 Unformatted Disk
What this message means:
The printer detects an unformatted hard disk.
What you can do:
???Press Go to clear the message and continue printing.
???Format the disk before performing any disk operations. To format the disk, select Format Disk from the Utilities Menu.
???If the error message remains, the hard disk may be defective and require replacing. Install a new hard disk and format it.
See also:
Format Disk
64 Disk Not Supported
What this message means:
The printer detects that an incompatible hard disk is installed.
What you can do:
Turn the printer off and remove the disk.
See also:
Removing memory and option cards
64 Unsupported Disk Format
What this message means:
The printer detects an unsupported disk format.
What you can do:
???Press Go to clear the message.
???Format the disk.
Note: Disk operations will not be allowed until the disk is formatted.
80 Fuser Maintenance
What this message means:
The counter that tracks wear on the fuser has reached its limit.
What you can do:
???Press Go to continue printing.
???If print quality is unacceptable, replace the fuser.
See also:
Replacing the fuser
81 Engine Code
CRC Failure
What this message means:
Microcode in the engine flash code module has failed a system check.
What you can do:
???Press Go to clear the message.
???Discard the code. Retransmit the microcode data from the host computer.
82 Waste Bottle Nearly Full
What this message means:
The toner waste container is almost full.
What you can do:
???Press Go to clear the message and continue printing.
???Replace the toner waste container.
See also:
82 Waste Toner Bottle Full; Replacing the toner waste container
82 Waste Toner Bottle Full
What this message means:
The toner waste container is full.
What you can do:
Replace the toner waste container and press Go to clear the message.
See also:
Replacing the toner waste container
82 Waste Toner Bottle Missing
What this message means:
The toner waste container is missing.
What you can do:
Replace the toner waste container and press Go to clear the message.
See also:
Replacing the toner waste container
83 ITU Maintenance
What this message means:
The counter that tracks wear on the image transfer unit has reached its limit.
What you can do:
???Press Go to continue printing.
???If print quality is unacceptable, replace the image transfer unit.
See also:
Replace the image transfer unit and transfer roller
84 Oiler Nearly Exhausted
What this message means:
The web oiler is nearing the end of its life.
What you can do:
???Press Go to clear the message and continue printing.
???Replace the web oiler.
See also:
84 Replace Oiler
84 Replace Oiler
What this message means:
The web oiler has reached its end of life or is missing from the printer.
What you can do:
Replace the web oiler.
See also:
84 Oiler Nearly Exhausted
87 Fuser
Missing
What this message means:
The fuser is either missing or incorrectly installed.
What you can do:
Correctly install the fuser to clear the message and continue printing.
See also:
Replacing the fuser
88 <color> Toner Low
What this message means:
The printer has detected that the toner supply in the specified cartridge is low. If you do not have the specified toner cartridge on hand, order one now. You can print approximately 250 more pages before the cartridge becomes empty.
What you can do:
???Replace the specified toner cartridge.
???Press Go to clear the message and continue printing. The Supplies message is displayed until you replace the specified toner cartridge.
See also:
Replacing print cartridges
900???999 Service <message>
What these messages mean:
Messages labeled 900???999 relate to printer problems that may require printer service.
What you can do:
Turn the printer off and check all cable connections. Turn the printer back on. If the service message recurs, call for service and report the message number and description of the problem.
See also:
Calling for service
Use the LocalTalk Menu to change printer settings affecting jobs sent to the printer through a LocalTalk port.
Select a menu item for more details:
Note: Values marked by an asterisk (*) are the factory default settings.
Job Buffering
Purpose:
To temporarily store jobs on the printer hard disk before printing.
Values:
Note: Changing the Job Buffering menu item automatically resets the printer.
LocalTalk Addr
Purpose:
To identify the LocalTalk Node number assigned to the printer. This menu item cannot be modified through the operator panel.
LocalTalk Buffer
Purpose:
To configure the size of the LocalTalk input buffer.
Values:
Note: Changing the LocalTalk Buffer menu item automatically resets the printer.
See also:
Resource Save
LocalTalk Name
Purpose:
To identify the printer model name stored in printer memory. This menu item cannot be modified through the operator panel.
LocalTalk Port
Purpose:
To activate the LocalTalk port.
Values:
LocalTalk Zone
Purpose:
To identify the LocalTalk Zone provided by the LocalTalk network. This menu item cannot be modified through the operator panel.
NPA Hosts
Purpose:
To specify the maximum number of NPA hosts that can register for NPA alerts.
Values:
1...10 (2*)
NPA Mode
Purpose:
To specify whether the printer performs the special processing required for bidirectional communication, following the conventions defined in the Network Printing Alliance (NPA) Protocol.
Values:
Auto* Printer examines the data to determine the format and then processes it appropriately.
Note: Changing this menu item automatically resets the printer.
PCL SmartSwitch
Purpose:
To configure the printer so it automatically switches to PCL emulation when a print job received through the LocalTalk port requires it, regardless of the default printer language.
Values:
See also:
PS SmartSwitch; Printer Language
PS SmartSwitch
Purpose:
To configure the printer so it automatically switches to PostScript emulation when a print job received through the LocalTalk port requires it, regardless of the default printer language.
Values:
See also:
PCL SmartSwitch; Printer Language

The Job Menu is only available when the printer is busy processing or printing a job, when a printer message is displayed, or when the printer is in Hex Trace mode. Press Menu to open the Job Menu.
Select a menu item for more details:
Cancel Fax
Purpose:
To cancel outgoing faxes before they are transmitted or to cancel incoming faxes before they finish printing.
Values:
RCancels an incoming fax. When the fax number for the sending machine is displayed, press Select to cancel the incoming fax.
DCancels an outgoing fax. When the fax number for the receiving machine is displayed, press Select to cancel the fax job. If the telephone number of the fax you want to cancel is not displayed, use the Menu button to scroll through the list. The printer can display up to five outgoing fax numbers in the outgoing fax queue. When more than five faxes are in the queue, the next fax job appears on the display as an outgoing fax is transmitted or canceled.
Cancel Job
Purpose:
To cancel the current print job.
Note: Cancel Job is only displayed if the printer is processing a job or has a job in printer memory.
Confidential Job
Purpose:
To print confidential jobs stored in printer memory. (When the Confidential Job prints, it is automatically deleted from printer memory.)
First enter the Personal Identification Number (PIN) associated with your Confidential Job:
Then select a value:
Held Jobs
Purpose:
To print Reserve Print, Repeat Print, or Verify Print jobs stored in printer memory.
Values:
Print Buffer
Purpose:
To print any data stored in the print buffer.
Note: Print Buffer is only available when you enter the Job Menu while Waiting is displayed. The Waiting state occurs if an incomplete job is sent to the printer or an ASCII job, such as a print screen command, is printing.
Reset Active Bin
Purpose:
To define the active bin as the start bin (the first bin to receive printed output) in a set of linked bins.
Reset Printer
Purpose:
To reset the printer to the user default value for each menu item, delete all downloaded resources (fonts, macros, and symbol sets) stored in printer memory (RAM), and delete all data in the interface link buffer.
Note: Before selecting Reset Printer, exit the software application you are using.
Use the Infrared Menu to change printer settings affecting jobs sent to the printer through an infrared port.
Select a menu item for more details:
Note: Values marked by an asterisk (*) are the factory default settings.
Infrared Buffer
Purpose:
To configure the size of the infrared input buffer.
Values:
Note: Changing the Infrared Buffer menu item automatically resets the printer.
See also:
Resource Save
Infrared Port
Purpose:
To activate the infrared port.
Values:
Job Buffering
Purpose:
To temporarily store jobs on the printer hard disk before printing.
Values:
Note: Changing the Job Buffering menu item automatically resets the printer.
Max Baud Rate
Purpose:
To specify the rate at which data can be received through the infrared port.
Values:
2400115200
9600576000
19200 1152000*
38400 4000000
57600
The maximum baud possible for both the printer and the infrared adapter is automatically set during a power on reset. However, if your printer is situated in a bright or highly reflective environment, you may experience intermittent communication problems. If you do, select a lower baud for the infrared connection.
NPA Mode
Purpose:
To specify whether the printer performs the special processing required for bidirectional communication, following the conventions defined in the Network Printing Alliance (NPA) Protocol.
Values:
Auto* Printer examines the data to determine the format and then processes it appropriately.
Changing this menu item automatically resets the printer.
PCL SmartSwitch
Purpose:
To configure the printer so it automatically switches to PCL emulation when a print job received through the infrared port requires it, regardless of the default printer language.
Values:
See also:
PS SmartSwitch; Printer Language
PS SmartSwitch
Purpose:
To configure the printer so it automatically switches to PostScript emulation when a print job received through the infrared port requires it, regardless of the default printer language.
Values:
See also:
PCL SmartSwitch; Printer Language
Transmit Delay
Purpose:
To define the amount of time, in seconds, the printer must wait before transmitting meaningful infrared data to the host computer, as well as the amount of time the printer requests that the host computer wait before transmitting infrared data.
Values:
Window Size
Purpose:
To specify the maximum number of infrared frames the printer can receive before sending an acknowledgment to the host computer.
Values:
Auto* Printer sets the Window Size value during a power on reset to maximize link performance (recommended).
1User sets the Window Size to one frame (1). If you have trouble printing using the infrared port, changing the Window Size menu item to 1 may resolve the problem.
Use the Finishing Menu to define how the printer delivers the printed output. Select a menu item for more details:
Note: Values marked by an asterisk (*) are the factory default settings.
Blank Pages
Purpose:
To specify whether to include application-generated blank pages as part of your printed output.
Values:
Collation
Purpose:
To keep the pages of a print job stacked in sequence, particularly when printing multiple copies of the job.
Values:
Copies
Purpose:
To set the number of copies you want for the printer default value. (Set the number of copies required for a specific job from the printer driver. Values selected from the printer driver always override values selected from the operator panel.)
Values:
1...999 (1*)
See also:
Collation
Duplex
Purpose:
To set duplexing as the default for all print jobs. (Select Duplex from the printer driver to duplex only specific jobs.)
Values:
Off* Prints on one side of the paper.
See also:
Duplex Bind
Duplex Bind
Purpose:
To define the way duplexed pages would be bound, and how the printing on the back of the sheet (even-numbered pages) is oriented in relation to the printing on the front (odd-numbered pages).
Values:
See also:
Duplex
Hole Punch
Purpose:
To punch holes along the edge of all printed output. (Select Hole Punch from the printer driver to punch holes only in output for a specific job.)
Values:
Off* Does not punch holes in printed output.
Multipage Border
Purpose:
To print a border around each page image when using Multipage Print.
Values:
None* Does not print a border around each page image.
See also:
Multipage Print
Multipage Order
Purpose:
To determine the positioning of multiple page images when using Multipage Print. The positioning depends on the number of images and whether the images are portrait or landscape in orientation.
For example, if you select 4-Up multipage printing and portrait orientation, the results differ depending on the Multipage Order value you select:
Values:
Horizontal*
Vertical
Rev Horizontal
Rev Vertical
See also:
Multipage Print
Multipage Print
Purpose:
To print multiple page images on one side of a sheet of paper. Also called n-up or Paper Saver.
Values:
See also:
Multipage Border; Multipage Order; Multipage View
Multipage View
Purpose:
To determine the orientation of a multipage sheet.
Values:
See also:
Multipage Print
Offset Pages
Purpose:
To offset the output of each print job or each copy of a print job, making it easier to separate the documents stacked in the output bin.
Values:
Between Copies Offsets each copy of a print job.
Separator Sheets
Purpose:
To insert blank separator sheets between jobs, between multiple copies of a job, or between each page of a job.
Values:
See also:
Separator Source; Collation
Separator Source
Purpose:
To specify the paper source that holds separator sheets.
Values:
See also:
Separator Sheets; Configure MP
Staple Job
Purpose:
To set stapling as the default for all print jobs. (Select stapling from the printer driver if you want to staple only specific jobs.)
Values:
Off* Does not staple print jobs.
Staple Prime Src
Purpose:
To specify the paper source you want the printer to use when it primes the stapler. When a staple cartridge is replaced or a staple jam is cleared, the printer may need to prime the stapler by stapling a sheet of paper several times.
Values:
Use the Color Menu to adjust print quality and customize color printing.
Select a menu item for more details:
Note: Values marked by an asterisk (*) are the factory default settings.
Color Correction
Purpose:
To adjust the printed color to better match the colors of other output devices or standard color systems.
Values:
Note: Due to the differences between additive and subtractive colors, certain colors that appear on your monitor are impossible to duplicate on your printer.
Manual Color
Purpose:
To let users customize color correction output from the operator panel.
Values:
Print Mode
Purpose:
To determine whether images are printed in a monochrome grayscale or in color.
Values:
Color*
Black & White
Note: Selections made in the printer PostScript or PCL drivers for Windows will override other selections.
Print Resolution
Purpose:
To define the number of dots printed per inch (dpi). The higher the value, the sharper the clarity of printed characters and graphics.
Values:
Toner Darkness
Purpose:
To lighten or darken text images, or conserve toner.
Values:
Select a lower value for finer line width, higher definition in graphics, and lighter grayscale images. Select a higher value for bolder line widths or darker grayscale images. Select 5 for very bold text. Select a value less than 4 to conserve toner.
A vertical bar ( | ) indicates the factory default value. An arrow symbol ( V ) indicates a user default value.
Use the Utilities Menu to print a variety of listings relating to available printer resources, printer settings, and print jobs. Other menu items let you set up printer hardware and troubleshoot printer problems.
Select a menu item for more details:
Color Adjust
Purpose:
To manually relinearize the color tables, adjusting for variations in output that occur as a result of environmental conditions.
Color Samples
Purpose:
To assist in selecting colors used by certain applications.
Defragment Flash
Purpose:
To retrieve storage area lost when resources are deleted from flash memory.
Values:
Yes Printer transfers all resources stored in flash memory to printer memory and then reformats the flash memory option. When the format operation is complete, the resources are loaded back into flash memory.
WARNING: Do not turn off the printer while the flash is defragmenting.
Factory Defaults
Purpose:
To return your printer settings to the factory default values.
Values:
Format Disk
Purpose:
To format the printer hard disk.
Values:
Yes Deletes any data stored on the hard disk and prepares the device to receive new resources.
WARNING: Do not turn off the printer while the hard disk is formatting.
Format Flash
Purpose:
To format the flash memory.
Values:
WARNING: Do not turn off the printer while the flash is formatting.
Hex Trace
Purpose:
To help isolate the source of a print job problem. With Hex Trace selected, all data sent to the printer is printed in hexadecimal and character representation. Control codes are not executed.
To exit Hex Trace, turn the printer off or reset the printer from the Job Menu.
Job Acct Stat
Purpose:
To print a listing of all job statistics stored on the hard disk, or to clear all statistics on the disk.
Values:
Print Prints all statistics available for the most recent print jobs.
Clear Deletes all accumulated job statistics from the hard disk.
See also:
Job Accounting, Job Acct Limit
Print Demo
Purpose:
To view a list of the demo files available in printer memory, in flash memory, and on optional hard disk.
Print Directory
Purpose:
To print a list of all the resources stored in flash memory or on the hard disk.
Note: Print Directory is available only when either a nondefective flash or disk is installed and formatted, and Job Buffer Size is not set to 100%.
Print Fonts
Purpose:
To print a sample of all the fonts available for the selected printer language.
Values:
Print Menus
Purpose:
To print a listing of the current user default values, the installed options, the amount of installed printer memory, and the status of printer supplies.
Print Net <x> Setup
Purpose:
To print information relating to the internal print server and the network settings defined by the Network <x> Setup menu item in the Network Menu.
Use the USB Menu to change printer settings affecting a Universal Serial Bus (USB) port (USB Option <x>).
Select a menu item for more details:
Note: Values marked by an asterisk (*) are the factory default settings.
Job Buffering
Purpose:
To temporarily store jobs on the printer hard disk before printing.
Values:
Note: Changing the Job Buffering menu item automatically resets the printer.
MAC Binary PS
Purpose:
To configure the printer to process Macintosh binary PostScript print jobs.
Values:
NPA Mode
Purpose:
To specify whether the printer performs the special processing required for bidirectional communication, following the conventions defined in the Network Printing Alliance (NPA) Protocol.
Values:
Note: Changing this menu item automatically resets the printer.
PCL SmartSwitch
Purpose:
To configure the printer so it automatically switches to PCL emulation when a print job received through the USB port requires it, regardless of the default printer language.
Values:
See also:
PS SmartSwitch; Printer Language
PS SmartSwitch
Purpose:
To configure the printer so it automatically switches to PostScript emulation when a print job received through the USB port requires it, regardless of the default printer language.
Values:
See also:
PCL SmartSwitch; Printer Language
USB Buffer
Purpose:
To configure the size of the USB input buffer.
Values:
Note: Changing the USB Buffer menu item automatically resets the printer.
See also:
Resource Save
The Supplies Menu provides information about printer supplies that require attention. It is only available when a supply is low or needs replacement.
Select a menu item for more details:
???<color> Toner
???Oiler
???Waste Bottle
<color> Toner
Purpose:
To view the status of the color print cartridges.
Values:
Low
Change Cartridge
See also:
Replacing print cartridges
Oiler
Purpose:
To view the status of the web oiler.
Values:
Near Exhausted
Waste Bottle
Purpose:
To view the status of the toner waste container.
Values:
Note: Once the toner waste container reaches Full, the printer will print up to 15 more pages from the buffer and then stop until the container is replaced.
Use the Setup Menu to configure a variety of printer features.
Select a menu item for more details:
Note: Values marked by an asterisk (*) are the factory default settings.
Alarm Control
Purpose:
To establish whether the printer sounds an alarm when the printer requires operator intervention.
Values:
Auto Continue
Purpose:
To define the amount of time (in seconds) the printer waits after displaying an operator intervention error message before it resumes printing.
Values:
Display Language
Purpose:
To determine the language of the text on the operator panel display.
Values:
Note: All values may not be available.
Download Target
Purpose:
To specify the storage location for downloaded resources.
Values:
RAM* All downloaded resources are automatically stored in printer memory (RAM).
Flash All downloaded resources are automatically stored in flash memory.
Storing downloaded resources in flash memory or on a hard disk is permanent storage rather than the temporary storage that RAM provides. The resources remain in the flash memory or on the hard disk even when the printer is turned off. Use MarkVision to download resources to the printer.
Hole Punch Alarm
Purpose:
To specify how the printer responds when the hole punch box becomes full.
Values:
See also:
Auto Continue
Jam Recovery
Purpose:
To establish whether the printer reprints jammed pages.
Values:

Job Accounting
Purpose:
To store statistical information about your most recent print jobs on the hard disk. The statistics include whether the job printed with or without errors, the print time, the job size (in bytes), the requested paper size and paper type, the total number of printed pages, and the number of copies requested.
Values:
Off* Printer does not store job statistics on disk.
Note: Job Accounting is only displayed when a hard disk is installed, is neither defective nor Read/Write or Write protected, and Job Buffer Size is not set to 100%.
See also:
Job Acct Limit; Job Acct Stat
Job Acct Limit
Purpose:
To specify the number of print jobs for which statistics are maintained on your printer hard disk.
Values:
10...1000 (1000*) Stores statistics for the specified number of print jobs.
If you set Job Acct Limit to 10, the statistics from the 10 most recent print jobs are stored on the hard disk. When the limit is reached, statistics for the oldest print job are discarded and replaced with the statistics from the current print job. If you change the Job Accounting Limit, all job statistics currently stored on the hard disk are deleted.
Note: Job Acct Limit is only displayed when a hard disk is installed, is neither defective nor Read/Write or Write protected, Job Buffer Size is not set to 100%, and Job Accounting is set to On.
See also:
Job Accounting, Job Acct Stat

Page Protect
Purpose:
To successfully print a page that may otherwise generate Complex Page errors.
Values:
Off* Prints a partial page of data if memory is insufficient to process the entire page.
If, after selecting On, you still cannot print the page, you may also have to reduce the size and number of fonts on the page, or increase the installed printer memory.
For most print jobs, you do not need to select On. When On is selected, printing may be slower.
Power Saver
Purpose:
To specify the amount of time (in minutes) the printer waits after a job is printed before it goes into a reduced power state.
Values:
The factory default Power Saver setting depends on your printer model. Print the menu settings page to determine the current Power Saver setting. When the printer is in Power Saver mode, it is still ready to receive print jobs.
Select 1 to put the printer in Power Saver mode one minute after it finishes a print job. This uses much less energy, but requires more warm-up time for the printer. Select 1 if your printer shares an electrical circuit with room lighting and you notice lights flickering.
Select a high value if your printer is in constant use. Under most circumstances, this keeps the printer ready to print with minimum warm-up time. Select a value between 1 and 240 minutes if you want a balance between energy consumption and a shorter warm-up period.

Print Area
Purpose:
To modify the logical and physical printable area.
Values:
Normal*
Fit to Page
Whole Page
Note: The Whole Page setting only affects pages printed using PCL 5 interpreter. This setting has no effect on pages printed using the PCL XL or PostScript interpreters. If you try to print any data in the non-printable area defined by Normal Print Area, the printer will clip the image at the boundary defined by the Normal defined printable area.
Print Timeout
Purpose:
To specify the amount of time (in seconds) the printer waits before printing the last page of a print job that does not end with a command to print the page. The print timeout counter does not start until Waiting is displayed.
Values:
Printer Language
Purpose:
To establish the default printer language used to communicate data from the computer to the printer.
Values:
PCL Emulation PCL emulation, compatible with Hewlett-Packard printers.
PS Emulation* PostScript emulation, compatible with Adobe PostScript language.
Note: Setting a printer language as the default does not prevent a software application from sending print jobs that use the other language.
Printer Usage
Purpose:
To determine the behavior of the image transfer unit during printing.
Values:
Resource Save
Purpose:
To determine what the printer does with downloaded resources, such as fonts and macros stored in RAM, if the printer receives a job that requires more memory than is available.
Values:
Staple Alarm
Purpose:
To specify how the printer responds when it is out of staples.
Values:
See also:
Auto Continue
Toner Alarm
Purpose:
To specify how the printer responds when it is low on toner.
Values:
See also:
Auto Continue
Wait Timeout
Purpose:
To specify the amount of time (in seconds) the printer waits to receive additional bytes of data from the computer. When this timeout expires, the print job is canceled.
Values:
15...65535 (40*) Specifies the amount of time the printer waits for additional data before it cancels the job.
Note: Wait Timeout is only available when you use PostScript emulation. This menu item has no effect on PCL emulation print jobs.
Use the Serial Menu to change printer settings affecting jobs sent to the printer through a serial port (either Standard Serial or Serial Opt <x>).
Select a menu item for more details:
Note: Values marked with an asterisk (*) are the factory default settings.
Baud
Purpose:
To specify the rate at which data can be received through the serial port.
Values:
120057600
2400115200
4800138200
9600* 172800
19200 230400
38400 345600
Data Bits
Purpose:
To specify the number of data bits that are sent in each transmission frame.
Values:
7
8*
Honor DSR
Purpose:
To determine whether the printer uses the Data Set Ready (DSR) signal. DSR is one of the handshaking signals for most serial interface cables.
Values:
The serial interface uses DSR to distinguish data sent by the computer from data created by electrical noise in the serial cable. This electrical noise can cause stray characters to print. Select On to prevent stray characters from printing.
Job Buffering
Purpose:
To temporarily store jobs on the printer hard disk before printing.
Values:
Note: Changing the Job Buffering menu item automatically resets the printer.
NPA Mode
Purpose:
To specify whether the printer performs the special processing required for bidirectional communication, following the conventions defined in the Network Printing Alliance (NPA) Protocol.
Values:
Note: Changing this menu item automatically resets the printer.
Parity
Purpose:
To select the parity for serial input and output data frames.
Values:
Even
Odd
None*
Ignore
PCL SmartSwitch
Purpose:
To configure the printer so it automatically switches to PCL emulation when a print job received through the serial port requires it, regardless of the default printer language.
Values:
See also:
PS SmartSwitch; Printer Language
PS SmartSwitch
Purpose:
To configure the printer so it automatically switches to PostScript emulation when a print job received through the serial port requires it, regardless of the default printer language.
Values:
See also:
PCL SmartSwitch; Printer Language
Robust XON
Purpose:
To determine whether the printer communicates availability to the computer.
Values:
This menu item only applies to the serial port if Serial Protocol is set to XON/XOFF.
RS-232/RS-422
Purpose:
To specify the type of serial communication.
Values:
RS-232*
RS-422
Note: Selecting RS-422 automatically sets Serial Protocol to XON/XOFF.
RS-422 Polarity
Purpose:
To establish the behavior of the positive and negative signals when using RS-422 serial communication.
Values:
Normal* Uses default definition of one and zero.
Reverse Reverses the definition of one and zero, thereby allowing a positive connection to a host???s negative terminal without changing the physical cable.
Serial Buffer
Purpose:
To configure the size of the serial input buffer.
Values:
Note: Changing the Serial Buffer menu item automatically resets the printer.
See also:
Resource Save
Serial Protocol
Purpose:
To select the hardware and software handshaking values for the serial interface.
Values:
Use the PostScript Menu to change printer settings that only affect jobs using the PostScript emulation printer language.
Select a menu item for more details:
???Font Priority
???Image Smoothing
???Print PS Error
Note: Values marked by an asterisk (*) are the factory default settings.
Font Priority
Purpose:
To establish the font search order.
Values:
Resident* Printer searches printer memory for the requested font before searching flash memory or hard disk.
Flash/Disk Printer searches the hard disk and flash memory for the requested font before searching printer memory.
Note: Font Priority is only displayed when a formatted flash or hard disk is installed, is neither defective nor Read/Write or Write protected, and Job Buffer Size is not set to 100%.
Image Smoothing
Purpose:
To enhance the contrast and sharpness of low resolution bitmapped images (such as images downloaded from the World Wide Web) and smooth their color transitions.
Values:
Off* Uses default resolution when printing all images.
Note: Image Smoothing has no effect on images that are 300 dpi or higher resolution.
Print PS Error
Purpose:
To print a page defining the PostScript emulation error when an error occurs.
Values:
Off* Discards the print job without printing an error message.
Use the PCL Emul Menu to change printer settings that only affect jobs using the PCL emulation printer language.
Select a menu item for more details:
Note: Values marked by an asterisk (*) are the factory default settings.
A4 Width
Purpose:
To select the width of the logical page for A4 size paper.
Values:
198 mm* Makes the logical page compatible with the Hewlett-Packard LaserJet 5 Printer.
203 mm Makes the logical page wide enough to print eighty 10-pitch characters.
Auto CR after LF
Purpose:
To specify whether the printer automatically performs a carriage return after a line feed control command.
Values:
Off* Printer does not perform a carriage return after a line feed control command.
Auto LF after CR
Purpose:
To specify whether the printer automatically performs a line feed after a carriage return control command.
Values:
Off* Printer does not perform a line feed after a carriage return control command.
Font Name
Purpose:
To choose a specific font from the specified font source.
Values:
R0 Courier 10*
The font name and font ID for all fonts in the selected font source are displayed. The font source abbreviation is R for resident, F for flash, K for disk, and D for download.
See also:
Font Source
Font Source
Purpose:
To determine the set of fonts displayed in the Font Name menu item.
Values:
See also:
Font Name
Lines per Page
Purpose:
To determine the number of lines that print on each page.
Values:
1...255
60* (country-specific factory default values)
64* (country-specific factory default values)
The printer sets the amount of space between each line (vertical line spacing) based on the Lines per Page, Paper Size, and Orientation menu items. Select the correct Paper Size and Orientation before changing Lines per Page.
See also:
Orientation; Paper Size
Orientation
Purpose:
To determine how text and graphics are oriented on the page.
Values:
Pitch
Purpose:
To specify the font pitch for scalable monospaced fonts.
Values:
0.08...100 (in increments of 0.01 cpi)
10*
Pitch refers to the number of fixed-space characters in a horizontal inch of type. You can select a pitch from 0.08 to 100 characters per inch (cpi) in increments of 0.01 cpi. For nonscalable monospaced fonts, the pitch is displayed, but cannot be changed.
Note: Pitch is only displayed for fixed, or monospaced, fonts.
Point Size
Purpose:
To change the point size for scalable typographic fonts.
Values:
1...1008 (in increments of 0.25 points)
12*
Point size refers to the height of the characters in the font. One point equals approximately 1/72 of an inch. You can select point sizes from 1 to 1008 in increments of 0.25 points.
Note: Point Size is only displayed for typographic fonts.
Symbol Set
Purpose:
To choose a symbol set for a specified font name.
Values:
10U PC-8* (country-specific factory default values)
12U PC-850* (country-specific factory default values)
A symbol set is a set of alphabetic and numeric characters, punctuation, and special symbols used when printing with a selected font. Symbol sets support the different requirements for languages or specific applications, such as math symbols for scientific text. Only the symbol sets supported for the selected font name are displayed.
See also:
Font Name
Tray Renumber
Purpose:
To configure your printer to work with printer drivers or applications that use different source assignments for the paper trays.
First select a paper source:
Then select a value:
Other Tray Renumber selections:
Use the Parallel Menu to change printer settings affecting jobs sent to the printer through a parallel port (either Std Parallel or Parallel Opt <x>).
Select a menu item for more details:
Note: Values marked by an asterisk (*) are the factory default settings.
Advanced Status
Purpose:
To enable bidirectional communication through the parallel port.
Values:
On* Enables bidirectional communication through the parallel interface.
Honor Init
Purpose:
To determine whether the printer honors hardware initialization requests from the computer. The computer requests initialization by activating the INIT signal on the parallel interface. Many personal computers activate the INIT signal each time the computer is turned on and off.
Values:
Job Buffering
Purpose:
To temporarily store jobs on the printer hard disk before printing.
Values:
Note: Changing the Job Buffering menu item automatically resets the printer.
MAC Binary PS
Purpose:
To configure the printer to process Macintosh binary PostScript print jobs.
Values:
NPA Mode
Purpose:
To specify whether the printer performs the special processing required for bidirectional communication, following the conventions defined in the Network Printing Alliance (NPA) Protocol.
Values:
Note: Changing this menu item automatically resets the printer.
Parallel Buffer
Purpose:
To configure the size of the parallel input buffer.
Values:
Note: Changing the Parallel Buffer menu item automatically resets the printer.
See also:
Resource Save
Parallel Mode 1
Purpose:
To control the pull-up resistors on the parallel port signals. This menu item is useful for personal computers that have open collector outputs on the parallel port signals.
Values:
Off* Enables the resistors.
Parallel Mode 2
Purpose:
To determine whether the parallel port data is sampled on the leading or trailing edge of strobe.
Values:
On* Samples parallel port data on the leading edge of strobe.
PCL SmartSwitch
Purpose:
To configure the printer so it automatically switches to PCL emulation when a print job received through the parallel port requires it, regardless of the default printer language.
Values:
See also:
Printer Language; PS SmartSwitch
PS SmartSwitch
Purpose:
To configure the printer so it automatically switches to PostScript emulation when a print job received through the parallel port requires it, regardless of the default printer language.
Values:
See also:
PCL SmartSwitch; Printer Language
Protocol
Purpose:
To specify the parallel interface protocol.
Values:
Fastbytes* Provides compatibility with most existing parallel interface implementations (recommended setting).
Use the Paper Menu to define the paper loaded in each paper tray and the default paper source and output bin.
Select a menu item for more details:
Note: Values marked by an asterisk (*) are the factory default settings.
Assign Type/Bin
Purpose:
To send print jobs to a specific output bin based on the requested paper type.
Values (for Standard Bin* and Bin <x>):
Note: If a user-defined name is available, it is displayed instead of Custom <x> Bin. The name is truncated to 14 characters. If two or more bins share the same name, the name only appears once in the Assign Type/Bin value list.
Configure Bins
Purpose:
To determine which output bin(s) the printer uses for a particular job.
Values:
Configure MP
Purpose:
To determine when the printer selects paper loaded in the multipurpose feeder.
Values:
Custom Types
Purpose:
To specify the kind of paper associated with each of the Custom Types available in the Paper Type menu item.
Values for Custom Type <x>, where <x> represents 1, 2, 3, 4, 6 (paper only), or 5 (transparencies only):
Note: If a user-defined name is available, it is displayed instead of Custom Type <x>. The user-defined name is truncated to 14 characters. If two or more custom types share the same name, the name only appears once in the Custom Types value list.
Output Bin
Purpose:
To specify the default bin for printed material.
Values:
Standard Bin*
Bin <x>
Note: If a user-defined name is available, it is displayed instead of Bin <x>. The name is truncated to 14 characters. If two or more bins share the same name, the name only appears once in the Output Bin value list.
Overflow Bin
Purpose:
To designate an output bin as the overflow bin. If Configure Bins is set to Mail Overflow and a specific output bin is full, the printer automatically diverts printed material to the overflow bin.
Values:
Standard Bin*
Bin <x>
Note: If a user-defined bin is available, it is displayed instead of Bin <x>. The name is truncated to 14 characters. If two or more bins share the same name, the name only appears once in the Overflow Bin value list.
Paper Loading
Purpose:
To properly handle preprinted paper loaded in a tray, whether the job is a duplexed job or a single- sided job.
Values:
First select a paper type:
Then select a value:
Note: If a user-defined name is available, it is displayed instead of Custom <x> Loading. The name is truncated to 14 characters.
Paper Size
Purpose:
To identify the default paper size for each paper source. For trays with automatic size sensing, only the value detected by the hardware is displayed.
Values:
First select a paper source:
Then select a value (*denotes country-specific factory default values):
Universal Select Universal when you load paper that does not match any of the other available sizes. The printer automatically formats the page for the maximum possible size. You can then set the actual page size from your application software.
Note: Size sensing must be turned off for Statement and Folio values to appear.
Paper Source
Purpose:
To identify the default paper source.
Values:
Tray <x> (Tray 1*)
MP Feeder
Manual Paper
Manual Env
If you loaded the same size and type of paper in two paper sources (and the Paper Size and Paper Type menu items are correctly set), the trays are automatically linked. When one paper source is empty, paper automatically feeds from the next linked source.
Paper Texture
Purpose:
To identify the texture of the paper loaded in a specific source and to ensure that characters print clearly.
Values:
First select a paper type:
Then select a value:
Smooth
Normal*
Rough
Note: The default for Bond Texture is Rough instead of Normal. If a user-defined name is available for a custom Type, then the name is displayed instead of Custom <x> Texture. The name is truncated to 14 characters.
Use Paper Texture in connection with the Paper Type and Paper Weight menu items. You may need to change those menu items to optimize print quality for your specific paper.
See also:
Paper Type; Paper Weight
Paper Type
Purpose:
To identify the type of paper installed in each paper source.
Values:
First select a paper source:
Then select a value:
The Paper Type default for each envelope source is Envelope. The Paper Type default for each paper tray is as follows:
Note: If a user-defined name is available, it is displayed instead of Custom Type <x>. The user-defined name is truncated to 14 characters. If two or more custom types share the same name, the name only appears once in the Paper Type value list.
Use this menu item to:
???Optimize print quality for the specified paper.
???Select paper sources through your software application by selecting type and size.
???Automatically link paper sources. Any sources containing the same type and size of paper are automatically linked by the printer, if you have set the Paper Size and the Paper Type to the correct values.
Paper Weight
Purpose:
To identify the relative weight of the paper loaded in a specific source and ensure that the toner adheres properly to the printed page.
Values:
First select a paper type:
Then select a value:
Light
Normal*
Heavy
Note: If a user-defined name is available, it is displayed instead of Custom <x> Weight. The name is truncated to 14 characters.
Substitute Size
Purpose:
To have the printer substitute the specified paper size if the requested size is not loaded.
Values:
Universal Setup
Purpose:
To determine the default size when the Paper Size setting for a tray or feeder is Universal.
Values:
First select a unit of measure (* denotes a country-specific factory default value):
Inches*
Millimeters*
Then select the values:
Use the Network Menu to change printer settings affecting jobs sent to the printer through a network port (either Standard Network or Network Opt <x>).
Select a menu item for more details:
Note: Values marked by an asterisk (*) are the factory default settings.
Job Buffering
Purpose:
To temporarily store jobs on the printer hard disk before printing.
Values:
Note: Changing the Job Buffering menu item automatically resets the printer.
MAC Binary PS
Purpose:
To configure the printer to process Macintosh binary PostScript print jobs.
Values:
Network Buffer
Purpose:
To configure the size of the network input buffer.
Values:
Note: Changing the Network Buffer menu item automatically resets the printer.
See also:
Resource Save
Network <x> Setup
Purpose:
To configure an internal print server.
Values:
Values for this menu item are supplied by the specific print server. Select the menu item to see the available values.
Note: Refer to the documentation on the drivers CD for more information.
NPA Mode
Purpose:
To specify whether the printer performs the special processing required for bidirectional communication, following the conventions defined in the Network Printing Alliance (NPA) Protocol.
Values:
Auto* Printer examines the data to determine the format and then processes it appropriately.
Note: Changing this menu item automatically resets the printer.
PCL SmartSwitch
Purpose:
To configure the printer so it automatically switches to PCL emulation when a print job received through the network port requires it, regardless of the default printer language.
Values:
See also:
PS SmartSwitch; Printer Language
PS SmartSwitch
Purpose:
To configure the printer so it automatically switches to PostScript emulation when a print job received through the network port requires it, regardless of the default printer language.
Values:
See also:
PCL SmartSwitch; Printer Language
Std Net Setup
Purpose:
To configure an internal print server.
Values:
Values for this menu item are supplied by the specific print server. Select the menu item to see the available values.
Note: Refer to the documentation on the drivers CD for more information.
Resident fonts
Your printer is equipped with resident fonts stored permanently in printer memory. Different fonts are available in PCL 6 and PostScript 3 emulations. Some of the most popular typefaces, like Courier and Times New Roman, are available for all printer languages.
The fonts in the PCL emulation are compatible with the fonts in the HP4500 and include four additional fonts and many extra symbol sets to support extra languages and applications. The fonts in the PostScript emulation are compatible with Adobe PostScript 3 and include 20 additional fonts.
The following tables list all the fonts resident in your printer. See Printing sample fonts for instructions on how to print samples of the fonts. You can select the resident fonts from your software application, or from the operator panel if you are using PCL 6 emulation.
Resident bitmapped fonts
Line Printer 16
POSTNET Bar code
Symbol sets
A symbol set is an encoded collection of alphabetic and numeric characters, punctuation, and special characters available in the font you select. Symbol sets support the requirements for different languages or specific applications, such as math symbols used for scientific text.
The symbol set encoding also defines which character will print for each key on the keyboard (or more specifically, for each code point). Some applications require different characters at some code points. To support multiple applications and languages, your printer has 83 symbol sets for the resident PCL 6 emulation fonts.
Downloadable fonts
You can download scalable fonts in PostScript 3 emulation and either scalable or bitmapped fonts in PCL 6 emulation. Fonts can be downloaded to printer memory, or to a flash memory option or hard disk option. Fonts downloaded to flash memory or hard disk remain in memory even after the printer language changes, the printer resets, or the printer is turned off.
Euro support
Support for the euro currency character is included in all applicable fonts for both the PostScript and PCL emulations. Twelve of the PCL symbol sets support the euro character, including all seven Windows symbol sets.
Hebrew and Arabic fonts
A variety of downloadable fonts for Hebrew and Arabic are included on the CD that shipped with the printer.
???Edition notice
???Licensing notice
???Safety information
???Cautions and warnings
???Electronic emission notices
???Noise emission levels
???Laser notice
Edition notice
August 2001
?? Copyright 2001 Lexmark International, Inc. All rights reserved.
UNITED STATES GOVERNMENT RESTRICTED RIGHTS
This software and documentation are provided with RESTRICTED RIGHTS. Use, duplication or disclosure by the Government is subject to restrictions as set forth in subparagraph (c)(1)(ii) of the Rights in Technical Data and Computer Software clause at DFARS 252.227-7013 and in applicable FAR provisions: Lexmark International, Inc., Lexington, KY 40550.
Licensing notice
The printer resident software contains:
???Software developed and copyrighted by Lexmark
???Lexmark modified software licensed under the provisions of the GNU General Public License version 2 and the GNU Lesser General Public License version 2.1
???Software licensed under the BSD license and warranty statements

Click the title of the document you want to review:
BSD License and Warranty statements
GNU General Public License
The Lexmark modified GNU licensed software is free software; you can redistribute it and/or modify it under the terms of the licenses referenced above. These licenses do not provide you any rights to the Lexmark copyrighted software in this printer.
Since the GNU licensed software that the Lexmark modifications are based upon is supplied explicitly without warranty, use of the Lexmark modified version is similarly provided without warranty. See the warranty disclaimers in the referenced licenses for additional details.
To obtain source code files for the Lexmark modified GNU licensed software, launch the drivers CD that shipped with your printer and click Contact Lexmark.
Safety information
???If your product is NOT marked with this symbol 


 , it MUST be connected to an electrical outlet that is properly grounded.
???The power cord must be connected to an electrical outlet that is near the product and easily accessible.
???Refer service or repairs, other than those described in the operating instructions, to a professional service person.
???This product is designed, tested, and approved to meet strict global safety standards with the use of specific Lexmark components. The safety features of some parts may not always be obvious. Lexmark is not responsible for the use of other replacement parts.
???Your product uses multiple lasers.
CAUTION: Use of controls or adjustments or performance of procedures other than those specified herein may result in hazardous radiation exposure.
???Your product uses a printing process that heats the print media, and the heat may cause the media to release emissions. You must understand the section in your operating instructions that discusses the guidelines for selecting print media to avoid the possibility of harmful emissions.
Cautions and warnings
CAUTION: A caution identifies something that might cause you harm.
WARNING: A warning identifies something that might damage your printer hardware or software.

Electronic emission notices
With a network cable or high-capacity output finisher installed
Federal Communications Commission (FCC) compliance information statement
The printer has been tested and found to comply with the limits for a Class A digital device, pursuant to Part 15 of the FCC Rules. Operation is subject to the following two conditions: (1) this device may not cause harmful interference, and (2) this device must accept any interference received, including interference that may cause undesired operation.
The FCC Class A limits are designed to provide reasonable protection against harmful interference when the equipment is operated in a commercial environment. This equipment generates, uses, and can radiate radio frequency energy and, if not installed and used in accordance with the instruction manual, may cause harmful interference to radio communications. Operation of this equipment in a residential area is likely to cause harmful interference, in which case the user will be required to correct the interference at his own expense.
The manufacturer is not responsible for any radio or television interference caused by using other than recommended cables or by unauthorized changes or modifications to this equipment. Unauthorized changes or modifications could void the user's authority to operate this equipment.
Note: To assure compliance with FCC regulations on electromagnetic interference for a Class A computing device, use a properly shielded and grounded cable such as Lexmark part number 1329605 (parallel) or Lexmark part number 12A2405 (USB). Use of a substitute cable not properly shielded and grounded may result in a violation of FCC regulations.
Industry Canada compliance statement
This Class A digital apparatus meets all requirements of the Canadian Interference-Causing Equipment Regulations.
Avis de conformit?? aux normes d???Industrie Canada
Cet appareil num??rique de la classe A respecte toutes les exigences du R??glement sur le mat??riel brouilleur du Canada.
European Community (EC) directives conformity
This product is in conformity with the protection requirements of EC Council directives 89/336/EEC and 73/23/EEC on the approximation and harmonization of the laws of the Member States relating to electromagnetic compatibility and safety of electrical equipment designed for use within certain voltage limits.
A declaration of conformity with the requirements of the directives has been signed by the Director of Manufacturing and Technical Support, Lexmark International, S.A., Boigny, France.
This product satisfies the Class A limits of EN 55022 and safety requirements of EN 60950.
WARNING: When a network cable or high capacity output finisher is installed, this is a Class A product. In a domestic environment, this product may cause radio interference, in which case, the user may be required to take adequate measures.

Japanese VCCI notice
Without a network cable or high-capacity output finisher installed
Federal Communications Commission (FCC) compliance information statement
The printer has been tested and found to comply with the limits for a Class B digital device, pursuant to Part 15 of the FCC Rules. Operation is subject to the following two conditions: (1) this device may not cause harmful interference, and (2) this device must accept any interference received, including interference that may cause undesired operation.
The FCC Class B limits are designed to provide reasonable protection against harmful interference in a residential installation. This equipment generates, uses and can radiate radio frequency energy and, if not installed and used in accordance with the instructions, may cause harmful interference to radio communications. However, there is no guarantee that interference will not occur in a particular installation. If this equipment does cause harmful interference to radio or television reception, which can be determined by turning the equipment off and on, the user is encouraged to try to correct the interference by one or more of the following measures:
???Reorient or relocate the receiving antenna.
???Increase the separation between the equipment and receiver.
???Connect the equipment into an outlet on a circuit different from that to which the receiver is connected.
???Consult your point of purchase or service representative for additional suggestions.
The manufacturer is not responsible for any radio or television interference caused by using other than recommended cables or by unauthorized changes or modifications to this equipment. Unauthorized changes or modifications could void the user's authority to operate this equipment.
Note: To assure compliance with FCC regulations on electromagnetic interference for a Class B computing device, use a properly shielded and grounded cable such as Lexmark part number 1329605 (parallel) or Lexmark part number 12A2405 (USB). Use of a substitute cable not properly shielded and grounded may result in a violation of FCC regulations.
Industry Canada compliance statement
This Class B digital apparatus meets all requirements of the Canadian Interference-Causing Equipment Regulations.
Avis de conformit?? aux normes d???Industrie Canada
Cet appareil num??rique de la classe B respecte toutes les exigences du R??glement sur le mat??riel brouilleur du Canada.

European Community (EC) directives conformity
This product is in conformity with the protection requirements of EC Council directives 89/336/EEC and 73/23/EEC on the approximation and harmonization of the laws of the Member States relating to electromagnetic compatibility and safety of electrical equipment designed for use within certain voltage limits.
A declaration of conformity with the requirements of the directives has been signed by the Director of Manufacturing and Technical Support, Lexmark International, S.A., Boigny, France.
This product satisfies the Class B limits of EN 55022 and safety requirements of EN 60950.
Japanese VCCI notice
The United Kingdom Telecommunications Act 1984
This apparatus is approved under the approval number NS/G/1234/J/100003 for the indirect connections to the public telecommunications systems in the United Kingdom.
Noise emission levels
The following measurements were made in accordance with ISO 7779 and reported in conformance with ISO 9296.
1-meter average sound pressure, dBA
Laser notice
The printer is certified in the U.S. to conform to the requirements of DHHS 21 CFR Subchapter J for Class I (1) laser products, and elsewhere is certified as a Class I laser product conforming to the requirements of IEC 60825-1.
Class I laser products are not considered to be hazardous. The printer contains internally a Class IIIb (3b) laser that is nominally a 5 milliwatt gallium arsenide laser operating in the wavelength region of 770-795 nanometers. The laser system and printer are designed so there is never any human access to laser radiation above a Class I level during normal operation, user maintenance, or prescribed service condition.
Readers' Comments ?? We'd Like to Hear from You
Infoprint Color 1220
User's Reference
Publication No. G510-2178-00
Overall, how satisfied are you with the information in this book?
How satisfied are you that the information in this book is:
Please tell us how we can improve this book:
Thank you for your responses. May we contact you? h Yes h No
When you send comments to IBM, you grant IBM a nonexclusive right to use or distribute your comments in any way it believes appropriate without incurring any obligation to you.
Company or Organization