MODEL 6300

VISIBLE RANGE

SPECTROPHOTOMETER

OPERATING MANUAL

630 026

SAFETY

Please read this information carefully prior to installing or using this equipment.

1.The unit described in this manual is designed to be operated only by trained personnel. Any adjustments, maintenance and repair must be carried out as defined in this manual, by a person qualified to be aware of the hazards involved.

2.It is essential that both operating and service personnel employ a safe system of work, in addition to the detailed instructions specified in this manual.

3.The covers on the unit should only be removed by personnel who have been trained to avoid the risk of shock.

4.References should always be made to the Health and Safety data supplied with any chemicals used. Generally accepted laboratory procedures for safe handling of chemicals should be employed.

5.If it is suspected that safety protection has been impaired in any way, the unit must be made inoperative and secured against any intended operation. The fault condition should immediately be

reported to the appropriate servicing authority.

6300/REV B/12-96

6300 SPECTROPHOTOMETER

OPERATING MANUAL

6300/REV B/12-96

SECTION 1

INTRODUCTION

1.1 INSTRUMENT DESCRIPTION

The Model 6300 is a microprocessor controlled Visible Range Spectrophotometer covering the wave- length range of 320 to 950nm with a 10nm bandwidth. The monochromator is of a modified Czerny Turner design, incorporating a stepper motor driven 1200 lines/mm holographic diffraction grating and featuring automatic second order response suppression. The 6300 has full interfacing capability for Analogue output and serial (RS232) interfacing. The optical system is independantly housed and isolated with lenses to give maximum protection from environmental contamination. Combined with a mechanically rigid structure, the 6300 provides a system with fast warm-up, low drift and high reliability.

1.2 INSTRUMENT SPECIFICATIONS

SECTION 2

INSTALLATION

2.1 UNPACKING

Remove the Model 6300 from the packaging and ensure the following items are present:

1.Model 6300 Spectrophotometer

2.Mains Cable

3.Pack 100 disposable Cuvettes (060 084)

4.Optional Accessories (as ordered)

Any shortages or damage should be reported immediately to the Manufacturer or your local Distributor.

2.2 INSTALLATION

MAINS SUPPLY

The 6300 is designed to operate on 115/230V a.c. supplies (-20%+10%) 50/60Hz.

The standard 2 metre mains cable supplied with the unit is fitted with an IEC type connector which can be plugged directly into the POWER IN socket on the rear panel.

The mains fuse is housed within the POWER IN socket. When replacing the fuse the unit should be disconnected from the mains supply.

In the event of the fuse failing after replacement it is advisable to consult with the Manufacturer or your local Distributor before proceeding further.

Fuse Rating: 2A 'F' (fast blow type)

NOTE: The unit should be positioned within 1.5 metres of an earthed mains supply.

VOLTAGE SELECT

NOTE: When changing the voltage select switch position always ensure the fuse rating is correct.

Before attempting to change the voltage select disconnect the instrument from the mains supply. Withdraw the fuse holder from the power input socket and remove the fuse. Extract the grey fuse retainer and rotate so that the correct voltage is visible through the aperture in the fuse holder. Replace the fuse retainer in its holder, fit the correct fuse and push assembly back into the power input socket.

MAINS CONNECTIONS

A suitable plug should be connected to the 3 wires on the mains lead. These are colour coded to conform to the internationally recognised standard such that:

IMPORTANT: THE UNIT MUST BE EARTHED.

The Green/Yellow wire in the a.c. supply cable must be connected to a properly grounded terminal.

2.3 DISPLAYS

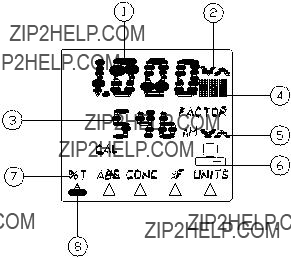
1.Primary display area - Transmission, Absorbance, Concentration

2.Primary display adjust annunciator

3.Secondary display area - Wavelength, Factor

4.Primary display units

5.Secondary display adjust annunciator

6.Operation with PC

8.Menu pointers (for 7)

2.4 CONTROLS

1.used to adjust values on the selected display

2.used to move horizontally between menu options

3.used to select the displayed menu option

4.initiates a calibration routine

5.Print key. Provides a printout of the current reading with an incremental sample number. When pressed for the first time after a calibration the print out will give calibration information. The incremental sample number will be reset after a calibration.

2.5 INPUTS/OUTPUTS

Fig. 2.5.1 Rear Panel Layout

1. LAMP ACCESS PANEL This panel allows the user to gain access to the tungsten halogen lamp when replacement is necessary.

NOTE: The Lamp Access Panel and all ventilation slots must not be covered or

SECTION 3

OPERATION

3.1 INITIAL SET-UP

Connect the unit to the correct mains supply and switch on. After switch on, the Model 6300 automatically re-aligns the monochromator at zero order wavelength. During this initialisation, the 6300 displays CAL on the primary display and the wavelength on the secondary display. The wavelength will change as the 6300 searched for the peak output at zero nm. After calibration, the unit will then go to the last wavelength used and enter the measurement mode last used.

The following error conditions, which are displayed for 2 seconds, are possible if the 6300 fails to find the zero order peak:

Err 4 Lamp failed after initially finding 0nm peak. If the lamp has failed, it should be replaced.

Err 5 No light level detected. The instrument has failed to find a zero order peak. Possible causes of this error are that the lamp has failed or that a sample has been left in the unit which is absorbing the zero order light.

Err 6 No dark level detected. The instrument checks the region below 320nm which should have no optical throughput. If this region cannot be found the most likely cause is that the sample chamber lid is not closed.

3.2 SAMPLE MEASUREMENT

Many methodologies are well documented and where these are available the recommended wavelength should be used. Where a new methodology is being developed, the choice of wavelength can often be approximately determined by choosing an absorbance wavelength that is complimentary in colour to that of the standard solution. The list given below illustrates this point. The chart may be read from left to right or right to left, i.e; a blue sample requires a yellow filter / a yellow sample requires a blue filter.

Colours, as they relate to wavelength, can be reviewed by placing a screen, i.e; a piece of card in the 6300 light path where it passes through the sample chamber. It will be seen that 400nm gives blue light and 700nm gives red, with a progression between these points of green, yellow and orange.

NOTE: The human eye is unable to detect wavelengths below 400nm or above 700nm.

Once a complimentary colour has been chosen the precise analytical wavelength needs to be selected. This wavelength will normally be that which gives the maximum absorbance value. This can be selected by scanning in 5nm steps until an optimum is reached. It should be noted that zero absorbance point will change with wavelength. A zero CAL should be carried out whenever the wavelength is changed.

The complimentary colour method of selecting wavelength may not be applicable in all situations, perhaps because the solution has no distinct colour, or the solution is of a complex nature and the absorbing species of interest is not the predominant colour. In these circumstances it will be necessary to scan across the spectrum to determine points of maximum absorbance.

Situations also exist where solutions will absorb at more than one wavelength. If this situation is encoun- tered it is usually best to select the wavelength which gives maximum absorbance.

It is always good practice to verify linearity (i.e; concentration vs reading) of the methodology at the se- lected wavelength. Where more than one absorbing wavelength is available, it is probable that one will offer better linearity characteristics than others.

To perform measurements the following procedures should be carried out:

Transmission Mode

This mode is selected by moving the cursor to the %T menu using the LEFT or RIGHT arrow keys. The primary display will show the transmittance, with %T units. The wavelength can be adjusted using the UP and DOWN arrow keys. A calibration routine is initiated by pressing the CAL key. The routine performs a zero% transmission calibration followed by a 100% transmission calibration. A blank (clear) solution should be used for this calibration procedure. (An internal shutter is automatically activated to perform the zero% setting and this part of the routine is therefore independent of the solution in the light path).

The following error codes are possible after a calibration:

Err 1 Dark cal error. This error occurs when the 6300 closes the shutter to block light entering the sample chamber. If the detector output does not fall to a level normally associated with a dark cal then this error is indicated. The most likely cause is that the sample chamber lid is not closed.

Err 2 Light cal error. This error indicates that there is insufficient light to calibrate to 100%. The most likely cause is that light at the selected wavelength is being absorbed by a sample in the sample chamber. This error can also be caused if the lamp has failed.

A calibration resets the sample number to unity.

Absorbance Mode

This mode is selected by moving the cursor to the ABS mode using the LEFT or RIGHT arrow keys. The primary display will show the absorbance, with ABS units. The wavelength can be adjusted using the UP and DOWN arrow keys. A calibration routine is initiated by pressing the CAL key.The routine performs a zero% transmission calibration followed by a 0.000 Absorbance calibration. A blank (clear) solution should be used for this calibration procedure. (An internal shutter is automatically activated to perform the zero% setting and this part of the routine is therefore independent of the solution in the light path). The instrument will display overrange

(1. ABS) absorbance during the dark calibration. The possible error conditions are the same as for the transmission mode.

Concentration Mode

This mode is selected by moving the cursor to the CONC menu option using the LEFT or RIGHT arrow keys. The primary display will show the concentration, with ppm, mgl-1, gl-1, M, % or blank units. The wavelength can be adjusted using the UP and DOWN arrow keys.

Pressing the CAL key places the 6300 in a concentration cal mode (indicated by the cal annunciator) which allows the UP and DOWN arrow keys to be used to change the displayed concentration to the required value (the wavelength adjust annunciator is extinguished, and the primary adjust annunciator is illuminated). Pressing the CAL or RETURN key calibrates the concentration to the set value by calculating a multiplication factor for the current absorbance. If the factor calculated is out of range, then the instrument will display Err 3 for 2 seconds after the calibration.

The factor can be displayed on the secondary display by moving the cursor beneath the FACTOR menu option. With the factor displayed, the UP and DOWN arrow keys allow the factor to be set directly. Pressing the RETURN or CAL key returns to concentration plus wavelength mode.

The concentration units can be set by selecting the UNITS menu option and then scrolled through by using the UP and DOWN arrow keys (the wavelength adjust annunciator is extinguished, and the adjust annun- ciator is illuminated, both primary and secondary display will show ---). Pressing the RETURN or CAL key returns to concentration plus wavelength mode.

3.3 GOOD PRACTICE GUIDELINES

1.For optimum performance a calibration routine should be carried out at the beginning and end of every sample batch.

2.To ensure accurate results are obtained the sample area lid should be kept in the closed position during measurement.

3.The styrene cuvettes supplied with the unit are disposable (i.e; ideally they should be used once and then thrown away). Some repeat use is possible, providing extreme care is taken during cleaning, to ensure no damage occurs to the polished surface.

4.Plastic cuvettes are not suitable for use with organic solvents.

5.Glassware used in the preparation of standards should be made of a high grade borosilicate glass. The use of soda glass should be avoided wherever possible as leaching can occur during prolonged contact, giving erroneous results.

6.Glass cuvettes should be thoroughly cleaned after use. Discard when scratches become evident in polished surfaces.

7.Chemical reagents should, wherever possible, be of high grade quality. Contamination can cause problems, even at very low levels. Diluents (i.e; water or solvents) must be free from impurities.

8.There are some substances which do not follow Beer???s Law. When attempting a new method it is advised that linearity checks should be performed over the range of concentrations being used. This can be carried out by preparing a quantity of known strength solutions and checking the results.

a)Deviations from Beer???s Law may occur at high concentrations by association of molecular ionic species.

b)Deviations from Beer???s Law may occur at low concentrations by variation in hydration, introducing changes in the nature of complex ions.

c)Absorption which does not obey Beer???s Law will require a graph of known standards to be

plotted. This should indicate Reading vs Concentration. The reading obtained from theunknowns can then be related to the concentrations from the graph.

9. Samples and standards can ???outgas??? when left in the cuvette. Bubbles formed on the cuvette walls will cause reading errors.
SECTION 4

MAINTENANCE

4.1 GENERAL

The 6300 has been designed to give optimum performance with minimum maintenance. It is only necessary to keep the external surfaces clean and free from dust. The sample area should always be kept clean and any accidental spillage should be wiped away immediately. To give added protection when not in use, the unit should be disconnected from the mains supply and covered with the optional dust cover (630 028). For longer term storage or re-shipment it is recommended that the unit be returned to the original packing case.

4.2 LIGHT SOURCE REPLACEMENT

The only routine maintenance which may be required is the replacement of the light source if this fails. Failure should be suspected if lamp failure indicator appears on the display. This can be confirmed by looking in the sample chamber. The Tungsten Halogen lamp is available from the Manufacturer or your local Distributor (refer Section 5.2, Spares).

WARNING: DISCONNECT THE UNIT FROM THE MAINS SUPPLY PRIOR TO

REPLACING THE LAMP. CARE SHOULD BE TAKEN WHEN

REMOVING THE LAMP FROM THE HOLDER. ENSURE THE LAMP IS

COOL PRIOR TO HANDLING.

1.Access to the tungsten halogen lamp can be gained via the lamp access panel, located at the rear of the unit (refer Section 2.4).

2.Slacken off the thumbscrew from the lamp access panel located at the rear of the 6300.

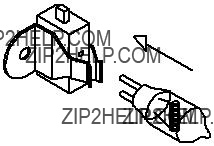
3.Remove the old lamp from the holder. The lamp is a plug-in fit and should be removed by gently easing it from the holder.

IMPORTANT: WHEN FITTING THE REPLACEMENT LAMP IT IS ESSENTIAL

THAT THE GLASS ENVELOPE IS NOT TOUCHED. FINGER

MARKS WILL DAMAGE THE LAMP. SHOULD ACCIDENTAL

DAMAGE WITH FINGERMARKS OCCUR, THE SURFACE OF THE

LAMP MAY BE CLEANED USING ISO-PROPYL ALCHOHOL.

4.Carefully remove the replacement lamp from the packaging, ensuring the glass portion of the lamp is not touched.

5.Insert the lamp into the holder, as illustrated, ensuring that it is fully pushed home.

10

6300/REV B/12-96

Fig. 4.2.1 Lamp Fitting

6.Close the lamp access panel and re-tighten the thumbscrew.

NOTE:

It is essential that only the specified replacement lamp should be used. Accuracy of optical alignment and performance cannot be guaranteed using alternative manufactured lamps.

SECTION 5

OPTIONAL ACCESSORIES

5.1 OPTIONAL ACCESSORIES

The following list of items are available as optional accessories for use with the Model 6300:

SECTION 6

INTERFACING

Serial Interface

The Model 6300 has a bi-directional RS232 interface set to: 1200 baud

7 data bits odd parity 1 stop bit

The 25 way D connector allows a standard one-to-one interconnection lead to be used, as supplied with the 40 column printer.

A printout is initiated by pressing the PRINT key. If the sample munber is unity, then the printout will include a header block. The sample number is incremented every time the PRINT key is pressed.

The following commands can also be sent to the 6300 via the serial interface (using Windows Terminal or Jensoft, for example).

ASCII SC<CR> Closes the dark shutter which blocks monochromatic light entering the sample chamber. This allows 0% transmittance to be calibrated.

ASCII SO<CR> Opens the dark shutter which allows monochromatic light to enter the sample chamber. This allows 100% transmittance (zero absorbance) to be calibrated. The shutter must be open for normal measurements.

ASCII Gnnn<CR> Commands the 6300 to go to the wavelength nnm. For example: G540<CR> will set the wavelength to 540nm.

1mV per 0.1%T 1mV per 0.001ABS
1mV per concentration unit
13

ASCII Fxxxx.x<CR> Sets the concentration factor to xxxx.x. For example: F1000<CR> will set the factor to 1000.

Note <CR> is an ASCII carriage return character.

The last three commands provide an output which can readily be incorporated into most spreadsheet software packages.

6.2 RS232 Output

The bi-directional RS232 interface is available on the rear panel 25 way D type connector.

Recorder Output

This is available via the 4mm rear panel sockets. The level is proportional to the displayed reading, de- pending on the measurement mode:

Transmission

Absorbance

Concentration

6300/REV B/12-96

EC Declaration of Conformity

Jenway Model 6300 Spectrophotometer complies with the following European Standards:

EN 50081-1:1992 Electromagnetic compatibility - Generic emission standard

EN 50082-1:1992 Electromagnetic compatibility - Generic immunity standard (Performance criterion B)

EN 61010-1:1993 Safety requirements for electrical equipment for measurement, control and laboratory use

Following the provision of:

EMC Directive - 89/336/EEC and Low Voltage Directive - 73/23/EEC

Martyn J. Fall

Managing Director, Jenway Limited,

Gransmore Green, Felsted, Dunmow,

Essex, CM6 3LB, England