
i

Functional highlights
Functional highlights
Audio Your computer is equipped with internal audio record and playback capabilities.
For more information on installing PC


 Cards
Cards


 ???Inserting a PC Card??? on page 68.
iv

About this book
About this book
Chapter 1. "Getting Familiar with
Your Computer," acquaints you
with the basic features of your computer
Chapter 4. "Solving Computer Problems," describes what to do when you have a computer problem. The chapter includes a troubleshooting guide and information on how to recover lost or damaged software.
Chapter 5. "Getting Service,"
describes various options of IBM's suppport and service.
v

About this book
Icons Used in This Book
For procedures or information unique to the operating system installed in your computer:
Indicates situations that are potentially lethal or extremely haz- ardous to you.
vi

Safety information
Safety information
Electrical safety notice
DANGER
To Connect
Turn everything OFF.
To Disconnect
Turn everything OFF.
First, attach all cables to devices.
First, remove the power cord from the outlet.
Attach the signal cables to the receptacles.
Remove the signal cables from the receptacles.
Attach the power cord to an outlet.
Remove all cables from device.
Turn the device ON.
vii

Safety information
DANGER
viii

Contents
Safety information . . . . . . . . . . . . .vii. . . . . .
Electrical safety .notice. . . . . . . . . . . . . . . . .vii. . . . .
Rear view of the computer. . . . . . . . . . . . . . . . .4 . . . .
Bottom view of the computer. . . . . . . . . . . . . . . 6. . . .
System status indicators. . . . . . . . . . . . . . . . . . .7 . . . . .
Distinctive functions of your . computer. . . . . . . . . . . . 9. . .
Keyboard functions . . . . . . . . . . . . 9 . . . . . .
ThinkPad utility programs. . . . . . . . . . . . . . . . 16. . . .
Online User's Guide. . . . . . . . . . . . . . . . . . .31. . . . .
Backing up your system. . . . . . . . . . . . . . . . . . 32. . . . .
ThinkPad Software Selection .CD. . . . . . . . . . . . 32. . .
Recovery CD . . . . . . . . . . . . . 32. . . . . . .
ConfigSafe . . . . . . . . . . . . . . 32. . . . . . .
ThinkPad Web site or bulletin. .board. . . . . . . . . .33. .
Replacing the battery. .pack. . . . . . . . . . . . . . .34. . . .
Using the Sensitivity . page. . . . . . . . . . . . . . . 46. . . .
Increasing memory . . . . . . . . . . . . .47 . . . . . . .
Upgrading the memory. . . . . . . . . . . . . . . . . .47. . . .
Attaching an external mouse, keypad or . keyboard. . . . . .53
Attaching an external mouse or numeric. .keypad. . . . .53
Attaching an external keyboard and. . mouse. . . . . . .55.
Using an external condenser microphone. . . . . . . . . .86.
Troubleshooting guide . . . . . . . . . . . .87 . . . . . . .
x
Recovering lost or damaged software. . . . . . . . . . . . 109. . .
Electronic support services. . . . . . . . . . . . . . . .127. . . .
Purchasing additional services. . . . . . . . . . . . . . .129. . . .
Enhanced PC support line. . . . . . . . . . . . . . . .129. . . .
xi
Trademarks . . . . . . . . . . . . . 143. . . . . . . .
Year 2000 readiness and instructions. . . . . . . . . . .144. .
Electronic emission notices. . . . . . . . . . . . . . .144. . . .
Telecommunication notice . . . . . . . . . 146. . . . . . . .
Industry Canada requirements. . . . . . . . . . . . . . 148. . . .
Glossary . . . . . . . . . . . . . . 151. . . . . . . .
Index . . . . . . . . . . . . . . . .155. . . . . . . .
xii

Chapter 1. Getting familiar with your computer
Identifying the hardware. .features. . . . . . . . . . . . . 2. . . .
Front view of the computer. . . . . . . . . . . . . . . . .2 . . . .
Rear view of the computer. . . . . . . . . . . . . . . . .4 . . . .
Bottom view of the computer. . . . . . . . . . . . . . . 6. . . .
System status indicators. . . . . . . . . . . . . . . . . . .7 . . . . .
Distinctive functions of your . computer. . . . . . . . . . . . 9. . .
Keyboard functions . . . . . . . . . . . . 9 . . . . . .

Identifying the hardware features
Front view of the computer
2 ThinkPad 240 User's Reference

Chapter 1. Getting familiar with your3 computer
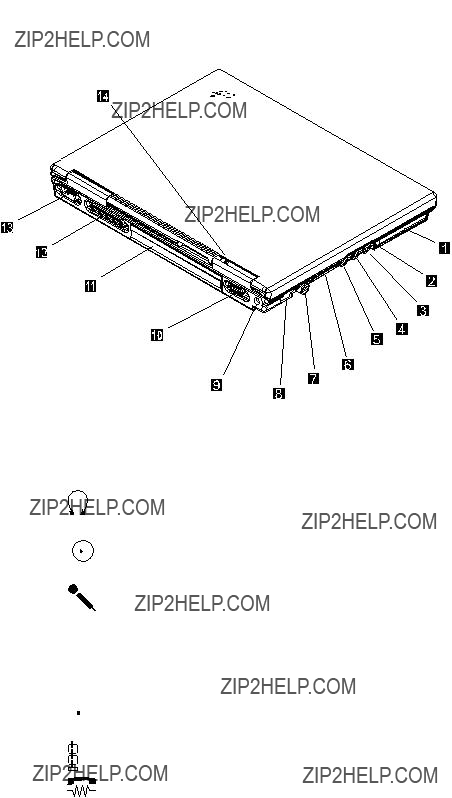
Identifying the hardware features
Rear view of the computer
.1/
.2/
.3/
.4/
.5/
.6/
.7/
.8/
4 ThinkPad 240 User's Reference

.9/
.1??/
.11/
.12/
.13/
.14/
Chapter 1. Getting familiar with your5 computer
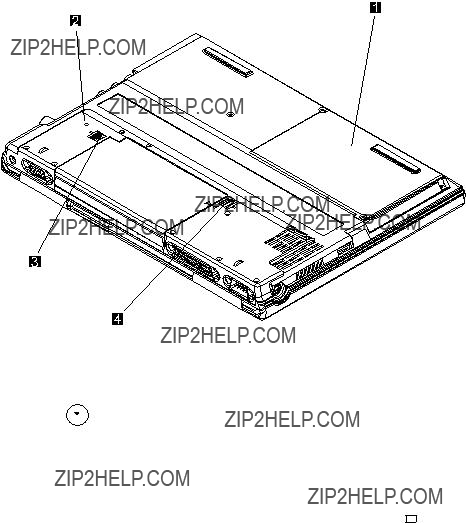
Identifying the hardware features
Bottom view of the computer
6 ThinkPad 240 User's Reference

System status indicators
System status indicators
Chapter 1. Getting familiar with your7 computer

System status indicators
8 ThinkPad 240 User's Reference
Distinctive functions of your computer
TrackPoint
The keyboard contains a unique
Chapter 1. Getting familiar with your9 computer

Distinctive functions of your computer
Stick
Left click button
Right click button
10 ThinkPad 240 User's Reference
Distinctive functions of your computer
Mouse Pointer (Cursor)
Stick
Right click button
Left click button
Chapter 1. Getting familiar with your11computer
Distinctive functions of your computer
Fn key
12 ThinkPad 240 User's Reference

Distinctive functions of your computer
Chapter 1. Getting familiar with your13computer

Numeric keypad
14 ThinkPad 240 User's Reference

Distinctive functions of your computer
__
_
NumLk
NumLk
}|
] \

 Enter
Enter
 Shift
Shift
Caps Lock
PgUp
NumLk
??? ???
}|
] \

 Enter
Enter
 Shift
Shift
Caps Lock
Alt Ctrl
Chapter 1. Getting familiar with your15computer
Distinctive functions of your computer
ThinkPad utility programs
Your ThinkPad computer has the following utility programs for easy configuration:
?? BIOS Setup Utility
?? ThinkPad Configuration program
This section summarizes these utility programs.
?? Date/Time: Set date and time.
?? Password: Set a password.
?? Startup: Set the startup device.
?? Restart: Restart the system.
16 ThinkPad 240 User's Reference
Distinctive functions of your computer
To start the BIOS Setup Utility, do as follows:
The BIOS Setup Utility menu appears:
IBM BIOS Setup Utility
 Config
 Date/Time
 Password
 Startup
 Restart
press Enter .
A submenu is displayed.
4. Change the items you wish to change.
To change the value of an item,- orspaceuse keythe.
5. PressEsc to exit from the submenu.
Chapter 1. Getting familiar with your17computer

Distinctive functions of your computer
Config: Selecting theConfig item and pressingEnter displays the following "Config" submenu.
IBM BIOS Setup Utility
 Memory
 System Board
Initialize
 Advanced Setup
The "Config" submenu includes the following:
?? Memory enters a submenu which shows memory information.
??System Board enters a submenu which shows system board information.
18 ThinkPad 240 User's Reference
Distinctive functions of your computer
Chapter 1. Getting familiar with your19computer

Distinctive functions of your computer
IBM BIOS Setup Utility
20 ThinkPad 240 User's Reference

Distinctive functions of your computer
Chapter 1. Getting familiar with your21computer
Distinctive functions of your computer
???Hibernate by timer enables you to set the system to enter hibernation mode instead of suspend mode when the suspend timer has elapsed. SettDisabledngs are,or
Enabled.
???Low Battery Action enables you to set the system to enter
22 ThinkPad 240 User's Reference

Chapter 1. Getting familiar with your23 computer
Distinctive functions of your computer
???Reset Config Data sets the BIOS configuration data back to factory defaults.
??? Startup Screen enables or disables the start up screen.
24 ThinkPad 240 User's Reference

Distinctive functions of your computer
To change the date and time, do the following:
Chapter 1. Getting familiar with your25 computer

Distinctive functions of your computer
26 ThinkPad 240 User's Reference

Distinctive functions of your computer
This submenu is used to change the startup sequence of the dri in your computer.
For example, if you have different operating systems on differen
your startup sequence. If you specify a wrong device, your d
Chapter 1. Getting familiar with your27 computer
Distinctive functions of your computer
28 ThinkPad 240 User's Reference
Distinctive functions of your computer
This submenu includes the following:
ThinkPad configuration
Chapter 1. Getting familiar with your29 computer
Distinctive functions of your computer
30 ThinkPad 240 User's Reference
Distinctive functions of your computer
Online User's Guide
Your ThinkPad computer features an online user's guide, so that y will always have key information at your fingertips even if you traveling. It contains the following information:
?? Basic:
??? Using your computer outside your country
??? Using the audio, infrared, and modem features
??? Using your computer with a battery pack
??? Using your computer with a PC Card
??Advanced:
???Installing software
??? Using system management
?? Troubleshooting:
??? Resolving system resource conflicts
??? Solving computer problems
Chapter 1. Getting familiar with your31computer

Backing up your system
32 ThinkPad 240 User's Reference

BIOS for your computer on the ThinkPad Web site:
http://www.pc.ibm.com/thinkpad
Chapter 1. Getting familiar with your33 computer

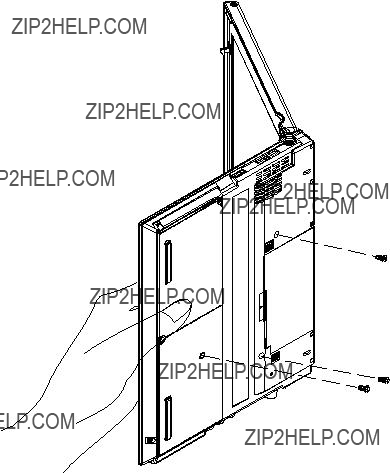
Replacing the battery pack
Replacing the battery pack
To insert the battery pack, do as follows:
1. Power off your computer.
2. Disconnect the AC Adapter and cables.
3. Close the LCD and turn the computer over.
4. Slide the
the battery.2/latchin the direction of the arrow. Remove the battery pack.3/.
2
1
You have finished replacing the battery pack.
Note: You can replace the battery pack when the computer is in
34 ThinkPad 240 User's Reference

Replacing the battery pack
Attaching the Large Battery pack
To attach the large battery pack, refer to the instructions in ???Replacing the battery pack??? on page 34 and the following illustrations:
2
1
Chapter 1. Getting familiar with your35 computer
Handling your computer
Handling your computer
ThinkPad don'ts
??Do not disassemble your computer. Only an authorized IBM ThinkPad repair technician should disassemble and repair your computer.
closed.
36 ThinkPad 240 User's Reference
level.
Chapter 1. Getting familiar with your37 computer
Handling your computer
ThinkPad do's
Cleaning your computer
??Gently wipe the LCD with a dry, soft cloth. Avoid using alcohol detergent to clean the LCD.
Carrying the computer
1. Disconnect and store the external diskette drive.
2. Turn off all attached devices.
3. Turn off the computer and close the LCD.
4. Unplug all external cables and cords connected to the computer.
5. Make sure all computer doors and covers are closed.
6. Use a quality carrying case that provides adequate cushion an protection.
38 ThinkPad 240 User's Reference
Handling your computer
Maximizing
??Whenever possible, use the ThinkPad battery
Ruggedized mobile computers
Some professionals work in environments that may require special ruggedized features to protect their computers from extreme te ature, humidity, and physical punishment. Construction, public service, distribution, repair service, and utilities are some of ronmentally demanding professions that may require rugged mobile computers that can withstand stresses. For these applications, IBM
Partner or visit our website at:
www.networking.ibm.com/wireless
Chapter 1. Getting familiar with your39 computer
Handling your computer
Ergonomics information
displays that are easy to see, yet easy on the eyes. Of cour concentrated and sustained visual activity can be tiring. If you questions on eye fatigue or visual discomfort, consult a vision car
40 ThinkPad 240 User's Reference

Handling your computer
 Head
Head
 View
View
 Display
 Chair
Chair
 Arms
Arms
Use a chair that gives you good back support.
Chapter 1. Getting familiar with your41computer

Handling your computer
For more information
42 ThinkPad 240 User's Reference

Chapter 2. Extending the features of your computer
This chapter provides information on how to customize and extend the ThinkPad's features. You can use the ThinkPad with external devices and increase the memory.
Customizing the TrackPoint. . . . . . . . . . . . . . . . .44. . . .
Using the
Using the Sensitivity . page. . . . . . . . . . . . . . . 46. . . .
Increasing memory . . . . . . . . . . . . .47 . . . . . .
Upgrading the memory. . . . . . . . . . . . . . . . . .47. . . .
Attaching an external mouse, keypad or . keyboard. . . . . .53
Attaching an external mouse or numeric. .keypad. . . . .53
Attaching an external keyboard and. . mouse. . . . . . .55.
Display output location. . . . . . . . . . . . . . . . . .64. . . .
Display modes . . . . . . . . . . . . . 65 . . . . . . .
Attaching a printer. . . . . . . . . . . . . . . . . . . . 67. . . . . .
Inserting a PC Card. . . . . . . . . . . . . . . . . . . .68 . . . . .
Removing the PC Card. . . . . . . . . . . . . . . . . .69 . . . .
Customizing the TrackPoint
??
??Sensitivity
You can set the features by going to pages corresponding to t tabs.
44 ThinkPad 240 User's Reference

Customizing the TrackPoint
Using the
Chapter 2. Extending the features of 45 your computer

Customizing the TrackPoint
Using the Sensitivity page
46 ThinkPad 240 User's Reference

Customizing the TrackPoint
Increasing memory
Different capacities of SoDIMM are available.
Upgrading the memory
Chapter 2. Extending the features of 47 your computer

Increasing memory
5. Set the ThinkPad 240 on its base.
48 ThinkPad 240 User's Reference
Increasing memory
Chapter 2. Extending the features of 49your computer

Increasing memory


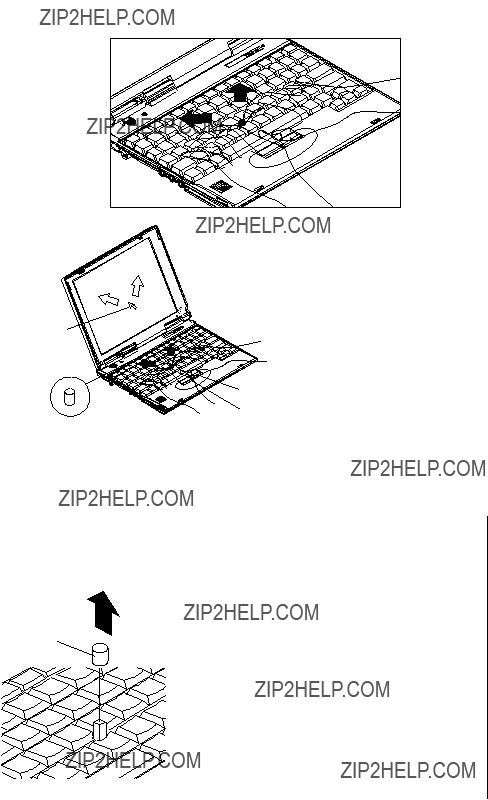
 ThinkPad
DRAM compartment
CAUTION:
When opening the keyboard, ensure that foreign materials do not fall inside the keyboard space.
8. Locate the DRAM compartment.
DRAM module
9. If memory is inserted, remove the memory module.
50 ThinkPad 240 User's Reference

Increasing memory
20
Chapter 2. Extending the features of 51your computer
Increasing memory
52 ThinkPad 240 User's Reference

Attaching an external mouse, keypad or keyboard
If you want to attach the mouse, do as follows:
1. Turn off the computer.
2. Attach the mouse directly to the
3. Turn on the computer.
Chapter 2. Extending the features of 53 your computer
54 ThinkPad 240 User's Reference
Attaching an external mouse, keypad or keyboard
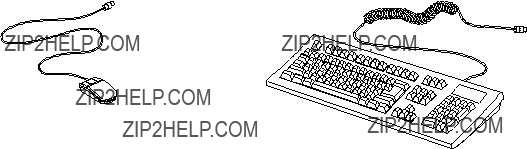
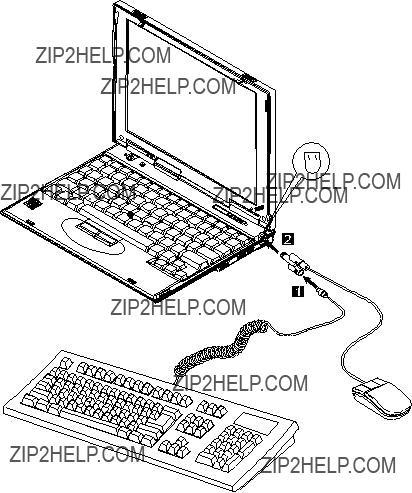
Attaching an external keyboard and mouse
MouseExternal keyboard
You can connect an external keyboard to your computer either directly through the external
When the external keyboard is attached, the following keys are available:
?? Numeric keypad on the computer keyboard
?? External numeric keypad
Instead, use the numeric keypad on the external keyboard.
To attach the external keyboard, turn off the computer, attach
Chapter 2. Extending the features of 55 your computer
Attaching an external mouse, keypad or keyboard
Disabling the TrackPoint
56 ThinkPad 240 User's Reference

Attaching an external mouse, keypad or keyboard
For Windows 98 and Windows 95:
To disable the TrackPoint:
1. Start the ThinkPad Configuration program. (See ???ThinkPad configuration??? on page 29.)
3. ClickDisable for the TrackPoint.
These changes become effective when computer power is turned off and then on again.
Chapter 2. Extending the features of 57 your computer
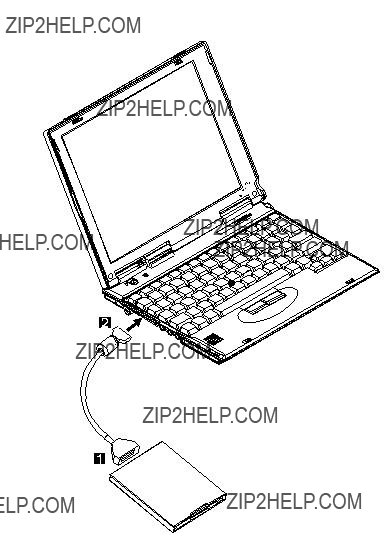
Attaching the external FDD drive
58 ThinkPad 240 User's Reference
Attaching the external
2. Connect the AC Adapter to the
Chapter 2. Extending the features of 59your computer
5. Insert the driver diskette into the FDD.
60 ThinkPad 240 User's Reference
Chapter 2. Extending the features of 61your computer
Attaching the external
62 ThinkPad 240 User's Reference

Attaching an external monitor
Attaching an external monitor
3.Start the ThinkPad Configuration program. (See ???ThinkPad configuration??? on page 29.)
4.Change the display output location by clicking on the
Chapter 2. Extending the features of 63 your computer

Attaching an external monitor
Note: Refer to the specifications for your external monitor to determine its supported resolutions and refresh rates.
4. Restart the computer to make the changes effective.
Display output location
game. Stop the application before changing the display output location.
You can change the display output location with the ThinkPad Con- figuration program. Select one of the following display output locations:
You can also change the display output locationFn key using the function. Press and holdFn key;the then pressF7 keythe. The
output is displayed sequentially as follows:
64 ThinkPad 240 User's Reference

Display modes
Chapter 2. Extending the features of 65 your computer
Attaching an external monitor
66 ThinkPad 240 User's Reference
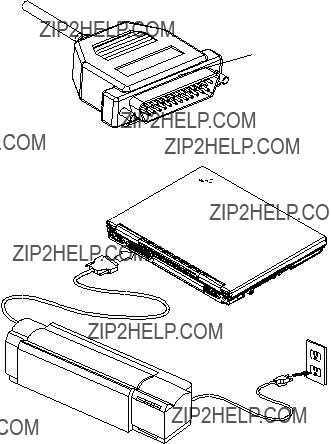
Attaching a printer
Attaching a printer
Any parallel printer with the standard Centronics** interface can b attached to the
Flush
to notebook connector
1. Attach the printer as shown.
2. Turn on the printer.
Chapter 2. Extending the features of 67 your computer

Inserting a PC Card
Inserting a PC Card
This section describes how to prepare to use a PC Card.
2. Insert the PC Card into the PC Card slot.
PC Card slot
68 ThinkPad 240 User's Reference
Removing the PC Card
Eject button
For more information for using a


 PC
PC


 inCardthe Online User's
Guide.
Chapter 2. Extending the features of 69your computer
70 ThinkPad 240 User's Reference

Chapter 3. Protecting your computer
Using passwords . . . . . . . . . . . . . 72. . . . . . .
Entering a password. . . . . . . . . . . . . . . . . . 73. . . . .
Setting a password. . . . . . . . . . . . . . . . . . .74. . . . .
Changing or removing a password. . . . . . . . . . . . .75 . .
Using locks . . . . . . . . . . . . . . 76. . . . . . .
Using passwords
Note: The hard disk password might be disabled by your system administrator.
?? Supervisor password
The supervisor password is a tool provided for the system
72 ThinkPad 240 User's Reference

???Only a system administrator can access the BIOS Setup Utility. If a supervisor password is set, a password prom
appears if you try to start the BIOS Setup Utility.
Entering a password
To enter a password, do the following:
1. Type your password.
Chapter 3. Protecting your computer73
Using passwords
Setting a password
74 ThinkPad 240 User's Reference

6. Type your desired new passwordEnterand. press
Note: If you want to remove the password, do not type anythin
7. Type your new password again Enterand presstoverify it.
Note: Write down the password and keep it in a safe place.
Chapter 3. Protecting your computer75

Using locks
Using locks
76 ThinkPad 240 User's Reference

Chapter 4. Solving computer problems
Frequently asked questions. . . . . . . . . . . . . . . . .78. . . .
Hints, tips and limitations. . . . . . . . . . . . . . . . . .86 . . . .
USB connector considerations. . . . . . . . . . . . . . .86 . . .
Using an external condenser microphone. . . . . . . . . .86.
Troubleshooting guide . . . . . . . . . . . .87 . . . . . .
Input problems . . . . . . . . . . . . . 93. . . . . . .
Indicator problems. . . . . . . . . . . . 97. . . . . . .

Frequently asked questions
This section addresses frequently asked indicated in the following chart and do
questions. Go to the page the specified action.
78 ThinkPad 240 User's Reference
Frequently asked questions
The ThinkPad Configuration program window appears:
Chapter 4. Solving computer problems79
Frequently asked questions
another communication device, such as the serial port. If the infrared p
80 ThinkPad 240 User's Reference

Frequently asked questions
another communication device, such as the infrared port. If the serial
Chapter 4. Solving computer problems81
Frequently asked questions
5.SelectDisable .
6.ClickOK .
3.SelectEnable .
4.ClickOK .
5. Disconnect the serial mouse.
82 ThinkPad 240 User's Reference

Frequently asked questions
You can set up the external monitor as follows:
1. Start the ThinkPad Configuration program.
Chapter 4. Solving computer problems83

Frequently asked questions
84 ThinkPad 240 User's Reference

Frequently asked questions
How do I maximize battery life?
To maximize battery life, do the following:
system and device drivers. Before installing a new operating system, do following:
?? Print the software installation section of the Online User's Guide.
See ???Using the Recovery CD??? on page 110.
Chapter 4. Solving computer problems85

Hints, tips and limitations
86 ThinkPad 240 User's Reference

Troubleshooting guide
Troubleshooting guide
Chapter 4. Solving computer problems87
Troubleshooting charts
Troubleshooting charts
88 ThinkPad 240 User's Reference
Troubleshooting charts
?? If an external keyboard is connected:
?? Test the computer by using the PC Doctor.
If you still have a problem, have the computer serviced.
Chapter 4. Solving computer problems89

Troubleshooting charts
If the same error message appears, have the computer serviced.
If you still have a problem, have the computer serviced.
90 ThinkPad 240 User's Reference

Troubleshooting charts
Operating system not Verify the following: found

Troubleshooting charts
If you still have a problem, have the computer serviced.
92 ThinkPad 240 User's Reference
Input problems

Troubleshooting charts
Note: See the manual supplied with the mouse for more information.
94 ThinkPad 240 User's Reference
Troubleshooting charts
??
This is not a defect.
Chapter 4. Solving computer problems95
Troubleshooting charts
LCD problems
If they are installed and configured correctly, have the computer serviced.
96 ThinkPad 240 User's Reference

Troubleshooting charts
Indicator problems
Battery problems
Chapter 4. Solving computer problems97

Troubleshooting charts
HDD problems
98 ThinkPad 240 User's Reference
Troubleshooting charts
Audio problems
General problems. Problems may be due to such factors as:
?? The audio cable configuration is not correct for your application.
?? The audio cable is defective.
?? The audio equipment is defective.
Chapter 4. Solving computer problems99
Troubleshooting charts
100 ThinkPad 240 User's Reference

Troubleshooting charts
11.ClickOK .
12.ClickClose to close the window.
13. Close all active windows.
Run your modem application again.
Chapter 4. Solving computer problems101

Troubleshooting charts
102 ThinkPad 240 User's Reference

Troubleshooting charts
Printer problems
3.SelectEnable .
4.ClickOK .
?? The printer is turned on and ready to print.
Chapter 4. Solving computer problems103

Troubleshooting charts
External monitor problems
The external monitor isDo the following: blank.
104 ThinkPad 240 User's Reference
Troubleshooting charts
If you did, have the external monitor serviced.
Chapter 4. Solving computer problems105
Troubleshooting charts
5. Set up the port in the "Device Manager" window.
6. ClickOK .
106 ThinkPad 240 User's Reference

Troubleshooting charts
Software problems
Chapter 4. Solving computer problems107

Troubleshooting charts
Other problems
108 ThinkPad 240 User's Reference
Recovering lost or damaged software
Chapter 4. Solving computer problems109
Recovering lost or damaged software
The following features are included:
?? Getting Started
Use this page for
?? System Customization
Use this page for doing the following:
??? Reinstalling a software application for Windows 98
??? Reinstalling a hardware device driver for Windows 98
??? Installing all hardware device drivers when installing Windows 98
Using the Recovery CD
Attention: This recovery program deletes all personal data and your
110 ThinkPad 240 User's Reference
Using the recovery CD with a FAT16 system.
Follow these instructions to use the Recovery CD:
1. Turn the computer off.
4. Insert the Recovery CD into the
5. Insert the bootable recovery diskette into your FDD.
6. Turn the computer on.
9. The system will boot to the ADOS. prompt
10. TypeSOFTCP at the command prompt and press [Enter].
the FDD.
Chapter 4. Solving computer problems111
Do you wish to enable large disk support (Y/N)...?
3. Press [Y] and then press [Enter]. The "FDISK Options" screen appears.
4. Press [3] and then press [Enter].
The "Delete DOS Partition or Logical DOS Drive" screen appears.
5. Press [3] and then press [Enter].
What drive do you want to delete...?press the last drive letter listed ([F], [E], or [D], etc.) and then press [Enter].
You are prompted to enter the volume label.
7. Type the volume label and then press [Enter].
You see the message
Are you sure (Y/N)...?
8. Press [Y] and then press [Enter].
Next to the drive letter, you will see the message
112 ThinkPad 240 User's Reference
WARNING! Data in a deleted Logical DOS Drive will be lost.
10. At the prompt
What drive do you want to delete...?press the next undeleted
drive letter listed ([E], or [D], etc.) and then press [Enter].
You are prompted to enter the volume label.
11. Type the volume label and then press [Enter].
You see the message
Are you sure (Y/N)...?
12. Press [Y] and then press [Enter].
No logical drives defined
and
Drive letters have been added or deleted.
13.Press [Esc].
You are returned to the "FDISK Options" screen.
WARNING! Data in the deleted Extended DOS Partition will be lost. Do you wish to continue (Y/N)...?
16. Press [Y] and then press [Enter].
You see the messages
WARNING! Data in the deleted Extended DOS Partition will be lost.
Chapter 4. Solving computer problems113
Recovering lost or damaged software
and
Extended DOS Partition deleted.
17. Press [Esc] to return to the FDISK Options screen.
18. Press [3] and then press [Enter].
The "Delete DOS Partition or Logical DOS Drive" window opens.
19. Press [1], and then press [Enter].
The "Delete Primary DOS Partition" screen appears. You see a message
Warning! Data in the deleted Primary DOS Partition will be??? lost. What primary partition do you want to delete?
20. Press [1], and then press [Enter].
You are prompted to enter the Volume label.
21. Type the volume label and press [Enter].
You see the message
Are you sure (Y/N)...?
22. Press [Y], and then press [Enter].
You see the message
Primary DOS Partition deleted
23. Press [Esc] to return to the "FDISK Options" screen.
24. Press [Esc] to exit FDISK.
25. Press [Esc] again to return to the DOS prompt.
26.Turn the computer off.
27.Connect the external FDD. See ???Attaching the external FDD drive??? on page 58.
29. Insert the bootable recovery diskette into your FDD.
114 ThinkPad 240 User's Reference
The "Create Primary DOS Partition" screen appears. You see the message
Do you wish to use the maximum available size for a Primary DOS Partition and make the partition active (Y/N)...?
34. Press [N], and then press [Enter].
You will see a message
Enter partition size in Mbytes or percent of disk space
(%)to create a Primary DOS Partition.
35.Press [Enter].
Primary DOS Partition created.
36.Press [Esc].
Enter partition size in Mbytes or percent of disk space
(%)to create a Extended DOS Partition.
39.Press [Enter].
Chapter 4. Solving computer problems115
Recovering lost or damaged software
Extended DOS Partition created.
40.Press [Esc].
All available space in the Extended DOS Partition is assigned to logical drives.
42. Press [Esc]. You return to the "FDISK Options" screen.
43. Press [2], and then press [Enter].
You see the message
Enter the number of the partition you want to make active.
44. Press [1] and then press [Enter].
You see the messagePartition 1 made active.
116 ThinkPad 240 User's Reference
The original image will be transferred to your computer. This
5. Turn the computer on. The computer boots to the prompt.
6. TypeFDISK at the DOS prompt.
The FDISK Options screen appears.
7. Press [1], and then press [Enter].
Chapter 4. Solving computer problems117
Recovering lost or damaged software
The "Create DOS Partition or Logical DOS Drive" screen appears.
8. Press [1], and then press [Enter].
The "Create Primary DOS Partition" screen appears. You see the message
Do you wish to use the maximum available size for a Primary DOS Partition and make the partition active (Y/N)...?
9. Press [N], and then press [Enter].
You will see a message
Enter partition size in Mbytes or percent of disk space
(%)to create a Primary DOS Partition.
10.Press [Enter].
Primary DOS Partition created.
11.Press [Esc].
You return to the "FDISK Options" screen.
12. Press [1], and then press [Enter].
The "Create DOS Partition or Logical DOS Drive" screen appears.
13. Press [2], and then press [Enter].
Enter partition size in Mbytes or percent of disk space
(%)to create a Extended DOS Partition.
14.Press [Enter].
Extended DOS Partition created.
15.Press [Esc].
118 ThinkPad 240 User's Reference
All available space in the Extended DOS Partition is assigned to logical drives.
Note the drives which are available (D, E, F, etc.).
17. Press [Esc]. You return to the "FDISK Options" screen.
18. Press [2], and then press [Enter].
You see the message
Enter the number of the partition you want to make active.
19. Press [1] and then press [Enter].
You see the message
Partition 1 made active.
20. Press [Esc] to return to the "FDISK Options" screen.
21. Press [Esc] again to exit the FDISK utility.
Chapter 4. Solving computer problems119
Recovering lost or damaged software
27. TypeSOFTCP at the command prompt and press [Enter].
120 ThinkPad 240 User's Reference

Chapter 5. Getting Service
For your convenience, write the service phone numbers here:
______________________________
______________________________

Information on your computer
Information on your computer
Option list
Identification numbers
The serial number label is down the machine type and
on the bottom of your computer. Write serial number (S/N) in the following box.
Serial number label
122 ThinkPad 240 User's Reference

Information on your computer
Problem recording sheet
Version_____
??Application programs running at the time of the problem:
____________________________________________
____________________________________________
??Problem symptom:
Describe the problem more specifically:
____________________________________________
____________________________________________
____________________________________________
If yes, describe how it can be reproduced:
____________________________________________
____________________________________________
Chapter 5. Getting Service123
Customer support and service
?? Description of the problem
?? Exact wording of the error message
?? Hardware and software configuration information for your system
If possible, be at your computer when you call.
?? In the U.S. and Puerto Rico, call
?? In Canada, call
These lines are available 24 hours a day, 7 days a week. The answering
??Sales information
??Product brochures
124 ThinkPad 240 User's Reference
Customer support and service
?? Locations of IBM resellers
?? Services available from IBM
ThinkPad EasyServ
Chapter 5. Getting Service125
vices as the electronic bulletin boards and public messaging areas, electronic conferences, and searchable databases available in several of the most popular online information services.
?? PC user groups
?? PC questions and answers
??Problem solving
??Technical information
?? Hardware and software configurations
To access the PC Company BBS, call:
?? In the U.S.,
?? In Canada, call the center closest to you:
???
???
???
???
Commercial online services that contain information about IBM pro- ducts are:
?? CompuServe**
126 ThinkPad 240 User's Reference
??America Online**
Use theGo to keywordIBM .
many other things. You can visit the site at the following URL:
with IBM and are thereafter greeted by name and presented ta information selected specifically to meet their particular needs. example, a corporate ThinkPad user might receive information on
major Internet service providers. You can set up your profile a http://www.pc.ibm.com/support
Chapter 5. Getting Service127
Purchasing additional services
?? Assistance with the preloaded operating system
?? Using selected application software and games
?? Tuning performance, such as memory management
?? Installing device drivers remotely
?? Setting up and using multimedia devices
128 ThinkPad 240 User's Reference
Purchasing additional services
Client support line
Client support is available to provide assistance with the following
?? Installation and configuration of clients
Chapter 5. Getting Service129
Purchasing additional services
?? In Canada
??? Call
??In other countries, contact your IBM reseller or IBM marketing representative.
For more information on how to purchase the Support Line Services:
?? In the U.S.: call
?? In Canada: call
??In other countries, contact your IBM reseller or IBM marketing representative.
Warranty and repair services
?? In the U.S.: call
?? In Canada: call
??In other countries, contact your IBM reseller or IBM marketing representative.
130 ThinkPad 240 User's Reference
Obtaining IBM operating system updates
Getting update diskettes
You can obtain update diskettes from:
??IBM PC Company BBS IBM Software Solutions Center
?? An IBM authorized reseller or an IBM marketing representative.
Ordering publications
??In the U.S. and Puerto Rico, call IBM PC Books at
?? In Canada, call
??In all other countries, contact your IBM reseller or IBM marke representative.
Chapter 5. Getting Service131
Obtaining IBM operating system updates
132 ThinkPad 240 User's Reference

Appendix A. Features and specifications
This appendix describes the features and specifications for the puter.
Features
Features
Processor
Intel??? Celeron??? processor
Memory
Base: 32 or 64 MB
Option: Max. 160MB or 192 MB
Storage devices
Display
The color display uses TFT technology
Up to 1024 by 768 resolution on the external monitor
Brightness control
Keyboard
Fn key function
External interface
Universal Serial Bus (USB) connector
Modem Port (6P4C)
Microphone jack
Headphone jack
Stereo
External FDD connector
134 ThinkPad 240 User's Reference
Features
Serial connector
PC Card slots (One Type II PC Card) Infrared port
Appendix A. Features and specifications135
Specifications
Specifications
136 ThinkPad 240 User's Reference
IBM power cords
IBM power cords
Appendix A. Features and specifications137
138 ThinkPad 240 User's Reference
Appendix B. Product warranties and notices
compatible with the feature, conversion, or upgrade. Some of these transactions (called
Replacement parts assume the remaining warranty of the parts they replace.
the item IBM or your reseller replaces becomes its property and replacement becomes yours. The replacement may not be new, but
140 ThinkPad 240 User's Reference
Misuse, accident, modification, unsuitable physical or operating env
In Canada, warranties include both warranties and conditions.
Circumstances may arise where, because of a default on IBM's part
Under no circumstances is IBM liable for any of the following:
3. economic consequential damages (including lost profits or
savings) or incidental damages, even if IBM is informed of their possibility.
142 ThinkPad 240 User's Reference
Notices
Notices
license inquiries, in writing, to the IBM Director of Licensing, I Corporation, 500 Columbus Avenue, Thornwood, NY 10594, U.S.A.
Trademarks
The following terms, in this publication, are trademarks of the IB
Corporation in the United States or other countries or both:
IBM
MMPM/2
Multimedia Presentation Manager/2
PC Card Director
PS/2
RediSafe
ThinkPad
TrackPoint IV
Microsoft, Windows, Windows NT, and the Windows 95 flag logo are trademarks or registered trademarks of Microsoft Corporation.
Appendix B. Product warranties and 143notices
Notices
Federal Communications Commission (FCC) Statement
ThinkPad 240
144 ThinkPad 240 User's Reference
harmful interference in a residential installation. This equipment g erates, uses, and can radiate radio frequency energy and, if installed and used in accordance with the instructions, may cause harmful interference to radio communications. However, there is no guarantee that interference will not occur in a particular installa this equipment does cause harmful interference to radio or telev
nectors are available from IBM authorized dealers. IBM is not responsible for any radio or television interference caused by other than recommended cables and connectors or by unauthorized changes or modifications to this equipment.
(2) this device must accept any interference received, including ference that may cause undesired operation.
Appendix B. Product warranties and 145notices
Notices
146 ThinkPad 240 User's Reference
telephone company may discontinue your service temporarily. If
5. Your telephone company may make changes in its facilities, equipment, operations, or procedures that could affect the pr
Appendix B. Product warranties and 147notices
Notices
Fax branding
Industry Canada requirements
Notice
The Industry Canada label identifies certified equipment. This cer ication means that the equipment meets certain telecommunications networks protective, operational, and safety requirement. The Depart- ment does not guarantee the equipment will operate to the user's satisfaction.
inside wiring associated with a single line individual service may extended by means of a certified connector assembly (telephone
148 ThinkPad 240 User's Reference
Avis
L'etiquette dus minist??re l'Industrie Canada identifie le mat??riel homologu??. Cette ??tiquette certifie que le mat??riel est conforme certaines normes de protection, d'exploitation et de s??curit?? de
interne). L'abonn?? ne doit pas oublier qu'il est possibile que la conformit?? aux conditions ??nonc??es
Appendix B. Product warranties and 149notices
Notices
La compagnie de t??l??communications peut demader ?? l'utilisateur de d??brancher un appareil ?? la suite de r??parations ou de modificat
de mise ?? la terre de la source d'??nergie ??lectrique, des ligne t??l??phoniques et des canalisations d'eau m??talliques, s'il y en a, s raccord??s ensemble. Cette pr??caution est particuli??rement
importante dans les r??gions rurales.
Avertissement
peut ??tre raccord??e ?? un circuit t??l??phonique boucl?? utilis?? par dispositif. La terminaison du circuit boucl?? peut ??tre constitu??e
150 ThinkPad 240 User's Reference

Glossary
152 ThinkPad 240 User's Reference
Glossary 153
154 ThinkPad 240 User's Reference

Index
A
America Online 127 attaching 67 audio problems 99
G
getting service 124
H
I
M
mechanical lock 76 memory 47
specifications 134
modem problems 100 modem, location 4
N
network and server support line 129 notices and warranties
product 139
numeric keypad, using 14 numeric lock lamp 8
156 ThinkPad 240 User's Reference
Index 157
troubleshooting(continued)
U
USB
W
warranty
extensions and upgrades 130 product 139
service, international 125 Web site 33
158 ThinkPad 240 User's Reference