Husqvarna
Operator's Manual
Instruction Manual
Read and follow all Safety Rules and Operating Instructionsbefore usingthis product. Failureto do so can result in serious injury.
530088541 4/24/01
Husqvarna
Operator's Manual
Instruction Manual
Read and follow all Safety Rules and Operating Instructionsbefore usingthis product. Failureto do so can result in serious injury.
530088541 4/24/01

1 2 3
9
10
WARNING! This chain saw can be dangerous! Careless or improper use can cause serious or even fatal injury.
m
Read and understand the instruction manual before using the chain saw.
/
Measured maximum kickback valuewithout chain brake for the bar and chain combination on the label.
There may be more symbols found on your unit other than those listed above. These symbols may represent compliances, standards, or other matters concerning the product.
2

_WARNING: Always disconnect
spark plug wire and place wire where it can- not contact spark plug to prevent accidental starting when setting up, transporting, ad- justing or making repairs except carburetor adjustments.
Because a chain saw is a
Careless or improper use of this tool can cause serious injury.
PLAN AHEAD
???Read this manual carefully until you com- pletely understand and can follow all safe- ty rules, precautions, and operating in-
structions before attempting to use the unit.
???Restrict the use of your saw to adult users who understand and can follow safety rules, precautions, and operating instruc- tions found in this manual.
???Wear protective gear. Always use steel- toed safety footwear with
???Keep all parts of your body away from the chain when the engine is running.
???Keep children, bystanders, and animals a minimum of 30 feet (10 meters) away from
the work area. Do not allow other people or animals to be near the chain saw when starting or operating the chain saw.
???Do not handle or operate a chain saw when you are fatigued, ill, or upset, or if you have taken alcohol, drugs, or medication. You must be in good physical condition and mentally alert. Chain saw work is strenuous. If you have any conditionthat might be aggravated by strenuous work, check with your doctor before operating a chain saw.
???Carefullyplan your sawing operationin ad- vance. Donor startcuttinguntilyou havea
clearwork area, secure footing, and, if you are felling trees, a planned retreat path.
OPERATE YOUR SAW SAFELY
???Do not operatea chain saw with one hand. Serious injury to the operator, helpers, by- standers or any combination of these per- sons may result from
???Operatethe chain saw only in a
???Do not operate saw from a ladder or in a tree.
???Make sure the chain will not make contact
with any object while starting the engine. Never try to start the saw when the guide bar is in a cut.
???Do not put pressure on the saw at the end of the cut. Applying pressure can cause you to lose control when the cut is com- pleted.
???Stop the engine before setting the saw down.
???Do not operate a chain saw that is dam- aged, improperly adjusted, or not com- pletely and securely assembled. Always replace bar, chain, hand guard, or chain
brake immediately if it becomes damaged, broken or is otherwise removed.
???With the engine stopped, hand carry the chain saw with the muffler away from your body, and the guide bar and chain to the
rear, preferably covered with a scabbard.
MAINTAIN YOUR SAW IN GOOD
WORKING ORDER
???Have all chain saw service performed by a qualified service dealer with the exception of the items listed in the maintenance sec-
tionofthis manual. Forexample, if improp- er tools are used to remove or hold the fly- wheel when servicing the clutch, structural damage to the flywheel can occur and cause the flywheel to burst.
???Make certainthe saw chain stops moving
when the throttle trigger is released. For correction, refer to CARBURETOR AD-
JUSTMENTS.
???Never modify your saw in any way.
???Keep the handles dry, clean, and free of oil or fuel mixture.
???With the engine stopped, hand carry the chain saw with the muffler away from your body, and the guide bar and chain to the
rear, preferably covered with a guide bar cover.
???Keep fuel and oil caps, screws, and fas- teners securely tightened.
???Use only Husqvarna accessories and re-
placement parts as recommended.
HANDLE FUEL WITH CAUTION
???Do not smoke while handling fuel or while operating the saw.
???Eliminateall sources of sparks or flame in the areas where fuel is mixed or poured.
3
Thereshouldbenosmoking,openflames, orworkthatcouldcausesparks.AIIowen-
gineto coolbeforerefueling.
???Mixandpourfuelin an outdoorareaon bareground;storefuelinacool,dry,well ventilatedplace;and use an approved,
markedcontainerfor all fuel purposes. Wipeupallfuelspillsbeforestartingsaw.
???Moveatleast10feet(3meters)fromfuel- ingsitebeforestartingengine.
???Turntheengineoff andletsawcoolin a
straw,paper,etc. Slowlyremovefuelcap andrefuelunit.
???Storetheunitandfuelinanareawherefuel
vaporscannot reach sparks or open flamesfromwaterheaters,electricmotors orswitches,furnaces,etc.
KICKBACK
a_WARNIN_: Avoidkickbackwhich canresultinseriousinjury.Kickbackis the
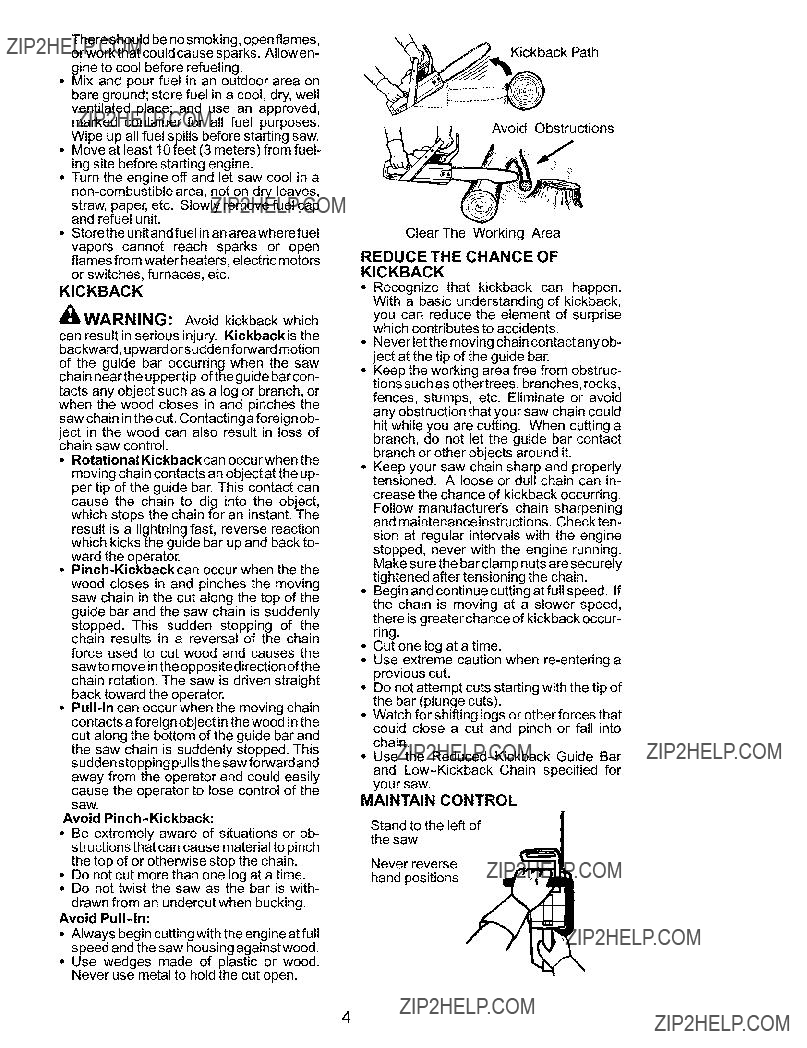
backward, upward orsudden forward motion of the guide bar occurring when the saw chain near the upper tip of the guide bar con- tacts any object such as a log or branch, or when the wood closes in and pinches the saw chain in the cut. Contacting aforeign ob- ject in the wood can also result in loss of chain saw control.
???RotationalKickbackcanoccurwhenthe moving chain contacts an object at the up- per tip of the guide bar. This contact can cause the chain to dig into the object, which stops the chain for an instant. The result is a lightning fast, reverse reaction which kicks the guide bar up and back to- ward the operator.
???
stopped. This sudden stopping of the chain results in a reversal of the chain force used to cut wood and causes the
sawto move inthe oppositedirectionofthe chain rotation. The saw is driven straight back toward the operator.
???
cause the operator to lose control of the saw.
Avoid
???Be extremely aware of situations or ob- structions that can cause material to pinch the top of or otherwise stop the chain.
???Do not cut more than one log at a time.
???Do not twist the saw as the bar is with-
drawn from an undercut when bucking.
Avoid
???Always begincuttingwiththeengineatfull speed and the saw housing against wood.
???Use wedges made of plastic or wood. Never use metal to hold the cut open.
ack Path
Avoid Obstructions
Clear The Working Area
REDUCE THE CHANCE OF
KICKBACK
???Recognize that kickback can happen. With a basic understanding of kickback, you can reduce the element of surprise which contributes to accidents.
???Never let the moving chain contact any ob- ject at the tip of the guide bar.
???Keep the working area free from obstruc- tions such as othertrees, branches, rocks,
fences, stumps, etc. Eliminate or avoid any obstruction that your saw chain could hit while you are cutting. When cutting a branch, do not let the guide bar contact branch or other objects around it.
???Keep your saw chain sharp and properly tensioned. A loose or dull chain can in-
crease the chance of kickback occurring. Follow manufacturer's chain sharpening and maintenanceinstructions. Checkten-
sion at regular intervals with the engine
stopped, never with the engine running. Make sure the bar clamp nuts are securely tightened after tensioning the chain.
??? Beginandcontinuecuttingatfullspeed. If the chain is moving at a slower speed, there is greaterchance of kickback occur- ring.
???Cut one log at a time.
???Use extreme caution when
???Do not attempt cuts starting with the tip of the bar (plunge cuts).
???Watch for shifting logs or other forces that could close a cut and pinch or fall into chain.
???Use the
MAINTAIN CONTROL
Stand to the left of_ the saw
Never reverse hand positions
4

I
t
Elbow locked
Thumb on undersideof handlebar
???Keep a good, firm grip on the saw with both hands when the engine is running and
don'tlet go. A firm grip will help you reduce kickback and maintain control of the saw.
Keep the fingers of your left hand encir- cling and your left thumb under the front handlebar. Keep your right hand com- pletely around the rear handle whether your are right handed or left handed. Keep your left arm straight with the elbow locked.
???Position your left hand on the front handle- bar so it is in a straight line with your right hand on the rear handle when making bucking cuts. Never reverse right and left hand positions for any type of cutting.
???Standwith your weight evenly balancedon both feet.
???Stand slightly to the left side of the saw to keep your body from being in a direct line with the cutting chain.
???Do not overreach. You could be drawn or thrown off balance and lose control of the saw.
???Do not cut above shoulderheight. It is diffi- cult to maintain control of saw above
shoulder height.
KICKBACK SAFETY FEATURES
_I_WARNING: The following features
are included on your saw to help reduce the hazard of kickback; however, such features
will not totally eliminate this dangerous reac- tion. As a chain saw user, do not rely only on safety devices. You must follow all safety precautions, instructions, and maintenance in this manual to help avoid kickback and other forces which can result in serious
injury.
???
has been demonstrated to significantly re- duce the number and seriousness of kick- backs when tested in accordance with
safety requirements for gasoline powered chain saws as set by ANSI B175.1.
Reduced Kickback Symmetrical Guide Bar
Symmetrical Guide Bar I "_
{
Large Radius Tip
???
wood to gradually ride into the cutter.
???Front Hand Guard, designed to reduce the chance of your left hand contacting the chain if your hand slips offthefront handle- bar.
???Position of front and rear handlebars, de- signed with distance between handlesand
CHAIN BRAKE AND CKA ANGLE
???Chain Brake, designedto stop the chain in the event of kickback.
_I_WARNING: WE DO NOT REP-
RESENT AND YOU SHOULD NOT AS-
SUME THAT THE CHAIN BRAKE WILL
PROTECT YOU IN THE EVENT OF A
KICKBACK. Kickback is a lightningfast ac- tion which throws the bar and rotating chain back and up toward the operator. Kickback can be caused by allowing contact of the bar tip in the danger zone with any hard object. Kickbackcan also be caused by pinchingthe saw chain alongthetop ofthe guidebar. This action may push the guide bar rapidly back toward the operator. Either of these events may cause you to lose control of the saw
which could result in serious injury or even death. DO NOT RELY UPON ANY OF THE
DEVICES BUILT INTO YOUR SAW. YOU
SHOULD USE THE SAW PROPERLY AND CAREFULLY TO AVOID KICKBACK. Re-
magnitude of kickback and are recom- mended. Your saw has a low kickback chain
and bar as original equipment. Repairs on a chain brake should be made by an autho- rized servicing dealer. Take your unit to the place of purchase if purchased from a Husqvarna Servicing Dealer, or to the near- est Authorized Husqvarna Service Dealer.
5

???Tipcontactin somecasesmaycausea lightningfastreverseREACTION,kicking
theguidebarupandbacktowardtheoper- ator.
???Pinchingthesawchainalongthetopofthe guidebarmaypushtheguidebarrapidly backtowardtheoperator.
???Eitherofthesereactionsmaycauseyouto losecontrolofthesawwhichcouldresult
in seriousinjury.Donot rely exclusively uponthesafetydevicesbuiltintoyoursaw.
_k, WAP.NING: Computed kickback
angle (CKA) listed on your saw and listed in the CKA table below represents angle of
kickback your bar and chain combinations will have when tested in accordance with
CSA (Canadian Standards Association) and ANSI standards. When purchasing replace- ment bar and chain, considerations should
Computed kickback angle (CKA) Table
BAR
be given to the lower CKA values. Lower CKA values represent safer angles to the user, higher values indicate more angle and higher kick energies. Computed angles rep- resented in the
The following guide bar and chain combina-
tions meet kickback requirements of CSA Standards Z62.1, Z62.3, & ANSI B175.1 when used on saws listed in this manual. Use of bar and chain combinations other than those listed is not recommended and
may not meet the CKA requirements per standard.
commercial logging, a chain brake is required and shall not be removed or otherwise disabled to comply with Federal OSHA Regulationsfor Commercial Logging.
Contact your authorized Husqvarna service dealer.
SAFETY NOTICE: Exposure to vibrations through prolonged use of gasoline powered hand tools could cause blood vessel or nerve damage in the fingers, hands, and joints of people prone to circulation disorders or abnormal swellings.
Prolonged use in cold weather has been linked to blood vessel damage in otherwise healthy people. If symptoms occur such as numbness, pain, loss of strength, change in skin color or texture, or loss of feeling in the
fingers, hands, or joints, discontinue the use of this tool and seek medical attention. An
SPECIAL NOTICE: Yoursaw is equipped with a temperaturelimiting muffler and spark arresting screen which meets the
Protective gloves (not provided) should be worn during assembly.
ATTACHING THE BAR & CHAIN (If not already attached)
_WAP.NING: Recheckeachassem-
blystep if the saw is received assembled. AI-
requirements of California Codes 4442 and 4443. All U.S. forest land and the states of
California, Idaho, Maine, Minnesota, New Jersey, Oregon, and Washington require many internal combustion engines to be equipped with a spark arrestor screen by law. If you operate a chain saw in a state or locale where such regulations exist, you are legally responsible for maintaining the operatingconditionofthese parts. Failureto do so is a violation of the law. Refer to the SERVICE AND ADJUSTMENTS sectionfor
maintenanceof the Spark Arresting Screen.
Failure to follow all Safety Rules and Precautions can result in serious injury. If situationsoccurwhich are not covered in this
manual, use care and good judgement. If you need assistance, contact your authorized service dealer.
STANDARDS
CSA Z62.1 "Chain Saws - Occupational
Health and Safety"
CSA Z62.3 "Chain Saw Kickback Occupa- tional Health and Safety"
ANSI
Powered Chain Saw - Safety Require- ments"
ways wear gloves when handling the chain. The chain is sharp and can cut you even when it is not moving!
???Loosen and remove the clamp nuts and the bar clamp from the saw.
???Remove the plastic shipping spacer (if present).
6
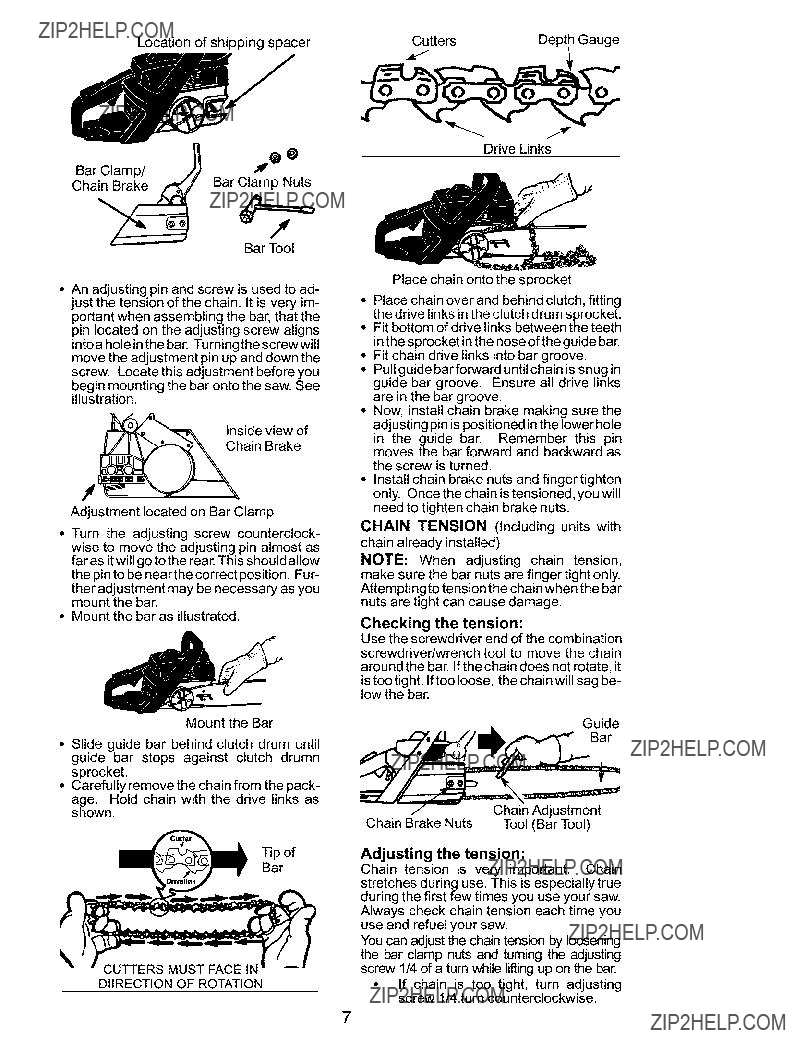
Locationof shippingspacer
Cha_
Bar Tool
???An adjusting pin and screw is used to ad- just the tension of the chain. It is very im- portant when assembling the bar, that the pin located on the adjusting screw aligns intoa hole in the bar. Turningthe screw will move the adjustment pin up and down the screw. Locate this adjustment before you
begin mounting the bar onto the saw. See illustration.
Inside view of
Chain Brake
\.
Adjustment located on Bar Clamp
???Turn the adjusting screw counterclock- wise to move the adjusting pin almost as far as it will go to the rear. This should allow the pin to be near the correct position. Fur-
ther adjustment may be necessary as you mount the bar.
???Mountthe baras illustrated.
Mount the Bar
???Slide guide bar behind clutch drum until guide bar stops against clutch drumn sprocket.
???Carefully remove the chain from the pack- age. Hold chain with the drive links as shown.
Tip of
Bar
DIIRECTION OF ROTATION
Drive Links
Place chain onto the sprocket
???Placechainoverand behind clutch, fitting the drive links in the clutch drum sprocket.
???Fit bottom ofdrivelinks betweentheteeth
in the sprocket in the nose of the guide bar.
???Fit chain drive links into bar groove.
???Pull guide bar forward until chain is snug in guide bar groove. Ensure all drive links are in the bar groove.
???Now, install chain brake making sure the adjusting pin is positioned in the lower hole in the guide bar. Remember this pin moves the bar forward and backward as the screw is turned.
???Install chain brake nuts and finger tighten only. Once the chain is tensioned, you will need to tighten chain brake nuts.
CHAIN TENSION (Including units with chain already installed)
NOTE: When adjusting chain tension, make sure the bar nuts are finger tight only. Attemptingto tensionthe chain when the bar nuts are tight can cause damage.
Checking the tension:
Use the screwdriver end of the combination screwdriver/wrench tool to move the chain around the bar. If the chain does not rotate, it
is too tight. Iftoo loose, the chain will sag be- low the bar.
Guide
Bar
Adjusting the tension:
Chain tension is very important. Chain stretches during use. This is especially true during the first few times you use your saw. Always check chain tension each time you use and refuel your saw.
You can adjust the chain tension by loosening the bar clamp nuts and turning the adjusting screw 1/4 of a tum while IAing up on the bar.
???If chain is too tight, turn adjusting screw 1/4 turn counterclockwise.
7
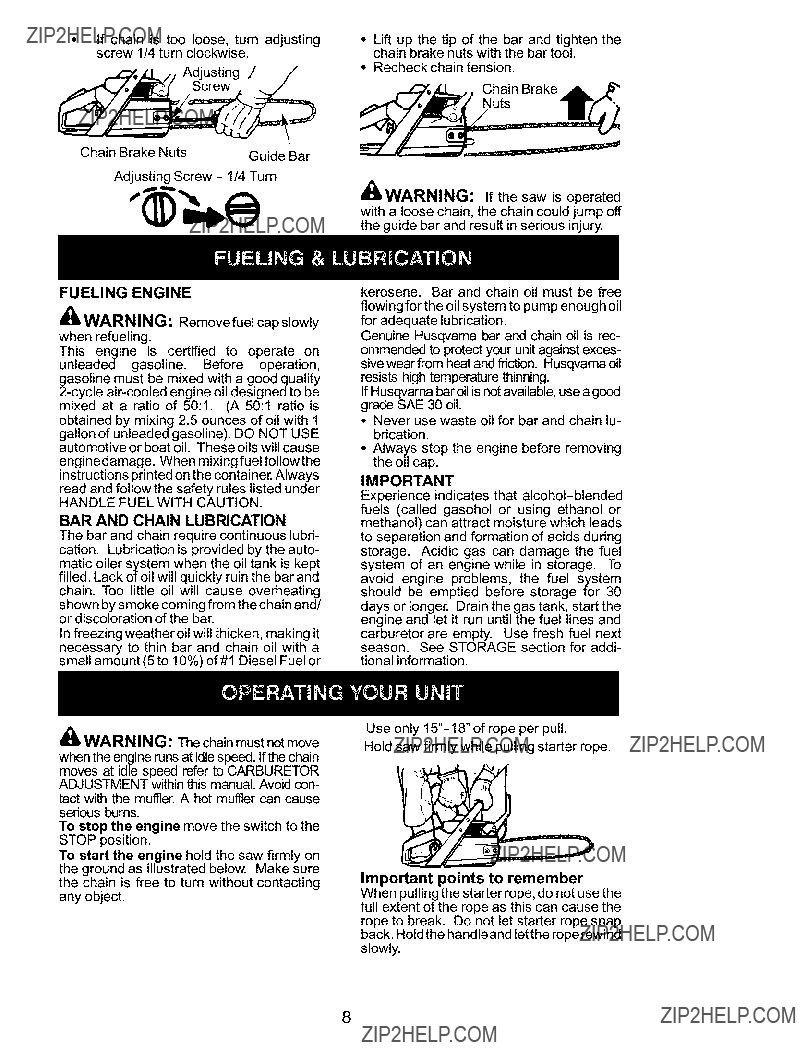
Adjusting Screw - 1/4 Turn
FUELING ENGINE
_h',WARNING: Removefuel capslowly
when refueling.
This engine is certified to operate on unleaded gasoline. Before operation, gasoline must be mixed with a good quality
gallon of unleaded gasoline). DO NOT USE automotive or boat oil. These oils will cause
enginedamage. When mixing fuel followthe instructions printed on the containe_ Always read and follow the safety rules listed under
HANDLE FUEL WITH CAUTION.
BAR AND CHAIN LUBRICATION
The bar and chain require continuous lubri- cation. Lubrication is provided by the auto- matic oiler system when the oil tank is kept filled. Lack of oil will quickly ruin the bar and chain. Too little oil will cause overheating shown by smoke coming from the chain and/ or discoloration of the bar.
In freezing weather oil will thicken, making it necessary to thin bar and chain oil with a small amount (5 to 10%) of#1 Diesel Fuel or
DWARNIN_: If the saw is operated
with a loose chain, the chain could jump off the guide bar and result in serious injury.
kerosene. Bar and chain oil must be free flowing for the oil system to pump enough oil for adequate lubrication.
Genuine Husqvarna bar and chain oil is rec- ommended to protect your unit against exces- sive wear from heat and friction. Husqvarna oil resists high temperature thinning.
If Husqvarna bar oil is not available, use a good grade SAE 30 oil.
???Never use waste oil for bar and chain lu- brication.
???Always stop the engine before removing the oil cap.
IMPORTANT
Experience indicates that
carburetor are empty. Use fresh fuel next season. See STORAGE section for addi- tional information.
when the engine runs at idle speed, if the chain moves at idle speed refer to CARBURETOR ADJUSTMENT within this manual. Avoid con- tact with the muffler. A hot muffler can cause serious bums.
To stop the engine move the switch to the STOP position.
To start the engine hold the saw firmly on the ground as illustrated below. Make sure the chain is free to turn without contacting any object.
Use only 15"- 18" of rope per pull.
Hold saw firmly while pulling starter rope.
Important points to remember
When pulling the starter rope, do not use the full extent of the rope as this can cause the rope to break. Do not let starter rope snap back. Hold the handleand let the rope rewind slowly.
8
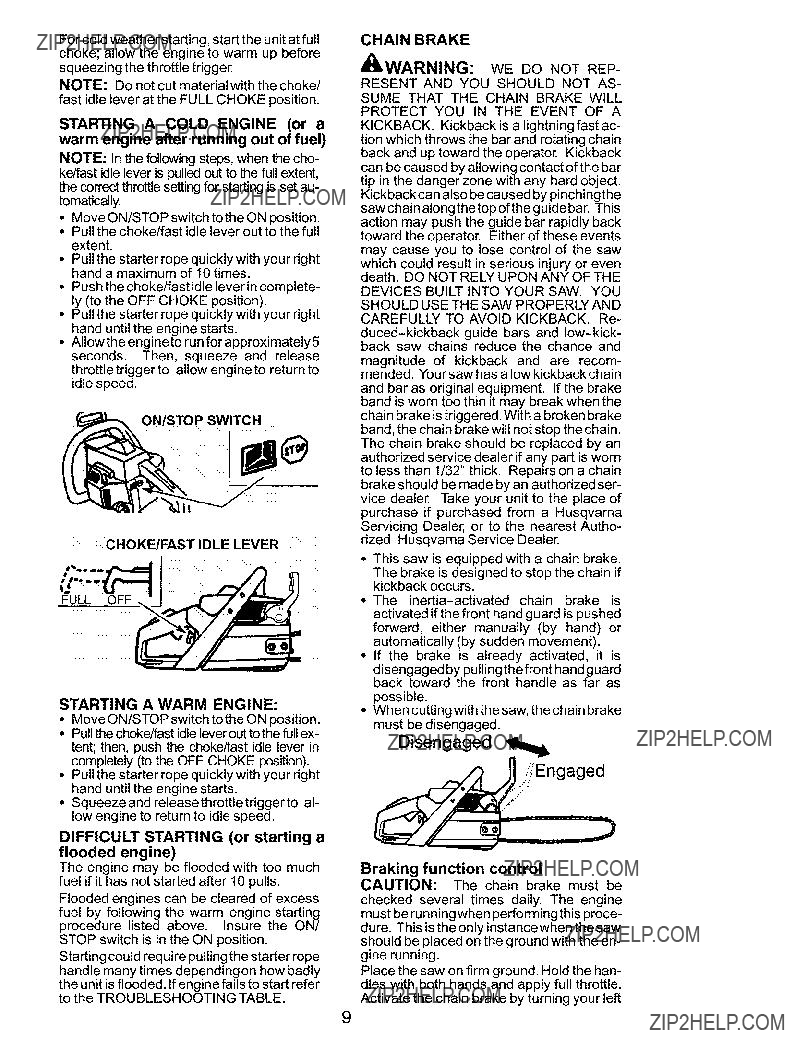
For cold weather starting, start the unit at full choke; allow the engine to warm up before squeezing the throttle trigger.
NOTE: Do not cut material with the choke/ fast idle lever at the FULL CHOKE position.
STARTING A COLD ENGINE (or a warm engine after running out of fuel)
NOTE: In the following steps, when the cho- ke/fast idle lever is pulled out to the full extent, the correct throttle setting for starting is set au- tomatically.
???Move ON/STOP switch to the ON position.
???Pull the choke/fast idle lever out to the full extent.
???Pull the starter rope quickly with your right hand a maximum of 10 times.
???Push the choke/fast idle lever in complete- ly (to the OFF CHOKE position).
???Pull the starter rope quickly with your right hand until the engine starts.
???AIIowthe engineto run for approximately5 seconds. Then, squeeze and release throttletriggerto allowengineto returnto idle speed.
ON/STOP SWITCH (_
CHOKE/FAST IDLE LEVER
FULL OFF
STARTING A WARM ENGINE:
???Move ON/STOP switch to the ON position.
???Pull the choke/fast idle lever out to the full ex-
tent; then, push the choke/fast idle lever in completely (to the OFF CHOKE position).
???Pull the starter rope quickly with your right hand until the engine starts.
???Squeezeand releasethrottletriggerto al- low engine to return to idle speed.
DIFFICULT STARTING (or starting a flooded engine)
The engine may be flooded with too much fuel if it has not started after 10 pulls.
Flooded engines can be cleared of excess fuel by following the warm engine starting procedure listed above. Insure the ON/ STOP switch is in the ON position.
Starting could require pulling the starter rope handle many times dependingon how badly the unit is flooded. If engine fails to start refer to the TROUBLESHOOTING TABLE.
CHAIN BRAKE
J'l_
RESENT AND YOU SHOULD NOT AS-
SUME THAT THE CHAIN BRAKE WILL
PROTECT YOU IN THE EVENT OF A KICKBACK. Kickback is a lightningfast ac- tion which throws the bar and rotating chain back and up toward the operator. Kickback can be caused by allowing contact of the bar tip in the danger zone with any hard object. Kickbackcan also be caused by pinchingthe saw chain alongthetop ofthe guidebar. This action may push the guide bar rapidly back toward the operator. Either of these events may cause you to lose control of the saw which could result in serious injury or even death. DO NOT RELY UPON ANY OF THE
DEVICES BUILT INTO YOUR SAW. YOU
SHOULD USE THE SAW PROPERLY AND CAREFULLY TO AVOID KICKBACK. Re-
magnitude of kickback and are recom- mended. Your saw has a low kickback chain
and bar as original equipment. If the brake band is worn too thin it may break when the chain brake is triggered.With a broken brake band, the chain brake will not stop the chain. The chain brake should be replaced by an authorized service dealer if any part is worn to less than 1/32" thick. Repairs on a chain brake should be made by an authorized ser- vice dealer. Take your unit to the place of purchase if purchased from a Husqvarna Servicing Dealer, or to the nearest Autho- rized Husqvarna Service Dealer.
???This saw is equipped with a chain brake. The brake is designed to stop the chain if kickback occurs.
???The
activated if the front hand guard is pushed forward, either manually (by hand) or automatically (by sudden movement).
???If the brake is already activated, it is
disengagedby pullingthe front hand guard back toward the front handle as far as
possible.
???When cutting with the saw, the chain brake must be disengaged.
Disengaged _
]Engaged
J}
Braking function control
CAUTION: The chain brake must be
checked several times daily. The engine must be runningwhen performing this proce- dure. This is the only instance when the saw should be placed on the ground with the en- gine running.
Place the saw on firm ground. Hold the han- dles with both hands and apply full throttle. Activate the chain brake by turning your left
9

wristagainstthehandguardwithoutreleas- ingyour griparoundthefronthandle.The
chainshouldstopimmediately. Inertia activating function control
_k, WARNING: When performing the fol-
lowing procedure, the engine must be turned off.
IMPORTANT POINTS
???Check chain tension before first use and
after 1 minute of operation. See CHAIN TENSION in the ASSEMBLY section.
???Cut wood only. Do not cut metal, plastics, masonry,
???Stop the saw if the chain strikes a foreign object. Inspect the saw and repair parts as necessary.
???Keepthechainoutofdirtandsand. Evena small amountofdirt will quickly dull a chain and increase the possibility of kickback.
???Practice cutting a few small logs using the following techniques to get the "feel" of us- ing your saw before you begin a major sawing operation.
???Squeeze the throttle trigger and allow the engine to reach full speed before cutting.
???Begin cutting with the saw frame against the log.
???Keep the engine at full speed the en- tire time you are cutting.
???Allow the chain to cut for you. Exert only light downward pressure.
???Releasethe throttletrigger as soon as the cut is completed, allowing the en- gine to idle. If you run the saw at full throttle without a cutting load, unnec- essary wear can occur.
???To avoid losing control when cut is complete, do not put pressure on saw at end of cut.
???Stop the engine before setting the saw down after cutting.
TREE FELLING TECHNIQUES
_;IWARNING: Check for broken or
dead branches which can fall while cutting causing serious injury. Do not cut nearbuild- ings or electricalwires if you do not know the directionoftree fall, norcut at night sinceyou will not be ale to see well, nor during bad weathersuch as rain, snow, or strong winds, etc. If the tree makes contact with any utility line, the utility company should be notified immediately.
???Carefullyplan your sawingoperationin ad- vance.
???Cleartheworkarea. You needacleararea
all aroundthetreeso you can havesecure footing.
???The chain saw operator should keep on the uphill side of the terrain as the tree is likelyto rollor slidedownhillafterit is felled.
The chain brake must be checked several times daily. Hold the chain saw approximate- ly 14" (35 cm) above a stump or otherfirm ob- ject. Release your grip on the front handle and let the saw, by its own weight, rotate around the rear handle. When the tip of the bar hits the stump, the brake should activate.
??? Study the natural conditions that can cause
the tree to fall in a particular direction. Natural conditions that can cause a tree to
fall in a particular direction include:
???The wind direction and speed.
???The lean of the tree. The lean of a tree might not be apparent due to uneven or
slopingterrain. Use a plumb or level to de- termine the direction of tree lean.
???Weight and branches on one side.
???Surroundingtrees and obstacles.
Look for decay and rot. Ifthetrunk is rotted,
it can snap and fall toward the operator. Check for broken or dead branches which
can fall on you while cutting.
Make sure there is enough room for the tree to fall. Maintain a distance of
Remove dirt, stones, loose bark, nails, sta-
ples, and wire from the tree wherecuts are to be made.
Plan a clear retreat path to the rear and diag- onal to the line of fall.
_X_z,_. Plan a clear retreat path
FELLING LARGE TREES
(15 cm in diameter or larger)
The notch method is used to fell large trees. A notch is cut on the side of the tree in the de-
sired direction of fall. After a felling cut is made on the opposite side of tree, the tree will tend to fall into the notch.
ing saw to remove buttress roots, keep saw chain from contacting ground to prevent dull- ing of the chain.
NOTCH CUT AND FELLING THE
TREE
???Make notch cut by cutting the top of the notch first. Cut through 1/3 of the diameter of the tree. Next complete the notch by cut- ting the bottom of the notch. See illustra- tion. Once the notch is cut remove the notch of wood from the tree.
10
Final (felling) cut here.
2" (5 cm) above center of_otch.
First cut,5c_ _ /
--x!". /I
???After removing the cutout of wood, make the felling cut on the opposite side of the notch. This is done by making a cut about two inches higher than the center of the notch. This will leave enough uncut wood between the felling cut and the notch to form a hinge. This hingewill help prevent the tree from falling in the wrong direction.
Hinge holds tree on stump and helps control fall
Opening of felling cut
Closing of
notch
NOTE: Before felling cut is complete, use wedges to open the cut when necessary to controlthe directionof fall. To avoid kickback
and chain damage, use wood or plastic wedges, but never steel or iron wedges.
???Be alert to signs that the tree is ready to fall: cracking sounds, widening of the felling cut, or movement in the upper branches.
???As tree starts to fall, stop saw, put it down, and get away quickly on your planned re- treat path.
???DO NOT cut down a partially fallen tree with your saw. Be extremely cautious with partially fallen trees that may be poorly supported. When a tree doesn't fall com- pletely, set the saw aside and pull down the tree with a cable winch, block and tackle, or tractor.
CUTTING A FALLEN TREE (BUCKING)
Bucking is the term used for cutting a fallen tree to the desired log length.
WARNING: Do not stand on the log
being cut. Any portion can roll causing loss of footing and control. Do not stand downhill of the log being cut.
IMPORTANT POINTS
???Cut only one log at a time.
???Cut shattered wood very carefully; sharp pieces of wood could be flu ng toward oper- ator.
???Use a sawhorse to cut small logs. Never allow another person to hold the log while
cutting and never hold the log with your leg or foot.
???Do not cut in an area where logs, limbs, and roots are tangled. Drag the logs into a clear area before cutting by pulling out ex- posed and cleared logs first.
TYPES OF CUTTING USED FOR
BUCKING
DWARNIN_5:If saw becomes
pinched or hung in a log, don'ttry to force it out. You can lose control of the saw resulting in injury and/or damage to the saw. Stop the saw, drive a wedge of plastic or wood into the cut until the saw can be removed easily. Re- start the saw and carefully reenter the cut. Do not attempt to restart your saw when it is pinched or hung in a log.
Use a wedge to remove pinched saw
Turn saw OFF and use a plastic or wooden wedge to force cut open. Overcutting beginson thetop sideofthelog with the saw against the log. When overcut- ting use light downward pressure.
OvercuttingUndercutting
Undercuttinginvolves cutting on the under- side of the log with top of saw against the log. When undercutting use light upward pres- sure. Hold saw firmly and maintain control. The saw will tend to push back toward you.
_kWARNING: Neverturn saw upside down to undercut. The saw cannot be con- trolled in this position.
Always make your first cut on the compres- sion side ofthelog. Thecompression sideof the log is where the pressure of the log's weight is concentrated.
First cut on co['npression side of log
Second cut
Second cut
First cut on compression side of log
11
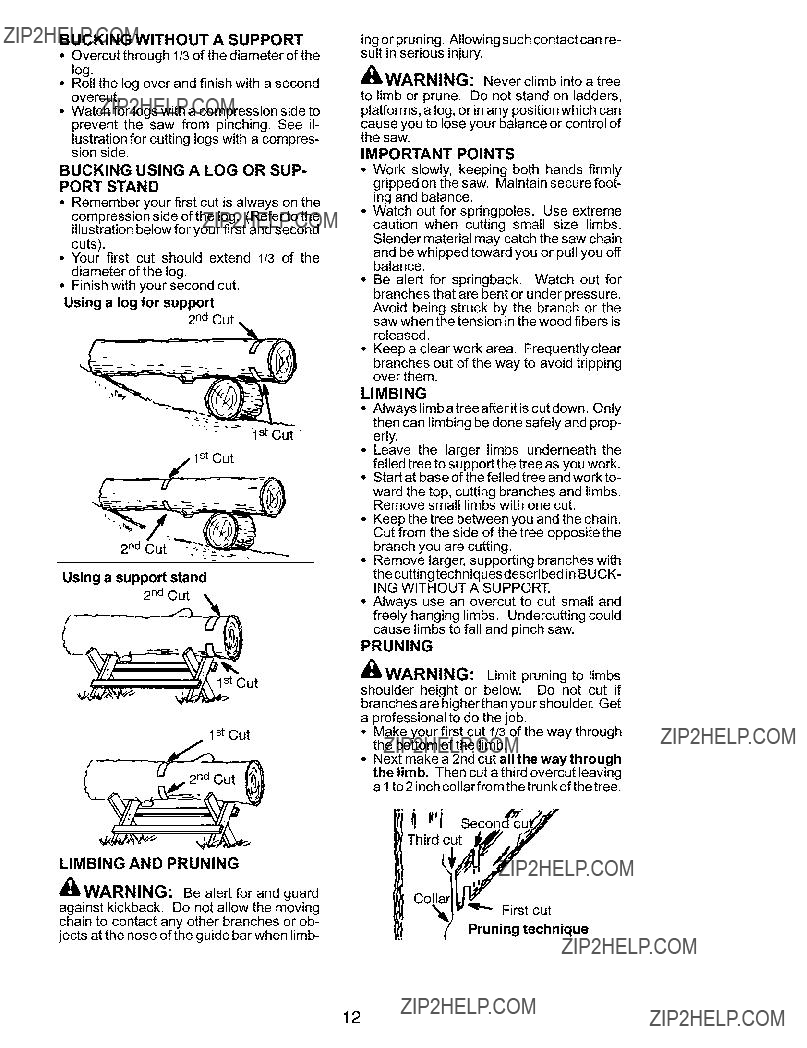
BUCKING WITHOUT A SUPPORT
???Overcut through 1/3 of the diameter of the log.
???Roll the log over and finish with a second overcut.
???Watch for logs with a compression side to prevent the saw from pinching. See il-
lustration for cutting logs with a compres- sion side.
BUCKING USING A LOG OR SUP-
PORT STAND
???Remember your first cut is always on the compression side of the log. (Refer to the illustration below for your first and second cuts).
???Your first cut should extend 1/3 of the diameter of the log.
???Finishwith yoursecond cut.
Using a log for support
2nd Cut
2nd Cut
Using a support stand
2nd Cut
1st Cut
/
L
LIMBING AND PRUNING
Ka, WARNIN(5: Be alert for and guard
against kickback. Do not allow the moving chain to contact any other branches or ob- jects at the nose of the guide bar when limb-
ing or pruning. Allowing such contact can re- sult in serious injury.
4[_WARNING: Never climb into a tree
to limb or prune. Do not stand on ladders, platforms, a log, or in any position which can cause you to lose your balance or control of the saw.
IMPORTANT POINTS
???Work slowly, keeping both hands firmly gripped on the saw. Maintain secure foot- ing and balance.
???Watch out for springpoles. Use extreme caution when cutting small size limbs. Slender material may catch the saw chain and be whipped toward you or pull you off balance.
???Be alert for springback. Watch out for branches that are bent or under pressure. Avoid being struck by the branch or the saw when the tension in the wood fibers is released.
???Keep a clearwork area. Frequentlyclear
branches out of the way to avoid tripping over them.
LIMBING
???Alwayslimbatreeafteritiscutdown. Only then can limbing be done safely and prop- erly.
???Leave the larger limbs underneath the felled tree to support the tree as you work.
???Start at base of the felled tree and work to-
ward the top, cutting branches and limbs. Remove small limbs with one cut.
???Keep the tree between you and the chain. Cut from the side of the tree opposite the branch you are cutting.
???Remove larger, supporting branches with thecuttingtechniquesdescribed in BUCK-
ING WITHOUT A SUPPORT.
???Always use an overcut to cut small and freely hanging limbs. Undercutting could cause limbs to fall and pinch saw.
PRUNING
'A_WARNING: Limit pruning to limbs
shoulder height or below. Do not cut if branches are higher than your shoulde_ Get a professional to do the job.
???Make your first cut 1/3 of the way through the bottom of the limb.
???Next make a 2nd cut all the way through the limb. Then cut a third overcut leaving a 1to2 inch collarfrom thetrunkofthe tree.
i ll'i Secon,_cu_/
Zhird_t _ _'
ColIVI_. _ First cut
(' Pruning technique
12

_',WARNIN_: Muffler is very hot dur-
ing and after use. Do not touch the muffler or allow combustible material such as dry grass or fuel to do so.
d}JLWARNING: Disconnect the spark
plug before performing maintenance except for carburetor adjustments.
We recommend all service and adjustments not listed in this manual be performed by an Authorized Service Dealer
MAINTENANCE SCHEDULE
AIR FILTER
CAUTION: Do not clean filter in gasoline or other flammable solvent to avoid creating
a fire hazard or producing harmful evapora- tive emissions.
Cleaning the air filter:
A dirty air filter decreases engine perform- ance and increases fuel consumption and harmful emissions. Always clean afterevery 5 hours of operation.
???Clean the cover and the area around it to
keep dirt and sawdust from falling into the carburetor chamber when the cover is re- moved.
???Remove the parts as illustrated.
???Wash the filter in soap and water. Rinse with clean cool water. Air dry completely before reinstalling.
???Reinstall parts.
,_, Air Filter
I_V
CARBURETOR ADJUSTMENTS
Your carburetor is equipped with limiter caps. Carburetor adjustment is a compli- cated task. We recommend that you take your unit to an Authorized Service Dealer. Damage wil l occur if you tu rn the need les be- yond the limiter stops.
BAR MAINTENANCE
If your saw cuts to one side, has to be forced
throughthe cut, or been run with an improper amount of bar lubrication it may be neces- saryto service your bar. Aworn barwilldam-
age your chain and make cutting difficult.
After each use, ensure ON/STOP switch is in the STOP position, then clean all sawdust from the guide bar and sprocket hole.
To maintain guide bar:
???Move ON/STOP switch to the STOP posi- tion.
???Loosen and remove chain brake nuts and chain brake. Remove barand chainfrom saw.
???Clean the oil holes and bar groove after each 5 hours of operation.
???Add lubricant to sprocket hole after each use.
???Burring of guide bar rails is a normal process of rail wear. Remove these burrs with a flat file.
???When rail top is uneven, use a flat file to re- store square edges and sides.
'_ ('7 _ File Rail
I U I andSides l U I
Replace guide bar when the groove is worn, the guide bar is bent or cracked, or when excess heating or burring of the rails occurs. If replacement is necessary, use only the guide bar specified for your saw in the repair parts list or on the decal located on the chain
saw.
13
CHAIN SHARPENING
Chain sharpening is a complicated task that requires special tools. We recommended you refer chain sharpeningto a professional chain sharpener.
IGNITION TIMING
Ignition timing is fixed and nonadjustable.
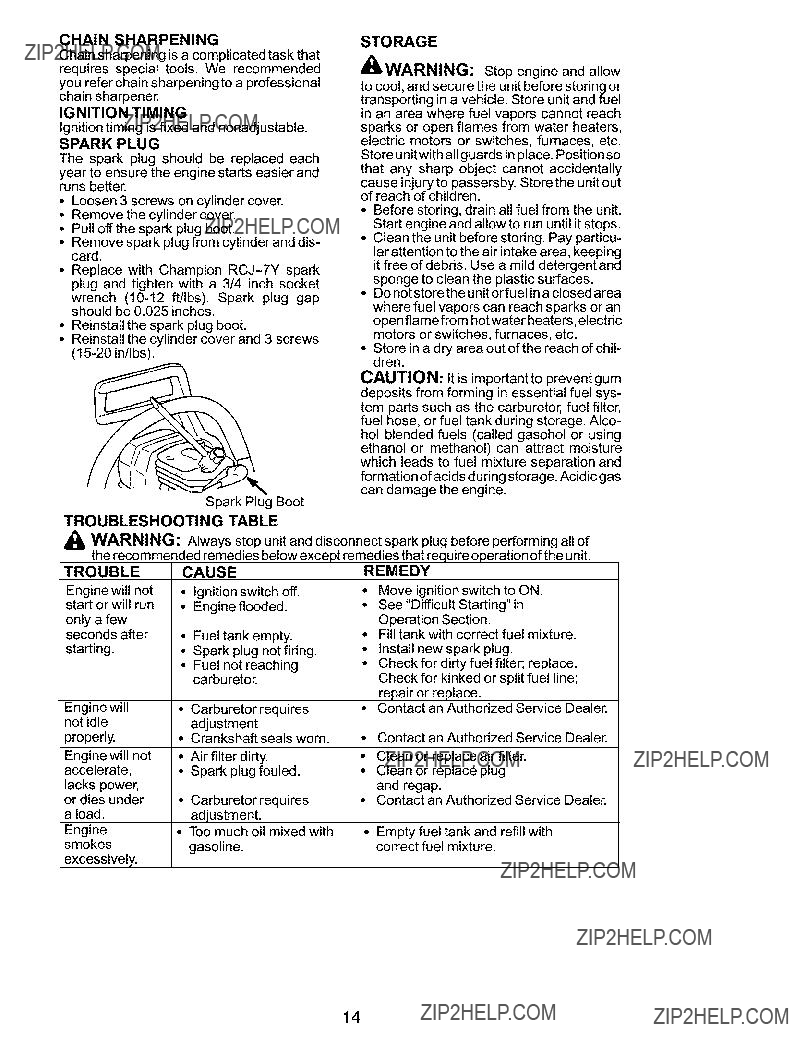
SPARK PLUG
The spark plug should be replaced each
year to ensure the engine starts easier and runs better.
???Loosen 3 screws on cylindercover.
???Remove the cylinder cover.
???Pull off the spark plug boot.
???Remove spark plug from cylinder and dis- card.
???Replace with Champion
wrench
???Reinstallthe spark plug boot.
???Reinstall the cylinder cover and 3 screws
Spark Plug Boot
TROUBLESHOOTING TABLE
STORAGE
="=WARNINg: Stop engine and allow
to cool, and secure the unit before storing or transporting in a vehicle. Store unit and fuel in an area where fuel vapors cannot reach
sparks or open flames from water heaters, electric motors or switches, furnaces, etc.
Store unitwith all guards in place. Positionso that any sharp object cannot accidentally cause injury to passersby. Store the unit out of reach of children.
???Before storing, drain all fuel from the unit. Start engine and allow to run until it stops.
???Cleanthe unit beforestoring. Pay particu- lar attention to the air intake area, keeping it free of debris. Use a mild detergent and sponge to clean the plastic surfaces.
???Do not store the unit orfuel in a closed area
where fuel vapors can reach sparks or an open flame from hot water heaters, electric motors or switches, furnaces, etc.
???Store in a dry area out of the reach of chil- dren.
CAUTION: It is important to prevent gum deposits from forming in essential fuel sys- tem parts such as the carburetor, fuel filter, fuel hose, or fuel tank during storage. Alco- hol blended fuels (called gasohol or using ethanol or methanol) can attract moisture which leads to fuel mixture separation and formation of acids during storage. Acidic gas can damage the engine.
_k, WARNING: Always stop unit and disconnect spark plug before performing all of the recommended remedies below except remedies that require operation of the unit.
excessively.
REMEDY
???Move ignition switch to ON.
???See "Difficult Starting" in Operation Section.
???Fill tank with correct fuel mixture.
???Install new spark plug.
???Check for dirty fuel filter; replace. Check for kinked or split fuel line; repair or replace.
???Contact an Authorized Service Dealer.
???Contact an Authorized Service Dealer.
???Clean or replaceairfilter.
???Clean or replace plug and regap.
???Contact an Authorized Service Dealer.
???Empty fuel tank and refill with correct fuel mixture.
14

SECTION 1 : LIMITED WARRANTY
Husqvama Forest & Garden Company ("Husqvarna") warrants Husqvama product to the original purchaser to be free from defects in material and workmanship from the date of purchase for the "Warranty Period" of the prod- ucts as set forth below:
Lifetime Warranty: All tiller tines against breakage, trimmer shafts, ignition coils and modules on hand held product.
3 Year Warranty: Spindles (on Zero Turn Riders and Wide Area Walks)
2 Year COMMERCIAL Warranty: Husq- varna Commercial Turf Equipment - zero turn riders, wide area walks, and ground en- gaging commercial equipment.
2 Year
garden tractors, walk behind mowers, tillers, chain saws, trimmers, brushcutters, cleadng saws, snow blowers,hand held blowers,back- pack blowers, hedge trimmers, electric p _r_d- ucts and
Emission control system components neces- sary to comply with EPA regulations, except for those components which are part of engine systems manufactured by third party engine manufacturers for which the purchaser has re- ceived a separate warranty with product infor- mation supplied at time of purchase.
1 Year Warranty: Power cutters, stump grinder, hydraulic pole pruners and hydraulic pole saws for
All trimmers, brushcutters, clearing saws, hov- ering trimmers, stick edgers, backpack blow-
ers, hand held blowers, hedge trimmers, model series 580 & 600
90 Day Warranty: Automatic mower, chain saws, power cutters, stump grinders, trimmers, brushcutters, clearing saws, hovering trim- mers, stick edgers, hedge trimmers, backpack blowers, hand held blowers, hydraulic pole saws, hydraulic pole pruners, snow throwers, commercial turf equipment or any Husqvama product used for rental purposes or use except as otherwise provided herein.
30 Day Warranty: Husqvama bow guide bars, replacement parts including bar and chains, product accessories, tools, display fea- tures and safety apparel.
SECTION 2: HUSQVARNA'S OBLIGA-
TIONS UNDER THE WARRANTY
Husqvama will repair or replace defective com- ponents without charge for parts or labor if a component fails because of adefect in material or workmanship during the warranty period.
SECTION 3: ITEMS NOT COVERED
BY THIS WARRANTY
The following items are not covered by this warranty:
(1)Normal customer maintenance items which become worn through normal regu- lar use, including, but not limited to, belts, blades, blade adapters, bulbs, filters, guide bars, lubricants, rewind springs, saw chains, spark plugs, starter ropes and tines;
(2)Natural discolorationof materialdue to ul- traviolet light.
(3)Engine and drive systems not manufac- tured by Husqvarna;these items are cov- ered by the respective manufacturer's warranty as provided in writing with the product information supplied at the time of purchase;all claims must besenttothe appropriate manufacturer.
(4)Lawn and garden attachments are cov- ered by a third party which gives a war-
ranty; all claims for warranty should be sent to the manufacturer; and
(5)Emission control system components necessary to comply with EPA regula- tions which are manufactured by third party engine manufacture_
(6) Batteries have a one year prorated limit- ed warrantywith 100% replacement dur- ing the first 6 months.
SECTION 4: EXCEPTIONS AND LIM-
ITATIONS
This warranty shall be inapplicable to de- fects resulting from the following:
(1)Accident, abuse, misuse, negligenceand neglect, including stale fuel, dirt, abra- sives, moisture, rust, corrosion, or any
adverse reaction due to incorrect storage or use habits.
(2)Failure to operate or maintain the unit in accordance with the instruction manual
or instruction sheet furnished by Husq- varna.
(3)Alterations or modifications that change the intended use of the product or affects
the product's performance, operation, safety, or durability, orcauses the product to fail to comply with any applicable laws.
(4)Additional damage to parts or compo- nents due to continued use occurring af-
ter any of the above.
REPAIR OR REPLACEMENT AS PRO-
VIDED UNDER THIS WARRANTY IS THE
EXCLUSIVE REMEDY OF THE PUR-
CHASER. HUSQVARNA SHALL NOT BE
LIABLE FOR ANY INCIDENTAL OR CON-
SEQUENTIAL DAMAGES FOR BREACH
OF ANY EXPRESS OR IMPLIED WAR-
RANTY ON THESE PRODUCTS EXCEPT
TO THE EXTENT PROHIBITED BY APPLI-
CABLE LAW. ANY IMPLIED WARRANTY
OR MERCHANTABILITY OR FITNESS
FOR A PARTICULAR PURPOSE ON
THESE PRODUCTS IS LIMITED IN DURA-
TION TO THE WARRANTY PERIOD AS
15

DEFINED IN THE LIMITED WARRANTY
STATEMENT HUSQVARNA RESERVES
THE RIGHT TO CHANGE OR IMPROVE
THE DESIGN OF THE PRODUCT WITH-
OUT NOTICE, AND DOES NOT ASSUME
OBLIGATION TO UPDATE PREVIOUSLY
MANUFACTURED PRODUCTS.
Some states do not allow the exclusion of in-
cidental or consequential damages, or limi- tations on how long an implied warranty lasts, so the above limitations or exclusions may not apply to you. This warranty gives you specific legal rights, and you may also
have other rights which vary from state to state.
SECTION 5: CUSTOMER RE-
SPONSIBILITIES
The product must exhibit reasonable care, maintenance, operation, storage and gener- al upkeep as written in the maintenancesec- tion of the Owner's/Operator's manual. Should an operational problem or failure oc- cur, the product should not be used, but de- livered as is to an authorized Husqvama dealerfor evaluation. Proof of purchase, as explained in Section 6, rests solely with the customer.
SECTION 6: PROCEDURE TO OB-
TAIN WARRANTY CONSIDERATION
It is the Owner's and Dealer's responsibility to make certain that the Warranty Registra- tion Card is properly filled out and mailed to HusqvarnaForest& GardenCompany. This card should be mailed within ten (10) days from the date of purchasein order to confirm the warranty and to facilitate
Proof of purchase must be presented to the authorized Husqvarna dealer in order to ob- tain warranty service. This proof must in- clude date purchased, model number, serial number, and complete name and address of the selling deale_
To obtain the benefit of this warranty, the product believed to be defective must be de- livered to an authorized Husqvarna dealer in a timely manner, no laterthanthirty (30) days from date of the operational problem or fail- ure. The product must be delivered at the owner's expense.
Husqvarna
7349 Statesville Road
CHARLOTTE, NO 28269
YOUR WARRANTY RIGHTS AND OB-
LIGATIONS: The U. S. Environmental
Protection Agency/Environment Canada and HUSQVARNA are pleased to explain the emissions control system warranty on your lawn and garden equipment engine. All new utility and lawn and garden equipment engines must be designed, built, and equipped to meet the stringent
emission control system on your lawn and garden equipment engine for the periods of time listed below provided there has been no abuse, neglect, or improper maintenance of your lawn and garden equipment engine. Your emission control system includes parts such as the carburetor and the ignition sys- tem. Where a warrantable condition exits, HUSQVARNA will repair your lawn and gar- den equipmentengine at no cost to you. Ex- penses covered under warranty include diagnosis, parts and labor MANUFACTUR- ER'S WARRANTY COVERAGE: If any emissions related part on your engine (as listed under Emissions Control Warranty Parts List) is defective or a defect in the ma- terials or workmanship of the engine causes the failure of such an emission related part, the part will be repaired or replaced by
HUSQVARNA. OWNER'S WARRANTY
RESPONSIBILITIES: As the lawn and gar-
den equipment engine owner, you are re-
sponsible for the performance of the re-
quired maintenance listed in your instruction manual. HUSQVARNA recommends that
you retain all receipts covering maintenance on your lawn and garden equipment engine, but HUSQVARNA cannot deny warranty solely for the lack of receipts or for you rfail- ure to ensure the performance of all sched- uled maintenance. As the lawn and garden equipment engine owner, you should be aware that HUSQVARNA may deny you warranty coverage if your lawn and garden equipmentengineor a part of it has failed due to abuse, neglect, improper maintenance, unapproved modifications, or the use of parts not made or approved by the original equipmentmanufacture_ You are responsi- ble for presenting your lawn and garden equipmentengineto a HUSQVARNAautho- rized repaircenteras soon as a problem ex-
ists. Warranty repairs should be completed in a reasonable amount of time, not to ex-
ceed 30 days. If you have any questions re- garding your warranty rights and responsibi-
lities, you should contact your nearest authorized service centeror call HUSQVAR- NA at
MENCEMENT DATE: The warranty period begins on the date the lawn and garden equipmentengineis purchased. LENGTH OF COVERAGE: This warranty shall be for a period of two years from the initial date of
16
purchase. WHAT IS COVERED: REPAIR
OR REPLACEMENTOF PARTS. Repairor replacement of any warranted part will be performed at no charge to the owner at an approved HUSQVARNA servicing center. If you have any questions regarding your war- ranty rights and responsibilities, you should contact your nearest authorized service center or call HUSQVARNA at
charged for diagnostic labor which leads to the determinationthat a warranted part is de- fective ifthe diagnostic work is performed at an approved HUSQVARNA servicing cen- ter. CONSEQUENTIAL DAMAGES:
HUSQVARNA may be liable for damages to other enginecomponents caused by the fail-
ure of a warranted part still under warranty. WHAT IS NOT COVERED: All failures
caused by abuse, ne,glect, or improper main-
tenance are not covered. ADD
fied parts can be grounds for disallowing a warranty claim. HUSQVARNA is not liable to cover failures of warranted parts caused by the use of
sponsibilities, you should contact your near- est authorized service center or call HUSQVARNA at
WHERE TO GET WARRANTY SERVICE:
Warranty services or repairs shall be provided at all HUSQVARNA service centers, call:
PLACEMENT AND REPAIR OF EMISSION
RELATED PARTS: Any HUSQVARNA ap- proved replacement part used in the perfor- mance of any warranty maintenance or re- pair on emission related parts will be provided without charge to the owner if the part is under warranty. EMISSION CON-
TROL WARRANTY PARTS LIST: Carbure-
tor, Ignition System: Spark Plug (covered up
to maintenance schedule), Ignition Module.
MAINTENANCE STATEMENT: The owner
is responsible for the performance of all re-
quired maintenance as defined in the in- struction manual.
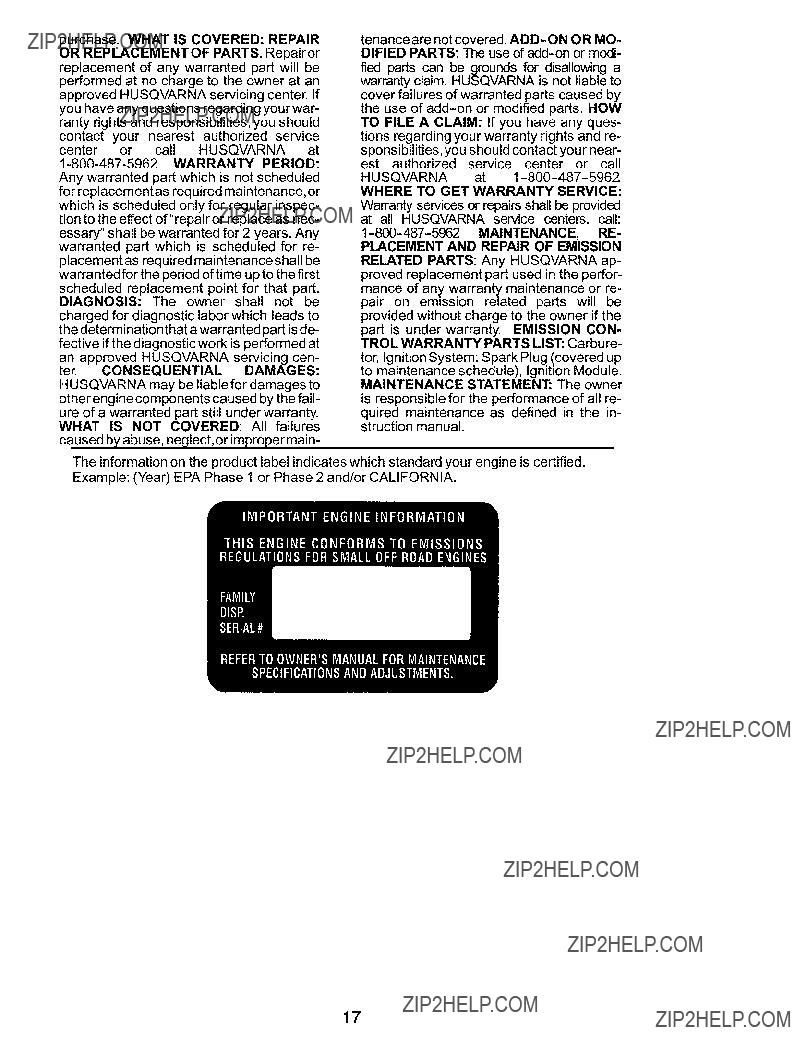
The information on the product label indicates which standard your engine is certified. Example: (Year) EPA Phase 1 or Phase 2 and/or CALIFORNIA.
17

Husqvama
Printed in U.S.A.