 WARNING: Always disconnect
spark plug wire and place wire where it can- not contact spark plug to prevent accidental starting when setting up, transporting, ad- justing or making repairs except carburetor adjustments.
Because a chain saw is a high-speed wood- cutting tool, special safety precautions must be observed to reduce the risk of accidents. Careless or improper use of this tool can cause serious injury.
PLAN AHEAD
SRead this manual carefully until you com- pletely understand and can follow all safety rules, precautions, and operating instruc-
tions before attempting to use the unit.
SRestrict the use of your saw to adult users who understand and can follow safety rules, precautions, and operating instruc-
tions found in this manual.
SWear protective gear. Always use steel-toed safety footwear with non-slip soles; snug-fit- ting clothing; heavy-duty, non-slip gloves; eye protection such as non-fogging, vented goggles or face screen; an approved safety hard hat; and sound barriers (ear plugs or mufflers) to protect your hearing. Regular users should have hearing checked regular- ly as chain saw noise can damage hearing. Secure hair above shoulder length.
SKeep all parts of your body away from the chain when the engine is running.
SKeep children, bystanders, and animals a minimum of 30 feet (10 meters) away from
the work area. Do not allow other people or animals to be near the chain saw when starting or operating the chain saw.
S Do not handle or operate a chain saw when you are fatigued, ill, or upset, or if you have taken alcohol, drugs, or medication. You must be in good physical condition and mentally alert. Chain saw work is strenuous. If you have any condition that might be aggravated by strenuous work, check with your doctor before operating a chain saw.
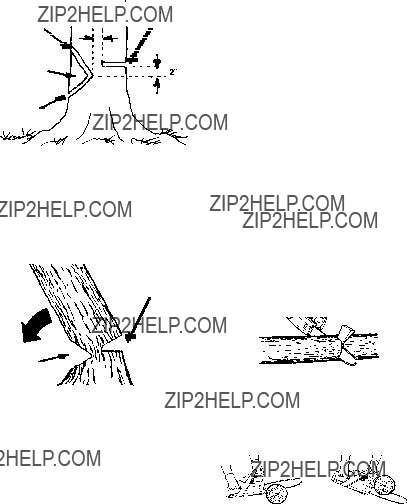
SCarefully plan your sawing operation in ad- vance. Do not start cutting until you have a clear work area, secure footing, and, if you are felling trees, a planned retreat path.
OPERATE YOUR SAW SAFELY
SDo not operate a chain saw with one hand. Serious injury to the operator, helpers, by- standers or any combination of these per- sons may result from one-handed opera- tion. A chain saw is intended for two-handed use.
SOperate the chain saw only in a well-venti- lated outdoor area.
S Do not operate saw from a ladder or in a tree.
SMake sure the chain will not make contact with any object while starting the engine. Never try to start the saw when the guide
bar is in a cut.
SDo not put pressure on the saw at the end of the cut. Applying pressure can cause you to lose control when the cut is com-
pleted.
S Stop the engine before setting the saw down.
SDo not operate a chain saw that is dam- aged, improperly adjusted, or not com- pletely and securely assembled. Always replace bar, chain, hand guard, or chain brake immediately if it becomes damaged,
broken or is otherwise removed.
S With the engine stopped, hand carry the chain saw with the muffler away from your body, and the guide bar and chain to the rear, preferably covered with a scabbard.
MAINTAIN YOUR SAW IN GOOD
WORKING ORDER
SHave all chain saw service performed by a qualified service dealer with the exception of the items listed in the maintenance sec- tion of this manual. For example, if improp- er tools are used to remove or hold the fly- wheel when servicing the clutch, structural
damage to the flywheel can occur and cause the flywheel to burst.
SMake certain the saw chain stops moving when the throttle trigger is released. For correction, refer to CARBURETOR AD-
JUSTMENTS.
S Never modify your saw in any way.
S Keep the handles dry, clean, and free of oil or fuel mixture.
S Keep fuel and oil caps, screws, and fas- teners securely tightened.
S Use only HusqvarnaR accessories and replacement parts as recommended.
HANDLE FUEL WITH CAUTION
S Do not smoke while handling fuel or while operating the saw.
SEliminate all sources of sparks or flame in the areas where fuel is mixed or poured. There should be no smoking, open flames, or work that could cause sparks. Allow en- gine to cool before refueling.


 Thumb on underside of handlebar
 Thumb on underside of handlebar


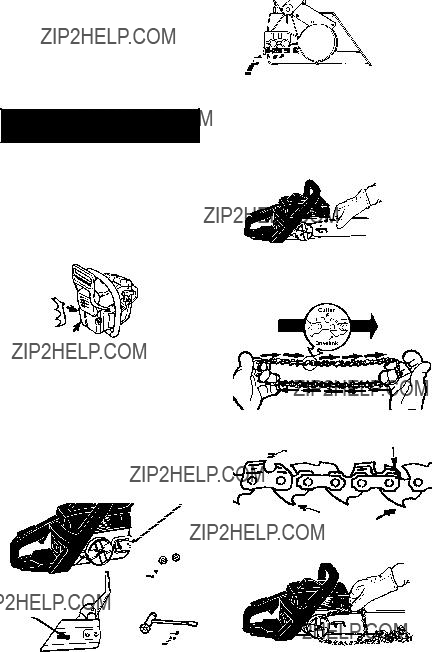


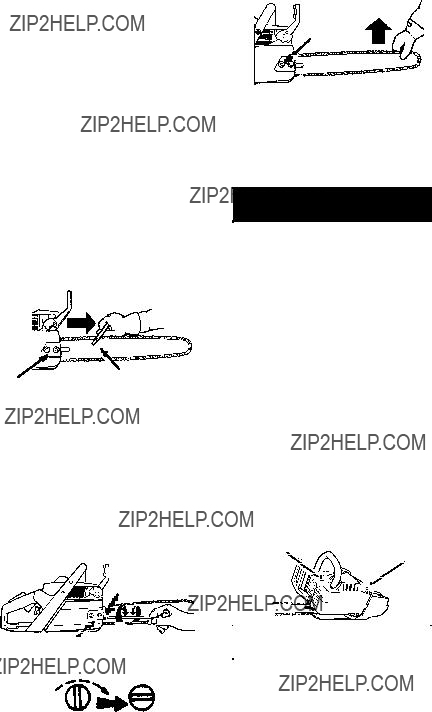

 Chain Brake


 on front
  handle


 1
1


