R

Warranty Registration by Internet

Registro Garant??a mediante Internet

Internet Address: www.huskypowerwasher.com

Sitio Internet: www.huskypowerwasher.com

SEE OUR WEB SITE FOR REPLACEMENT, MISSING PARTS AND TROUBLESHOOTING

VISITEN NUESTRO SITIO WEB PARA SUSTITUCIONES Y/O PARTES FALTANTES

READ AND SAVE THESE INSTRUCTIONS

LEER Y CONSERVAR ESTA INSTRUCCIONES

This product is covered by US Patents and other international patents. Copyright. All Rights Reserved.

Este producto se encuentra cubierto por patentes de EE.UU. y otras internacionales. Copyright. Todos los derechos reservados

Your Model Number is: Husky 1800S

IMPORTANT

Attention Valued Customer: The serial number of your machine and date of purchase is necessary information to facilitate warranty claims and the ordering of replacement parts.

For ease of reference, please record this information in the space provided below.

Serial Number: ...............................................................................

You can conveniently register your new online at:

www.huskypowerwasher.com

2

El N??mero de su Modelo es: Husky 1800S

IMPORTANTE

Atenci??n Estimado cliente: el n??mero de serie de su lavado- ra de presi??n y la fecha de compra es informaci??n necesaria para facilitar los derechos de garant??a y la petici??n de partes de recambio.

Para consultas m??s f??ciles, registre el n??mero de serie y la fecha de compra en el siguiente espacio

N??mero de Serie: ...........................................................................

Si lo desea, se puede registrar c??modamente su nuevo en nuestra p??gina web

www.huskypowerwasher.com

3

FOR EASY INSTALLATION INSTALACI??N F??CIL

REMOVE THE SHIPPING PLUGS FROM THE

MACHINE INLET AND OUTLET.

1RETIRE LAS CLAVIJAS DE ENV??O DE LA

TOMA Y LA SALIDA DE LA M??QUINA.

2

CONNECT THE HIGH PRESSURE HOSE. MAKE

SURE THREADS ARE ALIGNED PROPERLY.

CONECTE LA MANGUERA DE ALTA PRESI??N.

ASEGURARSE QUE TODOS LOS TUBOS

EST??N ALINEADOS CORRECTAMENTE.

CONNECT THE GARDEN HOSE.

3CONECTE LA MANGUERA PARA

JARD??N.

4

4

4INSERT THE WAND INTO THE SPRAY GUN

INTRODUZCA EL TUBO EN LA PISTOLA ROCIADORA

NOTE: Make sure wand is locked.

NOTA: Aseg??rese de que el tubo est?? cerrado.

5

CONNECT THE GARDEN HOSE TO WATER

SUPPLY AND OPEN THE VALVE FULLY.

CONECTAR LA MANGUERA A UNA TOMA DE

AGUA Y ABRIR TOTALMENTE LA V??LVULA.

Note: Use cold water only

Nota: Utilizar s??lo agua fr??a

PLUG GFCI INTO POWER RECEPTACLE. FIRMLY PRESS AND RELEASE

6LIGHT ON THE GFCI SHOULD BE ILLUMINATED.

ENCHUFE EL GFCI A UNA TOMA DE CORRIENTE. PRESIONE CON FIRMEZA Y

SUELTE EL BOT??N DE PRUEBA (TEST). A CONTINUACI??N, PULSE Y SUELTE EL

BOT??N DE REINICIO (RESET). SE ENCENDER?? LA LUZ DEL GFCI.THE TEST BUTTON, THEN PRESS AND RELEASE THE RESET BUTTON. THE

5

5

SQUEEZE AND HOLD TRIGGER UNTIL WATER

7FLOW IS STEADY. THEN RELEASE THE TRIGGER.

APRETAR Y SOSTENER EL GATILLO HASTA QUE

HAYA UN FLUJO CONSTANTE Y ESTABLE DE

AGUA. A CONTINUACI??N

SOLTAR EL GATILLO.

DEPRESS THE ???ON??? BUTTON. THE GREEN ???READY??? LIGHT SHOULD

8BE ILLUMINATED. SQUEEZE THE TRIGGER TO START MOTOR AND

WATER FLOW.

PULSE EL BOT??N ???ON???. SE ENCENDER?? LA LUZ

VERDE???LISTO???(READY).APRIETEELACCIONADOR

PARAPONERENMARCHAELMOTORYELCAUDAL

DE AGUA.

CAREFULLY READ THE OPERATORS INSTRUCTIONS BEFORE

USING THE PRESSURE WASHER FOR THE FIRST TIME.

ALWAYS STORE YOUR PRESSURE WASHER IN A LOCATION

IMPORTANT WHERE THE TEMPERATURE WILL NOT FALL BELOW 40??F.

FREEZE DAMAGE IS NOT COVERED BY THE WARRANTY.

LEA ATENTAMENTE EL MANUAL DE INSTRUCCIONES ANTES DE

PONER EL EQUIPO POR PRIMERA VEZ EN FUNCIONAMIENTO.

IMPORTANTE TIENE QUE PONER SIEMPRE LA M??QUINA DE LAVAR A PRESI??N

ENUNSITIODONDELATEMPERATURANODIMINUEBAJO40??F.

LOSDA??OSQUELELHIELOPROVOCANOSONREMBOLSDADO

DE LA GARANTIA.

66

INDEX

??NDICE

7

1.0IMPORTANT SAFETY

INSTRUCTIONS

Safety precautions are essential when any mechanical equipment is involved. These precautions are necessary when using, storing, and servicing mechanical equipment. Using this equipment with the respect and caution demanded will considerably lessen the possibilities of personal injury. If safety precautions are overlooked or ignored, personal injury or property damage may occur.

The following symbols shown below are used extensively throughout this manual.

Always heed these precautions, as they are essential when using any mechanical equipment.

This warning symbol identifies specific instructions or procedures which if not correctly followed could result in personal

WARNING injury or death.

This caution symbol identifies specific instructions or procedures which, if not strictly observed, could result in damage

CAUTION to, or destruction of equipment and/or property.

This unit was designed for specific applications. It should not be modified and/or used for any application other than that which it was designed.

When using this product basic precautions should always be followed, including the

WARNING following:

1.Read all the instructions before using the product.

2.To reduce the risk of injury, close supervision is necessary when a product is used near children.

3.Know how to stop the product and bleed pressures quickly. Be thoroughly familiar with the controls.

4.Stay alert - watch what you are doing.

5.Do not operate the product when fatigued or under the influence of alcohol or drugs.

6.Keep operating area clear of all persons.

7.Do not overreach or stand on unstable support. Keep good footing and balance at all times.

8.Follow the maintenance instructions specified in the manual.

9.This product is provided with a Ground Fault Circuit Interrupter built into the power cord plug. If replacement of the plug or cord is needed, use only identical replacement parts.

10.Outlets with a third prong ground are required. Do not use without grounded prong.

11.Do not touch plug or outlet with wet hands.

1.0 IMPORTANTES INSTRUCCIONES

DE SEGURIDAD

Cuando se trata de un equipo mec??nico, las precauciones inherentes a la seguridad son esenciales.

Por ello es necesario adoptar dichas precauciones durante el uso, el almacenamiento y la mantenimiento del equipo mec??nico. Utilizando los aparatos con el respeto y la cautela requeridos, las posibilidades de provocar lesiones personalesdisminuir??nnotablemente.Sisepasanporaltoo noseconsideranestasprecaucionesdeseguridad,podr??an producirse lesiones en las personas o da??o al equipo. Los s??mbolos que describiremos a continuaci??n son utilizados ampliamente en el presente manual. Tenga siempre en cuenta dichas precauciones puesto que son esenciales cuando se utiliza el equipo mec??nico.

IMPORTANTE pueden provocar da??os o la destrucci??n del equipo y/o bienes materiales.

Estaunidadhasidodise??adaparaaplicacionesespec??ficas.No se deber??a modificar y/o utilizar para aplicaciones diferentes de aquellas para las cuales ha sido pensada.

Cuando el equipo es utilizado, hay que seguir precauciones b??sicas, entre las

PELIGRO cuales se encuentran las siguientes:

1 Lea todas las instrucciones antes de utilizar el equipo.

2Para reducir el riesgo de lesiones, es necesario pre- star mucha atenci??n cuando se utilice un producto cerca de ni??os peque??os.

3Aprenda a detener el producto y purgar la presi??n r??pidamente. Familiar??cese con los controles.

4Est?? siempre atento: preste atenci??n a lo que est?? haciendo.

5No utilice el equipo si se encuentra fatigado, ha bebido alcohol o ha consumido drogas.

6Mantenga la zona de trabajo despejada de perso- nas.

7No se extralimite ni se coloque sobre un soporte inestable. Adopte siempre una posici??n de estabilidad y equilibrio.

8Respete las instrucciones de mantenimiento que se detallan en este manual.

9.Este producto es suministrado con un interruptor de circuito con conexi??n a tierra insertado en el enchufe del cable de alimentaci??n. Si fuera necesario cambiar el enchufe o el cable, utilicen piezas de repuesto del mismo tipo.

10.Se necesitan enchufes con una tercera punta con toma a tierra. No utilice enchufes sin la toma de tierra.

11.No toque el enchufe o la toma con las manos mojadas.

8

12.Avoid accidental starts. Move switch on unit to ???OFF??? position before connecting or disconnecting cord to electrical outlets.

13.Water spray must never be directed towards any electric wiring or directly towards the pressure washer machine itself or fatal electric shock may occur.

14.Never carry your pressure washer by the cord. Do not pull on the cord to disconnect from the outlet.

15.To prevent damage, the cord should not be crushed, placed next to sharp objects or near a heat source.

16.Check power cords before using. Damaged cords can reduce performance of pressure washer or cause a fatal electric shock.

17.The narrow pin point stream is very powerful. It is not recommended for use on painted surfaces, wood surfaces or items attached with an adhesive backing.

18.Keep operating area clear of all persons and animals.

19.Always use both hands when operating pressure washer to maintain complete control of the wand.

20.Do not touch nozzle or water spray while operating.

21.Wear safety goggles while operating.

22.Disconnect power plug from the outlet when not in use and prior to the detaching of the high pressure hose.

23.Never tie knots or kink the high pressure hose as damage could result.

24.Do not operate or store this product in temperatures below 40??F. Freeze damage is not covered by the warranty.

25.Carefully observe all chemical instructions and warnings before using.

26.The pressure washer should not be used in areas where gas vapors may be present. An electric spark could cause an explosion or fire.

27.To minimize the amount of water getting into the pressure washer, the unit should be placed as far as possible from the cleaning site during operation.

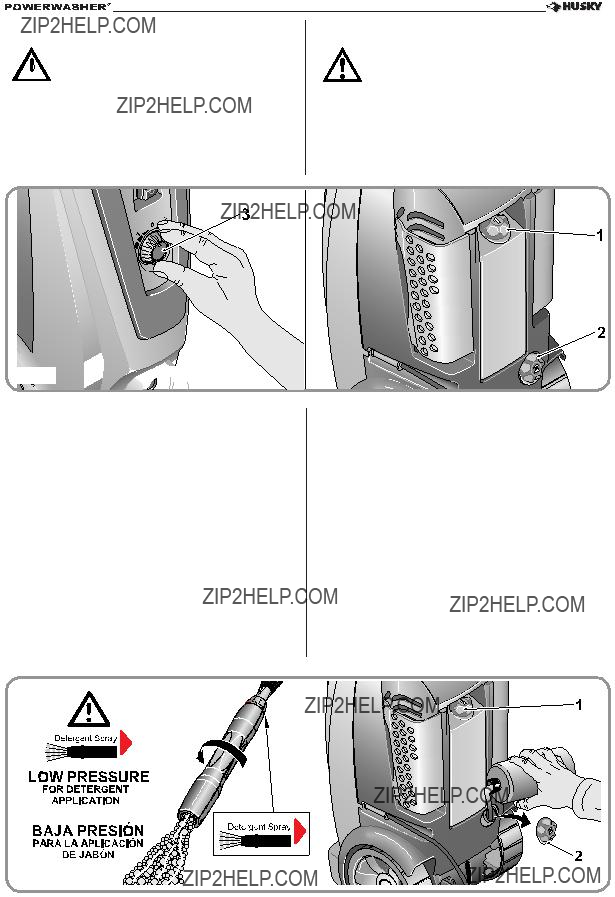
28.To prevent accidental discharge, the spray gun should be secured by locking the trigger when not in use.

29.To allow free air circulation, the pressure washer should NOT be covered during operation.

WARNING: Risk of injection or injury-Do not direct discharge stream at persons.

WARNING

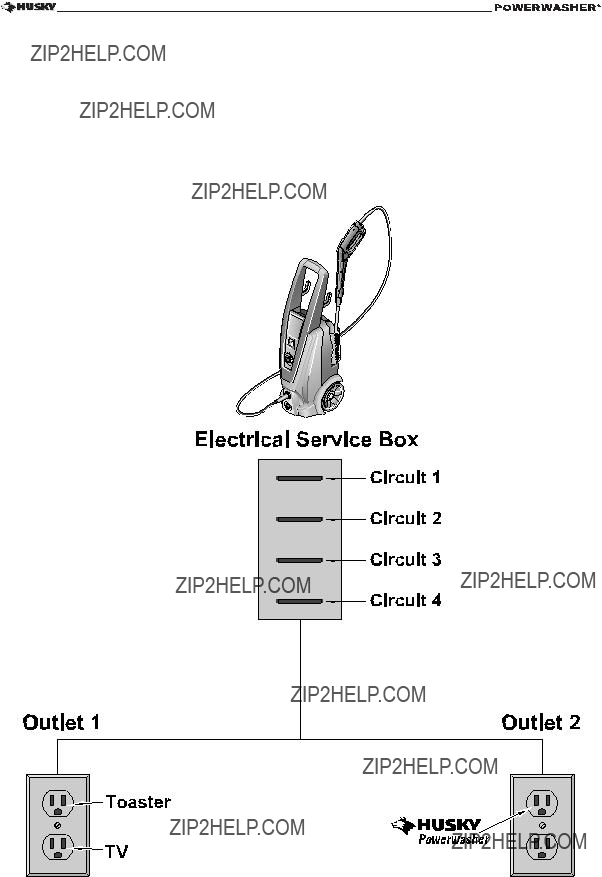
30. See page 10 for grounding instructions.

???SAVE THESE INSTRUCTIONS???

12.Eviten encendidos accidentales. Coloque el interruptor en APAGADO antes de conectar o desconectar el cable el??ctrico a una toma.

13.No dirija nunca el chorro del agua sobre instalaciones el??ctricasosobrelamismam??quinadelavarapresi??n, con el fin de evitar descarga el??ctrica.

14.No utilice el cable para mover la m??quina de lavar a presi??n. No tire del cable para desconectar el equipo de la toma.

15.Con el fin de evitar da??os, el cable no debe ser aplastado, no debe ser colocado cerca de objetos cortantes ni de fuentes de calor.

16.Antes del uso revise los cables el??ctricos.

Los cables da??ados no s??lo reducen los rendimiento de la m??quina de lavar a presi??n, sino que pueden provocar descargas el??ctricas.

17.El peque??o chorro de punta de alfiler es muy potente. No se aconseja su uso sobre superficies pintadas, sobre superficies de madera o sobre objetos con revestimiento adhesivo

18.Aleje a las personas y animals del ??rea de trabajo.

19.Use siempre ambas manos cuando se utiliza la m??quina de lavar a presi??n, con el fin de mantener un completo control del tubo/de la manguera.

20.No toque el boquilla o el chorro de agua cuando est?? en funcionamiento.

21.Durante el uso, utilice gafas de protecci??n.

22.Desconecte el enchufe el??ctrico de la toma cuando no est?? en uso e, igualmente, antes de desconectar la manguera de alta presi??n.

23.Nunca anude o doble la manguera de alta presi??n ya que podr??a da??arla.

24.No hagan funcionar este producto a temperaturas inferiores a 40??F. Los da??os provocados por el hielo no est??n cubiertos por la garant??a.

25.Siga cuidadosamente todas las instrucciones con respecto a productos qu??micos y las advertencias antes del uso.

26.No hay que utilizar la m??quina de lavar a presi??n en ??reas donde hayan vapores gaseosos. Una eventual chispa el??ctrica podr??a provocar una explosi??n o un incendio.

27.Para reducir al m??ximo la cantidad de agua que podr??a entrar en la m??quina de lavar a presi??n, durante el uso, col??quela lo m??s lejos posible de la zona que debe ser limpiada.

28.Con el fin de evitar escapes accidentales, cuando no est?? en uso, la pistola rociadora debe estar asegurada con el gatillo de bloqueo.

29.Duranteeluso,NOcubralam??quinadelavarapresi??n con el fin de permitir una ventilaci??n adecuada.

ATENCI??NRiesgodeinyecci??nodeda??os. No orienten el flujo contra las personas.

ATENCI??N

30.Para la conexi??n a tierra, v??anse las instrucciones a p??gina 10.

???CONSERVE LAS PRESENTES INSTRUCCIONES???

9

GROUNDING INSTRUCTIONS

This product must be grounded. If it should malfunction or breakdown, grounding provides a path of least resistance for electric current to reduce the risk of electric shock.

This product is equipped with a cord having an equipment - grounding conductor and a grounding plug.

The plug must be plugged into an appropriate outlet that is properly installed and grounded in accordance with all local codes and ordinances.

DANGER: Improper connection of the equipment-grounding conductor can result in a risk of electrocution.

Check with a qualified electrician or service personnel if you are in doubt as to whether

WARNING the outlet is properly grounded.

Do not modify the plug provided with the product.

If it will not fit the outlet, have a proper outlet installed by a qualified electrician. Do not use any type of adaptor with this product.

INSTRUCCIONES PARA LA TOMA DE TIERRA

Este equipo debe poseer la toma de tierra. En caso de funcionamiento defectuoso o de aver??a, la conexi??n a tierra suministra un recorrido de resistencia m??nima para la corriente el??ctrica con el fin de reducir el riesgo de descargas. El equipo est?? dotado de un cable que incluye un conductor y enchufe de tierra. El enchufe debe ser introducido en una tomacorriente apropiada, instalada en modo id??neo y con toma de tierra seg??n lo establecido por las leyes y disposiciones locales.

PELIGRO: Una conexi??n impropia entre el equipo y el conductor de tierra puede provocar descargas el??ctricas.

Si tienen dudas sobre la id??nea puesta a tierra de la toma, consulten con un electricista o con un encargado de la

manutenci??n.

ATENCI??N No modifique el enchufe que se proporciona con el producto.

Sielenchufenoencajaenlatomadecorriente, solicite a un electricista cualificado que instale una toma adecuada.

No utilice ning??n tipo de adaptador con este producto.

10

PARTS DRAWING

PARTS LIST

1 Turbo Nozzle with Lance

2Spray Gun

3 Holder for Power Cable

4 ON/OFF Switch

5 Detergent Dial

6Machine Inlet

7 Click-N-CleanTM Variable Spray Lance

8Holder for Accessories

9 Ground Fault Circuit Interrupter (GFCI)

10Shipping Plug

11Water Inlet Filter Screen (factory installed)

12Inlet Nipple (factory installed) (shown on page 13, figure 2)

13High-Pressure Hose

14Upper tank cap

15Lower tank cap

16High Pressure outlet

17Smart Tech Indicator Lights

18Quick Connector (in a plastic bag)

ILUSTRACI??N DE PIEZAS

LISTA DE PIEZAS

1 Tubo con Boquilla Turbo

2Pistola rociadora

3Portacable de alimentaci??n

4 Interruptor de encendido y apagado

5 Dosificador de detergente

6Entrada de agua con rosca

7 Lanza de pulverizaci??n variable Click-N-CleanTM

8Porta-accesorios

9 Interruptor diferencial autom??tico de seguridad (GFCI)

10Tap??n para el agua

11Filtro (instalado)

12Niple de entrada (instalado)

(Representado ?? la figura 2 de la p??gina 13)

13Manguera de alta presi??n

14Tap??n de estanque superior

15Tap??n de estanque inferior

16Salida de alta presi??n

17Indicadores luminosos Smart Tech

18Conexi??n r??pida (en un saco de pl??stica)

11

2.0SAFETY FEATURES

AUTOMATIC TOTAL STOP???

The pressure washer is equipped with a stop device which will sense when the trigger on the gun is released. It will open the power circuit to the motor and cause the pressure washer to stop.

2.0CARACTER??STICAS RELATIVAS

A LA SEGURIDAD

AUTOMATIC TOTAL STOP???

Lam??quinadelavarapresi??nest??dotadadeundispositivo de detenci??n que detecta cu??ndo est?? desenganchado el gatillo de la pistola. Abre el circuito el??ctrico al motor y bloquea la m??quina de lavar a presi??n.

WARNING

WARNING

If Automatic Total Stop??? fails to operate, DO NOT USE THE MACHINE. Contact our Customer Service department. Further use will damage the machine and/or cause personal injury.

WARNING: The pressure washer is also equipped with a main power ON/OFF switch located on the unit. It should always be moved to the OFF position when the pressure washer is not being used to prevent possible injury or damage.

ATENCI??N

ATENCI??N

Si la opci??n de Automatic Total Stop??? deja de funcionar, NO UTILIZAR LA M??QUINA. Contactar con el Departamento de Atenci??n al Cliente. Si, por el contrario, continua utiliz??ndola, pueden resultar da??adas personas o la propia m??quina.

ATENCI??N:Lam??quinadelavarapresi??n est?? tambi??n dotada de un interruptor el??ctrico principal de encendido y apagado. Cuando la hidrolimpiadora no est?? en uso, es necesario que dicho interruptor est?? colocado siempre en apagado para

MOTOR OVERLOAD

The electric motor in this pressure washer is equipped with an overload protection device which will automatically shut off the motor in the event the motor draws excessive current or overheats. The device will automatically reset itself and resume normal operation after a short period of time.

GROUND-FAULT CIRCUIT -

INTERRUPTER PROTECTION

This pressure washer is provided with a Ground-Fault Circuit-Interrupter (GFCI) built into the plug of the power supply cord. This device provides additional protection from the risk of electric shock. Should replacement of the plug or cord become necessary, use only identical replacement parts that include GFCI protection.

EXTENSION CORDS

WARNING: Extension cords are not recommended unless they are plugged into a ground-fault circuit-interrupter found in

WARNING circuit boxes or protected receptacles.

Use only 3-wire extension cords that have 3-prong grounding - type plugs and 3-pole cord connectors that accept the plug from the product.

Use only extension cords that are intended for outdoor use. These extension cords are identified by a marking ???Acceptable for use with outdoor appliances; store indoors while not in use???. Use only extension cords having an electrical rating not less than the rating of the product. Do not use damaged extension cords. Examine extension cord before using and replace if damaged. Do not abuse extension cord and do not yank on any cord to disconnect. Keep cord away from heat and sharp edges. Always disconnect the extension cord from the receptacle before disconnecting the product from the extension cord.

prevenir posibles accidentes o da??os.

SOBRECARGA DEL MOTOR

Elmotorel??ctricodelahidrolimpiadoraposeeundispositivode protecci??ncontralasobrecargaquebloqueaautom??ticamente el motor en el caso de exceso de corriente o en el caso de recalentamiento.

Eldispositivosereiniciaautom??ticamente y reactiva las condiciones normales de funcionamiento despu??s de un breve per??odo.

INTERRUPTOR DE CIRCUITO

CON TOMA DE TIERRA

La m??quina de lavar a presi??n est?? dotada de un interruptor de circuito con toma de tierra (GFCI) montado en el enchufe del cable de alimentaci??n el??ctrica. Dicho dispositivo suministra una protecci??n adicional contra el riesgo de descargas. Si fuere necesario substituir el enchufe o el cable, utilicen exclusivamente repuestos similares provistos de protecci??n GFCI.

EXTENSIONES

ATENCI??N: No se aconseja el uso de extensiones si ??stas no est??n conectadas

a un interruptor de circuito con toma de ATENCI??N tierra, puesto en cajas del circuito o en

tomas protegidas.

Utilice ??nicamente alargadores de 3 almas que di- spongan de conexi??n a tierra de 3 clavijas; tipo de enchufe y conectores de cable de 3 polos que acepten el enchufe del producto. Use exclusivamente exten- siones para uso exterior. Dichas extensiones est??n marcadas por la frase ???Aptas para uso exterior si no las utiliza, col??quelas en un lugar cubierto???. Utilice solamente alargadores que tengan una potencia el??ctrica igual o superior a la del producto. No utilice extensiones da??adas. Antes del uso, revise la exten- si??n y si est?? da??ada sustit??yala. Utilice el alargador correctamente y no tire del cable para desconectar el aparato.Mantenga las extensiones lejos de fuentes de calor y de ??ngulos cortantes. Antes de desconectar el equipo de la extensi??n, desconecte siempre esta ??ltima de la toma corriente.

12

When using an extension cord, observe the specification below:

3.0INSTALLATION

3.1HIGH PRESSURE HOSE

Remove and discard the water plug (Fig. 1) before attaching the high pressure hose. Carefully insert the fitting with the o-ring into the high pressure outlet and tighten the threaded nut by hand. (Fig. 1)

Fig. 1

Fig. 2

Cuando se utilizan extensiones, respeten las siguientes caracter??sticas:

3.0INSTALACI??N

3.1MANGUERA DE ALTA PRESI??N

Extraiga y deseche el tap??n para el agua (Fig. 1) antes de acoplar el tubo de alta presi??n. Introduzca con cuidado el accesorio con la junta t??rica dentro de la salida de alta presi??n y apriete manualmente la tuerca roscada. (Fig. 1).

3.2 WATER CONNECTION (Cold water)

Before connecting, run water through the garden hose (not supplied) to flush out any foreign matter. Attach garden hose to the pressure washer water inlet connection (Fig. 2). If your water source is a well, the garden hose length can only be 30 ft. Max.

Fig. 2

3.2 CONEXI??N DEL AGUA (Agua fr??a)

Antes de efectuar la conexi??n, haga correr el agua en la manguera para jard??n (no incluida en el suministro) para hacer salir los materiales extra??os. Conecte la manguera para jard??n a la conexi??n para la entrada del agua de la m??quina para lavar a presi??n (Fig. 2). Si su fuente h??drica es un pozo, la largura del tubo de jard??n puede ser s??lo 30 ft. M??x.

13

3.3POWER SUPPLY CONNECTION

The pressure washer is factory-equipped with an electrical cord and a Ground Fault Circuit Interrupter (GFCI) power plug.

This cord should only be connected to an electrical outlet installed in accordance with local safety regulations.

NOTE: The power supply must be 120v, 60hz and a minimum 15 amp circuit. (Dedicated)

WARNING: Test GFCI before each use. DO NOT use pressure washer if test below fails.

GFCI Test Procedures:

1.Plug GFCI into power receptacle. Indicator light should be illuminated.

2.Press Test button. Light should turn off.

3.Press Reset button for use. Indicator light should be illuminated.

Do not use if above test fails and contact us at customerservice@huskypowerwasher.com for a replacement.

NOTE: The GFCI must be reset each time the pressure washer is connected to an electrical outlet. Reset by simply pushing the reset button on the GFCI power plug.

WARNING

A.Connect only to properly grounded outlet. Do not remove grounding pin.

B.Inspect cord before using. Do not use if cord is damaged.

C.Keep all connections dry and off the ground.

D.Do not touch plug with wet hands.

E.The pressure washer is provided with a ground fault circuit interrupter built into the power plug. If replacement of the plug or cord is needed, use only identical replacement parts. Contact Customer Service for proper replacement parts via e-mail at: customerservice@huskypowerwasher.com. or order online at www.huskypowerwasher.com

Extension cords are not recommended unless they are plugged into a receptacle protected by a ground fault circuit interrupter. Any extension cord used must be 12 AWG outdoor with maximum length of 25 feet to prevent excessive voltage loss.

Use only extension cords intended for outdoor use. These extension cords are identified by a marking ???Acceptable for use with outdoor appliances; store indoors when not in use???.

3.3CONEXI??N CON LA POTENCIA DE

ALIMENTACI??N

La m??quina de lavar a presi??n est?? dotada de f??brica de un cable el??ctrico y de un enchufe de alimentaci??n con interruptor de circuito con toma de tierra (GFCI).

El cable deber?? ser conectado ??nicamente a una toma corriente el??ctrica instalada en conformidad con las normativas locales de seguridad.

NOTA: La corriente el??ctrica deber?? ser de 120V, 60 Hz con un circuito de por lo menos 15 amperios. (Dedicado).

ATENCI??N:Controlen el interruptor de circuito con toma de tierra (GFCI) antes del uso.

No utilicen la m??quina de lavar a presi??n si el control efectuado da un resultado negativo.

Procedimientos de prueba del GFCI:

1.Enchufe el GFCI a una toma de corriente. Se en- cender?? el indicador luminoso.

2.Pulse el bot??n de prueba (TEST). Se apagar?? la luz.

3.Pulse el bot??n de reinicio (RESET) para utilizar el equipo. Se encender?? el indicador luminoso.

No usar si la prueba descrita anteriormente falla y contacte al nuestro Servicio al Cliente por e-mail customerservice@huskypowerwasher.com por la substituci??

NOTA: El GFCI debe reiniciarse todas las veces que se conecta la hidrolimpiadora a una toma el??ctrica.

ATENCI??N

A.Conecte el equipo s??lo a una tomacorriente con toma a tierra adecuada. No retire la clavija de toma a tierra

B.Revise el cable antes del uso. Si est?? da??ado, no lo utilice.

C.Mantenga secas y fuera de tierra todas las conexiones

D.No toque el enchufe con las manos mojadas

E.La m??quina de lavar a presi??n es suministrada con un interruptor de circuito con toma de tierra instalado en el enchufe de alimentaci??n. Si es necesario substituir el enchufe o el cable, usen s??lo piezas de repuesto del mismo tipo. Para una substituci??n correcta, contacte

al Servicio al Cliente por e-mail: customerservice@huskypowerwasher.com. o haga un pedido por Internet en www.huskypowerwasher.com.

Noseaconsejaelusodeextensionessinoest??nintroducidas enunatomacorrienteprotegidaporelinterruptordecircuito contomadetierra. Cualquier extensi??n utilizada debe ser del tipo 12 AWG fuera y la longitud no debe superar los 25 pies con el fin de prevenir una excesiva dispersi??n de voltaje. Utilice s??lo extensiones para uso exterior. Tales extensiones est??n se??aladas con la siguiente frase: ???Adecuadas para uso exterior; almacenar en lugar cerrado cuando no es utilizada.???

14

4.0OPERATING INSTRUCTIONS

WARNING: Risk of injection or injury.

Do not direct discharge stream at self or

WARNING others.

4.1START-UP PROCEDURE

1.Connect the high pressure hose to the machine outlet. Ensure that the threads are aligned properly and that the connection is secure.

2.Connect the garden hose to the machine inlet using the quick connect. Make sure that the garden hose is connected to a water supply that is turned on.

3.Insert the Click-N-CleanTM or Turbo lance into the gun by pushing firmly and simultaneously twisting a ?? of a turn until locked into place (Fig.5).

Fig. 3

Safety lock ???unlocked???

Bloqueo de seguridad ???abierto???

Safety lock ???locked???

Bloqueo de seguridad ???cerrado???

4.0INSTRUCCIONES DE USO

IMPORTANTE: Riesgo de ingerirlo o de lesiones. NO dirija el chorro hacia s??

ATENCI??N mismo o hacia otras personas.

4.1 PROCEDIMIENTO DE PUESTA EN MARCHA

1.Conecte el tubo de alta presi??n a la salida de la m??qui- na.Aseg??resedequelosconductosest??ncorrectamente alineados y de que la conexi??n es segura.

2.Conecte la manguera del jard??n a la entrada de la m??quina mediante el dispositivo de conexi??n r??pi- da. Aseg??rese de que la manguera del jard??n est?? conectada a una toma de agua que est?? activa.

3.Introduzca la lanza Click-N-CleanTM o Turbo en la pistola. Para ello, presione con firmeza al tiempo que gira un cuarto de vuelta hasta que queda fijada en su lugar (Fig.5).

Fig. 4

Listo

4.Plug the GFCI into the power receptacle. Firmly press and release the TEST button then press and release the RESET button. The light on the GFCI should be illuminated.

5.Ensure that the gun safety is unlocked (Fig. 3) and squeeze the trigger until the air has excaped and a steady flow of water is coming from the nozzle.

6.Depress the ON button (Fig.6 - page 16). Note that the motor will momentanly start then stop. The green ???Ready??? light should be illuminated (Fig.4).

7.Squeeze the trigger to start motor and water flow.

NOTE: Make sure wand is locked (Fig.5).

Fig. 5

4.Enchufe el GFCI a la toma de corriente. Presione con firmeza y suelte el bot??n de prueba (TEST). A continuaci??n, pulse y suelte el bot??n de reinicio (RESET). Se encender?? la luz del GFCI.

5.Aseg??rese de que el dispositivo de seguridad de la pistola est?? desbloqueado (Fig. 3) y apriete el accionador hasta que salga aire y se genere un caudal de agua constante desde la boquilla.

6.Pulse el bot??n ON (Fig.6-p??g.16). Recuerde que el motor se encender?? moment??neamente y, a continuaci??n, se detendr??. La luz verde ???Listo??? (Ready) se encender?? (Fig.4).

7.Apriete el accionador para poner en marcha el motor y el caudal de agua.

NOTA:Aseg??rese de que la varilla est?? bloqueada (Fig.5).

15

WARNING: If the wand is not securely locked into place, it could be ejected under high pressure when operating the gun,

WARNING possibly causing injury or damage.

Fig. 6

IMPORTANTE: Si el lanzador no est?? bien bloqueado, cuando se utiliza la pistola, podr??a ser expulsada debido a la

ATENCI??N alta presi??n, provocando lesiones o da??os y perjuicios.

4.2CLICK-N-CLEANTM

(see Fig.7)

CAUTION: Do not move the nozzle to adjust pressure while the trigger is

WARNING squeezed.

The Click-N-CleanTM nozzle has three adjustments. Turn the collar 120?? to set the desired selection.

The High Pressure Fan Spray

position is intended for cleaning with maximum pressure. (Fig. 7)

The Medium Fan Spray position

is intended for cleaning with medium pressure. (Fig. 7)

The Detergent Spray position is

intended for dispensing detergent (Fig. 7).

Fig. 7

4.2CLICK-N-CLEANTM

(consulte la Fig.7)

PRECAUCI??N: No mueva la boquilla para ajustar la presi??n mientras est?? pul-

ATENCI??N sado el accionador.

La boquilla Click-N-CleanTM puede ajustarse en tres posiciones. Gire el cuello 120?? para ajustarla a la posici??n que desee.

La posici??n de Pulverizaci??n en abanico a alta presi??n est?? indicada para limpiar con la m??xima

presi??n. (Fig. 7).

Laposici??ndePulverizaci??n en aba- nico media est?? indicada para limpiar con una presi??n media. (Fig. 7).

La posici??n de Pulverizaci??n con detergente est?? indicada para suministrar detergente (Fig. 7).

16

(Fig.8).

Fig. 8

The green ???Ready??? light should be illuminated when the ???ON??? button is depressed and power is supplied to the machine.

NOTE: The green ???Ready??? light should remain illuminated until the ON/OFF switch is moved to the OFF position.

When using the Click-N-CleanTM lance set in the ???Medium Fan Spray???, ???Detergent Spray??? position, or when using the Turbo lance, the yellow ???Medium??? light should be illuminated.

NOTE: The yellow ???Medium??? light should be illuminated when the gun trigger is depressed, motor is running and water is spraying from the nozzle.

The blue ???High??? light should be illuminated when using the Click-N-CleanTM lance set in the ???High Pressure Fan Spray??? position.

NOTE: The blue ???High??? light should be illuminated when the gun trigger is depressed, motor is running and water is spraying from the nozzle.

NOTE: The pressure of the spray on the surface you are cleaning increases as you move the wand closer to the surface.

CAUTION: The high pressure fan spray adjustment is very aggressive.

We recommend that for most cleaning

CAUTION applications, a twenty degree (20??) spray angle be used to avoid damage

to the surface being sprayed.

l indicador luminoso verde ???Listo??? (Ready) se encender?? cuando se pulse el bot??n ???ON??? y la m??quina reciba alimentaci??n el??ctrica.

NOTA: La luz verde ???Listo??? (Ready) permanecer?? en- cendida hasta que se coloque el interruptor ON/OFF en la posici??n OFF.

Al utilizar la lanza Click-N-CleanTM en la posici??n ???Pulverizaci??n en abanico media???, ???Pulverizaci??n con detergente???, o al utilizar la lanza Turbo, se encender?? el indicador amarillo ???Media??? (Medium).

NOTA: La luz amarilla ???Media??? (Medium) se encender?? cuando se pulse el accionador de la pistola, el motor est?? en funcionamiento y el agua salga pulverizada por la boquilla.

La luz azul ???Alta??? (High) se encender?? cuando se utilice la lanza Click-N-CleanTM ajustada a la posici??n ???Pulverizaci??n en abanico a alta presi??n???.

NOTA: La luz azul ???Alta??? (High) se encender?? cuando se pulse el accionador de la pistola, el motor est?? en funcionamiento y el agua salga pulverizada por la boquilla.

NOTA: La presi??n que ejerce el pulverizador sobre la superficie que est?? limpiando aumenta a medida que acerca la varilla a la superficie.

PRECAUCI??N: El ajuste de pulveriza- ci??n en abanico a alta presi??n es muy agresivo. Le recomendamos que utilice

un ??ngulo de pulverizaci??n de veinte ATENCI??N grados (20??) para la mayor??a de las

aplicaciones de limpieza. De este modo evitar?? que se produzcan da??os en la superficie que se va a pulverizar.

17

4.3USE OF CLEANING DETERGENTS

CAUTION: Only use cleaning detergents recommended for pressure washers.

CAUTION: Fill and flush the detergent CAUTION tanks with clear water after use.

This product is equipped with dual Dial-N-Wash?? detergent tanks. The dial (3-Fig. 9) is used to control the suction between detergent tanks (1-2-Fig. 9) and increase/decrease detergent flow.

Fig. 9

1.Remove the tank caps (1-2) located on the back of the machine. (Fig. 10)

2.Fill the tanks with suitable cleaning solution. Use only approved pressure washer cleaners. Do not use bleach, chlorine, or any cleaners containing acids (Fig.10).

NOTE: Tank #1 is removable and can be released by shifting left or right and then pulling out.

3.Turn dial (3) to choose the desired tank and increase/ decrease detergent flow(Fig.9).

4.Set the Click-N-CleanTM to the ???Detergent Spray??? position. The detergent will automatically be mixed with the water and discharged through the nozzle.

NOTE: WHEN THE Click-N-CleanTM NOZZLE IS

MOVED TO THE HIGH PRESSURE OR MEDIUM

FAN SPRAY POSITION, DETERGENT WILL NOT

BE DISCHARGED.

Fig. 10

4.3USO DE DETERGENTE

CUIDADO:Usetansolodetergentesespec??ficos para m??quina de lavar a presi??n.

CUIDADO: Limpie con agua clarificada el

ATENCI??N estanque luego de haber utilizado productos qu??micos.

El aparato incorpora dos dep??sitos de detergente Dial-N-Wash?? .El dosificador de detergente (3-Fig. 9) se utiliza para seleccionar entre ambos dep??sitos de detergente (1-2-Fig. 9) y para dosificar la cantidad de detergente.

1.Retire los tapones de los dep??sitos (1-2) situados en la parte trasera de la m??quina. (Fig. 10).

2.Llene los dep??sitos con la soluci??n de limpieza ade- cuada. Utilice s??lo agentes limpiadores para limpieza a presi??n homologados. No utilice lej??a, cloro ni ning??n limpiador que contenga ??cido (Fig.10).

NOTA: El Dep??sito #1 es desmontable y, para sacarlo, s??lo tiene que girarlo a la izquierda o a la derecha y extraerlo.

3.Gire la rueda (3) para elegir el dep??sito deseado y aumentar/disminuir el caudal de detergente (Fig. 9).

4.Ajuste la lanza Click-N-CleanTM a la posici??n de ???Pulverizaci??n con detergente???. El detergente se mezclar?? autom??ticamente con el agua y se descargar?? a trav??s de la boquilla.

NOTA: CUANDO LA BOQUILLA Click-N-CleanTM

SE COLOCA EN LA POSICI??N DE PULVERIZA-

CI??N EN ABANICO A ALTA PRESI??N O A MEDIA

PRESI??N, NO SALDR?? DETERGENTE.

18

4.4CLEANING TECHNIQUES

When cleaning with the pressure washer, some cleaning tasks can be solved with water alone, but for most tasks it is advantageous to use a detergent. A detergent ensures a quick soaking of the dirt allowing the high pressure water to penetrate and remove the dirt more effectively.

The low pressure position provides a gentle application of detergents.

This position is also recommended to rinse a surface after wax application or for other applications which require the low pressure of a garden hose. Low pressure is the equivalent of a garden hose set at the lowest output to properly apply detergent. FOR DETERGENT

APPLICATION, TURN COLLAR ACCORDING TO SECTION 4.2.

APPLICATION OF DETERGENT

1.Apply the solution to a DRY work surface.

NOTE: WETTING THE SURFACE FIRST IS NOT

RECOMMENDED, AS IT DILUTES THE DETERGENT

AND REDUCES ITS CLEANING ABILITY.

On a vertical surface, apply horizontally from side to side starting from the bottom to avoid streaking.

2.Allow detergent to remain on the surface for a short time before rinsing.

CAUTION: Damage may occur to painted surface if detergent is allowed to dry on the surface. Wash and rinse a small section at

CAUTION a time. Avoid working on hot surfaces or in direct sunlight.

3.Rinse with clean water under high pressure. On a vertical surface, first rinse from the bottom up, then rinse from the top down. Hold nozzle 6 to 8 inches from the work surface at a 45?? angle using the flat spray as a peeling tool rather than a scrub brush.

NOTE: Ensure that the detergent injection system is completely clean prior to switching from one detergent to another.

APPLICATION OF LIQUID VEHICLE WAX

1.Immediately after cleaning, apply pressure washer liquid vehicle wax using low pressure. Pour wax into detergent tank.

2.Apply the wax sparingly in an even layer. Apply to wet surfaces from the bottom up for even distribution and to avoid streaking.

4.4T??CNICAS DE LIMPIEZA

Cuando se procede a la limpieza con la m??quina de lavar a presi??n, se pueden efectuar diferentes operaciones s??lo con el agua; en muchoscasos,sin embargo, esconveniente utilizar tambi??n un detergente.

El uso de un detergente asegura un tratamiento inmediato de la suciedad, permitiendo al agua con alta presi??n penetrar y eliminar eficazmente la suciedad.

La posici??n de baja presi??n permite una aplicaci??n delicada del detergente. Recomendamos esta posici??n tambi??n para enjuagar una superficie despu??s de la aplicaci??n de cera y de otras aplicaciones que requieran la baja presi??n de una manguera de jard??n.

La baja presi??n equivale a una manguera de jard??n programada en el rendimiento m??s bajo para aplicar en modo correcto el producto qu??mico.

PARA APLICACIONES CON DETERGENTE, GIRAR

LA ABRAZADERA COMO SE ESPECIFICA EN LA SECCI??N 4.2.

APLICACI??N DE DETERGENTE

1.Aplique la soluci??n de jab??n de la m??quina de lavar a presi??n sobre una superficie de trabajo SECA.

NOTA: NO SE ACONSEJA MOJAR LA SUPERFICIE

ANTES, PUESTO QUE DILUYE EL DETERGENTE Y

REDUCE SU CAPACIDAD DE LIMPIEZA.

Ante la presencia de una superficie vertical, aplique el jab??n horizontalmente comenzando por la parte baja para evitar estriados.

2.Antes de enjuagar, dejen el detergente sobre la superficie durante un breve lapso de tiempo.

ATENCI??N: Si se deja secar el jab??n, las superficies pintadas podr??an da??arse. Lave y seque una peque??a secci??n por vez. No

ATENCI??N trabaje sobre superficies calientes o bajo la luz directa del sol.

3.Enjuague con agua limpia y con alta presi??n. Sobre las superficies verticales, comience a enjuagar antes desde la parte baja hacia la parte alta y luego viceversa. Tenga la boquilla a 6/8 pulgadas de la superficie de trabajo con un ??ngulo de 45?? utilizando el chorro turbo como si fuera una herramienta para pelar en lugar de cepillo de acero.

NOTA: Aseg??rese de que el sistema de inyecci??n de detergente est?? completamente limpio antes de cambiar detergente.

APLICACI??N DE LA CERA

1.Despu??s de haber limpiado, apliquen la cera con la hidrolimpiadora regulada sobre la baja presi??n. Coloquen la cera dentro el dep??sito del liquido detergente.

2.Apliquen la cera en un estrato uniforme. Apliquen sobre superficies mojadas desde abajo hacia arriba, para distribuirla uniformemente y para evitar los estriados.

19

3.Rinse off the surplus wax. NOTE ??? IF SURPLUS

WAX IS NOT REMOVED, A HAZY FINISH MAY

RESULT.

4.Wipe dry to reduce water spotting.

4.5HIGH PRESSURE/TURBO SPRAY

CAUTION: Do not move the nozzle to adjust pressure. The turbo nozzle is not

CAUTION adjustable.

The turbo lance (Fig.11) high pressure spray pattern delivers the optimal cleaning effect. Keep the turbo lance a minimum of 8??? away from the cleaning surface at all times.

NOTE: When using this lance, it is normal for the yellow ???Medium??? light on the Smart Tech display to illuminate.

Fig. 11

4.6END OF OPERATION

When you have completed use of the detergent injection system, continue to run in low pressure position and flush clean water through the detergent tank until it is thoroughly cleaned. NOTE: Failure to clean properly will cause the injection system to become clogged and inoperable.

???Stop the unit by pressing the ON/OFF button.

???Disconnect electrical plug.

???Turn off water and depressurize unit by squeezing trigger.

WARNING: Turn off water supply and squeeze trigger to depressurize the unit. Failure to do so could result in personal

CAUTION injury due to discharge of high pressure water.

???Disconnect the high pressure discharge hose and the water inlet hose.

5.0MAINTENANCE

5.1CONNECTIONS

Connections on Pressure Washer hoses, gun and spray wand should be cleaned regularly and lubricated with non-water soluble grease to prevent leakage and damage to the o-rings.

5.2NOZZLE

The nozzles should be lubricated with non-water soluble grease or light oil regularly. Clogging of the nozzle causes the pump pressure to build up too high and cleaning is immediately required.

1.Clear blockage in nozzle by forcing stiff wire through center hole.

3.Elimine el exceso de cera del aparato. NOTA: SI EL

EXCESO DE CERA NO ES EXTRA??DO, SE PUEDE

OBTENER UN RESULTADO OPACO.

4.Seque la superficie para disminuir las manchas de agua.

4.5 CHORRO DE ALTA PRESI??N / TURBO

ATENCI??N: No act??e sobre la boquilla para modificar la presi??n. La rueda regulable

ATENCI??N turbo no se puede ajustar.

El patr??n de pulverizaci??n a alta presi??n de la lanza Turbo (Fig.11) ofrece un efecto de limpieza ??ptimo. Mantenga la lanza Turbo a una distancia m??nima de 20,32 cm con respecto a la superficie de limpieza en todo momento. NOTA: Cuando utilice esta lanza, es normal que la luz amarilla ???Media??? (Medium) de la pantalla Smart Tech se ilumine.

4.6FINALIZACI??N DE LA OPERACI??N

Cuando haya terminado de utilizar el sistema de inyecci??n de detergente, haga funcionar a??n a baja presi??n y haga pasar agua limpia por el dep??sito del l??quido detergente hasta que est?? completamente limpio. NOTA: la falta de una limpieza a fondo puede provocar una obturaci??n en el sistema de inyecci??n y ser?? inutilizable.

???Detenga el equipo presionando el bot??n on/off.

???Desconecte la toma el??ctrica.

???Cierre el agua y depresurice el equipo presionando el gatillo.

ATENCI??N: Cierren la suministro de agua y presione el gatillo para depresurizar el equipo. La falta de despresurizaci??n puede

ATENCI??N provocar da??os a las personas debido a la descarga del agua de alta presi??n.

???Desconecte la manguera de descarga de la alta presi??n y la manguera de introducci??n del agua.

5.0MANTENIMIENTO

5.1CONEXIONES

Las conexiones a mangueras, la pistola y el tubo de chorro de la hidrolimpiadora, deber??an ser limpiados regularmente y lubricados para prevenir las p??rdidas y la rotura de los aros t??ricos.

5.2BOQUILLA

Las boquillas deben lubricarse peri??dicamente con una grasa que no sea soluble al agua o aceite ligero.La obturaci??n de la boquilla provoca el aumento de la presi??n de la bomba. Se requiere una limpieza inmediata.

1.Eliminen el bloqueo en la boquilla forzando el cable r??gido a trav??s el agujero central.

20

2. Backflush the nozzle with water.

Restart the pressure washer and depress the trigger on the spray gun. If the pressure is still too high, repeat above items 1-2.

5.3LUBRICATION

The pressure washer is designed with a permanent lubrication system. Conventional oil check and oil changes are not necessary.

NOTE: IN CASE OF OIL LEAKAGE, CONTACT

OUR CUSTOMER SERVICE DEPARTMENT AT: customerservice@huskypowerwasher.com.

A SMALL AMOUNT OF OIL LEAKAGE IS NORMAL.

5.4WATER SCREEN

The pressure washer is equipped with a water inlet screen to protect the pump.

CAUTION: If the screen is not kept clean, the flow of water to the pressure washer

will be restricted and the pump may be CAUTION damaged.

???To clean inner water screen, remove quick connector and the inlet nipple in order to remove the filter screen from the pump inlet.

???Backflush screen to clean.

???Replace screen and quick connect immediately to prevent any foreign matter from entering the pump.

CAUTION: Do not damage the screen while removing or cleaning. Any foreign particles entering the pump may damage

CAUTION the pump.

5.5COOLING SYSTEM

The air vents, located in and around the pressure washer, must be kept clean and free of any obstructions to ensure proper air cooling of the motor during operation.

WARNING: Prevent water from pene- trating the vents of the pressure washer to minimize the risk of damage to the

CAUTION machine and to reduce the risk of shock to the operator.

6.0 MOVING AND STORAGE

INSTRUCTIONS

CAUTION: Prior to moving the unit,

CAUTION always disconnect the garden hose via the quick connect.

2. Dejen pasar el agua a trav??s la boquilla

Reinicie arrancar nuevamente la m??quina de lavar a presi??n y oprimir el gatillo de la pistola de chorro. Si la boquilla est?? a??n bloqueada o parcialmente bloqueada, repita dichas operaciones desde el punto 1 hasta el punto 2.

5.3LUBRICACI??N

La m??quina de lavar a presi??n ha sido creada con un sistema de lubricaci??n permanente. No son necesarios controles convencionales ni la substituci??n de aceites.

NOTA: EN CASO DE P??RDIDA DE ACEITE, CONTACTE

V??AE-MAIL CONELDEPARTAMENTODE ATENCI??N AL CLIENTE EN customerservice@huskypowerwasher.com.

UNA PEQUE??A P??RDIDA DE ACEITE ES NORMAL.

5.4FILTRO DE AGUA

La m??quina de lavar a presi??n est?? dotada de un filtro de introducci??n de agua para proteger la bomba.

ATENCI??N: Si no se mantiene limpio el filtro, el flujo del agua hacia la m??quina de lavar a presi??n se ve limitado y la bomba

ATENCI??N puede da??arse.

???Para limpiar la pantalla de agua interior, retire en secuencia el dispositivo de conexi??n r??pida, el niple de entrada y saque la pantalla del filtro de la entrada de la bomba.

???El filtro de retorno del flujo debe estar limpio.

???Reemplace de inmediato el filtro y la uni??n r??pida para evitar que entre material extra??o en la bomba.

ATENCI??N: No da??e el filtro cuando lo lo extraiga y limpie. Cualquier part??cula

extra??a que pudiera entrar en las bombas, ATENCI??N podr??a da??arla.

5.5SISTEMA DE REFRIGERACI??N

Los respiraderos de aire colocados en la m??quina de lavar a presi??n y a su alrededor, deben ser mantenidos limpios de cualquier obstrucci??n para garantizar la refrigeraci??n del motor con aire limpio durante el uso.

IMPORTANTE: Evite que el agua penetre en los respiraderos de la m??quina de lavar a presi??n para que el riesgo de da??ar la

ATENCI??N m??quina sea m??nimo y para reducir el peligro de sacudida el??ctrica al usuario.

6.0MANIPULACI??N Y

ALMACENAMIENTO

ATENCI??N:

PRECAUCI??N: Antes de mover la unidad, desconectar siempre la manguera del jard??n

ATENCI??N con la Conexi??n r??pida.

21

CAUTION: Always store your pressure washer in a location where the temperature will not fall below 40??F. The pump in this machine is susceptible to permanent damage

CAUTION if frozen. FREEZE DAMAGE IS NOT

COVERED BY THE WARRANTY.

End of use and winter storage instructions

1.When finished using the pressure washer, you must first drain and rinse the detergent tanks.

2.Run the pressure washer in low pressure until all of the soap is drained from the detergent tanks.

3.Pour clear water into the tanks and run it through on low pressure as though it were detergent.

4.Turn the machine OFF and squeeze the trigger to release the trapped pressure inside of the machine.

5.Remove both the garden hose and high pressure hose from the unit.

6.Turn ON the machine and allow it to run for 5 seconds. (This will clear out most of the water trapped in the pump).

7.Unplug the machine and store in a dry, climate controlled environment.

Do not store the machine or accessories in a place where the temperature could drop below 40??F.

6.1AFTER EXTENDED STORAGE

Scale deposits may form in the pump when it is not used for some time.

This causes the motor to hesistate or not start up at all.

???Connect machine to water supply and rinse thoroughly with water. Do not plug unit into electrical outlet.

???Connect high pressure hose to the gun and then lock hose safety device. (Fig. 12)

Fig. 12

ATENCI??N: Almacene la m??quina de lavar a presi??n en un local cuya temperatura no descienda por debajo de los 40??F. En el caso de congelamiento, la bomba de este

ATENCI??N equipo est?? sujeta a da??o permanente.

LOS DA??OS PROVOCADOS POR EL

HIELO NO EST??N CUBIERTOS POR

LA GARANT??A.

Instrucciones de almacenaje y finalizaci??n de uso

1.Despu??s de utilizar la lavadora a presi??n, se deben vaciar y aclarar los dos dep??sitos de detergente.

2.Poner la lavadora a presi??n baja hasta que se haya ido todo el detergente de los dep??sitos.

3.Vertiragua limpia en losdep??sitos yponerla m??quina a presi??n baja, como si llevara detergente.

4.Poner la m??quina en posici??n OFF y apretar el gatillo para liberar la presi??n acumulada dentro de la m??quina.

5.Desconectar la manguera y la manguera de alta presi??n de la m??quina.

6.Poner la m??quina en posici??n ON y dejarla que funcione durante 5 segundos. (Esto va a permitir que se vac??e el agua atrapada en el dep??sito).

7.Desconectar la m??quina y guardarla en un espacio seco y con la temperatura controlada.

No guardar la m??quina o los acesorios en un espacio donde la temperatura pueda descender hasta 4??C.(40??F)

6.1DESPU??S DE UN ALMACENAMIENTO

PROLONGADO

Cuando no es utilizada durante mucho tiempo, se podr??an formar en la bomba dep??sitos calc??reos.

Ellopodr??aimplicarqueelmotornofuncionecorrectamente o que directamente no funcione.

???Conecte la m??quina a la alimentaci??n del agua y enjuague. No introduzca el enchufe en el tomacorriente principal.

???Conectar la manguera de alta presi??n a la pistola y a continuaci??n cerrar el dispositivo de l a manguera de seguridad. (Fig.12)

Safety lock ???locked??? Bloqueo de seguridad ???cerrado???

22

7.0 TROUBLESHOOTING

23

24

25

26

The Husky 1800S Powerwasher requires a 15 amp minimum rated circuit to function properly. It is important that your Husky unit does not share a circuit with any other electrical device. If the circuit is shared, the additional device will create an amperage drain that ultimately causes the Husky to draw more amperage in order to run full force. Eventually the machine will overheat and shut itself down.

The Husky shuts down as part of the designed safety feature to protect against overheating. The same effect occurs when two or more outlets are connected to the same circuit. The diagram below shows outlet 1 and outlet 2 on the same circuit.

In regards to overheating and restarting, the unit requires a minimum of a 45 minute period in which the machine can properly cool.

27

7.0 SOLUCI??N DE PROBLEMAS

28

29

30

31

La unidad Husky 1800S PowerWasher necesita de un circuito m??nimo de 15 amp para su correcto funcionamiento. Es importante que su unidad Husky no comparta el circuito con otros aparatos el??ctricos. En el caso de que se compartiera, el aparato adicional provocar??a una fuga de amperes que har??a que la m??quina absorbiera m??s amperes para funcionar a plena fuerza. Al final, la unidad Husky se sobrecalentar??a y se parar??a. Husky se paraliza como parte de sus pensadas funciones de seguridad para evitarle un posible recalentamiento. Se produce el mismo efecto cuando dos o m??s tomas de corriente se conectan al mismo circuito.

El diagrama que aparece m??s abajo muestra una toma de corriente 1 y una toma de corriente 2 en el mismo circuito.

Por lo que se refiere al recalentamiento y al reinicio, la unidad necesita un per??odo m??nimo de 45 minutos para que la m??quina pueda enfriarse debidamente.

32

8.0TECHNICAL DATA

* Water Flow and Maximum Pressure Ratings determined in accordance with PWMA. Standard PW101.

In a continued commitment to improve quality, the Manufacturer reserves the right to make component changes or design changes when necessary.

If there are missing or damaged parts,

DO NOT RETURN THIS PRODUCT TO

THE STORE.

VISIT OUR WEBSITE FOR REGISTRATION,

TROUBLESHOOTING, AND REPLACE-

MENT PARTS.

www.huskypowerwasher.com

8.0DATOS T??CNICOS

* Flujo de agua y tasa de massima presi??n determinado de acuerdo y PWMA. Standard PW101.

Con un compromiso continuo de mejorar la calidad del producto, el Fabricante se reserva el derecho de realizar cambios en los componentes o en el dise??o del producto, si lo considera necesario.

Si faltan piezas o hay piezas da??adas,

NO DEVUELVA EL EQUIPO A LA

TIENDA

VISITE NUESTRO SITIO WEB PARA REGI-

STRO, SOLUCION, Y REPUESTOS.

www.huskypowerwasher.com

33

This product is warranted against defects in material and workmanship for a period of three years on the motor and pump group. All other components are covered for one year, excluding the gun, hose, lance, and ground fault circuit interrupter (GFCI) which are only covered for 90 days; effective from the date of retail purchase and is not transferable. This warranty excludes incidental/consequential damages and failures due to misuse, abuse or normal wear and tear. This warranty applies only to products used in consumer (home) ap- plications. This warranty does not apply to commercial or rental applications. This warranty gives you specific rights, and you may also have other rights, which vary from state to state.

Please visit www.huskypowerwasher.com for details.

Please register by Internet at www.huskypowerwasher.com or complete and return the enclosed Product Registration Card so that we can reach you in the unlikely event a safety recall is needed. Registration is not required to validate this warranty.

WHAT IS COVERED: Replacement parts and labor. Please note that we reserve the right to repair or replace the product as we deem appropriate.

WHAT IS NOT COVERED: This warranty does not include such parts as nozzles which must be replaced as part of normal maintenance of the equipment, rather than as the result of a defect. Transportation charges to warranty center for defective products. Transportation charges to consumer for repaired products. Damages caused by abuse, accident, improper repair, or failure to perform normal maintenance.

Use of improper chemicals or noncompliance with the operators manuals instructions. Sales outside of the United States or Canada.

Any other expense including consequential damages, incidental damages, or incidental expenses, including damage to property. Some states do not allow the exclusion or limitation of incidental or consequential damages, so the above limitation or exclusion may not apply to you. This warranty does not cover damage resulting from failure to observe any of the following conditions:

1)The inlet water pressure must be between 20 and 100 p.s.i.

2)The inlet water temperature must not exceed 90??F.

3)The unit should not be stored in areas where temperatures may drop below 40?? F.

Este producto tiene una garant??a que cubre los defectos causados al usar el art??culo o defectos en los materiales del motor y del tambor durante tres a??os. El resto de los componentes tienen una garant??a de un a??o, con excepci??n de la pistola, la manguera, la lanza y el m??dulo para prevenir descargas el??ctricas (GFCI), que tan s??lo tienen garant??a de 90 d??as, efectivos a partir del d??a de compra y sin opci??n de ampliarlos. Esta garant??a no incluye da??os ocasionados por accidente y defectos causados por un uso incorrecto, abuso o desgaste natural del producto. Esta garant??a se aplica s??lo a los productos destinados a usos privados (casas). Esta garant??a no se puede aplicar a usos comerciales o de alquiler. Esta garant??a concede derechos espec??ficos, que pueden variar de Estado a Estado.

Por favor, visite www.huskypowerwasher.com si desea m??s informaci??n.

Registro por Internet al sitio: www.huskypowerwasher.com o complete y devuelva la anexa Ficha de registro del producto, para que podamos comunicarnos con usted. en la improbable eventualidad de que se haga necesario reclamar la mercanc??a por motivos de seguridad. La inscripci??n no es necesaria para los fines de la validez de la presente garant??a.

LA GARANT??A CUBRE: piezas de repuesto substituci??n y mano de obra.

Debe tener en cuenta que nos reservamos el derecho de reparar o cambiar el producto cuando lo limpiamos correctamente.

EXCLUSIONESDELACOBERTURAENGARANT??A: la presente garant??a no incluye aquellas piezas que, como lasboquillas,debensersubstituidascomopiezasdenormal mantenimiento del equipo, y no como consecuencia de un defecto. Los gastos por transporte a un centro autorizado por los productos defectuosos. Los gastos de transporte al consumidor por los productos reparados. Los da??os causados por un mal uso, accidente, reparaci??n impropia o falta de mantenimiento.

El empleo de productos qu??micos inadecuados y el no respeto de las instrucciones del manual para el uso. Las ventas fuera de los Estados Unidos o de Canad??. Cualquier otro gasto que comprenda da??os indirectos, da??os accidentales o gastos accidentales, incluidos los da??os a la propiedad. Algunos Estados no permiten la exclusi??n o la limitaci??n de los da??os accidentales o indirectos; por lo tanto, dicha limitaci??n o exclusi??n podr??a no ser referida a usted.

La presente garant??a no cubre los da??os resultantes de la falta de observaci??n de una de las siguientes condiciones:

1)La presi??n del agua en entrada debe estar entre los 20 y los 100 p.s.i.

2)La temperatura del agua en entrada no debe superar los 90?? F

3)El equipo no debe ser almacenado en zonas donde la temperatura puede llegar por debajo de los 40?? F.

34

IMPLIED WARRANTIES:

Any implied warranties, including the implied warranties of merchantability and fitness for a particular purpose, are limited in duration to three years on the motor and pump group. All other components are covered for one year, excluding the gun, hose, lance, and ground fault circuit interrupter (GFCI) which are only covered for 90 days; effective from the date of retail purchase and is not transferable. Thiswarrantyexcludesincidental/ consequential damages and failures due to misuse, abuse or normal wear and tear. This warranty applies only to products used in consumer (home) applications. This warranty does not apply to commercial or rental applications. This warranty gives you specific rights, and you may also have other rights, which vary from state to state.

Please visit www.huskypowerwasher.com for details.

HOW TO OBTAIN WARRANTY SERVICE:

Contact our Customer Service Department at: customerservice@huskypowerwasher.com.

To the extent any provision of this warranty is prohibited by federal, state or municipal law, and cannot be preempted, it shall not be applicable. This warranty gives you specific rights, and you may also have other rights which vary from state to state.

GARANT??AS IMPL??CITAS:

Toda garant??a impl??cita, incluyendo las garant??as impl??citas de aprovechamiento e idoneidad del producto para un prop??sito concreto, se limitan a tres a??os en el motor y en el dep??sito.

El resto de los componentes tienen una garant??a de un a??o, con excepci??n de la pistola, la manguera, la lanza y el m??dulo para prevenir descargas el??ctricas (GFCI), que tan s??lo tienen garant??a de 90 d??as, efectivos a partir del d??a de compra y sin opci??n de ampliarlos. Esta garant??a no incluye da??os ocasionados por accidente y defectos causados por un uso incorrecto, abuso o desgaste natural del producto. Esta garant??a se aplica s??lo a los productos destinados a usos privados (casas). Esta garant??a no se puede aplicar a usos comerciales o de alquiler. Esta garant??a concede derechos espec??ficos, que pueden variar de Estado a Estado.

Por favor, visite www.huskypowerwasher.com si desea m??s informaci??n.

C??MO OBTENER EL SERVICIO GARANT??A:

Llame a nuestro Departamento de Servicio al Cliente al: customerservice@huskypowerwasher.com.

Cualquiera de las cl??usulas de la presente garant??a no ser?? aplicable en el caso de prohibici??n por parte de un Estado o de una administraci??n comunal federal y no pueda ser substituida. La presente garant??a les confiere derechos espec??ficos y Uds. pueden tener tambi??n otros derechos que var??an de un Estado a otro.

35

d. e. 12/2006 - cod. PLDC93995 (REV. 0)