Instructions for installation and use

WASHING MACHINE

EN

English,1

Installation, 2-3-4-5

Unpacking and levelling

Connecting the electricity and water supplies

Technical data

AQUALTIS

AQ113L 297 I

Description of the machine, 6-7

Control panel

Running a wash cycle, 8 Wash cycles and options, 9

Table of wash cycles

Wash options

Detergents and laundry, 10

Detergent

Preparing the laundry

Washing recommendations

Precautions and advice, 11

General safety

Load balancing system Disposal

Opening the porthole door manually

Care and maintenance, 12

Cutting off the water and electricity supplies Cleaning the machine

Cleaning the detergent dispenser drawer Caring for your appliance drum Cleaning the pump

Checking the water inlet hose

Trouble shooting, 13-14

Assistance, 15-16

1

Installation

3.Close off the holes using the plastic plugs supplied in the pack.

4.Keep all the parts in a safe place; they will be needed again if the washing machine is moved to another location, to prevent the inside of the appliance being damaged.

! Packaging materials should not be used as toys for children.

Levelling

1. Place the washing machine on a flat sturdy floor, without resting it up against walls or cabinets.

2. If the floor is uneven, the front feet of the machine may be adjusted until

it reaches a horizontal position (the angle of inclination must not exceed 2 degrees).

!If the appliance is levelled correctly, it will be more stable and much less likely to cause vibrations and noise while it is operating, particularly during the spin cycle.

!If it is placed on carpet or a rug, adjust the feet in such a way as to allow a sufficient ventilation space underneath the washing machine.

Connecting the electricity and water supplies

Connecting the water inlet hose

! Before connecting the inlet hose to the water supply, run the water until it is perfectly clear.

1. Connect the inlet hose to the machine by screwing it onto the cold water inlet of the appliance, which is situated on the top right- hand side of the rear part of the appliance (see figure).

2. Connect the inlet hose by screwing it to a cold water tap using a 3/4 gas threaded connection (see figure).

3. Make sure that the hose is not folded over or bent.

!The water pressure at the tap must fall within the values indicated in the Technical data table (see page 5).

!If the inlet hose is not long enough, contact a specialised shop or an authorised technician.

!Never use second-hand or old inlet hoses; use the products supplied with the machine.

2

Connecting the drain hose

Connect the drain hose, without bending it, to a draining duct or a wall drain situated between 65 and 100 cm from the floor;

Where it connects to the waste water pipe cut end off spigot or remove the blanking cap

The drain hose may be connected to an under-sink trap. Before connecting the drain hose from the machine ensure that any blanks or removable ends have

been taken off the spigot.

If it is placed over the edge of a basin or sink be sure the free end of the hose should not be underwater.

! We advise against the use of hose extensions; in case of absolute need, the extension must have the same diameter as the original hose and must not exceed 150 cm in length.

Ensure that if the drain hose is pushed into a standpipe, that the end does not go down more than 15cms (6 inches). If the hose is pushed down too far, this may cause the machine to self -syphon ie. continuously empty as it is filling.

Electric connection

Before plugging the appliance into the mains socket, make sure that:

???the socket is earthed and in compliance with the applicable law;

???the socket is able to sustain the appliance???s maximum power load indicated on the Technical Data Plate fixed on the machine.

Instructions for connecting cable to an alternative plug: Important: the wires in the mains lead are coloured in accordance with the following code:

3

Disposing of the appliance:

When disposing of the appliance please remove the plug by cutting the mains cable as close as possible to the plug body and dispose of it as described above.

!The washing machine should not be installed in an outdoor environment, not even where the area is sheltered, because it may be very dangerous to leave it exposed to damp, rain and thunderstorms.

!When the washing machine is installed, the mains socket must be within easy reach.

!Do not use extensions or multiple sockets.

!The power supply cable must never be bent or dangerously compressed.

!The power supply cable must only be replaced by an authorised serviceman.

Warning! The company denies all liability if and when these norms are not respected.

4

5

Description of the machine

PORTHOLE DOOR

HANDLE

KICK STRIP

ADJUSTABLE FEET

PORTHOLE DOOR

Always use the handle to open the porthole door (see figure).

DETERGENT DISPENSER DRAWER

The detergent dispenser drawer is located inside the machine and can be accessed by opening the door.

For more information on detergent measures, please refer to the chapter entitled

???Detergents and laundry???.

used, place the partition into slot B.

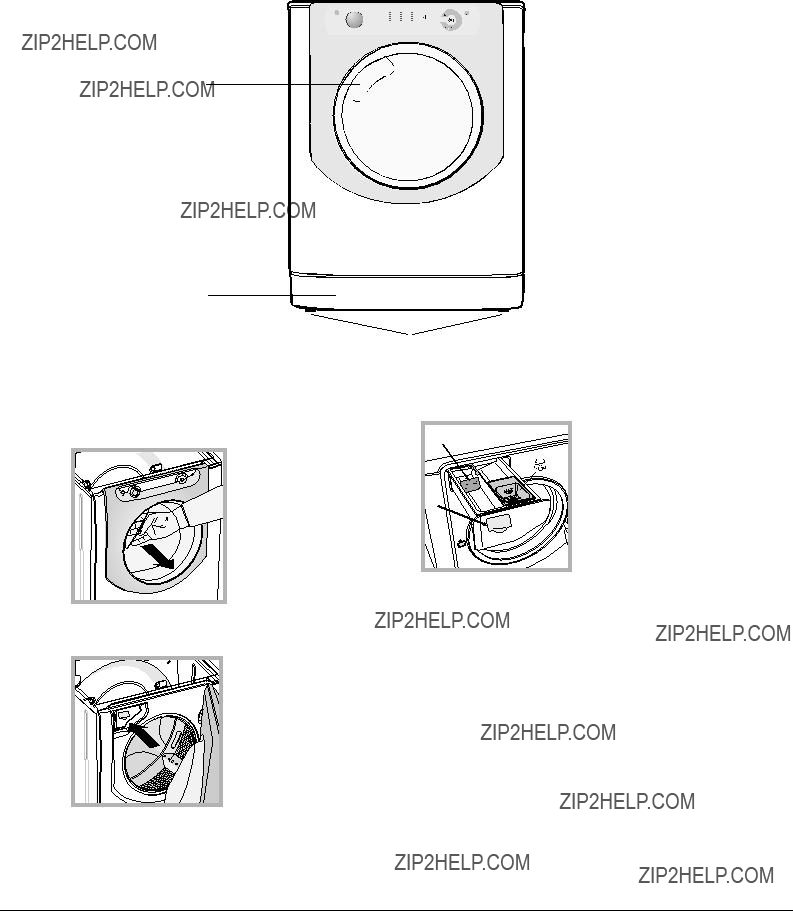
washing additives compartment: for fabric softener or liquid additives. We recommend that the maximum level indicated by the grille is not exceeded, and that concentrated fabric softeners are diluted.

Standby mode

This washing machine, in compliance with new energy saving regulations, is fitted with an automatic standby system which is enabled after about 30 minutes if no activity is detected. Press the ON-OFF button briefly and wait for the machine to start up again.

6

Button with 
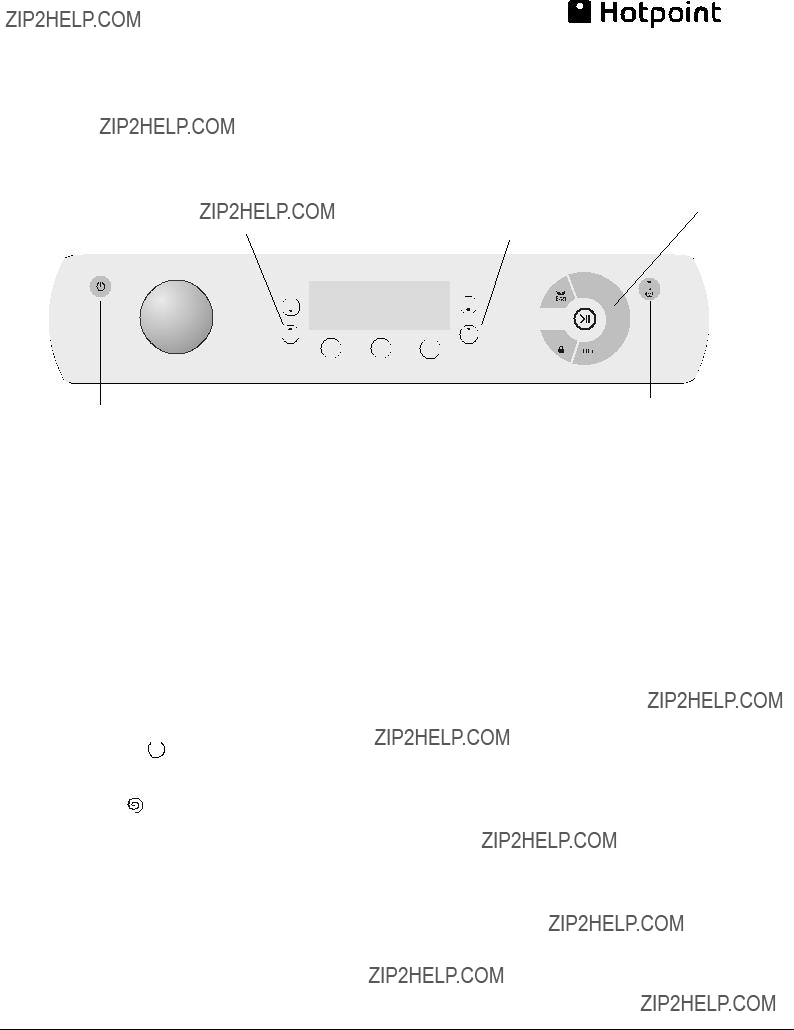
ON/OFF indicator light: press this briefly to switch the machine on or off. The green indicator light indicates that the machine is switched on. To switch off the washing machine during the wash cycle, press and hold the button for approximately 3 seconds; if the button is pressed briefly or accidentally the machine will not switch off. If the machine is switched off during a wash cycle, this wash cycle will be cancelled.

WASH CYCLE SELECTOR knob: may be turned in either direction. To select the most suitable wash cycle, please refer to the ???Table of wash cycles???.

The knob will not move during the wash cycle.

TEMPERATURE button: press to modify or exclude the temperature setting; the value selected will appear on the indicator lights above (see ???Running a wash cycle???).

SPIN CYCLE button: press to modify or exclude the spin cycle; the value selected will appear on the indicator lights above (see ???Running a wash cycle???).

DELAY TIMER button: press to set a DELAY TIMER for the selected wash cycle; the set delay time will appear on the indicator lights above (see ???Running a wash cycle???).

OPTION buttons with indicator lights: press to select the available options. The indicator light corresponding to the selected option will remain lit (see ???Running a wash cycle???).

WASH CYCLE PHASE icons: these illuminate to indicate the progress of the wash cycle (Wash ??? Rinse ??? Spin ??? Drain ). The text lights up when the cycle is complete.

START/PAUSE button with indicator light: when the green indicator light flashes slowly, press the button to start a wash cycle. Once the cycle has begun the indicator light will remain lit in a fixed manner. To pause the wash cycle, press the button again; the indicator light will flash in an orange colour. If the ???LOCK??? indicator light is switched off, the door may be opened. To start the wash cycle from the point at which it was interrupted, press the button again.

LOCK indicator light: indicates that the porthole door is locked. To open the door, pause the wash cycle (see ???Running a wash cycle???).

CHILD LOCK button with indicator light: to activate or deactivate the CHILD LOCK, press and hold the button for approximately 2 seconds. when the indicator light

is illuminated, the control panel is locked. This means it is possible to prevent wash cycles from being modified accidentally, especially where there are children in the home.

ECO indicator light: the icon lights up when, after altering the washing parameters, an energy saving of at least 10% is made. Furthermore, before the machine enters ???Standby??? mode, the icon will light up for a few

seconds; when the machine is switched off the estimated energy saving will be around the 80% mark.

7

Running a wash cycle

WARNING: before you use the washing machine for the EN first time, run a wash cycle with detergent and no laundry,

using the 90?? cottons cycle.

1.SWITCH THE MACHINE ON. Press the button. All the indicator lights will illuminate for 1 second; the indicator light corresponding to the button will then remain lit in a fixed manner and the START/PAUSE indicator light will flash slowly.

2.LOAD THE LAUNDRY. Open the porthole door. Load the laundry, making sure you do not exceed the maximum load value indicated in the table of wash cycles on the following page.

3.MEASURE OUT THE DETERGENT. Pull out the detergent dispenser drawer and pour the detergent into the relevant compartments as described in ???Description of the machine???.

4.CLOSE THE PORTHOLE DOOR.

5.SELECT THE PROGRAMME. Turn the WASH CYCLE SELECTOR KNOB right or left, until you have selected the desired wash cycle. A temperature and spin speed is set for each wash cycle; these may be adjusted.

6.CUSTOMISE THE WASH CYCLE. Use the relevant buttons on the control panel:

Modify the temperature and/or spin speed.

The machine automatically displays the maximum temperature and spin speed values set for the selected cycle, or the most recently-used settings if they are compatible with the selected cycle. The temperature can

is completely excluded (). If these buttons are pressed again, the maximum values are restored.

Setting a delayed start.

To set the ???delayed start??? option for the program you have selected, press the button until the indicator light for the desired delay time is illuminated.

On pressing the button six times, this function will deactivate.

! Once the START/PAUSE button has been pressed, the time delay may only be decreased.

Modify the cycle settings.

Press the OPTION buttons to customise the wash cycle in accordance with your own requirements.

???Press the button to activate the option; the corresponding indicator light will switch on.

???Press the button again to disable the option; the indicator light will switch off.

!If the selected option is not compatible with the selected wash cycle, this incompatibility will be signalled by the flashing of the indicator light and a sound alert

(3 beeps); the option will not be activated.

!If the selected option is not compatible with another option that has been selected previously, the indicator light corresponding to the first option selected will flash and only the second option will be activated; the indicator light corresponding to the button will remain lit in a constant manner.

7.START THE PROGRAMME. Press the START/PAUSE button. The corresponding indicator light remains lit in a

fixed manner and the porthole door locks (the LOCK indicator light illuminates). The icons corresponding to the wash cycle phases will light up during the cycle to indicate which phase is currently in progress.

To change a wash cycle once it has already started, pause the washing machine by pressing the START/ PAUSE button; then select the desired cycle and press the START/PAUSE button again.

To open the door during a wash cycle, press the START/

PAUSE button; if the LOCK indicator light is switched off you may open the door. Press the START/PAUSE button again to restart the wash cycle from the point at which it was interrupted.

8.THE END OF THE WASH CYCLE. This is indicated by the illuminated text END. The porthole door may be opened immediately. If the START/PAUSE indicator light is flashing, press the button to end the cycle. Open the door, unload the laundry and switch off the machine.

! If you wish to cancel a cycle which has already begun, press and hold the button until the cycle stops and the machine switches off.

Bag for quilts, curtains and delicate garments

The Aqualtis washing machine makes it easier for you to wash even the most valuable and delicate garments in complete confidence thanks to the special bag which protects the laundry (this is supplied with the machine).

We recommend that the bag is used every time you wash quilts and padded items with an outer layer made using synthetic material.

8

Wash cycles and options

The length of cycle shown on the display or in this booklet is an estimation only and is calculated assuming standard working conditions. The actual duration can vary according to factors such as water temperature and pressure, the amount of detergent used, the amount and type of load inserted, load balancing and any wash options selected.

Wash options

Steam Hygiene

This option enhances washing performance by generating steam during the wash cycle that eliminates any bacteria from fibres while treating them at the same time. Place the laundry in the drum, choose a compatible programme and select option ??? ???.

! The steam generated during washing machine operation may cause the porthole door to become hazy.

! It cannot be used in conjunction with , , , , ,

, , , , .

Easy Iron

By selecting this option, the wash and spin cycles will be modified in order to reduce the formation of creases.

At the end of the cycle the washing machine drum will rotate slowly; the ???Easy Iron??? and START/PAUSE indicator lights will flash. To end the cycle press the START/PAUSE button or the ???Easy Iron??? button.

! It cannot be used in conjunction with , , , , , .

Eco

The Eco Option saves energy by not heating the water used to wash your laundry ??? an advantage both to the environment and to your energy bill. Instead, intensified wash action and water optimisation ensure great wash results in the same average time of a standard cycle.

For the best washing results we recommend the usage of a liquid detergent.

! It cannot be used in conjunction with , , , , ,

, , , , .

Time Saver

If you select this option, the wash cycle duration will be reduced by up to 50%, depending on the selected cycle, thereby guaranteeing simultaneous water and energy saving. Use this cycle for lightly soiled garments.

! It cannot be used in conjunction with , , , , ,

, , , .

9

Detergents and laundry

Preparing the laundry

???Shake out the garments before loading them into the machine.

???Divide the laundry according fabric type (symbol on the washing instruction label) and colour, making sure you separate the coloured garments from the white ones;

???Empty all pockets and check the buttons;

???Do not exceed the values listed in the ???Table of wash cycles???, which refer to the weight of the laundry when dry.

How much does your laundry weigh?

Washing recommendations

** Refresh

This programme refreshes garments by removing bad odours and relaxing the fibres (2 kg, roughly 3 items). Insert dry items only (that are not dirty) and select programme

??? ???. The garments will be damp once the cycle is completed, so we recommend hanging them to dry. The ???

??? programme makes ironing easier. Moreover, with the ???Steam Perfume??? laundry balls, your favourite perfume can be added to your laundry. Place a few drops of perfume on the sponge contained inside the laundry ball, close it and insert it into the drum together with the laundry. Then launch the specific programme ??? ???. At the end of the cycle, garments will be relaxed and fragrant.

!Not recommended for wool or silk garments.

!Do not add too much perfume to the sponge in order to avoid it dripping.

!Do not add softeners or detergents.

Whites: use this cycle to wash white clothes. The programme is designed to maintain the brightness of white clothes over time.

Coloureds: use this cycle to wash bright coloured clothes. The programme is designed to maintain bright colours over time.

Darks: Use programme to wash dark-coloured garments. This programme is designed to maintain dark colours over time. We recommend using a liquid detergent for the best results when washing dark- coloured garments.

Duvets: to wash double or single duvets (the weight of which should not exceed 3,5 kg), cushions or clothes padded with goose down such as puffa jackets, use the special wash cycle. We recommend that duvets are placed in the drum with their edges folded inwards (see figure) and that no more than ?? of the total volume of the drum is used. To achieve the best results, we recommend that a liquid detergent is used and placed inside the detergent dispenser drawer.

Quilts: to wash quilts with a synthetic outer layer, use the bag provided and set the wash cycle to .

Bedlinen and towels: Use programme to wash bed

linen and towels in one single cycle: it optimises softener performance and helps you save time and energy. We recommend the use of powder detergent

Anti Allergy: use programme to remove major allergens such as pollen, mites, cat???s and dog???s hair.

Ultradelicates: use programme to wash very delicate garments having strasses or sequins. We recommend turning the garments inside out before washing and placing small items into the special bag for washing delicates. Use liquid detergent on delicate garments for best results.

To wash Silk garments and Curtains (these should be folded and placed inside the bag provided), select cycle and then option ; the machine will end the cycle while the laundry is soaking and the indicator light will flash. To drain the water so that the laundry may be removed, press the START/PAUSE button or the button. Wool: is the only washing machine brand to have

been awarded the prestigious Woolmark Apparel Care - Platinum endorsement (M1135) by The Woolmark Company. The ???Wool??? wash cycle can be used

to wash up to 2,5 kg of all washable wool garments in the washing machine while guaranteeing optimum performance. This means that all washable wool

garments may be washed in the washing machine, even those which state ???hand wash only??? on the label when washed in accordance with the instructions for the wool cycle.

10

Precautions and tips

! The machine was designed and constructed in accordance with international safety regulations. The following information is provided for safety reasons and must therefore be read carefully.

General safety

???This appliance was designed for domestic use only.

???This appliance is not intended for use by persons

(including children) with reduced physical, sensory or mental capabilities, or lack of experience and knowledge, unless they have been given supervision or instruction concerning use of the appliance by a person responsible for their safety. Children should be supervised to ensure that they do not play with the appliance.

???Do not touch the machine when barefoot or with wet or damp hands or feet.

???Do not pull on the power supply cable when unplugging the appliance from the electricity socket. Hold the plug and pull.

???Do not touch the drained water as it may reach extremely high temperatures.

???Never force the porthole door. This could damage the safety lock mechanism designed to prevent accidental opening.

???If the appliance breaks down, do not under any circumstances access the internal mechanisms in an attempt to repair it yourself.

???Always keep children well away from the appliance while it is operating.

???If it must be moved, proceed with the help of two or three people and handle it with the utmost care. Never try to do this alone, because the appliance is very heavy.

???Before loading laundry into the washing machine, make sure the drum is empty.

Load balancing system

Before every spin cycle, to avoid excessive vibrations before every spin and to distribute the load in a uniform manner, the drum rotates continuously at a speed which is slightly greater than the washing rotation speed. If, after several attempts, the load is not balanced correctly, the machine spins at a reduced spin speed. If the load is excessively unbalanced, the washing machine performs the distribution process instead of spinning. To encourage improved load distribution and balance, we recommend small and large garments are mixed in the load.

Disposal

???Disposing of the packaging materials: observe local regulations so that the packaging may be re-used.

???The European Directive 2002/96/EC relating to Waste

Electrical and Electronic Equipment (WEEE) states that household appliances should not be disposed of using the normal solid urban waste cycle. Exhausted appliances should be collected separately in order to optimise the cost of re-using and recycling the materials inside the machine, while preventing potential damage to the atmosphere and to public health.

The crossed-out dustbin is marked on all products

to remind the owner of their obligations regardingEN separated waste collection.

For more information relating to the correct disposal of household appliances, owners should contact their local authorities or appliance dealer.

Opening the porthole door manually

In the event that it is not possible to open the porthole door due to a powercut, and if you wish to remove the laundry, proceed as follows:

1. remove the plug from the electrical socket.

2. make sure the water level inside the machine is lower than the door opening; if

it is not, remove excess water using the drain hose, collecting it in a bucket as indicated in the figure.

3. remove the cover panel on the lower front part of the washing machine (see overleaf).

4. pull outwards using the tab as indicated in the figure, until the plastic tie-rod is freed from its stop position; pull downwards until you hear a ???click???, which indicates that the door is now unlocked.

5. open the door; if this is still not possible repeat the procedure.

6. reposition the panel, making sure the hooks are securely in place before you push it onto the appliance.

11

Care and maintenance

To access the pre-chamber:

2

1. take off the cover panel on the front of the machine by first pressing it in the centre and then pushing downwards on both sides until you can remove it (see figures);

2. position a container so that it will collect the water which flows out (approximately 1.5 l) (see figure);

To remove the drawer, press lever (1) and pull the drawer outwards (2) (see figure).

Wash it under running water; this procedure should be repeated frequently.

3. unscrew the lid by rotating it in an anti-clockwise direction (see figure);

4.clean the inside thoroughly;

5.screw the lid back on;

6.reposition the panel, making sure the hooks are securely in place before you push it onto the appliance.

Caring for your appliance drum

???Always leave the door ajar to prevent unpleasant odours from forming.

Cleaning the pump

The washing machine is fitted with a self-cleaning pump which does not require any maintenance. Sometimes, small items (such as coins or buttons) may fall into the protective pre-chamber at the base of the pump.

Make sure the wash cycle has finished and unplug the appliance.

Checking the water inlet hose

Check the inlet hose at least once a year. If there are any cracks, it should be replaced immediately: during the wash cycles, water pressure is very strong and a cracked hose could easily split open.

12

Trouble shooting

Problem:

The machine does not switch on.

The wash cycle does not start.

The machine does not fill with water or Indicator light for the first wash cycle flashing rapidly.

The machine continuously fills with water and continually drains away or Water left in the drum

or Stuck on wash.

The machine does not drain or spin - (error lights flashing).

The machine does not spin.

The machine does not drain or spin - ???EASY IRON??? light flashes.

The programme takes too long.

The machine vibrates a lot during the spin cycle.

The machine is noisy.

Possible causes / Solutions:

???The appliance is not plugged into the socket fully, or not enough to make contact.

???There is no power to the socket, or the fuse has blown in the mains plug.

???The door is not closed properly.

???The ON/OFF button has not been pressed.

???The START/PAUSE button has not been pressed.

???The water tap has not been turned on to allow water to flow into the machine.

???The ???DELAY TIMER??? has been selected.

???The ???CHILD LOCK??? is activated (see ???The machine just ???beeps??? when a programme or option is selected??? below).

???The water inlet hose is kinked.

???The water inlet hose is not connected to the water supply.

???The water pressure is too low.

???The water tap has not been turned on to allow water to flow into the machine.

???There is no water supply to the house.

???The inlet valve filter is blocked.

???The START/PAUSE button has not been pressed.

???The top of the drain hose is too low - It must be fitted at a height between 65 and 100 cm from the floor (see ???Installation???).

???The drain hose is connected incorrectly to the sink trap allowing water to run into the machine, the drain hose must be positioned higher than the bottom of the sink to prevent water flowing down the drain hose.

???The end of the drain hose has been pushed too far down the standpipe, the ???U??? bracket should be fitted 100 mm from the end of the drain hose.

???The Pump filter is blocked.

???The drain hose is kinked (see ???Installation???).

???New Installation - The blanking cap or spigot has not been removed if connected under a sink.

???The drain hose or sink trap is blocked.

???The Spin Speed is set to ?????? position.

???The ???EASY IRON??? option is enabled, at the end of the program the machine drum will rotate slowly. To complete the wash cycle press the ???START/PAUSE??? or the ???EASY IRON??? buttons (see Wash Cycles & Options).

???The ???SILK??? program is selected, at the end of the program it requires the drain phase to be started. To complete the program press either the ???START/PAUSE??? or ???EASY IRON??? buttons (see Wash Cycles & Options).

???Programme times will vary due to water pressure, the incoming water temperature and if the wash load goes out of balance. This will increase the programme time accordingly (see ???The machine wont spin properly??? below) - (Most Common Cause!)

???The feet have not been adjusted, enabling the machine to rock.

???New Installation - Either the Transit Bolts including the plastic spacers, or the Polystyrene Packaging have not been removed when installing the machine.

???The machine is trapped between cabinets and/or walls.

???The load is in a slight out of balance condition and machine is spinning, but at a lower speed.

???There will always be some motor, pump and drum noise during spin.

13

The machine leaks from the dispenser.

???Out of Balance detected when attempting to go into a spin cycle - If this happens the machine will continue to try to repeat the distribution of the load required before the machine will go into higher spin speeds - This will increase the programme time accordingly. This is a safety feature to prevent damage. Out of Balance can be caused by washing a single heavy item (eg duvet, quilt, etc). - Try the programme again using a different load.

???The dispenser drawer is blocked with detergent and requires cleaning.

???The water pressure is too high and requires turning down - turn down the tap on the water supply pipe slightly and try again.

???The machine is tilting forwards - It must be level when in its final position.

The machine leaks (other than dispenser).

The Phase in Progress indicator lights flash rapidly at the same time as the ON/OFF indicator light.

The machine smells.

The machine door cannot be opened.

Door Seal damaged at the bottom.

The water level is too low when the machine is washing.

The machine just ???beeps??? when a programme or option is selected (Child Lock Symbol is lit).

Clothes are coming out too wet on ???Steam Refresh??? cycle.

There is too much foam.

???The fill hose is loose, check both the cabinet and tap ends.

???The fill hose is tight but still leaks, if so replace the rubber washers, or the fill hose is missing the rubber washer.

???The drain hose is not fixed in properly.

???Switch off the machine and unplug it, wait for approximately 1 minute and then switch back on again. If the problem persists contact Technical Assistance Centre.

???The machine requires a service wash. Run a 90 degree wash cycle with detergent and no laundry.

???The door will not open until the door lock indicator light goes out shortly after the program has finished.

???If there is no power to the machine you need to perform the manual unlocking procedure (see Precautions & Tips).

???The door seal has drainage holes at the bottom - This is normal.

???The water level is correct if it can be seen at the bottom of the door.

???Deactivate the Child Lock feature by pressing and holding in the ???CHILD LOCK??? button for 2 seconds.

???Only dry items are to be used for this program. The program refreshes garments by removing bad odours and relaxing the fibres, also making items easier to iron if required.

???The detergent is not suitable for machine washing (it should display the text ???for washing machines??? or ???hand and machine wash??? or the like).

???Too much detergent was used - less detergent is required in soft water.

After completing the programme, or before starting a programme, the machine has turned itself off (no lights).

General.

???To comply with new energy saving regulations the machine is fitted with an automatic standby system. Press ???ON/OFF??? button for 3 seconds to activate the machine, it can then either be switched off or a new programme selected.

???Your washing machine contains sensors that monitor progress during the wash cycle (eg: Water Levels, Temperatures, Out of Balance loads, Wash time/progress). Normally, if your machine successfully completes the cycle, there is unlikely to be anything wrong!

Remember, you will be charged for a service call for problems caused by incorrect installation, as listed above. Not emptying contents from pockets may cause pump or drain blockages, or may damage the machine. Do not wash items which do not have a wash label, or wash items that are not intended as machine washable.

14

Assistance

GuaranteeEN

12 Months Parts and Labour Guarantee

Your appliance has the benefit of our manufacturer???s guarantee, which covers the cost of breakdown repairs for twelve months from the date of purchase.

This gives you the reassurance that if, within that time, your appliance is proven to be defective because of either workmanship or materials, we will, at our discretion, either repair or replace the appliance at no cost to you.

This guarantee is subject to the following conditions:

-The appliance has been installed and operated correctly and in accordance with our operating and maintenance instructions.

-The appliance is used only on the electricity or gas supply printed on the rating plate.

-The appliance has been used for normal domestic purposes only.

-The appliance has not been altered, serviced, maintained, dismantled, or otherwise interfered with by any person not authorised by us.

-Any repair work must be undertaken by us or our appointed agent.

-Any parts removed during repair work or any appliance that is replaced become our property.

-The appliance is used in the United Kingdom or Republic of Ireland.

The guarantee does not cover:

-Damage resulting from transportation, improper use, neglect or interference or as a result of improper installation.

-Replacement of any consumable item or accessory . These include but are not limited to: plugs, cables, batteries, light bulbs, fluorescent tubes and starters, covers and filters.

-Replacement of any removable parts made of glass or plastic.

THIS GUARANTEE WILL NOT APPLY IF THE APPLIANCE HAS BEEN USED IN COMMERCIAL

OR NON-DOMESTIC PREMISES.

5 Year Parts Guarantee

Hotpoint also offers you a free 5 year parts guarantee. This additional guarantee is conditional on you registering your appliance with us and the parts being fitted by one of our authorised engineers. There will be a charge for our engineer???s time. To activate the extra parts warranty on your appliance, simply call our registration line on 08448 24 24 24 (ROI 01 230 0800).

Extended Guarantees

We offer a selection of repair protection plans that enable you to fully cover yourself against the expense of repair bills for the life of your policy. To find the ideal plan for you please call our advice line on

08448 226 226 (Republic of Ireland 01 230 0233).

Free Helpdesk Service

We have a dedicated team who can provide free advice and assistance with your appliance if you experience any technical difficulties within the first 90 days of ownership. Simply call our Hotpoint Service Hotline on 08448 224 224 (Republic of Ireland 0818 313 413) for telephone assistance, or, where necessary, to arrange for an engineer to call. If we cannot resolve the technical problem we will replace your machine or, if you prefer, give you your money back.

15

195094104.02

10/2011 - Xerox Fabriano

16