Instructions for use

WASHING MACHINE

GB

English,1

Installation, 2-3-4-5

Unpacking and levelling

Electric and water connections

The first wash cycle

Technical data

HE9L 493

Care and maintenance, 6

Cutting off the water or electricity supply Cleaning the washing machine

Cleaning the detergent dispenser drawer Caring for the door and drum of your appliance Cleaning the pump

Checking the water inlet hose

Precautions and tips, 7

General safety

Disposal

Description of the washing machine and starting a wash cycle, 8-9

Control panel

Indicator lights

Starting a wash cycle

Wash cycles, 10

Table of wash cycles

Personalisation, 11

Setting the temperature

Setting the spin speed

Functions

Detergents and laundry, 12

Detergent dispenser drawer

Preparing the laundry

Garments requiring special care

Load balancing system

Troubleshooting, 13-14

Assistance, 15-16

EXPERIENCE

1

Installation

! Keep this instruction manual in a safe place GB for future reference. Should the appliance be

sold, transferred or moved, make sure the instruction manual accompanies the washing machine to inform the new owner as to its operation and features.

! Read these instructions carefully: they contain vital information on installation, use and safety.

Unpacking and levelling

2. If the floor is not perfectly level, compensate for any unevenness by tightening or loosening the adjustable front feet (see figure); the an- gle of inclination, measured according to the worktop, must not exceed 2??.

Levelling your appliance correctly will provide it with stability and avoid any vibrations, noise and shifting during operation. If it is placed on a fitted or loose carpet, adjust the feet in such a way as to allow enough room for ventilation beneath the washing machine.

!This is a separate part of the polystyre- ne base and should be removed with the base.

!IMPORTANT check when unpacking your machine.

Electric and water connections

Connecting the water inlet hose

1. Connect the supply pipe by screwing it to a cold water tap using a 3/4 gas threaded connection (see figu-

re).

Before performing the connection, allow the

1. Unpack the washing

machine.

2. Check whether the

washing machine has been damaged during transport. If this is the

case, do not install

it and contact your

retailer.

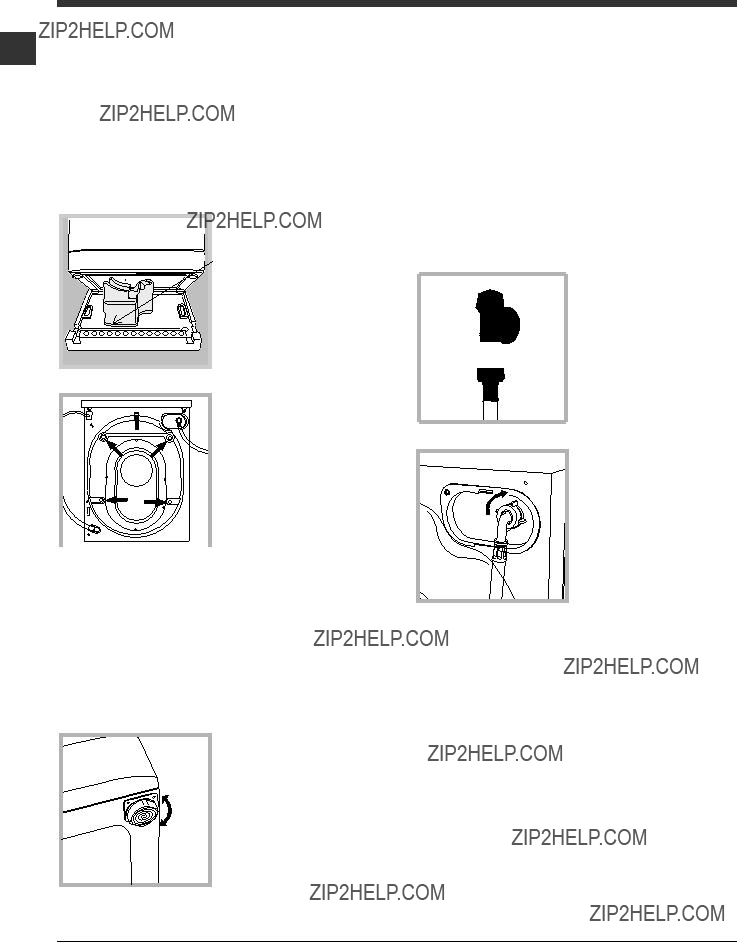
3. Remove the 4 pro- tective screws and the rubber bush with the respective spacer, situated on the rear of the appliance (see also the installation leaflet).

4.Seal the gaps using the plastic plugs provi- ded.

5.Keep all the parts: you will need them again if the washing machine needs to be moved to another location.

! Packaging materials are not children???s toys.

Levelling

Your machine may make a considerable amount of noise if the two front feet have not been adjusted correct- ly.

1. Install the washing machine on a flat sturdy floor, without resting it up against walls, cabinets or anything else.

water to run freely until it is perfectly clear.

2. Connect the other end of the water inlet hose to the washing machine,

screwing it onto the appliance???s cold water inlet, situated on the top right-hand side on the rear of the ap- pliance (see figure).

3. Make sure there are no kinks or bends in the hose.

!The water pressure at the tap must be within the values indicated in the Technical details table (on the page 5).

!If the water inlet hose is not long enough, contact a specialist store or an authorised serviceman.

!Ensure that the supply taps are allowing wa- ter through. Old taps may seize in the closed position and thus prevent water reaching the machine.

!Never use second-hand or old inlet hoses; use the products supplied with the machine.

2

Connecting the drain hose

Connect the drain hose, without bending it, to a draining duct or a wall drain situa- ted between 65 and 100 cm from the floor;

Where it connects to the waste water pipe cut end off spigot or remove the blanking cap

The drain hose may be connected to an under-sink trap. Be- fore connecting the drain hose from the machine ensure that any blanks or remo- vable ends have been taken off the spigot.

If it is placed over the edge of a basin or sink be sure the free end of the hose should not be under- water.

! We advise against the use of hose extensions; in case of absolute need, the extension must have the same diameter as the original hose and must not exceed 150 cm in length.

Ensure that if the drain hose is pushed into a standpipe, that the end does not go down more than 15cms (6 inches). If the hose is pu-

shed down too far, this may cause the machine to self -syphon ie. continuously empty as it is filling.

Electric connection

Before plugging the appliance into the mains socket, make sure that:

???the socket is earthed and in compliance with the applicable law;

???the socket is able to sustain the appliance???s maximum power load indicated on the Tech- nical Data Plate fixed on the machine;

3

As the colours of the wires in the lead may not GB correspond with the coloured markings iden-

tifying the terminals in your plug, proceed as follows:

Connect Green & Yellow wire to terminal marked E or or coloured Green or Green & Yellow.

Connect Brown wire to terminal marked L or coloured Red.

Connect Blue wire to terminal marked N or coloured Black.

If a 13 amp plug (BS 1363) is used it must be fitted with a

13 amp fuse, either in the plug or adaptor or at the distribution board.

If you are in any doubt regarding the electrical supply to your machine, consult a qualified electrician before use.

How to connect an alternative plug:

The wires in this mains lead are coloured in accordance with the following code:

Disposing of the appliance:

When disposing of the appliance please re- move the plug by cutting the mains cable as close as possible to the plug body and dispo- se of it as described on the previous page.

!The washing machine should not be installed in an outdoor environment, not even where the area is sheltered, because it may be very dangerous to leave it exposed to damp, rain and thunderstorms.

!When the washing machine is installed, the mains socket must be within easy reach.

!Do not use extensions or multiple sockets.

!The power supply cable must never be bent or dangerously compressed.

! The power supply cable must only be repla- ced by an authorised serviceman.

Warning! The company denies all liability if and when these norms are not respected.

The first wash cycle

Once the appliance has been installed, and before you use it for the first time, run a wash cycle with detergent and no laundry, setting the 2 programme.

4

5

Care and maintenance

2. unscrew the lid by rotating it anti- clockwise (see figu- re): a little water may trickle out. This is perfectly normal;

3.clean the inside thoroughly;

4.screw the lid back on;

5.reposition the panel, making sure the hooks are securely in place before you push it onto the appliance.

Remove the dispenser by raising it and pul- ling it out (see figure).

Wash it under running water; this operation should be repeated frequently.

Checking the water inlet hose

Check the inlet hose at least once a year. If there are any cracks, it should be replaced immediately: during the wash cycles, water pressure is very strong and a cracked hose could easily split open.

! Never use second-hand hoses.

Caring for the door and drum of your appliance

???Always leave the porthole door ajar in order to prevent unpleasant odours from forming.

Cleaning the pump

The washing machine is fitted with a self-clea- ning pump which does not require any mainte- nance. Sometimes, small items (such as coins or buttons) may fall into the pre-chamber which protects the pump, situated in its bottom part. ! Make sure the wash cycle has finished and unplug the appliance.

To access the pre-chamber:

1. using a screwdri- ver, remove the cover panel on the lower

front part of the wa- shing machine (see

figure);

6

Precautions and tips

! This washing machine was designed and constructed in

accordance with international safety regulations. The fol-GB lowing information is provided for safety reasons and must

therefore be read carefully.

General safety

???This appliance was designed for domestic use only.

???This appliance can be used by children aged

from 8 years and above and persons with re- duced physical, sensory or mental capabilities or lack of experience and knowledge if they have been given supervision or instruction concerning use of the appliance in a safe way and understand the hazards involved. Chil- dren shall not play with the appliance. Clea- ning and user maintenance shall not be made by children without supervision.

???Do not touch the machine when barefoot or with wet or damp hands or feet.

???Do not pull on the power supply cable when unplugging the appliance from the electricity socket. Hold the plug and pull.

???Do not open the detergent dispenser drawer while the machine is in operation.

???Do not touch the drained water as it may reach extreme- ly high temperatures.

???Never force the porthole door. This could damage the safety lock mechanism designed to prevent accidental opening.

???If the appliance breaks down, do not under any circum- stances access the internal mechanisms in an attempt to repair it yourself.

???Always keep children well away from the appliance while it is operating.

???The door can become quite hot during the wash cycle.

???If the appliance has to be moved, work in a group of two or three people and handle it with the utmost care. Never try to do this alone, because the appliance is very heavy.

???Before loading laundry into the washing machine, make sure the drum is empty.

Disposal

???Disposing of the packaging materials: observe local regu- lations so that the packaging may be re-used.

???The European Directive 2012/19/EU on Waste Electrical and Electronic Equipment, requires that old household electrical appliances must not be disposed of in the normal unsorted municipal waste stream. Old appliances must be collected separately in order to optimise the recovery and recycling of the materials they contain and reduce the im- pact on human health and the environment. The crossed out ???wheeled bin??? symbol on the product reminds you of your obligation, that when you dispose of the appliance it must be separately collected. Consumers should contact their local authority or retailer for information concerning the correct disposal of their old appliance.

7

Detergent dispenser drawer: used to dispense detergents and washing additives (see ???Detergents and laundry???).

ON/OFF button: switches the washing machine on and off.

WASH CYCLE knob: programmes the wash cycles. Du- ring the wash cycle, the knob does not move.

FUNCTION buttons with indicator light: used to select the available functions. The indicator light corresponding to the selected function will remain lit.

TEMPERATURE knob: sets the temperature or the cold wash cycle (see ???Personalisation???).

SPIN SPEED knob: sets the spin speed or exclude the spin cycle completely (see ???Personalisation???).

WASH CYCLE PROGRESS indicator lights: used to monitor the progress of the wash cycle.

The illuminated indicator light shows which phase is in progress.

DOOR LOCKED indicator lights: indicates whether the door may be opened or not (see next page).

START/PAUSE button with indicator light: starts or tem- porarily interrupts the wash cycles.

N.B. To pause the wash cycle in progress, press this button; the corresponding indicator light will flash orange, while the indicator light for the current wash cycle phase will remain lit in a fixed manner. If the DOOR LOCKED indicator light is switched off, the door may be opened (wait approximately 3 minutes).

To start the wash cycle from the point at which it was interrupted, press this button again.

Standby mode

This washing machine, in compliance with new energy sa- ving regulations, is fitted with an automatic standby system which is enabled after about 30 minutes if no activity is detected. Press the ON-OFF button briefly and wait for the machine to start up again.

Consumption in off-mode: 0,5 W

Consumption in Left-on: 0,5 W

8

Indicator lights

The indicator lights provide important information. This is what they can tell you:

Wash cycle phase indicator lights

Once the desired wash cycle has been selected and has begun, the indicator lights switch on one by one to indicate which phase of the cycle is currently in progress.

Wash

Rinse

Spin

Pump out

End of wash cycle

Function buttons and corresponding indicator lights

When a function is selected, the corresponding indicator light will illuminate.

If the selected function is not compatible with the program- med wash cycle, the corresponding indicator light will flash and the function will not be activated.

If a function which is incompatible with another function selected previously, only the most recent selection will remain active.

Door locked indicator light

If this indicator light is on, the appliance door is locked to GB prevent it from being opened accidentally; to avoid any

damage, wait for the indicator light to switch off before you open the appliance door (wait approximately 3 minutes).

! If the START/PAUSE indicator light (orange) flashes rapidly at the same time as the function indicator light, this indicates a problem has occurred (see ???Troubleshooting???).

Starting a wash cycle

1.Switch the washing machine on by pressing the ON/OFF button. All the indicator lights will turn on for a few seconds, then only the indicator lights relative to the selected programme settings will remain lit and the START/PAUSE indicator light will flash.

2.Load the laundry and close the door.

3.Set the WASH CYCLE knob to the desired programme.

4.Set the washing temperature (see ???Personalisation???).

5. Set the spin speed (see ???Personalisation???).

6.Measure out the detergent and washing additives (see ???Detergents and laundry???).

7.Select the desired functions.

8.Start the wash cycle by pressing the START/PAUSE button and the corresponding indicator light will remain lit in a fixed manner, in green.

To cancel the set wash cycle, pause the machine by pressing the START/PAUSE button and select a new cycle.

9.At the end of the wash cycle the indicator light will switch on. The DOOR LOCKED indicator light will switch off, indi- cating that the door may be opened (wait approximately 3 minutes). Take out your laundry and leave the appliance door ajar to make sure the drum dries completely. Switch the washing machine off by pressing the ON/OFF button.

9

Wash cycles

Essentials

1 Anti Stain

2Whites

3 
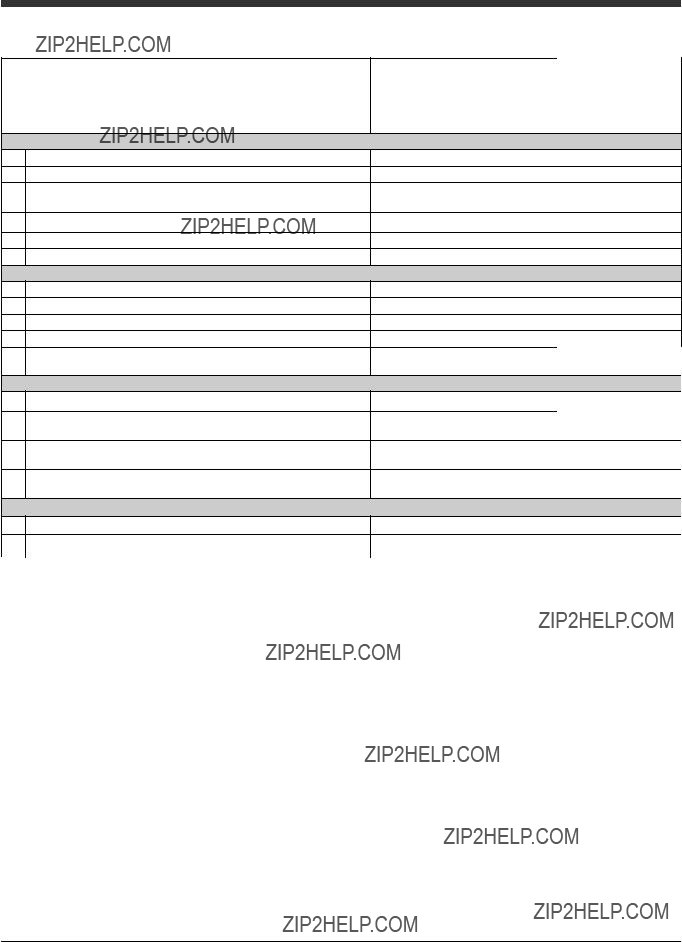
Cotton Standard 60??C (1): heavily soiled whites and resistant colours.

4 Cotton Standard 40??C (2): lightly soiled resistant and delicate colours.

5Synthetics: heavily soiled resistant colours.

5Synthetics (3): lightly soiled resistant colours.

Specials

6 Anti Allergy

7Baby

8 Wool: for wool, cashmere, etc.

9Delicates

10Fast Wash 60???: to refresh normal soiled garments quickly (not suitable for wool, silk and clothes which require washing by hand).

Eco Cycle

11 Cotton Standard 20??: lightly soiled resistant and delicate colours.

12Cottons

13Synthetics

14Fast Wash

Partials cycles

ARinse

B Spin+Pump out

The length of cycle shown in this booklet is an estimation only and is calculated assuming standard working conditions. The actual duration can vary according to factors such as water temperature and pressure, the amount of detergent used, the amount and type of load inserted, load balancing and any wash options selected.

1) Test wash cycle in compliance with directive 1061/2010: set wash cycle 3 with a temperature of 60??C.

This cycle is designed for cotton loads with a normal soil level and is the most efficient in terms of both electricity and water consumption; it should be used for garments which can be washed at 60??C. The actual washing temperature may differ from the indicated value.

2) Test wash cycle in compliance with directive 1061/2010: set wash cycle 4 with a temperature of 40??C.

This cycle is designed for cotton loads with a normal soil level and is the most efficient in terms of both electricity and water consumption; it should be used for garments which can be washed at 40??C. The actual washing temperature may differ from the indicated value.

For all Test Institutes:

2)Long wash cycle for cottons: set wash cycle 4 with a temperature of 40??C.

3)Long wash cycle for synthetics: set wash cycle 5 with a temperature of 40??C.

10

Personalisation

The spin speed may be lowered, or the spin cycle can be excluded altogether by selecting the symbol .

The washing machine will automatically prevent you from selecting a spin speed which is higher than the maximum speed set for each wash cycle.

Functions

The various wash functions available with this washing machine will help to achieve the desired results, every time. To activate the functions:

1.Press the button corresponding to the desired function;

2.the function is enabled when the corresponding indicator light is illuminated.

Note: If the indicator light flashes rapidly, this signals that this particular function may not be selected in conjunction with the selected wash cycle.

Time Saver

If you select this option, the wash cycle duration will be reduced by up to 50%, depending on the selected cycle, thereby gua- ranteeing simultaneous water and energy saving. Use this cycle for lightly soiled garments.

! It cannot be used in conjunction with wash cycles 1, 2, 6, 7, 8, 9, 10, 12, 13, 14, A, B.

Reduced Creases

By selecting this function, the wash and spin cycles will be modified in order to reduce the formation of creases. At the end of the cycle the washing machine will perform slow rotations of the drum; the REDUCED CREASES and START/PAUSE indi- cator lights will flash (orange) and the phase will remain lit in a fixed manner. To end the cycle, press the START/PAUSE button or the REDUCED CREASES button.
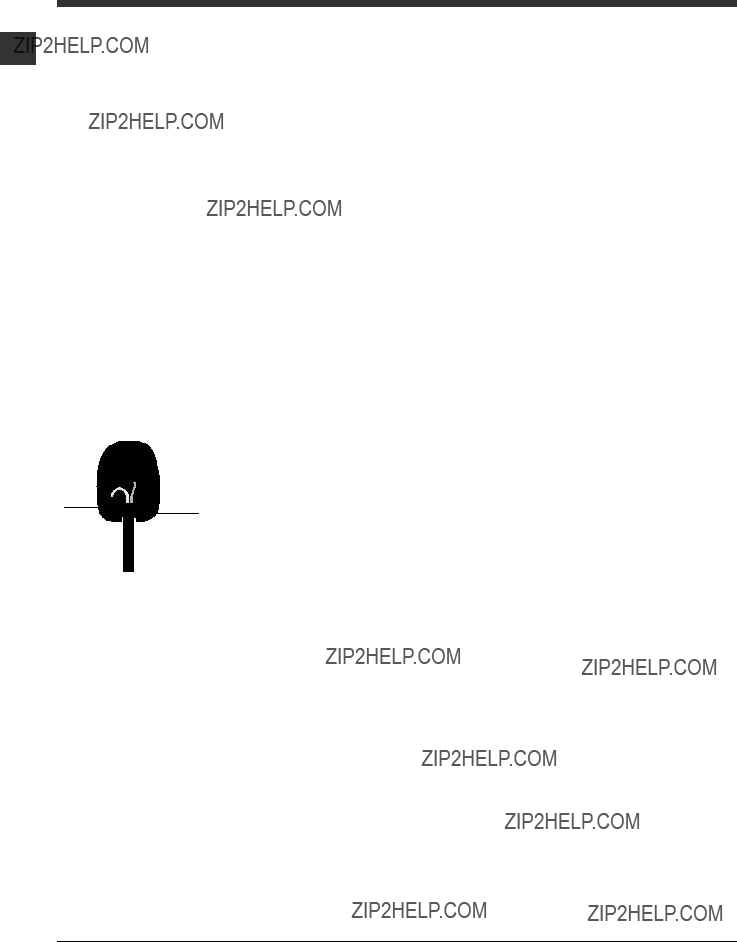
! This function may not be used in conjunction with wash cycles 1, 2, 6, 8, 12, 13, 14, A, B.

Extra rinse

By selecting this function, the efficiency of the rinse is increased and optimal detergent removal is guaranteed. It is particularly useful for sensitive skin.

! This function may not be used in conjunction with wash cycles 6, 9, 14, B.

Super Wash

Because a greater quantity of water is used in the initial phase of the cycle, and because of the increased cycle duration, this function offers a high-performance wash.

! This function may not be used in conjunction with wash cycles 2, 6, 8, 9, 10, 12, 13, 14, B.

11

Detergents and laundry

!Use powder detergent for white cotton garments, for pre- washing, and for washing at temperatures over 60??C.

!Follow the instructions given on the detergent packaging.

!Do not use hand washing detergents; they create too much foam.

compartment 1: Detergent for the wash cycle (powder or liquid)

For best results liquid detergent should be poured in the dispenser immediately before the start of the programme. compartment 2: Additives (fabric softeners, etc.)

The fabric softener should not overflow the grid.

Preparing the laundry

???Divide the laundry according to:

-the type of fabric/the symbol on the label

-the colours: separate coloured garments from whites.

???Empty all garment pockets and check the buttons.

???Do not exceed the listed values, which refer to the weight of the laundry when dry: see ???Table of wash cycles???.

How much does your laundry weigh?

1 sheet 400-500 g

1 pillow case 150-200 g

1 tablecloth 400-500 g

1 bathrobe 900-1,200 g

1 towel 150-250 g

Garments requiring special care

Anti Stain: the programme 1 is suitable to heavily-soiled garments with resistant colours. It ensures a washing class that is higher than the standard class (A class). When running the programme, do not mix garments of different colours. We recommend the use of powder detergent. Pre-treatment with special additives is recommended if there are obstinate stains.

Whites: use this cycle 2 to wash white clothes. The pro- gramme is designed to maintain the brightness of white clothes over time. Use powder detergent for best results. Anti Allergy: use programme 6 to remove major allergens such as pollen, mites, cat???s and dog???s hair.

Baby: use the special wash cycle 7 to remove the soiling typically caused by babies, while removing all traces of detergent from nappies in order to prevent the delicate skin

of babies from suffering allergic reactions. The cycle has been designed to reduce the amount of bacteria by using a greater quantity of water and optimising the effect of special disinfec- ting additives added to the detergent.

Wool: the ???Wool??? wash cycle on this Hotpoint machine has been tested and approved by The Woolmark Company

for washing wool garments labelled as hand washable provided that the garments are washed according to the instructions on the garment label and those issued by the manufacturer of this washing machine. Hotpoint is the first washing machine brand to be approved by The Woolmark Company for Apparel Care- Platinum for its washing per- formance and consumption of energy and water. (M1127)

Delicates: use programme 9 to wash very delicate garments

with decorative features, such as diamantes and sequins. We recommend turning the garments inside out before washing and placing small items into the special bag for washing delicates.

Use liquid detergent on delicate garments for best results. To wash silk garments and curtains select cycle 9 and then function ???Reduced Creases??? (in this case it will also be possible to enable the ???Extra Rinse??? option); the machine will end the cycle while the laundry is soaking, the ???Reduced Creases??? and START/PAUSE indicator lights will flash (orange) and the RINSE phase will remain lit in a fixed manner. To drain the water so that the laundry may be removed, press the START/PAUSE button or the ???Reduced Creases??? button. Cotton Standard 20??: (programme 11) ideal for heavily soiled cotton loads. The effective performance levels achieved at cold temperatures, which are comparable to washing at 40??, are guaranteed by a mechanical action which operates at varying speed, with repeated and frequent peaks.

Eco cycles

The Eco Cycles assure energy saving by eliminating the need of heating water and it???s an advantage both to your energy bill and the environment! These innovative Eco programmes (Cottons 12, Synthetics 13 and Fast Wash14) are available for various fabrics and different quantity of garment; they have been designed to guarantee a high cleaning action even at low temperature and can be used for lightly to medium soiled loads. Eco Cycles give the best results thanks to an intensified wash action, water optimization and are carried out in the same average time of a standard cycle. For the best washing results with Eco Cycles we recommend the usage of a liquid detergent.

Load balancing system

Before every spin cycle, to avoid excessive vibrations before every spin and to distribute the load in a uniform manner, the drum rotates continuously at a speed which is slightly greater than the washing rotation speed. If, after several attempts, the load is not balanced correctly, the machine spins at a reduced spin speed. If the load is excessively unbalanced, the washing machine performs the distribution process instead of spinning. To encourage improved load distribution and balance, we recommend small and large garments are mixed in the load.

12

Troubleshooting

The machine does not switch on.

The wash cycle does not start.

???The appliance is not plugged into the socket fully, or not enough to make contact.

???There is no power to the socket, or the fuse has blown in the mains plug.

???The door is not closed properly.

???The ON/OFF button has not been pressed.

???The START/PAUSE button has not been pressed.

???The water tap has not been turned on to allow water to flow into the machine.

???A delayed start has been set.

The machine does not fill with wa- ter or the indicator light for the first wash cycle stage flashes rapidly.

???The water inlet hose is kinked.

???The water inlet hose is not connected to the water supply.

???The water pressure is too low.

???The water tap has not been turned on to allow water to flow into the machine.

???There is no water supply to the house.

???The inlet valve filter is blocked.

???The START/PAUSE button has not been pressed.

The machine continuously fills with water and continually drains away or Water left in the drum

or Stuck on wash.

???The top of the drain hose is too low - It must be fitted at a height between 65 and 100 cm from the floor (see ???Installation???).

???The drain hose is connected incorrectly to the sink trap allowing water to run into the machine, the drain hose must be positioned higher than the bottom of the sink to prevent water flowing down the drain hose.

???The end of the drain hose has been pushed too far down the standpipe, the ???U??? bracket should be fitted 100 mm from the end of the drain hose.

The machine does not drain or spin.

The machine does not heat or poor wash results.

The programme takes too long.

???The Pump filter is blocked.

???The drain hose is kinked (see ???Installation???).

???New Installation - The blanking cap or spigot has not been removed if con- nected under a sink.

???The drain hose or sink trap is blocked.

???The wash cycle does not include draining, some wash cycles require the drain phase to be started manually.

???The REDUCED CREASES function button has been activated. To complete the wash cycle, press the START/PAUSE button.

???The ???Temperature??? selector knob is in the ?????? position.

???Programme times will vary due to water pressure, the incoming water tempe- rature and if the wash load goes out of balance. This will increase the pro- gramme times accordingly (see ??? The machine wont spin properly??? below).

The machine vibrates a lot during the spin cycle.

???The feet have not been adjusted, enabling the machine to rock.

???New Installation - Either the Transit Bolts including the plastic spacers, or the Polystyrene Packaging have not been removed when installing the machine.

???The machine is trapped between cabinets and/or walls.

???The load is in a slight out of balance condition and machine is spinning, but at a lower speed.

13

GB

The machine is noisy.

The machine wont spin properly.

The machine leaks from the dispenser.

The machine leaks (other than di- spenser).

???There will always be some motor, pump and drum noise during spin.

???Out of Balance detected when attempting to go into a spin cycle - If this happens the machine will continue to try to repeat the distribution of the load required before the machine will go into higher spin speeds - This will increase the programme time accordingly. This is a safety feature to prevent damage. Out of Balance can be caused by washing a single heavy item (eg duvet, quilt, etc). - Try the programme again using a different load.

???The dispenser drawer is blocked with detergent and requires cleaning.

???The water pressure is too high and requires turning down - turn down the tap on the water supply pipe slightly and try again.

???The machine is tilting forwards - It must be level when in its final position.

???The fill hose is loose, check both the cabinet and tap ends.

???The fill hose is tight but still leaks, if so replace the rubber washers, or the fill hose is missing the rubber washer.

???The drain hose is not fixed in properly.

The indicator lights on the console are flashing rapidly.

The machine smells.

The machine door cannot be opened.

Door Seal damaged at the bottom.

The water level is too low when the machine is washing.

There is too much foam.

???Switch off the machine and unplug it, wait for approximately 1 minute and then switch it back on again If the problem persists contact the Technical Assistance Service.

???The machine requires a service wash. Run a 2 wash cycle with detergent and no laundry.

???The door will not open until the door lock indicator light goes out shortly after the program has finished.

???The door seal has drainage holes at the bottom - This is normal.

???The water level is correct if it can be seen at the bottom of the door.

???The detergent is not suitable for machine washing (it should display the text ???for washing machines??? or ???hand and machine wash??? or the like).

???Too much detergent was used - less detergent is required in soft water.

After completing the programme, or before starting a programme, the machine has turned itself off (no lights).

General.

???To comply with new energy saving regulations the machine is fitted with an automatic standby system. Press ???ON/OFF??? button for 3 seconds to activate the machine, it can then either be switched off or a new programme selected.

???Your washing machine contains sensors that monitor progress during the wash cycle (eg: Water Levels, Temperatures, Out of Balance loads, Wash time/pro- gress).

Normally, if your machine successfully completes the cycle, there is unlikely to be anything wrong!

Remember, you will be charged for a service call for problems caused by incorrect installation, as listed above. Not emptying contents from pockets may cause pump or drain blockages, or may damage the machine.

Do not wash items which do not have a wash label, or wash items that are not intended as machine washable.

14

Assistance

GuaranteeGB

12 Months Parts and Labour Guarantee

Your appliance has the benefit of our manufacturer???s guarantee, which covers the cost of breakdown repairs for twelve months from the date of purchase.

This gives you the reassurance that if, within that time, your appliance is proven to be defective because of either workmanship or materials, we will, at our discretion, either repair or replace the appliance at no cost to you.

This guarantee is subject to the following conditions:

-The appliance has been installed and operated correctly and in accordance with our operating and maintenance instructions.

-The appliance is used only on the electricity or gas supply printed on the rating plate.

-The appliance has been used for normal domestic purposes only.

-The appliance has not been altered, serviced, maintained, dismantled, or otherwise interfered with by any person not authorised by us.

-Any repair work must be undertaken by us or our appointed agent.

-Any parts removed during repair work or any appliance that is replaced become our property.

-The appliance is used in the United Kingdom or Republic of Ireland.

The guarantee does not cover:

-Damage resulting from transportation, improper use, neglect or interference or as a result of improper installation.

-Replacement of any consumable item or accessory . These include but are not limited to: plugs, cables, batteries, light bulbs, fluorescent tubes and starters, covers and filters.

-Replacement of any removable parts made of glass or plastic.

THIS GUARANTEE WILL NOT APPLY IF THE APPLIANCE HAS BEEN USED IN COMMERCIAL

OR NON-DOMESTIC PREMISES.

5 Year Parts Guarantee

Hotpoint also offers you a free 5 year parts guarantee. This additional guarantee is conditional on you registering your appliance with us and the parts being fitted by one of our authorised engineers. There will be a charge for our engineer???s time. To activate the extra parts warranty on your appliance, simply call our registration line on 08448 24 24 24 (ROI 01 230 0800).

Extended Guarantees

We offer a selection of repair protection plans that enable you to fully cover yourself against the expense of repair bills for the life of your policy. To find the ideal plan for you please call our advice line on

08448 226 226 (Republic of Ireland 01 230 0233).

Free Helpdesk Service

We have a dedicated team who can provide free advice and assistance with your appliance if you experience any technical difficulties within the first 90 days of ownership. Simply call our Hotpoint Service Hotline on 08448 224 224 (Republic of Ireland 0818 313 413) for telephone assistance, or, where necessary, to arrange for an engineer to call. If we cannot resolve the technical problem we will replace your machine or, if you prefer, give you your money back.

15

195112141.00

02/2013 - Xerox Fabriano

GB

After Sales Service

No one is better placed to care for your Hotpoint appliance during the course of its working life than us - the manufacturer.

Essential Contact Information

Hotpoint Service

We are the largest service team in Europe offering you access to 400 skilled telephone advisors and 1000 fully qualified engineers on call to ensure you receive fast, reliable, local service.

UK: 08448 224 224

Republic of Ireland: 0818 313 413

www.hotpointservice.co.uk

Please note: Our advisors will require the following information:

Model number:

Serial number:

Parts and Accessories

We supply a full range of genuine replacement parts as well as accessory products that protect and hygienically clean your appliance to keep it looking good and functioning efficiently throughout its life.

UK: 08448 225 225

Republic of Ireland: 0818 313 413

www.hotpointservice.co.uk

Appliance Registration

We want to give you additional benefits of Hotpoint ownership. To activate your free 5 year parts guarantee you must register your appliance with us.

UK: 08448 24 24 24

Republic of Ireland: 01 230 0800

www.hotpointservice.co.uk

Indesit Company UK Ltd. Morley Way, Peterborough, PE2 9JB

Indesit Company Unit 49 Airways Industrial Estate,Dublin 17

Recycling & Disposal Information

As part of Hotpoint???s continued commitment to helping the environment, Hotpoint reserves the right to use quality, recycled components to keep down customer costs and minimise material wastage.

Please dispose of packaging and old appliances carefully. To minimise the risk of injury to children, remove the door, plug and cut the mains cable off flush with the appliance. Dispose of these parts separately to ensure that the appliance can no longer be plugged into a mains socket, and the door cannot be locked shut.

16