The machine is noisy.
The machine wont spin properly.
The machine leaks from the dispenser.
The machine leaks (other than dispenser).
The machine is locked and an error code appears on the display (eg F-01, F-..).
The machine smells.
The machine door cannot be opened.
Door Seal damaged at the bottom.
The water level is too low when the machine is washing.
The word ???DEMO ON??? appears in- termittently in the display window and the drum slowly turns.
The machine just ???beeps??? when a programme or option is selected (Child Lock Symbol is lit).
There is too much foam.
After completing the programme, or before starting a programme, the ma- chine has turned itself off (no lights).
General.
???The feet have not been adjusted, enabling the machine to rock.
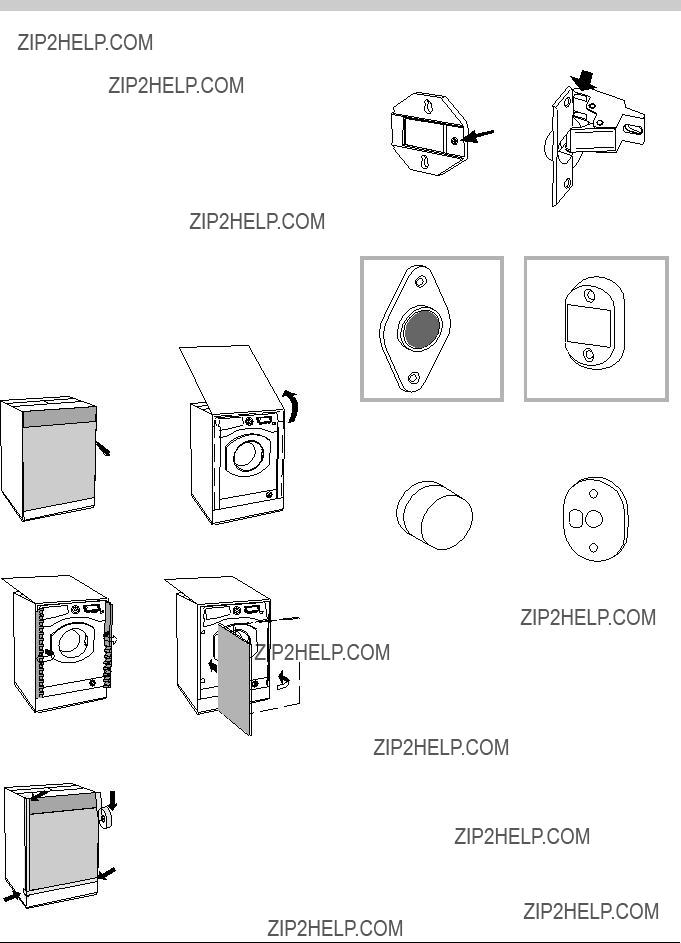
???New Installation - Either the Transit Bolts including the plastic spacers, or the Polystyrene Packaging have not been removed when installing the machine.
???The machine is trapped between cabinets and/or walls.
???The load is in a slight out of balance condition and machine is spinning, but at a lower speed.
???There will always be some motor, pump and drum noise during spin.
???Out of Balance detected when attempting to go into a spin cycle - If this happens the ma- chine will continue to try to repeat the distribution of the load required before the machine will go into higher spin speeds - This will increase the programme time accordingly. This is a safety feature to prevent damage. Out of Balance can be caused by washing a single heavy item (eg duvet, quilt, etc). - Try the programme again using a different load.
???The dispenser drawer is blocked with detergent and requires cleaning.
???The water pressure is too high and requires turning down - turn down the tap on the water supply pipe slightly and try again.
???The machine is tilting forwards - It must be level when in its final position.
???The fill hose is loose, check both the cabinet and tap ends.
???The fill hose is tight but still leaks, if so replace the rubber washers, or the fill hose is missing the rubber washer.
???The drain hose is not fixed in properly.
???Switch off the machine and unplug it, wait for approximately 1 minute and then switch it back on again If the problem persists contact the Technical Assistance Service.
???The machine requires a service wash. Run a 60 degree wash cycle with deter- gent and no laundry.
???The door will not open until the door lock indicator light goes out shortly after the program has finished.
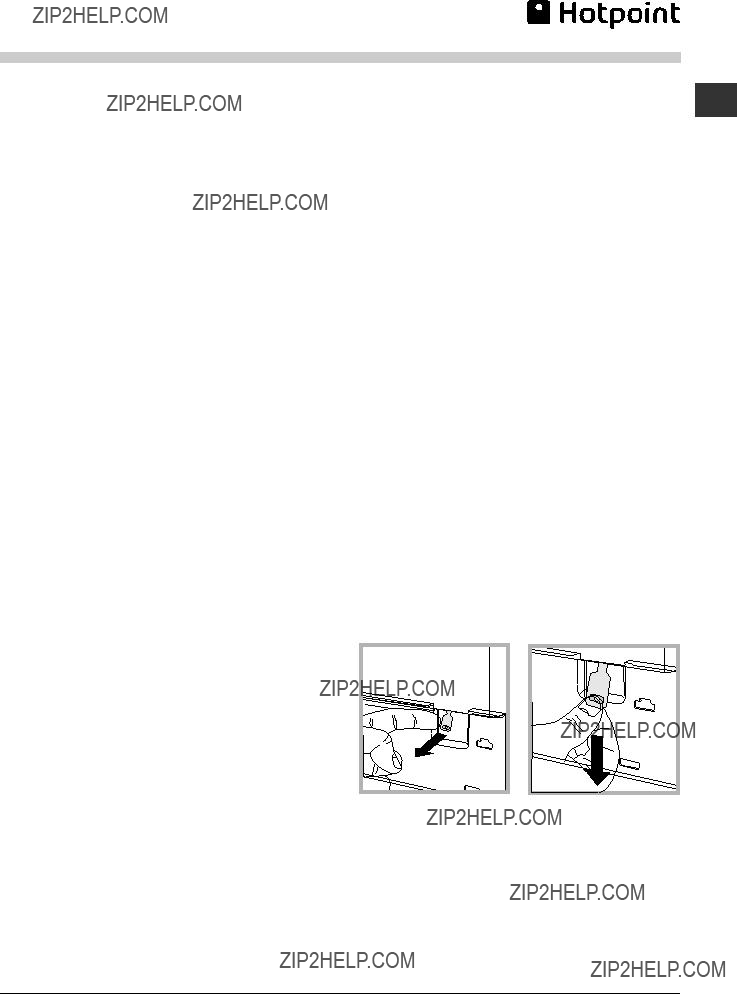
???If there is no power to the machine you need to perform the manual unlocking procedure (see Precautions & Tips).
???The door seal has drainage holes at the bottom - This is normal.
???The water level is correct if it can be seen at the bottom of the door.
???To exit, switch machine off, then press and hold ???ON/OFF??? and ???START/PAUSE??? buttons simultaneously for 3 seconds. Note the machine will need the langua- ge resetting.
???Deactivate the Child Lock feature by pressing and holding in the ???CHILD LOCK??? button for 2 seconds.
???The detergent is not suitable for machine washing (it should display the text ???for washing machines??? or ???hand and machine wash??? or the like).
???Too much detergent was used - less detergent is required in soft water.
???To comply with new energy saving regulations the machine is fitted with an automatic standby system. Press ???ON/OFF??? button for 3 seconds to activate the machine, it can then either be switched off or a new programme selected.
???Your washing machine contains sensors that monitor progress during the wash cycle (eg: Water Levels, Temperatures, Out of Balance loads, Wash time/progress). Normally, if your machine successfully completes the cycle, there is unlikely to be anything wrong!

 3. Remove the 4 pro-

 (60??C).


 : press this briefly to switch the ma- chine on or off. The START/PAUSE indicator light, which flashes slowly in a green colour shows that the machine is switched on. To switch off the washer dryer during the wash cycle, press and hold the button for approximately 2 seconds; if the button is pressed briefly or accidentally the machine will not switch off. If the machine is switched off during a wash cycle, this wash cycle will be cancelled.
 : press to reduce or completely exclude the spin cycle - the value is indicated on the display.
 : press to decrease the tem-
 : to activate the control panel lock, press and hold the button for approximately 2 seconds. When the symbol
  is illuminated, the control panel is locked (apart from the ON/OFF key). This means it is possible to prevent wash cycles from being modified accidentally, especially where there are children in the home. To deactivate the control panel lock, press and hold the button for approximately 2 seconds.
 : press to set a delayed start time for the selected wash cycle. The delay time will be shown on the display.
 : press to set a drying cycle.
 is not illuminated, the door may be opened. To start the wash cycle from the point at which it was interrupted, press the button again.

 button; the text
 Modifying the temperature and/or spin speed.
 button, until the cold wash ???OFF??? setting is reached. The spin speed may be progressively reduced by pressing the
  button, until it is completely excluded (the ???OFF??? setting). If these buttons are pressed again, the maximum values are restored.
 (60??) programme is selected, the temperature can be increased up to a value of 90??C.
 Setting a delayed start.
 symbol lights up on the display. To remove the delayed start function press the button until the text ???OFF??? appears on the display.


 ) in accordance with the type of fabric. The desired drying level or time may also be set using the DRYING button
 will be on). During the wash cycle, the name of the phase in progress will appear on the display. To change a wash cycle while it is in progress, pause the washer dryer using the START/PAUSE button (the START/PAUSE indicator light will flash slowly in an orange colour); then select the desired cycle and press the START/PAUSE button again. To open the door while a cycle is in progress, press the START/PAUSE button; if the DOOR LOCKED
  symbol is switched off the door may be opened. Press the START/PAUSE button again to restart the wash cycle from the point at which it was interrupted.
 symbol switches off the door may be opened. Open the door, unload the laundry and switch off the machine.
 button. The cycle will be stopped and the machine will switch off.
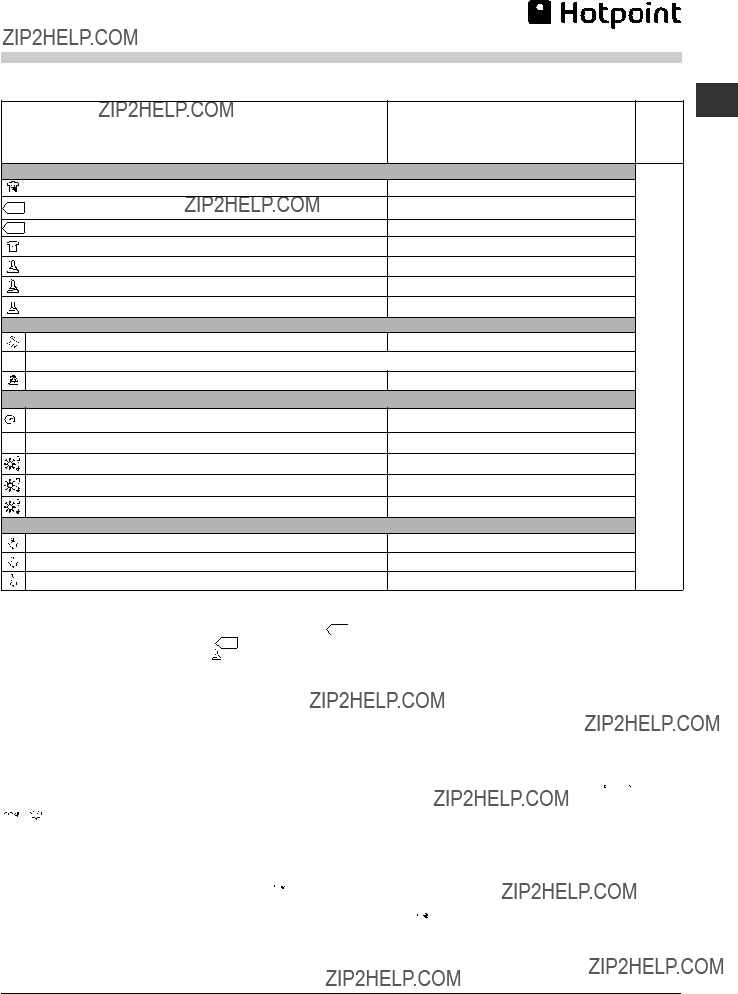

 Fast Wash 30'


 kly (not suitable for wool, silk and clothes which require washing by hand).

 ,
, 
 ,
,  , ???Ready to Wear???,


 ,
,  .
. ,
, 
 ,
, 


 , ???Fast Spin Cottons???, ???Pump out??? and.
 ,
,  ,
, 

 ,
,


 ,
,  . Note: If you also want to run the drying cycle, thi
 ,
,  ,
,  ,
, 
 , ???Spin??? ???Pump out??? and


 .
.
 to wash very delicate garments having strasses or sequins.
 and then option ???Reduced Creases???
  : this programme is suitable to


 Recycling & Disposal Information
