Instructions for Installation and Use
Electric Hood
Model HT9X
Instructions for Installation and Use
Electric Hood
Model HT9X

CONTENTS
CE marking certifies that this appliance conforms to the following EEC directives:-
Retention of this Instruction Book
This Instruction Book must be kept handy for reference as it contains important details on the safe and proper use of the appliance.
If you sell or pass the appliance to someone else, or move house and leave it behind, make sure this Book is also provided so the new owner can become familiar with the appliance and safety warnings.
If the Book is lost or damaged a copy may be obtained from:
GDA LTD., Morley Way, Peterborough, PE2 9JB

RECOMMENDATIONS AND SUGGESTIONS
Using your new Cooker Hood is very simple. Nevertheless, to get the best results it is important that you read this manual thoroughly before installing and using your appliance for the first time.
INSTALLATION
???All installation and repairs should be carried out by a qualified technician in accordance to regulations in force.
???The manufacturer will not be held liable for any damage resulting
from incorrect or improper installation.
??? After having removed the packaging, check the condition of the appliance, if in any doubt, do not use and contact Hotpoint Service (see Key Contacts, back page).
???The minimum safety distance between the hob and the extractor hood is 600 mm.
???Check that the mains voltage corresponds to that indicated on the rating plate fixed to the inside of the hood.
??? For Class I appliances, check that the domestic power supply guarantees adequate earthing.
???Connect the extractor to the exhaust flue through a pipe of minimum diameter 120 mm. The route of the flue must be as short as possible.
???Do not connect the extractor hood to exhaust ducts carrying combustion fumes (boilers, fireplaces, etc.).
???If the extractor is used in conjunction with
(e.g. gas burning appliances), a sufficient degree of ventilation must be guaranteed in the room in order to prevent the backflow of exhaust gas. The kitchen must have a suitable vent to the outside of the building, so that clear fresh air can circulate through the kitchen.
600mm min.
USE
???The extractor hood has been designed exclusively for domestic use to eliminate kitchen smells.
???Never use the hood for purposes other than for which it has ben designed.
???Never leave high naked flames under the hood when it is in operation.
???Adjust the flame intensity to direct it onto the bottom of the pan
only, making sure that it does not engulf the sides.
??? Deep fat fryers must be continuously monitored during use: overheated oil can burst into flames.
??? When frying, never leave the pan unattended.
???The hood should not be used by children or persons not instructed in its correct use.
MAINTENANCE
???Switch off and unplug the appliance from the mains supply before carrying out any cleaning or maintenance work.
???Clean regularly (see Care and Cleaning section), build up of dirt and grease could cause a fire hazard.
INSTALLATION
12
 7
7


10  11
11
14
 11 14
11 14
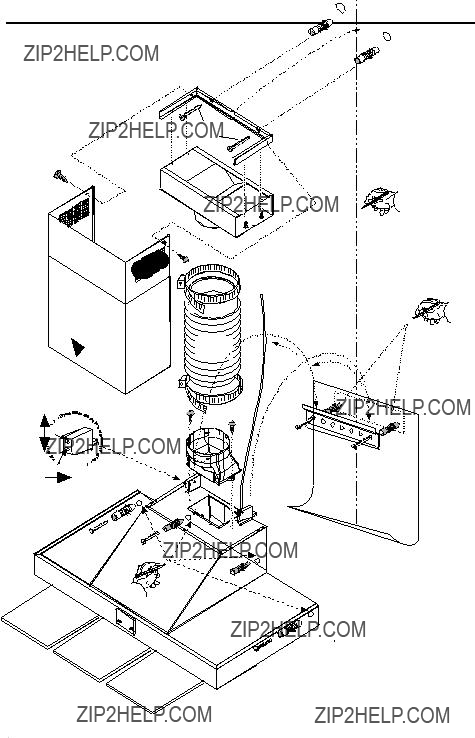
Fig.1A

INSTALLATION
Consult Fig.1A on page 4 of this manual, referenced in the text by alphabet letters. Closely follow the instructions set out in this manual. All liability, for any inconvenience, damage or fires caused by not complying with the
instructions in this manual, is declined.
The cooker hood must be placed at a minimum distance of 60 cm from the hob top for electric cookers and 75cm for gas or mixed cookers.
The hood is equipped with a top air outlet B for discharge of fumes to the outside (Ducting version ??? exhaust pipe and pipe fixing clamps not provided).
Should it not be possible to discharge cooking fumes and vapour to the outside, the hood can be used in the filter version, fitting an activated carbon filter and the deflector F
onto the support (bracket) G. Fumes and vapours are recycled through the top grille H by means of an exhaust pipe connected to the top air outlet B and the connection ring mounted on the deflector F (exhaust pipe and pipe fixing clamps not provided).
The models with no extraction motor only operate in ducting mode, and must be connected to an external extraction device (not supplied).
Preliminary information for installation of the hood:
Disconnect the hood during electrical connection, by turning the home mains switch off.
First decide which functioning version is better for you.
-Using a pencil, draw a line on the wall, extending up to the ceiling, to mark the centre. This will facilitate installation.
-Rest the drilling template against the wall: the vertical centre line printed on the drilling template must
-Adjust the horizontal position of the hood.
-From inside the extraction unit, use a pencil to mark the hole (4 holes) to be used for final fixing of the hood.
Remove the hood from the bracket. Drill at the points marked (2 x ??8mm).
-Insert 4 wall plugs.
-Rest the chimney support bracket G against the wall, touching the ceiling. Use the support bracket as a
-Apply the chimney stacks and fasten them at the top to the chimney support G using 2 screws.
-Slide the bottom section of the chimney down until it completely covers the suction unit and slots into the
housing provided on top of the hood.
Refit the grease filter/s and check that the hood is operating correctly.
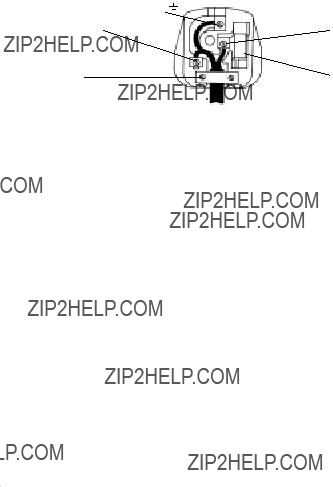
Electrical Connection
WARNING: This appliance MUST be earthed. Connect to a 230 - 240V A.C. Supply only.
???Connection to the electricity supply should be made via a properly earthed, readily accessible wall socket which is adjacent to and not more than 1.25m away from the appliance and capable of electrical isolation.
Should this plug not fit the socket outlet in your home it should be cut off and replaced with a suitable plug as outlined below.
Note: The removed plug cannot be used for any other appliance and should therefore be properly disposed of and not left where children might find it and plug it into a supply socket - with the obvious consequent danger.
IF THE FITTED PLUG IS REMOVED
The flexible mains lead must be correctly connected as below, to a three pin plug of not less than 13 amp capacity. If a B.S.1363 fused plug is used, it must be fitted with a 3amp fuse which is approved to B.S.1362.
IMPORTANT: The wires in the mains lead fitted to this appliance are coloured in accordance with the following code:
GREEN and YELLOW - EARTH
As the colours of the wires in the mains lead of this appliance may not correspond with the coloured markings identifying the terminals in your plug, proceed as follows:- The wire which is green and yellow must be connected to the terminal in the plug which is marked with the letter E or by the earth symbol or coloured green or green and yellow. The wire which is coloured blue must be connected to the terminal which is marked with the N or coloured black. The wire which is coloured brown must be connected to the terminal which is marked with the letter L or coloured red. When wiring the plug, ensure that all strands of wire are securely retained in each terminal. Do not forget to tighten the mains lead clamp on the plug. As the appliance must be earthed, DO NOT use
Should the mains lead ever require replacement, it is essential that this operation be carried out by a qualified electrician and should only be replaced with a flexible cord of the same size ie. 0.75mm2 cross sectional area and temperature rating of 85??C eg. heat resisting PVC.
IF A MOULDED PLUG IS FITTED
In the event of replacing a fuse in the plug supplied a 3amp ASTA approved fuse to B.S.1362 must be fitted.
Note: The fuse cover must be refitted when changing the fuse. In the event of losing the fuse cover the plug must not be used until a replacement fuse cover has been obtained and fitted. A new fuse cover can be obtained from your local Electrical Retailer. The colour of the correct replacement fuse cover is that of the coloured marks or inserts in the base of the plug.

f1
Fig. 2

a
Fig. 4
Fig. 3


GETTING TO KNOW YOUR COOKER HOOD
The Controls
WARNING: Children should not be allowed to play with the appliance or tamper with the controls.
1Control Panel
2Grease Filters
3Grease Filter Release Handle
4Light (Halogen)
5Vapour Screen
6Telescopic Chimney
7Air Outlet (used for Filter version only)

CARE AND CLEANING
Before you clean your Cooker Hood to disconnect it from the electricity
or carry out any maintenance, switch off and remove the plug from the socket supply.
Grease Filters (see Fig.2)
These must be cleaned once a month using non aggressive detergents, either by hand or in the
Carbon Filters (see Figs.2 and 3)
It absorbs unpleasant odours caused by cooking.
The active carbon filter must NEVER be washed.
The active carbon filter should be changed every 4 months in normal use.
Replacement bulbs are available from Hotpoint Genuine Parts and Accessories (see Key Contacts, back page). Only use halogen bulbs of 20W max (G4), making sure you do not touch them with your hands.
Access the light compartment: extract the guard by levering it off with a small screwdriver or similar tool (fig. 4). Make sure that the lamps have cooled before replacing them.
Replace the burnt out light bulb.
Close the lamp cover (it will snap shut).
Cleaning
???Clean regularly, with a sponge soaked in warm water and a sodium bicarbonate solution, which is among other things a good disinfectant. If you do not have any, you can use a neutral soap.
???DO NOT use abrasive detergents, bleach or detergents using ammonia. NEVER use solvent based products.
WARNING:

After Sales Service
"No company is better positioned to offer an after sales service on a Hotpoint appliance than us - the manufacturer"
As part of our commitment to you, all Hotpoint appliances have the added benefit of a fully inclusive parts and labour guarantee for the first 12 months. In addition to this you also have the advantage of free replacement parts for the first 5 years when fitted by a Hotpoint
engineer. When the 12 months parts and labour guarantee expires we offer the following after sales service options:
Repair Service and Information Help Desk
UK: 08709 066066 www.theservicecentre.co.uk Republic of Ireland: 1850 302 200
Note: Our operators will require the Model number and the Serial number of your appliance
Available 364 days a year with a fast, effective and value for money service. We have the largest white goods repair service in the UK with over 1200 of our own fully trained engineers. All repairs include a parts and labour guarantee for 12 months from the date of the repair.
If you require any information or have any questions about your appliance, our operators are on hand with help and advice.
All this ensures that you will receive the best available after sales service possible.
Extended Warranties
UK: 08709 088 088 www.theservicecentre.co.uk Republic of Ireland: 1850 502 200
Whether you have just one or a number of Hotpoint appliances in your kitchen, we offer two service
8 years old.
Genuine Parts and Accessories
UK: 08709 077 077 www.theservicecentre.co.uk Republic of Ireland: (01) 842 6836
A wide range of genuine parts and accessories are available from our hotline or through our website.
Genuine parts and accessories, extended warranties and service repairs are all available on our
www.theservicecentre.co.uk
Guarantee
"Satisfaction guaranteed or your money back"
We give you a unique 'satisfaction guaranteed' promisevalid- for 90 days - after you have purchased your Hotpoint appliance. If there is a technical problem simply call Hotpoint Repair service or visit our
All Hotpoint appliances carry a fully inclusive 12 month parts and labour guarantee as well as free replacement parts for the first 5 years (except microwaves, selected integrated appliances and cooker hoods, which have a one year guarantee) provided that they are fitted by a Hotpoint engineer.
Guarantee terms and conditions
Your guarantee is only applicable in the United Kingdom or Republic of Ireland and is subject to the following provisions that your appliance:
???Has been installed and used correctly in accordance with this instruction booklet.
???Has been used solely for domestic purposes and is located on domestic premises (ie. not for commercial or trade use).
???Has been properly connected to a suitable electrical supply voltage as stated on the appliance rating plate.
???Has not been subject to misuse, accident, modified or repaired by anyone other than one of our own service engineers.
For pre purchase information on any other Hotpoint product call: 08701 50 60 70 or visit: www.hotpoint.co.uk
Recycling & Disposal Information
As part of Hotpoint's continued commitment to helping the environment, Hotpoint reserves the right to use quality recycled components to keep down customer costs and minimise material wastage.
Please dispose of packaging and old appliances carefully.
To minimise risk of injury to children, remove the plug and cut mains cable off flush with the appliance. Dispose of these parts separately to ensure that the appliance can no longer be plugged into a mains socket.

Key Contacts
After Sales Service
Over 1200 trained specialists, directly employed by us, ensure that you can have complete confidence in both the appliances and services we offer.
Repair Service and Information Desk
UK: 08709 066 066
(Open 8 to 8 Mon - Fri, 8 to 6 Sat, 10 to 4 Sun & Bank Holidays) www.theservicecentre.co.uk
Republic of Ireland: 1850 302 200
Note: Our operators will require the following information:
Model number:
Serial number:
Extended Warranties
UK: 08709 088 088 (Open 8 to 8 Mon - Sun) www.theservicecentre.co.uk Republic of Ireland: 1850 502 200
Genuine Parts and Accessories
UK: 08709 077 077
(Open
Republic of Ireland: (01) 842 6836
General Domestic Appliances Limited, Morley Way, Peterborough, PE2 9JB.