Instructions for Installation and Use
Dishwasher
Model BFI62
Instructions for Installation and Use
Dishwasher
Model BFI62

D ISHWASHER
Contents
Retention of this Instruction Book
This Instruction Book must be kept handy for reference as it contains important details on the safe and proper use of the appliance.
If you sell or pass the appliance to someone else, or move house and leave it behind, make sure this Book is also provided so the new owner can become familiar with the appliance and safety warnings.
If the Book is lost or damaged a copy may be obtained from:
GDA LTD., Morley Way, Peterborough, PE2 9JB
2

D ISHWASHER
Electrical Connection
WARNING:Thisappliancemustbeearthed.
Fuses
Your appliance comes fitted with a plug and a 13A fuse. If you need to replace the fuse, only those rated at 13A and ASTA approved to BS1362 should be used. If you lose the fuse cover, a replacement may be obtained from your local authorised Service Centre or Electrical company. Correct replacement is identified by colour coding or the marking on base of plug.
WARNING: DO NOT use the plug unless the fuse cover is fitted.
Safety Information
At the time of delivery...
All functions of your dishwasher have been thoroughly tested at the factory. A small number of water marks may have been left as a result, they will disappear when the appliance is used for the first time.
WARNING: The dishwasher must not be connected to the electricity supply while installation is being carried out.
Changing the Plug
Cut off and dispose of the supplied plug if it does not fit your socket.
WARNING: To avoid a shock hazard DO NOT insert the discarded plug into a socket anywhere else.
IMPORTANT: WIRES IN THE MAINS LEAD ARE COLOURED IN
ACCORDANCEWITH THE FOLLOWING CODE:
If you change the plug, the colour of the wires in the mains lead may not correspond with the terminal markings in the plug, which if not coloured, could be:
Changing the Mains Lead
A lead can be ordered from Hotpoint Service UK: 08709 066 066 or
Republic of Ireland: 1850 302 220
If you have damaged the existing lead or require a longer one a charge will be made. It is strongly advised that this work is carried out by a qualified electrician.
If the domestic wiring includes a residual
-This appliance should only be connected to a 230/240V AC source, via a properly installed earthed socket.
-Use the dishwasher solely in a domestic environment.
-DO NOT stand or place heavy objects on the door when it is open, this could damage the door or cause the appliance to tip forward.
If your family includes children...
-DO NOT allow children to play with the appliance or tamper with its controls.
-Keep detergents and rinse aids away from children. Keep children away from the open door of a dishwasher, there could still be some detergent left inside.
CAUTION:
The dishwasher meets the requirements set out by the regulations in force concerning safety and electrical equipment.
Any technical checks should be conducted exclusively by a trained and authorised technician: Repairs carried out by unaithorised persons will invalidate the guarantee, as well as posing a potential hazard to the user.
The manufacturer declines all responsibility for damage to persons or property resulting from failure to observe the above precautions, from tampering with even a single component or from the use of non- original spare parts.
3

D ISHWASHER
For your Safety
Thismanualformsanintegralpartoftheappliance.Itmustalwaysbekepthandyforreference.Readthroughalltheinstructionscontainedinthismanual beforeusingthedishwasher.
Installation must be performed by a qualified technician, in compliance with the regulations in force, including the prevention and elimination of radio frequency interference.
The dishwasher is designed for washing and drying dishes, any other use shall be considered improper. The manufacturer declines all responsibility for uses other than those described above.
1.Seperate the various packaging materials and dispose of safely - DO NOT leave discarded packaging materialaroundthehome.
2.Afterremovingthepackaging, check to make sure your appliance is intact. If in doubt, contact a qualified professional.
3.DONOTuse extensionleads and multiple plugs. If the electricity supply wire is not long enough, then have it replacedwithoneofthecorrect length and remember that it should be free of bends or dangerouskinks.
4.In the event of any damage to the power cord have it replaced by a qualified technician.
5.Themainsplugmustbeeasily accessibleafterinstallation.
6.Iftheapplianceisnotoperating properly or if maintenance operations are necessary, disconnect the dishwasher from the mains power supply (unplugit!).
7.DO NOT install outdoors, not even if the area is covered by a roof: it is extremely dangeroustoleaveitexposed torainandthunderstorms.
8.If installed on a carpeted or covered floor, ensure that the openingsontheundersideare not obstructed.
9.Do not touch the heating elementduringorstraightafter a wash cycle.
10.Iftheappliancemalfunctions, turn off the water inlet tap and disconnecttheplugfromthe wall socket. Then read the sectionentitled "Troubleshooting".Ifyou cannotresolvetheproblem, thencallHotpointService (seeKEYCONTACTS,back page).
Theratingplate,featuringthe technicaldata,serialnumber andmarkings,isvisibly positionedontheinneredgeof thedoor.
DONOTremovetheratingplate.
The dishwasher is intended for use by adults. DO NOT allow children to come near or play with the controls.
Keep children away from detergents and clear of the dishwasher door whenopen.
Keep all packaging material away from children.
1.DO NOT use solvents, such as alcohol or turpentine which may causeanexplosion.
2.DO NOT load dishes to wash that are soiled with ash, wax or paints.
3.DO NOT lean, sit or stand on any part of the dishwasher - this could causeinjuryand/ordamagetheappliance.
4.DO NOT drink any water residues from inside the dishwasher.
4
Installation
D ISHWASHER
Choose where you want to install your dishwasher, you can place it so that its sides or back panel are side by side with furniture or up againstthewall.Thedishwasheris providedwithwatersupplyanddrain hoses, which can be directed towards the left or right to facilitate appropriateinstallation.
Levelling.
Once the appliance is positioned, adjust the feet by screwing them in or out depending on how high you want it and to level it so that it is horizontal. Make sure that it is not inclinedmorethan2degrees.Ifthe applianceislevel,itwill helpensure itscorrect operation.
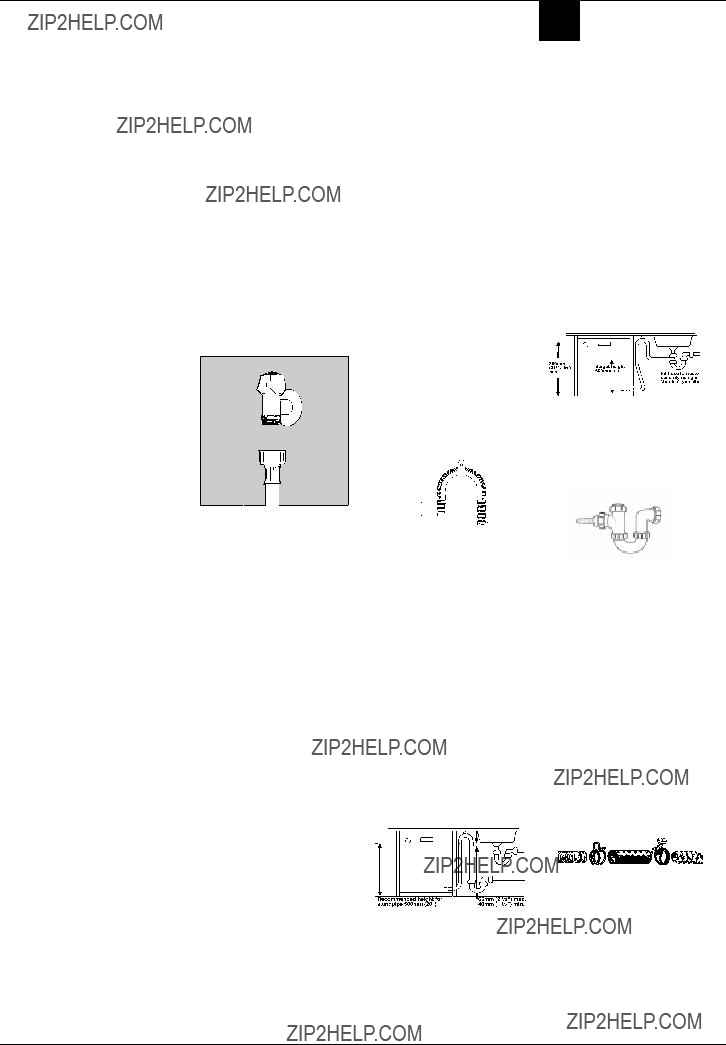
Cold water connection.
Connect the cold water supply hose, inserting the small filter supplied with the dishwasher and makingsurethatitisfastenedtightly in place (see figure 2). If the water hoses are new or have been out of use for an extended period of time, let the water run to make sure it is clear and free of impurities before making the connection. If this precaution is not taken, the water inlet could get blocked, causing damagetoyourdishwasher.
Drain hose connection.
WARNING: Connect your dishwasher drain hose to pipes which connect to the foul drain system and not to surface water drains.
IMPORTANT: For the correct operation of your dishwasher, it is essentialtocomplywiththefollowing information:-
Standpipe:
Ensurethatthehoseisnotpushed toofardownthestandpipe.
Iftheendofyourdrainhoseisfitted with???retainingflaps???,ensuretheyare insertedfullyintothestandpipe. This will prevent the pipe from jumping out during installation and use.
SinkWasteSystem:
Forundersinkdrainage:
Before connecting the drain hose, remove any internal restrictions - Thiswillpreventabuildupofdebris whichcouldcauseablockage.
Remove any restrictions from the waste spigot and ensure that the sealingbungisremoved.Thehose should be routed, such that it is raised to a minimum height of 800mm(31/2???).
Height Adjustment
Insert the appliance into the cutout andthenadjusttheheightusingthe screws located on the front bottom part of the machine. Use a screwdriver to turn the screws in the clockwise or

 A
A
Fig.2
DO NOT position the standpipe near an electrical outlet. ENSUREthatthedrainhoseisnot kinked and it is routed as shown in thediagram.
The standpipe should have a bore of at least 38mm (11/2???). It should be installed as shown, have a trap fitted and must discharge into the same drain system as your householdsink.
It MUST NOT be connected to a surface water drain.
NOTE: Ensure the sink outlet pipe has a minimum diamtere of 32mm.
1.Untie the end of the GREY drainage hose from the rear of the appliance.
2.Reposition the ???Hooked End Support??? as required along the GREY drainage hose.
3.If fitting an under sink waste disposal unit, cut out the membrane, bung or blanking plug.
4.Attach the GREY drainage hose to the under sink waste disposal unit securely, using the clip and rubber tube supplied.
Ensure the drain hose is securely attached, to prevent it coming away while the machine is in use and causing a flood.
5
D ISHWASHER
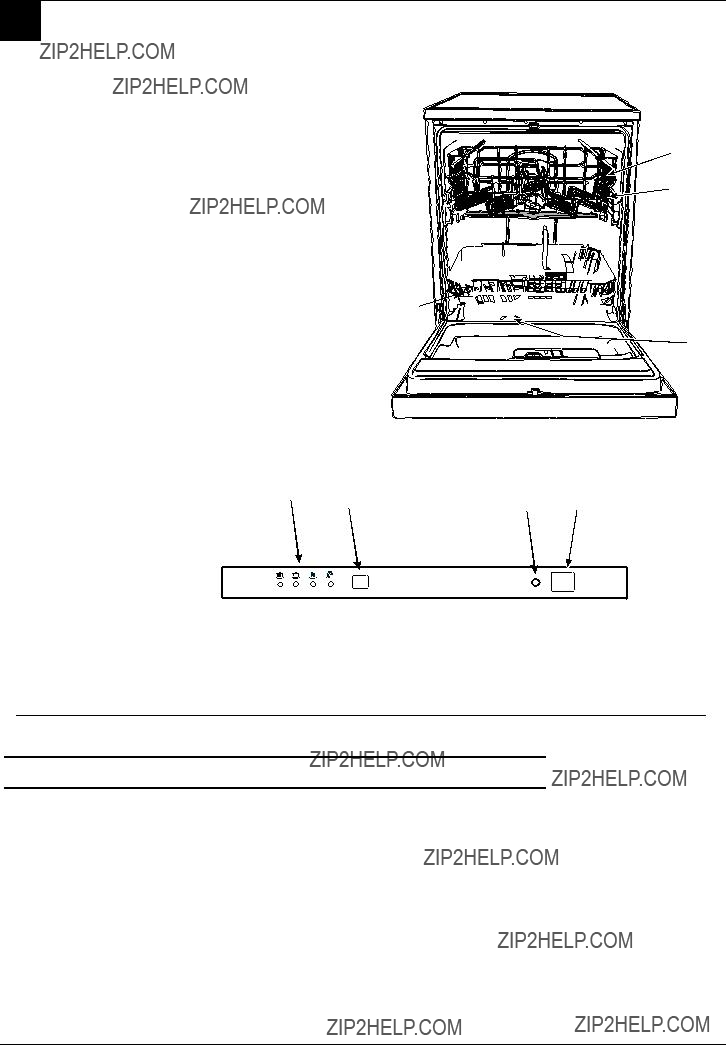
Getting to know your Dishwasher
E. Upperbasket
F. Top spray arm
G. Basket height adjuster
H. Lowerbasket
I. Bottom spray arm
J. Salt container cap
K. Washingfilter
L. Detergent and rinse aid dispenser
E
G
 F
F

 H
H
J  I
I
L 
K
The Controls
A.
Press this button to switch the appliance on.
B.
This light informs you that the dishwasher is on.
P. Wash Programme Selector
Each time this button is pressed, one of the cycle indicator lights ???M??? will come on in sequence.
M.Cycle indicator light
This light shows you which cycle you have selected or the one in progress.
M
PB A
Technical Characteristics
Technical characteristics
Thisdishwasherconformstothe followingEuropeanCommunity Directives:
???73/23/EECof19/02/73(Low Voltage)andsubsequent modifications;
???89/336/EECof03/05/89 (Electromagnetic Compatibility)andsubsequent modifications;
???97/17/CE
(Labelling)
6

D ISHWASHER
How to use your Dishwasher
First of all.
-Turn on the water supply tap completely.
-Add the correct amount of detergent.
-Load the baskets correctly.
-Check that the spray arms rotate freely.
-Close the door securely.
-Press the
Select the wash cycle.
Select the wash cycle by pressing button "P". Each time this button is pressed, one of the indicator lights ???M???willcomeoninsequence.Select thewashcyclemostsuitableforthe type of dishes to wash (see ???Pro- gramme Chart???).
Closethedoorandafterafewsec- onds,youwillhearashortbeep:the wash cycle has started.
Modifying a wash cycle in progress.
Ifyouhavechosenthewrongcycle - You can modify the wash cycle in progress, if it has only just started. Open the door carefully, to avoid anyhotwatersplashes.Thenkeep button "P" pressed in fro approxi- mately 5 seconds, until you hear 3 shortbeeps.
Indicatorlight"M"willgoouttoshow all the settings will have been can- celled. You are now free to
You've left out a dish?
Interruptthewashcyclebyopening the door, carefully, then insert the dishyouhadforgotten.
When you shut the door the cycle will start up from where you inter- ruptedit.
Cycle end
The end of the wash cycle is indi- cated by 2 short beeps and the flashing ofthewashcycleindicator light???M???.
Openthedishwasherdoor.
Turn the appliance off by pressing
Turn off the water tap.
Wait a few minutes before unload- ing the dishes: they are very hot! If youwaitalittlewhile,theydrybetter due to the steam.
Empty the lower basket first.
There's been a power failure or you opened the dishwasher door
The wash cycle stops and then restartswhentheelectricitycomes backonorwhenyouclosethedoor.
7

D ISHWASHER
Programme Chart
Select the most suitable programme for the type of dishes and how dirty they are. To select the wash programme see the chart below:
To optimise wash performance and save on energy, try yo use the dishwasher with a full wash load. If it takes some time to fill your dishwasher, use the soak cycle to avoid caked on food and build up of bad odours.
8
D ISHWASHER
Before Using your Dishwasher
Adjusting the water softener.
Your dishwasher can adjust its salt consumptionaccordingtothehard- ness of the water in your home. This way, you can optimise and customise your dishwasher's salt consumption.
To adjust salt consumption, do as follows:
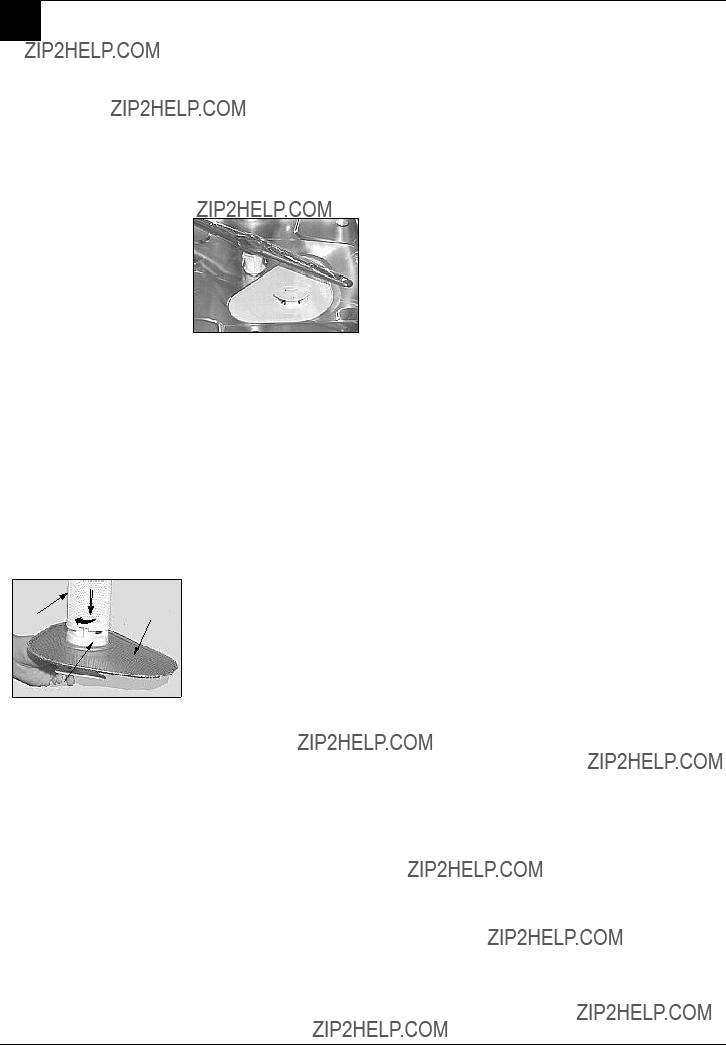
1.Unscrew the salt container cap
2.There is an arrow on the neck of the container (see figure): if necessary, turn the arrow anti-
clockwise from the
Select the arrow position depending on the water hardness, referring to the table.
You don't know how hard the water in your home is? Ask the company that supplies water in your area.
Salt
Always use salt which is intended for dishwasher use.
The salt container is situated underneath the lower basket, fill it upasfollows:
1.Pull out the lower basket completely, unscrew and removethecontainercap
2.If it is the first time you add the salt,firstfillthecontainerupwith water (you won't have to do this againnexttime)
3.Putthedishwasherfunnelonthe hole and pour in approximately two kilos of salt. It is normal that some water comes out of the container.
4.Screw the cap back in place carefully.
This green device is located at the centreofthecapforthedecalcifica- tioncartridgeanditindicateswhether thecontainerisfull.
When the indicator is not visible it means that you need to add salt.
9
D ISHWASHER
Before Using your Dishwasher
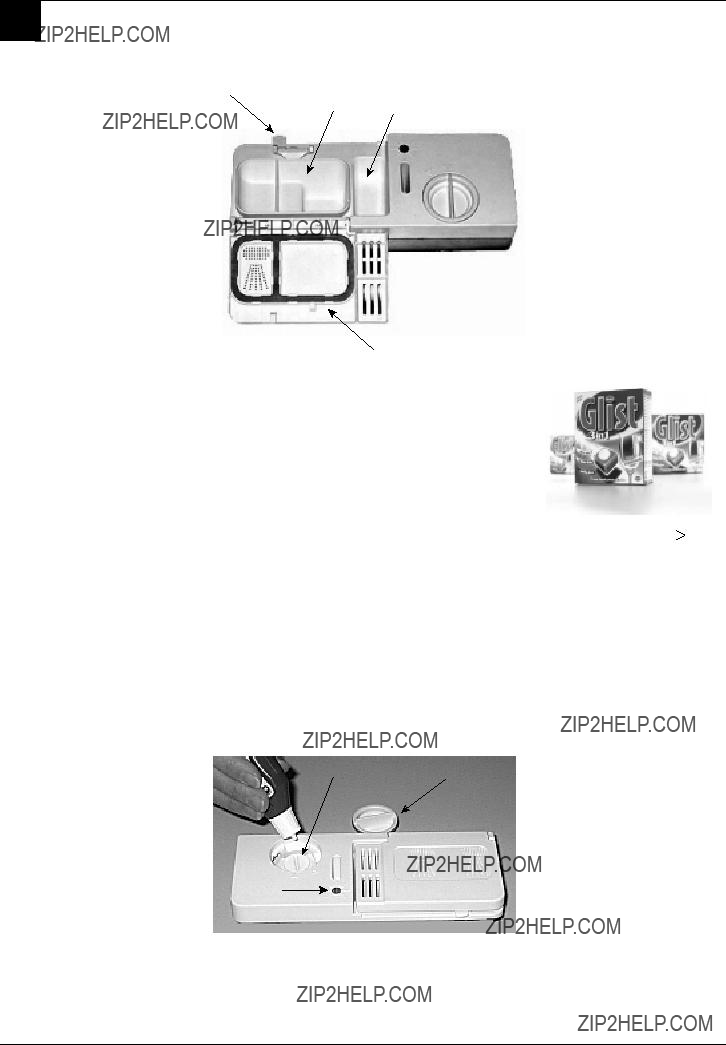
B
The detergent
Adding detergent
To open lid A, press button B. Thedetergentshouldbeputintothe twocontainersCandD.
If using a tablet, put it in container "D".
Now you can close the lid: press it down until you hear it click.
If it won't close
Check whether there is any detergent residue on the edges of thedispenser.Removetheexcess.
D C
???Use the right amount of detergent (see programme chart).
???Storeyourdetergentandrinse aid in a cool, dry place, safely away from children.
A
We recommend Glist 3 in 1 for use in all Hotpoint dishwashers...
Brilliant cleaning is guaranteed with Glist 3 in 1.
Hotpoint only recommends Glist 3 in 1 Dishwasher tablets to give outstanding cleaning and care.
It is important to use detergent specially designed for domestic dishwashers. (Always follow the manufacturersinstructions.)
Glist 3 in 1 advanced dishwasher tablets with active enzymes are the ideal way to protect and care for yourdishwasher,whilegettingyourdishesandglassessparkingclean.
Softer Water:
Built in salt action softens water, helping to prevent the build up of limescale in the dishwasher and improvethecleaningresult*.
CleanerDishes:
With unique active enzymes in the cleaning phase Glist 3 in 1 breaks down even the hard to shift foodstuffs and grease, leaving the dishes spotless and the dishwasher clean too.
Sparkling Results:
The
If you have any questions regardingGlist 3 in 1, please contact the hotline on 0800 216 730.
*If you live in an area particularly prone to very hard water ( 35?? f) Glist and Hotpoint recommend that you continue to keep your dishwasher salt topped up.
Rinse aid.
Rinse aid makes dishes sparkle moreasitimprovestheirdrying.The rinseaidcontainerissituatedonthe inside of the appliance door, you shouldrefillitwhenlight ???D???indicates that it is empty.
(If your dishwasher is fitted with a ???low rinse aid??? indicator light, fill the containerupwhentheindicatorlight flashes or lights up).
Adding rinse aid.
To open the dispenser, turn cap C anticlockwise.Takecarewhenyou pour in the rinse aid to avoid it overflowing. You can regulate the amount of rinse aid used by the dishwasher, move the adjuster F whichyouwillfindunderlidC.
FC
D
You can choose from six different positions.
It is normally set to 4.
-The amount of rinse aid needs to be increased if the dishes appear dull or you can see circular stains.
-The amount of rinse aid needs to be reduced if the dishes are sticky or you can see white streaks.
10
D ISHWASHER
Loading your Dishwasher
First of all.
Beforeplacingdishesinthebaskets, removeallcoursefoodremains.This avoids blocking the filter, which would reduce the efficiency of the wash.
If saucepans and frying pans are verydirty,allowthemtosoakbefore beingwashed.
Tomakeiteasiertoloadyourdishes, pull the baskets out.
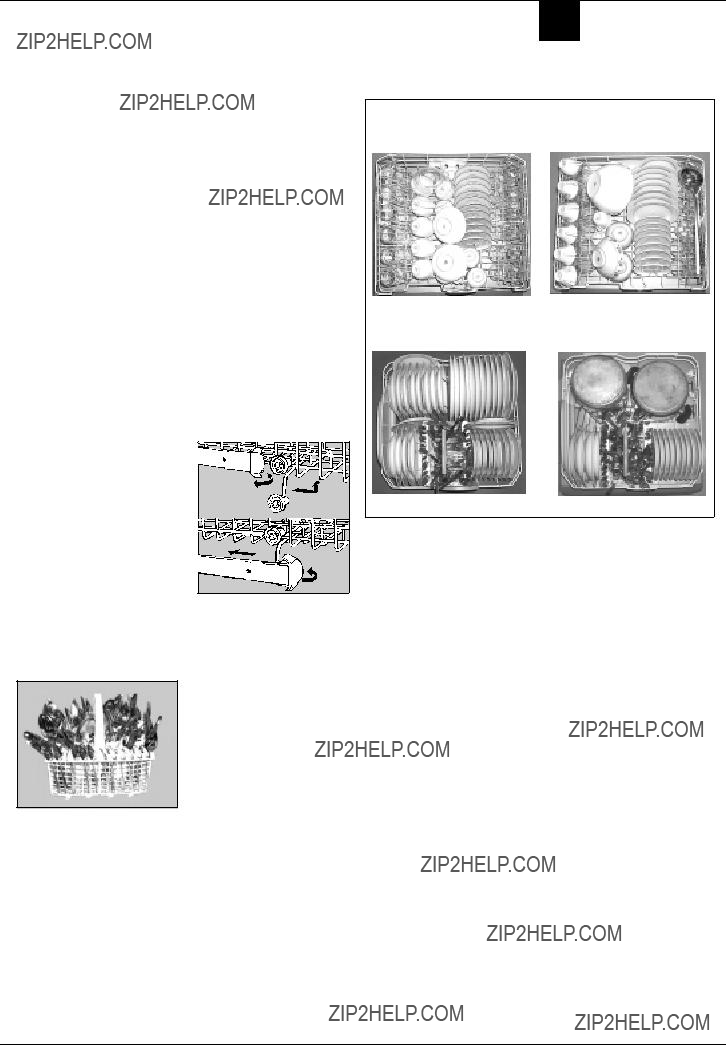
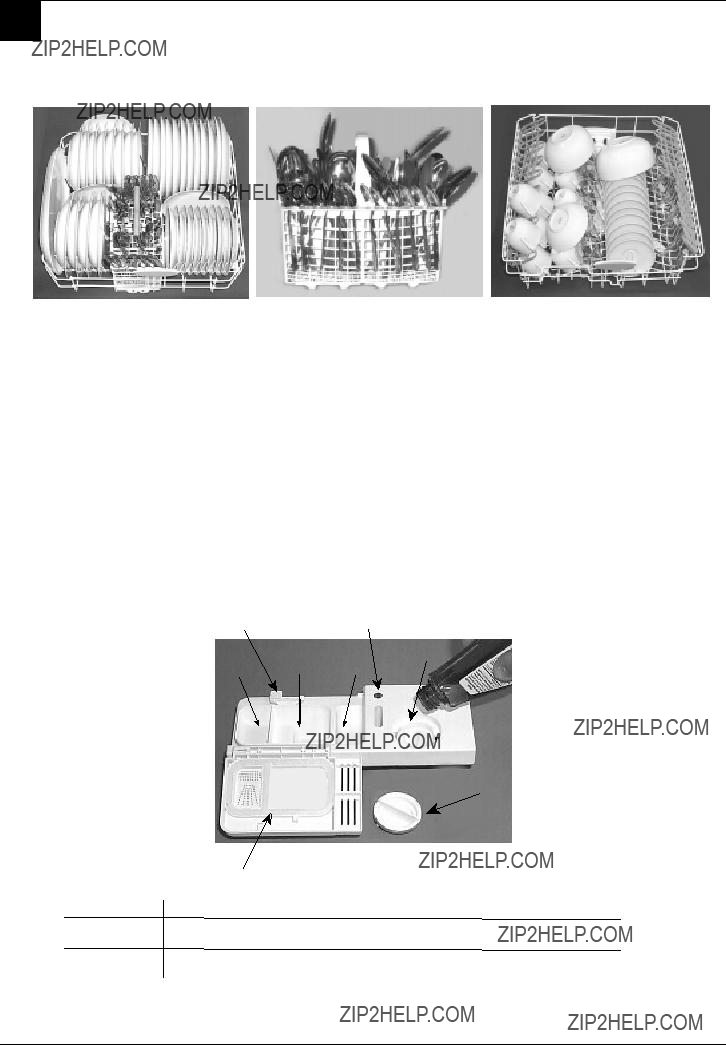
What goes into the lower basket?
Werecommendyouplacethemost difficultdishestowashintothelower basket: saucepans, lids, soup dishes and plates (a load example isshowninthephoto).
???Servingdishesandlargelids: place them on the sides of the basket.
???Saucepans,saladbowls: must alwaysbeplacedupsidedown
???Very deep dishes: placethem obliquely,thusallowingwaterto run down them and cleaning thembetter
Placethecutlerywiththehandlesat the bottom; if the basket is the one withsideinserts,theninsertthetea spoons one by one into the slots.
Itisbestifyouplacelongerutensils horizontallyatthefrontoftheupper basket.
Afterloadingthedishes,remember to check that the spray arms can
turnfreelywithouthittingagainstany upperbasket dishes.
What goes into the upper basket?
Placedelicateandlightweightdishes in the upper basket: glasses, tea cupsandcoffeecups,saucersand
lowerbasket
How to adjust the upper basket.
Theupperbasketcanbesetinhigh or low position to enable you to organise your dishes effortlessly.
Open the rail stop flaps and pull the basket out completely. Now place it in high or low position, then slide it along the guide rails until the front wheels also go in. Now close the rail stop flaps. Follow the sequence of actions illustrated in figure "F".
Load examples
upperbasket
lowerbasket
What can I Wash Items not suitable for the dishwasher:
???
???Avoidwashinghornhandledandbronzecutleryinthemachine.
???Delicate/decorative glassware and vases, special antique or irreplaceable china - the decorative patterns printedontheseitemswillnotbedishwasherproof.
???Plastic objects that are not resistant to hot water.
???CopperandPewterutensils.AluminiumandSliverobjects.
???Some types of glass can become opaque in appearance after they have been washed too many times in a dishwasher.
???Highly absorbent materials such as sponges and towelsshould never be placed in a dishwasher.
???If in any doubt, check with the manufacturer on items suitability for dishwasher???s.
WARNING:Dishesorcutlerysoiledwithtobaccoash,wax,lubricatinggreaseorpaintshouldnotbeput
in the dishwasher.
11
D ISHWASHER
Care and Cleaning
Unplug the appliance.
Beforecarryingoutanycleaningor maintenance on the dishwasher, always remove the plug from the electricitysocket.
After every wash.
Whenthewashcyclehasended, always remember to turn off the water supply tap and to leave the appliance door ajar. This way, moistureandbadodourswillnotbe trappedinside.
Thefilterassembly
???Ifyouwantconsistentgoodresults fromyourdishwasher,youneedto cleanthefilterassembly.
???Removethelargerfoodparticles trappedinsidethecup???C???andthe
???Theentirefilterassemblyshould becleanedthoroughlyonceamonth: cup C +
For cleaning, use a non metallic brush.
C
Reassemble the filter parts (as showninthefigure)andreinsertthe whole assembly into the dishwasher. Position it into its housingandpressdownwards.
Thedishwasherisnottobeused withoutfilters.Improperreplacement of the filters may reduce the efficiency of the wash and even damageyourdishwasher.
Cleaning the spray arms.
Food residue may become encrustedontothesprayarmsand blocktheholeswherewatercomes out.Checkthesprayarmsregularly andcleanthemonceinawhile.
Cleaning the Water Inlet
Filter
Periodicallycleanthewaterinletfilter (see figure 2 under "Installation") located on the outlet of the water supplytap.Afterturningoffthewater tap,unscrewtheendofthewater supplyhose,removethefilterand cleanitcarefullyunderrunningwater. Then,returnthefiltertoitsplaceand tightenthewatersupplyhoseback intoposition.
Theseals.
One of the factors that cause unpleasantodourstoforminsidethe dishwasher is food that remains trapped in the seals. Periodic cleaningusingadampspongewill preventthisfromoccurring.
DONOTusesolventsorabrasives tocleantheexteriorandrubberparts of your appliance, do not use solvents or abrasive cleaning products. Use a cloth dampened withlukewarmsoapywateronly.
Ifthereareanystainsonthesurface oftheapplianceinterior,useacloth dampened with water and a little whitevinegar,oracleaningproduct specificallymadefordishwashers.
Goingaway
Ifthedishwasherisnotgoingtobe used for some time, carry out the following:
???run a cycle with the dishwasher empty.
???switchoffattheelectricalsocket andunplug.
???turn off the water supply tap, disconnect the inlet hose and allowtodrain.
???filltherinseaiddispenser.
???leavethedoorajar,topreventthe build up of unpleasant odours insidethedishwasher.
Beforeusingthedishwasheraftera longbreak,pluginandswitchonat theelectricalsocket.Reconnectthe inlet hose and turn on the water supply tap. Check there are no deposits of rust inside the water pipe,ifthereareallowwatertorun from the supply tap for a few minutes.
Disconnectingthedishwasher.
Whendisconnectingthedishwasher itisimportantthattasksarecarried outinthecorrectsequence.
???switchoffatthemainsandremove theplugfromthesocket.
???turnoffthewatersupply.
???disconnectdrainandwaterinlet hose.
???pulloutthedishwasher,carefully, withdrawinghosesatthesame time.
Movingtheappliance.
Drainwaterfromthedishwasher. Secure all loose parts. Only transportinanuprightposition.
??? Ifnotkeptuprightduringtransport, anywaterremaininginsidemay seepintothecontrolmoduleand causesubsequenterrorswith programmefunctions.
12

D ISHWASHER
Troubleshooting
Caution
-Do not forget that repairs should only be carried out by a qualified specialist. Improper repairs can lead to considerable equipment damage, as well as danger to the user.
-The dishwasher must first be disconnected from the electricity supply before any repairs or other work can be carried out. Switch off at the mains socket and water supply and remove the plug.
Resolving minor problems yourself.
Experience has shown that you can resolve most problems that arise during normal daily usage yourself, without having to call out a service engineer. Not only does this save costs but it also means the appliance is available for use again that much sooner. The following list of common occurences and their remedies should help you identify the causes of most problems.
If the dishwasher won't
start, check...
???Isthedishwasherpluggedinat the electricity socket and switchedon?
???Is there a power failure, check otherappliances.
???Checkthefuse.
???Is the water supply tap turned on?
???Isthewaterinlethoseconnected properly?
???Is the pressure of the water supplysufficient?
???Istheinlethosekinked?
???Isthefilteronthewatersupply hoseblocked?
???Isthedishwasherdoornotclosed properly?
If water remains inside the
dishwasher, check...
???thedrainhoseisnotkinked.
???the drain syphon is not obstructed.
???the dishwasher filters are not clogged.
If the dishes are not being
cleaned properly, check...
???thecorrectamountofdetergent hasbeenadded.
???thereisregeneratingsaltinthe saltcontainer.
???the dishes have been loaded correctly.
???the selected programme is suitableforthetypeofdishesand thedegreeofsoiling.
???allfiltersarecleanandpositioned correctly.
???the spray arm nozzles are not obstructed.
???thereisnothingobstructingthe rotationofthesprayarms.
If the dishes fail to dry or
remain dirty, check...
???thereisrinseaidinsidetherinse aidcontainer.
???therinseaiddispensersettingis correct.
???the detergent being used is of goodqualityandhasnotlostits effectiveness (for example, throughincorrectstorage,with theboxleftopen).
If the dishes show signs of streaking, staining etc. check...
???therinseaiddispensersettingis notsettoohigh.
If there are visible traces of rust inside the tank, check...
???thecapoffthesaltcontaineris securely closed and that the watersoftnersettingiscorrect.
???thecorrectamountofdetergent isbeingused.Certaindetergents can be more corrosive than others.
???the tank is made of steel and thereforeanyrustmarksaredue toexternalelements(fragments ofrustfromthetankpipes,pots, cutleryetc.)Specialproductsare commerciallyavailabletoremove suchmarks.
Error messages
Yourdishwasherisequippedwitha safetysystemwhichisabletode- tectoperatingfaults.
Thesefaultsarereportedbyoneor twocycleindicatorlights"M"flash- ingrapidly.Takeanoteofwhichlights areflashing,turntheapplianceoff andcallHotpointServicefortechni- calassistance.
Tap off alarm
Ifyouhaveforgottentoturnthewa- ter tap on, your appliance will re- mindyouofthisbysoundingafew shortbeepsforafewminutes.Turn thetaponandyourappliancewill startupagainafterafewminutes. Wereyoutobeabsentwhenthese beepsaresounded,theappliance will be blocked automatically and cycle2and3indicatorlights(daily and rapidcycle)willflashrapidly. Turn the appliance off at the ON- OFFbutton,turnonthewatertap andwaitapproximately20seconds beforeturningtheapplianceback on.
If after all the checks, the appli- ance still does not operate or the problem persists, call Hotpoint Service (see KEY CONTACTS, backpage)andinformthemof:
-thetypeofproblem
-the abbreviation of the model name(Mod.)andtherelativenum- bers(S/N)writtenontheratingplate
located on the inner edge of the door.
Switch off at the mains socket and remove the plug. Turn off the water supply.
13
D ISHWASHER
INFORMATION FOR TEST LABS
Load for 12 Standard Settings tests (upper rack at top position)
Detergent
Detergent specifically intended for use with dishwashers must be used. The dispenser must be refilled before the start of each wash cycle following the instructions provided in the "Programme Chart". The detergent dispenser is located on the inside panel of the door.
Loading the detergent
To open lid "A", press button "B". The cleaning detergent should be introduced into the three containers "1", ???2???and
???3???. "(see table at the end of the page)
After pouring in the detergent, replace the lid, pressing down until it clicks.
The rinse aid
This product makes dishes sparkle more as it improves their drying. The rinse aid container is situated on the inside of the door, you should refill it when light ???D??? indicates that it is empty.
(If your dishwasher is fitted with a ???low rinse aid??? indicator light, fill the container up when the indicator light flashes or lights up).
Loading the Rinse Aid
To open the dispenser, turn the "C" cap in the
There are 6 different settings; the normal dosage is setting 5
BD
F
Comp1 Comp2 Comp3
C
To use the Normal or daily wash cycles (See Programm Chart in the instruction booklet)
14

After Sales Service
"No company is better positioned to offer an after sales service on a Hotpoint appliance than us - the manufacturer"
As part of our commitment to you, all Hotpoint appliances have the added benefit of a fully inclusive parts and labour guarantee for the first 12 months. In addition to this you also have the advantage of free
replacement parts for the first 5 years when fitted by a Hotpoint
engineer. When the 12 months parts and labour guarantee expires we offer the following after sales service options:
Repair Service and Information Help Desk
UK: 08709 066066 www.theservicecentre.co.uk Republic of Ireland: 1850 302 200
Note: Our operators will require the Model number and the Serial number of your appliance
Available 364 days a year with a fast, effective and value for money service. We have the largest white goods repair service in the UK with over 1200 of our own fully trained engineers. All repairs include a parts and labour guarantee for 12 months from the date of the repair.
If you require any information or have any questions about your appliance, our operators are on hand with help and advice.
All this ensures that you will receive the best available after sales service possible.
Extended Warranties
UK: 08709 088 088
www.theservicecentre.co.uk
Republic of Ireland: 1850 502 200
Whether you have just one or a number of Hotpoint appliances in your kitchen, we offer two service
Genuine Parts and AccessoriesUK: 08709 077 077
www.theservicecentre.co.uk
Republic of Ireland: (01) 842 6836
A wide range of genuine parts and accessories are available from our hotline or through our web site.
Genuine parts and accessories, extended warranties and service repairs are all available on our
www.theservicecentre.co.uk
15

Guarantee
"Satisfaction guaranteed or your money back"
We give you a unique 'satisfaction guaranteed' promise - valid for 90 days - after you have purchased your Hotpoint appliance. If there is a technical problem simply call Hotpoint Repair service or visit our
All Hotpoint appliances carry a fully inclusive 12 month parts and labour guarantee as well as free replacement parts for the first 5 years (except microwaves, selected integrated appliances and cooker hoods, which have a one year guarantee) provided that they are fitted by a Hotpoint engineer.
Guarantee terms and conditions
Your guarantee is only applicable in the United Kingdom or Republic of Ireland and is subject to the following provisions that your appliance:
lHas been installed and used correctly in accordance with this instruction booklet.
lHas been used solely for domestic purposes and is located on domestic premises (ie. not for commercial or trade use).
lHas been properly connected to a suitable electrical supply voltage as stated on the appliance rating plate.
lHas not been subject to misuse, accident, modified or repaired by anyone other than one of our own service engineers.
For pre purchase information on any other Hotpoint product call: 08701 50 60 70 or visit: www.hotpoint.co.uk


 Recycling & Disposal Information
As part of Hotpoint's continued commitment to helping the environment, Hotpoint reserves the right to use quality recycled components to keep down customer costs and minimise material wastage. Please dispose of packaging and old appliances carefully.
To minimise risk of injury to children, remove the door, plug and cut mains cable off flush with the appliance. Dispose of these parts separately to ensure that the appliance can no longer be plugged into a mains socket and the door cannot be locked shut.
16

Key Contacts
After Sales Service
Over 1200 trained specialists, directly employed by us, ensure that you can have complete confidence in both the appliances and services we offer.
Repair Service and Information Desk
UK: 08709 066 066
(Open 8 to 8 Mon - Fri, 8 to 6 Sat, 10 to 4 Sun & Bank Holidays) www.theservicecentre.co.uk
Republic of Ireland: 1850 302 200
Note: Our operators will require the following information:
Model number:
Serial number:
Extended Warranties
UK: 08709 088 088 (Open 8 to 8 Mon - Sun) www.theservicecentre.co.uk Republic of Ireland: 1850 502 200
Genuine Parts and Accessories
UK: 08709 077 077
(Open
Republic of Ireland: (01) 842 6836
General Domestic Appliances Limited, Morley Way, Peterborough, PE2 9JB.