Power for the digital revolution.???
Power for the digital revolution.???

CDR 20 Compact Disc Recorder
3 Introduction
3Important Information about CD Recording
4Safety Information
5
7
9
10 Remote Control Functions
12 Installation and Connections
14CD Recording Basics
14Disc Types
14CDR Terminology and Display Messages
15Playback Basics
15Loading and Unloading Discs
15Using the Remote
16Normal Play
16Search
16Track Skip
17
17
17Time Display
17Headphone Listening
18Program Play
18 Programming Play Lists
18 Checking, Editing and Clearing
Programmed Play Lists
18Repeat Programmed Play
18Repeat One Track
18Repeat All Tracks
19Repeat
20CD Recording
20Disc Dubbing
21CD Sync Recording
21Recording from an External Source
22Finalizing
22Unfinalizing and Erasing
22Unfinalizing a
22Erasing an Entire
22Erasing a Single Track
23Troubleshooting Guide and Error Messages
24Technical Specifications
Typographical Conventions
In order to help you use this manual with the remote control,
EXAMPLE ??? (bold type) indicates a specific remote control or
EXAMPLE ??? (OCR type) indicates a message that is visible on the
EXAMPLE ??? (outlined type) indicates a lit indicator in the
1??? (number in a square) indicates a specific
a??? (number in an oval) indicates a button or indicator on the remote
?? ??? (number in a circle) indicates a
A??? (letter in a square) indicates an indicator in the
2 TABLE OF CONTENTS

Introduction
Thank you for choosing Harman Kardon.
The CDR 20 CD Player/Recorder is a unique product, designed not only to play back your existing library of compact discs, but also to record compact discs from either analog or digi- tal programs. You may feed signals (for record- ing) to the CDR 20 from external sources such as an A/V receiver, a tuner, a tape deck or a CD player, or you may simply place a CD in one deck, and make a copy using a recordable CD in the other deck.
Designed and engineered by Harman Kardon, the CDR 20 is among the first audio CD recorders with x4 speed capability. This means that it will take only 15 minutes to copy a
The CDR 20 not only records with the highest speed and quality available but it is also an audiophile CD player. Through the use of
Since CD recorders are a relatively new technol- ogy, this may be your first
If you have additional questions about this product ??? its installation or operation ??? that are not answered in this manual, please contact your dealer, who is your best source of local information. You may also contact Harman Kardon via
Special Features
???
???X4 Dub Speed for Both
???
???
???Extensive Playback Programming Capabilities
???Coaxial and Optical Digital Inputs and Outputs
???
???
???Ergonomic Remote Control
Declaration of Conformity
We, Harman Consumer International
2, route de Tours
72500
France
declare in own responsibility, that the product described
in this owner???s manual is in compliance with technical
standards:
EN 60065:1993
EN 55013/A12/8.1994
EN 55022/5.1995
EN 55020/12.1994
EN
EN
Carsten Olesen
Harman Consumer International
Important Information About CD
Recording
In order to get the most enjoyment from your new
???The CDR 20 plays all standard CD audio discs but for recording, the CDR 20 uses special
???The last step in making a
???Once finalized,
???As with all CD players, except those designed specifically for portable use, you should never move a CD player while there is a disc inside one of the decks. NEVER move the CDR 20 until discs have been removed from both decks.
3 INTRODUCTION

Safety Information
Important Safety Information
Verify Line Voltage Before Use
Your CDR 20 has been designed for use with 100- to
If you have any questions about the voltage requirements for your specific model, or about the line voltage in your area, contact your sell- ing dealer before plugging the unit into a wall outlet.
Do Not Use Extension Cords
We do not recommend that extension cords be used with this product. As with all electrical devices, do not run power cords under rugs or carpets or place heavy objects on them. Damaged power cords should be replaced immediately by an authorized service depot with cords meeting factory specifications.
Handle the AC Power Cord Gently
When disconnecting the power cord from an AC outlet, always pull the plug, never pull the cord. If you do not intend to use the unit for any considerable length of time, disconnect the plug from the AC outlet.
Do Not Open the Cabinet
There are no
CAUTION: The CDR 20 uses a laser system. To prevent direct exposure to the laser beam, do not open the cabinet enclosure or defeat any of the safety mechanisms provided for your pro- tection. DO NOT STARE INTO THE LASER BEAM. To ensure proper use of this product, please read this owner???s manual carefully and retain it for future use. Should the unit require mainte- nance or repair, please contact your local Harman Kardon service station. Refer servicing to qualified personnel only.
Installation Location
???To assure proper operation and to avoid the potential for safety hazards, place the unit on a firm and level surface. When placing the unit on a shelf, be certain that the shelf and any mounting hardware can support the weight of the product.
???Make certain that proper space is provided both above and below the unit for ventila- tion. If this product will be installed in a cabinet or other enclosed area, make certain that there is sufficient air movement within the cabinet.
???Do not place the unit directly on a carpeted surface.
???Avoid installation in extremely hot or cold locations, or an area that is exposed to direct sunlight or heating equipment.
???Avoid moist or humid locations.
???Do not obstruct the ventilation slots on the top of the unit, or place objects directly over them.
Cleaning
When the unit gets dirty, wipe it with a clean, soft dry cloth. If necessary, wipe it with a soft cloth dampened with mild soapy water, then a fresh cloth with clean water. Wipe dry immedi- ately with a dry cloth. NEVER use benzene, aerosol cleaners, thinner, alcohol or any other volatile cleaning agent. Do not use abrasive cleaners, as they may damage the finish of metal parts. Avoid spraying insecticide near the unit.
Moving the Unit
Before moving the unit, be certain to discon- nect any interconnection cords with other com- ponents, and make certain that you disconnect the unit from the AC outlet.
IMPORTANT NOTE: To avoid damage to the CDR 20 which may not be covered by the war- ranty, be certain that all discs are removed from the unit before it is moved. Once the CDR 20 is installed, discs may be left in the unit when it is turned off, but the unit should NEVER be moved with discs left in either deck.
Unpacking
The carton and shipping materials used to pro- tect your new receiver during shipment were specially designed to cushion it from shock and vibration. We suggest that you save the carton and packing materials for use in shipping if you move, or should the unit ever need repair.
To minimize the size of the carton in storage, you may wish to flatten it. This is done by care- fully slitting the tape seams on the bottom and collapsing the carton down to a more two- dimensional appearance. Other cardboard inserts may be stored in the same manner. Packing materials that cannot be collapsed should be saved along with the carton in a plastic bag.
If you do not wish to save the packaging mate- rials, please note that the carton and other sec- tions of the shipping protection are recyclable.
Please respect the environment and discard those materials at a local recycling center.
4 SAFETY INFORMATION

1 Power Switch: Press this switch to apply power to the CDR 20. When the unit is first turned on, the
2
3 Play Deck: This disc deck is used to play back conventional CD discs and
4Headphone Jack: Connect standard head- phones to this jack for private listening.
5Headphone Level Control: Turn this control to adjust the volume level to the head- phones. Note that the use of this control will not change the analog output levels at the
6Digital Input: This coaxial digital input may be used to connect a portable digital audio player to the CDR 20 for digital recording. When an active digital signal is connected to both the front- and
8Record Button: Press this button to begin the recording process. See pages
9CD Sync: Press this button once to begin an automated recording of a single track from an external CD player when a digital connec- tion is used. Press it twice to begin automated recording of an entire disc. See page 21 for more information on CD Sync recording.
) Dubbing: Press this button to begin the process of making a complete copy of the disc in the Play Deck 3to a
!Erase: Press this button to erase one or more tracks or the entire contents of an unfi- nalized
5

@Finalize: Press this button when a record- ing is complete to initiate the finalization process. The Play/Select Button *j must be pressed within three seconds to acti- vate finalization. Until this button is pressed and the finalization process is complete,
#Speed: Press this button to select the recording speed for internal dubs. See page 20 for more information on selecting the proper speed.
%Record Deck: This Disc Deck is used to record or play back CD,
??Record Deck Previous: This button has two functions. When a disc is playing in the Record Deck %, press and hold this button to play the disc in a fast reverse mode to quickly locate a desired passage. At any time, tapping the button and quickly releasing it will move to the beginning of the current track, and the next press will move to the previous track. When a disc is stopped, each press will move back one for programming or play when the disc is stopped. Once a track is entered, it may be played by simply pressing the Play
button *j.
???Input Select: Press this button to select the input source (analog or digital coax) for recording. See page 22 for more information on input selection.
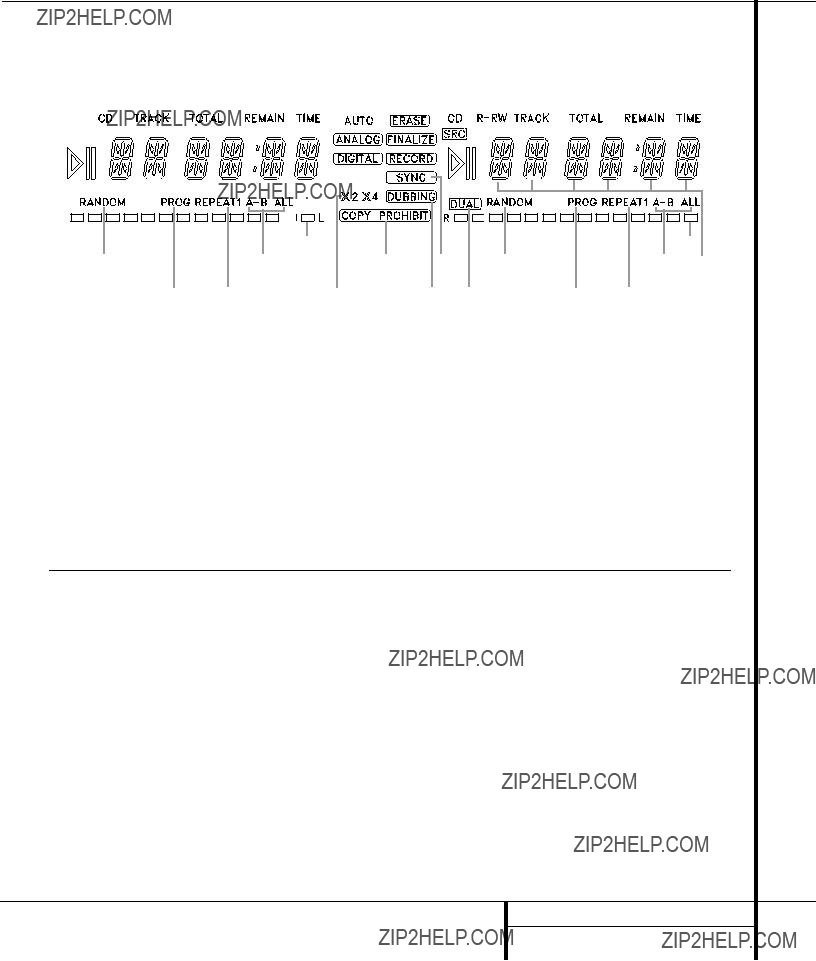
??Information Display: The indicators in the Information Display provide status reports on the operation of the CDR 20. See page 7 for complete explanations of each indicator.
??Remote Sensor: The IR sensor that receives the commands from the remote control is behind this area. Do not cover or obscure this part of the front panel to avoid any malfunction with the remote.
??j.
6
Important Note: Since the CDR 20 is a
ARandom Indicators: These indicators light when random playback has been programmed for one of the CD decks. See page 16 for more information on random play.
BProgram Indicators: These indicators light when one of the CD decks is being pro- grammed for playback options. See page 18 for more information on programmed play.
CLevel Indicators: These LEDs display the input level during an analog recording, and the output level during playback. See page 22 for more information on record levels.
DRepeat Indicators: These indicators light when a repeat function is being used. See page 18 for more information on repeat play.
FSpeed Indicators: These indicators show which record speed has been selected for dub recordings. See page 20 for more information on
due to the intervention of the Serial Copy Management System (SCMS). See page 20 for more information on SCMS.
HDubbing Indicator: This indicator lights when a dub is in progress between the two CD
Decks. See page 20 for more information on CD dubbing.
ISync Indicator: This indicator lights when the unit has been programmed for a CD Sync recording. See page 21 for more information on CD Sync recordings.
KInformation Displays: These displays serve two functions, showing the time displays for discs playing, and displaying messages about discs or recordings.
7

LTime Indicators: These indicators light in conjunction with one of the time indicators MNOto show which of the time status modes is active.
NTotal Time: These indicators light when the Information Display Kshows the total time of all tracks on a disc.
OTrack Time: These indicators light when the Information Display Kshows the running time of the individual track being played.
PR/RW Indicator: This indicator shows which type of recordable disc is present in the Record Deck %. When a
QPlay/Pause Indicators: These indicators show the status of the individual CD decks. The ???lights when the CD is playing, and the ????? lights when the unit is in a Pause mode.
SCD Indicators: These indicators light when a standard CD is playing in either deck 3or
%.
TRecord Indicator: This indicator lights when the unit is making a recording and flashes during the preparations for recording.
UFinalize Indicator: This indicator lights when the unit is in the Finalization process, which is required before a
VErase Indicator: This indicator lights when a
WAuto Indicator: This indicator lights when the automatic method of incrementing tracks is selected for a recording session. See page 21 for more information on track increments.
XAnalog Indicator: This indicator lights when an analog source is being recorded. See page 21 for more information on source selection.
YDigital Indicator: This indicator lights when a digital source is being recorded. See page 21 for more information on source selection.
8

?? Play Deck (CDP) Analog Output ??? Record Deck (CDR) Analog Output ?? Record Deck (CDR) Analog Input
??Play Deck (CDP)
??Play Deck (CDP) Analog Output: These jacks carry the analog audio output signal from the Play Deck 3. Connect them to the CD input jacks on a receiver, preamp or processor.
??? Record Deck (CDR) Analog Output:
These jacks carry the output signal from the Record Deck %. Connect them to the Tape Play/In input jacks on a receiver, preamp or processor.
?? Record Deck (CDR) Analog Input: These jacks accept the analog signals that are used for CD recordings. Connect them to the Tape Rec/Play outputs on a receiver, preamp or processor.
?? Play Deck (CDP)
??? Record Deck (CDR)
?? Record Deck (CDR)
??? Record Deck (CDR)
??? Play Deck (CDP)
IMPORTANT NOTE: The coaxial digital inputs should only be connected to digital input or output jacks. Even though they use the same RCA type connector as standard analog audio connections, DO NOT connect them to conven- tional analog input or output jacks.
?? Record Deck (CDR)
??? Play Deck (CDP)
?? Remote IR Input: Connect the output of a remote infrared sensor or the remote control output of another compatible Harman Kardon product to this jack. This will enable the remote control to operate even when the
??? Remote IR Output: Connect this jack to the IR input jack of another compatible Harman Kardon remote controlled product to have the
?? Remote IR Input
??? Remote IR Output
??? AC Power Cord
CDR 20 provide IR signals to other compatible products.
??? AC Power Cord: Connect this plug to an AC outlet. If the outlet is switch controlled, make certain that it is in the ON position.
9

Remote Control Functions
a
b Play Deck (CDP) Display Control
c Play Deck (CDP) Open
functions, including Play, Pause, Stop, Search, Next and Previous Track, are shared between the two decks. Always remember to press the CDP Select button d to use the remote to control the Play Deck, or press the CDR Select button 29 to control the Record Deck. When you press one of these buttons, an indication of CDP or CDR will appear in the appro- priate Information Display K.
SPEED
1 2 3
4 5 6
REPEAT
7 8 9
A B
0
CDR/RW
33
32
31
30
29
28
`
z
y
x
w
v
u
t
s
r
q
10 REMOTE CONTROL FUNCTIONS
Remote Control Functions
bPlay Deck (CDP) Display Control: Press this button to cycle through the various time display options for the disc in the Play Deck 3. See page 17 for more information on time- display options.
cPlay Deck (CDP) Open: Press this button to open the Play Deck 3.
dPlay Deck (CDP) Select: Press this but- ton to control or program the functions of the disc in the Play Deck 3.
eProgram: Press this button to begin the programming sequence for one of the CD decks. See page 18 for more information on programming the CDR 20.
fReverse Search: Press this button to play the selected disc in reverse to locate a desired passage.
gSingle: When this button is pressed, the CDR 20 will function as a
hProgram Check: Press this button to check or edit a programmed playback sequence. See page 18 for more information on pro- grammed playback.
jPlay/Select: This button has two func- tions. It will most often be used as a standard play button, but when setting up certain record functions, it is also used as an Enter or Select button.
kRandom Play: When the CD deck is stopped, press this button to begin random play of all tracks on a disc.
lDub: Press this button to begin a dub. See page 20 for more information on dubbing.
mAutomatic/Manual Track Increment Selector: Press this button to select between automatic and manual track increments during a recording session. See page 21 for more infor- mation on track increments.
nTrack Increment: When the Manual mode for track increments is selected during recording, press this button to increase the track number. NOTE: This function does not operate during CD Sync or dub recording.
oFinalize: Press this button when a record- ing is complete to initiate the finalization process. The Play/Select button *jmust be pressed within three seconds to activate finalization. Until this button is pressed and the finalization process is complete,
on Finalization.
pNumeric Keys: Press these buttons to access a specific track for playback or during the programming process. See page 18 for more information on programmed playback.
rRepeat: Press this button once to repeat the current track. To repeat an entire disc, press the button twice.
sSpeed Select: Press this button to select the recording speed for internal dubs. See page 20 for more information on selecting the proper speed.
tRecord Button: Press this button to begin a manual recording.
uErase Button: Press this button to initiate the erasure of a track or of an entire
vInput Select: Press this button to select the input source (analog or
wCD Sync: Press this button once to begin an automated recording of a single track from an external CD player when a digital connection is used. Press it twice to begin automated recording of an entire disc. See page 21 for more information on CD Sync recording.
xStop: Press this button to stop playback or recording.
yPause: Press this button to momentarily pause playback. Press it again to resume playback.
zNext Track/Skip: Press this button to skip forward to the next track on a disc.
`Dual Deck Playback: Press this button to enable both CD decks to play back at the same time and function as separate, independ- ent CD units. In this mode it is also possible to record from an external source while the Play Deck is functioning as a standard CD player. See page 17 for more information on
28Forward Search: Press this button to play a disc in a
29Record Deck (CDR) Select: Press this button to control or program the functions of the disc in the Record Deck %.
30Record Deck (CDR) Open: Press this button to open the Record Deck %.
31Record Deck (CDR) Display Control:
Press this button to cycle through the various
32
33 Clear: Press this button to clear an item in a program sequence. See page 18 for more information.
11 REMOTE CONTROL FUNCTIONS

Installation and Connections
Important Note: To prevent possible damage to your speakers or other components in your audio system, we strongly recommend that ALL system components, including the CDR 20, be turned off and unplugged from their AC power source when any connections are made or a new component is installed.
Locating the CDR 20
Since the CD transports in the CDR 20 are pre- cision instruments, they are subject to interfer- ence from vibration. To minimize the possibility of skipping during playback or recording, it is recommended that the unit be placed on a level, solid,
When installing the CDR 20 in a cabinet or tight space, always make certain that there is enough room in front of the unit for the disc drawers to open fully, and that there is enough space above the unit so that discs may easily be inserted in the disc drawers.
In addition to the safety considerations outlined on page 4, it is also recommended that the CDR 20 not be placed in a location that is sub- ject to direct sunlight or extreme heat or cold, as these conditions may damage the discs used in the player, or the player itself. Note that audio amplifiers or
The unit should also be kept away from sources of water or damp conditions.
Connections to Your Audio System
When connecting the CDR 20, think of the process as if your were connecting a standard CD player and a tape or cassette recorder, with the addition of the digital connections.
The
The
a standard tape recorder, this might make it easier to select it as an input on your receiver or preamp. Connect the analog
To play the output of the Record Deck through the digital decoder in your receiver or an exter- nal processor, connect the CDR
To make recordings from external digital sources, such as a CD, DVD or MD player, con- nect the CDR
??6or CDR Optical In Jack ?? on the CDR 20 directly to the digital outputs on your CD player or other digital device.
Connections to a portable digital CD or MD player may also be made by connecting the Coax Digital Output of the player to the Front- Panel Digital Input 6on the CDR 20.
Note that when both the front and rear panel digital inputs are connected to external sources, the CDR 20 will give priority to the
IMPORTANT NOTES ON DIGITAL
CONNECTIONS:
Although
12 INSTALLATION AND CONNECTIONS

Installation and Connections
Batteries
Insert the two AA batteries supplied with the CDR 20???s remote by turning the remote over so that the bottom of the remote is facing towards you. Gently lift the plastic tab on the battery cover up and away from you, and lift the lid off. Insert the batteries in the remote, being careful to follow the + and ??? polarity indications in the bottom of the compartment. Replace the cover by first seating the two small tabs into the mat- ing holes at the top of the remote, and then gently push the cover down until the latch snaps into place with an audible click.
NOTE: When replacing batteries, it always a good idea to replace both at the same time. When the remote will not be used for an extended period of time, it is also a good idea to remove the batteries to avoid the possibility of damage due to corrosion. Batteries contain chemical substances and we recommend that you dispose of them properly and in compliance with any local regulations.
IR Remote Connections
If the CDR 20 is installed behind a cabinet or other obstruction that may block the path between the
You may also use the IR Sensor in the CDR 20 to send commands to other compatible remote products. Connect the Remote IR Out Jack ??? to the input of the other product or system.
Power Connections
Connect the AC Power Cord ??? to an AC power source. the CDR 20 uses sensitive, high- performance
If the
13 INSTALLATION AND CONNECTIONS

CD Recording Basics
CD Recorders (CDRs) are similar to standard CD players, with the addition of the features and controls needed for recording. Functions such as play, search and programming for playback will be familiar, but the recorder will function slightly differently than what you may be used to for magnetic tape recorders.
Disc Types
Unlike a conventional CD player, the CDR 20 uses three types of discs, and it is important to understand how each one plays.
 Both decks in the CDR 20 will play back any conventional CD that bears this logo.
Recordable Discs that bear this logo may be recorded on one time, and when they are final- ized they will play in either deck in the CDR 20 or in any conventional CD player, including home, car and portable models. The Record Deck %on the CDR 20 may also be used
to record on these discs, and it will play
ReWritable Discs that bear this logo may be used for recording on the CDR 20, and they may also be erased and reused. They may be recorded on or played on the Record Deck %of the
CDR 20 and in other
Recordable ReWritable Discs designed for use in computer
Note that the CDR 20 is specifically designed for the recording and playback of consumer audio discs, and cannot be used to copy data discs, DVD discs, or other optical discs used by video- or
CDR Terminology and Display Messages
Compact disc recording has its own special terminology, and some of the messages displayed by the CDR 20 may be new to you. Before using the CDR 20, you may wish to familiarize yourself with some of the terms used by the CDR 20. Additional error message dis- plays may also appear. Please see page 23 for a complete explanation of error messages.
Finalize: This term refers to the process that completes the recording of a disc by recording a final Table of Contents and prepar- ing the disc so that it may be played on other machines. A
TOC: Stands for Table of Contents and it refers to the data recorded on each CD that tells the player how many tracks are on the disc, the total time of the disc and the running time of each individual track. Each time a disc of any sort is placed in the CDR 20, you will see a TOC to indicate that the unit is reading this data from the disc. This is required to copy the track information to any recording.
OPC: Stands for Optical Processing Calibration. When you see this message in the
Information Display for the Record Deck
K, it means that the laser transport inside the unit is making the calibrations and adjustments needed so that the recording process is optimized for the specific disc in use.
BUSY: When you see this message, it means that the Record Deck is completing part of the record operation. When you see this message, do not press any buttons; simply wait until the message clears from the display.
DISC FULL: When there are only four seconds of record time remaining on a blank disc, a DISC FULL message will appear in the Information Display ??. When you see this message, you will need to stop the recording process and, when a
14 CD RECORDING BASICS
Playback Basics
Playback of CDs on the CDR 20 resembles that for traditional CD players with a few exceptions to accommodate the availability of two sepa- rate playback decks. Before using the CDR 20,
Once the Main Power Switch 1has been turned on, the CDR 20 may be
the remote, simply press the
Note that when the unit is in the Standby mode, it is still drawing power from the AC main outlets. To turn the unit completely off, press the Main Power Switch 1. When the
completely off.
Although compact discs are very reliable, rough handling may damage them. Avoid scratching the bottom (nonprinted) side of the discs, as this will affect playback of standard CDs and interfere with the recording of
Loading and Unloading Discs
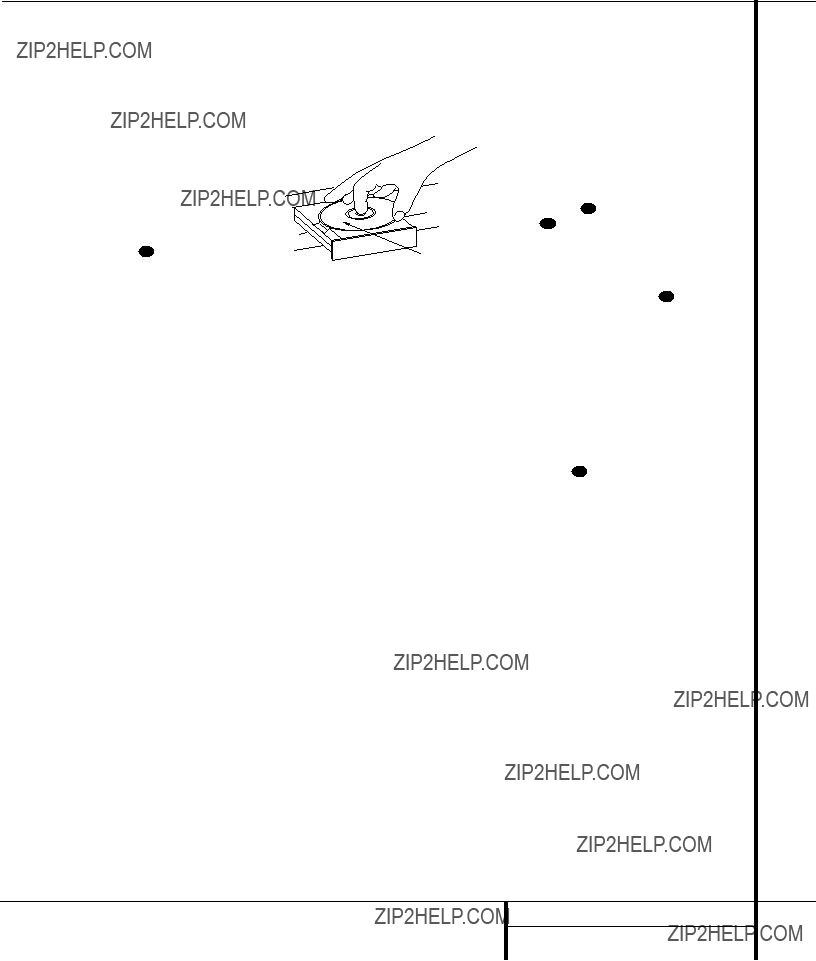
To load a disc, first open the desired CD deck by pressing the appropriate Open/Close button 7$c30 . The word OPEN will appear in the Information Display K. Always make certain that there is sufficient room in front of the unit for the disc drawers to open. Note that if either disc drawer is blocked, the drawer will stop at the blocked position and an ERROR message will appear. Press the appropriate Open/Close button 7$c 30 to reopen the drawer.
Load a disc in the tray with the printed (label) side facing up. Once the disc is seated, make certain that it is properly centered within the tray. When using 3" discs, take extra care to make certain that the disc is carefully centered within the smaller ridges in the disc tray.
Labeled
Surface
To close the drawer, press the appropriate Open/Close button 7$c30 or gently press on the outside of the front cover of the disc tray. When the drawer is closed the word CLOSE will appear momentarily in the
Information Display K, and the letters
TOC will begin to flash in the display once the drawer is completely closed.
If the disc is a standard CD or a finalized
When an unfinalized
If a computer data disc is placed in the machine, a DATA DISC message will appear to alert you to the error. Data discs will not play and may not be recorded or dubbed in the CDR 20.
Using the Remote
The CDR 20???s infrared remote control is designed to operate both CD decks, as well as control the playback programming and record functions. To allow for efficient use of the remote, its operation is different from standard CD players. Some buttons are dedicated to one specific CD deck, while others are shared between the two decks.
No matter which deck is playing, the Play Deck (CDP) and Record Deck (CDR) Display b 31 and Open/Close buttons c 30 will always send a command to their respective deck. The other transport and pro- gramming functions, however, are shared. To use any of the transport controls, such as Play j, Stop x, Pause yor the Search and Skip buttons fiz 28 , the
Numeric Keys por the Programming
Keys eghkr, first press either the
CDP button dto command the Play Deck
3or the CDR button 29 to command the Record Deck %. When the button is pressed, a message reading CDP or CDR will appear in the appropriate Information Display Kto confirm the selection.
To switch the remote from controlling one deck to controlling the other, simply press the Select button d 29 for the deck you wish to con- trol at any time.
Note that features relating to the recording process, such as Speed sand the double row of
15 PLAYBACK BASICS

Playback Basics
Normal Play
To play a disc, first make certain that the unit is properly installed and that the Main Power Switch 1is turned on. Turn the CDR 20 on by pressing the
Insert a disc following the instructions shown on the previous page. To start the playback, press the Play button on the front panel for the appropriate deck *??or press the Select but- ton on the remote for the desired deck d
29 and then press the Play button on the
remote j. The Play/Pause Indicator Q will show a right pointing triangle ??? and the
Information Display Kwill show the track number being played and the running time of the track. As each new track begins to play, the track time will reset to 00:00 and begin to count up for the new track.
NOTE: Remember that Unfinalized
To go directly to a specific track on a disk, enter the track number using the Numeric Keys p. Note that when selecting a two digit track number, the second digit must be entered with- in three seconds after the first Numeric Key is pressed.
To play all of the tracks on a disc in random order, press the Select Button d 29 for the desired deck, and then press the Random button k. The unit will briefly examine all of the tracks on the disc and the Random Indicator Awill illuminate. Each track will be played in a random order until all tracks on the disc have been played. Note that there will be a brief pause in between each track as the unit searches for the next track to play. During
the search, the left two positions in the
Information Display Kwill show a clock- wise circle to confirm the search.
To momentarily stop the disc at any time, press the Pause button y(??. When a disc is paused, the Play/Pause Indicator Qwill add two vertical lines to indicate a paused disc. Press either the Play button j*??or the Pause button y(??to resume playback at the point where the disc was paused.
When there is only one disc in the unit, it will automatically stop when all tracks on a disc have played through. To stop playback at any time, press the Stop button x&??for the deck in use.
When there is a disc in each deck, the player will respond in one of two ways, depending on which way the
At the end of a listening session, remove the discs from the decks by following the instruc- tions shown on the previous page. Do not leave the disc drawers open when the unit is not
in use to prevent dust and dirt from entering the unit and to prevent damage to the disc- drawer tray.
To place the unit in the Standby mode at the end of a listening session, press the Power- Off button 32 . The word OFF will appear
briefly in the Information Display K, any open disc trays will automatically close, and the
Search
You may quickly scan through the contents of a disc while listening to the playback at high speed in forward or reverse. To move forward through a disc, press the Forward Search but- ton 28 on the remote or press and hold the Next button ????on the front panel that is appropriate for the deck in use. To move back- wards through a disc, press the Reverse Search button fon the remote, or press and hold the Previous button ????on the front panel that is appropriate for the deck in use. When using the remote, always remember to make certain that you have selected the deck you wish to control by pressing the appropriate selector button d29 before entering the desired remote command.
Track Skip
To move from one track on a disc directly to another, enter the number for the desired track with the Numeric Keys p. The disc will pause briefly to locate the track, and then immediately play it. When entering a two digit track number, the second digit must be entered within three seconds of the first digit.
To move to the next track on a disc by cycling through the individual tracks, press the Next button zon the remote, or the appropriate
When a disc is playing, press the Previous button i????to return to the beginning of the track being played. Additional presses of the Previous button will move backwards through the tracks on the disc.
When a disc is stopped, you may press the Next or Previous buttons to locate a specific track that you wish to play. When the desired track number appears at the left side of the appropri- ate Information Display K, press the Play button j*??to hear that track.
16 PLAYBACK BASICS

Playback Basics
Since the CDR 20 has more than one CD deck, you may play a disc in either drawer. When only one deck is playing, the unit is in the Single mode. In the Single mode, the audio output will be fed to all digital and analog jacks for both decks. This means you may select the input on your receiver, preamp or processor for either deck. For example, if you have the Play Deck connected to ???CD??? and the Record Deck con- nected to ???Tape,??? when only one deck is play- ing, either input may be selected.
It is also possible to play two discs at once, using the Dual mode. To initiate
As long as the
????????????or Record Deck
&*(??????. To control the transports using the remote, remember to first press the Selector button for either the Play/CDP Deck dor the Record/CDR Deck 29 , and then press the desired command function.
NOTE: When in the Dual mode, you may return to Single play mode by pressing the Single button on the remote gor the Dual button ??on the front panel. However, pressing the Single button while both decks are playing, will automatically stop playback of the disc in the Record Deck %while the disc in the Play Deck 3continues to play. The output of the play deck will be sent to both sets of out- put jacks.
Since the CDR 20 has two separate CD decks, it may be used as a
When the CDR 20 is in the
NOT being lit, when the disc in one deck has played through to the end, the disc in the other deck will automatically begin to play. Each disc will play through, and when one deck is fin- ished the other will start. To stop playback, press the Stop button x&??for the deck that is currently playing.
To have the CDR 20 function as two separate CD players, where the deck in use stops at the end of a disc, press the Dual button `?? until the
Time Display
The CDR 20???s time display is capable of show- ing a wide range of information about the con- tents of a CD.
Once the disc???s Table of Contents or TOC data has been read, the Information Display K for any deck that has a CD inside will show the number of tracks on the disc in the two left digits of the display, and the total running time of the disc. When the disc is playing, the tracks will count up as each new track is reached, and time display will show the elapsed time for the track being played.
To view the time remaining in the track being played, press the Display button b 31 ????for the deck in use so that the
REMAINING TIME Indicators ML illuminate. The Information Display Kwill count down the time remaining in the track, and at the start of the next track the counter will start to count down the running time of that track.
To view the total time remaining on the disc, press the Display Button b 31 ????for the deck in use so that the Total Time Indicators NLilluminate. The Information Display Kwill show the total time remaining for all tracks on the disc and count down until the disc has finished playing. When the disc has played all the way through, the total number of tracks and the total running time of the disc will be displayed.
Headphone Listening
You may listen to the output of the CDR 20 through headphones at any time by simply plugging the headphones into the
Note that when only one deck is playing back a disc, the output of that deck will be fed to the headphone jack. When the unit is in the Dual- Playback mode, only the output of the Play Deck 3will be fed to the headphone jack.
17 PLAYBACK BASICS
Program Play
The CDR 20???s advanced programming system enables you to program the order in which tracks are played, to repeat one track or all tracks, or to repeat any segment of a disc without regard to track numbers.
Programming Play Lists
To program the order of playback for the tracks on a disc, insert the disc, let the unit read the Table of Contents information, and wait until the disc has stopped and the number of tracks and total running time is displayed. Next, select the deck that will be programmed by pressing the CDP Select button don the remote for the Play Deck 3or the CDR Select button
29 on the remote for the Record Deck %.
To begin the programming sequence, press the Program button eand note that the PROG Indicator Bwill illuminate and the Information Display Kwill show
00 00 : 00.
Next, enter the track numbers to be played by pressing the Numeric Keys p. For
Information Display Kunder the Track Indicator O, while the right side will flash the number of steps that have been pro- grammed. For example, after programming the first step to be track number 3, the display will flash 03
Alternating with the track number and program step will be a display of the track and the total running time of all tracks that have been programmed so far. For example, a display of 06 11:25 will indicate that track number six was the last track programmed, and that the total time of all tracks so far is 11 minutes and 25 seconds. The Total Time Indicators NL will flash with this display to remind you of the display???s contents.
These displays will alternate three times, and then show a steady display of the total time and last track programmed.
Continue to add tracks in the order you wish to have them played until the programming ses-
sion is complete. You may add up to 20 tracks, repeating a track if desired, as long as the total number does not exceed 20. If you exceed the 20 track limit, the display will read FULL. Tracks may also be added using the Next z????and Previous buttons i????to locate the track, and the Program button e to enter that track to the programmed sequence.
When the complete list of tracks has been entered, press the Play button j*??. The tracks will then play in the order they have been entered. Note that a programmed list of tracks may also be recorded if the disc being programmed is in the Play Deck 3. Follow the instructions on page 20 for complete information on recording and dubbing.
Checking, Editing and Clearing
Programmed Play Lists
Once you have entered a program list it will remain in the unit???s memory until the disc is removed or the unit is turned off. Thus, if you play through a program list, simply press the Play button j*??again to replay the list. If you find that you wish to check the list or make changes, that is also possible by following a few simple steps.
To scroll through a program list, press the Program Check button h. Each press of the button will move through the tracks that have been programmed. The display will alternate between the track number of the program step number (e.g., 12
At any point in the list you may insert a new track by simply entering the track number using the Numeric Keys p. Simply press the but- tons that correspond to the number of the track you wish to add. Any tracks that are in the pro- gram will remain.
To remove a step in the program, first use the Program Check button hto locate the track you wish to delete. Next, press the Clear button 33 . The information in the display will blink and the step will be removed from the program list. Program steps need not be deleted
in any order; as long as you have located a step in the program list, it may be erased.
To cancel an entire program list while the pro- gram is playing, press the Program button eand note that the Program Indicator B will go out. To remove a total program list when the disc is stopped, simply open and close the disc drawer. Whenever a disc is removed or the unit is turned off, the program list is erased.
Repeat Programmed Play
The CDR 20???s programming system enables you to repeat either a single track on a disc, the entire disc, or a specially programmed passage that you select.
Repeat One Track
To repeat the track you are currently listening to, press the Repeat button rand note that the Repeat Indicator Dand the Repeat- Status Indicator Ewill both light 1. If the track is changed by using the Next/Previous Skip button iz????????while the Repeat 1 mode is active, the new track will now be repeated.
Once Repeat 1 playback has been started, it will continue until the unit is stopped by press- ing the Stop button x&??, or the disc deck is opened by pressing the appropriate Open/Close button 7$c30 . When playback is stopped, the Repeat sequence is erased and must be reentered if you wish to repeat a track on another disc.
Repeat All Tracks
To repeat all the tracks on a disc in order, press the Repeat button rtwice while the disc is playing and note that the Repeat Indicator
Dand the ALL
Ewill light. Once the Play button j*?? is pressed, the disc will play through from beginning to end continuously, until the Stop button x&??is pressed. The Repeat All function may be cancelled at any time by press- ing the Repeat button ronce until both the
Repeat Indicator D and ALL Repeat- Status Indicators Ego out. The Repeat All Function is also canceled when the disc drawer is opened.
18 PROGRAM PLAY

Program Play
Repeat
The CDR 20 may be programmed to repeat any section within a track, or a complete passage that includes material from a series of consecu- tive tracks.
To program the unit for
The unit will immediately begin to play the section you have programmed, and continually repeat it.
To resume normal play, press the
DEwill go out, and the disc will continue playing through to the end. Stopping the disc or opening the disc drawer will automatically cancel the Repeat
19 PROGRAM PLAY

CD Recording
Making recordings on the CDR 20 is simple and easy once you become accustomed to the basics of CD Recording. Before making your first recording, please take a moment to review the CDR Basics on page 14. In particular, you will need to become familiar with the types of discs that may or may not be used in the
CDR 20. In addition, some terms used in the following pages may be new to you. The follow- ing definitions and information will help you to make CD recordings using the CDR 20???s many features:
???The CDR 20 accepts analog inputs and digital coax or optical inputs. Before making a recording, be certain that you have selected the correct input.
???After a disc is recorded, it must be finalized. This process adds a table of contents data to the disc and makes it playable on other machines. Until a disc is properly finalized, it may not be played on standard CD players.
???The CDR 20 may record on either
???
???At least four (4) seconds of blank recording time must remain on an unfinalized disc for recording to take place.
???The maximum number of tracks that may be recorded on a disc is 99.
???Note that some
???In some rare cases, a CD player may not be compatible with
patible with finalized
???Some commercial CD discs may contain a copy protection data bit that will prevent the disc from being dubbed. In that case, the
Copy Prohibit Indicator Gwill light to remind you that the inability to record is intentional, and not the result of a problem with the CDR 20.
???This product is equipped with the Serial Copy Management System (SCMS) to protect the rights of copyright owners. Although it is possible to make a copy of most CDs for your own personal use, it is not possible to make a digital copy from another digital copy but it is possible to make an analog copy of a digital copy.
RECORDINGS MAY BE MADE FOR
PERSONAL USE ONLY, AND ANY
UNAUTHORIZED COPYING IS SUBJECT
TO THE APPLICABLE LAW.
???The CDR 20 will not copy DVD discs, comput-
Recordings on the CDR 20 may be made in a number of ways:
???Discs may be dubbed using the playback deck on the CDR 20 as a source. These copies may be made in real time, at twice normal speed, or at four times normal playback speed.
???Recordings may be made from an external CD player or other digital source that is synchronized with the dub being made in the CDR 20.
???Recordings may be made from any compati- ble external digital source.
???Recordings may be made from an external analog source.
???
Disc Dubbing
The easiest way to make a copy of an entire disc is to use the CDR 20???s internal dub capability.
First, insert a blank or unformatted disc in the Record Drawer %. When the disc is inserted, the CDR 20 will examine it to determine if it
is a
Place the disc to be dubbed in the Play Drawer 3and wait until the Table of
Contents data is read and the Information Display Kshows the track and running time data for the disc.
Next, select a dub speed. The default speed is a
When you are ready to start the dub, press the Dubbing Button l). The Play Deck will begin to read the track information again to make certain that there is enough space on the blank disc for the recording. During this process the Dubbing Indicator Hwill light, the
Record Indicator Twill flash and a BUSY message will flash in the Record Deck???s
Information Display K. When both Information Display Indicators return to normal, with indications of 01 00:00, press the
Play/Select Button j*??to start the dub.
While the dub is in progress, you will see the track numbers and running time increase as the disc is copied. The Level Indicators will also flash but this is only for your reference, as record levels may not be adjusted during digital recordings. It is possible to listen to the source disc while it is being dubbed by selecting the appropriate input on your receiver, preamp or processor.
Important Note: When a
The dub will stop automatically when the source disc has played through to the end. After the dub is finished, the Information Display will show an UPDATE message, and then return to normal operation. To manually stop a dub- bing operation, press the Stop button x&??for either deck.
As with all recorded
20 CD RECORDING
CD Recording
Notes on Dubbing:
???If you wish to make a dub with the tracks in a different order from the original disc, omit tracks on a disc, or make a dub that mixes tracks from different discs, create a Program- Playback List before pressing the Play/Select button j*??to start the dub. Instructions for creating a Program List may be found on page 18. NOTE: Dubs containing Program Lists may be made at either the x1 or x2 speed. If you attempt to make a Programmed Dub at the x4 speed, the unit will automatically select the x1 speed.
???The Pause buttons do not operate while a dub is in progress.
???Tracks will be added automatically to mirror the track structure of the original disc.
???The Total Time indication of the recorded CD may vary slightly from the original due to vari- ations in the spin speed of each drive, but this is normal. No information has been lost in the recording process.
???If the original disc being dubbed is a digital copy or if it contains
CD Sync Recording
CD Sync recording allows you to make an auto- matic digital recording from an external CD player or MD. During CD Sync Recording, the record unit starts in sync with the source, and tracks are added automatically.
To make a CD Sync recording: First, make cer- tain your playback source is selected and cued to the correct starting point. Next, select the appropriate digital input by pressing the Input button v???until the desired COAX or OPTICAL indication appears in the Record Deck Information Display K. CD Sync recordings may not be made from an analog input.
Next, make certain that there is a fresh disc in the Record Drawer for the recording. Press the CD Sync button w9and note that the
Sync Indicator Iwill light and the Record Indicator Twill flash. Select the type of recording to be made:
???To record only the first track from the source player, press the CD Sync Button once so that 1 TRK appears in the Record Deck Information Display K.
???To record the entire disc or tape, press the CD Sync Button twice so that ALL appears in the Record Deck Information Display K.
When the desired mode has been selected, start the playback from the source machine. The CDR 20 will automatically recognize the incom- ing digital data and begin recording. If the source material is a CD, the track numbering from the original disc will be carried over to the dub. If the playback source is NOT a CD, you will have to increment the tracks manually.
The recording will continue until the CDR 20 senses that the playback is finished when there in no incoming signal for more than three sec- onds. At that point the recording will stop. You may also stop the recording at any time by pressing the Record Deck Stop button x&. When there are only four seconds remaining on a blank disc, DISC FULL message will appear in the Information Display ??. When you see this message, you will need to stop the recording process and, when a
After the recording is complete, an UPDATE message will appear briefly, and the unit will then return to normal operation. Remember to finalize the recorded disc so that it may be used in other machines.
Recording from an External Source
To record from an external source, first place a
ANALOG. In addition, the Digital Indicator
Ywill light when the coax input is selected, and the Analog Indicator Xwill light when the analog inputs are selected.
Note that when the digital input is selected, the connection may be made to either the rear panel Coax Input ?? or the
Press the Auto/Manual button mto select how tracks will be numbered on the recorded disc.
???The default mode is Manual. In that mode for either digital or analog recordings, you must add track numbers manually by pressing the
Track Increment button nwhen you wish to increase the track number. This mode is recommended for recordings made from analog sources.
???The Auto mode will add track numbers auto- matically, in one of two ways. When track data is present from a digital recording, it will be carried over to the new copy disc. Thus, when the CD being played moves from one track to the next track, the copy disc will also increase the track number by one. Activate the Auto mode by pressing the Auto/Manual button monce and note that the Auto Indicator Wwill light.
???In the Auto mode for recordings from an ana- log source or a digital source with no track data, the track number will be increased when the CDR 20 receives silence for 3 sec- onds. After 5 seconds of silence, the recording will stop. To activate the Auto mode, press the Auto/Manual button monce and note that the Auto Indicator Wwill light.
To prepare for a recording, press the Record button t8. The Record Indicator Twill flash, and the word BUSY will briefly appear in the Information Display K. When the Display returns to the track and
Once the source material is playing, start the actual recording by pressing the Play/Select button j*. Note that the Record Indicator Twill stop flashing and the
Information Display Kwill begin to show the running time of the recording and the track data. Depending on which mode of track incre- ment has been selected as described above, track numbers must be increased manually or they will be added automatically. Regardless of which mode has been selected, a track may be added at any time by pressing the Track Increment button n.
Note: If there is a pause in the playback signal for more than 3 seconds for digital recordings or 10 seconds for analog recordings, the
CDR 20 will stop the recording. Also, when the Pause button is pressed during a recording, the track number will increase by one number and the recording will stop and must be restarted by pressing the Play/Select button j*. When the recording is finished, press the Stop button &x.
21 CD RECORDING

CD Recording
Unlike conventional analog tape recorders, the CDR 20 does not require level setting when recordings are made from a digital source. Although the Level Indicator Cwill operate, this is only informative and the level may not be changed or adjusted. However, when you are making a recording from an external analog source such as a cassette recorder or the ana- log output of a receiver or preamp, you should adjust the input levels using the
To stop the recording, press the Stop button x&. The recording will automatically stop if it takes more space than is available on the
At the end of a recording, a BUSY message and an UPDATE message will appear briefly, and the unit will return to normal operation. Remember to finalize the disc after recording so that it may be used in other players.
Finalizing
Finalizing is a simple process that completes the recording of a disc so that it may be used in other players. When a recording is finished, a disc must be finalized. Once that is done, a
To finalize a disc, place it in the Record Drawer %. Once the disc???s Table of Contents information has been read and the OPC process has been completed, press the Finalize button o@and note that the Finalize Indicator
Uwill begin to flash. Within three seconds, press the Select button j*and note that the Finalize Indicator Uwill stop flashing.
The finalization process will take up to two minutes, depending on the length of material recorded on the disc. During the finalization process the Record Deck will not accept any operating commands.
When the finalization process is complete the
Finalize Indicator Uwill go out, and the
R/RW Indicator Pwill also go out as an indication that the disc is now playable on other players. The CD Indicator Swill remain lit.
Unfinalizing and Erasing
Unfinalizing a
To keep the material that is already recorded on a
Press the Erase button u!twice and check to make sure that the Erase Indicator Vflashes and the word TOC appears in the
Record Deck Information Display K.
Within three seconds, press the Play/Select button j*to start the process. The Erase Indicator Vwill remain lit and stop flashing, and the Information Display Kwill switch to OPC and then back to TOC.
When the process is finished, the Erase Indicator Vwill go out, and the display will return to normal. The disc is now ready to have single tracks removed or additional tracks added.
Erasing an Entire
Erasing the entire contents of a disc is simple, and it does not matter if the disc has been finalized or not. To erase the disc, press the Erase button u!twice if the disc has NOT been finalized and once if it has been finalized, so that the word DISC appears in the Information Display Kand the Erase Indicator Vflashes. To start the erasure, press the Select button j*and note that the Erase Indicator Vwill stop flashing. The erasure process takes about a minute, and it is complete when the Information Display resets to 00 00:00 and the Erase Indicator V goes out. The disc is now totally erased and may be reused.
Erasing a Single Track
The individual tracks on a
To erase only the last track, press the Erase button u!. Note that the Information Display Kwill display 01 TRK and the Erase Indicator Vwill flash. Press the Play/Select button j*within three sec- onds and note that the Erase Indicator will stop flashing. When the Erase Indicator Vgoes out the Information Display Kwill show the total number of tracks that now remain on the disc.
You may erase more than one track, counting backwards from the last track. First, press the Erase button u!. Note that the Information Display will display 01 TRK and the Erase Indicator Vwill flash. Press the Next button z??or Previous button i??until the number of tracks to be erased appears in the Information Display K. For example, when 06 TRK appears in the dis- play a total of six tracks will be erased, count- ing back from the last track on the disc. Next, press the Play/Select button j*within three seconds of making the track selection and note that the Erase Indicator Vwill stop flashing. When the Erase Indicator Vgoes out the Information Display Kwill show the total number of tracks that now remain on the disc.
Important Note: Tracks at the beginning or in the middle of the disc may not be erased until all of the tracks after them have been erased.
Important Note on Erasure and Finalization Times: Regardless of the speed at which a disc was recorded, the CDR 20 will erase and finalize discs at the x4 speed to mini- mize the length of the process. However, in some cases, it may be necessary for the unit to repeat the erasure or finalization due to the nature of an individual disc. For that reason, it is normal for the time required to complete these steps to vary from one disc to another.
22 CD RECORDING

Troubleshooting Guide and Error Messages
TROUBLESHOOTING GUIDE
ERROR MESSAGES
???Only CD Audio and DTS discs will play in the CDR 20; replace the disc
23 TROUBLESHOOTING GUIDE

Technical Specifications
Depth measurement includes knobs, buttons and connection jacks.
Height measurement includes feet and chassis.
All features and specifications are subject to change without notice.
Harman Kardon is a registered trademark, and
Power for the digital revolution is a trademark, of Harman Kardon, Inc.
250 Crossways Park Drive, Woodbury, New York 11797 www.harmankardon.com
?? 2000 Harman Kardon, Incorporated Part