IMITATION DOME CAMERA With LED
95154
ASSEMBLY AND OPERATING INSTRUCTIONS
Visit our website at: http://www.harborfreight.com
Read this material before using this product.
Failure to do so can result in serious injury.
Save this manual.
Copyright?? 2006 by Harbor Freight Tools??. All rights reserved. No portion of this manual or any artwork contained herein may be reproduced in any shape or form without the express written consent of Harbor Freight Tools. Diagrams within this manual may not be drawn proportionally. Due to continuing improvements, actual product may differ slightly from the product described herein. Tools required for assembly and service may not be included.
For technical questions or replacement parts, please call 1-800-444-3353.

Specifications
Save This Manual
You will need the manual for the safety warnings and precautions, assembly instructions, operating and maintenance procedures, parts list and diagram. Keep your invoice with this manual. Write the invoice number on the inside of the front cover. Keep the manual and invoice in a safe and dry place for future reference.
Safety Warnings and Precautions
WARNING:When using this product, basic safety precautions should always be followed to reduce the risk of personal injury and damage to equipment.
Read all instructions before using this product!
1.Keep work area clean and well lit. Cluttered areas invite injuries.
2.Observe work area conditions. Do not use the Imitation Dome Camera in damp or wet locations. Don???t expose to rain. Do not use electrically powered products in the presence of flammable gases or liquids.
3.Keep children away. Children must never be allowed in the work area. Do not let them handle the Imitation Dome Camera. This product is not a toy.
4.Use the right product for the job. Do not modify this product and do not use this product for a purpose for which it was not intended.
5.Dress properly. Protective, electrically non conductive clothes and nonskid footwear are recommended when working. Wear restrictive hair covering to contain long hair.
6.Use eye protection. Always wear ANSI-approved impact safety goggles during installation.
7.Maintain with care. Keep the Imitation Dome Camera clean for better and safer performance.

8.Stay alert. Watch what you are doing, use common sense. Do not install the Imitation
Dome Camera when you are tired.
9.Check for damaged parts. Before using the Imitation Dome Camera, any part that appears damaged should be carefully checked to determine that it will operate properly and perform its intended function. Check for alignment and binding of moving parts; any broken parts or mounting fixtures; and any other condition that may affect proper operation. Any part that is damaged should be properly repaired or replaced by a qualified technician. Do not use the Imitation Camera Dome if the power switch does not turn the
Camera Dome on and off properly.
10.Replacement parts and accessories. When servicing, use only identical replacement parts. Use of any other parts will void the warranty. Only use accessories intended for use with this product. Approved accessories are available from Harbor Freight Tools.
11.Do not install the Imitation Dome Camera if under the influence of alcohol or drugs.
Read warning labels if taking prescription medicine to determine if your judgment or reflexes are impaired while taking drugs. If there is any doubt, do not install the unit.
12.Only use 1.5V DC AA-Batteries. Always properly dispose of used batteries in accordance to the guidelines for waste disposal in your community.
13.The warnings, precautions, and instructions discussed in this instruction manu- al cannot cover all possible conditions and situations that may occur. It must be understood by the operator that common sense and caution are factors which cannot be built into this product, but must be supplied by the operator.
14.WARNING: All batteries must be disposed of properly. Do not incinerate. Batteries may burst, causing personal injury and/or property damage. Dispose of the used bat- teries properly, as cadmium in the batteries is toxic. For disposable guidelines, check with your local waste management guidelines in your community.
Unpacking
When unpacking, check to make sure that the product is intact and undamaged. If any part are missing or broken, please call Harbor Freight Tools at: 1-800-444-3353
BATTERY INSTALLATION
1.First, remove the battery cover by pressing in on the upper lip of the cover then pull it out.
2.Next place two AA 1.5 VDC Batteries in the Battery Housing. Be sure that the polari- ties (+ or -) of the batteries line up with the polarity signs in the battery housing. Finally replace the battery cover. See Figure 1 on page 4.
CAMERA Installation
1.Chose a wall or ceiling location that allows you to mount the unit onto a solid surface capable of sustaining the weight of the unit. It is recommended that you choose a location that is out of the reach of pedestrians. If you cannot mount the camera to a wall stud, you will need to use the Dry Wall Mounting Anchors and Wood Screws (both not included).
2.It is essential to proper mounting that you use the correct size screws and that you also space the two screw correctly. The exact distance between the two screws is 2.659???
(67.59 mm) center to center. You can make a pattern of the mounting holes by placing a piece of tracing paper over the back of the Imitation Dome Camera and trace the mounting holes location using a pen or pencil. Next tape the pattern over the area that you want to install the camera. Mark the center of each mounting hole by hammering a nail through the pattern into the mounting surface. Attach the screws to the mounting surface leaving about a 1/4??? of the screws??? shanks exposed.
Warning: When mounting, be sure to avoid hammering into any electrical wiring.
3.After the two mounting screw have been attached to the wall or ceiling, place the two mounting holes on the camera over the screw heads. Press the Dome Camera over the screw heads and twist the camera. This should secure it into place. Always be careful, when drilling into a wall or ceiling, to avoid wires, pipe or cables that may be in the path of the drill. Be aware that the Camera needs to be mounted securely so it will not fall off the mounting and cause bodily injury.
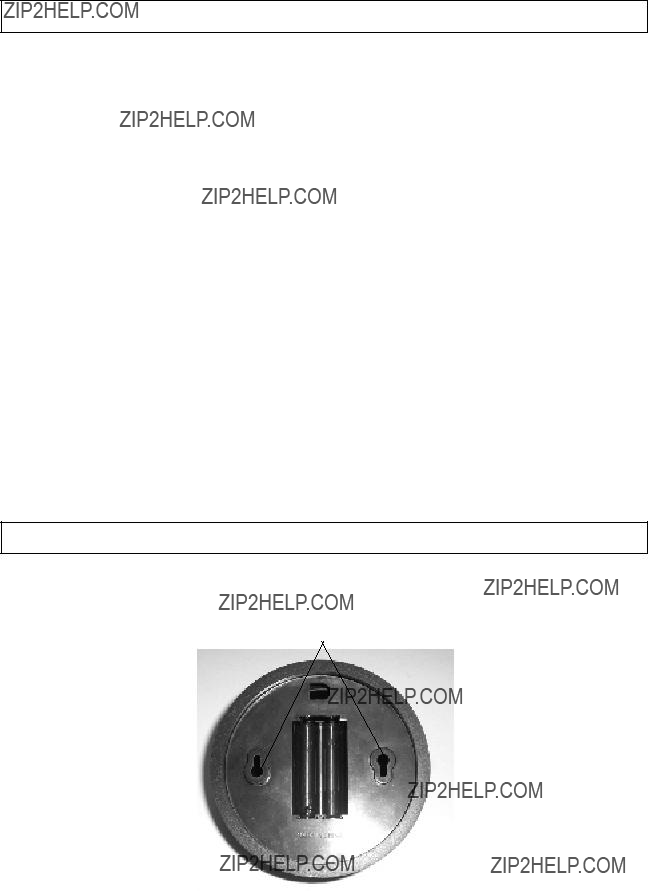
Note: The mounting holes on the Imitation Dome Camera are approximately 1/4??? with 5/32??? slots. See Figure 4 below.
operation
Once the two AA batteries are installed in the Dome Camera, the LED light will automatically blink in 5 second intervals until the batteries go dead. When the light stops blinking, replace the batteries.
Mounting Holes
Battery Housing 
FIGURE 1
Note: There are no replacement parts available for this product.