250 WATT ELECTRIC

MEAT GRINDER

9 0 2 6 2

ASSEMBLY AND OPERATING INSTRUCTIONS

3491 Mission Oaks Blvd., Camarillo, CA 93011

Visit our Web site at http://www.harborfreight.com

Copyright ?? 2003 by Harbor Freight Tools ?? . All rights reserved. No portion of this manual or any artwork contained herein may be reproduced in any shape or form without the express written consent of Harbor Freight Tools.

For technical questions and replacement parts, please call 1-800-444-3353

Accessories: Star Cutter, Fine Grill, Coarse Grill,

Sausage Stuffer attachments (3), Wheat Grinder, Pusher (#13)

Save This Manual

You will need the manual for the safety warnings and precautions, assembly instructions, operating and maintenance procedures, parts list and diagram. Keep your invoice with this manual. Write the invoice number on the inside of the front cover. Keep the manual and invoice in a safe and dry place for future reference.

Safety Warnings and Precautions

WARNING: When using product, basic safety precautions should always be followed to reduce the risk of personal injury and damage to equipment.

Read all instructions before using this product!

1.Keep work area clean. Cluttered areas invite injuries.

2.Observe work area conditions. Do not use Meat Grinder in damp or wet locations.

Don???t expose to rain. Keep work area well lighted. Do not use electrically powered tools in the presence of flammable gases or liquids.

3.Keep children away. Children must never be allowed in the work area. Do not let them handle the Meat Grinder.

4.Store idle equipment. When not in use, the Meat Grinder must be stored in a dry location to inhibit rust. Always lock up the Meat Grinder and keep out of reach of children.

5.Use the right product for the job. Do not attempt to force a smallproduct or attachment to do the work of a larger industrial product. There are certain applications for which this product was designed. It will do the job better and more safely at the rate for which it was intended. Do not modify this product and do not use this product for a purpose for which it was not intended.

6.Dress properly. Do not wear loose clothing or jewelry as they can be caught in moving parts. Protective, electrically non-conductive clothes and non-skid footwear are recommended when working. Wear restrictive hair covering to contain long hair.

7.Do not overreach. Keep proper footing and balance at all times.

8.Maintain products with care. Keep the Meat Grinder sharp and clean for better and safer performance. Follow instructions for changing accessories. Inspect the tool cord periodically, and if damaged, have it repaired by an authorized technician.

9.Disconnect power. Unplug product when not in use.

10.Avoid unintentional starting. Be sure the switch is in the Off position when not in use and before plugging in.

11.Stay alert. Watch what you are doing, use common sense. Do not operate any product when you are tired.

12.Check for damaged parts. Before using any product, any part that appears damaged should be carefully checked to determine that it will operate properly and perform its intended function. Check for alignment and binding of moving parts; any broken parts or mounting fixtures; and any other condition that may affect proper operation. Any part that is damaged should be properly repaired or replaced by a qualified technician. Do not use the Meat Grinder if the switch does not turn On and Off properly.

13.Guard against electric shock. Prevent body contact with grounded surfaces such as pipes, radiators, ranges, and refrigerator enclosures.

14.Replacement parts and accessories. When servicing, use only identical replacement parts. Use of any other parts will void the warranty. Only use accessories intended for use with this product. Approved accessories are available from Harbor Freight Tools.

15.Do not operate product if under the influence of alcohol or drugs. Read warning labels if taking prescription medicine to determine if your judgment or reflexes are impaired while taking drugs. If there is any doubt, do not operate the Meat Grinder.

16.Use proper size and type extension cord. If an extension cord is required, it must be of the proper size and type to supply the correct current to the tool without heating up.

Otherwise, the extension cord could melt and catch fire, or cause electrical damage to the tool. This tool requires use of an extension cord with up to 10 amps capability (up to 50 feet), with wire size rated at 18 AWG. Longer extension cords require larger size wire. If you are using the tool outdoors, use an extension cord rated for outdoor use.

(signified by ???WA??? on the jacket).

17.Maintenance. For your safety, service and maintenance should be performed only by a qualified technician.

18.Pacemaker safety warning. People with pacemakers should consult with their physician(s) before using this product; operation of equipment in close proximity to a heart pacemaker could cause interference or failure of the pacemaker.

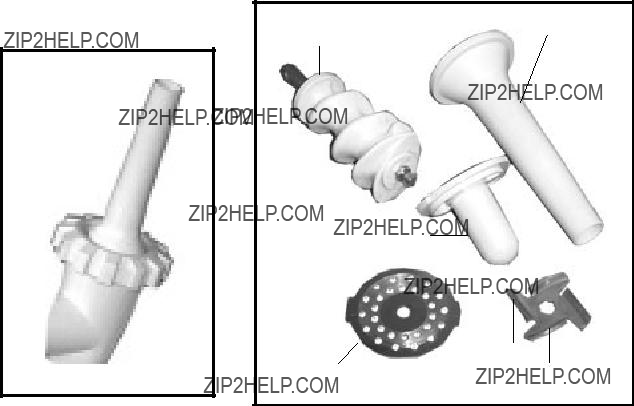
19.Always use the Pusher (13). When using the Meat Grinder, never use your hands, fork, spoon, or other utensils to push meat into the grinder. Be sure the on/off switch is in the OFF position until you complete all preparations for grinding.

20.Handle blades carefully. Be alert when handling sharp blades - especially the Star Cutter (8).

21.Unplug unit. When you are finished grinding, unplug the unit. Never attempt to clean

Note: Performance of this product may vary depending on variations in local line voltage or tool battery power. Extension cord usage may also affect product performance.

Warning:The warnings, cautions, and instructions discussed in this instruction manual cannot cover all possible conditions and situations that may occur. It must be under- stood by the operator that common sense and caution are factors which cannot be built into this product, but must be supplied by the operator.

Unpacking

When unpacking, check to make sure the parts listed on page 7 are included. If any parts are missing or broken, please call Harbor Freight Tools at the number on the cover of this manual as soon as possible.

Caution: To avoid health hazards: Clean all un-assembled parts in the dishwasher. Never wash the Grinder Drive Unit (1) in the dishwasher. Before assembling, thorougly wipe off the Meat Grinder Drive Unit (1) parts with a damp rag and antibacterial soap, making sure to keep moisture away from the motor housing and power cord. After assembly, test the Meat

Grinder by running several slices of day old bread through the machine to insure that all parts are working properly. After each use, clean the Meat Grinder thoroughly. Do not submerge the electrical machinery in the water. Detach parts and wash in mild antibacterial detergent and warm water. Dry parts and re-assemble when ready to use.

FIGURE 1

Sausage Stuffer (14) attached to unit - held in by threaded Nut (12).

FIGURE 2

Sausage Maker (14)

Spiral Drive (7)

Sausage Maker (15)

Operation

Refer to the Assembly Drawing on page 7 and FIGURES 1 and 2 on page 4.

Unplug the unit until you are completely prepared to grind.

Note: Situate the Grinder well away from the sink or any other water source. When the unit is plugged in, if it contacts water, it can cause severe electrical shock causing injury or death.

Assembly for Meat Grinding:

1.Gently drop the Spiral Drive (7) into the Mincing Body (6) with the shaft protruding through the hole at the back.

2.Carefully fit the Star Cutter (8) on the end of the Spiral Drive (7) with its cutting edge facing outwards. See FIGURE 2.

3.Place the Fine Grill (10), or Coarse Grill (11) on top of the Star Cutter (8) lining up the 2 tabs (See FIGURE 2) on the Grill with the notches threaded in the portion of the Mincing Body (6).

4.Attach the #12 Nut to the body, taking care not to over-tighten it. The cutter must rotate behind the grill, and should not bind.

5.Insert the Feeder Tube (4) into the Mincing Body (6).

6.Place the Mincing Body (6) into the Drive Unit (1) with the Feeder Tube (4) facing to the right. Turn the Feeder Tube (4) upright for operation.

7.Add the Tray (3) to the top of the Feeder Tube (4).

Grinding

1.After cutting the meat so that the chunks are small enough to fit into the Feeder Tube (4), you may plug in the unit.

2.Turn the Switch (2) to the ???On??? positon.

3.Drop a handful of meat into the Feeder Tube (4) and use the Pusher (13) to slowly push the meat into the blade. Do not force the Pusher (13). Allow the blades to cut at their pace. Continually add meat until you are finished. Shut off the unit and unplug from the outlet.

Assembly for sausage making:

Make sure the unit is unplugged.

1.If the unit is set up for meat grinding, remove the Nut (12) and then remove both the Grill and the Star Cutter (8). They are not used for sausage making.

2.Gently drop the Spiral Drive (7) into the Mincing Body (#6) with the shaft protruding through the hole at the back.

3.Position the wide end of the Sausage Maker (14) attachment so it threads into the

Mincing Body (6). Tightly thread the Nut (12) on the end of the Mincing Body (6). See FIGURE 1.

Operation (continued)

Sausage making:

1.Season the ground sausage meat to taste.

2.Soak the sausage skin in tepid water to make it more pliable.

3.Slide the sausage skin onto the end of the Sausage Maker (14) leaving approximately 1/2??? to spare.

4.Put the sausage meat into the Feeder Tube (4) and plug in and switch on the unit. Push down on the Pusher (13) gently, letting the motor do the work. Once the meat reaches the end of the Sausage Maker (14), turn off the Meat Grinder.

5.To avoid trapping air in the skin, tie a knot up to the end of the Sausage Maker (14).

6.Turn the unit back on and continue adding ground sausage meat.

Notes: Do not make excessively large sausages as the skins will burst. For easier sausage making work with another person; one to feed the Grinder and the other to hold the sausage skin as it fits on the Grinder.

7. When finished, turn off the grinder and unplug it. Tie a knot in the remaining skin on the Sausage Maker (14), and remove it. Note: Pinching and twisting the skin at the desired length will make the sausage into links.

Maintenance

Before cleaning the Meat Grinder, make sure it is unplugged from the outlet.

Never wash the Grinder in the dishwasher. You may wash the attachments in a dishwasher.

After each use, clean the Meat Grinder thoroughly. Do not submerge the Grinder Drive Unit (1) in the water. Detach parts and wash in mild antibacterial detergent and warm water. Dry parts and re-assemble when ready to use.

Assembly Drawing and Parts List

15

14

16

PLEASE READ THE FOLLOWING CAREFULLY

THE MANUFACTURER AND/OR DISTRIBUTOR HAS PROVIDED THE PARTS DIAGRAM IN THIS

MANUAL AS A REFERENCE TOOL ONLY. NEITHER THE MANUFACTURER NOR DISTRIBUTOR

MAKES ANY REPRESENTATION OR WARRANTY OF ANY KIND TO THE BUYER THAT HE OR

SHE IS QUALIFIED TO MAKE ANY REPAIRS TO THE PRODUCT OR THAT HE OR SHE IS

QUALIFIED TO REPLACE ANY PARTS OF THE PRODUCT. IN FACT, THE MANUFACTURER

AND/OR DISTRIBUTOR EXPRESSLY STATES THAT ALL REPAIRS AND PARTS REPLACEMENTS

SHOULD BE UNDERTAKEN BY CERTIFIED AND LICENSED TECHNICIANS AND NOT BY THE

BUYER. THE BUYER ASSUMES ALL RISK AND LIABILITY ARISING OUT OF HIS OR HER

REPAIRS TO THE ORIGINAL PRODUCT OR REPLACEMENT PARTS THERETO, OR ARISING

OUT OF HIS OR HER INSTALLATION OF REPLACEMENT PARTS THERETO.

NOTE: Some parts are listed and shown for illustration purposes only and are not available individually as replacement parts.