SOLAR CANDLE
GARDEN LANTERN
95797
Assembly And Operation Instructions
Due to continuing improvements, actual product may differ slightly from the product described herein.
3491 Mission Oaks Blvd., Camarillo, CA 93011
Visit our website at: http://www.harborfreight.com
To prevent serious injury, read and understand all warnings and instructions before use.
Copyright?? 2007 by Harbor Freight Tools??. All rights reserved. No portion of this manual or any artwork contained herein may be reproduced in any shape or form without the express written consent of Harbor Freight Tools.
For technical questions or replacement parts, please call 1-800-444-3353.

Save This Manual
You will need the manual for the safety warnings and precautions, assembly instructions, operating and maintenance procedures, parts list and diagram. Keep your invoice with this manual. Write the invoice number on the inside of the front cover. Keep the manual and invoice in a safe and dry place for future reference.
Safety Warnings and Precautions
WARNING: When using tool, basic safety precautions should always be followed to reduce the risk of personal injury and damage to equipment.
Read all instructions before using this tool!
1.Keep work area clean. Cluttered areas invite injuries.
2.Observe work area conditions. Keep work area well lighted.
3.Keep children away. Children must never be allowed to handle this product. This is not a toy. Keep out of their reach.
4.Use the right product for the job. Do not attempt to force this product to do the work of a larger Lantern. There are certain applications for which this product was designed. Do not modify this product and do not use this product for a purpose for which it was not intended.
5.Use eye protection. Always wear ANSI-approved impact safety goggles during set up.
6.Do not overreach. Keep proper footing and balance at all times. .
7.Stay alert. Watch what you are doing. Use common sense when positioning this Lantern in the ground.
8.Avoid any hidden pipes or wiring in the ground. Be aware of where you are inserting the Ground Stake (16) of the Solar Candle Garden Lantern.
9.Check for damaged parts. Before using any tool, any part that appears damaged should be carefully checked to determine that it will operate properly and perform its
REV 07d
intended function. Any broken parts or mounting fixture that may affect proper operation should be properly repaired or replaced by a qualified technician.
10.Properly disponse of any used batteries. Dispose of the used batteries properly according to the solid Waste disposal regulations in your community.
11.Warning: The warnings, cautions, and instructions discussed in this instruction manual cannot cover all possible conditions and situations that may occur. It must be understood by the operator that common sense and caution are factors which cannot be built into this product, but must be supplied by the operator.
Unpacking
When unpacking, check to make sure that the item is intact and undamaged. If any parts are missing or broken, please call Harbor Freight Tools at the number on the cover of this manual as soon as possible.
OPERATING INSTRUCTIONS
NOTE: For additional information regarding the parts listed in the following pages, refer to the Assembly Diagram on page 7.
1.Before using, you need to charge the batteries. You can do this by placing the Solar Lantern in the sunlight.The Lantern will take approximately 8 hours of sunlight to charge.
Be sure the four Solar Panels (2) are in full sunlight.
Solar Panels (2)
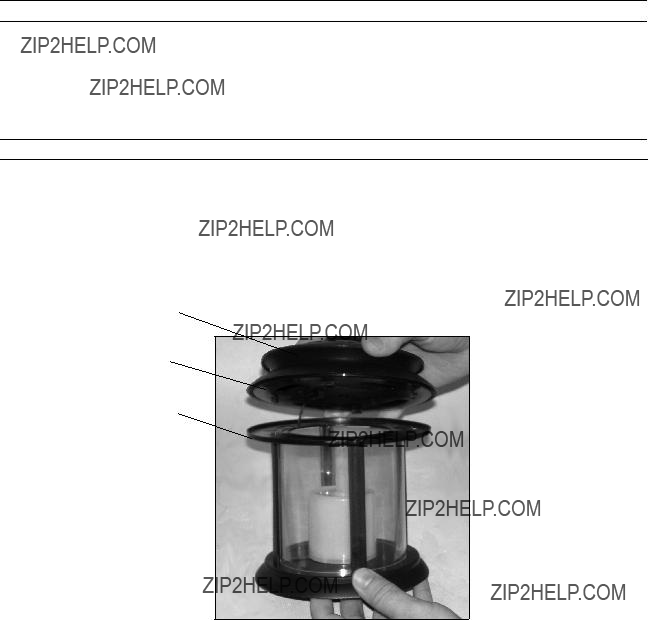
Top Assembly
Plastic Ring (11)
FIGURE 1
2.After the Batteries (8) are charged, remove the Top Assembly (See Figure 1) by twisting counterclockwise off the Plastic Ring (11) and lifting it off the Lantern.
Plastic Ring (11)
FIGURE 2
3.The Power Switch (10) is on the underside of the Top Assembly. To have the light turn on at night, locate the Power Switch (18) and switch to the ON position. You can turn the Solar Candle Garden Lantern Power Switch (18) OFF if you do not want the light to turn on at night. See Figure 2.
4.Replace the Top Assembly by connecting it to the Lantern, matching up the notches and twisting clockwise for closure.
Small Loop (1)
???S??? Steel Tube (19)
Middle Steel Tube (22) 
Lower Steel Tube (23) 
Ground
Stake (16)
FIGURE 3
5.The Shepherd???s Hook is screwed together with three threaded shafts (19, 22 and 23). Hook inserts into the top of the Ground Stake (16) and the Lantern hangs from the

hook by a Small Loop (1) at the top of the light. See Figure 3 and Assembly Drawing on page 7.
6.Choose the location for the Solar Candle Garden Lantern and stick the Shepherd???s Hook and Ground Stake (16) into the ground, avoiding any underground wiring or plumbing. Be sure to choose a location that gets plenty of sunshine during the day and is not near a porch or street light at night. See Figure 3.
7.If the Solar Candle Garden Lantern stops working or is not holding a charge for a long enough period, replace the batteries with identical rechargeable NiCd ???AA??? batteries. See directions below for battery replacement.
Small Loop (1)
FIGURE 4
Note: The Solar Candle Garden Lantern can be removed from the Shepherd???s Hook and Stake and used as a table Lantern. See Figure 4.
BATTERY REPLACEMENT
1.Turn the Top Assembly of the Solar Candle Garden Lantern slightly counterclockwise. Remove the assembly from the top of the Solar Candle Garden Lantern.See Figure 1 on page 3.
2.Take assembly off the Lantern, being careful not to disturb the wires and the internal components. See Figure 2 on page 4.
3.Remove the used Batteries (8) and dispose of them properly according to the Solid Waste Disposal regulations in your community. Replace with new Rechargeable

NiCd Batteries (8). The polarity of the batteries is marked inside the Battery Case
(10). Be careful of the internal components and do not disturb the wires.
4.Once the batteries are in place, match up the notches and return the Top Assembly. Twist clockwise onto the Plastic Ring (11). Then tighten.
Note: Test that the Top Assembly and Lantern are secure before hanging on the
Shepherd???s Hook.
Maintenance
1.WARNING! Make sure the Power Switch (18) of the Solar Candle Garden Lantern is in its ???OFF??? position before performing any inspection, maintenance, or cleaning procedures.
2.BEFORE EACH USE, inspect the general condition of the Solar Candle Garden
Lantern. Check for loose screws, cracked or broken parts, damaged electrical wiring, and any other condition that may affect its safe operation. Do not use damaged equipment.
3.Clean the outside of the Solar Candle Garden Lantern with a clean and damp cloth. Never use abrasive cleaners; they will damage the unit. You may use a mild detergent. Never submerge the Solar Candle Garden Lantern in water or any other liquid.
PLEASE READ THE FOLLOWING CAREFULLY
The manufacturer and/or distributor has provided the parts list and assembly diagram in this manual as a reference tool only. Neither the manufacturer or distributor makes any representation or warranty of any kind to the buyer that he or she is qualified to make any repairs to the product, or that he or she is qualified to replace any parts of the product. In fact, the manufacturer and/or distributor expressly states that all repairs and parts replacements should be undertaken by certified and licensed technicians, and not by the buyer. The buyer assumes all risk and liability arising out of his or her repairs to the original product or replacement parts thereto, or arising out of his or her installation of replacement parts thereto.
Assembly Diagram
Note: Some parts are listed and shown for illustration purposes only and are not available individually as replacement parts.

