SOLAR LIGHT SET
4 PIECE
Model 93863
ASSEMBLY & OPERATING INSTRUCTIONS
Diagrams within this manual may not be drawn proportionally.
Due to continuing improvements, actual product may differ slightly from the product described herein.
Distributed exclusively by Harbor Freight Tools??.
3491 Mission Oaks Blvd., Camarillo, CA 93011
Visit our website at: http://www.harborfreight.com
Read this material before using this product. Failure to do so can result in serious injury. Save this manual.
Copyright?? 2006 by Harbor Freight Tools??. All rights reserved. No portion of this manual or any artwork contained herein may be reproduced in any shape or form without the express written consent of Harbor Freight Tools.
For technical questions or replacement parts, please call 1-800-444-3353.

THANK YOU for choosing a HARBOR FREIGHT TOOLS product. For future reference, please complete the owner???s record below:
SAVE THE RECEIPT, WARRANTY AND THESE INSTRUCTIONS. It is important that you read the entire manual to become familiar with the unit BEFORE you begin assembly.
Technical Specifications
The Solar Light Set includes 4 solar lights and parts for each one.
Safety Warnings and Precautions
WARNING: When using product, basic safety precautions should always be followed to reduce the risk of personal injury and damage to equipment.
Read all instructions before using this product!
1.Keep work area clean. Cluttered areas invite injury.
2.Observe work area conditions. Keep work area well lit. Position the Solar Light Set in an unobstructed area that receives sunlight at least six hours a day.
3.Check for damaged parts. Before using any product, any part that appears damaged should be carefully checked to determine that it will operate properly and perform its intended function. Check for any broken or damaged parts and any other conditions that may affect its operation. Replace or repair damaged or worn parts immediately. Do not use the Solar Light Set if any switch does not turn on and off properly.
4.Replacement parts and accessories. When servicing, use only identical replacement parts. Use of any other parts will void the warranty.
5.Always check hardware and assembled parts after assembling. All connections should be tight and hardware tightened.
6.Keep children away. Children must never be allowed in the work area. Do not let them handle the Solar Light.
7.Store idle equipment. When not in use always lock up the Solar Light Set and keep it out of the reach of children.
8.Dress properly. Protective, electrically nonconductive clothes and nonskid footwear are recommended when setting up the Solar Light Set. Wear restrictive hair covering to contain long hair.
9.Use eye protection. Always wear ANSI approved impact safety goggles when setting up this product.
10.Maintain products with care. Keep the Solar Light Set clean for better and safer performance. Inspect the Solar Light Set periodically. If damaged, have it repaired by an authorized technician.
11.Do not overreach. Keep proper footing and balance at all times.
12.Use the right Solar Light for the job. Do not attempt to force a small Solar Light to do the work of a larger Solar Light. There are certain applications for which this Solar Light Set was designed. Do not modify these products and do not use this Solar Light for a purpose for which it was not intended.
13.Do not set up the Solar Light Set if under the influence of alcohol or drugs. Read warning labels on prescriptions to determine if your judgement or reflexes are impaired while taking drugs. If there is any doubt, do not set up the Solar Light.
14.Keep the Solar Panel free of dirt, dust and grime. Dust covering the Solar Panel will block out sunlight causing a decrease or stoppage of efficiency in recharging the batteries.
WARNING: NiCad batteries must be disposed of properly. Do not incinerate. Batteries may burst, causing personal injury and/or property damage. Contact your local hazardous waste disposal authority for proper disposal.
WARNING: The warnings, cautions, and instructions discussed in this instruction manual cannot cover all possible conditions and situations that may occur. It must be understood by the operator that common sense and caution are factors which cannot be built into this product, but must be supplied by the operator.
Unpacking
When unpacking the Solar Light Set, check to make sure parts on page 5 are included. If any parts are missing or broken, please call HARBOR FREIGHT TOOLS at 1-800-444-3353.
Assembly/ Operation
Your Solar Light Set will require complete assembly. The Solar Light Set requires special conditions for set up and operation. It is important that you read the entire manual to become familiar with the product BEFORE you use the Solar Light Set. Before operating the Solar Light Set be sure that you have all parts described in the Parts List and Assembly Diagram located on page 5 of this manual.
1.Decide where you want to place the Solar Light Set. Choose a location that receives full, direct sunlight a minimum of six hours a day. The location should not be near nighttime light sources such as porch lights or streetlights as this may trigger the lights to turn off or flicker.
2.The Solar Light Set will need to charge for at least 6 hours before using it for the first time.
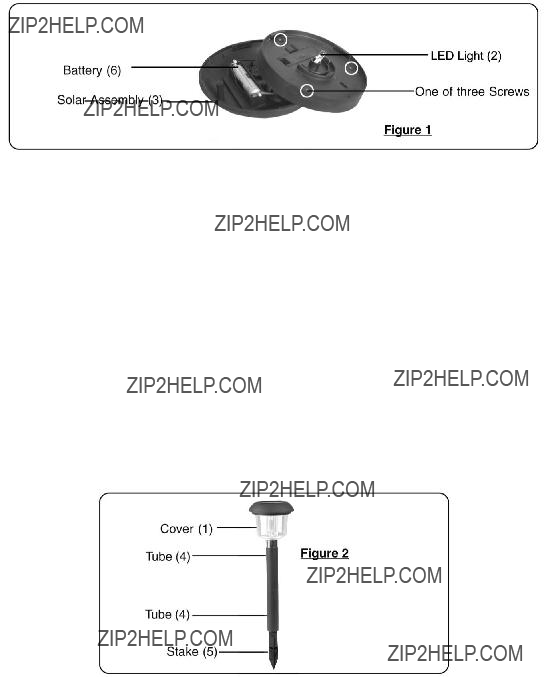
3.Each light is powered by a battery. Each Battery (6) has a pull tab that keeps the battery disconnected until you are ready to use the Solar Light Set. To access the battery, see steps 4, 5 and 6. Refer to the section, ???Replacing the Battery??? and see Figure 1.
4.Remove the Solar Assembly (3) by unscrewing it from the Cover (1) and gently pulling it off. Unscrew the three screws from the Solar Assembly (3)-see Figure 1.
5.Carefully separate the top portion of the Solar Assembly (3) from the bottom piece as seen in Figure 1. Be careful to not bump or pull on any wires while doing this. If any wires are pulled, they may disconnect and disable the Solar Light.
6.Remove the pull tab from the Battery (6) so that the battery in each light is connected and providing power to the Solar Light. The pull tab can be grasped with long nosed pliers through the hole in the Solar Assembly. Note: Keep the pull tab and attach it to the battery when the Light Set is being stored and not being used.
Note: During the day, the Solar Panel converts sunlight into electricity, recharging the battery. The amount of light the Solar Panel receives depends on placement of the Solar Light Set, geographic location and weather. If the weather is cloudy and the panel did not receive a full charge, the Solar Light Set may not achieve the full hours of operating time. It will catch up on its own after two to three days of full sun.
7.Slide the top Tube (4) into the Cover (1). Set another Tube (4) into the top Tube (4). Slide the Stake (6) onto the lower Tube (4)-see Fig. 2.
Warning: Before inserting the Solar Lights into the ground, make certain to choose an area where there are no underground pipes, cables or other obstructions.
Make certain that the ground is soft enough to accept the Stakes (6). Gently insert them into the ground making certain that it is in solid. Make certain that the Stake (6) is completely inserted into the ground to assure full stability for the Solar Light.
Replacing the Battery
It is recommended that you replace the battery in each Light every 12 months.
1.Remove the Cover (1). Unscrew the three screws from the Solar Assembly (3)-see Figure 1.
2.Carefully separate the top portion of the Solar Assembly from the bottom piece as seen in Figure 1. Be careful to not bump or pull on any wires while doing this. If any wires are pulled, they may disconnect and break the Solar Light.
3.Remove the old Battery (6). Make certain that the new battery is Ni-Cd (600 mAh/1.2V) rechargeable. Install the new battery into the battery compartment. Make certain that the battery is placed according to the correct polarity.
Maintenance
Clean regularly with a damp towel. Do not use any type of solvent for cleaning. Do not put too much pressure on the light or components while cleaning. Dry thoroughly.
Note: Some parts are listed and shown for illustration purposes only and are not available individually as replacement parts.
PLEASE READ THE FOLLOWING CAREFULLY
THE MANUFACTURER AND/OR DISTRIBUTOR HAS PROVIDEDTHE PARTS DIAGRAM INTHIS MANUAL AS A REFERENCETOOL
ONLY. NEITHERTHE MANUFACTURER NOR DISTRIBUTOR MAKES ANY REPRESENTATION OR WARRANTY OF ANY KINDTO
THE BUYER THAT HE OR SHE IS QUALIFIED TO MAKE ANY REPAIRS2TO THE PRODUCT OR THAT HE OR SHE IS QUALIFIED
TO REPLACE ANY PARTS OF THE PRODUCT. IN FACT, THE MANUFACTURER AND/OR DISTRIBUTOR EXPRESSLY STATES THat ALL REPAIRS AND PARTS REPLACEMENTS SHOULD BE UNDERTAKEN BY CERTIFIED AND LICENSED TECHNICIANS
AND NOT BY THE BUYER. THE BUYER ASSUMES ALL RISK AND LIABILITY ARISING OUT OF HIS OR HER REPAIRS TO THE
ORIGINAL PRODUCT OR REPLACEMENT PARTSTHERETO,OR ARISING OUT OF HIS OR HER INSTALLATION OF REPLACEMENT
PARTS THERETO.