Portable Fish Finder
Model 96902
Set up And Operating Instructions
Diagrams within this manual may not be drawn proportionally.
Due to continuing improvements, actual product may differ slightly from the product described herein.
Distributed exclusively by Harbor Freight Tools??.
3491 Mission Oaks Blvd., Camarillo, CA 93011
Visit our website at: http://www.harborfreight.com
Read this material before using this product. Failure to do so can result in serious injury. Save this manual.
Copyright?? 2007 by Harbor Freight Tools??. All rights reserved. No portion of this manual or any artwork contained herein may be reproduced in any shape or form without the express written consent of Harbor Freight Tools.
For technical questions or replacement parts, please call 1-800-444-3353.

Save This Manual
Keep this manual for the safety warnings and precautions, assembly, operating, inspection, maintenance and cleaning procedures. Write the product???s serial number in the back of the manual near the assembly diagram (or month and year of purchase if product has no number). Keep this manual and the receipt in a safe and dry place for future reference.
WARNING! Read all instructions
Failure to follow all instructions listed below may result in serious injury.
SAVE THESE INSTRUCTIONS
General Safety Rules
1.Keep children and bystanders away while operating. Distractions can cause you to lose control.
2.Stay alert and use common sense when operating. Do not use when tired or under the influence of drugs, alcohol or medication.
3.Do not overreach. Keep proper footing and balance at all times. This enables better control in unexpected situations.
4.This product is not a toy. Keep it out of reach of children.
5.Do not modify this product or use it for a purpose for which it is not intended.
6.Check for broken parts and any other condition that may affect the product???s operation. If damaged, have the product repaired before use.
7.Have product serviced by a qualified repair person using only identical replacement parts. This will ensure that the safety of the product is maintained.
8.Maintain labels and nameplates on the product. These carry important safety information. If unreadable or missing, contact Harbor Freight Tools for a replacement.
9.The depth gauge feature on this Fish Finder is intended only as an aid in catching fish; not as a navigation device. Always consult depth charts and pay attention to posted water depth warnings. This device should not be used as a navigational aid to prevent collision, grounding, boat damage, or personal injury.
10.Do not put the Fish Finder directly near any human or animal ear. Although the frequency of the SONAR is well out of the range of human hearing, there is a chance of damaging the inner ear.
11.Do not use near diving or swimming areas.
12.Position batteries in proper polarity and do not install batteries of different types, charge levels, or capacities together.
13.The warnings, precautions, and instructions discussed in this instruction manual cannot cover all possible conditions and situations that may occur. It must be understood by the operator that common sense and caution are factors which cannot be built into this product, but must be supplied by the operator.
 Save these instructions.
Specifications
Unpacking
When unpacking, check to make sure that the item is intact and undamaged. If any parts are missing or broken, please call Harbor Freight Tools at the number shown on the cover of this manual as soon as possible.
Operating Instructions
Read the entire Important Safety Information section at the beginning of this manual including all text under subheadings therein before set up or use of this product.
1.Remove the back cover on the Display and, observing polarity, insert 4 AAA 1.5V batteries into the unit. Close back cover.
2.Plug the Transducer (29) into the top of the Display, taking care to align the pins properly.
3.Push the MENU POWER button to turn the Fish Finder on.
4.Choose ???Start up??? to begin using the unit or push the right arrow button once to see a simulation, push the MENU POWER button to select.
5.SONAR (SOund Navigation And Ranging) works by sending out a specific audio signal that bounces off objects and is then read by the unit to provide a graphic display.
6.The Transducer can be used directly in the water to look for Fish, but the Display unit should never be immersed.
Settings
1.Each option is selected by using the right or left arrow buttons. Toggle through the options by pushing the MENU POWER button. The menu screen turns off automatically, saving any changes, after five seconds.
2.Light allows the backlight to be turned on or off. Continuous operation of the backlight significantly decreases battery lifespan.
3.Sensitivity adjusts the level of sonar returns shown on the Display. A higher number will yield more returns and find more fish, whereas a lower number will remove clutter from the Display. The Fish Finder will not work well in areas where the water is especially murky or stirred up.
4.Depth Range allows manual selection of a specific depth to scan, or automatic depth range if put on ???Auto???. If the depth of the water is greater than the depth range setting, the bottom will not be visible on screen.
5.Zoom allows the user to magnify the area on the bottom to better detect fish and objects.
6.Depth Alarm allows the unit to be set to sound an alarm when the depth becomes equal to, or greater than, the set level.
7.Fish Alarm can be set to sound an alarm when the Fish Finder has detected a fish.
8.Fish Icon; turning this feature off allows the user to see raw sonar data images instead of the Fish Finder???s graphics.
9.Chart Speed controls the rate at which information scrolls across the Display.
10.Depth Unit allows the user to choose whether depth information is presented in standard or metric units.
11.Temp Unit allows the user to choose whether temperature information is provided in Fahrenheit or Celsius.
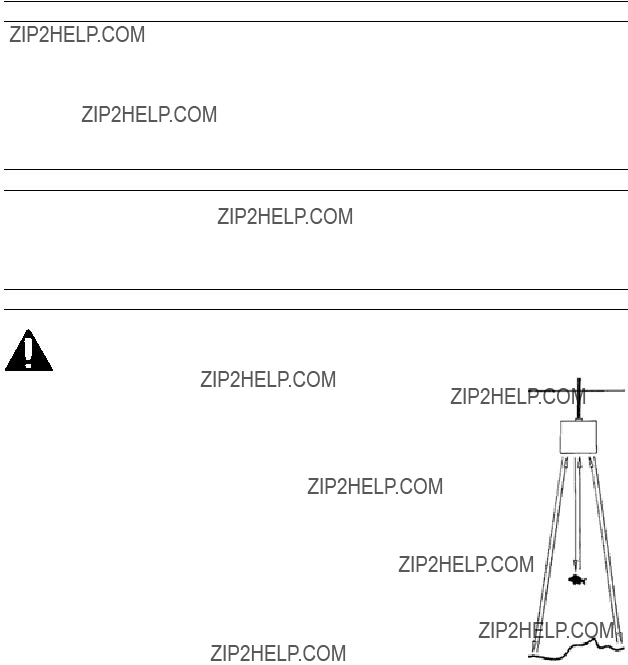
Using the Fish Finder in a boat:

???Place the transducer in 1/2??? of water on the bottom of the boat, or
???coat the face of the transducer with petroleum jelly and apply it firmly to the bottom of the boat, or
???place it in a plastic bag filled with water. (See Figure 1)
2.Do not immerse the entire Fish Finder, this unit is water resistant but not waterproof. Immersing the Display will permanently damage the unit.
3.Monitor the Display to observe underwater objects and fish.
Using the Fish Finder ???freehand???:
1.Hold the tip of the transducer under the surface of the water. The tip of the transducer must remain submerged in order to get an accurate reading.
2.Move the transducer slowly back and forth to allow scanning of the surrounding underwater area.
3.Monitor the Display to observe the underwater fish and objects.
Using the Fish Finder on ice:
1.Do not use the Fish Finder in temperatures lower than 0?? F (-17?? C).
2.Place the face of the transducer directly on the ice. The Fish Finder will not work if there are air pockets between the transducer and the surface of the water. It may be necessary to apply a small amount of water to the surface of the ice to get a reading or to cut a hole in the ice for the Fish Finder to operate properly.
3.When finished, carefully remove the transducer from the ice; if necessary use a small amount of water to melt the surface of the ice.
4.After any application, clean the transducer with fresh water and wipe dry with a soft, clean cloth, remove the batteries for long-term storage and, then store the product indoors out of children???s reach.
1.BEFORE EACH USE, inspect the general condition of the product. Check for loose screws, misalignment or binding of moving parts, cracked or broken parts, damaged wiring, and any other condition that may affect its safe operation.
2.After Use, clean external surfaces of the product with clean, moist cloth.
3.Dispose of batteries properly, in a manner consistent will all State, local, and
Federal laws and regulations.
PLEASE READ THE FOLLOWING CAREFULLY
The manufacturer and/or distributor has provided the parts list and assembly diagram in this manual as a reference tool only. Neither the manufacturer or distributor makes any representation or warranty of any kind to the buyer that he or she is qualified to make any repairs to the product, or that he or she is qualified to replace any parts of the product. In fact, the manufacturer and/or distributor expressly states that all repairs and parts replacements should be undertaken by certified and licensed technicians, and not by the buyer. The buyer assumes all risk and liability arising out of his or her repairs to the original product or replacement parts thereto, or arising out of his or her installation of replacement parts thereto.
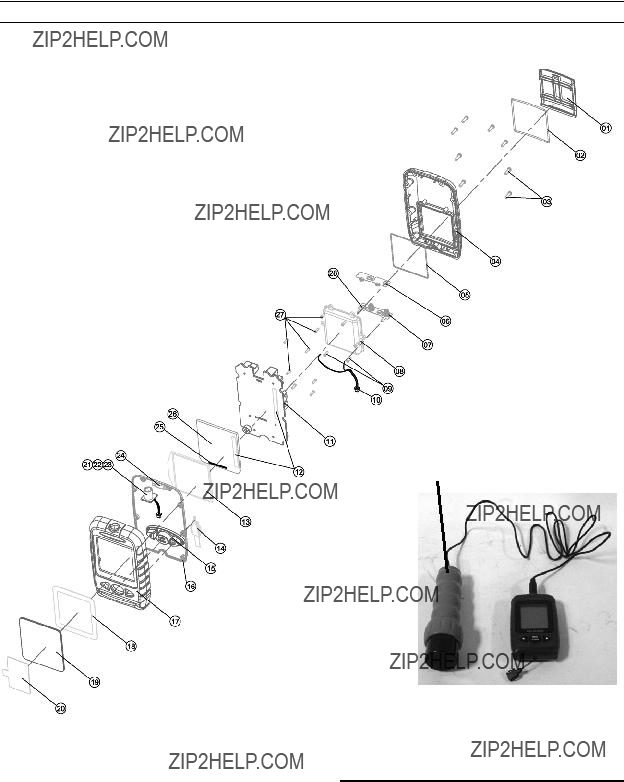
PARTS LIST
ASSEMBLY DIAGRAM
Transducer (29)
Display
Record Product???s Serial Number Here:
Note: If product has no serial number, record month and year of purchase instead.
Note: Some parts are listed and shown for illustration purposes only, and are not available individually as replacement parts.