3 Piece decorative solar light set

Model 95588

Assembly And Operation Instructions

Due to continuing improvements, actual product may differ slightly from the product described herein.

??

3491 Mission Oaks Blvd., Camarillo, CA 93011

Visit our website at: http://www.harborfreight.com

To prevent serious injury, read and understand all warnings and instructions before use.

Copyright?? 2006 by Harbor Freight Tools??. All rights reserved. No portion of this manual or any artwork contained herein may be reproduced in any shape or form without the express written consent of Harbor Freight Tools.

For technical questions or replacement parts, please call 1-800-444-3353.

Specifications

Color changing Solar Light Set. Led turns on automatically and changes colors in red, green and blue sequence.

Save This Manual

You will need this manual for the safety warnings and precautions, assembly, oper- ating, inspection, maintenance and cleaning procedures, parts list and assembly diagram. Keep your invoice with this manual. Keep this manual and invoice in a safe and dry place for future reference.

GENERAL SAFETY RULES

WARNING!

READ AND UNDERSTAND ALL INSTRUCTIONS Failure to follow all instructions listed below may result in

electric shock, fire, and/or serious injury.

SAVE THESE INSTRUCTIONS

1.Keep your work area clean and well lit. Cluttered benches and dark areas invite accidents.

2.Keep bystanders, children, and visitors away while assembling and operating this product. Distractions can cause you to lose control. Keep children out of the work area. This product is not a toy; keep children away from this Solar Light.

3.Stay alert. Watch what you are doing, and use common sense when assem- bling and operating the Solar Light Set. A moment of inattention while operating this product may result in serious personal injury.

4.Dress properly. Do not wear loose clothing or jewelry. Contain long hair. Do not overreach. Keep proper footing and balance at all times.

5.Use safety equipment. Always wear eye protection. Always wear ANSI-approved safety goggles when performing maintenance on this product.

6.Do not force the product. Use the correct product for your application. The correct product will do the job better and safer at the rate for which it is designed. Do not force the product and do not use it for a purpose for which it is not intended.

7.Do not use this product if the Power Switch does not turn it on or off. Any product that cannot be controlled with the Power Switch is dangerous and must be replaced.

8.Store idle products out of reach of children and other untrained persons. This product is dangerous in the hands of untrained users.

9.Use only accessories that are recommended by the manufacturer for your model. Accessories that may be suitable for one product may become hazardous when used on another product.

10.When servicing a product, use only identical replacement parts. Follow instructions in the ???Inspection, Maintenance, And Cleaning??? section of this manual. Use of unauthorized parts or failure to follow maintenance instructions may create a risk of electric shock or injury.

11.Maintain labels and nameplates on the product. These carry important informa- tion. If unreadable or missing, contact Harbor Freight Tools for a replacement.

12.Maintain a safe working environment. Make sure there is adequate surrounding workspace. Do not use this product in a damp or wet location.

13.People with pacemakers should consult their physician(s) before using this product. Electromagnetic fields in close proximity to a heart pacemaker could cause interference to or failure of the pacemaker. In addition, people with pacemakers should adhere to the following:

???Avoid operating power tools alone.

???Don???t use a power tool with the power switch locked on.

???If powered via a power cord be certain that the tool is properly grounded. A ground fault interrupt (GFCI) system is also a good precaution. This inexpensive device is a good safety measure because it prevents a sustained electrical shock.

???Properly maintain and inspect all tools before use to avoid electrical shock.

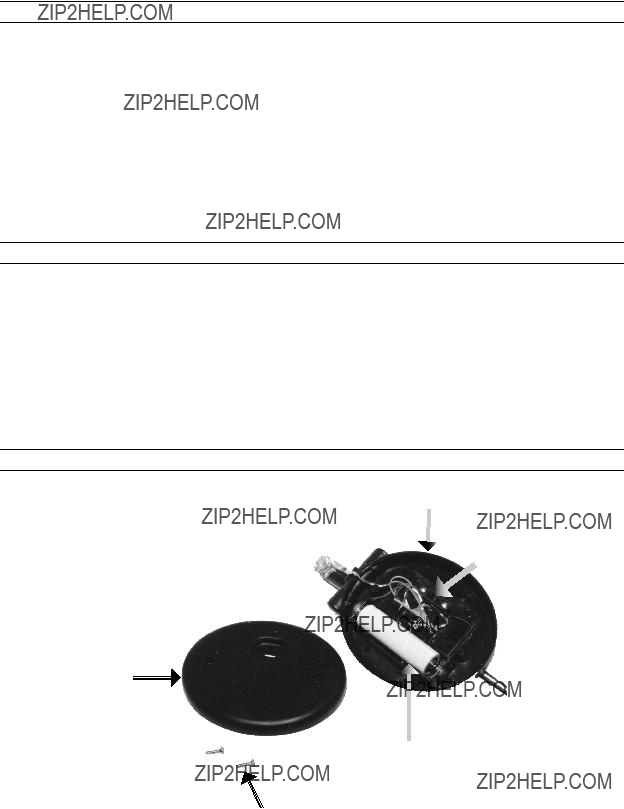
14.Keep the Solar Panel free of dirt, dust and grime. Dust covering the Solar Panel will block out sunlight causing a decrease or stoppage of efficiency in recharging the battery.

15.WARNING: NiCad batteries must be disposed of properly. Do not incinerate.

The battery may burst, causing personal injury and/or property damage. Contact your local hazardous waste disposal authority for proper disposal.

Unpacking

When unpacking, check to make sure that the item is intact and undamaged. If any parts are missing or broken, please call Harbor Freight Tools at the number shown on the cover of this manual as soon as possible.

Assembly AND OPERATING Instructions

Note: For additional information regarding the parts listed in the following pages, refer to the Assembly Diagram near the end of this manual.

1.WARNING! Make sure the Power Switch of the product is in its ???OFF??? position before making any adjustments to the product.

2.Decide where you want to place the Solar Light Set. Choose a location that receives full, direct sunlight a minimum of six hours a day. The location should not be near nighttime light sources such as porch lights or streetlights as this will cause the

Solar Light Set to remain off.

3.The Solar Light Set will need to charge for at least twelve hours before using it for the first time. Allow to charge for two sunny days before the Solar Light Set is fully charged. During initial charging, set the switch to ???Off???.

4.Located underneath the Battery Cover (9) is a Auto/Off Switch (7). The Switch can be set to either ???Auto??? or ???Off???. Set the Auto/Off Switch to ???Auto.???-see Figure 1 and Parts Diagram.

5.Moving the Auto/Off Switch (7) to ???Auto??? will automatically turn on the Solar Light during the night. After the initial charge is set, check to see that the Light (2) is on by viewing the light at night or in a dark location. If the Light (2) is not lit, check the position of the ???Auto??? Switch.

6.Note: During the day, the Solar Panel converts sunlight into electricity, recharging the battery. The amount of light the Solar Panel receives depends on placement of the Solar Light, geographic location and weather. If the weather is cloudy and the panel did not receive a full charge, the Solar Garden Light may not achieve the full hours of operating time. It will catch up on its own after two to three days of full sun.

7.Set the Hummingbird, Dragonfly or Butterfly onto the Top Tube (3). Slide the Top Tube (3), into the Bottom Tube (4). Slide the Stake (5) onto the Bottom Tube (4).

8.Push the Stake (5) directly into the ground. Make certain that the path of the Stake

(5)is clear of lines, cables and conduits.

replacing the Batteries

1.It is recommended that you replace the battery every 12 months.

2.Unscrew the screws from underneath the Battery Cover (9) and remove it from the

Solar Panel (1)-see Figure 1.

3.Remove and properly recycle the old battery. Make certain that the new battery is Ni-Cd ( ???AA???, 1.2V, 600 mAh) rechargeable.

4.Install the new battery into the Battery Compartment. Make certain that the battery is placed according to the correct polarity-see Figure 1.

Battery Cover

(9)

Battery (6)

5.Replace the cover and screw it back into place.

inspection, Maintenance and cleaning

1.Clean regularly with a damp towel. Do not use any type of solvent for cleaning. Do not put too much pressure on the Light, Solar Panel or accessories while cleaning.

Dry thoroughly.

2.WARNING! Make sure the Auto/Off Switch is in its ???OFF??? position before per- forming any inspection, maintenance, or cleaning procedures.

3.BEFORE EACH USE, inspect the general condition of the Solar Light Set. Check for loose screws, cracked or broken parts, damaged electrical wiring, and any other condition that may affect its safe operation. Do not use damaged equipment.

Troubleshooting

PARTS LIST

parts and ASSEMBLY DIAGRAM

1

7

9

6

8

parts and ASSEMBLY DIAGRAM (Cont???d)

4

5

3

1

2

PLEASE READ THE FOLLOWING CAREFULLY

The manufacturer and/or distributor has provided the parts list and assem- bly diagram in this manual as a reference tool only. Neither the manufacturer or distributor makes any representation or warranty of any kind to the buyer that he or she is qualified to make any repairs to the product, or that he or she is qualified to replace any parts of the product. In fact, the manufacturer and/or distributor expressly states that all repairs and parts replacements should be undertaken by certified and licensed technicians, and not by the buyer. The buyer assumes all risk and liability arising out of his or her repairs to the original product or replacement parts thereto, or arising out of his or her installation of replacement parts thereto.