OPERATING MANUAL
SYSTEM
DC POWER SUPPLIES HP MODELS 6621A, 6622A, 6623A, 6624A, and 6627A
HP Part No 5957-6377
HP Model 6621A, Serials 3213A-01681 and Above*
HP Model 6622A, Serials 3210A-02091 and Above*
HP Model 6623A, Serials 3209A-02231 and Above*
HP Model 6624A, Serials 3210A-06721 and Above*
HP Model 6627A, Serials 3209A-00841 and Above*
* For instruments with higher Serial Numbers, a change page may be included.

CERTIFICATION
Hewlett-Packard Company certifies that this product met its published specifications at time of shipment from the factory. Hewlett-Packard further certifies that its calibration measurements are traceable to the United States National Bureau of Standards, to the extent allowed by the Bureau's calibration facility, and to the calibration facilities of other International Standards Organization members.
WARRANTY
This Hewlett-Packard hardware product is warranted against defects in material and workmanship for a period of three years from date of delivery. HP software and firmware products, which are designated by HP for use with a hardware product and when properly installed on that hardware product, are warranted not to fail to execute their programming instructions due to defects in material and workmanship for a period of 90 days from date of delivery. During the warranty period Hewlett-Packard Company will, at its option, either repair or replace products which prove to be defective. HP does not warrant that the operation for the software, firmware, or hardware shall be uninterrupted or error free.
For warranty service, with the exception of warranty options, this product must be returned to a service facility designated by HP. Customer shall prepay shipping charges by (and shall pay all duty and taxes) for products returned to HP for warranty service. Except for products returned to Customer from another country, HP shall pay for return of products to Customer.
Warranty services outside the country of initial purchase are included in HP's product price, only if Customer pays HP international prices (defined as destination local currency price, or U.S. or Geneva Export price).
If HP is unable, within a reasonable time to repair or replace any product to condition as warranted, the Customer shall be entitled to a refund of the purchase price upon return of the product to HP.
LIMITATION OF WARRANTY
The foregoing warranty shall not apply to defects resulting from improper or inadequate maintenance by the Customer, Customer-supplied software or interfacing, unauthorized modification or misuse, operation outside of the environmental specifications for the product, or improper site preparation and maintenance. NO OTHER WARRANTY IS EXPRESSED
OR IMPLIED. HP SPECIFICALLY DISCLAIMS THE IMPLIED WARRANTIES OF MERCHANTABILITY AND
FITNESS FOR A PARTICULAR PURPOSE.
EXCLUSIVE REMEDIES
THE REMEDIES PROVIDED HEREIN ARE THE CUSTOMER'S SOLE AND EXCLUSIVE REMEDIES. HP SHALL
NOT BE LIABLE FOR ANY DIRECT, INDIRECT, SPECIAL, INCIDENTAL, OR CONSEQUENTIAL DAMAGES,
WHETHER BASED ON CONTRACT, TORT, OR ANY OTHER LEGAL THEORY.
ASSISTANCE
The above statements apply only to the standard product warranty. Warranty options, extended support contracts, product maintenance agreements and customer assistance agreements are also available. Contact your nearest Hewlett- Packard Sales and Service office for further information on HP's full line of Support Programs.
SAFETY SUMMARY
The following general safety precautions must be observed during all phases of operation, service, and repair of this instrument. Failure to comply with these precautions or with specific warnings elsewhere in this manual violates safety standards of design, manufacture, and intended use of the instrument. Hewlett-Packard Company assumes no liability for the customer's failure to comply with these requirements.
BEFORE APPLYING POWER.
Verify that the product is set to match the available line voltage and the correct fuse is installed.
GROUND THE INSTRUMENT.
This product is a Safety Class 1 instrument (provided with a protective earth terminal). To minimize shock hazard, the instrument chassis and cabinet must be connected to an electrical ground. The instrument must be connected to the ac power supply mains through a three-conductor power cable, with the third wire firmly connected to an electrical ground (safety ground) at the power outlet. For instruments designed to be hard-wired to the ac power lines (supply mains), connect the protective earth terminal to a protective conductor before any other connection is made. Any interruption of the protective (grounding) conductor or disconnection of the protective earth terminal will cause a potential shock hazard that could result in personal injury. If the instrument is to be energized via an external autotransformer for voltage reduction, be certain that the autotransformer common terminal is connected to the neutral (earthed pole) of the ac power lines (supply mains).
FUSES.
Only fuses with the required rated current, voltage, and specified type (normal blow, time delay, etc.) should be used. Do not use repaired fuses or short circuited fuseholders. To do so could cause a shock or fire hazard.
DO NOT OPERATE IN AN EXPLOSIVE ATMOSPHERE.
Do not operate the instrument in the presence of flammable gases or fumes.
KEEP AWAY FROM LIVE CIRCUITS.
Operating personnel must not remove instrument covers. Component replacement and internal adjustments must be made by qualified service personnel. Do not replace components with power cable connected. Under certain conditions, dangerous voltages may exist even with the power cable removed. To avoid injuries, always disconnect power, discharge circuits and remove external voltage sources before touching components.
DO NOT SERVICE OR ADJUST ALONE.
Do not attempt internal service or adjustment unless another person, capable of rendering first aid and resuscitation, is present.
DO NOT EXCEED INPUT RATINGS.
This instrument may be equipped with a line filter to reduce electromagnetic interference and must be connected to a properly grounded receptacle to minimize electric shock hazard. Operation at line voltages or frequencies in excess of those stated on the data plate may cause leakage currents in excess of 5.0 mA peak.
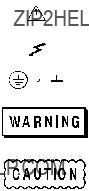
SAFETY SYMBOLS.
Instruction manual symbol: the product will be marked with this symbol when it is necessary for the user to refer to the instruction manual (refer to Table of Contents) .
Indicates hazardous voltages.
Indicate earth (ground) terminal.
The WARNING sign denotes a hazard. It calls attention to a procedure, practice, or the like, which, if not correctly performed or adhered to, could result in personal injury. Do not proceed beyond a WARNING sign until the indicated conditions are fully understood and met.
The CAUTION sign denotes a hazard. It calls attention to an operating procedure, or the like, which, if not correctly performed or adhered to, could result in damage to or destruction of part or all of the product. Do not proceed beyond a CAUTION sign until the indicated conditions are fully understood and met.
DO NOT SUBSTITUTE PARTS OR MODIFY INSTRUMENT.
Because of the danger of introducing additional hazards, do not install substitute parts or perform any unauthorized modification to the instrument. Return the instrument to a Hewlett-Packard Sales and Service Office for service and repair to ensure that safety features are maintained.
Instruments which appear damaged or defective should be made inoperative and secured against unintended operation until they can be repaired by qualified service personnel.
SAFETY SUMMARY (continued)
GENERAL
Any LEDs used in this product are Class 1 LEDs as per IEC 825-1.
ENVIRONMENTAL CONDITIONS
This instrument is intended for indoor use in an installation category II, pollution degree 2 environment. It is designed to operate at a maximum relative humidity of 95% and at altitudes of up to 2000 meters. Refer to the specifications tables for the ac mains voltage requirements and ambient operating temperature range.
SAFETY SYMBOL DEFINITIONS
Herstellerbescheinigung
Diese Information steht im Zusammenhang mit den Anforderungen der
Maschinenl??minformationsverordnung vom 18 Januar 1991.
* Schalldruckpegel Lp <70 dB(A) * Am Arbeitsplatz * Normaler Betrieb * Nach EN 27779 (Typpr??fung).
Manufacturer's Declaration
This statement is provided to comply with the requirements of the German Sound Emission Directive, from 18 January 1991.
* Sound Pressure Lp <70 dB(A) * At Operator Position * Normal Operation * According to EN 27779 (Type Test).
DECLARATION OF CONFORMITY
according to ISO/IEC Guide 22 and EN 45014
conforms to the following Product Specifications:
The product herewith complies with the requirements of the Low Voltage Directive 73/23/EEC and the EMC Directive 89/336/EEC and carries the CE-marking accordingly.
Note 1: The product family was introduced prior to 12/93.
European Contact: Your local Hewlett-Packard Sales and Service Office or Hewlett-Packard GmbH, Department TRE, Herrenberger Strasse 130, D-71034 Boeblingen (FAX:+49-7031-14-3143)
WHAT THIS MANUAL CONTAINS
This is the Operating manual for the HP 6621A through 6624A and 6627A Series of Multiple Output Linear System Power Supplies. It contains information relating to the installation, operation, and programming of these supplies as outlined below. Maintenance and troubleshooting instructions are given in a separate Service Manual (HP Part No. 5957- 6379).
Chapter 1.--General Information
Chapter 1 contains a general description of the power supplies as well as instrument specifications and information concerning options and accessories.
Chapter 2.--Installation Procedures
Chapter 2 contains information to prepare the supply for use. Included in this chapter are power requirements, line voltage conversion, and HP-IB interface connections.
Chapter 3.--Getting Started
Chapter 3 contains a brief description of the supply's front panel controls and indicators and describes how to turn on the supply and to check it's operation. An introduction to remote operation over the HP-IB is also given to help a first time user get started quickly.
Chapter 4.--Output Connections and Operating Information
Chapter 4 contains information about making connections to the supply's output terminals. General operating information is also provided.
Chapter 5.--Remote Operation
Chapter 5 contains all of the information required to operate the supply remotely via an HP-IB computer. All of the commands that can be used to program the supplies are described.
Chapter 6.--Local Operation
Chapter 6 contains instructions on using all of the front panel controls and indicators.
Appendix A--Calibration Procedure
Appendix A contains programming steps and procedures that are required to calibrate your power supply. It is recommended that the power supply be calibrated yearly.
Appendix B--Programming with Series 200 Computer
Appendix B contains Series 200/300 Computer programming examples (in HP extended BASIC language) for your Power Supply's most frequently used functions.
Appendix C--Command Summary
Appendix C contains an alphabetical listing of all commands that can be sent to a supply.
Appendix D--Error Messages
Appendix D contains a listing and brief explanation of all error codes and messages for all programming and hardware errors.
Appendix E - Manual Backdating
Appendix E contains backdating information for units with Serial numbers lower than those listed on the title page.

1
General Information
Introduction
This chapter contains a general description of your power supply, as well as its performance specifications. Information about options, accessories, and HP-IB cables is also provided. This manual describes all five models in the HP 6621A- 6624A, and 6627A power supply family. Unless stated otherwise, the information in this manual applies to all of these models. Information that is specific to one model only is identified as such in this manual.
Safety Considerations
This product is a Safety Class 1 instrument, which means that it is provided with a protective earth terminal. This terminal must be connected to a power source that has a 3-wire ground receptacle. Review the instrument and this manual for safety markings and instructions before operation. Refer to the Safety Summary page at the beginning of this manual for a summary of general safety information. Safety information for specific procedures is located at appropriate places in this manual.
Instrument and Manual Identification
Hewlett-Packard power supplies are identified by a two-part serial number, i.e. 2601A-00101. The first part of the serial number (the prefix) is a number/letter combination that denotes either the date of manufacture or the date of a significant design change. It also indicates the country of origin. (Starting at 1960, 26 = 1986; 01 = the first week of the year; A = U.S.A.) The second part of the serial number is a different sequential number assigned to each instrument starting with 00101.
If the serial number prefix on your power supply differs from that shown on the title page of this manual, a yellow Manual Changes sheet that is supplied with this manual explains the difference between your instrument and the instrument described by this manual. The change sheet can also contain information for correcting errors in the manual.
Options
Options 100,120, 220, and 240 simply determine which line voltage is selected at the factory. For information about changing the line voltage setting, see Line Voltage Conversion, page 28.
Option 750 consists of a fault indicator (FLT) and remote inhibit (INH) circuit and relay control, which provide additional shutdown protection should either the HP-IB and/or controller fail. This Option is described in a separate document entitled, "Appendix E Option 750 Operating Instructions for the Multiple Output Linear System DC Power Supply, HP Models 6621A, 6622A, 6623A, 6624A, and 6627A (HP P/N 5957-6372).
#100 Input power, 100 Vac, 47--66 Hz #120 Input power, 120 Vac, 47--66 Hz #220 Input power, 220 Vac, 47--66 Hz #240 Input power, 240 Vac, 47--66 Hz
#700 Computer Interface Intermediate Language (CIIL) #750 Fault (FLT) Remote Inhibit (INH) and Relay Control #908 One rack mount kit (5062-3977)
#909 One rack mount kit with handles (5062-3983) #910 One service manual with extra operating manual

Accessories
10833A HP-IB cable, 1 m (3.3 ft)
10833B HP-IB cable, 2 m (6.6 ft)
10833C HP-IB cable, 4 m (13.2 ft)
10833D HP-IB cable, 0.5 m (1.6 ft)
10834A HP-IB connector extender Slide mount kit (1494-0059)
Description
The HP 6621A-6624A, and 6627A Multiple Output Linear Power Supplies feature a combination of programming capabilities and linear power supply performance that make systems applications. The five models in this family offer a total of up to 200 watts of output power, with voltages up to 50 volts and currents up to 10 amps. The output combinations that correspond to each model are shown in Table 1-1. Each isolated output can supply power in two ranges as shown in Figure 1-1. This flexibility allows you to use the same output to power loads with different voltage and current requirements. No separate command is required to program ranges; the power supply automatically selects one of the operating ranges based on the last parameter (voltage or current) that is set. Additionally, each output contains an active downprogrammer, which means that voltage downprogramming can be accomplished as quickly as upprogramming, even without a load.
Table 1-1. Output Combinations Available
The output voltage and current for any output can be monitored with the front panel display. Output specific error messages are also displayed. Front panel annunciators show the operating status of the instrument. The front panel keypad lets you set and readback the voltage limit, current limit, and overvoltage trip level of any output. With the keypad, you can also enable or disable outputs, mask and delay bits in the fault register, enable overcurrent protection, reset overvoltage and overcurrent protection, and return to local operating mode.
Your multiple output power supply can be both a listener and a talker on the HP-IB. (HP-IB is Hewlett-Packard's implementation of IEEE-488). The built-in interface is tailored to the supply, resulting in simpler programming. Voltage and current settings can be sent directly to the specified dual range output in volts and amps.
Service can be requested from your power supply for up to ten reasons. The supply responds to a serial poll by identifying the output on which the fault occurred. Self-contained measurement and readback capability eliminate the need for externally scanning the outputs using a separate DVM. Upon command the supply will measure its output voltage or current and return the value on the HP-IB. The following functions are implemented via the HP-IB:
Voltage and current programming.
Voltage and current measurement and readback.
Present and accumulated status readback.
Programmable service request mask.
Programmable overvoltage and overcurrent protection.

Storage and recall of programmed voltage and current values for all outputs.
Queries of programmed functions or settings.
Output enable or disable.
Programming syntax error detection.
Programmable delay time for service request and OCP mask.
Voltage, current, and overvoltage calibration.
HP-IB interface selftest.
Message display capability on the front panel.
Output connections are made to rear panel screw terminals. Either the positive or negative output terminal can be grounded, or the output can be floated up to ??240 Vdc (including output voltage) from chassis ground. Output voltage can be locally or remotely sensed, and identical outputs can be operated in series or parallel combinations for increased output voltage or current capability. As shipped from the factory, the power supply is jumpered for local sensing.
Your power supply can be calibrated without having to remove the cover or even having to remove it from your system cabinet. This feature allows you to calibrate the supply at its normal operating temperature. The recommended calibration interval is one year. Refer to Appendix A of this manual for complete calibration details. A calibration security jumper is available inside the unit. Access is described in the service manual.
Basic Operation
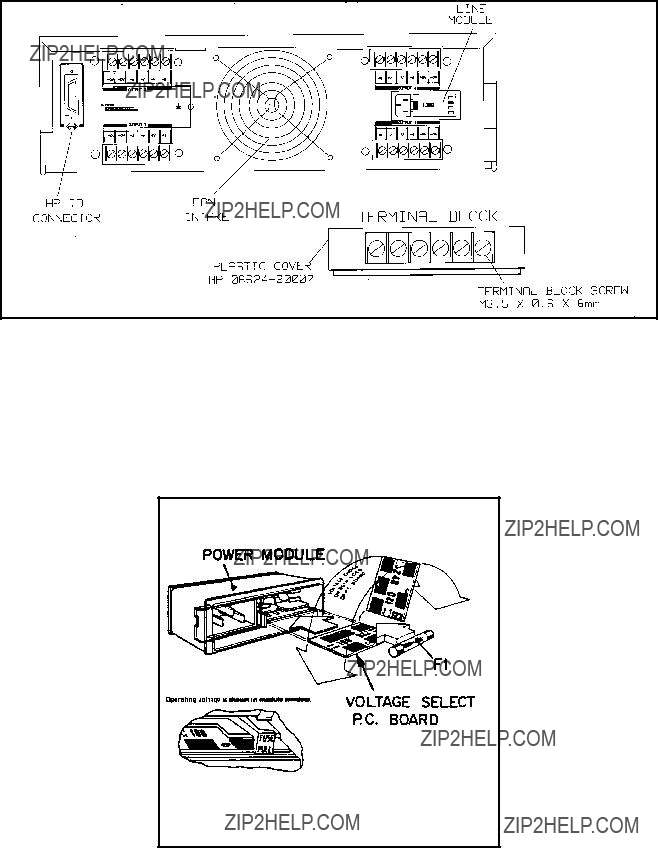
Figure 1-2 is a block diagram that illustrates the major assemblies contained within the power supply. As shown in the figure, each supply includes a power transformer, two or more output boards, an HP-IB board, and front panel (display and control keys).
Figure 1-1. Output Operating Ranges for HP Models 6621A, 6624A and 6627A.
The appropriate ac input voltage is applied to each output board where it is converted to a raw dc voltage which is subsequently linearly regulated to become the dc output voltage. The magnitude of the output and the mode of operation are determined by the load and the data received from the HP-IB computer or from the front panel.
Each power supply model contains one output board for each output that it provides. Models 6624A and 6627A contain four 40 watt output boards; Model 6623A contains two 40 watt output boards and one 80 watt output board; Models 6621A and 6622A each contain two 80 watt output boards.
HP-IB Board
The HP-IB board provides the interface between the user and the multiple outputs of the power supply. Each output board is actually an output channel that can be individually selected and controlled over the HP-IB or from the supply's front panel. Circuits on the HP-IB board interpret commands from the HP-IB or from the front panel to control the selected output.

The HP-IB board also processes measurement and status data received from the output boards. This data may be read back over the HP-IB and/or displayed on the supply's front panel.
The power supply has no potentiometers. Each output is individually calibrated over the HP-IB using calibration commands (see Appendix A). Correction factors are calculated by the power supply during calibration and are stored in a non-volatile memory which is located on the supply's HP-IB board. The supply contains no batteries.
Output Boards
The output boards are linear dc power supplies. Each isolated output has the L-shaped operating curve described in Description, page 12 and Figure 1-1.
The ac input to each output board is rectified and applied to a regulator circuit. Each output board employs series regulation techniques. A regulator element is connected in series with the load and operates in the linear region (between saturation and cutoff) of the transistor characteristic curve. Regulation is achieved by varying the conduction of the series element in response to a change in line voltage or circuit load.
The output board receives digital signals from the HP-IB board and converts them to analog signals which program the output voltage, current, and overvoltage values. The output may be programmed remotely over the HP-IB using commands (see Chapter 5) or locally from the supply's front panel using the control keys (see Chapter 6).
The output board can be commanded to send measurement and status data back over the HP-IB and/or front panel. The data is sent back via the supply's HP-IB board. HP-IB readback capabilities include output voltage and current, present and accumulated status, and all programmed settings. The front panel LCD display can indicate the output voltage and current, the supply's HP-IB address, error messages, and programmed values. Annunciators on the front panel indicate the operating status of the selected channel (output board).
Figure 1-2. HP 6621A, 6624A and 6627A Multiple Output System Power Supplies, Block Diagram
Specifications
Table 1-2 lists the performance specifications for the HP 662xA power supplies. Performance specifications describe the instrument's warranted performance. The service manual, Option 9l0, contains procedures for verifying the performance specifications.
Table 1-3 lists the supplemental characteristics for the HP 662xA supplies. Supplemental characteristics are type-tested or typical values, which are based on a product sample and, while representative, are not guaranteed.
Qualifying Conditions
All performance specifications apply over the full operating temperature range of the power supply (0 to 55??C) unless otherwise specified. All regulation, accuracy, etc. specifications are plus or minus the values listed. All measurements are made at the rear terminals of the supply with a resistive load and local sensing unless otherwise specified. Voltage measurements are made from the + S to the - S terminals. Overvoltage measurements are made from the + V to the - V terminals. + Current refers to the output acting as a current source while - Current refers to the output acting as a current sink.
Definitions
Load effect: Maximum steady state change in the regulated output parameter due to a change in load resistance on the output in question.
Source effect: Maximum steady state change in the regulated output parameter due to a change in the source voltage within rated values. (Expressed as a percentage of setting plus a constant).
Cross regulation: Maximum steady state change in the regulated output parameter due to a change in load resistance on any other output(s).
Programming accuracy: (Calibration temp ??5??C) Maximum difference between the programmed value and the actual output. (Expressed as a constant plus a percentage of the setting.)
Readback accuracy: (Calibration temp ??5??C) Maximum error in reading back an output parameter. (Expressed as a constant plus a percentage of the reading).
Output response time: Beginning at the time the power supply has finished processing a VSET command (change output voltage), the maximum time for the output voltage to settle to within a settling band about the final value from any specified operating point. This value must be added to the command processing time to obtain total programming time (see Figure 1-3). Time constant is the maximum time required for the voltage to reach 63% of its final value.
Temperature coefficient: Maximum change in the regulated output parameter per ??C change in ambient temperature after a 30 minute warmup. Expressed in parts-per-million plus a constant per ??C (plus a constant for readback temperature coefficient).
Long Term Drift: Maximum change of regulated output voltage or current during an 8-hour period following a 30 minute warmup, with all influence and control quantities maintained constant. Expressed as a percentage of setting plus a constant.
Short Term Drift: Maximum change of regulated output voltage or current within 30 minutes after a line and/or load change. Expressed as a percentage of setting plus a constant.
Output Noise (PARD): PARD replaces the former term ripple and noise. PARD is the periodic and random deviation of dc output voltage or current from its average value, over a specified bandwidth and with all influence and control quantities maintained constant.
General Information 15
Programming resolution: Average programming step size.
Current Sinking ( - Current): Each output can sink as well as source current. The sinking capability is not programmable and depends upon the output voltage. The current sinking capability is described in greater detail in Chapter 4.
Figure 1-3. Output Response Characteristics

Table 1-2. Specifications
DC Output Ranges: All outputs will accept voltage programming commands 1% higher than those listed and current programming commands 3% higher than those listed. Also, the minimum programmable current values are slightly above zero amps for each output. (See Table 5-4).
Load Effect (Regulation): When remote sensing, add 1 mV to the value listed for each 200 mV drop in the - V load lead.
Programming Accuracy: (At calibration temperature ??5??C)
Note: The programming accuracy specifications may degrade slightly when the unit is subjected to an RF field equal to or greater than 3 volts/meter.
Readback Accuracy: (At calibration temperature ??5??C)
Load Transient Recovery Time:
75 ??S maximum to recover to within 75 mV of nominal value following a load change within the range 300 mA to full load for low voltage units, and 150 mA to full load for high voltage units.
Maximum Output Noise (PARD):
AC Input Voltage and Frequency:
Nominal Line = 100,120, 220, or 240 Vac
Amplitude = + 6%, -13% of nominal line voltage
Frequency Range = 47-66 Hz
Note: At low line, the supply will operate with up to 3/4 ?? line resistance.
Table 1-3. Supplemental Characteristics
DC Floating Voltage:
No output terminal may be more than 240 Vdc from any other terminal or from chassis ground. Also, no overvoltage terminal may be more than 240 Vdc from any other terminal or chassis ground.
Remote Sense Capability: (See wire size selection, page 47 and remote voltage sensing, page 48)
Outputs can maintain specifications with up to 1 volt drop per load lead except that the maximum voltage at the output terminals must not exceed the rated output voltage + 1 volt (see Figure 4-6). If the steady state voltage drop exceeds approximately 1.5 V on either load lead when remote sensing, a circuit will trip the OVP.
Table 1-3. Supplemental Characteristics (continued)
Fixed Overvoltage Protection: (Measure at output terminals +V and -V):
HP-IB Interface Capabilities:
SH1, AH1, T6, L4, SR1, RL1, PP1, DC1, DT0, C0, E1
Current Sink Capability:
Current sink limits are fixed approximately 10% higher than the maximum current source limits for a given operating voltage at any voltage above 2.5 V (see Chapter 4).
Command Processing Time: (see Figure 1-3):
7 milliseconds typical (with front panel display disabled). Using STO and RCL commands allows you to change all the voltage and current settings in about 10 mS (with front panel display disabled).
Series and Parallel Operation:
Two outputs can be operated directly in parallel or can be connected for straight series operation. Refer to Chapter 4 for more information.
Reactive Load Capability:
All outputs have been designed with the ability to operate with significant reactive loads without instability (refer to Figures 1-4 through 1-6).
Table 1-3. Supplemental Characteristics (continued)
Output Impedance:
Approximated by a resistance in parallel with an inductance (see graphs in Figure 1-7). The values for each output are:
Safety Agency Compliance:
This series of power supplies is designed to comply with the following standards: IEC 348, UL 1244, and CSA 22.2 No. 231.
Dimensions: (all models)
Height = 132.6 mm (5.22in.)
Width = 425.5 mm (16.75in.)
Depth = 497.8 mm (19.6in.)
Weight: (all models):
Net Weight = 17.4 kg (38 lb.)
Shipping Weight = 22.7 kg (50 lb.)
Figure 1-4. CV Operation with Capacitive Load, Stability Graph for all Outputs
Figure 1-5. CC Operation with Inductive Load, Small Signal Stability Graph for HV (0 to 50 V) Outputs
Figure 1-6. CC Operation with Inductive Load, Small Signal Stability Graph for LV (0 to 20 V) Outputs
Figure 1-7. Output Impedance (Typical) Graphs (See Supplemental Characteristics, Table 1-1)

2
Installation
Introduction
This chapter contains instructions for checking and mounting your power supply, connecting your supply to ac power, converting it from one line voltage to another, and connecting the HP-IB cable.
The power supply generates operating magnetic fields which may affect the operation of other instruments. If your instrument is susceptible to magnetic fields, do not locate it in the immediate vicinity of the power supply. Typically, at three inches from the power supply, the electromagnetic field is less than 5 gauss.
Initial Inspection
Your instrument was thoroughly inspected and tested before it left the factory. As soon as you receive it, remove the power supply from its packing case and check to make sure it has not been damaged in shipment. Check that there are no broken connectors or keys, and that the cabinet and panel surfaces are free from dents and scratches. Check the rear panel terminal blocks and front panel display for any cracks. If damage is found, you should file a claim with the carrier immediately and notify the Hewlett-Packard Sales and Service office nearest you.
Chapter 3 of this manual includes an electrical turn-on check-out procedure which, when carried out successfully, will give you a high level of confidence that the power supply is operating in accordance with its specifications. Detailed electrical checks complete with verification procedures are included in the Service Manual.
Keep the original packing materials for the carrier' s inspection if there was damage, or in case any equipment has to be returned to Hewlett-Packard. Warranty information is printed on the inside cover of this manual. Remember to send a detailed description of the failure and symptoms when returning the power supply for service. Your Hewlett-Packard Sales and Service office will furnish the address of the nearest service office to which the instrument can be shipped .
Location and Cooling
Your power supply can operate without loss of performance within the temperature range of 0 to 55 ?? C (measured at the fan intake). The fan, located at the rear of the unit, cools the supply by drawing air in through the openings on the rear panel and exhausting it through openings on the sides. Using Hewlett-Packard rack mount kits will not impede the flow of air.
Because the power supply is fan cooled, it must be installed in a location that allows sufficient space at the rear and the sides for adequate circulation of air. Either side may be restricted to have as little as 1 inch (25 mm) space.
Figure 2-1 gives the dimensions of the power supply cabinet. These dimensions apply to all five models. The cabinet has plastic feet that are shaped to ensure self-alignment when stacked with other Hewlett-Packard System II cabinets. The feet may be removed for rack mounting.
The power supply can be mounted in a standard 19 inch rack panel or enclosure. Rack mounting accessories for this unit are listed on page 12, under Options of Chapter 1. Complete installation instructions are included with each rack mounting kit. Instrument support rails are required for non-stationary installations. These are normally supplied with the cabinet and are not included with the rack mounting kits.

Figure 2-1. Outline Diagram
Input Power Requirements
You can operate this power supply from a nominal 100 V, 120 V, 220 V or 240 V single phase power source at 47 to 66 Hz. The input voltage range, maximum input current, high line inrush current (PK), and the fuse required for each of the nominal inputs are listed in Table 2-1. You can check the line voltage setting of your supply by examining the door on the line module. This is located on the rear panel of your supply as shown in Figure 2-2.
If necessary, you can convert the supply from one line voltage setting to another by following the instructions under Line Voltage Conversion (page 28).
Table 2-1. Input Power
Line Fuse
The ac line fuse is located behind the door on the line module (see Figure 2-3). To access the fuse, remove the power cord and push against the tab on the line module in the direction of the ac input socket. The current rating of the fuse is based on the line voltage setting of your supply. Table 2-2 gives the HP part numbers for the fuses that should be used with specific line voltages.
Note All fuses are rated for 250 V.
Figure 2-3. Line Module Detail

Power Cord
The power supply is shipped from the factory with a power cord that has a plug appropriate for your location. Figure 2-4 shows the standard configuration of plugs used by Hewlett-Packard. Below each drawing is the HP part number for the replacement power cord equipped with a plug of that configuration. If a different power cord is required, contact the nearest Hewlett-Packard Sales and Service office.
For your protection, the National Electrical Manufacturer's Association (NEMA) recommends that the instrument panel and cabinet be grounded. This power supply is equipped with a three-conductor power cord; the third conductor being the ground. The power supply is grounded only when the power cord is plugged into an appropriate receptacle. Do not operate this power supply without adequate cabinet ground connection.
Figure 2-4. Power Cord Plug Configurations
SHOCK HAZARD Connect the power cord to a grounded receptacle before you connect any external floating voltages to the supply.
The offset pin on the standard three-prong power cord connector is the ground connection. If a two contact receptacle is encountered, it must be replaced with a properly grounded three-contact receptacle in accordance with the National Electrical Code, local codes and ordinances. The work should be done by a qualified electrician.
Line Voltage Conversion
You can change the supply to accept 100 V, 120 V, 220 V and 240 V ac input by adjusting the voltage selector card located inside of the line module (see Figure 2-3). After you have changed the line voltage, refer to Table 2-2 and check that the fuse inside the line module is the correct fuse for that line voltage. The procedure is as follows:
l. Turn off power and remove the power cord from the ac input socket on the back of the power supply.
2.To open the line module, move the plastic door on the module aside. If your line voltage change requires a change in the rating of the fuse, rotate FUSE PULL to the left and remove the fuse.
3.Grasp the voltage select pc board with a pair of needle-nose pliers and slide it out of its slot.
4.To select a voltage, orient the pc board so that the desired voltage appears on the top left side of the board. Push the board all the way back into its slot. The desired line voltage must be visible when the board is installed.
5.Install the correct fuse in the door of the line module if your line voltage change also requires a change in the rating of the fuse (see Table 2-2).

FIRE HAZARD Make sure the replacement fuse is one of the same type (size) and rating (amps) that is consistent with the voltage level you are operating at. Do not use a substitute fuse; use a fuse with the same HP Part number listed in Table 2-2.
6. Close the door of the line module and insert the power cord in the ac input socket. Your power supply is now configured to operate at the voltage you selected.
HP-IB Interface Connector
The HP-IB connector on the rear panel connects your power supply to your computer and other HP-IB devices (see Figure 2-2). Chapter 1, page 12 lists the cables and cable accessories that are available from Hewlett-Packard. An HP-IB system can be connected together in any configuration (star, linear, or both) as long as the following rules are observed:
1.The total number of devices, including the computer, is no more than 15.
2.The total length of all the cables used is no more than two meters times the number of devices connected together, up to a maximum of 20 meters.
Do not stack more than three connector blocks together on any HP-IB connector. The resultant leverage can exert excessive force on the mounting panels. Make sure that all connectors are fully seated and that the lock screws are firmly finger tightened. Do not use a screwdriver. Use a screwdriver only for the removal of the screws.
3
Getting Started
Introduction
This chapter is intended for the first time user of the supply. It provides four main discussions:
???Front Panel Controls and Indicators
???Turning on Your Supply
???Checking Out Your Supply Using Local Control
???Introduction to Remote Operation
First, the supply's front panel controls and indicators are briefly described. Some of the controls and indicators will be used in the Turn On and Checkout procedures that follow. Chapter 6 describes how to use all of the front panel controls.
Successful completion of the turn on and checkout procedures ensures with a high level of confidence that your supply is operating properly. Complete performance testing and troubleshooting procedures are given in the Service Manual (HP Part No. 5957-6379).
The checkout procedures are performed locally from the front panel. In addition to checking the operation of your supply, these simple step-by-step checkout procedures will help the first time user become familiar with operating the supply from the front panel.
When you have completed the checkout procedures, you are then introduced to the fundamentals of operating the supply remotely from a computer. You will learn how to send a command to the supply from the computer and how to get data back to the computer from the power supply. A few of the most often used power supply commands will be described to help you get started and become familiar with the basics of programming your supply.
After completing this chapter, you can proceed to Chapter 4 to find out how to make load connections to your supply's outputs and then to Chapter 5 (Remote Control) and/or Chapter 6 (Local Control) to learn all the details about operating your supply.
Front Panel Controls and Indicators
The power supply's controls and indicators are shown in Figure 3-1 and are described in Table 3-1. Note that the front panel controls are identical for HP Models 6621A-6624A, and 6627A, except for the number of OUTPUT annunciators (number 3 in Figure 3-1). The HP Model 6624A, shown in Figure 3-1, has four outputs (as does the HP 6627A), HP Models 6621A and 6622A each have two outputs, and HP Model 6623A has three outputs.
Table 3-1, in addition to providing a brief description of each control and indicator, lists the paragraphs in which the use of each control and indicator is described. Because most of the functions performed by the front panel controls can also be performed remotely by power supply commands, the corresponding paragraphs in Chapter 5 (Remote Operation) are listed in Table 3-1 where applicable.
Turning On Your Supply
The following paragraphs describe the power-on sequence which includes a self test of most of the power supply's circuits.
Before you turn on your supply, make sure that:
??? The line module on the rear panel is set to match your input line voltage.
Getting Started 31
??? The proper fuse is installed and the line cord is plugged in.
If you have any questions concerning installation or power requirements, review Chapter 2.
To turn on your supply, press the front panel LINE switch. When the power is initially applied, the supply performs a series of self tests which last about 3 seconds. Included in these tests are checks of circuits on the HP-IB board and on each of the output boards.
Figure 3-1. HP 6624A Front Panel
Table 3-1. Controls and Indicators
32 Getting Started
Table 3-1. Controls and Indicators (continued)
Table 3-1. Controls and Indicators (continued)
Table 3-1. Controls and Indicators (continued)
Normal Self Test Indications
If the supply passes the self test, the display will first show all segments of the LCD display with annunciators on as illustrated in Figure 3-2.
Figure 3-2. Test Pattern of all Display Segments at Power-on
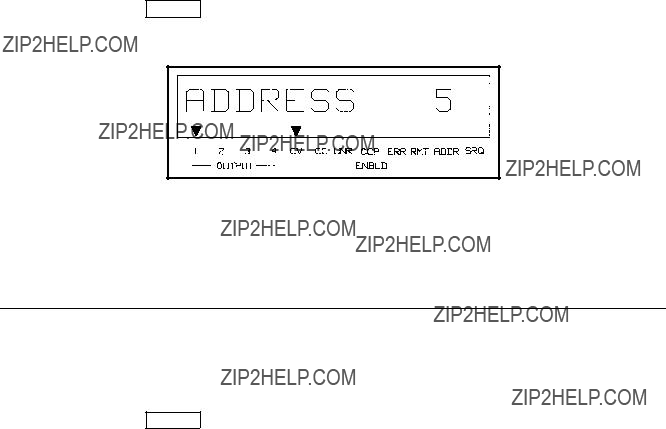
After all segments are displayed, the supply's HP-IB address will appear for approximately 2 seconds as shown in Figure 3-3. As shipped from the factory, the power supply's address is set to 5. You must know this address before you can remotely program your supply (see Reading the HP-IB Address, page 39).
Figure 3-3. Typical Address Display During Power-On
When self test is successfully completed, the output voltage and current readings (both approximately 0) for output 1 will appear in the display as shown in Figure 3-4. Note that the CV annunciator will also indicate that the output is in the constant voltage mode.

Figure 3-4. Typical Display at Power-On
Self-Test Errors
If the supply fails the power-on self-test, all power supply outputs will remain disabled (off) and the display will indicate the type of failure and the output channel on which it occurred. Figure 3-5 shows that self-test detected an error in output channel 3. Error messages that could appear on the display if self-test fails are listed below. Self-test error messages are explained in Appendix D and troubleshooting procedures are given in the Service Manual for the HP 6621A-6624A, and 6627A Power Supplies. You may also call your HP Sales office for help.
Figure 3-5. Sample Self-Test Failure Display
Checking Out Your Supply Using Local Control
The following procedures use the display and keys on the front panel to check each of your power supply's outputs. No test equipment, other than a jumper wire (14 AWG), is required to perform these tests. The tests must be repeated for each output of your particular supply. The checkout consists of voltage, overvoltage, and current tests. It is assumed that power has already been turned on, the supply has passed the power-on self-test, loads are not connected to any of the supply's outputs, and sense clips are connected between the sense terminals and the output terminals.
Voltage Test
1. Set the voltage of the selected output to 10 V by pressing:
2. Check that the display reads approximately 10 V and 0 A and the CV annunciator is on indicating that the supply is in the constant voltage mode of operation.
Overvoltage Test
1. Program the overvoltage protection (OVP) to 19 V by pressing:
2. Set the voltage to 16 V by pressing:
3.Check that the display reads approximately 16 V and 0 A.
4.Set the voltage to 20 V by pressing:
5.Check that the display reads "OVERVOLTAGE".
6.Reset the supply by pressing:
7. Check that the display reads approximately 16 V and 0 A.
Current Test
1.Turn off the supply.
2.Remove the barrier block cover from the output to be tested and connect a short circuit (jumper wire) between the +V and -V terminals of the output being tested.
3.Turn on the supply.
6.Check that the display reads approximately 0 volts and the minimum current limit value (0.05 to 0.13A depending upon the model and output, see Table 5-4). Also, check that the front panel CC annunciator is on indicating that the output is in the constant current mode of operation.
7.Set the current to 0.5 A by pressing:
8.Check that the display reads approximately 0 V and 0.5 A.
9.Enable the overcurrent protection circuit by pressing:
OCP
10.Check that the OCP ENBLD annunciator is on indicating that overcurrent protection is enabled and the display reads "OVERCURRENT". When in overcurrent, the output is disabled.
11.Disable the overcurrent protection circuit by pressing:
OCP
12. Reset the output by pressing:
OC
RST
13.Check that the display reads approximately 0 V and 0.5 A.
14.Turn off the supply and remove the jumper from the output terminals.
Introduction To Remote Operation
The following paragraphs explain the fundamentals of operating the supply remotely from a computer. Only a few commonly used programming commands will be discussed. Refer to Chapter 5 for a detailed description of all the commands. The intent of this discussion is to help first time users to quickly become familiar with operating their supply from a computer.
The programming examples that follow assume that a computer is connected to the HP-IB connector on the rear of your supply (see Chapter 2), power is applied, and loads are not connected to any of the supply's outputs. The examples used are primarily for HP Series 200 computers using HP BASIC language. Read the manuals for your particular computer to find out which statements you must use.
Enter/Output Statements
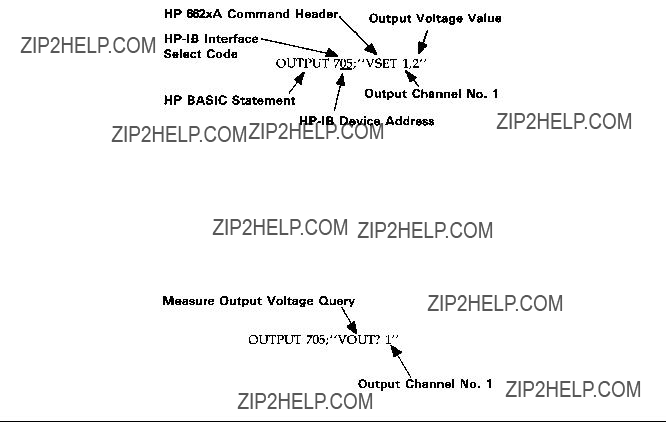
The programming statements you use to operate your supply from remote depend on your computer and its language. In particular, you need to know the statements your computer uses to output and enter information. For example, the HP BASIC language statement that addresses the power supply to listen and sends the command to the power supply is:
OUTPUT
The HP BASIC language statement that addresses the power supply to talk and reads back data from the power supply is:
ENTER
The supply's front panel ADDR annunciator is on when the supply is addressed to talk or to listen.
Reading the HP-IB Address
Before you can operate your power supply remotely, you need to know its HP-IB address. The address was displayed during the power on sequence described in Normal Self Test Indications, page 35. To see the address, press:
ADDR
A typical address display is shown in Figure 3-6:
Figure 3-6. Typical Address Display
The displayed response is the power supply's HP-IB address. When sending a remote command, you append this address to the computer's HP-IB interface select code (normally 7). For example, if the select code is 7 and the power supply's HP- IB address is 5, the combination is 705.
Changing the HP-IB Address
Every device on the HP-IB must have an address. The supply's address is factory set to decimal 5. Any address from 0 through 30 is a valid address. If you need to change the HP 662xA Supply's address press:
ADDR
You can now enter a new address. For example, press:
You have now changed the address from 5 to 14. If you want to change the address back to 5, repeat the above procedure but use 5 instead of 14 in the last step. Note that the address is stored in the power supply's non-volatile memory and therefore will be retained through interruption of the ac line power.
Sending a Remote Command
To send the power supply a remote command, combine your computer's output statement with the HP-IB interface select code, the HP-IB device address, and finally, the power supply command. For example, to set the output voltage of output channel 1 to 2 volts, send:
Getting Data From The Supply
The supply is capable of measuring the values of its output parameters in response to queries. In this example, the query asks the supply to measure the output voltage at output 1.
When you send a query from remote, the supply does not display the response as it did when you executed the command from the front panel. Instead, it holds the response in an output buffer. The output buffer is a register that holds information until it is read by the computer or is replaced with new information.
Use your computer's enter statement to get the response from the output buffer. For example, execute:
ENTER 705; A
Followed by:
DISP A
The ENTER statement enters whatever is in the supply's output buffer into the computer's A variable. The DISP statement displays the A variable ' s contents on the computer's display.
Often Used Commands
The command set contains over forty commands that allow you to program the power supply in a variety of applications. Within this command set, however, is a small subset of commands that are all you need for most applications. These commands are: VSET, ISET, VOUT?, IOUT?, OUT, OVSET, and OCP.
Each of these commands is briefly discussed in the following paragraphs to help you get started in programming your supply. To know more about these commands, refer to Chapter 5.
Voltage and Current Programming. You can send voltage and current values to the power supply directly in volts or amps The following examples use voltage and current values that are within the range of any output that the power supply provides.
To set the voltage of output 1 to 5 volts, send:
OUTPUT 705; "VSET 1,5"
To set the current of output 2 to 450 milliamps, send:
OUTPUT 705; "ISET 2,.450"
Output Voltage and Current Measurement. You can instruct the supply to measure the actual output voltage and current at a specified output using the VOUT? and IOUT? queries, respectively.
To measure the output voltage at output 1, send:
OUTPUT 705; "VOUT? 1''
To get the measurement from the output buffer, send:
ENTER 705; A
DISP A
The computer should display a reading of approximately 5 volts.
To measure the output current at output 2 send:
OUTPUT 705, "IOUT? 2"
To get the measurement from the output buffer, send:
ENTER 705; A
DISP A
Output On/Off. You can turn a specified output on or off. Individual outputs can be controlled as shown below. To turn off output 1, send:
OUTPUT 705; OUT 1,0
When an output is turned off, it is set to 0 volts and to the minimum current limit value.
To turn on output 1, send:
OUTPUT 705; "OUT 1,1"
When an output is turned on, it will return to the voltage and current settings determined by the present VSET and ISET values.
Overvoltage Setting. You can send an overvoltage setting value to the power supply directly in volts. If the output voltage exceeds this setting, the output crowbar is fired, and the output voltage is quickly downprogrammed and disabled (0. volts output).
To set the overvoltage value of output 2 to 3.5 volts, send:
OUTPUT 705; "OVSET 2,3.5"
Overcurrent Protection. The output will go to the off state (0 volts and min. current) when the overcurrent protection (OCP) feature is enabled and the output is in the + CC mode. To enable the overcurrent protection mode for output 2, send:
OUTPUT 705; "OCP 2,1"
To disable the overcurrent protection mode for output 2, send:
OUTPUT 705; "OCP 2,0"
When overcurrent protection is disabled and the output is in + CC mode, the output current will be limited to and will stay at the ISET value.
Returning the Supply to Local Mode
In the remote mode (RMT annunciator on), the front panel keys have no effect on any of the supply's outputs and only the computer can control the supply. However, you can still use the front panel display to monitor the output voltage and current or check any of the present settings (VSET, ISET, OVSET, etc.) of the selected output channel.
If you want to use the front panel keys to change the output settings, you must return the supply to the local mode. You can return the supply to the local mode (provided that the local lockout command has not been received from the computer) by pressing the LCL key. A change between the local and remote modes (or vice versa) will not result in a change in the power supply outputs. Refer to Chapter 6 for additional details on using the LCL key and operating the supply in the local mode.

4
Output Connections and Operating Information
Introduction
This chapter explains how to make connections to the output terminals located on-the rear of your power supply. Some general operating information is included in this chapter to help you understand how the power supply operates under various load conditions. This information applies whether you are operating the supply via the front panel or the HP-IB.
Output Ranges
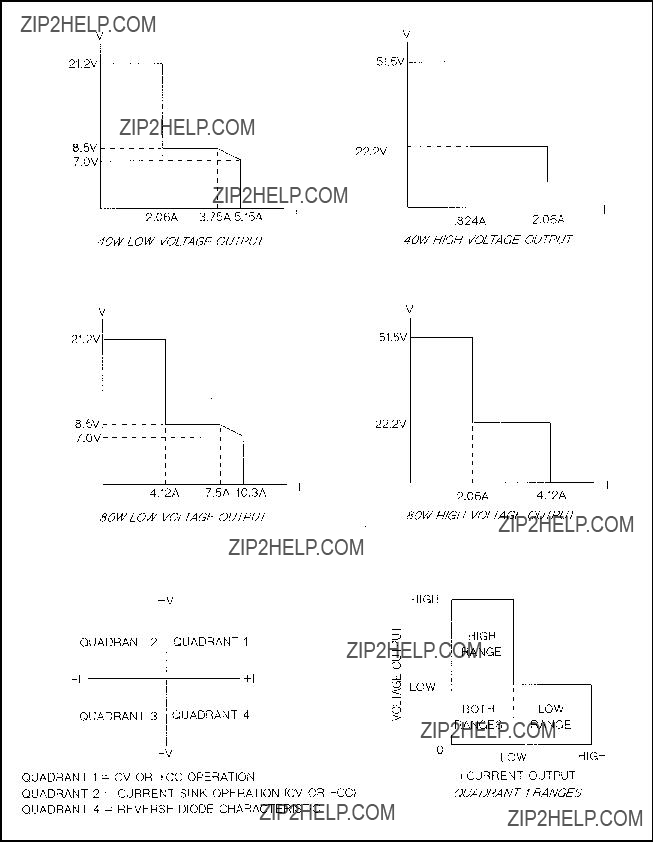
Figure 4-1 identifies the output combinations that are available on the power supply. Each output can operate as a constant voltage (CV) or constant current (CC) source over a wide variety of output voltage and current combinations. In addition, each output has an active downprogrammer which operates at currents up to approximately 110% of the maximum positive current rating of the output. This means that each output can actively sink as well as source its maximum rated output current. At voltages below 2.5 V, a downprogramming resistor continues downprogramming until the voltage reaches approximately zero volts.
Figure 4-1. Output Connections
Output Connections and Operating Information 43

Operating Quadrants
Figure 4-2 shows the operating locus of your power supply in three quadrants. The area in quadrant 1 shows the operating locus defined by the voltage and current settings of each output. The characteristics shown for quadrant 1 incorporate remote sensing and include the maximum available sense voltage plus load lead drop. The area in quadrant 2 indicates the locus where each output can operate as a current sink. You cannot program current limit values in quadrant 2. (Figure 4-3 shows the current sink characteristics at voltages below 2.0 V in greater detail.) The area in quadrant 4 illustrates the reverse polarity diode characteristics of each output. Do not operate any output with reverse-voltage currents that are greater than the maximum rating of the output.
Notice that the L shaped characteristics in quadrant 1 of Figure l-l consists of two overlapping ranges-a high voltage/low current range, and a low voltage/high current range. The power supply always limits its settings to within the boundaries of these ranges. Attempting to program voltage or current values that are greater than the maximum programmable values for a given output results in an error message and the values are ignored by the supply.
Range Selection
When a voltage and current are specified, each of which is within the maximum programmable value but whose combination lies outside the L shaped operating locus, the power supply will automatically select the operating range based on the value of the last VSET or ISET parameter that was programmed. The other parameter will automatically be reprogrammed to the maximum rating of the selected range. Chapter 5 includes an example of automatic range selection (also referred to as range switching).
Once your power supply output is operating in a given range, it will not automatically switch to the other range because of a change in the load. The only time an output switches operating ranges is in response to a command from either the front panel or the HP-IB that changes the voltage or current settings. For the output to switch ranges, the voltage or current setting must specify a value that is inside the operating locus of the other range. If the value sent is common to both ranges, no range switching occurs.
Protection Features
Protective circuitry within the supply can limit or turn off an output in the event of an abnormal condition. The activated protection feature can be determined by observing the front panel display area. You can also read back the status of the supply over the HP-IB. The following protection features are implemented:
OVERVOLTAGE -- shorts the output by firing an SCR crowbar and sets zero volts and minimum current on an output if any of the following conditions are present:
1. The output voltage exceeds the programmed overvoltage trip point. or
2.The voltage from the +V output terminal to the + S terminal or from the -S terminal to the -V output terminal exceeds
1.5V (applies to remote sensing only).
or
3. A trip signal is received on the output's OV terminals.
or
4. The output's fixed overvoltage circuit is activated.
The OV trip point can be programmed up to 23 V on a low voltage output and up to 55 V on a high voltage output. When an overvoltage occurs, the word OVERVOLTAGE appears in the front panel display and the OV status bit is set for that output. Chapter 5 explains how to program the overvoltage trip level.
44 Output Connections and Operating Information
Figure 4-2. Typical Output Range Characteristics
Output Connections and Operating Information 45

A fixed overvoltage threshold of approximately 120% of the maximum rated output voltage is built into each output. Because the fixed overvoltage circuit is biased from the output terminals, it can be activated and provide protection even when the supply is not connected to the ac power line.
The OVRST command restores the programmed voltage and current values and clears the OV once the cause of the overvoltage has been eliminated.
OVERCURRENT--when the overcurrent protection feature is enabled, and the output is sourcing current and enters the + CC operating mode, the output will be disabled (set to zero volts and minimum current) and the word OVERCURRENT will appear on the front panel display. In addition the OC status bit is set for that output. The OCRST command restores the programmed voltage and current values and clears the OC once the cause of the overcurrent condition has been eliminated. Refer to Chapter V for programming details.
UNREGULATED OUTPUT--the supply informs the user when output regulation is not guaranteed. This can occur when attempting to sink excessive currents below 2.5 volts or when operating outputs in parallel. The UNR annunciator on the front panel and the UNR bit in the status register indicate that the specified output is unregulated. Line voltage dropout or an incorrectly set ac power module can also cause the output to become unregulated. If line voltage dropout continues, the supply shuts down and will return to the power-up condition when normal line voltage is restored.
OVERTEMPERATURE--shuts down the linear pass and downprogrammer of the output that has reached an unsafe operating temperature. Operation of the other outputs is unaffected. An overtemperature can occur because of excessively high ambient temperature, a blocked fan, or insufficient space at the sides for adequate air circulation. When an overtemperature condition occurs, the word OVERTEMP appears in the front panel display and the OT status bit is set. This circuit resets automatically and restores the output approximately 30 seconds after the temperature drops sufficiently for safe operation.
ERROR--if the power supply receives an invalid command either through the front panel or the HP-IB, the ERR annunciator on the front panel comes on and the ERR bit in the serial poll register is set. The power supply does not execute the command and remains at previously set values. Pushing the ERR button in local mode displays the error message and clears the error. The error indicator may also indicate that an instrument failure has occurred. Refer to Appendix D for further details.
CONNECTING THE LOAD
Each terminal block cover on the rear panel is secured by a locking tab which snaps into a slot at the left of the terminal block. To remove, insert a screwdriver into this rectangular slot and move the locking tab to the left. When the locking tab releases, gently pull the terminal block cover away from the terminal block. To reinstall the cover, align it over the terminal block and gently press it into position until the locking tab engages.
SHOCK HAZARD Turn off ac power before making rear panel connections. All wires and straps must be properly connected with terminal block screws securely tightened. Replace terminal block covers before reapplying power.
Each rear terminal block has six M3.5 x 0.6 x 6 mm screws for attaching wires (see Figure 2-2). Load connections to the supply are made at the + V and -V terminals on each terminal block Do. not connect unterminated wires to the load terminals. Wires used for load connections must be properly terminated with termination connectors securely attached. Remember to replace the impact resistant plastic covers (HP P/N 06624-20007) over the terminal blocks after making connections.
46 Output Connections and Operating Information
Figure 4-3 Typical Downprogramming Characteristic Below 2.0 V
Wire Size Selection
FIRE HAZARD Select a wire size large enough to carry short-circuit current without overheating. Two factors must be considered when selecting wire size for load connections: conductor temperature and voltage drop. To satisfy safety requirements, load wires must be heavy enough not to overheat while carrying the short-circuit output current of the unit. Table 4-1 lists the current-carrying capacity (ampacity) for various sizes of stranded wire.
Note that the minimum wire size required to prevent overheating may not be large enough to prevent OV trip and to maintain good regulation. Under most conditions, the load wires should be heavy enough to limit the voltage drop to no more than l.0 V total (see Figure 4-6). With remote sensing, load regulation is degraded ImV per 200 mV in the -V output load lead (see page 50). On the 40 W low voltage outputs, when the output voltage is set to 7 V, there is no voltage drop
Output Connections and Operating Information 47

available in the load leads for prolonged operation into a 5 A load during ac low line at high ambient temperature conditions.
There is a similar stipulation for 80 W low voltage outputs at l0 A under the same conditions as above. See Figure 4-2A for worst case voltages available at the output terminals.
Table 4-1. Stranded Copper Wire Ampacity and Maximum Wire Lengths to Limit Load Lead Voltage Drop
Notes:
1.Ampacities for AWG wires are derived from MIL-W-5088B. Maximum ambient temp: 55??C. Maximum wire temp: 105??C.
2.Ampacities for metric wires are derived from IE Publication 335-1.
3.Ampacity of aluminum wire is approximately 84% of that listed for copper wire.
4.Because of wire inductance considerations, it is recommended that you keep your load leads twisted, tie wrapped, or bundled together and less than 50 feet (14.7 meters) in length per lead.
5.See pages 47 & 48 for information on wire gauge considerations with capacitive loads.
Table 4-1 lists the resistivity for various wire sizes and the maximum lengths to limit the voltage drop to 1.0 volts for various currents.
Load lead resistance is an important factor relating to the CV stability of the supply with remote sensing of capacitive loads. If high capacitance loads are expected, you should not use wire gauges heavier than 12 to 14 AWG for long runs of load lead. See Figure 1-4 for more information about stability with output capacitors.
48 Output Connections and Operating Information

Multiple Loads
If you are using the as-shipped terminal block strapping pattern (local sensing) and are connecting multiple loads to one output, connect each load to the output terminals using separate connecting wires (see Figure 4-4). This minimizes mutual coupling effects and takes full advantage of the power supply's low output impedance. Each pair of wires should be as short as possible and twisted or bundled to reduce lead inductance and noise pickup.
If load considerations require the use of distribution terminals that are located remotely from the supply, connect the power supply output terminals to the remote distribution terminals by a pair of twisted or bundled wires. Connect each load to the distribution terminals separately. Remote voltage sensing is recommended under these circumstances. Sense either at the remote distribution terminals or, if one load is more sensitive than the others, directly at the critical load.
Positive and Negative Voltages
Either positive or negative voltages can be obtained from the supply by grounding (or "commoning") one of the output terminals. Always use two wires to connect the load to the supply regardless of where or how the system is grounded.
This supply can be operated with any output terminal ??240 Vdc (including output voltage) from ground.
Remote Voltage Sensing
Because of the unavoidable voltage drop developed in the load leads, the as-shipped terminal block strapping pattern shown in Figure 4-4 does not provide the best possible voltage regulation at the load. The remote sensing connections shown in Figure 4-5 improve the voltage regulation at the load by monitoring the voltage there instead of at the supply's output terminals. This allows the power supply to automatically compensate for the voltage drop in the load leads. Remote
Output Connections and Operating Information 49

sensing is especially useful for CV operation with load impedances that vary or have significant lead resistance. It has no effect during CC operation. Because sensing is independent of other power supply functions, remote sensing can be used regardless of how the power supply is programmed. Note that with remote sensing, voltage readback monitors the load voltage at the sense points.
Figure 4-5. Remote Voltage Sensing
Figure 4-6. Allowable Load Lead Voltage Drop with Remote Sensing
The maximum voltage available at the power supply output terminals during remote sensing (see Figure 4-6) is the maximum voltage (20.2 V or 50.5 V) rating, plus one volt (i.e. 21.2 V or 51.5 V as shown in Figure 4-2).This allows a voltage drop of 0.5 V per load lead, or one volt total. For lower output voltages refer to Figure 4-2.
Remote Sense Connections
Remember to turn off the power supply before making or changing any connections on the rear panel terminal blocks. Connect the unit for remote sensing by first disconnecting the straps between sense and load terminals. Then make your connections as shown in Figure 4-5. Connect the sense leads as close to the load as possible. See pages 47 & 48 for information on selection of load lead wire gauge. Best results will be obtained by using the shortest load leads practical. It is recommended that you keep your load leads under 14.7 meters (50 feet) per lead because of inductance effects.
The sense leads carry only a few milliamperes of current and therefore, can be lighter gauge than the load leads. However, note that any voltage drop in the sense leads can degrade the voltage regulation of the supply. Try to keep the sense lead resistance less than about 0.5?? per lead (this requires 20 AWG or heavier for a 50 foot length). You can use the following formulas to calculate the CV load regulation error when using remote sensing:
50 Output Connections and Operating Information

LV Output CV Reg Error(mV) = Rs ( Vset45 - Vdrop1.1 )
HV Output CV Reg Error(mV) = Rs ( Vset105 - Vdrop3.3 )
CV Regulation Error = Remotely sensed voltage will change by this number of millivolts.
Rs = Resistance of each sense lead in ??.
Vset = Programmed voltage value in volts.
Vdrop = Total drop in the load leads in volts.
In addition, include ??1 mV error per 200 mV drop in the -V load lead independent of Rs value.
Output Noise Considerations
Any noise picked up on the sense leads will appear at the supply's output and may adversely affect CV load regulation. Twist the sense leads or use a ribbon cable to minimize the pickup of external noise. In extremely noisy environments it may be necessary to shield the sense leads. Ground the shield at the power supply end only; do not use the shield as one of the sensing conductors.
The noise specifications in Table 1-1 apply at the power supply output terminals when using local sensing. However, voltage transients may be produced at the load by noise induced in the leads or by load current transients acting on the inductance and resistance of the load lead. If it is desirable to keep voltage transient levels to a minimum, place an aluminum or a tantalum capacitor, with an approximate value of 10 ??F per foot (30.5cm) of load lead, right across the load (see Figure 4-5). Refer to Figure 1-4 for capacitive load stability considerations.
Programming Response Time with an Output Capacitor
Because voltage programming into an external output capacitor may cause the supply to briefly enter CC operating mode, voltage programming response time may be longer than that specified in Table 1-1. Use the following formula to estimate the additional response time:
Open Sense Leads
The sense leads are part of the supply's feedback path. Connect them in such a way so that they do not inadvertently become open circuited. The power supply includes protection resistors that reduce the effect of open sense leads during remote-sensing operation. If the sense leads open during operation, the supply returns to the local sensing mode, with the voltage at the output terminals approximately 2.5% higher (low voltage outputs) or approximately 3% higher (high voltage outputs) than the programmed value.
Output Connections and Operating Information 51
Overvoltage Trigger Connections
Each output of your power supply has two OV terminals on its rear panel terminal block. These terminals are labeled +OV and -OV. By connecting the OV terminals all in parallel as shown in Figure 4-7, an overvoltage shutdown on any one output will also trigger the overvoltage on the remaining outputs. Any number of OV terminals up to eight sets can be strapped together. Observe polarity when connecting the OV terminals in parallel.
Figure 4-7. Overvoltage Connections
The overvoltage trip point for each output can be set either from the front panel or by remote programming. You can also externally fire the overvoltage circuit of one or more outputs by applying a 5 volt pulse of at least 50 ??S to any pair of OV terminals (see Figure 4-8). As long as all OV terminals are wired together, the outputs will be crowbarred simultaneously.
External Trigger Circuit
Figure 4-8 illustrates a recommended external circuit that can be used to provide an OV trip signal to the OV terminals. This circuit configuration provides good noise immunity and protects against the voltage pulse that is returned from the OV terminals every time that the overvoltage circuit fires. It can be operated from a wide range of bias voltages provided the input limiting resistors are chosen as tabulated in the figure. If it is not required to trip the OV with a TTL signal, then a bias supply, switch, current limiting resistor (R2), and protection diode are all that are required. Note that with the unit off (ac power removed), the + OV and - OV terminals are inactive.
52 Output Connections and Operating Information
Figure 4-8. External Trigger Circuit
The internal equivalent OV circuit is shown in Figure 4-9. Note the internal DC blocking capacitor, bleed resistor and noise bypass capacitors.
Do not exceed 50 volts maximum between the + OV and the - OV terminals. The OV terminals are rated at ??240 Vdc (including external OV voltage) from chassis ground or any other output terminals.
Figure 4-9. Equivalent Internal OV Trigger Circuit
Output Connections and Operating Information 53

Power Supply Protection Considerations
Battery Charging
If you are using your supply in a battery charging application, it is recommended that a series protection diode be added to prevent damage to the supply during an overvoltage shutdown. Remember that each output has an overvoltage protection circuit that fires a crowbar to disable the output for any of the OVERVOLTAGE conditions described in Protection Features, page 44.
Figure 4-10 illustrates the recommended connections and protection circuit for a battery charging application. The diode will prevent damage to your supply that can result from excessive battery current flowing into the supply's output in the event of an overvoltage shutdown.
Figure 4-10. Recommended Protection Circuit for Battery Charging
Capacitive Load Limitation
The programmable overvoltage protection circuit can be used to downprogram capacitive loads although it is primarily intended for use as a protection feature (page 44).
Repetitive (over 100 cycles) tripping of the overvoltage circuit with output capacitors greater than 5000??F on high voltage units and 20,000??F on low voltage units may result in eventual damage to
the
supply.
Parallel Operation
Connect in parallel only outputs that have equivalent voltage and current ratings.
Connecting outputs in parallel provides a greater current capability than can be obtained from a single output. Because each output contains an active downprogrammer that is capable of sinking current from only ONE identical output, you can parallel no more than two outputs. These outputs must have equivalent voltage and current capability. For example, you can connect the 40 W low voltage outputs together because they have the same voltage and current ratings, but you cannot connect a 40 W high voltage and a 40 W low voltage output together because they have different voltage and current ratings.
As an example, Figure 4-11 shows how to connect two outputs in parallel to a single load with local sensing. This configuration applies to both CV and CC operating modes. Connecting the load leads of output 2 directly to the + V and
54 Output Connections and Operating Information

- V terminals of output 1 keeps the total length of the load leads to a minimum and reduces the number of wire connections that must be made at the load itself. Connecting the + S and - S terminals of output 2 directly to the sense terminals of output 1 compensates for the IR drop in the interconnecting load leads.
CV Operation
For CV operation, one output must operate in CC mode and the other output must operate in CV mode. Although each output operates independently of the other, the output that is operating in CV mode will be ''controlling" the voltage regulation of both outputs. Setting the output voltages as outlined in the following paragraph and configuring the outputs as shown in Figure 4-11 will allow output 1 to operate in CV mode and output 2 to operate in CC mode.
Figure 4-11. Parallel Connections with Local Sensing
To assure that output 2 will be operating in CC mode, you must program output 2's voltage to a higher value than the voltage of output 1. One way to accomplish this is to first program output 2 to the maximum allowable voltage setting for the desired operating range (see Table 4-2 or Figure 4-2). These values are 1% higher than the rated voltage for the operating range. Then, program output 1's voltage to the desired operating voltage. The lower voltage setting of output 1 will determine the voltage that appears across the load. The current limit point of the paralleled outputs is the sum of both individual current limit points. The output current of the parallel combination is the algebraic sum of the individual current readbacks.
The + OV and - OV terminals of output 1 should be wired to the + OV and - OV terminals of output 2. When programming the overvoltage setpoint, set both outputs to the same overvoltage value. When resetting the overvoltage, first disable both outputs by using the OUTPUT ON/OFF key or OUT command. Next, reset both overvoltages. Finally, re-enable the outputs with the OUTPUT ON/OFF key or OUT command.
Table 4-2. Maximum Allowable Voltage Setting
Output Connections and Operating Information 55

CC Operation
For CC operation, set the output voltages as outlined in CV operation (page 55), or alternatively, program the voltage settings of both outputs to the same voltage limit point. Then program the current of each output so that the sum of both currents equals the total desired operating current. The simplest way to accomplish this is to program each output to one half of the total desired operating current. Both outputs will operate in the CC mode.
Remote Sensing
If it is necessary to remote voltage sense at the load, parallel the sense leads of output 1 with the sense leads of output 2 and connect to the load as shown in Figure 4-12. The outputs can be programmed as previously described. Additional information on programming outputs connected in parallel is given in Appendix B.
Figure 4-12. Parallel Connections with Remote Sensing
Specifications for Parallel Operation
Specifications for outputs operating in parallel can be obtained from the specifications for single outputs. Most specifications are expressed as a constant or as a percentage (or ppm) plus a constant. For parallel operation, the percentage portion remains unchanged while constant portions or any constants are changed as indicated below. For current readback accuracy and temperature coefficient of current readback, use the minus current specifications:
56 Output Connections and Operating Information

Series Operation
SHOCK HAZARD Floating voltages must not exceed 240 Vdc. No output terminal may be more than 240 Vdc from chassis ground.
Connect in series only outputs that have equivalent current ratings. Each output has a reverse voltage protection diode across its output terminals. The current conducted by this diode is not internally limited by the output. Therefore, never connect an output in such a way that this diode will conduct current in excess of the rated current of the output since damage could result.
Connecting outputs in series provides a greater voltage capability than can be obtained from a single output. Because the current is the same through each element in a series circuit, outputs connected in series must have equivalent current ratings. Otherwise, the higher rated output could potentially damage the lower rated output by forcing excessive current through it under certain load conditions.
Figure 4-13 shows an example of how to connect two outputs in series to a single load with local sensing. This configuration applies to both CV and CC operating modes. Connecting the + load lead of output 2 directly to the - V terminal of output 1 completes the series connection between the two outputs. Connecting the + S terminal of output 2 directly to the - S terminal of output 1 and removing the sense jumper (between + S and + V) on output 2 compensates for the IR drop in the load lead from output 2 to output 1.
Figure 4-13. Series Connections with Local Sensing
CV Operation
For CV operation, first program the current setting of each output to the desired current limit point. Then program the voltage of each output so that the sum of both voltages equals the total desired operating voltage. The simplest way to accomplish this is to program each output to one half of the total desired operating voltage. Both outputs will operate in CV mode.
Output Connections and Operating Information 57

CC Operation
For CC operation, the current setting of each output must be programmed to the desired operating current. The sum of the voltage settings determines the voltage limit point. As an example, one way to program the voltage of the output is to set the voltage of each output to one half of the total voltage limit point. Then, at load voltages less than one half of the total voltage limit point, one output will operate in CC mode while the other output will be conducting through its internal reverse voltage protection diode. At load voltages greater than one half the total voltage limit point, the output that was in CC mode will change to CV mode while the output that was conducting through its diode will regulate the current in CC mode and provide the balance of the voltage required by the load. Note that the total load voltage can be found by adding the results of reading back the individual series outputs only when neither reverse voltage protection diode is conducting. When this diode is conducting, the corresponding output has reverse voltage across it so that its voltage readback may not be accurate.
When an output is conducting through its reverse voltage protection diode, the output will have a reverse voltage across its output terminals with the - V terminal more positive than the + V terminal. This voltage will be I maximum at the rated current of the output. (See Figure 4-2 for reverse diode characteristic). Note that when an output conducts through this diode, it will indicate CC mode even though it is not regulating the current or voltage. Also, note that the voltage readback is not specified to indicate negative voltages although it will operate down to a limit of about - .22 V on the low voltage outputs and -.52 V on the high voltage outputs. These values will still be indicated even if the actual voltage is more negative.
Figure 4-14. Series Connections with Remote Sensing
Remote Sensing
If it is necessary to remote voltage sense at the load, connect the sense leads of output 1 and output 2 as shown in Figure 4-14. Note that the + sense lead of output 2 must remain connected to the-sense terminal of output 1. The outputs may be set as previously described. Additional information on programming outputs connected in series is given in Appendix B.
Specifications for Series Operation
Specifications for outputs operating in sense can be obtained from the specifications for single outputs. Most specifications are expressed as a constant or a percentage (or ppm) plus a constant. For series operation, the percentage portion remains unchanged while constant portions or any constants are changed as indicated below.
58 Output Connections and Operating Information
Output Connections and Operating Information 59

5
Remote Operation
Introduction
Chapter 3 introduced you to the basics of remote operation and provided a few simple examples using a Series 200 computer as the HP-IB controller. This chapter contains all the information required to control your power supply remotely and discusses in greater detail how each of the commands can be implemented. The material covered is intended for any controller capable of using the HP-IB interface functions mentioned in Interface Function, on this page.
Four major sub-sections are discussed. These are:
1.HP-IB Operation
2.Programming Syntax
3.Initial Conditions
4.Power Supply Commands
The HP-IB section briefly describes the HP-IB interface functions to get you acquainted with remote programming using the HP-IB. Under Programming Syntax, the syntax of all commands, the numeric data formats and the programmable ranges for all models are given. Initial Conditions highlights the initial values of all the parameters at power-on. Power Supply Commands will describe all the commands which can be used to program the supply's functions including status reporting, error handling, protection features, and voltage and current programming. The power supply commands are summarized in Appendix C.
The examples are written in a generic form to make adaptation to your controller easy. You should be familiar with the use of your controller and its instruction set and how the power supply commands can be incorporated in your controller commands. If you are not familiar with the operation of the power supply, you are advised to read through Chapters 2 through 4 first.
HP-IB Operation
Interface Function
Remote control is implemented by the HP-IB. It enables instructions to be sent from an external computer equipped with an HP-IB interface. The power supply implements the following IEEE-488 Interface Functions:
SH1- Source Handshake
SR1 - Service Request
AH1 - Acceptor Handshake
RL1 - Remote/Local
T6 - Talker
PP1 - Parallel Poll
L4- Listener
DC1 - Device Clear
The source handshake, acceptor handshake, talker and listener functions are implemented by the interface circuits of the power supply and the controller. The ADDR annunciator indicates when the power supply is addressed to listen or talk. (The talker function includes the Serial Poll, see page 62).
Service Request. This is a message which can be initiated by the power supply to request service from the controller. When the supply is requesting service, it asserts the service request (SRQ) line on the HP-IB to interrupt the controller

providing the controller is configured to service interrupts. A service request can be generated whenever there is a fault on one of the outputs (up to 4 outputs), a programming error has occurred, or at power on providing certain commands are sent. Service request commands are discussed in detail on page 76.
The SRQ annunciator on the front panel display is turned on when the power supply is requesting service from the computer and remains on until the controller conducts a serial poll. A serial poll removes the service request and turns off the SRQ annunciator regardless of whether the condition that caused the service request continues to exist. The service request is also removed when you send the "CLR" command (see page 73).
Remote/Local. The power supply can receive programming information either from the HP-IB (remote) or from the front panel (local). When the power supply is in remote, the state of the supply cannot be changed by using the front panel keys, although the LCL key will remain enabled. Remote operation takes precedence over local operation, hence if the supply is accepting commands remotely and you attempt to change it to local operation, the supply will not allow any local settings and will remain in remote. You can prevent the front panel from sending programming information by sending the local lockout command. This command is sent only from the HP-IB. If you change from local to remote or vice-versa, there will be no change in the programmed settings.
Parallel Poll. Parallel Poll allows the controller to receive at the same time one bit of data from each of up to eight instruments connected to the bus. HP power supplies designate bit #6, the RQS bit of the serial poll register for this operation. By checking the status of this bit, the computer can quickly determine which instruments on the bus requested service. Once an instrument is identified, the computer can perform a serial poll to find out the exact cause of the request. Parallel Poll does not reset this service request bit (RQS) in the power supply.
Unless remotely configured, the power supply will respond with a 1 on one of the HP-IB data lines if it is requesting service and its address is between 0 and 7. Addresses 0 through 7 define which data line (1 through 8) the supply will respond on. If the address is set to 8 or greater, the supply will not respond unless remotely configured.
The power supply may be remotely configured to respond with a 0 or 1, on any of the data lines, to indicate that it is requesting service. This is done in accordance with IEEE-488 1978.
Serial Poll. In a serial poll, the controller polls each instrument on the bus one at time. The power supply responds by placing the contents of the eight-bit serial poll register on the HP-IB data lines. Page 75 discusses the Serial Poll Register and defines the function of each of the bits. After the serial poll, the service request is cleared and the SRQ annunciator at the front panel is reset (off). However, the condition that generated the service request may still be present. See page 76.
Device Clear. The Device Clear command is typically used in systems to send all devices in the system to a known state with a single command. It may be implemented as an addressed or an unaddressed command. The power supply CLR command performs the same function as Device Clear (see page 73).
HP-IB Address Selection
You can find out the present address or change the address of the supply by using the front panel ADDR key as described in Chapter 3. Any address 0 through 30 is a valid address. If you program an address outside this range you will get a number range error.

Power-On Service Request (PON)
The power supply can request service from the controller when the power is turned on. This request can be enabled or disabled by sending a PON command (see page 77). When the request is enabled, the supply can generate an SRQ at power-on or when there is a momentary loss in power. You can execute a serial poll to clear the service request. Table 5-7 details the conditions under which a PON command will generate an SRQ.
Programming Syntax
The following paragraphs describe the syntax of the device command that is used to program your power supply. As shown in Figure 5-1, the device command is a specific part of the program statement that your computer will accept. The first part of the statement is computer as well as programming language specific. Figure 5-1 shows the structure of a typical programming statement for an HP Series 200 computer. If you are using a different computer or programming language, refer to your computer programming manual to determine the correct syntax for this portion of the program statement. This section of the manual is only concerned with the device command portion (the part inside the quotes for Series 200 computers with BASIC) of the program statement.
Figure 5-1. Typical Program Statement for Series 200 Computers
Figure 5-2 shows the possible syntax forms for the device commands that are used to program the power supply. Syntax forms for the calibration commands that are discussed in Appendix A are also included. The oblong shape at the left of the syntax forms contains the command header which must be entered as shown in Tables 5-1 and 5-2. Commands are accepted in either uppercase or lowercase letters (ASCII characters). Circles contain characters that must be entered exactly as shown. Characters such as a space <SP> or a comma are used to separate elements in the command string. Characters such as a line feed < LF > or a semicolon are used to terminate the command string. Rectangles contain parameters that follow the command header lines and arrows indicate the correct paths through the syntax diagrams.
Numeric Data
The power supply will accept numeric data in implicit point, explicit point, or scientific notation. A general syntax diagram for numeric data is included in Figure 5-2. Implicit point notation means that numbers do not contain a decimal point; integers for example. Numbers written in explicit notation contain a decimal point, such as 12.35. In scientific notation, the letter E stands for "10 raised to". For example, 1.2E3 is read as 1.2 times 10 raised to the 3rd power, which equals 1,200. Plus and minus signs are considered numeric characters and are optional. If you program a number with an accuracy that is greater than the resolution of the supply, the number will automatically be rounded to the nearest multiple of the power supply's resolution. Table 5-1 gives the ranges for numeric data that is sent to the supply.
The power supply will also return numeric data (ASCII characters) to your computer. The format of the numbers returned depends upon the type of data requested. Table 5-2 gives the format for data returned to the computer in response to any of the queries that are listed.
Figure 5-2 (Sheet 1 of 2). Syntax Forms for Power Supply Commands
Figure 5-2 (Sheet 2 of 2). Syntax Forms for Power Supply Commands
Table 5-1. Power Supply Commands
*Output channels 3 and 4 are not used in all models (see Table 5-4).
Table 5-2. Power Supply Queries
NOTES:
1.Output channels 3 and 4 are not used in all models. (See Table 5-4).
2.Applies to 80 W Low V output.
3.Applies to 40 W High V and 80 W High V outputs.
4.''X'' depends upon model.
5.A space is returned for a + sign.
6.All responses are followed by a < CR > and < LF > (EOI asserted with < LF > ).
7.Spaces are allowed between the header and the question mark.

Order of Execution
When you send a set of instructions to the power supply, they are executed in the order in which they are received. The power supply completes the execution of the present command before executing another command. To send more than one command within the power supply command string, use a semicolon to separate the commands. This maximizes the rate at which the power supply accepts commands.
Terminators
Terminators mark the end of a command string. As shown in Figure 5-2, the semicolon, line feed < LF >, and carriage return line feed < CR > < LF > are the characters that indicate the end of a message to the power supply. When you are using the HP Series 200 computer with BASIC to send a command using the standard format (see Figure 5-1), the computer automatically sends < CR > < LF > on the data bus following the command.
Initial Conditions
Immediately after power on, the power supply automatically undergoes a self-test and sets all parameters to their initial values. Table 5-3 lists the parameters and their initial values.
Power Supply Commands
This section discusses the commands which you will use to program the supply's voltage and current, protection circuits, and enhanced features like storage and recall registers, and reprogramming delay. When programming, you should be aware that the current, voltage and overvoltage ranges for each output of your supply may differ. Table 5-4 shows these values for the power supply. If you send values out of these ranges, you will get a number range error. A summary of all commands appears in Appendix C.
The output voltage of some output channels exceeds the safe operating limit of 42.2 V. To avoid any electrical shock, program the voltage to zero volts or turn off ac input power before changing any rear panel connections. Make certain all straps are properly connected, terminal block screws are securely tightened and terminal block covers are replaced before reapplying power.

Voltage Programming
To program voltage, send the output channel and the programmed value. In the example below, output 1 is programmed to 5 V.
VSET 1,5
The values you send must always be volts. For example if you want to program 450 millivolts, convert to volts and then send the command:
VSET 1,.45
If the output channel is operating in constant voltage mode (CV annunciator on) then the actual voltage is the programmed voltage, but in CC mode of operation (CC annunciator on), the programmed voltage is the voltage limit for that output.
To readback the programmed voltage setting for output 1, send the query:
VSET? 1
and address the supply to talk. If you want to know the value of the actual output voltage of output 1, send the query:
VOUT? 1
The results are placed on the HP-IB and read into the controller when the supply is addressed to talk.
Current Programming
To program the current, send the output channel and the programmed value in amps. In the example below, output is programmed to 1.15 amps.
ISET 1,1.15
The value you send must always be in amps. For example if you want to program 95 milliamps, convert to amps and then send the command
ISET 1,.095
If the output channel is in constant current (CC) mode of operation, then the actual current is the programmed current but if the output is in the CV mode, the programmed current is the current limit of that output.
To readback the programmed current for output 1, send the query and addressing the supply to talk.
ISET? 1
You can also instruct the supply to measure the actual output current at output channel 1 by sending the following query and address the supply to talk.
IOUT? 1
The results are placed on the HP-IB and read into the controller .

Table 5-4. Programmable Output Ranges for the HP 662lA-6624A and 6627A Supplies
*The maximum programmable voltage values for each range are 1% higher than the rated voltage and the maximum programmable current values for each range are 3% higher than the rated current.
**Each output channel "wakes up" with current programmed to a small positive value. This permits the output channel's output voltage to be programmed up without specifically programming the current. An output channel, in fact, cannot be programmed to zero amps. If the output channel receives a command to go to zero amps, or any positive current below the minimum programmable current, it will set itself to the minimum. Note that you can use the DCPON command to cause the ouput channels to wake up with the current programmed to a small negative value. This prevents currrent overshoots at turn on if the unit is operating in constant current mode.
Range Switching
Each output operates in the boundaries of either the low range or the high range as specified in Table 5-4. Refer to page 43 for a detailed description of the dual range operation. The range is selected based on the programmed parameters. If the last parameter (voltage or current) programmed is outside of the existing range, the supply will automatically switch ranges. A sequence of examples are given on the next page to illustrate this operation. Output 1, used in the examples, is a 40 W Low V output.
Example 1: VSET 1,5; ISET 1,2
This example programs output 1 to 5 V and 2 A. These values are in the quadrant of the characteristic curve which has voltage and current boundaries common to both high and low operating ranges.
Example 2: VSET 1,20
Now output 1 is in the high range programmed to 20 V and 2A.
Example 3: VSET 1,5; ISET 1,3
Output 1 is now in the low range programmed to 5 V and 3A.
Example 4: VSET 1,10
Now output 1 is in the high range and the current is automatically scaled back from 3 A to the lower current limit of 2.06 A. The output is operating in the same range as that of Example 2.
Example 5: VSET 1,20; ISET 1,3
The ISET command will cause the voltage to be scaled back to the low range limit of 7.07 V and the output will operate within the boundaries of the low range as in Example 3.
Output On/Off
The OUT command disables/enables an output channel of the power supply. It will not disturb any other programmed function nor will it reset the protection circuits. You can control individual outputs with the OUT command as shown below. For example, to disable output channel 1 send the following:
OUT 1,0
To enable output channel 1 send the following command
OUT 1,1
You can find out the present state of output 1 by sending the query:
OUT? 1
and addressing the supply to talk. The response from the supply is either a "0" to indicate output 1 is off or a "1'' to indicate that the output is on. When disabled, the output behaves as if it were programmed to zero volts and minimum current.
Overvoltage (OV) Protection
The programmable OV is a protection feature which can be set by the operator to protect the load against excessive voltage. When the actual voltage exceeds the programmed overvoltage setting for a given output channel, the OV is tripped. The OV circuit will fire the SCR crowbar which shorts across the output and the output assumes a low impedance state.
For example, to program the OV of output channel 1 to 9.5 V send the following command:
OVSET 1,9.5
To find out the OV setting for output channel 1 send the following query and address the supply to talk:
OVSET? 1
Remote Operation 71

To enable an output after it went into overvoltage, you must first remove the overvoltage condition and then send the OV reset command.
To reset output 1 send:
OVRST 1
If you send the reset command without first removing the OV condition, the supply will fire the OV again.
Overcurrent Protection (OCP)
The OCP is a protection feature employed by the power supply to guard against excessive output currents. When the output enters the + CC mode and the OCP is enabled, the OCP circuit down programs the output voltage and disables the output.
To enable the OCP, for output channel 1, send the command
OCP 1,1
To disable the OCP, send the command
OCP 1,0
You can find out the OCP setting by sending the following query and addressing the power supply to talk.
OCP? 1
The response from the power supply is either a "0" to indicate that OCP is off or a ''1" to indicate that it is on. To reset the output channel after an overcurrent trip, you can either disable the OCP and send the reset command, or you can reduce the output current below the programmed current and then send the reset command. To reset output 1, send the command:
OCRST 1
Multiple Output Storage & Recall
The power supply has 10 internal registers each of which can store the voltage and current settings of all the outputs. By storing voltage and current settings for all outputs and recalling them later, you can have significant savings in programming time. (See Supplemental Characteristics in Table 1-1).

At power-on, each of the registers contain 0 volts and the minimum current limit. To store voltage and current settings, you must specify the register (1 to 10). For example to store the present settings of current and voltage of all your supply's outputs in register 2, send the following command:
STO 2
This command will take the programmed voltage and current settings of all output channels and store them in register 2.
You can set the power supply outputs to these stored voltage and current settings by sending the recall command.
RCL 2
When a register is recalled, the outputs will be set sequentially (output 1, output 2, etc.). If you attempt to recall registers which were not previously stored, then the supply will return the power-on values for that register (0 volts and minimum current limit). If you recalled registers outside the 1 to 10 range, you will get a number range error.
The Clear Command
This command will return the power supply to its power-on state and all parameters are returned to their initial power-on values except for the following:
1.The store/recall registers are not cleared.
2.The power supply remains addressed to listen.
3.The PON bit in the serial poll register is cleared.
To Clear the power supply, send the following command:
CLR
Status Reporting
The power supply has the ability to report its internal status to the user whenever it is asked to do so. Depending on the type of status the user requested, the supply will interrogate the status, accumulated status, mask, or fault registers present in each output. The status register can report status independently or it can work together with the mask and fault registers to report a fault. The accumulated status register records every status condition the output experienced since the time it was last read. Figure 5-3 shows a conceptual model of the operation of these registers.

Figure 5-3. Functional Relationship of Status Registers
The supply has one serial poll register which services all outputs and provides the user with other power supply status- related information as discussed on page 75.
Status Register. Each output channel of the power supply maintains its present status in an 8-bit register. This status register reports the status of the output channel whenever it is queried. A "1" in any of the bit positions indicates that the condition is true. As long as the condition continues to be true, the bit will remain set. Assignments for the bits are shown in Table 5-5.
Decoding of the reading is based on the weighted number placed on each bit of the 8-bit status registers. For example, bit position 5 in the register has a bit weight of 32 (see Table 5-5). Each bit is assigned to a particular condition and the corresponding bit weight is used to identify that condition. When set, bit 5 indicates that the associated output is in the unregulated state. If this is the only bit that is set, the number 32 will be returned when the output's status register is queried.
Table 5-5. Bit Alignment for the Status, A Status, Fault, and Mask Register
CV = Constant Voltage Mode
+ CC = Positive Constant Current Mode - CC = Negative Current Limit Mode
OV = Overvoltage Protection circuit tripped
OT = Over Temperature Protection circuit tripped UNR = Unregulated Mode
OC = Over Current Protection tripped CP = Coupled parameter (See Note)
Note: When the range is automatically switched as discussed on page70, the CP bit is set. It is cleared when you send a voltage or current value that causes no range change.
To query an output channel for its status, you must specify the output channel. For example, to find out the status at output 2 send the following query and address the supply to talk:
STS? 2
Accumulated Status Register. Each output channel of the power supply also maintains a cumulative status in its accumulated status (astatus) register. This register records every status condition the power supply output entered since it was last queried. When queried, it returns a decimal number which is decoded as shown below. The astatus register is reset to the present value of the status register after it is queried. The bits are assigned as in Table 5-5. Here is an example to help you decode the decimal number (from 0 to 255) returned when the astatus register is queried. If the output channel was in overvoltage since the last reading of the astatus register and that channel is presently operating in constant voltage mode, the reading you will get when you query the register will be 9. To decode this we use table 5-5.
For example, to query the astatus register of output 2, send the following query and address the supply to talk.
ASTS? 2

The Mask and Fault Register. The fault register works in conjunction with the mask register. These are two eight bit registers which report any fault condition on a particular output channel. The mask register is used to set up the conditions that generate a fault which is latched into the fault register. The user can then read the fault register to determine the fault. When a bit in the fault register is set, the power supply can generate a service request for that output providing the service request command on fault (SRQ 1 or SRQ 3) was previously sent. See page 76 for a discussion on service request.
To understand how these two registers work, we must include the status register in this discussion. Recall that the status register takes its input from the power supply and the user cannot change its contents. The mask register takes its inputs from the user, and the power supply cannot change its contents. The fault register takes its inputs from both the mask and the status registers. You can find out the setting of the mask register of output 2 by sending the following query and addressing the supply to talk:
UNMASK? 2
The response will be a numeric code between 0 and 255 which can be decoded by consulting Table 5-5. You can set the conditions to generate a fault by setting (unmasking) one or more bits in the mask register. The conditions will remain unmasked until you change them. To unmask conditions in output 2 for example, send the following command:
UNMASK 2,XXX
where XXX specifies the numeric code (0 to 255) for the unmasked conditions (see Table 5-5). If during operation, the output experiences any of the previously unmasked conditions, it will set the corresponding bit(s) in its fault register.
Remember that the bits in the fault register can be set when there is a change in either the status register or the mask register. Each output has its status, mask, and fault registers arranged as shown in Figure 5-3 and Table 5-5. The mask register, which is set by the user, is used to specify which bits in the status register are enabled (unmasked) to set bits in the fault register. A bit is set in the fault register when the corresponding bit in the status register changes from "0'' to "1" and the corresponding bit in the mask register is a "1". Also, if a bit in the status register is already set and then the corresponding bit in the mask register is set (unmasked), the corresponding bit in the fault register will be set.
In addition, if both status and mask register bits remain set after the fault register was read (and cleared), the fault register will remain cleared as long as there are no changes in either the status or mask registers with the following exception. Executing a VSET, ISET, RCL, OVRST, OCRST, or OUT on/off command, will cause the CV, + CC, - CC, or UNR bit (as applicable) in the fault register to be set. Note that the fault register is cleared immediately after it is read.
As shown in Figure 5-3, if one or more bits in the fault register of a given output channel are set, then the FAU bit for that output in the serial poll register will also be set and a service request may be generated (see page 76). To read the fault register of output 2 and find out which bits are set, send the following query and address the supply to talk:
FAULT? 2
The power supply responds with a number which can be decoded from Table 5-5. For example, the number 9 (8 + 1) indicates that the OV and the CV bits in the fault register are set.
The Serial Poll Register. The serial poll register is an 8 bit register which the supply uses to keep track of its internal operating status and to determine the operating status of each of its outputs. Table 5-6 defines each bit.
Table 5-6. Bit Assignment of the Serial Poll Register

The first four bits (0 to 3) in the register tell whether or not a particular output has a fault. If there is a fault in one of the outputs, then the corresponding FAU bit will be set. Thus if output 1 has a fault, then FAU 1 will be set. In models with only three outputs, FAU 4 will always be zero and in two output models, FAU 3 and FAU 4 will always be zero.
The RDY bit is set when processing is complete and is cleared when the supply is processing commands.
The ERR bit is set when a programming or hardware error occurs and is cleared when the error query (ERR?) is received. The error annunciator on the front panel informs the user when this bit is set or cleared.
The RQS bit is set when the power supply generates a service request and cleared after a serial poll is done (see the following paragraph, Service Request Generation).
The PON bit is set at power on and cleared when a CLR command is sent.
Service Request Generation
When operating your supply, you may want it to request service every time a fault or a programming error condition occurs. To do this you send a service request (SRQ) command. When the condition is true, the power supply responds by setting the RQS bit in the serial poll register, setting the SRQ annunciator on the front panel, and issuing an SRQ over the HP-IB.
The 662xA supplies can generate a service request for any of the following reasons: (refer to Table 5-7).
???An Output Fault. If there is a fault on one or more of the output channels and you previously sent the SRQ 1 or SRQ 3 command (see Service Request Enable/Disable information below), then an SRQ will be generated.
???An Error. If there is an error (see Tables 5-8) and you previously sent the SRQ 2 or SRQ 3 command, (see Service Request Enable/Disable information below), then the supply will generate a service request.
???Power-on. At power-on, the PON bit of the serial poll register is set but the supply will only generate an SRQ if you previously sent a PON 1 command.
???Input Line Voltage Dropout. Same as power-on condition.
To find out the nature of the service request, you must do a serial poll. This will isolate the output that generated the request by checking which of the FAU bits are set in the case of a fault, or checking to see if the error bit is set in the case of an error. If the SRQ on faults was set, then send the fault query.
FAULT? 2 (using output 2 as an example)
and address the supply to talk if you want to find out which of the conditions you unmasked in Figure 5-3 are true. For example if the supply was in overvoltage and that condition was unmasked then the response from the fault query will be ''8" (see Table 5-5).
If the SRQ on error was set, then you can send the error query ERR? and address the supply to talk. The response will identify the error by its code (see Table 5-8).

Service Request Enable/Disable. You can query the status of the service request enable/disable function by sending the query:
SRQ?
and addressing the power supply to talk. The response from the supply is one of the following:
0, 1, 2, or 3
0--indicates that the service request capability (except for power-on; see The Power On-Service Request information below) is disabled.
1--indicates that it is enabled for output fault conditions.
2--indicates that it is enabled for error conditions.
3--indicates that it is enabled for both fault and error conditions
The ability to generate service requests can be enabled or disabled using the SRQ command as described below.
To disable the service request capability, except for power-on, send:
SRQ 0
To enable the service request capability for all output faults,
SRQ 1
To enable the service request capability for errors, send:
SRQ 2
To enable the service request capability for both faults and errors, send:
SRQ 3
The Power-On Service Request. You can also cause the power supply to request service every time it is switched on or every time there is a temporary loss in power. To do this send the following command:
PON 1
If you want to disable this facility, send the command.
PON 0
If you want to find out if the power-on SRQ is enabled or disabled, send the following query:
PON ?
and address the supply to talk. The supply will respond with a 1 or 0 as discussed above.
Table 5-7 summarizes all the conditions under which a service request will be generated.
Table 5-7 Condition for Generating a Service Request
Reprogramming Delay
The power supply may switch modes or become unregulated momentarily after a new output value is programmed. Because of their short duration, these cases may not ordinarily be considered a fault but the supply will recognize this deviation and generate a fault signal. To prevent this, the reprogramming delay feature is implemented.
Reprogramming delay will delay the onset of certain fault conditions and prevent the power supply from registering a fault when these conditions are true. When the delay is in effect, the CV, + CC, - CC and UNR bits of the status register are masked and cannot communicate with the mask and fault registers and the OCP function. This will prevent the supply from registering a fault should any of these bits become set during the delay period. Reprogramming delay is initiated when any of the following functions are executed:
VSET: ISET: RCL: OVRST: OCRST; OUT on/off
At power-on reprogramming delay is set to 20 mS. You can specify new values between 0 and 32 S in steps of 4 mS. If you specify a value which is not a multiple of 4 mS, the supply will round off the set value to the nearest 4 mS multiple.
To program a new value of 80 mS in output 2 for example, send the following:
DLY 2,.08
If you send a value outside the 0 to 32 S range you will get a programming error. You may use the programming response times in the specifications table to give you an idea of a typical delay setting. However, the appropriate delay setting will also depend on load capacitance, load resistance, and current limit setting. See page 51 for output capacitor considerations.
To query the reprogramming delay setting of a particular output channel, send the following query:
DLY? 2 (using output 2 as an example)
and address the supply to talk. The response will be a numeric value between 0 and 32.
Display On/Off
When the display is on, the commands sent across the HP-IB may experience a slower processing time because the processor must also spend time to monitor the outputs and update the display. You can shorten your command processing time by turning off the display. To turn off the display, send the command:
DSP 0
To re-enable the display send the command:
DSP 1
You can also find out the status of the display by sending the following query and addressing the supply to talk:
DSP?
The response will be either a "1'' or a "0''.
Message Display Capability. The display command can also be used to display messages on the front panel. Messages may consist of a maximum of twelve alphanumeric characters. Only upper case alpha characters, numbers, and spaces will be displayed.
For example, to display the message "OUTPUT 2 OK??? send the following command:
DSP "OUTPUT 2 OK"
OUTPUT 705; ''DSP'"'OUTPUT 2 OK""
Other Queries
In the examples discussed above, you saw how to use queries for each function discussed. The following paragraphs describe other queries which were not previously covered.
ERROR Query. The power supply can detect both programming and hardware errors. You can use either the front panel (see page 87) or the HP-IB to find out the type of error. Upon detecting an error, the error annunciator on the front panel and the ERR bit in the serial poll register will be set. When in local mode the supply will display the error name in response to pressing the ERR key on the front panel. Over the HP-IB, only the error code will be returned. After a query, the error bit is cleared. A description of these codes is given in Table 5-8. To find out what the error is, send the following query and address the supply to talk:
ERR?
The supply will respond with an error code number (see Table 5-8).
ID Query. If you want to know the model number of the power supply you are working with, you can send the ID? query over the HP-IB. To do this send the following over the HP-IB and address the supply to talk.
ID?
The supply will respond with its model number.
Test Query. You can get the power supply to perform a limited self-test at any time during its operation by sending the TEST? query over the HP-IB. This test does not affect the analog control circuits of the supply and it can be performed while the outputs are connected to external circuits. For tests of the analog control circuits refer to Chapter 3. Responses to the test query are described in Table 5-9. This test cannot be done from the front panel. To instruct the power supply to carry out a self-test, send the following query and address the supply to talk:
TEST?
Calibration Mode Query. To be able to calibrate your power supply, the calibration mode (CMODE) must be turned on (See Appendix A for a detailed description of the calibration procedure). To find out if the CMODE is on or off, send the following query over the HP-IB and address the supply to talk:
CMODE?
Remote Operation 79
The supply will respond with a ''1" which indicates that CMODE is on or a "0" which indicates that CMODE is off.
DCPON. The DCPON command sets the state of all outputs at power-on. You can specify if the outputs wake up enabled or disabled when the unit is turned on. To enable all outputs at turn-on send:
DCPON 1
To disable all outputs at turn-on send:
DCPON 0
Note that these commands set the output voltage to zero and the output current to a slightly positive value when the OUTPUT OFF command is issued. Therefore, the constant voltage feedback loop is active and the outputs are in constant voltage mode when programmed ???OFF???.
Starting with firmware revision A.00.04 and later, two additional commands let you set the output current to a slightly negative value when the OUPUT OFF command is issued, causing the outputs to be in constant current mode when programmed ???OFF???. The benefit of being in constant current mode when the output is off is that if the load impedance and the voltage and current settings are such that the unit is forced into constant current mode at turn on, then the current feedback loop will be active during the transition to OUTPUT ON, and there will be no output current overshoot due to mode crossover.
20The timer has failed self-test. Refer to the troubleshooting section in the Service Manual.
21The RAM has failed self-test. Refer to the troubleshooting section in the Service Manual.
27 The ROM has failed the checksum test. Refer to the troubleshooting section in the Service Manual.

6
Local Operation
Introduction
Chapter 3 introduced you to the supply's front panel controls and indicators to help you turn on the supply and perform the checkout procedures that were given in that chapter. The following paragraphs describe how to use all of the front panel controls and indicators. Most of the remote operations described in Chapter 5 can also be performed locally from the supply's front panel.
Local Mode
In order to use the front panel keys to control the supply, the local mode must be in effect. The local mode is in effect immediately after power is applied. Table 5-3 lists the initial settings for all of the power supply's functions when power is initially applied. When the local mode is in effect (RMT annunciator off), the Output Function, System Function, and Numeric Entry keys on the front panel (see Figure 6-1) can be used to operate the power supply.
In the remote mode (front panel RMT annunciator on), the front panel keys will have no effect on any of the supply's outputs and only the computer can control the supply. You can, however, still use the front panel display to view the output voltage and current readings or the present settings for the selected output channel while the supply is in the remote mode.
You can return the supply to the local mode from the remote mode by pressing the LCL key provided that the local lockout command has not been received from the HP-IB controller. Pressing the LCL key will also turn the supply's display back on if it was turned off with a DSP command during remote operation (see page 78). A change between the local and remote modes will not result in a change in the power supply's outputs.
Local Control Of Output Functions
The Output Function keys (see Figure 6-1) allow you to control the selected output. Figure 6-1 shows the annunciator arrow over OUTPUT 2 indicating that output channel 2 is selected. Pressing the OUTPUT SELECT key selects the output channels in forward (??) or reverse ( ?? ) sequence. Note that Figure 6-1 illustrates the front panel for the HP 6624A supply which has four output annunciators. The HP 6627A front panel also has four annunciators. The front panels for HP Models 6621A, 6622A, and 6623A are identical to Figure 6-1 except they have fewer output annunciators.
General
The power supply will accept programming values directly in volts and amps. The programmable voltage, current, and overvoltage ranges for the outputs of each model are given in Table 5-4. The power supply will round off the values received to the nearest multiple of the resolution for that particular output. If you send a value out of the valid range, it will not be executed and the ERR annunciator will come on. You can get a readout of the error on the display by pressing the ERR key. For an out-of-range error, the error message "NUMBER RANGE" will be displayed.
When you press the VSET, ISET, OVSET, DLY, or UNMASK key, the output selected and the present setting for that function will be displayed. For example, the front panel display in Figure 6-1 shows the VSET function for output 2 set to 1.250. You can change the setting using the numeric entry keys. Pressing the number keys will cause the present numeric setting to become blank and be replaced with the new numbers on the display. You can use the ??? key to erase previous keystrokes if you make a mistake.

Figure 6-1. Front Panel (Model 6624A shown)
Pressing the ENTER key will enter the values displayed for the function indicated, initiate that function, and return the display to the metering mode in which the measured output voltage and current for the selected output are displayed. Pressing the ENTER key without entering numbers will result in retention of the previous values and return to the metering mode. You can also return to the metering mode at anytime by pressing the METER key.
Setting Voltage
The selected output's voltage is programmed locally using the VSET key. For example, program the voltage to 5.25 volts by pressing:
The front panel display then indicates the actual output voltage and current for the selected output.
Setting Current
The selected output's current is programmed locally using the ISET key. For example, program the current to 1.5 amps by pressing:
The power supply will accept any programmed current between zero and the minimum programmable current and automatically set the output to the minimum programmable current without causing a programming error. See Table 5-4.
Enabling/Disabling an Output
The selected output channel can be turned on and off from the front panel. The OUTPUT ON/OFF key toggles the selected output on and off. When an output is turned off, the message ''DISABLED" will be displayed.
The OUTPUT ON/OFF key will not affect any other programmed functions nor will it reset an overvoltage or overcurrent condition. An output disabled by the OUTPUT ON/OFF key will behave as if it were programmed to zero volts and minimum current.
Setting Overvoltage Protection
Programmable overvoltage protection (OVP) guards your load against overvoltage by crowbarring and downprogramming the power supply output if the programmed overvoltage setting is exceeded.
A fixed OVP circuit with a trip level about 20 percent above the maximum programmable voltage acts as a backup to the programmable OVP. When overvoltage protection is activated, the output is shorted and the message ''OVERVOLTAGE" will appear on the front panel display.
The selected output's overvoltage setting is programmed locally using the OVSET key. For example, program the overvoltage to 10.5 volts by pressing:
Resetting Overvoltage Protection
The condition that caused the OV must first be cleared and then the output can be returned to its previous state by pressing the OVRST key.
Enabling/Disabling Overcurrent Protection
The overcurrent protection feature guards against excessive output currents. When the output goes into the + CC mode and OCP is enabled, the OCP circuit is activated which downprograms the output voltage and disables the output. For this condition, the message ''OVERCURRENT'' appears on the front panel display.
The selected output's overcurrent protection feature can be turned on and off from the front panel. The OCP key toggles the selected output's overcurrent protection circuit on and off. When it is on (enabled), the OCP ENBLD annunciator will be on.
Resetting Overcurrent Protection
The condition that activated the OCP circuit must first be cleared then the output can be returned to its previous state by pressing the OCRST key.
Displaying the Contents of the Fault Register
Each output channel has a fault register which can be used in conjunction with the status and mask registers to report a fault condition. A detailed description of these registers is given in Chapter 5. The main points of this description are repeated below for continuity in explaining how to use the front panel UNMASK and FAULT keys.
The mask register, which is set by the user, is used to specify which bits in the status register are enabled (unmasked) to set bits in the fault register. A bit is set in the fault register when the corresponding bit in the status register changes from 0 to 1 and the corresponding bit in the mask register is 1. Each output channel has its status, mask, and fault registers arranged as shown in Table 6-1.

Table 6-1. Bit Arrangement of the Status, Mask, and Fault Registers
Note that bits can be set in an output's fault register only when there is a change in either the status register or the mask register. Therefore, if a bit is set in the mask register (unmasked) while the corresponding condition is true in the status register, the associated bit will also be set in the fault register.
The UNMASK key is used to send a decimal number that is the sum of the weights of the bits to be set. The decimal number 0 will clear all bits in the mask register so that status register bits cannot set any of the corresponding fault register bits.
The following example uses the number 9 (8 + 1) to set the OV bit (8) and the CV bit (1) in the mask register of the selected output.
This example allows only an OV and/or CV condition to appear as faults; i.e., set the corresponding bits in the fault register. Note that the mask register does not affect the status register; it simply determines which bits in the status register can set bits in the fault register.
When you press the FAULT key, the contents of the fault register are displayed. For example, the display 9 indicates that the OV and CV bits in the fault register are set. The fault register is cleared immediately after it is reset by pressing
FAULT.
Setting the Reprogramming Delay
A power supply's output may switch modes momentarily after a new output value is programmed or the output is reset from zero. To prevent these momentary conditions from appearing as faults, each output has a reprogramming delay parameter. The delay parameter specifies a time period in which the CV, + CC, - CC, and UNR bits in the present status register are masked from the fault register and from the overcurrent protection (OCP) circuit after certain commands are sent. Refer to Reprogramming Delay, page 78, for additional details about the reprogramming delay parameter.
The delay time is initiated following a VSET, ISET, OVRST, OCRST, OUT on/off, or RCL command that is sent from the front panel (or from a remote controller).
The delay time is settable from 0 to 32 seconds in .004 s (4 ms) intervals. The default (or power on value) is 20 ms.
For example, set the delay time of the selected output to 345 mS by pressing:
Local Control Of System Functions
The System Function keys consist of the ADDR, ERR, STO, and RCL keys as shown in Figure 6-1. These keys are independent of the output selected and are used in setting the supply's HP-IB address, displaying error messages, and storing/recalling voltage and current settings for all of the supply's output channels.
Setting the Supply's HP-IB Address
As described on page 39 before you can operate the supply remotely, you must know its HP-IB address. You can find this out locally from the front panel by pressing:

ADDR
The supply's present address will appear in the display. Address 5 is the factory set address.
If you want to leave the address set at 5, you can return to the metering mode by pressing the METER key or you can press another function key.
If you want to change the address, you can enter a new value.
Any integer from 0 through 30 can be selected.
For example, you can change the address of your supply to 10 by pressing:
Displaying Error Messages
The power supply can detect both programming and hardware errors. Upon detecting an error, the ERR annunciator on the front panel comes on and the ERR bit in the serial poll register will be set (see page 75).
When an error is detected, you can display the error message by pressing the ERR key. The power supply will return the error message to the display and clear the error bit. For example, if you program a number that is not within the valid range, the ERR annunciator will come on. You can display the error message by pressing the ERR key. In this case, the error message "NUMBER RANGE" will be displayed. Errors generated either locally from the front panel or remotely from the HP-IB computer can be displayed by pressing the ERR key only when the supply is in the local mode. Pressing the ERR key also clears the error bit so if you press ERR again, the message "NO ERROR" will appear. All error codes and associated display messages are listed in Table 5-8.
Storing and Recalling Voltage and Current Settings for All Outputs
As described on page 72, the power supply has 10 internal registers for storing voltage and current settings of
all outputs. At power on each location contains zero volts and the minimum current limit (see Initial Conditions, page 68).
The STO and RCL keys allow you to store and recall voltage and current settings for all your output channels from any of the 10 internal registers (numbered 1 through 10). For example, you can store the present settings of voltage and current for all the output channels in internal register 2 by pressing:
You can change the settings of any of your supply's outputs any number of times as required and then program them to the settings stored in internal register 2 by pressing;
The internal register will not retain the settings when power is turned off. When power is turned off and then on again, each internal register will be reset to the zero voltage and minimum current settings of each output channel.
The advantages in using the internal registers are that command processing time is saved and repetitive programming of different settings is simplified. The STO key can be used in conjunction with the OUTPUT ON/OFF key to store settings while the outputs are disabled (OFF). These stored settings can be used later to program the outputs to the stored settings using the RCL and OUTPUT ON/OFF keys.

A
Calibration Procedures
Introduction
This appendix discusses the software calibration procedures for the power supply. These supplies should be calibrated annually or whenever certain repairs are made (see Service Manual).
Because there are no internal or external hardware adjustments, your power supply can be calibrated without removing the covers or removing it from the cabinet if it is rack mounted. Calibration is performed by measuring actual output values and sending them to the supply over the HP-IB. The power supply uses these values to calculate output, readback, and overvoltage correction constants. These correction constants are stored in a non-volatile memory on the HP-IB interface board of the supply. Thereafter, when a command such as ''VSET1,5" is sent to set the voltage on output 1, the power supply uses the correction constants to accurately program the output.
Correction constants for offset and full scale voltage and current values are stored for one output channel at a time. A separate calibration command calculates and stores correction constants for the internal overvoltage circuit. This appendix lists the equipment that you need, shows the test setup to perform the calibration, gives a general calibration procedure that explains all of the calibration commands, and gives a sample program you can use if you have a HP 3456A voltmeter and a HP Series 200/300 computer with BASIC.
Security against accidental calibration is available. A jumper inside the unit may be moved to disable all calibration commands. Access to this jumper requires opening the unit (see the Service Manual).
Tables A-1 and A-2 give the data ranges for all of the power supply calibration commands. Refer to Figure 5-2 for the syntax structure of the calibration commands. You can either execute the calibration commands directly from the keyboard, or you can use them in a program to reduce the time involved in calibrating each output.
Test Equipment and Setup Required
The following test equipment is required for calibration:
1.A computer connected to the HP-IB connector on the back of the power supply.
2.A voltmeter accurate to 0.003% of reading.
3.A precision 0.1 ??, ??0.05%, 10 amp shunt resistor (4 terminal).
Figure A-1 shows the setup required for calibrating both voltage and current. Observe polarity when connecting the voltmeter. Note that for voltage calibration, the voltmeter leads are connected to the + S and - S terminals and NOT the + V and - V terminals. Note that for both + and - current calibration the voltmeter leads are connected to the shunt resistor's sense terminals.
Calibration Procedures 89
Figure A-1. Calibration Setup
90 Calibration Procedures

Table A-1. Calibration Commands
*Channels 3 and 4 are not used in all models.
Table A-2. Voltage and Current Data Ranges
General Calibration Procedure
This procedure causes the voltage of the specified output to go to full scale value. Take appropriate precautions.
The following general procedure applies to any computer that you are using to control your power supply. This procedure must be repeated for each output on your power supply. The calibration commands shown are the actual string commands that must be sent to the power supply. Because the power supply will attempt to calibrate itself even when incorrect or invalid readings are sent to it, it is recommended that you perform some type of error checking after steps 4, 5, and 8 to ensure that the values sent to the supply are legitimate. Use the ranges in Table A-2 as a guide. If an error is detected while in calibration mode, send CLR or turn the supply off to maintain the previous calibration constants. This will prevent incorrect constants from being stored. See Table 5-8 for a list of errors.
Before you continue with this procedure, disconnect all loads from the supply, strap the supply for local sensing, and connect the voltmeter to the + S and - S terminals as shown in the voltage calibration setup of Figure A-1.
Start with output channel 1 and use the following commands to calibrate your power supply:
Calibration Procedures 91

1.CMODE < param > - This command turns the calibration mode either on or off. The parameter must be either a 1 or a 0. CMODE1 is used in the beginning of the calibration procedure to turn calibration mode on. CMODE must be on to use any of the calibration statements. CMODE0 is used at the end of the procedure to store the correction constants and turn calibration mode off. The CMODE? query can also be used at any time to determine if the supply is in calibration mode. A 1 indicates calibration mode is on; a 0 indicates calibration mode is off. Continue to the next command.
2.VHl<channel> - This command causes the voltage of the specified output channel to go to the high calibration point (full scale). After the command is sent, use the voltmeter to read the actual voltage <Vhi > put out by the power supply. Continue to the next command.
3.VLO < channel > - This command causes the voltage of the specified output channel to go to the low calibration point (voltage offset). After the command is sent, use the voltmeter to read the actual voltage < Vlo > put out by the power supply. Continue to the next command.
4.VDATA < channel >, < Vlo >, < Vhi > - This command is used to send the actual values measured by the voltmeter in the previous steps to the power supply. Refer to Table A-2 for the range of valid voltage readings that can be sent to the supply. <Vlo> is the voltage in volts that was measured after the VLO command was sent. < Vhi > is the voltage in volts that was measured after the VHI command was sent. The power supply uses these values to calculate the voltage and voltage readback correction constants of the specified output. Continue to the next command.
5.OVCAL < channel > - This command automatically calibrates the programmable overvoltage. This can only be done after the voltage has been calibrated. It may take up to 10 seconds for this command to execute. During this time, the front panel display indicates "CALIBRATING" .
When the front panel display of the power supply no longer indicates ''CALIBRATING", the overvoltage portion of the calibration procedure is complete. The voltages on the output are returned to zero volts after the overvoltage calibration. To continue with the current portion of the calibration procedure, connect a four terminal 0.1?? current shunt resistor (0.05%, 10 A) between the +V and -V output terminals. Connect the voltmeter to the resistor's sense terminals. Refer to the current calibration setup in Figure A-1.
Continue calibrating output 1 with the following commands:
6.IHI < channel > - This command causes the current of the specified output channel to go to the high calibration point (full scale). After the command is sent, use the voltmeter to read the voltage drop across the current shunt resistor. Divide this reading by the shunt value to derive the actual current in amps < Ihi > put out by the supply. Continue to the next command.
7.ILO <channel> - This command causes the current of the specified output channel to go to the low calibration point (current offset). After the command is sent, use the voltmeter to read the voltage drop across the current shunt resistor. Divide this reading by the shunt value to derive the actual current in amps <Ilo> put out by the supply. Continue to the next command.
8.IDATA < channel >, < IIO >, < Ihi > - This command is used to send the actual current values derived in steps 6 and 7 to the power supply. Refer to Table A-2 for the range of valid current readings that can be sent to the supply. < Ilo > is the current in amps that was put out by the supply after the ILO command was sent. < Ihi > is the current in amps that was put out by the supply after the IHI command was sent. The power supply uses these values to calculate the current and current readback correction constants of the specified output.
92 Calibration Procedures
Repeat commands two through eight for any other outputs that must be calibrated on your power supply. After you have completed calibration of all outputs, turn the calibration mode off by sending the CMODE0 command (see step 1) to the power supply. The correction constants are stored in memory at this time.
Calibration Program
The following calibration program can be used as is, provided you have an HP Series 200 computer with the BASIC programming language and an HP 3456A voltmeter. The calibration program is written with the assumption that your power supply is at address 705 and the voltmeter is at address 722. The program will ask you which output is to be calibrated and will prompt you to make the voltage and current calibration connections shown in Figure A-1.
Calibration Procedures 93
LINE 10: This comment line identifies the program as a CALIBRATION EXAMPLE.
LINE 30,40: Assigns I/O path names to the power supply and the voltmeter.
LINE 50: Establishes a COM block for the instruments on the HP-IB.
LINE 60: Initializes the variable Shunt _ resistor to .1 ohms.
LINE 80: Clears the power supply.
LINE 90: Initializes the voltmeter to take voltage readings.
LINE 100,110: Tells the voltmeter to take a reading and clears the voltmeters output buffer. This reading is not used in the program.
LINE 120: Turns on the power supply calibration mode.
LINE 140: Labels the line ''Start_loop" to loop back to when calibrating more than one output.
LINE 160: Enters the output channel number to be calibrated.
LINE 170,180: Prompts the user to make voltage calibration connections and waits for CONTINUE key to be pressed.
LINE 200: Sets the voltage of the specified output to the high calibration point.
LINE 210: Sets the variable Vhi to the output voltage as measured by the user defined function FNDvm.
LINE 230: Sets the voltage of the specified output to the low calibration point.
LINE 240: Sets the variable Vlo to the output voltage as measured by the user defined function FNDvm.
LINE 260: Sends the measured data in volts to the power supply for the specified channel.
LINE 280: Checks the power supply for errors with the user defined function FNPs _ err. If there was an error, the program goes to the line labeled Finish and the supply is cleared. The new measured data is not used and the previous calibration constants are maintained.
94 Calibration Procedures
LINE 300: Instructs the power supply to perform an overvoltage calibration on the specified channel.
LINE 310--330: Displays a message on the computer until bit 4 (RDY) of the power supply's serial poll register indicates that the supply is finished processing the OVCAL command. This may take up to 10 seconds.
LINE 350: Checks for errors. See line 280.
LINE 370,380: Prompts the user to make current calibration connections and waits for CONTINUE key to be pressed.
LINE 400: Sets the current of the specified output to the high calibration point.
LINE 410: Sets the variable Ihi to the output current as measured by the voltmeter across the shunt resistor. Note that Ihi is in amps since the voltmeter returns volts and Shunt _ resistor is in ohms.
LINE 430: Sets the current of the specified output to the low calibration point.
LINE 440: Sets the variable Ilo to the output current as measured by the voltmeter across the shunt resistor.
LINE 460: Sends the measured data in amps to the power supply for the specified channel.
LINE 480: Checks for errors. See line 280.
LINE 500: Set output voltage to 0 so that output connections may be safely moved.
LINE 520,530: Loops to Start_loop if the user has more outputs to calibrate otherwise, continues.
LINE 550: Stores the calibration constants by turning off the power supply calibration mode.
LINE 570--600: Clears the supply and ends the main program.
LINE 630: Defines the user defined function FNDvm.
LINE 640: Brings in the COM block "Instr''.
LINE 650: Waits .02 seconds for the supply to settle at the calibration points.
LINE 660,670: Takes a reading from the voltmeter.
LINE 680: Returns the voltmeter reading to the appropriate variable within the main program.
LINE 690: Ends the user defined function FNDvm.
LINE 710: Defines the user defined function FNPs _ err.
LINE 720: Brings in the COM block "Instr".
LINE 730,740: Queries the power supply for any errors.
LINE 750: If an error occurred, the computer reports the error.
LINE 760: Returns the error number to the appropriate place within the main program.
LINE 770: Ends the user defined function FNPs _ err.
Calibration Procedures 95

B
Programming With A Series 200/300 Computer
Introduction
The purpose of this appendix is to serve as an introduction to programming your power supply with an HP Series 200/300 computer using the HP extended BASIC language. Examples are included that employ some of the most frequently used functions. These examples have been written so that they will run on any one of the five HP 6621A-6624A, and 6627A model power supplies. The values used in the examples (5 V and 1 A for instance), are within the operating locus of all outputs on all models. The examples program only channels one and two because all five models contain at least two channels (outputs).
You must be familiar with the BASIC language to understand the examples. If you do not recognize a programming statement, look up the keyword in the BASIC Language Reference document that was supplied with your computer, and look up the device command in Chapter 5 of this manual. Questions about program structure and selection are discussed in the BASIC Programming Techniques manual.
I/O Path Names
Throughout this appendix, I/O path names are used in place of interface and device select codes. In a large program, I/O path names simplify changing the address of an instrument if necessary. Reading and writing the program is easier as well. The l/O path name can be carried in a common block and changed by a single assign statement.
In the programming examples in this appendix, the I/O path name @Ps is used for the power supply. The ASSIGN statement that defines the I/O path must precede any statements that use the l/O path name. Therefore, instead of using the statement OUTPUT 705;"VSET1,5" in the following programs, the equivalent OUTPUT @Ps;"VSET1,5'' statement is used. The examples assume that the power supply is at address 5 and the HP-IB interface in the computer is select 7 (factory default).
Voltage and Current Programming
The power supply normally functions in one of two modes, either constant voltage with current limit or constant current with voltage limit. The operating mode is determined by a combination of voltage and current settings and load resistance. For example, with a 10 ?? load connected to output 1, the following program will put output 1 in constant voltage mode at 5 volts out with a 1 amp current limit. In this case the output current would be 0.5 A.
10 ASSIGN @Ps TO 705
20 OUTPUT @Ps;"VSET1,5;1SET1,1"
30 END
Line 10: Assigns the l/O pathname to the power supply.
Line 20: Sets output voltage and current. Note the use of the semicolon to separate multiple device commands.
If a 4 ?? load were used instead of a 10 ?? load, output 1 would have been operating in constant current mode at 1 amp out with a voltage limit of 5 volts. In this case the output voltage would be 4 V.
Programming with a Series 200/300 Computer97

Voltage and Current Programming With Variables
You can use variables in a program to represent data values in the device commands. This is useful in applications that require changing the voltage and current values to different predetermined settings. The following program uses a variable in a FOR NEXT loop to ramp up output voltage in 0.1 volt steps from 0 to 5 volts.
10 ASSIGN @Ps TO 705
20 OUTPUT @Ps;"CLR;ISET1,1"
30 FOR Voltage=0 TO 5 STEP 0.1
40 OUTPUT @Ps;"VSET1,'';Voltage
50 WAIT 0.2
60 NEXT Voltage
70 END
Line 10: Assigns the I/O pathname to the power supply.
Line 20: Initializes the power supply to its power on state and sets the current limit.
Line 30,60: Increments the voltage in 0.1 V steps to 5 volts.
Line 40: Sets the voltage of output 1 to the value of the variable "Voltage''. The comma inside the quotes is required because it separates numbers in the device command (the output channel number from the voltage value in this case). A space < SP > may also be used instead of the comma. The semicolon outside the quotes is used because it suppresses the <CR > <LF> that the computer would normally send to the power supply if a comma were used as a separator after a string item. Using a comma in this case would produce a syntax error in the power supply.
Line 50: Waits 0.2 seconds between steps.
Another way to use variables to represent data values in device commands is when using input statements to program the power supply. The following program uses input statements to program the voltage and current settings of output 1 and output 2.
10 ASSIGN @Ps TO 705
20 INPUT "ENTER A VOLTAGE FOR OUTPUT #1",V1
30 INPUT "ENTER A CURRENT LIMIT FOR OUTPUT #1",I1
40 INPUT ''ENTER A VOLTAGE FOR OUTPUT #2",V2
50 INPUT "ENTER A CURRENT LIMIT FOR OUTPUT #2",I2
60 OUTPUT @Ps;''VSET1,";V1;";ISET1,'';I1;'';VSET2,";V2;";ISET2,";I2
70 END
Line 10: Assigns the I/O pathname to the power supply.
Line 20,30: Enter voltage and current values for output 1.
Line 40,50: Enter voltage and current values for output 2.
Line 60: Sets the voltage and current of outputs 1 and 2 to the values entered into the variables. The previous example explained the use of the comma inside the quotes and the semicolon that precedes the variable. The semicolon that follows the variable suppresses the comma that the computer would normally send to the power supply if a comma were used as a separator after a numeric item. The leading semicolons inside the quotes separate multiple device commands (the VSET commands from the ISET commands in this case).
Voltage and Current Readback
Reading back data from the power supply requires two statements. First, an output statement is used to query the power supply. A list of queries appears in Table 5-2. The power supply responds to the query by entering the requested data into a buffer. Next, an enter statement is used to read the data from the buffer on the power supply into a variable in the computer. The following program queries the power supply for the voltage and current settings of output 1 and prints the results on the screen.
98 Programming with a Series 200/300 Computer
10 ASSIGN @Ps TO 705
20 OUTPUT @Ps;"VSET?1''
30 ENTER @Ps;Vsl
40 OUTPUT @Ps;''ISET?1"
50 ENTER @Ps;Isl
60 PRINT ''VOLTAGE SETTING OF OUTPUT #1 = '';Vsl
70 PRINT ''CURRENT LIMIT SETTING OF OUTPUT #1 = ";Is1
80 END
Line 10: Assigns the I/O pathname to the power supply.
Line 20,30: Queries the supply for output 1's voltage setting. You cannot string multiple queries together in a single device command because the power supply can only return the most recently queried data.
Line 40,50: Queries the supply for output 1's current limit.
Line 60,70: Prints the results of the queries on the screen.
Programming Power Supply Registers
Present Status
The power supply makes available several forms of status information. Chapter 5 discusses the different registers and their functions. The present status register contains continuously updated information. The following example shows how to query bit position 0 of output 1's status register to see if output 1 is in CV mode. In this example, the program references the function as a variable in a conditional execution statement. Note that instead of printing a message, line 30 could be used to branch to another part of the program in the event that the supply is in CV mode.
10 ASSIGN @Ps TO 705
20 COM /Ps/ @Ps
30 IF FNCv_mode THEN
40 PRINT "OUTPUT1 IS IN CV MODE"
50 END IF
60 END
70 !
80 !
90 DEF FNCv_mode
100 COM /Ps/ @Ps
110 OUTPUT @Ps;"STS?1"
120 ENTER @Ps;Sts
130 RETURN BIT(Sts,0)
140 FNEND
Line 10: Assigns the I/O path name to the power supply.
Line 20: Declare a common block for the I/O path name. The COM statement must be used for the @Ps variable to preserve its value in the function subprogram.
Line 30,40,50: If FNCv_mode is true, print the message.
Line 90: Defines the Cv_mode function.
Line 100: Brings in the common block for the I/O pathname.
Line 110,120: Reads the present status of output 1 into the variable Sts.
Line 130: Returns the value of bit position 0 of Sts.
Service Request and Serial Poll
The fault and mask registers, when used in conjunction with the service request and serial poll functions, allow you to select which conditions can cause computer interrupts. The fault and mask registers can also be used independently of the serial poll or service request if so desired. The following example shows how to enable an interrupt to the computer in the case of an overvoltage condition. After the interrupt has occurred, this example includes an interrupt routine that conducts
Programming with a Series 200/300 Computer99
a serial poll to determine on which output the overvoltage occurred. Note that this example assumes that terminal block external OV trip lines are not wired together.
10 ASSIGN @Ps TO 705
20 COM /Ps/ @Ps
30 OUTPUT @Ps;''CLR;UNMASK1,8;UNMASK2,8;SRQ1''
40 ON INTR 7,1 CALL Err _ trap
50 ENABLE INTR 7;2
60 OUTPUT @Ps;"OVSET1,4;0VSET2,4"
70 OUTPUT @Ps;"VSET1,5;VSET2,5"
80 Lbl: GOTO Lbl
90 END
100 !
110 !
120 SUB Err _ trap
130 OFF INTR
140 COM /Ps/ @Ps
150 IF BlT(SPOLL(@Ps),0) THEN
160 OUTPUT @Ps;''OUT1,0;OVRST1''
170 PRINT ''OVERVOLTAGE ON OUTPUT #1"
180 END IF
190 IF BIT(SPOLL(@Ps),1) THEN
200 OUTPUT @Ps;"OUT2,0;OVRST2"
210 PRINT "OVERVOLTAGE ON OUTPUT #2"
220 END IF
230 OUTPUT @Ps;''FAULT?1;FAULT?2"
240 SUBEND
LINE 10: Assigns the I/O pathname to the power supply.
LINE 20: Declare a common block for the I/O pathname. The COM statement must be used for the @Ps variable to preserve its value for use in the service routine.
LINE 30: Returns the power supply to its power on state, unmasks output 1's and output 2's OV status bits to generate faults, and enables the service request capability on all outputs.
LINE 40: Define interrupt at interface 7, with HP-IB priority 1.
LINE 50: Enable interrupt at interface 7 for service request type interrupts only.
LINE 60: Sets the overvoltage of outputs 1 and 2 to 4 volts.
LINE 70: Sets the voltage of outputs 1 and 2 above the OV setting so that both outputs will overvoltage when the program is run.
LINE 80: Waits for the computer to receive the interrupt. This simulates conditions that would normally exist when a program is running.
LINE 120: Defines the error handling routine.
LINE 130: Disables interrupt capability while processing.
LINE 140: Brings in the common block for the I/O pathname.
LINE 150-180: Conducts a serial poll. If bit 0 in serial poll register indicates a fault for output 1, output 1 is disabled and the overvoltage circuit is reset.
LINE 190-220: Checks bit 1 in serial poll register for a fault on output 2. If true, output 2 is disabled and the overvoltage circuit is reset.
LINE 230: Reads fault registers to clear FAU bits in serial poll register.
100 Programming with a Series 200/300 Computer
Error Detection
The power supply can recognize programming errors and can inform you when a programming error occurs. When an error is detected, no attempt is made to execute the command. Instead, a bit in the serial poll register is set. If SRQ2 or SRQ3 is set, an interrupt will be generated. The following program checks for programming errors and can be entered and run as is. While it is running, commands can be sent to the power supply from the keyboard. If the ERROR annunciator on the power supply's front panel indicates that an error has been detected, depress the labeled softkey to display the error on your computer screen.
10 ASSIGN @Ps TO 705
20 COM /Ps/ @Ps
30 ON KEY 0 LABEL "ERROR?" CALL Err_trap 40 Lbl: GOTO Lbl
50 END
60 !
70 !
80 SUB Err _ trap
90 OFF KEY
100 COM /Ps/ @Ps
110 OUTPUT @Ps;"ERR?''
120 ENTER @Ps;Err
130 OUTPUT 2 USING "#,K";CHR$(255)&CHR$(75)
140 IF Err THEN
150 PRINT "POWER SUPPLY PROGRAMMING ERROR:"
160 END IF
170 SELECT Err
180 CASE 0
190 PRINT "NO ERROR OCCURRED"
200 SUBEXIT
210 CASE 1
220 PRINT "INVALID CHARACTER"
230 CASE 2
240 PRINT "INVALID NUMBER"
250 CASE 3
260 PRINT "INVALID STRING"
270 CASE 4
280 PRINT ''SYNTAX ERROR"
290 CASE 5
300 PRINT "NUMBER OUT OF RANGE"
310 CASE 6
320 PRINT "DATA REQUESTED WlTHOUT QUERY"
330 CASE 7
340 PRINT "STRING EXCEEDS DISPLAY LENGTH"
350 CASE 8
360 PRINT "NUMBER TOO LARGE FOR INPUT BUFFER"
370 CASE 28
380 PRINT ''INVALID CHARACTERS IN STRING"
390 CASE ELSE
400 PRINT ''UNRECOGNIZED ERROR NUMBER"; Err
410 END SELECT
420 PRINT "RE-ENTER STATEMENT AND TRY AGAIN"
430 SUBEND
Programming with a Series 200/300 Computer101

LINE 10: Assigns the I/O path name to the power supply.
LINE 20: Declare a common block for the I/O path name.
LINE 30: Define interrupt on softkey depression and branch to error routine.
LINE 40: Idle on softkey definition.
LINE 80: Define subprogram Err_trap
LINE 90: Disable interrupt capability while processing.
LINE 100: Bring in the common block for the I/O pathname.
LINE 110,120: Enter error code from power supply.
LINE 130: Clears computer screen.
LINE 140,150: If an error occurred, print message.
LINE 170-420: Print message based on error code. Prompt user to try again. If no error occurred, print message saying no error occurred.
Stored Operating States
Your power supply has registers that can store up to 10 operating states. These states can be recalled in arbitrary order. Storing a state involves taking a "snapshot" of the voltage and current settings that are in effect when the command is received. The following example uses stored operating states to set up an output. Using this method of setting up outputs saves processing time and facilitates repeating the same commands.
10 ASSIGN @Ps TO 705
20 OUTPUT @Ps;"OUT1,0;OUT2,0"
30 !
40 OUTPUT @Ps;"VSET1,1;ISET1,.1;VSET2,5;ISET2,.1;5TOl"
50 OUTPUT @Ps;"VSET1,2;ISET1,.2;VSET2,4;ISET2,.2;STO2"
60 OUTPUT @Ps;''VSET1,3;ISET1,.3;VSET2,3;ISET2,.3;STO3"
70 OUTPUT @Ps;"VSET1,4;ISET1,.4;VSET2,2;ISET2,.4;STO4''
80 OUTPUT @Ps;"VSET1,5;1SET1,.5;VSET2,1;1SET2,.5;STO5"
90 !
100 OUTPUT @Ps;"CLR"
110 FOR State= 1 TO 5
120 OUTPUT @Ps;"RCL";State
130 WAIT 2
140 NEXT State
l50 END
LINE 10: Assigns the I/O pathname to the power supply.
LINE 20: Disables output 1 and output 2.
LINE 40-80: Stores 5 operating states for output 1 and output 2 in storage registers 1 through 5. Outputs not explicitly programmed will store the settings that are in effect when the store command is received.
LINE 100: Clears the supply. All outputs are enabled and set to the initial power on state (0 volts; minimum current setting).
LINE 110-140: Loops through the sequence of five states with a two second wait between states.
Programming Outputs Connected In Parallel
Only outputs that have equivalent voltage and current ratings can be connected in parallel.
When programming outputs that are connected in parallel, it is convenient if you first know if you will be operating in CC or CV mode. Refer to Chapter 4 for more information on parallel operation.
102 Programming with a Series 200/300 Computer
CC Operation
Programming for CC operation is straightforward. Program each output to the desired voltage limit point. Then program each output to supply half of the total desired operating current. Both outputs will operate in CC mode. Note that the total desired current cannot exceed the combined current capability of both outputs. Figures 4-11 and 4-12 are examples of parallel configurations. These configurations apply to both CV and CC operating modes. Note the sense lead connections.
10 ASSIGN @Ps TO 705
20 INPUT "ENTER VOLTAGE LIMIT'',V
30 INPUT "ENTER OPERATING CURRENT",Oc
40 C = Oc/2
50 OUTPUT @Ps;"CLR;VSET1,'';V;";ISET1,";C;";VSET2,";V;";ISET2,";C
60 END
LINE 10: Assigns the I/O pathname to the power supply.
LINE 20,30: Enter the voltage limit and operating current.
LINE 40: Divides the total current requirement by 2.
LINE 50: Clears the supply and sets each output to supply half of the desired operating current at any voltage up to the desired voltage limit.
CV Operation
For CV operation, one output must operate in CC mode and the other output must operate in CV mode. The output that is operating in CV mode will be controlling the voltage regulation of both outputs.
In the example that follows, outputs 1 and 2 (both 40 W or 80 W Low V channels) will be operating in parallel with output 1 in CV mode and output 2 in CC mode at output voltages above 2.5 V. Each is programmed to one half of the desired current limit point. Above 2.5 V, the voltage for output 2 is always programmed higher than that of output 1 to ensure that output 2 operates in the CC mode. Note that any current from output 2 that is not required by the load flows into the downprogrammer of output 1 and is reflected in the current readback of output 1. The total current supplied to the load can be read back by adding the results of reading back the currents of outputs 1 and 2. At 2.5 V and below, the outputs are set to the same voltage and the operating modes depend upon the load.
10 ASSIGN @Ps to 705
20 INPUT "ENTER OPERATING VOLTAGE",V1
30 INPUT "ENTER TOTAL CURRENT LIMIT",Ilim
40 C = Ilim/2
50 IF V1 > 7 THEN V2 = 20.2
60 IF V1< =7 THEN V2=7.07
70 IF Vl < = 2.5 THEN V2 = V1
80 OUTPUT @Ps;"CLR;ISET1,";C;";VSET1,";V1
90 OUTPUT @Ps;''ISET2,";C;"VSET2,";V2
100 WAIT 1
110 OUTPUT @Ps;"VOUT?1"
120 ENTER @Ps;Vout
130 OUTPUT @Ps;"IOUT?1''
140 ENTER @Ps;Ioutl
150 OUTPUT @Ps;"IOUT?2"
160 ENTER @Ps;Iout2
170 PRINT "OUTPUT VOLTAGE IS ";Vout
180 PRINT "TOTAL OUTPUT CURRENT IS ";Ioutl + Iout2
190 END
Programming with a Series 200/300 Computer103

LINE 10: Assigns the I/O pathname to the power supply.
LINE 20,30: Enter the operating voltage and current limit point.
LINE 40: Sets C equal to one half of the current limit point.
LINE 50-70: Determines the voltage setting for output 2. It is 20.2 V when the operating voltage is greater than 7 V, 7.07 V when the operating voltage is between 7 V and 2.5 V, and the same as the operating voltage below 2.5 V.
LINE 80: Clears the supply, sets the current of output 1 to one half of the current limit point, and sets the voltage of output 1 to the operating voltage.
LINE 90: Sets the current of output 2 to one half of the current limit point and sets the voltage of output 2 to the value determined by the operating voltage.
LINE 100: Waits 1 second before reading back output voltage and current.
LINE 110-160: Reads the output voltage of output 1 and the output current of outputs 1 and 2.
LINE 170: Prints the output voltage of the parallel outputs on the screen.
LINE 180: Prints the total output current of the parallel outputs on the screen. Note that this is the sum of the output currents of outputs 1 and 2.
Programming Outputs Connected In Series
To program outputs connected in series, you must first determine the maximum voltage and current that you would like to have available to your load. These values are the desired voltage limit and current limit points. Next, program the current of both outputs to this desired current limit point. The voltage of each output can then be programmed so that the sum of the voltages equals the desired voltage limit point. An easy way to do this is to set each output to one half of the desired limit point. Refer to Chapter 4 for more information on series operation. Figures 4-13 and 4-14 are examples of series configurations which apply to both the CV and CC operating modes. Note the sense lead connections shown in Figure 4-14.
The following example programs outputs 1 and 2 which are connected in a series configuration.
10 ASSIGN @Ps to 705
20 INPUT "ENTER THE DESIRED CURRENT LIMIT POINT",I
30 INPUT "ENTER TElE DESIRED VOLTAGE LIMIT POINT",V
40 OUTPUT @s;"CLR;ISET1,";I;'';ISET2,";I
50 OUTPUT @Ps;"VSET1,'';V/2;";VSET2,";V/2
60 END
LINE 10: Assigns the I/O pathname to the power supply.
LINE 20: Enter the desired current limit point.
LINE 30: Enter the desired voltage limit point.
LINE 40: Clears the supply and sets the current of both outputs to the desired current limit point.
LINE 50: Sets the voltage of each output to one half of the desired voltage limit point so that the sum is the desired voltage limit point.
104 Programming with a Series 200/300 Computer

C
Command Summary
Introduction
Table C-1 provides an alphabetical listing and a brief description of each command that can be sent to the HP 6621A- 24A, and 6627A power supplies. All of the commands can be executed remotely over the HP-IB. Many of the commands can also be executed locally from the supply's front panel as indicated in the table.
Command headers are accepted in upper or in lower case letters although only upper case letters are used in this summary. The brackets < > indicate a number to be sent. Note that <ch> must specify an output channel number from 1 through 4 as applicable. Commas or spaces are required between numbers. Spaces are optional between the command header and the first number. No commas are allowed between header and first number. Use semi-colons between multiple commands sent in one statement.
Chapter 5 gives a complete description (including syntax) of most of the commands listed. Calibration commands are described in Appendix A. Two of the commands listed (ROM? and VMUX?) are described in the Service Manual.
* Indicates that the command can be executed from the front panel.
* Indicates that the command can be executed from the front panel.
*Indicates that the command can be executed from the front panel.

D
Error Codes and Messages
Introduction
This appendix describes the HP-IB error codes that can be readback to the controller and the error messages that can be displayed on the power supply's front panel. A brief explanation of each code and message is also given. The error codes and/or messages fall into three categories: Power-on Self Test Messages, responses to the ERR? query, and responses to the TEST? query.
Power-On Self Test Messages
The applicable message listed in Table D-1 is displayed on the supply's front panel if the corresponding function has failed the power-on self test. No error code numbers can be returned for these errors. If any of these error messages appear, refer to the Troubleshooting section in the Service Manual.
Error Responses
Table D-2 describes the error codes and messages that can be generated for various programming, calibration, and hardware errors. The error codes can be read back over the HP-IB in response to the ERR? query. The applicable error message is displayed on the supply's front panel when the ERR key is pressed. Sending the ERR? or pressing the ERR key clears the error.
Test Responses
Table D-3 describes the codes that can be read back over the HP-IB in response to the TEST? query. The TEST? query initiates a self test of the supply.
110 Error Codes and Messages
Table D-2. ERROR Responses (continued)
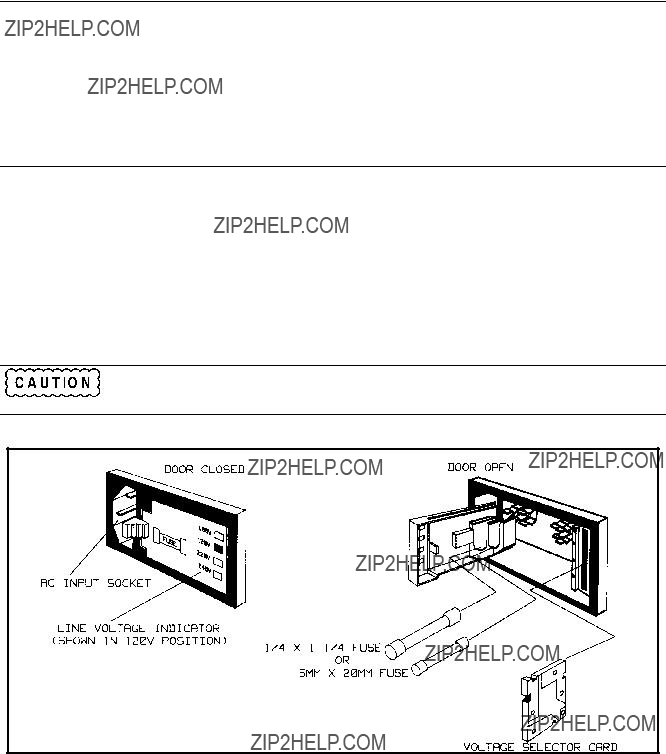
E
Manual Backdating
Introduction
The backdating information in this section applies to units that have the following serial numbers:
HP Model 6621A serials 2611A-00101 to 01680
HP Model 6622A serials 2611A-00101 to 02090
HP Model 6623A serials 2611A-00101 to 02230
HP Model 6624A serials 2550A-00101 to 06720
HP Model 6627A serials 2751A-00101 to 00840
Make Changes
On page 28, replace the information in Line Voltage Conversion paragraph under steps number 2, 3, and 4 as follows:
2.To open the line module push against the tab on the line module in the direction of the ac input socket.
3.Remove the voltage selector card from its receptacle. This card is about one inch square and has a red notch in each of its four edges.
4.To select a voltage, insert the card into its receptacle so that after the door is closed, the red notch shows through the window next to the voltage level you require.
It is possible to insert the voltage selector card so that a red notch is not visible through any of the four windows. Do NOT operate the power supply while the selector card is in this position.
Also on page 27, replace figure 2-3 with the following figure;
Figure 2-3. Line Module Detail
ADDENDUM
I. Generally Applicable Annotations
Consistent with good engineering practice, leads attached to customer accessible signal/monitoring ports (such as the l0-pin Control Connector, the 7-pin Analog Connector, the 7-pin Digital Port/Trigger Connector, screw terminal Barrier Blocks, etc.) should be twisted and shielded to maintain the instrument's specified performance.
II. CE'92 Product Specific Annotations
When tested for radiated susceptibility as called for in EN 50082-1 per the EC EMC directive, the following changes in the Supplementary Characteristics of the 6621A and 6623A have been noted:
6621A
When subjected to radiated field strengths of 3 volts/meter in the vicinity of 90 MHz, the full scale programming accuracy of channel 2 increases from 31 millivolts at 20 volts output to 700 millivolts.
The accuracy reverts to the published value of 31 millivolts when the field is reduced to 2 volts/ meter.
When subjected to radiate field strengths of 3 volts/meter in the vicinity of 200 MHz, the full scale readback accuracy of channel 1 increases from 23 millivolts at 5 volts output to 100 millivolts.
The accuracy reverts to the published value of 30 millivolts when the external field is reduced to 2 volts/meter.
6623A
When subjected to radiated field strengths of 3 volts/meter in the vicinity of 160 MHz, the full scale programming accuracy of channel 1 increases from 31 millivolts at 20 volts output to 50 millivolts.
The accuracy reverts to the published value of 31 millivolts when the field is reduced to 2.5 volts/ meter.
When subjected to radiate field strengths of 3 volts/meter in the vicinity of 160 MHz. the full scale readback accuracy of channel 1 increases from 30 millivolts at 5 volts output to 50 millivolts.
The accuracy reverts to the published value of 30 millivolts when the external field is reduced to 2.5 volts/meter.
HP Sales and Support Office
For more information, call your local HP Sales Office listed in the telephone directory white pages. Ask for the Electronic Instruments Department.
Or contact: