HP Photosmart A620 Series - Help
HP Photosmart A620 Series - Help

Contents
1
2
3
4
1 HP Photosmart A620 series Help
Welcome to the HP Photosmart A620 series Help! For more information about the HP Photosmart printer, see:
??????Get started??? on page 7
??????Paper basics??? on page 19
??????Print without a computer??? on page 21
??????Print from a computer??? on page 39
??????Maintenance??? on page 53
??????Shop for ink supplies??? on page 75
??????HP support and warranty??? on page 77
??????Specifications??? on page 81
??????Regulatory and environmental information??? on page 83
You can print information at any time from the HP Photosmart Help. Just click Print in the top navigation bar of the HP Photosmart Help window.
Chapter 1
6 HP Photosmart A620 series Help
2 Get started
This section provides introductory information about the HP Photosmart A620 series printer. This section contains the following topics:
???How do I?
???The HP Photosmart at a glance
???Control panel buttons and indicator lights
???The touch screen and stylus
How do I?
Click any of the following links to get more information on how to perform creative and common tasks using the HP Photosmart printer and software.
Print photos
??????Print borderless photos??? on page 47
??????Print photos with a border??? on page 49
??????Print postcards??? on page 50
Click any of the following links to view an animation on how to perform common tasks.

Chapter 2
Find more information
Your new HP Photosmart A620 series printer comes with the following documentation:
Setup instructions: The setup instructions explain how to set up the printer, install the HP Photosmart software, and print a photo. Read this document first. This document may be called Quick Start Guide or Setup Guide, depending on your country/region, language, or printer model.
Basics Guide: The Basics Guide describes the features of the printer, explains how to use the printer without connecting it to a computer, and contains troubleshooting tips and support information.
8 Get started

The HP Photosmart at a glance
Figure
Chapter 2
Figure
Control panel buttons and indicator lights
Figure
10 Get started

The touch screen and stylus
This section describes how to use the touch screen and stylus to interact with the printer.
Use the touch screen
Use your fingers on the touch screen for most operations, such as photo navigation, printing, making selections in the printer menus, or touching the onscreen buttons in the quick touch frame that borders the photo viewing area of the touch screen. The printer chirps once for each button press. You can change the volume of the sounds or turn them off in the Preferences menu. You can also use the stylus for these activities, but it is designed primarily for drawing and entering captions through the touch screen keyboard. For more information, see ???Get creative??? on page 27.
 NOTE: The quick touch frame buttons are displayed only when the printer is turned on.
Figure
The printer status bar also appears on the top of most screens. The information available on it varies according to what screen you are viewing. Touch it to open the printer status dialog box which displays detailed information on the following:
???How many photos are being printed and how much time remains for the print job.
???How much charge remains in the optional battery.

Chapter 2
Table
Number of copies selected: Displays the number of photos selected for printing.
Photo icons appear on photos and video clips in thumbnail and
Table
12 Get started

Related topics
???View estimated ink levels??? on page 54
Use the stylus
Use the stylus to draw on a photo or to enter a caption for a photo through the touch screen keyboard. For more information, see ???Get creative??? on page 27.
 NOTE: If the printer is set to a language that does not use the roman alphabet, the printer displays the English keyboard.
 CAUTION: To prevent damage to the touch screen, never use any sharp objects or any device other than the stylus that comes with the printer or an approved replacement.
There are two stylus storage areas on the printer: a slot that stores the stylus until you need to use it and a hole where you can rest the stylus and keep it handy.
Figure
Printer menus
The printer menus contain many features for printing photos, changing print settings, and more. The menus, when opened, overlay the current photo on the screen.
This section contains the following topics:
???How to use the printer menus
???The menus
Chapter 2
How to use the printer menus
The printer menus contain many features for printing photos, changing print settings, and more.
TIP: The printer menus contain many useful commands and options, but common functions, such as printing, are usually available by touching an icon on the quick touch frame.
To use the printer menus
1.Touch the Menu icon on the quick touch frame to open the printer menus, and then press the scroll arrows to navigate through the menus.
2.Touch a menu name to open the options under the menu. Menu options that are not accessible are dimmed. The current menu option is indicated by a check mark.
3.Touch an option to open it or to perform the operation it indicates.
4.To exit a menu, touch the  icon on the quick touch frame.
14 Get started
The menus
Specialty Printing Projects
Some printer functions may be unavailable and grayed out in the printer menus when a selected specialty printing project mode is turned on.
???Panoramic photos: Touch to turn panoramic printing On or Off (default). Touch On to print all selected photos with a 3:1 aspect ratio; load 10 x 30 cm (4 x 12 inches) paper before printing. When a photo is selected, a green bounding box shows the area to be printed. Touch Off to print with a normal 3:2 aspect ratio.
???Photo stickers: Touch to turn sticker printing On or Off (default). Touch On to print one photo 16 times per page, and then load special sticker media. Touch Off to print using
???Passport photos: Touch to turn passport photo mode On or Off (default). A separate page is printed for each selected photo (in the passport photo size that is chosen), and each printed page contains the number of photos of the selected size that will fit on the page.
???CD/DVD tattoo: Touch to turn CD/DVD tattoo mode On or Off (default).
Print options
???Print All: Touch to print all the still photos in the camera, one borderless photo per page.
???Print Index Page: Touch to print an index of all photos, 24 photos per page.
Slide show
???Start Slide Show: Touch to start a slide show.
???Slide Show Settings: Touch to set slide show preferences. You can choose Loop,
Duration between images, Transitions, and Random.
Tools
???Bluetooth
???Device address: Some devices with Bluetooth wireless technology require you to enter the address of the device they are trying to locate. This menu option shows the printer address.
???Device name: You can select a name for the printer that appears on other devices with Bluetooth wireless technology when they locate the printer.
???Passkey: When the Bluetooth Security level of the printer is set to High, you must enter a passkey to make the printer available to other Bluetooth devices. The default passkey is 0000.
???Visibility: Select Visible to all (default) or Not visible. When Visibility is set to
Not visible, only devices that know the printer address can print to it.
Chapter 2
???Security level: Select Low (default) or High. The Low setting does not require users of other devices with Bluetooth wireless technology to enter the printer passkey. High requires users of other devices with Bluetooth wireless technology to enter the printer passkey.
???Reset Bluetooth options: Select to reset all items in the Bluetooth menu to their default values.
???Photosmart Share (Instant Share): Touch to share photos on an inserted memory card with family and friends. The printer must be connected to a computer and the printer software must be installed on the computer.
???Test & Sample Pages
???Print test page: Touch to print a test page containing information about the printer that can help in troubleshooting problems.
???Print sample page: Touch to print a sample page useful for checking the print quality of the printer.
Cartridge
???Align cartridge: Touch to align the print cartridge, which ensures high print quality prints. Do this if colors in the printouts are misaligned, or if the alignment page does not print correctly when you install a new print cartridge.
???Clean cartridge: Touch to clean the print cartridge. After cleaning, you will be asked if you want to continue to
Help
Help tips appear on the printer screen whenever you begin an Edit Photo or Get Creative operation, such as cropping a photo or adding a frame. Follow the instructions on the printer. If you turn this feature off, you can turn it back on by setting the Reset Help Tips preference to Yes in Preferences.
???Photo printing tips: Touch to read the top ten printing tips.
???Printer features: Touch to see information about printer features.
???Print from imaging devices: Touch to see information about printing from imaging devices.
???Get Creative tips: Touch to see information about the Get Creative aspects of the printer.
???Printing specialty projects: Touch to see information on printing specialty projects.
???Troubleshooting and maintenance: Touch to see information on troubleshooting and maintenance.
???Getting assistance: Touch to read how to obtain help with the printer.
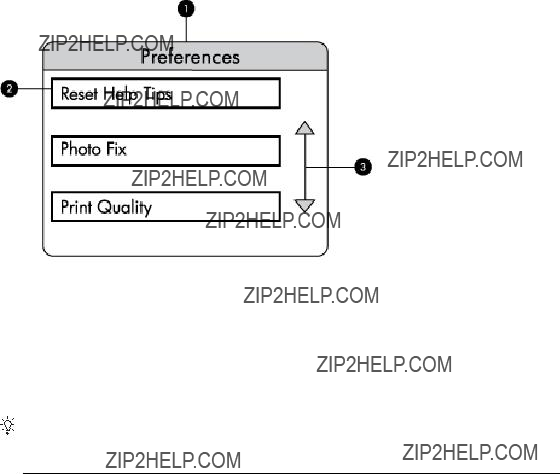
Preferences
???Sound: Touch to change the sound volume to High, Medium (default), Low, or
Off.
???Reset Help Tips: Touch Yes to reset the help tips, if they have been turned off.
???Photo Fix: Touch to turn Photo Fix enhancements On (default) or Off.
16 Get started
???Print quality: Touch to change the print quality. Choose between Best, Normal, or Fast Normal print quality.
???Paper type: Touch to change the type of paper on which to print. Choose between
HP Advanced, HP Premium, Other, Plain, or Other, Photo. HP recommends using HP Advanced Photo Paper for best results. If you are printing on
???Date/time: Touch to show a date/time stamp on your printed photos. Touch Date/ time, Date only, or Off (default).
???Colorspace: Touch to choose a colorspace (a
???Borderless: Touch to turn borderless printing On (default) or Off. When borderless printing is turned off, all pages print with a narrow white border around the outside edges of the paper.
???Demo Mode: Touch to turn Demo Mode On or Off (default). When Demo Mode is on, the printer displays sample images a user can edit and print. If no interaction with the demo takes place within two minutes, a slideshow starts with information about printer features.
???Restore defaults: Touch to restore printer defaults: Yes or No (default). Touching Yes restores the original factory preferences.
???Language: Touch to change the language used on the printer screen.
Chapter 2
18 Get started

3 Paper basics
Learn how to choose the right paper for your print job and how to load it into the input tray for printing.
???Choose the best paper for the job
Choose the best paper for the job
Use HP Advanced Photo Paper. It is especially designed to work with the inks in your printer to create beautiful photos. Other photo papers will produce inferior results.
For a list of available
???www.hpshopping.com (U.S.)
???www.hpshopping.ca (Canada)
???www.hp.com/eur/hpoptions (Europe)
???www.hp.com (All other countries/regions)
The printer is set by default to print the best quality photos on HP Advanced Photo Paper. If you print on a different type of paper, be sure to change the paper type. For information on changing the paper type in the printer menu, see ???Load your paper??? on page 19. For information on changing the paper type when printing from a computer, see ???Change the print settings for the print job??? on page 43.
Load your paper
Paper loading tips:
???You can print on photo paper, index cards,
???Before loading paper, slide out the
???Load only one type and size of paper at a time. Do not mix paper types or sizes in the input tray.
???Do not load more than 20 sheets of photo paper.
???Do not load more than 10 sheets of 10 x 30 cm (4 x 12 inches) photo paper for panoramic printing. Loading more than ten sheets can cause paper feed problems.
???If you are using tabbed paper, load the paper so the tab feeds in last.
Chapter 3
To load paper
1. Open the output tray. The input tray opens automatically.
2.Load up to 20 sheets of photo paper with the print side or glossy side facing the front of the printer. If you are using tabbed paper, load the paper so tab feeds in last. When loading, slide the paper to the left side of the input tray and push the paper down firmly until it stops.
3.Adjust the
To change the paper type
TIP: If you are printing on a paper type other than the recommended HP Advanced Photo Paper, be sure to change the paper type setting to improve the results. Best quality can be achieved with HP Advanced Photo Paper only.
1.Touch the Menu icon on the quick touch frame to open the printer menus.
2.Scroll to and touch Preferences.
3.Touch Paper type, and then touch the desired paper type to select it.
???HP Advanced Photo Paper (default)
???HP Premium Photo Paper
???Other, Plain
???Other, Photo
If you are printing from a computer, change the paper type and other printer settings in the print dialog box. For more information, see ???Print from a computer??? on page 39 and ???Change the print settings for the print job??? on page 43.
You can select from a greater number of paper sizes when you print from a computer than when you print without a computer. When you print without a computer, the printer senses the paper size being used.
20 Paper basics

4 Print without a computer
This section contains the following topics:
???Print from a
???Print from a Bluetooth device
???Get creative
???Enhance or edit your photos
Print from a
This section describes the procedure for printing from a PictBridge digital camera. The procedure for printing from other PictBridge
 NOTE: If you disconnect the camera while printing, all print jobs are cancelled.
To print using a
1.Load HP Advanced Photo Paper into the printer.
2.Turn on the
3.Make sure the USB configuration setting of the camera is set to Digital Camera, and then connect the camera to the camera port of the printer using the USB cable that came with the
4.If you already selected photos for printing on the camera, the Print DPOF Photos? dialog box is displayed on the camera. Select No to bypass printing
5.Use the options and controls on your camera to print your photos. See the camera documentation for more information. The On light and the memory card/camera port light on the printer flash while the photos are printing.
Print from a memory card
This section explains how to print digital photos that are stored on a memory card. You can select photos while the memory card is in the camera (Digital Print Order Format, or DPOF) or while the memory card is in the printer. Printing from a memory card requires no computer and does not drain your digital camera's batteries.
Chapter 4
???Print photos from a memory card
???Save photos from a memory card to another device
Supported memory cards
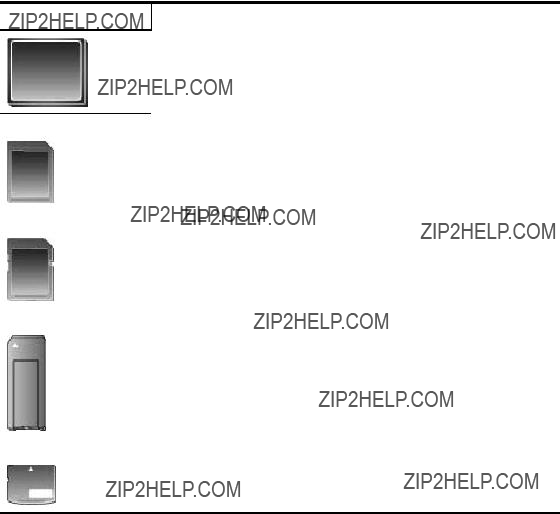
The HP Photosmart printer can read a variety of memory cards. These cards are manufactured by several vendors and are available in a variety of storage capacities.
???CompactFlash Type I and II
???MultiMediaCard
???Secure Digital
???Memory Sticks, Memory Stick Duo, Memory Stick PRO Duo
???
???miniSD Card with SD adapter
 CAUTION: Using unsupported memory cards may damage the memory card and the printer.
Insert a memory card
Find your memory card in the following table and use the instructions to insert the card into the printer.
22 Print without a computer
(continued)
Print photos from a memory card
This section describes several ways to print photos from a memory card, including one photo, multiple photos, multiple copies of the same photo, and so on.
One touch photo prints
1.Navigate through the photos on the inserted memory card.
2.Touch the photo you want to print to display it in
3.Touch the Print icon on the quick touch frame once for each copy you want to print.
4.Navigate to the next photo you want to print. You do not have to wait for the first photo to finish printing.
You can continue to browse through and print photos in
 and browse through your photos in thumbnail view.
To select, add copies, and print multiple photos
1.Navigate through the photos on the inserted memory card in the default thumbnail view.
2.Touch a photo you want to print to view it in

Chapter 4
3.If you want several copies of the same photo, touch the Copies icon on the photo, set the number of copies to be printed, and then touch OK.
4.Touch the arrow keys to browse through photos and select other photos you want to print. To return to the thumbnail view, touch  .
.
5.When you finish selecting photos, press the Print icon on the quick touch frame to print all selected photos.
To print all photos
 NOTE: Make sure no photo is selected. If you are in
  to return to thumbnail view first.
1.Touch the Print icon on the quick touch frame while viewing photos in the default thumbnail view.
2.Touch Yes to print all photos on the inserted memory card.
To print a photo index
1.Touch the Menu icon on the quick touch frame.
2.Touch Print Options, and then touch Print Index Page.
A photo index shows thumbnail views and index numbers for photos on a memory card. Use an index card instead of photo paper to cut costs when printing index pages.
To print
 NOTE: DPOF (Digital Print Order Format) provides information to the printer about photos preselected on the camera for printing, along with information on the number of copies to be printed and other image settings.
1.Insert a memory card that contains
2.Touch Yes when the printer asks you whether you want to print the
To print a frame from a video clip
1.Insert a memory card that has a video clip on it.
2.Navigate to the video clip and display it in
3.Touch the icon to play the video clip.
4.When the frame you want to print appears, touch the Pause button, and then touch the Print icon.
5.To print multiple frames from the video clip, touch the Pause button and then the
Select button on each frame you want to print. Then touch the  and then the
Print icon.
 NOTE: The image resolution in video clips is typically lower than that of digital photos; therefore, you may notice that the print quality of your video clip frames is lower than the print quality of your photos.
NOTE: This printer supports several, but not all, video file formats. For a list of supported video file formats, see ???Printer specifications??? on page 81.
24 Print without a computer

To cancel printing
1.Touch Cancel on the quick touch frame when viewing a photo in
If the current photo is not in the print queue
??? Click Yes in the Cancel All Printing dialog box.
If there is only one photo in the print queue
???The print is cancelled without displaying a dialog box.
If the current photo is in the print queue
???Touch This Image or All Images in the Cancel Printing dialog box.
Save photos from a memory card to another device
You can save photos from a memory card inserted in the printer to another device, such as a thumb drive connected to the printer, without using a computer. For information on transferring photos from a memory card to a computer, see ???Transfer photos to a computer??? on page 40.
To save photos from a memory card to another device
1.Insert a memory card and connect a storage device to the camera port.
2.Touch Yes when prompted to save the photos to the storage device.
3.When prompted, remove the storage device.
Remove a memory card
 CAUTION: Do not pull out the memory card while the memory card/camera port light is flashing. A flashing light means the printer or computer is accessing the memory card. Wait until the light remains solid. Removing a memory card while it is being accessed may corrupt information on the card or damage the printer and card.
To remove a memory card
???When the memory card/camera port light on the printer is solid, it is safe to pull the card out of the slot.
Print from a Bluetooth device
This section describes how to print from any device with Bluetooth wireless technology, a
This section contains the following topics:
???Print photos from a Bluetooth device
 NOTE: For more information on Bluetooth wireless technology and HP, go to www.hp.com/go/bluetooth.

Chapter 4
Configure Bluetooth
To access the full configuration options for Bluetooth wireless technology, you need to configure both the printer and your computer. The way you access these settings depends on the Bluetooth software you use. This section provides Bluetooth instructions using the Widcomm software. In general, the default Bluetooth settings on the printer will work for most users without the need for further configuration.
 NOTE: Before you configure the printer, verify that Bluetooth connectivity functions correctly on the device you want the printer to communicate with. Refer to the documentation that came with the Bluetooth device for instructions.
To configure Bluetooth settings on the computer
1.Open the Toolbox dialog box. For more information, see ???Toolbox dialog box??? on page 53.
2.Click the Configure Bluetooth Settings tab.
3.Make changes and then click Apply.
To configure Widcomm Bluetooth software on the computer
1.
2.In Bluetooth Tasks, click View devices in Range.
3.When the printer appears in the device list, click the Printer icon, then click OK.
4.Select Yes or No to choose the encryption options:
If the security level is set to High, select Yes, then click Next. You will be prompted to enter a passkey.
a. To find the passkey, press the Menu button on the printer control panel. b. Select Bluetooth, then select Display Passkey.
The passkey appears on the printer screen.
c. Enter the passkey in the Bluetooth Pin Code field, and then click OK.
5.From the Windows Control Panel, click Printers & Faxes, then click Add Printer.
6.Click Local Printer, then click Next. The Printer Properties dialog box appears.
7.Click the General tab, and enter a name for the printer.
8.Click OK.
Print photos from a Bluetooth device
The basic procedure for printing from any device with Bluetooth wireless technology is the same. For more detailed instructions, see the documentation that came with your Bluetooth device.
To print from a Bluetooth device
1.Connect the optional Bluetooth adapter to the camera port on the printer.
2.Have the device you are printing from search for available Bluetooth printers.
3.Select the HP Photosmart A620 series printer when it appears on the device.
4.Send the print job from the Bluetooth device to the printer. See the documentation for your Bluetooth device for specific instructions on starting a print job.
26 Print without a computer

Print photos from an iPod
If you have an iPod that can store photos, you can connect your iPod to the printer and print the photos.
Before you begin
Check that the images you copy to the iPod are in JPEG format.
 NOTE: iPods might not be available in your country/region.
To import photos to an iPod
1.Copy photos from a memory card to your iPod using the Belkin Media Reader for iPod.
2.Verify that photos are on your iPod by selecting Photo Import on the iPod menu. Photos appear as Rolls.
To print photos from an iPod
1.Connect the iPod to the camera port of the printer using the USB cable that came with the iPod. Once the photos are read they appear on the touch screen.
2.Select the photo(s) you want to print and touch the Print icon on the quick touch frame. The basic procedure for selecting and printing photos from an iPod is the same as when printing from a memory card. For more information, see ???Print photos from a memory card??? on page 23.
Get creative
The printer provides several creative options you can apply to photos, including captions, frames, special effects, and more. You can then print a modified photo. Get Creative actions are not saved with the photo, so your original file remains untouched.
 NOTE: The Get Creative features available on the printer may vary by country/region and/or model.
???Add captions
???Add frames
???Add clip art

Chapter 4
To access creative options
1.View a photo in
2.Touch Get Creative.
3.In the Get Creative Menu, touch the desired creative option. Use the onscreen arrows to navigate through all the creative options available.
Draw on photos
The Scribble creative option lets you draw on the current photo with the stylus. You can change the color and line weight or switch to an eraser tool to edit drawings already on the photo.
To use the Scribble creative option
1.Touch Get Creative when viewing a photo in
2.Touch the Scribble creative option. Use the onscreen arrows to navigate to this option if it is not visible.
3.Select a draw color and line weight by touching the appropriate button on the touch screen.
4.Use the stylus to draw on the current photo. You can touch the eraser button on the touch screen to switch to the eraser tool and then erase part of anything you have drawn.
After a drawing has been added to a photo, you can later delete it by touching the Edit Photos button in
Add captions
The Caption creative option lets you add text (24 characters maximum) to the current photo by using an touch screen keyboard. You can select from five fonts and six colors
28 Print without a computer

for the text. The keyboard is in the language set for the printer, so long as the language uses roman characters. For
To use the Caption creative option
1.Touch Get Creative when viewing a photo in
2.Touch the Caption creative option. Use the onscreen arrows to navigate to this option if it is not visible.
3.Type on the onscreen keyboard. You can switch among four keyboard layouts ??? Uppercase, lowercase, numbers, and accents ??? by touching the appropriate key on the keyboard: Caps, 123+, or ??????. Use the stylus to make typing easier.
4.Touch Done and chose a font and color when prompted.
After a caption has been added to a photo, the next time you select the photo and access the Get Creative menu, you can click Remove Caption to delete the caption from the photo.
Add frames
The Frames creative option lets you add a frame to the current photo. You can select from several categories, including: Seasonal, Kids, General, and Special. Each frame has a landscape and portrait version.
Chapter 4
To use the Frames creative option
1.Touch Get Creative when viewing a photo in
2.Touch the Frames creative option. Use the onscreen arrows to navigate to this option if it is not visible.
3.Touch the desired category to view the frames available in that category. Touch
 to return to the main Frames window to select a different category.
4.Touch the desired frame.
5.Adjust the photo by using the Zoom buttons. You can move the photo around within the frame with your finger or rotate it by touching the Rotate button.
6.When you are finished, touch Done.
7.In the Add Frame To dialog box, touch This Photo or All photos, as desired. After a frame has been added to a photo, you can later delete it by touching the Edit Photos button in
Add clip art
The Clip Art creative option lets you add clip art to the current photo. You can select from several categories, including: Seasonal, Kids, General, and Special.
To use the Clip Art creative option
1.Touch Get Creative when viewing a photo in
2.Touch the Clip Art creative option. Use the onscreen arrows to navigate to this option if it is not visible.
3.Touch the desired category to view the clip art available in that category. Touch
 to return to the main Clip Art window to select a different category.
4.Touch the desired clip art.
5.Adjust the clip art using the appropriate onscreen buttons to make it larger or smaller or to rotate it. Move it around on the photo by dragging it with your finger or the stylus.
6.When you are finished, touch Done.
After clip art has been added to a photo, the next time you use the Clip Art creative option with that photo, you will be prompted whether you want to add more clip art to the photo or remove clip art currently on the photo.
30 Print without a computer
Create albums
The Albums creative option lets you add photos to photo album books. You can select from several categories, including: Seasonal, Kids, General, and Special.
To use the Albums creative option
1.Touch Get Creative when viewing a photo in
2.Touch the Albums creative option. Use the onscreen arrows to navigate to this option if it is not visible.
 NOTE: If you want to zoom or rotate a photo, do it before you enter album mode. You cannot manipulate a photo when you are viewing it in an album.
3.Touch the desired category to view the albums available in that category. Touch
 to return to the main Album window to select a different category.
4.Touch the desired album.
5.Follow the prompt to use selected photos (if any) or to select photos.
6.Touch Done when you are ready to preview the album.
7.In the Album Pages window the recommended number of pages that will create the best looking album is displayed. Change the number of pages if desired, and then touch OK.
The album opens with the selected photos placed on pages. The first selected photo appears on the album cover page. Use the onscreen arrows to move among the pages of the album.
8.Touch the Shuffle button to move photos among the template positions on the current page. Touch Shuffle repeatedly, if necessary, until the photos are in the desired positions.
 NOTE: If the template has both portrait and landscape positions, note that photos will rotate only into positions with the same orientation as themselves.
9.Press the Print button to print the album.
 NOTE: Deleting a photo used in an album also deletes the album.

Chapter 4
Use Design Gallery
The Design Gallery creative option lets you apply special effects. You can modify the effect by changing the settings available for that effect.
To use the Design Galley creative option
1.Touch Get Creative when viewing a photo in
2.Touch the Design Gallery creative option. Use the onscreen arrows to navigate to this option if it is not visible.
3.Touch the desired effect and change its available variables when prompted, if you want to modify how the effect looks on the current photo.
4.When you are finished, touch Done.
5.When prompted, touch This Photo or All photos, to apply the effect, as desired. After a Design Galley effect has been applied to a photo, the next time you use the Design Galley creative option with that photo, you will be prompted whether you want to add more effects to the photo or remove the last effect applied to the photo.
Create and view slide shows
Play your favorite photos as a slide show on the printer touch screen. It is a fun and convenient way to share your photos with family and friends. You can also print all or just some of the photos in the slide show as you view it.
To view photos in a slide show
1.Insert a memory card.
2.Navigate through and select photos to view in the slide show.
3.Touch the Menu icon on the quick touch frame, touch Slide Show, and then Start Slide Show.
If no photos are selected, you will be prompted to select some or to use all the photos in the slide show.
To change slide show settings, touch the Settings icon before touching Start Slide Show. For information on slide show settings, see the slide show section of ???The menus??? on page 15.
4.Touch anywhere on the touch screen to pause the slide show. Touch Resume to continue the slide show.
5.Touch Exit to stop the slide show.
32 Print without a computer

To print from a slide show
1.When the photo you want to print is displayed, touch anywhere on the touch screen to pause the slide show.
2.Touch the Print icon to print the photo. The slide show resumes after printing.
Specialty printing projects
This section discusses several specialty printing projects, special printing modes you can turn on, when printing directly from the printer.
Panoramic photos
To use Panoramic Photos mode
1.Touch the Menu icon on the quick touch frame.
2.Touch Specialty Printing Projects, and then touch Panoramic Photos.
3.Touch On, and then load 10 x 30 cm (4 x 12 inches) paper when prompted.
4.Browse through your photos and touch one to open it in
While Panoramic Photos mode is on, the printer displays photos in the panoramic aspect ratio. This means only part of each photo appears. To change the area of the photo that prints, touch the photo to open it in
5.Touch the Print icon on the quick touch frame.
6.If you are finished printing in Panoramic Photos mode, touch Yes at the prompt to exit Panoramic Photos mode and return to a normal 3:2 aspect ratio.
Photo stickers
You can print 16 copies of a single photo on
 NOTE: Photo sticker paper is not available in all countries/regions.
Load a single sheet of
To use Photo Stickers mode
1.Touch the Menu icon on the quick touch frame.
2.Touch Specialty Printing Projects, and then touch Photo Stickers.
3.Touch On and then load photo sticker media when prompted.
4.Browse through your photos and touch one to open it in
Chapter 4
5.Touch the Print icon on the quick touch frame. The printed sheet contains 16 copies of a single photo.
6.If you are finished printing in Photo Stickers mode, touch Yes at the prompt to exit Photo Stickers mode.
Passport photos
To use Passport Photos mode
1.Touch the Menu icon on the quick touch frame.
2.Touch Specialty Printing Projects, and then touch Passport Photos.
3.Touch On, and then select one of the following sizes, when prompted:
???2 x 2 inches
???25 x 36 mm
???35 x 45 mm
???36 x 51 mm
???45 x 55 mm
4.Touch OK and then load photo paper, if needed.
5.Browse through your photos and touch one to open it in
While Passport Photos mode is on, the printer displays photos in the selected aspect ratio. This means only part of each photo appears. To change the area of the photo that prints, touch the photo to open it in
6.Touch the Print icon on the quick touch frame. The printed sheet contains as many copies of a photo as will fit on the page, depending on the passport photo size selected.
7.If you are finished printing in Passport Photos mode, touch Yes at the prompt to exit Passport Photos mode.
CD/DVD labels
To use CD Tattoo mode
1.Touch the Menu icon on the quick touch frame.
2.Touch Specialty Printing Projects, and then touch CD Tattoo.
3.Touch On, and then load CD/DVD label media, when prompted.
4.View the photo to be used as a CD/DVD label in
5.When the circular crop box overlay area of the CD label is displayed on the screen, move it around with your finger to position the label on the photo, and then press Done. For more information on cropping, see ???Crop a photo??? on page 35.
6.Touch the Print icon on the quick touch frame.
7.If you are finished printing in CD Tattoo mode, touch Yes at the prompt to exit CD Tattoo mode.
34 Print without a computer

Enhance or edit your photos
You can enhance or edit your photos in various ways, as explained in the following:
???Crop a photo
???Remove
Use Photo Fix
Photo Fix automatically enhances your photos using HP Real Life Technologies that:
???Sharpen blurred photos.
???Improve the dark areas of a photo without affecting the light areas of a photo.
???Improve the overall brightness, color, and contrast of photos.
Photo Fix is on by default when you turn on the printer. If you want to print a photo without using the Photo Fix improvements, turn off Photo Fix.
To turn off Photo Fix
1.Touch the Menu icon on the quick touch frame.
2.Touch Preferences, and then touch Photo Fix.
3.Touch Off.
Photo Fix remains off until you turn it on again. Photo Fix is always on for Bluetooth or PictBridge printing.
Crop a photo
The Crop feature lets you crop the current photo. You can change the amount and area of the photo to crop.
To crop a photo
1.Touch Edit Photo when viewing a photo in
2.Touch Crop Photo.
3.Touch the Zoom In and Zoom Out icons to adjust the amount of cropping.
The crop box shows how much of the photo will be cropped. The crop box turns red if the amount cropped causes the photo to print at a resolution below 100 dpi.
4.Touch the Rotate icon if you want to rotate the crop box 90 degrees clockwise.
5.Drag the crop box with your finger to reposition it, and then press Done.
Chapter 4
Remove
The printer provides a way to reduce
To remove
1.Touch Edit Photo when viewing a photo with
2.Touch Remove
The
3.To undo
Adjust photo brightness
To adjust photo brightness
1.Touch Edit Photo when viewing a photo in
2.Touch Photo Brightness.
3.Touch the arrows to adjust to the desired brightness and then touch Done.
Change print quality
You can set the printer to print photos at a higher or lower level of quality. The default print quality is determined by the paper type setting. The default print quality setting produces the highest quality photos, but is also a slightly slower print mode. If you want to print a photo quickly, and are not concerned with obtaining the highest quality, choose a lower print quality setting.
To change the print quality setting
1.Touch the Menu icon on the quick touch frame, and then touch Preferences.
2.Touch Print Quality.
3.Select a print quality:
???Best
???Normal
???Fast Normal
4.Touch OK.
This print quality setting remains in effect until you change the paper type setting or change the print quality setting. For information on changing the paper type, see ???Load your paper??? on page 19.
36 Print without a computer
Delete a photo
You can delete a photo or video clip from a memory card or storage device using the printer.
To delete a photo
1.View the photo or video clip in
2.Touch Edit and touch Delete. Follow the prompts on the touch screen.
If you delete a photo used in an album, a message appears alerting you that deleting the photo also deletes the album.
If you delete a photo or a video clip with a video frame currently in the print queue, the deleted photo or video frame is removed from the print queue.
Chapter 4
38 Print without a computer

5 Print from a computer
This section describes how to print photos when the HP Photosmart A620 series printer is connected to a computer, and you want to print an image from an imaging application such as Photosmart Essential.
This section contains the following topics:
???Transfer photos to a computer
???Change the print settings for the print job
???Print photos
Printer software
This section contains the following topics:
???Printer Properties dialog box
???Download printer software updates
Printer Properties dialog box
When connected to a computer, the printer is controlled by the printer software you installed on the computer. Use this software, also known as the printer driver, to change the print settings and to begin print jobs.
To change the print settings, open the Printer Properties dialog box.
 NOTE: The Printer Properties dialog box is also referred to as the Printing Preferences dialog box.
To open the Printer Properties dialog box
1.Open the file that you want to print.
2.Click File, click Print, and then click Properties or Preferences. The Printer Properties dialog box is displayed.
 NOTE: The path to the Printer Properties dialog box can vary depending on the software program you are using.
What's This? help
Use the What's This? help to learn about the features that you see on the Printer Properties dialog box. For more information, see ???What's This? help??? on page 40.
Chapter 5
What's This? help
Use What's This? help to learn more about the available printing options.
To use What's This? help
1.Move the cursor over the feature that you want to learn more about.
2.Click the right mouse button. The What's This box is displayed.
3.Move the cursor over the What's This? box, and then click the left mouse button. An explanation of the feature is displayed.
Download printer software updates
Download the latest printer software update every few months to ensure you have the latest features and improvements.
To download a printer software update
1.Make sure you are connected to the Internet.
2.From the Windows Start menu, click Programs or All Programs, point to HP, and then click HP Software Update.
The HP Software Update window is displayed.
3.Click Next.
HP Software Update searches the HP Web site for printer software updates.
???If the computer has the most recent version of the printer software installed, No updates are available for your system at this time is displayed in the HP Software Update window.
???If the computer does not have the most recent version of the printer software installed, a software update is displayed in the HP Software Update window.
4.If a software update is available, select the check box beside the update name.
5.Click Install.
6.Follow the onscreen instructions.
Download HP Photosmart software
Installing the printer software update you download from the HP Web site does not update the HP Photosmart software you might have installed on the computer. For information about updating the HP Photosmart software, see the HP Photosmart Software Help.
Transfer photos to a computer
This section describes how to transfer photos and other files from cameras and memory cards to a computer, and contains the following topics:
???Transfer photos from a camera or other device
???Transfer photos and files from a memory card
Transfer photos from a camera or other device
You can transfer photos to a computer from a connected camera or USB device (like a Flash drive). To transfer photos, the device must be connected to the printer, and the
40 Print from a computer

printer must be connected to your computer with an appropriate USB cable. In addition you must have installed the HP Photosmart software. You need to transfer the photos to your computer to use them in image editing software, including the HP Photosmart software that came with the printer.
To transfer photos to a computer
1.Connect the printer to the computer with a USB cable.
2.Connect a PictBridge camera to the camera port, or connect another device that contains the photos you wish to transfer. Turn the camera or device on.
3.HP Solution Center opens on the computer. Click Transfer Photos, and then follow the prompts on the computer. For more information, see the HP Photosmart Software Help.
Transfer photos and files from a memory card
This section describes how to transfer photos and
???Transfer photos from a memory card to the computer
???Transfer
???Delete photos and other files from a memory card
Transfer photos from a memory card to the computer
Follow these steps to transfer photos from a memory card to the computer.
To transfer photos from a memory card to a computer
1.Make sure the printer is connected to the computer.
2.Insert a memory card that contains photos into the correct memory card slot in the printer.
3.HP Solution Center opens on the computer. Click Transfer Photos, and then follow the prompts on the computer. For more information, see the HP Photosmart Software Help.
Transfer
Follow these steps to save
To transfer files from a memory card to a computer
1.Make sure the printer is connected to the computer.
2.Insert a memory card that contains
3. icon in the Windows taskbar, and select HP Photosmart A620 series > Open E.
 NOTE: E may not be the drive letter the computer assigns. Windows Explorer opens and shows the contents of the card.
4.Drag and drop files from the memory card to a location on the computer.

Chapter 5
 NOTE: You can also use Windows Explorer to copy files from the computer to the memory card.
Delete photos and other files from a memory card
Follow these steps to delete photos and other files from a memory card.
To delete photos or files from a memory card
1.Make sure the printer is connected to the computer.
2.Insert a memory card that contains files into the correct memory card slot in the printer.
3. icon in the Windows taskbar, and select HP Photosmart A620 series > Open E.
 NOTE: E may not be the drive letter the computer assigns. Windows Explorer opens and shows the contents of the card.
4.Select the files you want to delete, then select File > Delete.
Enhance your photos
The printer software offers several features to make printing digital photos easier and to improve photo quality:
???Use the HP Real Life technology options to touch up photos. For more information, see ???HP Real Life technology options??? on page 42.
???Achieve the highest resolution with Maximum dpi. For more information, see ???Maximum dpi??? on page 43.
Learn how to add professional touches to digital photographs:
???Use advanced color settings to improve printed colors. For more information, see ???Use advanced color settings??? on page 45.
???Print black and white photos. For more information, see ???Print black and white photos??? on page 50.
???Use HP Advanced Photo Paper for easy to handle, sturdy, glossy photo paper with an
HP Real Life technology options
HP Real Life technologies enhance the quality of your printed photos.
In most cases, you do not need to change the Basic default print setting. The Basic setting sharpens the images that you print, and improves the quality and clarity of low resolution images, such as those downloaded from the Internet.
You can change the setting to Full if the images that you print are under exposed or over exposed, contain dark areas or red eye, or have colors that appear washed out.
You can also select the Off setting if you prefer to edit the image manually in a software program such as HP Photosmart software.
42 Print from a computer

To change the HP Real Life technologies setting
1.Open the Printer Properties dialog box. For more information, see ???Printer Properties dialog box??? on page 39.
2.Click the Features tab.
3.In the HP Real Life technologies Photo fix
Maximum dpi
Use maximum dpi mode to print
To get the most benefit from maximum dpi mode, use it to print
Printing in maximum dpi takes longer than printing with other settings and requires a large amount of disk space.
To print in Maximum dpi mode
1.Open the Printer Properties dialog box. For more information, see ???Printer Properties dialog box??? on page 39.
2.Click the Features tab.
3.In the Paper Type
4.In the Print Quality
 NOTE: To view the maximum dpi that the HP Photosmart printer will print, click
Resolution.
5.Select any other print settings that you want, and then click OK.
Change the print settings for the print job
This section describes how to change print settings, such as paper type or print quality, when printing from a computer. This section contains the following topics:

Chapter 5
Change the print quality
Choose the print quality and speed to optimize your photo printing.
To select a print quality and speed
1.Open the Printer Properties dialog box. For more information, see ???Printer Properties dialog box??? on page 39.
2.Click the Features tab.
3.In the Paper Type
4.In the Print Quality
Print quality settings
???Draft produces
???Fast Normal produces higher quality output than the Draft setting and prints more quickly than the Normal setting.
???Normal provides the best balance between print quality and speed and is appropriate for most documents.
???Best provides the best balance between high quality and speed and can be used for high quality prints. For most documents, the Best setting prints more slowly than the Normal setting.
???Maximum dpi optimizes the dots per inch (dpi) that the HP Photosmart prints. Printing in maximum dpi takes longer than printing with other settings and requires a large amount of disk space. For more information, see ???Maximum dpi??? on page 43.
 NOTE: To see the print resolution for the selected print quality, click the
Resolution button on the Features tab.
Change the paper type
For best results, always select a specific paper type that matches the media you are using for the print job.
To select a specific paper type
1.Open the Printer Properties dialog box. For more information, see ???Printer Properties dialog box??? on page 39.
2.Click the Features tab.
3.Click More in the Paper Type
4.Click OK.
5.Select any other print settings that you want, and then click OK.
44 Print from a computer
Change the paper size
Use the Printer Properties dialog box instead of the software application's Page Setup dialog box to select a paper size. Some software applications do not list all the paper sizes the printer supports.
To select a paper size
1.Open the Printer Properties dialog box. For more information, see ???Printer Properties dialog box??? on page 39.
2.Click the Features tab.
3.Select a paper size from the Size
For borderless printing, select a borderless paper size, or select a paper size, then click the Borderless check box.
4.Select any other print settings that you want, and then click OK.
Resize a photo
Use the printer software to print a photo that is formatted for one paper size on another paper size. Doing this can be useful if you do not have the correct paper size available.
To resize a photo for a different paper size
1.Open the Printer Properties dialog box. For more information, see ???Printer Properties dialog box??? on page 39.
2.Click the Features tab.
3.Click Scale to paper size, and then select the target paper size in the
4.Select any other print settings that you want, and then click OK.
Use advanced color settings
Use the More color options dialog box to adjust how printed colors appear.
Adjusting these settings causes the printed colors to differ from the colors that appear on the computer monitor. These settings do not affect the original photo; they only affect how it prints.
Follow these steps to specify advanced color settings:
To specify advanced color settings
1.Open the Printer Properties dialog box. For more information, see ???Printer Properties dialog box??? on page 39.
2.Click the Color tab, and then click the More color options button. The More color options dialog box is displayed.

Chapter 5
3.You can adjust the following settings:
???Adjust the Brightness, Saturation, and Color Tone to affect how overall colors are printed.
???Adjust the Cyan, Magenta, Yellow, and Black sliders to specify the level of each color that is used in printing.
 NOTE: When you adjust color settings, the changes are reflected in the Preview box.
4.After specifying the color settings, click OK.
5.Select any other print settings that you want, and then click OK.
Use the What's This? help to learn about the features that you see on the Printer Properties dialog box. For more information, see ???What's This? help??? on page 40.
Create printing shortcuts
In addition to the printing shortcuts that are available in the Printing Shortcuts list in the print driver, you can create your own printing shortcuts to save time and ensure consistency between print jobs.
If you frequently print on transparency film, for example, you can create a printing shortcut by selecting the Presentation Printing shortcut, changing the paper type to HP Premium Inkjet Transparency Film, and then saving the modified shortcut under a new name; for example, Transparency Presentations. After creating the printing shortcut, simply select it when printing on transparency film rather than changing the print settings each time.
To create a printing shortcut
1.Open the Printer Properties dialog box. For more information, see ???Printer Properties dialog box??? on page 39.
2.Click the Printing Shortcuts tab.
3.In the Printing Shortcuts list, click a printing shortcut.
The print settings for the selected printing shortcut are displayed.
4.Change the print settings to those you want in the new printing shortcut.
5.In the Type new shortcut name here box, type a name for the new printing shortcut, and then click Save.
The printing shortcut is added to the list.
To delete a printing shortcut
1.Open the Printer Properties dialog box. For more information, see ???Printer Properties dialog box??? on page 39.
2.Click the Printing Shortcuts tab.
3.In the Printing Shortcuts list, click the printing shortcut that you want to delete.
4.Click Delete.
The printing shortcut is removed from the list.
 NOTE: Only the shortcuts that you have created can be deleted. The original HP shortcuts cannot be deleted.
46 Print from a computer

Print preview
You can preview a document on the computer before printing it. If the print preview does not look the way you want it to, close the preview window and make the necessary adjustments to the document or to the print settings. For more information on changing the print settings, see ???Change the print settings for the print job??? on page 43.
To preview a printed document
1.Open the Printer Properties dialog box. For more information, see ???Printer Properties dialog box??? on page 39.
2.Click the Features or the Color tab.
3.Select the Show preview before printing check box.
4.Select any other print settings that you want, and then click OK. Before the document prints, a preview is displayed.
5.Do one of the following:
???Click OK to print the document.
???Click Cancel to cancel the print job. Adjust the print settings as needed before printing the document.
Print photos
This sections describes how to print several types of photos and contains the following topics:
???Print black and white photos
???Print on index cards and other small media
Print borderless photos
Use borderless printing to print to the edges of the paper.
Guidelines
???For tips on achieving the best quality prints, see ???photo enhancing??? on page 42.
???Verify that the photo paper you are using is not rippled or curled.
???Do not exceed the paper tray capacity when loading media. For more information, see ???Printer specifications??? on page 81.
Prepare to print
1.Verify that the printer is turned on.
2.Load photo paper. For more information, see ???Paper basics??? on page 19.
Chapter 5
 NOTE: If your software program includes a photo printing feature, follow the instructions that are provided with the software program. Otherwise, follow these instructions.
1.Open the photo in a software program that allows editing, such as HP Photosmart software.
2.Open the Print Properties dialog box. For more information, see ???Printer Properties dialog box??? on page 39.
3.Click the Printing Shortcuts tab.
4.In the Printing Shortcuts list, click Photo
???Print Quality: Normal or Best
 NOTE: For maximum dpi quality, go to the Features tab, and then click
Maximum dpi in the Print Quality
???Paper Type: An appropriate photo paper type
???Paper Size: An appropriate borderless photo paper size
???Orientation: Portrait or Landscape
5.If necessary, change the HP Real Life technology options setting. For more information, see ???HP Real Life technology options??? on page 42.
6.Select any other print settings that you want, and then click OK.
If you printed on photo paper with a
Use the What's This? help to learn about the features that you see on the Printer Properties dialog box. For more information, see ???What's This? help??? on page 40.
Related topics
???Change the print settings for the print job??? on page 43
48 Print from a computer
Print photos with a border
Guidelines
???To learn how to use the photo printing features, see the ???photo enhancing??? on page 42 page.
???Verify the photo paper you are using is not rippled or curled.
???Do not exceed the paper tray capacity when loading media. For more information, see ???Printer specifications??? on page 81.
Prepare to print
1.Verify that the printer is turned on.
2.Load photo paper. For more information, see ???Paper basics??? on page 19.
 NOTE: If your software program includes a photo printing feature, follow the instructions that are provided with the software program. Otherwise, follow these instructions.
1.Open the photo in a software program that allows editing, such as HP Photosmart software.
2.Open the Print Properties dialog box. For more information, see ???Printer Properties dialog box??? on page 39.
3.Click the Printing Shortcuts tab.
4.In the Printing Shortcuts list, click Photo
???Print Quality: Normal or Best
 NOTE: For maximum dpi quality, go to the Features tab, and then click
Maximum dpi in the Print Quality
???Paper Type: An appropriate photo paper type
???Paper Size: An appropriate photo paper size
???Orientation: Portrait or Landscape
5.If necessary, change the HP Real Life technology options setting. For more information, see ???HP Real Life technology options??? on page 42.
6.Select any other print settings that you want, and then click OK.
Use the What's This? help to learn about the features that you see on the Printer Properties dialog box. For more information, see ???What's This? help??? on page 40.
Related topics
???Change the print settings for the print job??? on page 43
Chapter 5
Print postcards
Guidelines
???Use only cards and small media that meet the printer
???Do not exceed the paper tray capacity when loading media. For more information, see ???Printer specifications??? on page 81.
Prepare to print
1.Verify the printer is turned on.
2.Load cards. For more information, see ???Paper basics??? on page 19.
1.Open the Print Properties dialog box. For more information, see ???Printer Properties dialog box??? on page 39.
2.Click the Features tab, and then specify the following print settings:
???Paper Type: Click More, click Specialty Papers, and then select an appropriate card type.
???Print Quality: Normal or Best
???Size: An appropriate card size
3.Select any other print settings that you want, and then click OK.
Use the What's This? help to learn about the features that you see on the Printer Properties dialog box. For more information, see ???What's This? help??? on page 40.
 NOTE: If an
Related topics
???Change the print settings for the print job??? on page 43
Print black and white photos
Guidelines
???To print a photo that is already black and white you do not need to adjust the color settings; simply follow the instructions for the type and size of photo you want to print. See ???Print from a computer??? on page 39 for some basic photo print options.
???To print a color photo in black and white, use the Print in grayscale color option.
To print in grayscale
1.Open the Print Properties dialog box. For more information, see ???Printer Properties dialog box??? on page 39.
2.Click the Color tab.
3.Select the Print in grayscale option.
4.Select any other print settings that you want, and then click OK.
50 Print from a computer

Print panoramic photos
For true panoramic printing, you must have taken a panoramic photo. Also, use HP panorama paper 10 x 30 cm (4 x 12 inch).
To create a panoramic print from a
Guidelines
???To learn how to use the photo printing features, see ???photo enhancing??? on page 42.
???Verify that the photo paper you are using is not rippled or curled.
???Do not exceed the paper tray capacity when loading media. For more information, see ???Printer specifications??? on page 81.
???For maximum fade resistance, use HP Advanced Photo Paper.
Prepare to print
1.Verify the printer is turned on.
2.Load paper. For more information, see the ???Paper basics??? on page 19 section.
 NOTE: If the software program you are using includes a photo printing feature, follow the instructions that are provided with the software program. Otherwise, follow these instructions.
1.Open the Print Properties dialog box. For more information, see ???Printer Properties dialog box??? on page 39.
2.On the Printing Shortcuts tab, select Photo
???Print quality: Best
???Paper type: The appropriate photo paper type
???Paper size: The appropriate borderless photo panorama paper size
???Orientation: Portrait or Landscape
3.Set the following options as appropriate:
??????HP Real Life technology options??? on page 42
??????Use advanced color settings??? on page 45
??????Print black and white photos??? on page 50
4.Select any other print settings you want, then click OK.
Use What's This? help to learn more details about each of the features in the Printer Properties dialog box. For more information, see ???What's This? help??? on page 40.
Related topics
???Change the print settings for the print job??? on page 43

Chapter 5
Print on index cards and other small media
Guidelines
???Use only cards and small media that meet the printer
???Do not exceed the paper tray capacity when loading media. For more information, see ???Printer specifications??? on page 81.
???Print quality decreases when printing on plain paper such as index cards. This is to be expected and does not indicate a problem. Printing on plain paper is useful for print jobs, such as drafts, where print quality is not important.
Prepare to print
1.Verify the printer is turned on.
2.Load paper. For more information, see the ???Paper basics??? on page 19 section.
1.Open the Print Properties dialog box. For more information, see ???Printer Properties dialog box??? on page 39.
2.Click the Features tab, and then specify the following print settings:
???Paper Type: Plain Paper
???Size: An appropriate card size
3.Select any other print settings that you want, and then click OK.
Use the What's This? help to learn about the features that you see on the Printer Properties dialog box. For more information, see ???What's This? help??? on page 40.
 NOTE: If an
Related topics
???Change the print settings for the print job??? on page 43
HP Photosmart software
The HP Photosmart software coordinates the functions of HP imaging devices: scanners, cameras, printers, and
Organize, edit, and share digital images in creative ways
If you performed the default installation of the printer software, you also installed the Photosmart Essential software. This software lets you easily:
???Print photos and digital images
???Transfer images from a camera or memory card
???Edit images
???Share photos with friends and family
For more information, see the HP Photosmart Software Help.
52 Print from a computer

6 Maintenance
This section contains basic maintenance procedures that can help keep your printer performing well and producing
???Clean the print cartridge automatically
???Insert or replace the print cartridge
???Remove ink from your skin and clothing
???Get print cartridge ordering information
???HP Digital Imaging Monitor icon
Toolbox dialog box
The Toolbox contains useful tools to enhance printer performance.
Open the Toolbox
From the Windows taskbar
1. icon.
icon.
2.Make sure the correct printer is selected, and then click the Settings button in the HP Solution Center.
3.Select Print Settings > Printer Toolbox.
Use the Toolbox
Use the Toolbox to do the following:
??????Align the print cartridge??? on page 53
??????Clean the print cartridge automatically??? on page 54
??????Print a test page??? on page 57
??????Print a sample page??? on page 57
??????View estimated ink levels??? on page 54
??????Get print cartridge ordering information??? on page 56
??????Configure Bluetooth??? on page 26
Align the print cartridge
The printer automatically aligns the print cartridge after a new one is installed. You can also align the print cartridge at other times to ensure optimal print quality. Indications that
Maintenance 53

Chapter 6
you need to align the print cartridge manually include documents that print at an angle, colors not printing satisfactorily, or poor print quality.
To align the print cartridge from the printer
1.Load a sheet of HP Advanced Photo Paper in the input tray.
2.Touch the Menu icon in the quick touch frame, and then touch Cartridge.
3.Touch Align Cartridge and follow the prompts.
To align the print cartridge from a connected computer
1.Load a sheet of HP Advanced Photo Paper in the input tray.
2.Open the Toolbox dialog box. For more information, see ???Toolbox dialog box??? on page 53.
3.Click Align the Print Cartridges.
4.Click Align, and follow the onscreen instructions.
Clean the print cartridge automatically
If the printed pages are missing lines or dots or contain ink streaks, the print cartridge might be low on ink or need to be cleaned.
 CAUTION: Clean the print cartridge only when necessary. Unnecessary cleaning wastes ink and shortens the life of the cartridge.
If the print cartridge is not low on ink, follow these steps to clean the cartridge either from the printer or from a connected computer:
To clean the print cartridge from the printer
1.Touch the Menu icon on the quick touch frame, and then touch Cartridge.
2.Touch Clean Cartridge and follow the prompts.
To clean the print cartridge from a connected computer
1.Open the Toolbox dialog box. For more information, see ???Toolbox dialog box??? on page 53.
2.Click Clean the Print Cartridge.
3.Click Clean.
4.Follow the onscreen instructions.
If the documents are still missing lines or dots after cleaning, replace the print cartridge.
View estimated ink levels
You can view the estimated ink level of the print cartridge installed in the printer either from a connected computer or on the printer itself.
54 Maintenance
 NOTE: Ink from the cartridges is used in the printing process in a number of different ways, including in the initialization process, which prepares the device and cartridges for printing, and in printhead servicing, which keeps print nozzles clear and ink flowing smoothly. In addition, some residual ink is left in the cartridge after it is used. For more information see www.hp.com/go/inkusage.
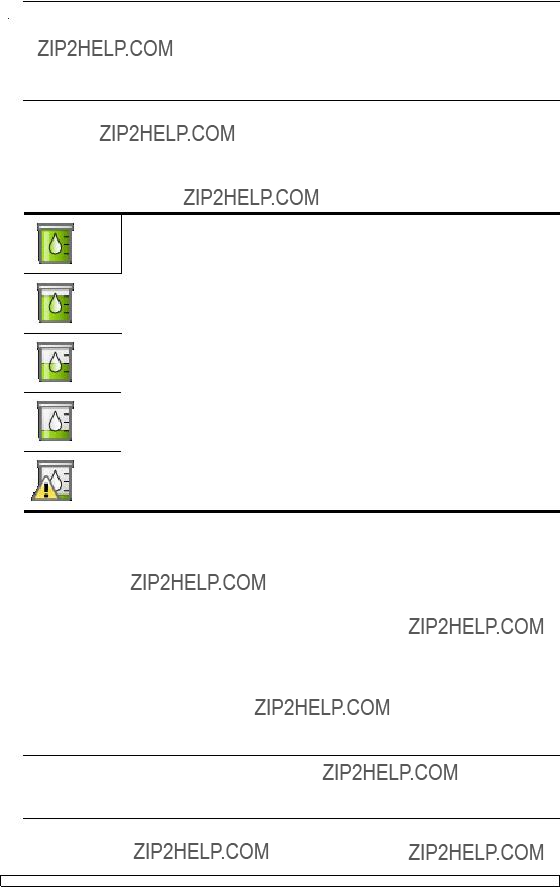
To view the estimated ink level of the print cartridge on the printer itself
???Check the ink level icon on the printer status bar at the top of the touch screen. The
100%
75%
50%
25%
Low on ink (less than 25%).
To view the estimated ink level of the print cartridge from a connected computer
1.Open the Toolbox dialog box. For more information, see ???Toolbox dialog box??? on page 53.
2.Click the Estimated Ink Levels tab.
Insert or replace the print cartridge
Use the HP 110
HP Vivera Inks deliver
 CAUTION: Check that you are using the correct print cartridges. Also, note that HP does not recommend modifying or refilling HP cartridges. Damage that results from modifying or refilling HP cartridges is not covered by the HP warranty.
For best print quality, HP recommends that you install all retail print cartridges before the date stamped on the box.

Chapter 6
To insert or replace a print cartridge
1.Make sure the power is on and you have removed the cardboard from inside the printer.
2.Open the print cartridge door of the printer.
3.Remove the bright pink tape from the cartridge.
 NOTE: Do not touch the
4.If you are replacing a cartridge, push down and pull outward on the cartridge in the cradle to remove it.
5.Hold the replacement cartridge with the label on top. Slide the cartridge at a slight upward angle into the cradle so the
6.Close the print cartridge door.
The printer starts print cartridge alignment. See ???Align the print cartridge??? on page 53 for more information.
Recycle the old cartridge. The HP Inkjet Supplies Recycling Program is available in many countries/regions and lets you recycle used print cartridges free of charge. For more information, go to www.hp.com/hpinfo/globalcitizenship/environment/recycle/ inkjet.html.
Remove ink from your skin and clothing
Follow these instructions to remove ink from your skin and clothing:
Surface
Skin
White fabric
Color fabric
Remedy
Wash the area with an abrasive soap.
Wash the fabric in cold water and use chlorine bleach.
Wash the fabric in cold water and use sudsy ammonia.
 CAUTION: Always use cold water to remove ink from fabric. Warm or hot water can set the ink into the fabric.
Get print cartridge ordering information
To view print cartridge ordering information and order cartridges online
1.Open the Toolbox dialog box. For more information, see ???Toolbox dialog box??? on page 53.
2.Click the Estimated Ink Levels tab.
3.Click Print Cartridge Information.
If you are connected to the Internet, you can click the Shop Online button to order cartridges online.
56 Maintenance
To order HP papers and other supplies, go to www.hp.com/buy/supplies. If prompted, choose your country/region, follow the prompts to select your product, and then click one of the shopping links on the page.
Print a test page
The information on a test page can be helpful if you need to contact HP support. It also contains information about ink levels, print or ink cartridge performance, printer serial number, and so on. You can print a test page either from the printer or, if the printer is connected to a computer, from the printer driver software.
To print a test page from the printer
1.Touch the Menu icon on the quick touch frame.
2.Touch Tools, and then touch Print Test Page.
To print a test page from a computer
1.Open the Toolbox dialog box. For more information, see ???Toolbox dialog box??? on page 53.
2.Click the Device Services tab.
3.Click Print a Test Page.
4.Click Print Page.
Print a sample page
Print a sample page to test the printer photo printing quality and to make sure the paper is loaded correctly.
To print a sample page from the printer
1.Touch the Menu icon on the quick touch frame.
2.Touch Tools, and then touch Print Sample Page.
To print a sample page from a computer
1.Open the Toolbox dialog box. For more information, see ???Toolbox dialog box??? on page 53.
2.Click the Device Services tab.
3.Click Print a Sample Page.
4.Click Print Page.
HP Digital Imaging Monitor icon
After you install the printer software, the HP Digital Imaging Monitor icon appears in the Windows taskbar. This icon helps you perform a variety of tasks.

Chapter 6
The HP Digital Imaging Monitor icon shows the status of the printer:
The HP Digital Imaging Monitor icon has a green check mark when the printer is in an idle state.
The HP Digital Imaging Monitor icon has an exclamation mark when there is an error. An error message also appears. Click the error message or HP Digital Imaging Monitor icon to return the icon to its idle state.
???
???
???HP Photosmart A620 series > About: View the printer software version, installed printers, and the printer name and serial number.
???Launch/Show HP Solution Center: Opens the HP Solution Center.
???About: Shows the version of the HP Digital Imaging Monitor icon.
???Close HP Digital Imaging Monitor: Removes the HP Digital Imaging Monitor icon from the Windows taskbar. The icon reappears when you restart the computer.
???HP Photosmart A620 series > Display Status: Describes the current status of the printer.
58 Maintenance

7 Troubleshooting
Before contacting HP support, read this section for troubleshooting tips or go to the online support services at www.hp.com/support.
Before you begin, make sure:
???All the cable connections between the printer and computer are secure.
???You are using the most recent version of the printer software.
 TIP: HP recommends using a USB cable 3 meters (10 feet) or less in length. Using a longer USB cable may cause errors.
This section contains troubleshooting information for the HP Photosmart A620 series printer.
???Software installation issues
???Printing and hardware issues
???Bluetooth printing problems
Software installation issues
???The printer software did not install successfully
???One or more system components did not meet minimum system requirements
???The computer did not read the HP Photosmart CD
???A "There was an error writing to Dot4" message appeared
???Missing HP Photosmart Software
The printer software did not install successfully
Cause: There may be a conflict with the virus protection application or another software application that is running in the background on the computer that prevented a successful software installation.
Solution:
1.Uninstall the printer software:
a. From the Windows Start menu, go to Programs > HP > HP Photosmart A620 series > Uninstall Devices.
b. Follow the onscreen instructions.
2.Pause or disable any active virus protection applications.
3.Quit all software applications.
4.Reinstall the printer software according to the setup instructions that came with the printer.
Troubleshooting 59
Chapter 7
One or more system components did not meet minimum system requirements
Cause: A component of the computer system does not meet the minimum or recommended system requirements.
Solution:
???A red circle on the System Requirements dialog box indicates which part of the system does not meet the minimum requirements for software installation. Click Details for information about the minimum system requirement for the component. Modify or upgrade the specified component.
???A yellow triangle on the System Requirements dialog box indicates a component that does not meet the recommended system requirements. HP recommends the suggested system requirements for optimal performance. Click Continue to continue installing the software.
If the monitor's display resolution did not meet or was set below the minimum system requirements, increase the computer monitor's display resolution:
1.Click Cancel in the System Requirements dialog box.
2.
3.Click the Settings tab.
4.Set the Screen Resolution to 800 x 600 or higher.
5.Click Apply. A Monitor Settings message appears.
6.Click Yes to accept the changes.
7.Click Retry to continue the installation. If the installation does not continue, click Cancel, then reinstall the printer software.
The computer did not read the HP Photosmart CD
Cause:
???The CD player or system may not be set to Autoplay.
???The CD was not properly inserted or installed.
???The CD or
Solution:
???Make sure the CD does not have any scratches or smudges. If there are smudges on the surface of the CD, clean it with a soft, dry,
???Reinsert the CD, and follow these steps:
1.Navigate to the
2.
3.
4.Follow the onscreen instructions.
60 Troubleshooting
???Try inserting a CD that you know autoplays. If that CD does not autoplay, you may need to service the
???If other CDs work but the HP Photosmart CD does not work, you may have a damaged CD. You can download the printer software from www.hp.com/ support.
A "There was an error writing to Dot4" message appeared
Cause: The printer software may have not installed correctly.
Solution:
???Unplug the USB cable from the computer, then plug it in again.
???Make sure the cable is securely attached to the computer and to the USB port on the back of the printer.
???Restart the computer.
If this does not resolve the issue, follow these steps:
1.Disconnect the USB cable from the printer.
2.Uninstall the printer software:
a. From the Windows Start menu, go to Programs > HP > HP Photosmart A620 series > Uninstall Devices.
b. Follow the onscreen instructions.
3.When the uninstall is complete, restart the computer.
4.Reinstall the printer software. Follow the onscreen installation instructions.
5.Connect the power cord to the back of the printer and turn on the printer.
6.When the computer prompts you, connect the USB cable to the USB port on the back of the printer.
Missing HP Photosmart Software
Cause: The HP Photosmart Software is not installed.
Solution: Install the HP Photosmart Software that came with the HP Photosmart. If it is installed, restart your computer.
To install the HP Photosmart Software
1.Insert the HP Photosmart
2.When prompted, click Install More Software to install the HP Photosmart Software.
3.Follow the onscreen instructions and the setup instructions provided in the box with the HP Photosmart.
Chapter 7
Printing and hardware issues
???The printout did not appear
???The computer and printer lost communication
???The Found New Hardware Wizard did not recognize the printer when it was connected to the computer
???The New Hardware Wizard did not appear when the printer and computer were connected with a USB cable
???The HP Digital Imaging Monitor icon does not appear in the Windows taskbar
???A small red circle appeared on the HP Digital Imaging Monitor icon in the Windows taskbar
???An Unknown device message appeared
???The document or photo did not print using the selected default print settings
???The printer does not print borderless photos when printing without a computer.
???Could not save photos from the computer to the memory card
???The printout is rippled or curled
???A blank page came out of the printer
???The printer ejected the paper when preparing to print.
???Parts of the printed document are missing or are in the wrong place
???The photo printout appears cropped
???The printout does not appear as it should
The printout did not appear
Cause: The paper jammed while printing.
Solution: Try the following steps to clear the paper jam:
???If the paper came part way through the front of the printer, gently pull the paper towards you to remove it.
???If the paper did not come part way through the front of the printer, try removing it from the back of the printer:
???Remove the paper from the input tray, then gently pull down on the input tray until it pops open more fully. Do not attempt to extend it to a full horizontal position. Doing so could damage the printer.
???Gently pull the jammed paper to remove it from the back of the printer.
???Lift the input tray up until it snaps back into
???If you cannot grasp the edge of the jammed paper to remove it, try the following:
???Turn off the printer.
???Turn on the printer. The printer checks for paper in the paper path and will automatically eject the jammed paper.
???Press OK to continue.
62 Troubleshooting

The computer and printer lost communication
Cause:
???The computer might not be connected to the printer.
???The printer might be turned off.
???The printer might not be connected to a power source.
???You might be using a USB hub or docking station that has multiple devices connected to it. Accessing another device can temporarily break the connection to the printer.
Solution:
???Make sure the USB cable is securely attached to both the computer and to the USB port on the back of the printer.
???Make sure that the printer power cord is securely attached and the printer is turned on.
???Wait until the other device is no longer being accessed or connect the printer directly to the computer.
If an HP Photosmart dialog box is displayed, click Retry to try to
The Found New Hardware Wizard did not recognize the printer when it was connected to the computer
Cause: You connected the printer to the computer before installing the software or before the software prompted you to connect.
Solution:
1.Disconnect the USB cable from the printer and close the Found New Hardware Wizard.
2.Insert the HP Photosmart CD that came with the printer. When the Install Wizard appears, click Cancel.
3.From the Start menu, click Run.
4.Click Browse and navigate to the
5.Select the Uninstaller.bat file and click Open.
6.Click OK to launch the Uninstaller.
7.Click Continue to uninstall the files created when you connected the printer to the computer.
8.Click Restart. When the computer restarts, remove the HP Photosmart CD and follow the installation instructions in the setup instructions that came in the box with the printer.

Chapter 7
The New Hardware Wizard did not appear when the printer and computer were connected with a USB cable
Cause: You may not be using the proper version of Windows, or there may be something wrong with the USB cable or the USB cable connection.
Solution: Make sure the computer???s operating system is the proper version of Windows and that the computer is connected to the USB port on the back of the printer with a USB cable.
If that isn't the problem, try the following:
1.Disconnect the USB cable and power cord from the back of the printer.
2.Uninstall the printer software:
a. From the Windows Start menu, go to Programs >HP > HP Photosmart A620 series > Uninstall Devices.
b. Follow the onscreen instructions.
3.When the uninstall is complete, restart the computer.
4.Reinstall the printer software. Follow the onscreen installation instructions.
5.Connect the power cord to the back of the printer and turn on the printer.
6.When the computer prompts you, connect the USB cable to the USB port on the back of the printer.
The HP Digital Imaging Monitor icon does not appear in the Windows taskbar
Cause: You may have selected Close HP Digital Imaging Monitor from the menu when you
Solution: Restart the computer.
The printer would not print when it was connected to the computer with a USB cable through another USB device
Cause:
Solution:
1.Turn off the computer.
2.Connect the printer directly to a USB port on the computer.
3.Make sure the cable is securely attached to the computer and to the USB port on the back of the printer.
4.Disconnect all USB devices (including the hub) from the computer.
5.Turn on the computer.
6.Try printing again. If the problem persists, repeat steps
64 Troubleshooting

A small red circle appeared on the HP Digital Imaging Monitor icon in the Windows taskbar
Cause: There is a connection or communication problem between the printer and the computer.
Solution:
1.Connect the printer directly to a USB port on the computer.
2.Unplug the USB cable from the computer, then plug it in again.
3.Disconnect all USB devices (including the hub) from the computer.
4.If you are using a USB hub to connect the printer and computer, unplug the printer from the USB hub and connect it directly to the computer to verify communication.
5.Try printing the document again. If the problem persists, repeat steps
An Unknown device message appeared
Cause:
???Static electricity may have built up in the cable between the computer and printer.
???The software could not identify the printer because the
Solution:
1.Disconnect the USB cable from the printer.
2.Disconnect the power cord from the printer.
3.Wait about 10 seconds.
4.Plug the power cord back into the printer.
5.Plug the USB cable back into the USB port on the back of the printer.
6.If the problem persists, unplug the power cord and the USB cable and uninstall the printer software:
a. From the Windows Start menu, go to Programs > HP > HP Photosmart A620 series > Uninstall Devices.
b. Follow the onscreen instructions.
7.Restart the computer.
8.Reinstall the printer software and follow the onscreen instructions. Do not connect the USB cable to the printer until prompted.
If ???Unknown device??? continues to appear, check www.hp.com/support for more information, or contact HP support.
The document or photo did not print using the selected default print settings
Cause: The printer default settings may be different than those in the software application. The software application print settings override any that you set on the printer.

Chapter 7
Solution: From the software application's File menu, select Print, then click Properties and choose the desired print settings.
The printer does not print borderless photos when printing without a computer.
Cause: The borderless printing option may be turned off.
Solution: To turn on borderless printing, follow these steps:
1.Touch the Menu icon on the quick touch frame and then press the down scroll arrow to navigate to the Preferences menu.
2.Touch Preferences.
3.If Borderless is set to Off, touch Borderless to turn it on.
4.Touch the  icon on the quick touch frame twice to exit the menus.
Could not save photos from the computer to the memory card
Cause: The memory card may be locked.
Solution: If the memory card has a lock switch, make sure it is in the unlocked position.
Printing is very slow
Cause:
???You may be printing a
???You may have chosen Maximum dpi.
???The system resources may be too low. You may have chat, music download, or virus software running in the background.
???You may be using outdated printer software.
Solution:
???In the Features tab of the Printer Properties dialog box, set the Print Quality to Best or Normal instead of Maximum dpi, and try printing again.
???See ???View estimated ink levels??? on page 54 for information on checking the level of ink in the print cartridge. Replace the cartridge if necessary.
???See ???Download printer software updates??? on page 40 for information on updating the printer software. To check the version of the software, select About from the HP Digital Imaging Monitor  icon in the taskbar.
66 Troubleshooting
To improve the system resources, close all open programs except Windows Explorer and Systray, then try printing again:
To improve system resources
1.Press Ctrl+Alt+Delete.
2.Select all programs except Windows Explorer and Systray. Hold Ctrl or Shift to select multiple programs.
3.Click End Task. If a second message appears, click End Task again.
4.Repeat steps
5.Try printing again.
The printout is rippled or curled
Cause: The project you are printing is using a larger amount of ink than normal.
Solution: Lower the ink saturation using the Printer Properties dialog box.
1.Open the Printer Properties dialog box. For more information, see ???Printer Properties dialog box??? on page 39.
2.Click the Color tab.
3.Click More color options.
4.Reset the ink attributes by moving the Saturation slider closer to Muted.
5.Try printing again.
A blank page came out of the printer
Cause: The print cartridge may be out of ink.
Solution: Print a test page. For more information, see ???Print a test page???
on page 57. Replace the print cartridge if necessary. For more information, see ???Insert or replace the print cartridge??? on page 55.
The printer ejected the paper when preparing to print.
Cause: The printer might be in direct sunlight, which affects the operation of the automatic paper sensor.
Solution: Move the printer out of direct sunlight.
Parts of the printed document are missing or are in the wrong place
Cause:
???You may have selected the incorrect paper orientation.
???You may have selected an incorrect paper size.

Chapter 7
Solution:
???Make sure you have selected the correct orientation on the Features tab of the Printer Properties dialog box.
???Make sure you have selected the correct paper size. For more information, see ???Change the paper size??? on page 45.
Print quality is poor
Cause:
???You may have magnified the photo too much.
???The print cartridge may be running out of ink.
???You may not be using the best paper type for the output.
???You may be printing on the wrong side of the paper.
???You may have selected a
???You may need to clean the print cartridge.
Solution:
???Reduce the magnification.
???Print a test page. For more information, see ???Print a test page??? on page 57. Replace the print cartridge if necessary. For more information, see ???Insert or replace the print cartridge??? on page 55.
???Check the ink levels of the print cartridge from the Estimated Ink Level tab of the Toolbox. For more information, see ???Toolbox??? on page 53
???Make sure you are using a paper type intended for the printer. Use
???Choose paper that is specifically designed for the output rather than plain paper. Use HP Advanced Photo Paper for best results when printing photos.
???Make sure the paper is loaded with the side to be printed facing up.
???Reduce the size of the image and try printing again. For better results in the future, set the digital camera to a higher photo resolution.
???From the Device Services tab of the Toolbox, click Clean the Print Cartridge.
The photo printout appears cropped
Cause: You may have used the software application???s Page Setup dialog box to select the paper size or type.
Solution: Select paper size and type from the Features tab of the Printer Properties dialog box.
68 Troubleshooting

The printout does not appear as it should
Cause: The paper may be marked, scratched, or wrinkled, or the paper may be dark in color or contain metallic fibers.
Solution: If the paper is damaged, dark in color, or contains metallic fibers, the sensor may not detect paper type and size accurately. Make sure the paper is clear, free of scratches or wrinkles, light colored, and does not contain metallic fibers. Select the appropriate paper type on the Features tab of the Printer Properties dialog box.
Bluetooth printing problems
Before contacting HP support, read this section for troubleshooting tips, or go to the online support services at www.hp.com/support. Be sure to also read the documentation that came with your HP Bluetooth wireless printer adapter (if you are using one) and your device with Bluetooth wireless technology.
???My Bluetooth device cannot find the printer.
???No page came out of the printer.
???The photo printed with borders.
???My computer cannot set the device name using the Bluetooth wireless connection.
My Bluetooth device cannot find the printer.
Solution:
???If you are using the optional HP Bluetooth wireless printer adapter, make sure the adapter is plugged into the camera port on the front of the printer. The light on the adapter flashes when the adapter is ready to receive data.
If the printer has integrated Bluetooth wireless technology, check the Bluetooth light on the printer. The light flashes when the printer is ready to receive data.
???Bluetooth Visibility may be set to Not visible. Change this setting to Visible to all as follows:
???Touch the Menu icon on the quick touch frame.
???Touch Bluetooth, and then touch Visibility.
???Touch Visible to all.
???Bluetooth Security level may be set to High. Change this setting to Low as follows:
???Touch the Menu icon on the quick touch frame.
???Touch Bluetooth.
???Touch Security level.
???Touch Low.
Chapter 7
???The passkey (PIN) that the device with Bluetooth wireless technology is using for the printer may be incorrect. Make sure the correct passkey for the printer is entered in the device with Bluetooth wireless technology.
???You may be too far from the printer. Move the device with Bluetooth wireless technology closer to the printer. The maximum recommended distance between the device with Bluetooth wireless technology and the printer is 10 meters
(30 feet).
No page came out of the printer.
Solution: The printer may not recognize the type of file sent by the device with Bluetooth wireless technology. For a list of the file formats that the printer supports, see ???Specifications??? on page 81.
Print quality is poor.
Solution: The photo you printed may be low resolution. For better results, set the digital camera to a higher resolution. Photos taken with
The photo printed with borders.
Solution: The printing program installed on your device with Bluetooth wireless technology may not support borderless printing. Contact the vendor of the device, or go to their support Web site to obtain the latest updates for the printing program.
My computer cannot set the device name using the Bluetooth wireless connection.
Solution: Use a USB cable to connect your computer to the printer in order to set the printer Bluetooth device name using the printer Toolbox. The printer software must already be installed on the computer.
Use the following instructions to get to the printer Toolbox.
Windows users only:
Device messages
The following is a list of error messages that may appear while your printer is connected to a computer:
???Low on ink
70 Troubleshooting

???The print carriage has stalled
???The printer is out of paper
???The paper loaded does not match the paper size selected
???The memory card has been inserted upside down
???The memory card is not inserted properly
???Insert only one memory card at a time
???There was a problem with the memory card
???Communication with the printer has been lost
Low on ink
Cause: The print cartridge is estimated to be low on ink and may need to be replaced soon.
Solution: Have a replacement cartridge on hand to avoid printing interruptions. You do not have to replace the cartridge until print quality deteriorates. If you have installed a refilled or remanufactured print cartridge, or a cartridge that has been used in another printer, the ink level indicator will be inaccurate or unavailable.
The print cartridge is old or damaged
Solution: The print cartridge may be old or damaged.
To troubleshoot a print cartridge
1.Replace remanufactured or refilled cartridges, if installed, with genuine HP products.
2.Remove the cartridge and then reinstall it. For more information, see ???Insert or replace the print cartridge??? on page 55.
3.Make sure the cartridge is compatible with the printer.
4.If this does not work, replace the cartridge.
The print cartridge is missing or incorrect
Solution: The print cartridge is not installed, is installed incorrectly, or is not supported by your printer???s country/region settings. For more information, see ???Insert or replace the print cartridge??? on page 55.
To troubleshoot a print cartridge
1.Replace remanufactured or refilled cartridges, if installed, with genuine HP products.
2.Remove the cartridge and then reinstall it. For more information, see ???Insert or replace the print cartridge??? on page 55.
Chapter 7
3.Make sure the cartridge is compatible with the printer.
4.If this does not work, replace the cartridge.
The print carriage has stalled
Solution: There is an obstruction blocking the path of the print carriage or the cartridge service station. Contact HP support for help, or go to the online support services at www.hp.com/support.
The printer is out of paper
Solution: Check that paper has been loaded in the correct paper tray. See ???Paper basics??? on page 19 and refer to the setup instructions that came with your printer for more information on loading paper.
There is a paper jam
Solution: Try the following steps to clear the paper jam:
???If the paper came part way through the front of the printer, gently pull the paper towards you to remove it.
???If the paper did not come part way through the front of the printer, try removing it from the back of the printer:
???Remove the paper from the input tray, then gently pull down on the input tray until it pops open more fully. Do not attempt to extend it to a full horizontal position. Doing so could damage the printer.
???Gently pull the jammed paper to remove it from the back of the printer.
???Lift the input tray up until it snaps back into
???If you cannot grasp the edge of the jammed paper to remove it, try the following:
???Turn off the printer.
???Turn on the printer. The printer checks for paper in the paper path and will automatically eject the jammed paper.
???Press OK to continue.
The paper loaded does not match the paper size selected
Solution: The paper loaded does not match the paper size selected. Try the following:
1.Change the type of paper selected for the print job.
2.If your printer has multiple paper trays, make sure the correct tray is selected for the print job.
3.Make sure the correct paper is loaded in the paper tray.
72 Troubleshooting
The memory card has been inserted upside down
Solution: The memory card has been inserted upside down. Remove the memory card and reinsert it with the gold contacts facing down.
The memory card is not inserted properly
Solution: The printer can detect the memory card but cannot read it. Push the memory card gently into the memory card slot until it stops.
Insert only one memory card at a time
Solution: The printer has two or more different types of memory cards inserted simultaneously. Alternatively, a memory card may be inserted while a digital camera is connected to the camera port. Remove memory cards or disconnect the camera until only one card is in the printer or only the camera is connected.
There was a problem with the memory card
Solution: There was a problem with the memory card. Try to copy your pictures directly to a computer and then reformat the card using the camera.
Communication with the printer has been lost
Solution: Check that your printer is on and that the cover is closed, and then try the following:
1.Make sure the printer cable is firmly connected to both the printer and computer.
2.Check the printer for a paper jam.
3.Try turning the printer off and then on again.
4.Make sure the printer cable you are using is designed for
Chapter 7
74 Troubleshooting

8 Shop for ink supplies
To find the print cartridge reorder number, see the printed documentation that came with the HP Photosmart. You can also use the software that came with the HP Photosmart to find out the reorder number for the print cartridge. You can order print cartridges online from the HP Web site. Additionally, you can contact a local HP reseller to find out the correct print cartridge reorder number for your device and purchase print cartridges.
To order HP papers and other supplies, go to www.hp.com/buy/supplies. If prompted, choose your country/region, follow the prompts to select your product, and then click one of the shopping links on the page.
 NOTE: At this time, some portions of the HP Web site are available in English only.
NOTE: Ordering print cartridges online is not supported in all countries/regions. If it is not supported in your country/region, contact a local HP reseller for information about purchasing print cartridges.
To order print cartridges from your desktop
???Click the Shop for HP Supplies icon on your desktop to connect to HP SureSupply. You will see a list of original HP printing supplies that are compatible with your device, as well as options to conveniently purchase the supplies you need (options vary by country/region).
If you deleted this icon from your desktop, click the Start menu, point to the HP folder, then click Shop for Supplies.
For more information, go to www.hp.com/buy/supplies.
To order print cartridges through the HP Photosmart Software
1.In the HP Solution Center, click Settings, point to Print Settings, and then click
Printer Toolbox.
 NOTE: You can also open the Printer Toolbox from the Print Properties dialog box. In the Print Properties dialog box, click the Services tab, and then click
Service this device.
2.Click the Estimated Ink Levels tab.
3.Click Print Cartridge Ordering Information. The print cartridge reorder numbers appear.
4.Click Order Online.
HP sends detailed printer information, including model number, serial number, and ink supply levels, to an authorized online reseller. The supplies you need are preselected; you can change quantities, add or remove items, and then check out.
Chapter 8
76 Shop for ink supplies

9 HP support and warranty
This section contains the following topics:
???Check the HP support Web site first
???HP Warranty
???Additional warranty options
Check the HP support Web site first
Check the documentation that came with the printer. If you do not find the information you need, check out the HP support Web site.
To check for online support
1.Visit the HP online support Web site at www.hp.com/support. HP online support is available to all HP customers. It is the fastest source for
???Fast access to qualified online support specialists
???Software and driver updates for the HP Photosmart
???Valuable HP Photosmart and troubleshooting information for common problems
???Proactive device updates, support alerts, and HP newsgrams that are available when you register the HP Photosmart
2.For Europe only: Contact your local point of purchase. If the HP Photosmart has a hardware failure, you will be asked to bring it back to your local point of purchase. (Service is provided at no charge during the device limited warranty period. After the warranty period, you will be quoted a service charge.)
3.If you do not find the information you need online, call HP support. Support options and availability vary by device, country/region, language, and phone support period.
HP support by phone
For a list of support phone numbers, see the phone number list in the printed documentation.
This section contains information on the following:
???After the phone support period
Phone support period
One year of phone support is available in North America, Asia Pacific, and Latin America (including Mexico). To determine the duration of phone support in Europe, the Middle East, and Africa, go to www.hp.com/support. Standard phone company charges apply.
Chapter 9
Placing a call
Call HP support while you are in front of the computer and the HP Photosmart. Be prepared to provide the following information:
???Device model number (located on the label on the front of the device)
???Device serial number (located on the back or bottom of the device)
???Messages that appear when the situation occurs
???Answers to these questions:
???Has this situation happened before?
???Can you
???Did you add any new hardware or software to your computer at about the time that this situation began?
???Did anything else occur prior to this situation (such as a thunderstorm, device was moved, etc.)?
After the phone support period
After the phone support period, help is available from HP at an additional cost. Help may also be available at the HP online support Web site: www.hp.com/support. Contact your HP dealer or call the support phone number for your country/region to learn more about support options.
78 HP support and warranty

HP Warranty
Additional warranty options
Extended service plans are available for the printer at additional costs. Go to www.hp.com/support, select your country/region and language, then explore the services and warranty area for information about the extended service plans.
Chapter 9
80 HP support and warranty

10 Specifications
This section lists the minimum system requirements for installing the HP Photosmart software, and provides selected printer specifications.
System requirements
Operating System
Windows XP Home, XP Professional, x64 Edition, or Vista
Processor
???Windows XP Home & XP Professional: Any Intel?? Pentium?? II, Celeron??, or compatible processor, 233 MHz (Pentium III, 300 MHz or higher recommended)
???x64 Edition: Pentium 4 with Intel EM64T support
???Vista: 800 MHz
RAM
???Windows XP Home & XP Professional: 128 MB (256 MB or higher recommended)
???x64 Edition: 256 MB (512 MB or higher recommended)
???Vista: 512 MB (1 GB or higher recommended)
Free Disk Space
400 MB
Video Display
SVGA 800 x 600,
Optical Drive
Browser
Microsoft?? Internet Explorer?? 5.01 Service Pack 2 or higher
Connectivity
???Available USB port and USB cable
???Internet access recommended
Printer specifications
Connectivity
USB 2.0
HP recommends that the USB cable be less than 3 meters (10 feet) in length
PictBridge: Using the camera port
Image File Formats
JPEG Baseline
Video File Formats
Motion JPEG AVI
Motion JPEG Quicktime
Specifications 81
Chapter 10
(continued)
82 Specifications

11Regulatory and environmental information
The following regulatory and environmental information applies to the HP Photosmart A620 series printers.
???Environmental product stewardship program
Regulatory notices
The following regulatory notices apply to the HP Photosmart A620 series printers.
???VCCI (Class B) compliance statement for users in Japan

Chapter 11
FCC statement
LED indicator statement
VCCI (Class B) compliance statement for users in Japan
84 Regulatory and environmental information

Notice to users in Japan about power cord
Notice to users in Korea
European Union Regulatory Notice
Environmental product stewardship program
Chapter 11
For more information, visit HP???s Commitment to the Environment Web site at:
www.hp.com/hpinfo/globalcitizenship/environment/index.html
This section contains the following topics:
???Paper use
???Plastics
???Material safety data sheets
???HP inkjet supplies recycling program
???Disposal of Waste Equipment by Users in Private Households in the European Union
Paper use
This product is suited for the use of recycled paper according to DIN 19309 and EN 12281:2002.
Plastics
Plastic parts over 25 grams are marked according to international standards that enhance the ability to identify plastics for recycling purposes at the end of product life.
Material safety data sheets
Material safety data sheets (MSDS) can be obtained from the HP Web site at:
Recycling program
HP offers an increasing number of product return and recycling programs in many countries/regions, and partners with some of the largest electronic recycling centers throughout the world. HP conserves resources by reselling some of its most popular products. For more information regarding recycling of HP products, please visit:
For more information regarding recycling of HP products, please visit:
www.hp.com/hpinfo/globalcitizenship/environment/recycle/
HP inkjet supplies recycling program
HP is committed to protecting the environment. The HP Inkjet Supplies Recycling Program is available in many countries/regions, and lets you recycle used print cartridges and ink cartridges free of charge. For more information, go to the following Web site:
www.hp.com/hpinfo/globalcitizenship/environment/recycle/
Energy consumption
This product is designed to reduce power consumption and save natural resources without compromising product performance. It has been designed to reduce total energy consumption both during operation and when the device is not active. Specific information on power consumption may be found in the product specifications.
86 Regulatory and environmental information
Disposal of Waste Equipment by Users in Private Households in the European Union