HP NetServer
LH 3/LH 3r
to LH 4/LH 4r
Upgrade Guide
HP Part Number
Printed November 1998
Revision A, December 2000
HP NetServer
LH 3/LH 3r
to LH 4/LH 4r
Upgrade Guide
HP Part Number
Printed November 1998
Revision A, December 2000

Notice
The information contained in this document is subject to change without notice.
This document contains proprietary information that is protected by copyright. All rights are reserved. No part of this document may be photocopied, reproduced, or translated to another language without the prior written consent of Hewlett- Packard Company.
PentiumTM is a U.S. trademark of Intel Corporation.
Network Server Division
Technical Communications / MS
10955 Tantau Avenue
Cupertino, CA 95104 USA
?? Copyright 1998,
Audience Assumptions
This guide is for the person who installs, administers, and troubleshoots LAN servers.
ii


iv

Preface
Purpose of This Guide
This guide describes the steps you need to perform to convert the HP NetServer LH 3 to the HP NetServer LH 4. This guide includes the following topics:
???An introduction to the LH 3 and LH 4
???An explanation of changing the LH 3 configuration to the LH 4 configuration
Related Documentation
The following documents describe the HP NetServer LH 3:
???HP NetServer LH 3/LH 3r User Guide
???HP NetServer LH 3/LH 3r Installation Road Map
???HP NetServer Power Supply Upgrade Kit Guide
???HP NetServer LH 3/LH 3r Technical Reference Card
???HP NetServer Online Documentation
Once the LH 3 has been converted to the LH 4 configuration, you should refer to the documentation listed below:
???The HP NetServer LH 4/LH 4r User Guide
???The HP NetServer LH 4/LH 4r Installation Road Map
???HP NetServer LH 4/LH 4r Technical Reference Card
???HP NetServer Online Documentation
???All documentation that comes with your rack, such as the Rack Installation Road Map.
???The Rack Cabling Reference for the HP NetServer LH 4.
???The user guide for your mass storage units: for example, the HP Rack Storage/8 System Installation Guide.
1

Preface
Tools You Need
To install this accessory kit, you need the following tools:
???An
Power Supplies Needed
This table shows the power supply configurations for the LH 3 and LH 4 standard and redundant configurations:
LH 3/LH 3r
LH 4/LH 4r
Standard Configuration
1 cage, 2 bricks
2 cages, 3 bricks: 2 in first cage, and 1 in second
Redundant Configuration
2 cages, 3 bricks: 2 in first cage, and 1 in second
2 cages, 4 bricks: 2 in each cage
2

Preface
Precautions
Follow the procedures listed below to ensure safe handling of components and to prevent harm to yourself and the NetServer.
WARNING The HP NetServer LH 3r weighs up to 160 pounds (73 kg.) when fully loaded. If you are removing the LH 3r from the rack, remove the power supplies and hard disk drives before doing so. Follow all local regulations when lifting the NetServer.
To prevent the rack enclosure from tipping over,
??? Extend the
??? Verify that the leveling feet on the rack are lowered
??? Do not extend more than one piece of equipment at once
Before removing the cover, always disconnect the power cord and unplug telephone cables. Disconnect the power cord to avoid exposure to high energy levels that may cause burns when parts are
Note that the power switch does not turn off the standby power. Disconnect the power cord to turn off standby power. If the backlight on the LCD display is on, standby power is still on.
CAUTION Never operate this NetServer without first installing all covers and the front bezel. Operating the system without all covers in place reduces critical cooling airflow over some components, such as hard disk drives and processor modules. Operating the system without all covers in place may result in failure of these components.
Wear a wrist strap and use a
3

1 Introduction
Installation Overview
This guide describes the procedures for installing new hardware and software in your LH 4/LH 4r NetServer. The hardware update takes 10 or 15 minutes. The firmware update can take up to an hour, not including time taken by backing up and restoring your hard disk drives, or by reinstalling the NOS or applications. During the update procedure, you will see progress screens that indicate the action underway.
During the software upgrade, you will:
???update system information
???reconfigure options like interrupt management and NetRAID details
???reinstall the NOS if necessary
5

CAUTION After the system information update, your NetServer will revert to the default NetRAID settings. You must restore your NetRAID configuration from your worksheets or from notes before you can access the NetRAID arrays. If you do not save the NetRAID configuration details before performing the system information update, your data may be unrecoverable.
Briefly, the conversion takes several steps:
1.Back up the contents of your hard disks - both the system disk(s) and any RAID arrays.
2.Save the current system software configuration with the LH 3/LH 3r
HP NetServer Navigator
3.Gather the documentation, tools, hardware, and software needed to perform the conversion.
4.Perform the first part of the software upgrade, backing up data.
5.If you are upgrading an LH 3r, extend it from the rack. Be sure to extend the
6.Remove cover 2, the cover protecting the top of the CPU baseboard, and cover 3, the cover shielding the components on the CPU baseboard side of the LH 3.
7.Remove the LH 3 CPU baseboard.
8.Install the power supply upgrade kit, or additional power supplies, if necessary.
9.Remove the CPU card guide and air baffle used with the old CPU baseboard.
10.Install memory and processors in the LH 4 CPU baseboard.
11.Install the chassis reinforcement bars.
12.Install the LH 4 CPU baseboard in the chassis.
13.Replace the covers.
14.Perform the second part of the software update from the HP NetServer Navigator
6
15.Reconfigure the system with the Setup and NetRAID utilities, using the configuration details you saved in step 2.
16.Verify that the system is restored to its operating configuration.
Verifying Contents
The contents of the shipping box include:
???A new LH 4 CPU baseboard, containing two processor terminator cards, four Voltage Regulator Modules (VRMs), and two memory boards
???Two Intel Pentium II??? Xeon??? processors
???Four 64 MB EDO RAM DIMMs (one set of DIMMs)
???LH 4 nameplates for the pedestal and rack configurations
???Two chassis reinforcement bars
???A Technical Reference Card (which fits into an envelope inside the chassis)
???An HP NetServer Navigator
???A Torx???
???This manual
Recycling the LH 3/LH 3r CPU Baseboard
Dispose of the LH 3/LH 3r CPU baseboard by shipping it to
7

Saving the Current Operating Environment
Before you start the upgrade, follow these instructions to preserve the current operating environment.
CAUTION You must back up all disks on your system - the disk containing the NOS and any RAID arrays. Failure to perform this step leaves you vulnerable to potential loss of data.
1.Back up all hard disks - both the hard disk containing the NOS, and any RAID arrays, using the backup utilities on your NOS. You will perform a restore later to replace this data.
2.You must write down all system configuration details from the Setup, Remote Management, and NetRAID utilities, as you will have to reconfigure them after the system software update. For a discussion of NetRAID implementation and usage details, refer to the HP NetRAID Installation and Configuration Guide and HP NetRAID User Guide manuals on the HP NetServer Online Documentation
For example, note the following information:
A.Adapter:
???PowerFail Safeguard (Default is Enabled)
???Disk Spin Up Timings (Default is Automatic Spinup)
???Cache Flush Timings (Default: every 4 seconds)
???Rebuild Rate (Default: 50%)
???Auto Rebuild (Default: Enabled)
B.Logical Drive:
???RAID level
???Size
???Stripe Size (Default: 64 KB)
???Write Policy (Default: Write Through)
???Read Policy (Default: Adaptive)
8

???Cache Policy (Default: Cached I/O)
???Virtual Sizing (Default: Disabled) C. SCSI Channel:
???Transfer Rate (Default:
3.If you are using the Integrated Remote Assistant features, run the Integrated Remote Assistant. Record all configuration settings.
4.Ensure that the following features in the Integrated Remote Management utility are not enabled:
??? Power off on critical temp
??? Power off on critical voltage
5.From the "More NetServer Utilities" option in the Main Menu, view the
Event Log Report Utility. If there are problems with the system, troubleshoot these before continuing with the upgrade. Refer to the HP NetServer LH 3/LH 3r User Guide and the HP NetServer Online Documentation
Preparing for Hardware Upgrade
Gather the tools and the setup information you need before beginning the conversion. Locate the HP NetServer where there will be sufficient space to remove the covers. Reserve bench space at a comforTable level so you can add processors, VRMs, and memory easily.
Follow these steps:
1.Shut down the network operating system.
2.Turn off the NetServer and display.
3.Disconnect all telephone cables and power cords.
4.Disconnect all cables attached to the system board connectors at the rear of the chassis.
9

Upgrading the Rack (LH 3r) Configuration
You can upgrade the LH 3r rack configuration without removing it from the rack, but you may find it easier to reinstall the CPU baseboard and install the chassis reinforcement bars when the LH 3r is removed from the rack and sitting on a workbench. When in the rack, the chassis reinforcement bars mount on the bottom of the LH 3r. If you do decide to remove it from the rack to perform the upgrade, refer to the documentation below.
CAUTION Do not pull the LH 3r forward in the rack without extending the
For HP Racks
Refer to the HP NetServer LH 3/LH 3r User Guide. For cabling instructions, refer to the documentation that came with the rack, and to the Rack Cabling Reference for the HP NetServer LH 4.
For
Refer to the HP NetServer LH 3r Installation Guide for Compaq?? 4000/7000 Racks. For cabling instructions, refer to the documentation that came with the rack, and to the Rack Cabling Reference for the HP NetServer LH 4.
10

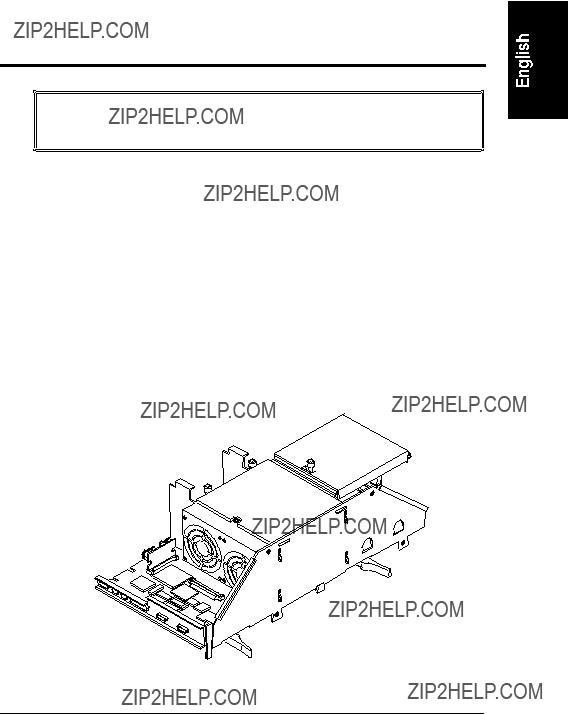
2Removing Covers and the CPU Baseboard
CAUTION Wear a wrist strap and use a
Before you can install the new LH 4 CPU baseboard, there are several components to remove from the LH 3:
???Remove the bezel and covers 2 and 3 to get access to the HP NetServer???s interior
???Remove the LH 3 CPU baseboard
???Remove the old CPU baseboard guide and the air baffle from the LH 3 chassis.
Removing the Bezel and Covers
The HP NetServer has three
???Cover 1 covers the side where the I/O board is located.
???Cover 2 covers the area above the CPU baseboard.
???Cover 3 covers the side where the CPU baseboard is located.
11

Cover 2
 Cover 3
Cover 1
LH 3
Cover 1
 Cover 2
Cover 3
LH 3r
Figure
Refer to the HP NetServer LH 3/LH 3r User Guide for details of removing covers 2 and 3 and the bezel.
12

Removing the LH 3 CPU Baseboard
1.Remove cover 2.
2.Open the CPU baseboard retaining latches until they point away from the chassis, and the CPU baseboard has come out of its socket.
3.Slide the board out of the chassis (see Figure
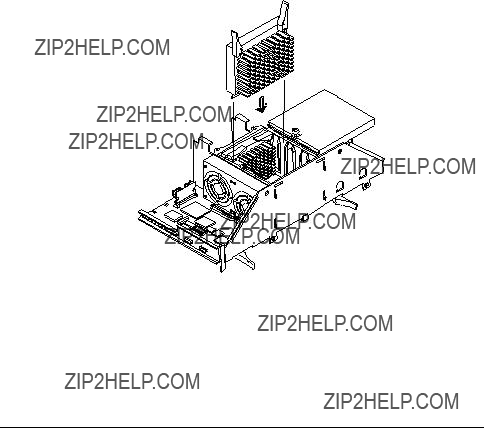
Removing the CPU Baseboard Guide and Air Baffle
The LH 3/LH 3r CPU baseboard is smaller than the LH 4 board, and it uses a different guide to hold its position. The LH 3/LH 3r also uses an air baffle plate that would interfere with the LH 4 CPU baseboard, and you must remove it to seat the new CPU baseboard.
1.Remove cover 3.
2.Locate the CPU baseboard guide and air baffle, shown in Figure
3.Remove the CPU baseboard guide and air baffle from the chassis.
13

Remove CPU baseboard guide
Remove air baffle
Remove CPU baseboard guide
LH 3
LH 3r
Remove air baffle
Figure
14
3 Installing LH 4 Components
WARNING Do not use memory or VRMs from the LH 3/LH 3r CPU baseboard with the LH 4/LH 4r CPU baseboard. This may result in damage to components and put data integrity at risk.
Upgrading the HP NetServer LH 3/LH 3r to an HP NetServer LH 4/LH 4r requires several steps, but there are few differences between the two NetServers.
Remove any packing materials and position the following components where you can reach them from your work position.
CPU Baseboard Components
The LH 3/LH 3r has a CPU baseboard that accepts two Intel Pentium II??? Xeon??? processors, each with an associated Pentium II Voltage Regulator Module (VRM). The LH 4/LH 4r has a new CPU baseboard that accepts up to four Intel Pentium II Xeon processors and six new VRMs designed especially for the Intel Pentium II Xeon processors.
Figure
Figure
15

Figure
Processor 4
Processor 3
Processor 2
Processor 1
Figure
Processor and VRM Configurations
The HP NetServer???s CPU baseboard has four processor slots, labeled Processor 1 through Processor 4. It also has six voltage regulator module slots, labeled VRM 1/2, VRM 3/4, VRM 1, VRM 2, VRM 3, and VRM 4. VRM 1/2 and VRM 3/4 provide regulated power for the cache memory on the processors, and the other four VRMs supply power to the processors themselves. Figure
Add processors in ascending slot order. You must also add additional voltage regulator modules (VRMs) as you add processors, again in ascending slot order. There will always be VRMs in slots VRM 1/2 , VRM 3/4, VRM 1, and VRM 2, so a VRM is added to each corresponding slot as you install a new processor.
Refer to Table
16
Chapter 3Installing LH 4 Components
Note: x = VRM installed
Table
Table
17
Installing Processors
1.Position the LH 4 CPU baseboard, as shown in Figure
2.Unfasten the two captive screws securing the processor cage cover, then lift it off and put it aside. You will see two empty slots for processors 1 and 2, and two terminators installed in slots processor 3 and processor 4.
3.Open the levers at the top of the processor, as shown in Figure
4.Insert a processor in the processor 1 slot until it is completely in.
5.Push the levers inward to close them. This also locks the processor into place.
6.Open the levers on the second processor, insert it into the slot immediately above the first processor, as shown in Figure
Figure
18
Installing Memory
CAUTION Memory comes in packages of four DIMMs. Do not install all four DIMMs into one board. Proper interleaving requires memory in each board, bank by bank, in pairs.
1.Unfasten the captive screw on the right side of the memory cage cover, as shown in Figure
Figure
2.Remove the two memory boards from the slots in the memory cage. Lift the ejection levers away from the board to back the board out of its slot, then lift the board free from the cage, as shown in Figure
19

Figure
3.Position the memory board on a
4.Remove a DIMM from its container, handling the module by its ends; do not touch the pins. Lay it on an
5.Locate the slot in which you will install the DIMM (shown in Figure
Bank 1
Bank 2
Bank 3
Bank 4
20
J1
J2
J3
J4
J5
J6
J7
J8
Figure

6. Align the notches on the DIMM with the keys in the slot (see Figure
 Clips
Clips
LEDs
Figure
7.Hold the DIMM at a
8.Insert the DIMM carefully into the slot. The retaining clips will close automatically if it is inserted properly.
CAUTION Do not rock the DIMM into place, but apply firm and even pressure directly downward. If the retaining clips do not close, remove the module and repeat steps 5 through 8.
9.Repeat steps 4 through 8 to install all DIMMs - two in one board, and two in the other board.
CAUTION Do not install all four DIMMs into one board. Proper interleaving requires memory in each board, bank by bank.
21

10.Replace the boards in the memory cage. Lower the ejection levers to lock the board into place in the cage.
11.Close the cover of the memory cage.
Additional Processor, VRM, and Memory Configurations
The LH 4/LH 4r CPU baseboard is shipped with two processors, two terminators, and four VRMs. If you are installing additional processors at this time, refer to the processor upgrade kit documentation and install them, and install the new VRMs as well.
The LH 4/LH 4r CPU baseboard contains two 64 MB DIMM modules. If you are installing additional memory at this time, refer to the memory upgrade kit documentation and install it with the other DIMMs.
Installing the Chassis Reinforcement Bars
The chassis reinforcement bars are two metal bars that help hold the CPU baseboard in place in the LH 4/LH 4r chassis. Since the CPU baseboard fits into to small slots on the lower chassis reinforcement bar, you need to install these bars before installing the CPU baseboard.
Insert the chassis reinforcement bars next to the CPU baseboard, as shown in Figure
22
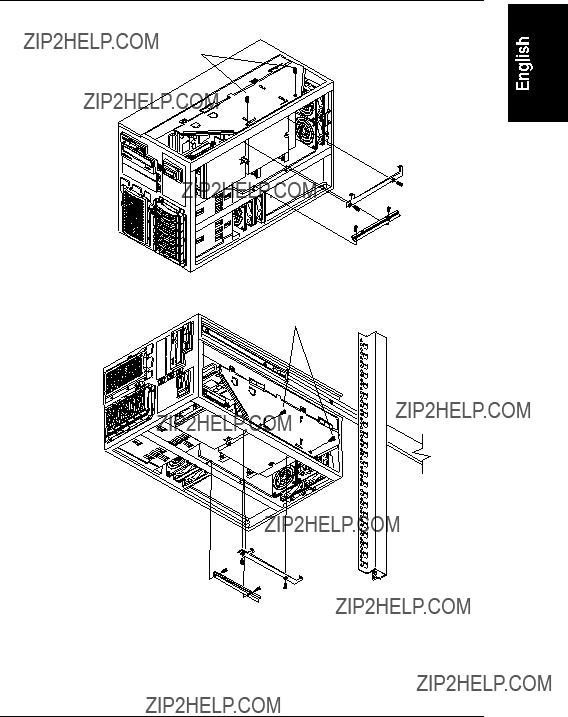
Chapter 3Installing LH 4 Components
Screws secure
CPU baseboard LH 4r to reinforcing
bars
Figure
23

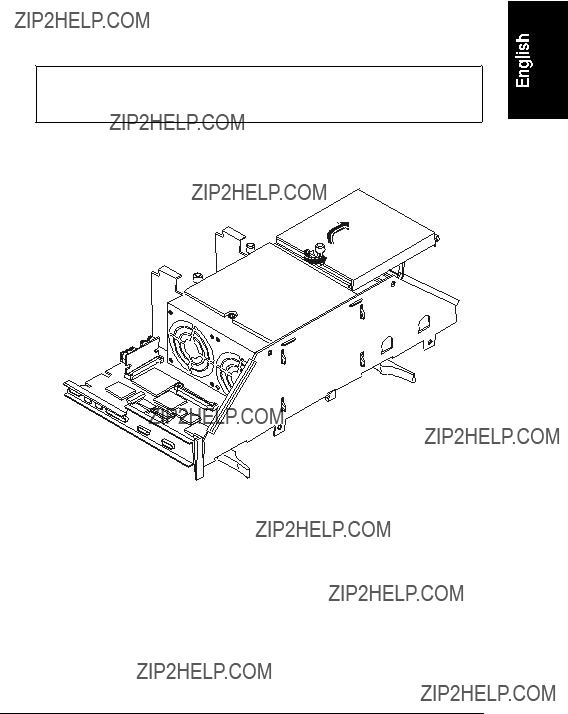
Installing the CPU Baseboard in the Chassis
The LH 4 CPU baseboard fits into the chassis snugly. Observe these precautions:
???Check to make sure that you have removed the card guide and air baffle for the LH 3 CPU baseboard. If it is still installed, it will prevent the LH 4 board from seating properly. See "Removing the CPU Baseboard Guide and Air Baffle" earlier in this manual, and refer to Figure
???Check to see that the covers for the processor cage and memory cage are screwed on, and that the VRMs are seated properly.
???The edge of the CPU baseboard that faces the rear of the LH 4 has a thin metal liner that protects against radio frequency interference. This material may snag on the chassis edge and crumple. If you have problems seating the board, check to see if the metal liner is catching on the chassis.
1.Use two people to lift the CPU baseboard, one holding each end. One person can do it, but it???s easier with a person on each end.
2.Raise the ejection levers into a vertical position, as shown in Figure
CAUTION The side of the CPU baseboard facing the front of the LH 4 fits into the long black guide slot mounted to the chassis. The side of the CPU baseboard facing the rear of the LH 4 fits into two slots that frame the connectors on the rear edge of the CPU baseboard. Note the metal liner around the edge of the CPU baseboard and be careful not to snag it on the chassis. See Figure
24

 Screws Ejection
levers
LH 4
Ejection levers
Screws
LH 4r
Figure
25

3.As the CPU baseboard lowers into place, raise the levers into a vertical position. When the CPU baseboard seats in its slot, push the levers flat to lock the CPU baseboard into position.
4.Attach the two Torx thumbscrews to secure the CPU baseboard to the chassis, as shown in Figure
5.Insert the new technical reference card in the sleeve on the inside of the NetServer cover, then replace the covers on the NetServer.
Installing a Redundant Power Supply
The LH 3/LH 3r runs on two power supply modules, and can accept a third to assure power continuity if a single power supply fails. The LH 4/LH 4r needs three power supply modules and can accept a fourth to assure power continuity if a single power supply fails.
If your LH 3/LH 3r does not already have a second power supply cage and redundant power supply, install the Power Supply Upgrade Kit. If you require power supply redundancy, order a fourth power supply module. To install the power supply hardware, refer to the instructions supplied with the kits.
Installing a Redundant Fan
The Power Supply Upgrade Kit contains an extra fan to provide extra cooling and redundancy for power supply cooling. If you install the power supply upgrade, install the redundant fan according to the installation directions.
Installing the LH 4r in the Rack
If you removed the LH 3r to upgrade it, refer to the documentation listed below to install the LH 4r in the rack.
For HP Racks
Refer to the HP NetServer LH 3/LH 3r User Guide. For cabling instructions, refer to the documentation that came with the rack, and to the Rack Cabling Reference for the HP NetServer LH 3.
For
Refer to the HP NetServer LH 3
26
Finishing the Hardware Upgrade
As the last step in the LH 3/LH 3r to LH 4/LH 4r upgrade, attach the new nameplate to the top of the front surface of the front bezel, as follows:
1.Orient the nameplate so that it can be read correctly when attached.
2.Secure the nameplate to the front bezel, as follows:
???For the LH 4, pry off the LH 3 nameplate in the upper left corner, then snap the LH 4 nameplate into place.
???For LH 4r with the HP rack front bezel, insert the tab at one end of the nameplate into the slot in the bezel, bend the nameplate slightly, and simultaneously insert the snaps on the back of the nameplate and the tab at the other end of the nameplate.
???For the LH 4r with the Compaq rack front bezel, insert the snap at one end of the nameplate, and then insert the other snaps successively.
3.Attach the label reading "intel inside pentium II xeon" to a convenient location near a corner of the front bezel.
27

4 Updating Firmware
The HP NetServer Navigator
Update System Firmware
1.Run the HP NetServer Navigator
A.If "User Preferences" appears, select the appropriate language. Click to select <BACK when you are through.
B.If the BIOS Mismatch screen appears, the system has recognized that you installed a new CPU baseboard, and has detected a mismatch between the firmware on the LH 4/LH 4r CPU baseboard and the firmware in the LH 3/LH 3r. Click to select CONTINUE.
2.From the Navigator Main Menu, click to select "NetServer Utilities".
3.Click to select "More NetServer Utilities".
4.Click to select "BIOS Update Utilities". You will see a screen informing you that selecting this option updates the BIOS. Click to select EXECUTE.
5.You will see a screen giving you a last chance to continue the update or return to the Utilities Menu. Press 1 to continue the update.
6.You will see the BIOS Update Utility screen change as various parts of the firmware are updated. This process takes 10 to 15 minutes.
7.When the process is complete, remove the HP NetServer Navigator
8.Generate the "Integrated HP NetRAID Firmware Update
A.From the Navigator Main Menu, move to NetServer Utilities and click to select it.
B.Move to Diskette Library and click to select it. Click to switch to the "Long List" format.
C.Move to the "Integrated HP NetRAID Firmware Update
29

D.Insert a blank flexible diskette in the NetServer and click to select EXECUTE. The NetServer copies the update file to the diskette. Label the diskette "NetRAID Firmware Update".
E.Click <BACK to return to the NetServer Utilities screen.
9.Update the system name (on the LCD) and the Embedded RAID Firmware:
A.Remove the NetRAID Firmware Update diskette from the flexible diskette drive and remove the HP NetServer Navigator
B.Insert the LH4UPD diskette into the flexible diskette drive and press RESET to reboot the NetServer. You will see a DOS screen.
C.From DOS, type LH4UPD.BAT <CR>. This runs the batch file that updates the NetServer name on the LCD screen in the Control Panel.
D.When the name update is complete, remove the LH4UPD diskette and insert the NetRAID Firmware Update diskette.
E.Type MFLASH.EXE<CR>. This runs the NetRAID firmware update.
F.From the MFLASH.EXE screen, type Y to continue the upgrade.
G.You will get a screen listing the new and old firmware revision numbers. Type Y when asked if you want to continue.
H.When the firmware upgrade is finished, remove the NetRAID Firmware Update diskette and power cycle from the front panel. Do not press RESET, as a power cycle is necessary to initialize the firmware update.
30

CAUTION This Embedded NetRAID update only updates the firmware on the CPU baseboard. When you reboot the NOS after this update, you will get an error message caused by conflicts between the NetRAID information stored elsewhere in the system and the new information saved in the CPU baseboard firmware. Use the HP NetRAID Express Tools utility to reconfigure your system, based on the configuration details you documented before starting the upgrade.
10.Enter the Setup utility by pressing F2 at the screen prompt. Run "Clear Config" to clear the SCSI Controller, Embedded RAID, and system configuration.
11.Reconfigure Embedded RAID and Setup according to the configuration you saved earlier. You should not need to reinitialize the hard disks.
12.Reboot the system and:
A.Reconfigure Integrated Remote Assistant
B.Clear the System Event Log
Update the Operating System
WARNING Navigator will prompt the user, "Would you like to use HP???s automated mode of NOS Installation?" The default is "Yes." If you choose "Yes," whatever was on the C: drive will be lost.
31

1.From directories on the HP NetServer Navigator
???Top Tools Application
???Top Tools Agents
???PC Anywhere
2.Follow these steps to create a driver diskette to update your HP drivers:
A. From the Navigator Main Menu, move to NetServer Utilities and click to select it.
B. Move to Diskette Library and click to select it. Click to switch to the "Long List" format.
C. Move to the appropriate NOS Drivers file (such as Windows NT 3.51, 4.0, SCO UNIX 5.0, or OS/2 Warp), and click to select it.
D. Insert a blank flexible diskette in the NetServer and click to select Execute. The NetServer copies the drivers file to the diskette.
E. Click <BACK to return to the NetServer Utilities screen.
3.Use the Driver Diskette and update the latest drivers.
4.Reinstall all your hard disks.
5.The latest version of system firmware requires a larger (32 MB) utility partition on the NOS disk. The HP NetServer Navigator
6.Restore the information on your disk drives, including any NetRAID arrays.
7.If you need to reinstall any applications, do that now.
8.Save the system information reported from Navigator, and compare it with the information you saved before beginning the upgrade.
9.Run the Diagnostic Test Tool to test your system.
32

5 Warranty and Support
The hardware warranty below applies to components purchased as accessories. If your component was factory installed as part of an HP NetServer model, refer to the warranty statement provided with your system documentation.
Hardware Warranty
This HP NetServer accessory is covered by a limited hardware warranty for a period of one year from receipt by the original
Once installed in an HP NetServer, this accessory may carry the longer of either a
This accessory may be serviced through expedited part shipment. In this event, HP will prepay shipping charges, duty, and taxes; provide telephone assistance on replacement of the component; and pay shipping charges, duty, and taxes for any part that HP asks to be returned.
The customer may be required to run
Refer to the warranty statement provided with your original HP NetServer system documentation for the warranty limitations, customer responsibilities, and other terms and conditions.
HP Repair and Telephone Support
Refer to the Service and Support section of your HP NetServer system documentation for instructions on how to obtain HP repair and telephone support.
33

A Regulatory Information
For regulatory information pertaining to this HP accessory, please refer to the regulatory section of the user guide for the NetServer in which this accessory is installed.
35
Index
A
Accessory kit contents, 7 Air baffle, 13
B
Backing up disks, 8
Baseboard guide, 13
C
CAUTION
Chassis reinforcement bars installing, 22
Contents of upgrade kit, 7 Cover panels, 11
Covers, 11
Covers, removing, 11 CPU baseboard
installing, 24
CPU baseboard layout, 16 CPU slots, 16
CPUs and VRMs configurations, 16, 22
D
DIMMs
board location, 20
Documentation
related, 1
G
Getting help, 33
H
Hardware repair
warranty information for, 33 Help, 33
I
Installation overview, 5
Installing
memory, 15
processors, 15
Integrated Remote Management
disable settings before upgrade, 9
Introduction, 5
K
Kit contents, 7
L
Leveling feet, 3 LH 3 components
do not use, 15
M
Memory installing, 19
interleaving order, 19 Memory card cage
opening, 19 Memory cards
installing DIMMs, 21 removing, 19
Multiprocessor configurations, 17
O
Operating system update, 31
P
Power supplies configurations, 2 redundant, 2, 26
Power switch standby power, 3
R
Rack cabling instructions, 10 Rack installation
see HP NetServer LH 3/LH 4 User Guide, 10, 26
37

Index
Redundant fan, 26
Regulatory information, 35
Related documentation, 1
S
Saving the environment, 8 Shock hazard, 3
Software upgrade, 29
HP NetServer Navigator
T
Tools needed, 2
U
Upgrade
time required, 5
V
VRM slots, 16
W
WARNINGS
Extend
Warranty information for hardware, 33
38