HP Photosmart M305/M307 digital camera with HP Instant Share
User's Manual
HP Photosmart M305/M307 digital camera with HP Instant Share
User's Manual

Legal Notices
?? Copyright 2004
The information contained herein is subject to change without notice. The only warranties for HP products and services are set forth in the express warranty statements accompanying such products and services. Nothing herein should be construed as constituting an additional warranty. HP shall not be liable for technical or editorial errors or omissions contained herein.
Windows?? is a U.S. registered trademarks of Microsoft Corporation.

 SD logo is a trademark of its proprietor.
Printed in China
Table of Contents
Getting Started . . . . . . . . . . . . . . . . . . . . . . . . . . . .9
Windows?? . . . . . . . . . . . . . . . . . . . . . . . 14
Taking Pictures and Recording Video Clips . . .27
Taking Still Pictures . . . . . . . . . . . . . . . . . . . . . . . . . 27
Recording Audio with Still Pictures . . . . . . . . . . 28
Recording Video Clips . . . . . . . . . . . . . . . . . . . . . . 29
Using Live View . . . . . . . . . . . . . . . . . . . . . . . . . . . 30
Focusing the Camera . . . . . . . . . . . . . . . . . . . . . . . 31
Using Auto Focus . . . . . . . . . . . . . . . . . . . . . . 31
Using Focus Lock . . . . . . . . . . . . . . . . . . . . . . . 34
Using Zoom . . . . . . . . . . . . . . . . . . . . . . . . . . . . . .34
Optical Zoom . . . . . . . . . . . . . . . . . . . . . . . . . .34
Digital Zoom . . . . . . . . . . . . . . . . . . . . . . . . . .35
Setting the Flash . . . . . . . . . . . . . . . . . . . . . . . . . . .36
Using the Shooting Modes . . . . . . . . . . . . . . . . . . . .38
Using the
Using the Burst Setting . . . . . . . . . . . . . . . . . . . . . . .42
Using the Capture Menu . . . . . . . . . . . . . . . . . . . . .43
Help for the Menu Options . . . . . . . . . . . . . . . .44
EV Compensation . . . . . . . . . . . . . . . . . . . . . . .44
Image Quality . . . . . . . . . . . . . . . . . . . . . . . . .45
White Balance . . . . . . . . . . . . . . . . . . . . . . . . .47
ISO Speed . . . . . . . . . . . . . . . . . . . . . . . . . . . .49
Color . . . . . . . . . . . . . . . . . . . . . . . . . . . . . . . .50
Date & Time Imprint . . . . . . . . . . . . . . . . . . . . .50
Reviewing Images and Video Clips . . . . . . . . . 53
Using Playback . . . . . . . . . . . . . . . . . . . . . . . . . . . .53
Total Images Summary Screen . . . . . . . . . . . . . .56
Viewing Thumbnails . . . . . . . . . . . . . . . . . . . . .56
Magnifying Images . . . . . . . . . . . . . . . . . . . . . .57
Using the Playback Menu . . . . . . . . . . . . . . . . . . . . .58
Delete . . . . . . . . . . . . . . . . . . . . . . . . . . . . . . .60
Record Audio . . . . . . . . . . . . . . . . . . . . . . . . . .61
Rotate . . . . . . . . . . . . . . . . . . . . . . . . . . . . . . .62
Using HP Instant Share . . . . . . . . . . . . . . . . . . . 63
Using the HP Instant Share Menu . . . . . . . . . . . . . . .64 Setting Up Destinations in the
HP Instant Share Menu . . . . . . . . . . . . . . . . . . . . . . .65 Setting Up Destinations on a
Windows Computer . . . . . . . . . . . . . . . . . . . . .67 Setting Up Destinations on a
Macintosh Computer . . . . . . . . . . . . . . . . . . . . .68
HP Photosmart M305/M307 User???s Manual
Selecting Images for HP Instant Share Destinations . . 69 How HP Instant Share
Transferring and Printing Images . . . . . . . . . . .73
Using the Setup Menu . . . . . . . . . . . . . . . . . . . . .79
Phone Support in the United States
and Canada . . . . . . . . . . . . . . . . . . . . . . . . .124
Phone Support in Europe, the Middle East,
and Africa . . . . . . . . . . . . . . . . . . . . . . . . . . .125
Other Phone Support Worldwide . . . . . . . . . . .127
Managing Batteries . . . . . . . . . . . . . . . . . . . . . 129
Safety Precautions for Recharging
NiMH Batteries . . . . . . . . . . . . . . . . . . . . . . . .136 Sleep
Purchasing Camera Accessories . . . . . . . . . . 139
Specifications . . . . . . . . . . . . . . . . . . . . . . . . . . 143
Memory Capacity . . . . . . . . . . . . . . . . . . . . . . . . .148
HP Photosmart M305/M307 User???s Manual

Chapter 1:
Getting Started
Congratulations on your purchase of this HP Photosmart digital camera! This camera has many features to enhance your
With HP Instant Share, you can easily select images in your camera to be automatically sent to your favorite destinations (such as
To further enhance your experience, you can purchase an HP Photosmart
or television, and recharge Nickel Metal Hydride (NiMH) batteries for your camera. The dock also provides a convenient home for your camera.

Setup
To locate a part on your camera (such as a button or a light) while following the instructions in this section, see Camera Parts on page 16.
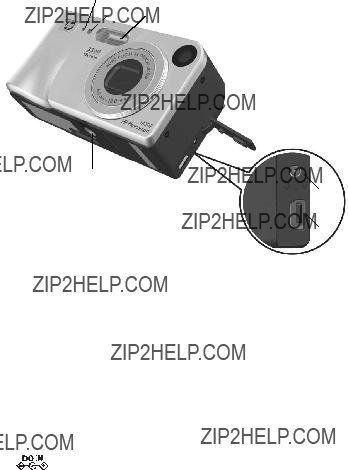
Attaching the Wrist Strap
Attach the wrist strap to the wrist strap mount on the side of the camera as shown.
Installing the Batteries
1Open the Battery/Memory card door on the side of the camera by sliding the door down toward the bottom of the camera.
2Insert the batteries as indicated inside the door.
3If you want to install an optional memory card, leave the Battery/Memory card door open and go on to Installing a Memory Card (Optional) on page 11.
However, if you do not have an optional memory card to install, close the Battery/
Memory card door by pushing the door down and sliding the door toward the top of the camera until the door latches. Then skip to Turning on Power on page 12.
NOTE Digital cameras use batteries at a much faster rate than film cameras. Battery life in digital cameras can be measured in hours and minutes of use rather than the years more typical of film cameras. Battery life may also vary dramatically from one user to another, depending on what modes the camera is being used in most frequently. For hints on optimizing battery performance, see
Appendix A: Managing Batteries on page 129.
NOTE You can also use an optional HP AC power adapter to power the camera. If you use rechargeable NiMH batteries, you can recharge the batteries in the camera using the optional HP AC power adapter or optional
HP Photosmart
Installing a Memory Card (Optional)
If you do not have an optional memory card to install, skip this section and go on to the next section, Turning on Power on page 12.
Your camera contains internal memory that allows you to store images and video clips. However, you can use a memory card (purchased separately) instead to store images and video clips. For more information about supported memory cards, see Storage on page 145.
When you install a memory card in the camera, all new images and video clips are stored on the card. The camera???s internal memory is only used when there is no memory card in the camera.

1With the Battery/Memory card door open, insert the memory card in the small slot below the batteries, with the notched side of the card going in first, as shown. The card only fits one way; do not force it. Make sure the memory card snaps into place.
2Close the Battery/Memory card door by pushing the door down and sliding the door toward the top of the camera until the door latches.
To remove the memory card from the
camera, first turn the camera off. Then open the Battery/ Memory card door, press down on the top edge of the memory card, and it will spring outward from
the slot.
Turning on Power
Turn the camera on by sliding the  ON/OFF switch to the right and then releasing it.
The lens extends and the Power light to the left of the  ON/ OFF switch turns on solid green.
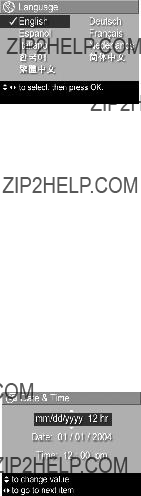
Choosing the Language
The first time you turn the camera on, the following screen appears and prompts you to choose a language.
1Scroll to the language that you
want by using the 


 buttons on the Controller
  .
.
2Press the Menu/OK button to select the highlighted language.
NOTE If you need to change the
language later, you can do this with the Language setting in the Setup menu. See Chapter 6: Using the Setup Menu on page 79.
Setting the Date and Time
The camera has a clock that records the date and time at which you take each picture. This information is recorded in the image properties, which you can see when viewing the image on your computer. You can also choose to have the date and time imprinted on the visible image (see Date & Time Imprint on page 50).
The first time you turn the camera on, a Date & Time screen appears after you choose the language, prompting you to set the date and time.
1Adjust the value of the highlighted selection by using the 
 buttons.
2Press the 
 buttons to move to the other selections.
3Repeat steps 1 and 2 until the correct date/time format, date, and time are set.
4Press the Menu/OK button when you have entered the proper values for the date and time. A confirmation screen appears, asking if the correct date and time have been set.
5If the date and time are correct, press the Menu/OK button to select Yes.
If the date and time are incorrect, press the  button to highlight No, and then press the Menu/OK button. The Date & Time screen appears again. Repeat steps 1 through 5 to set the correct date and time.
NOTE If you need to change the date and time settings later, you can do this with the Date & Time setting in the Setup menu. See Chapter 6: Using the Setup Menu on page 79.
Installing the Software
The HP Image Zone software allows you to transfer images from the camera, and then view, edit, print, or
NOTE If you do not install the HP Image Zone software, you can still use the camera, but certain features will be affected. For details, see Using Your Camera without Installing the HP Image Zone Software on page 89.
Windows??
In order for the HP Image Zone software to install successfully, you must have installed at least Internet Explorer 5.01 Service Pack 2 on Windows 2000, XP, 98, 98 SE, or Me. (Internet Explorer 6 is recommended.)
1Close all programs and temporarily disable any virus protection software running on your computer.
2Insert the HP Image Zone software CD into the CD drive of your computer. Follow the instructions in the installation screen that automatically appears.
NOTE If the installation screen does not appear, click Start, click Run, type D:\Setup.exe, where D is the letter of your CD drive, then click OK.
NOTE If you have trouble installing or using the HP Image Zone software, see the HP Customer Support website: www.hp.com/support for more information.
Macintosh
1Close all programs and temporarily disable any virus protection software running on your computer.
2Insert the HP Image Zone software CD into the CD drive of your computer.
3
4
NOTE Before you can transfer images from the camera to your Macintosh computer with the HP Image Zone software, or to take advantage of the HP Instant Share functionality, you must first change the USB Configuration setting to Disk Drive on the camera. See Chapter 6: Using the Setup Menu on page 79.
NOTE If you have trouble installing or using the HP Image Zone software, see the HP Customer Support website: www.hp.com/support for more information.
User Manual on the CD
A copy of this camera User???s Manual in several different languages is located on the HP Image Zone software CD. To view your camera User???s Manual:
1Insert the HP Image Zone software CD into the CD drive of your computer.
2On Windows: Click View User???s Manual on the Main page of the CD installation screen to view the User???s Manual.
On Macintosh: Look in the readme file in the docs folder of the HP Image Zone software CD to locate the User???s Manual in your language.
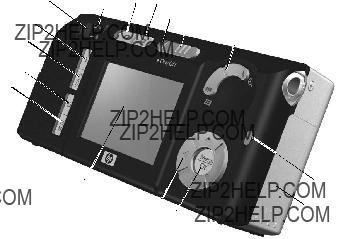
Camera Parts
Refer to the pages in parentheses after the part names in the following tables for more information about those parts.
Back and First Side of the Camera
11
10
 4
4


zAF solid
zAF blinking
zBoth  and AF
Front, Second Side, and Bottom of
the Camera
1 2 3

Camera States
Your camera has two main states that allow you to complete certain tasks. Each of these states has an associated menu that you can use to adjust camera settings or perform tasks in that state. See Camera Menus on page 22.


Camera Menus
Your camera has five menus that, when accessed, appear in the Image Display on the back of the camera. When any menu is displayed, you can then access the other menus by using the menu tabs at the top of the screen. To display another menu,
use the 
 buttons to move to the menu tab for that menu.
To display the Capture Menu  , press the Live View
  button to turn Live View on, then press the Menu/ OK button. A shortcut is to simply press the Menu/OK button when Live View is off. For information about using this menu, see Using the Capture Menu on page 43.

To display the Playback Menu, press the Menu/OK button while you are in Playback. If you are not currently in
Playback, press the Playback 
button first, then press the Menu/OK button. For information about using this menu, see Using the Playback Menu on page 58.
To display the HP Instant Share
Menu  , press the HP Instant
Share/Print  /
/ button. For information about using this menu, see Using the HP Instant Share Menu on page 64.
NOTE To use the HP Instant Share Menu  to send images to destinations other than printers (such as to email addresses or other online services), you must first set up the menu. See Setting Up Destinations in the HP Instant Share Menu on page 65.
To display the Setup Menu  , first access either the Capture, Playback, or HP Instant Share menu, then use
the 
 buttons to move to the menu
tab for the Setup Menu  . For information about using the Setup
Menu  , see Chapter 6: Using the

To display the Help Menu  , first access either the Capture, Playback, or HP Instant Share menu, then use
the 
 buttons to move to the menu tab for the Help Menu
  . For information about using the Help Menu
  , see the next section.
Using the Help Menu
The Help Menu  provides helpful information and tips for using your camera.
Image Display.
2Use the 
 buttons to highlight the Help topic you want to read.
3Press the Menu/OK button to display the Help topic.
4Use the 
 buttons to scroll through the Help topic to read it.
5Press the Menu/OK button to exit the Help topic and return to the Help Menu  .
.
Camera Status Screen
A status screen appears for a few seconds in the Image Display any time you press the Flash  , MODE, or
Timer/Burst  buttons when Live
View is off.
As shown in the example here, a text
description of the current setting for the button that was just pressed appears at the top of the screen. Beneath that, icons for the current flash, shooting mode, and timer/burst settings are shown, with the icon for the button that was just pressed highlighted. The bottom portion of the screen shows whether a memory card is installed (indicated by the SD icon), power indicator (such as the low battery level indicator; see Power Indicators on page 133), the number of pictures remaining, and the Image Quality setting (indicated in the example by the 3MP).
Restoring Previous Settings
The flash, shooting mode, and Timer/Burst settings, as well as some of the Capture Menu settings that you change from their default settings do not remain set after you turn the camera off. However, you can restore the  ON/OFF switch to turn the camera on. The icons for the restored settings are then displayed in the Live View screen.

Chapter 2:
Taking Pictures and
Recording Video Clips
Taking Still Pictures
You can take a picture almost any time the camera is on, regardless of what is being shown on the Image Display. For example, if a menu is currently displayed when you press the Shutter button, the menu will be canceled, and the camera will take a picture. To take a still picture:
1Frame the subject for your picture in the viewfinder.
2Hold the camera steady (especially if using zoom) and press the Shutter button on the top of the camera halfway down. The
camera measures and then locks the focus and exposure (the AF viewfinder light turns on solid green when focus is locked - see Using Auto Focus on page 31 for details).
3Press the Shutter button all the way down to take the picture. You will hear a shutter click when the camera takes the picture.
After a picture is taken, the image appears for several seconds on the Image Display. This is called Instant Review. You can delete the image during Instant Review by pressing the
Menu/OK button.
You can use Playback to review the pictures you have taken. See Using Playback on page 53.
Recording Audio with Still Pictures
There are two ways to attach an audio clip to a still picture:
???Add an audio clip to the picture later, or
???Record the audio while you are taking the picture, as explained in this section. You will not be able to use this method when using the
An audio clip can be as long as you like or until the camera runs out of memory, whichever happens first.
1Press the Shutter button all the way down to take the picture.
2Continue to hold the Shutter button down to record the
audio clip. A microphone icon ( ) and audio counter appear on the Image Display during recording.
3To stop recording audio, release the Shutter button.
Audio recording stops when you release the Shutter button; otherwise, the audio will continue recording until the camera runs out of memory. After recording has stopped, the image is displayed for several seconds in Instant Review on the Image Display. You can delete the image and the audio clip that is attached to the image during Instant Review by pressing the
Menu/OK button.
To delete or record a new audio clip, use the Record Audio option in the Playback menu. See Record Audio on page 61.
NOTE To hear audio clips that have been attached to your still images, you must use a computer or television (TV). If you have an optional HP Photosmart

Recording Video Clips
NOTE Zoom is disabled while recording video clips. A video clip includes audio.
1Frame the subject for your video in the viewfinder.
2To start recording video, press and
release the Video  button on the top of the camera. The Video
 viewfinder light turns on solid red. If Live View is on, a video
  icon, REC, a video counter, and a message instructing how to end
the video appear on the Image Display. (See Using Live View on page 30.)
3To stop recording video, press and release the Video  button again; otherwise, the video will continue recording until the camera runs out of memory.
NOTE If you have set the camera to
After recording has stopped, the last frame of the video clip appears for several seconds on the Image Display. This is called Instant Review. You can delete the video clip during
Instant Review by pressing the Menu/OK button.
You can use Playback on the camera to review the video clips you have recorded. See Using Playback on page 53.
NOTE To hear the audio portion of your video clips, you must use a computer or television (TV). If you have an optional HP Photosmart
Using Live View
The Image Display allows you to frame pictures and video clips using Live View. To activate Live View from the menus or when
the Image Display is off, press the Live View  button. To turn off Live View, press the Live View
  button again.
NOTE Using Live View consumes a lot of battery power. To conserve battery power, use the viewfinder instead.
The following table describes the information that is displayed in the Live View screen of the Image Display when the camera settings are at their default values and an optional memory card is installed in the camera. If you change other camera settings, icons for those settings will also be displayed in the
Live View screen.
1
2  3
3  4
4
5
# Icon Description
2
 Power indicator, such as this low battery level indicator (see Power Indicators on page 133)
312 Remaining pictures count (actual number depends on the current Image Quality setting and how much space remains in memory)
4 3MP Image Quality setting (default is 3MP)
5 
 Focus brackets (see Using Auto Focus on page 31)
Focusing the Camera
Using Auto Focus
The focus brackets in the Live View screen show the focus region for the still picture you are taking or the video clip you are recording. (See Using Live View on page 30.) When you press the Shutter button halfway down to take a still picture, the camera uses this focus region to automatically measure and then lock the focus. The AF viewfinder light turns on solid green and the focus brackets in the Live View screen turn green when the image is in focus and the camera can lock the focus.
When you have the camera set to any of the shooting modes
other than Macro  (see Using the Shooting Modes on page 38), the camera will attempt to auto focus still pictures using the normal focus range of 0.5 m (20 in) to infinity. However, when the camera cannot focus in these shooting modes, one of the following will occur:
zThe AF viewfinder light will blink green and the focus brackets in Live View will turn red. The camera will still take the picture, but the picture may be out of focus. To focus the picture, release the Shutter button,
If the AF viewfinder light continues to blink green and the focus brackets continue to turn red after several tries, there may not be enough contrast or light in the focus region. Try using a technique called Focus Lock to focus on an object about the same distance away but in a
zThe AF viewfinder light will blink green, the focus brackets
will turn red, and the Macro  icon will blink in the Live View screen. In this case, the camera detects that the focus is closer than the normal range. The camera will still take the picture, but the picture may be out of focus. To focus the picture, either move farther away from the subject you are
trying to photograph, or set the camera to the Macro  shooting mode (see Using the Shooting Modes on page 38).
Finally, if the camera is set to the Macro  shooting mode but detects that either the focus is closer or farther away than the Macro range of 0.1 to 0.5 m (4 to 20 in), or there is not enough contrast or light in the focus region, both viewfinder lights will blink, the focus brackets will turn red, and the Macro
 icon will blink in the Live View screen. In these cases, the camera will not take a picture if it cannot find focus.
If the subject for the picture is not within the Macro range, either move farther away from or closer to the subject, or set
the camera to a shooting mode other than Macro  (see Using the Shooting Modes on page 38). If there is not enough contrast or light in the focus region, try using a technique called Focus Lock to focus on an object about the same distance away but in a
Using Focus Lock
Focus Lock allows you to focus on a subject that is not in the center of the picture, or to capture action shots more quickly by
1Frame the subject for your picture within the focus brackets.
2Press the Shutter button halfway down to lock the focus and exposure.
3Continue to hold the Shutter button halfway down while you
4Press the Shutter button all the way down to take the picture.
Using Zoom
NOTE The more you zoom in on the subject of your picture, the more even small movements of the camera are magnified (this is called ???camera shake???). So, especially at full telephoto zoom (3x), you must hold the camera steady in order to take a picture that is not blurry. If an
icon of a shaking hand ( ) appears in the Live View screen, you should set the camera on a tripod or stable surface; otherwise, the picture will likely be blurry.
Optical Zoom
NOTE Optical zoom is disabled while recording video clips.
Optical zoom works like the zoom on a traditional film camera, with physical lens elements moving inside the camera to make the subject of your picture appear closer.

Press Zoom Out  and Zoom In
  on the Zoom lever to move the lens between wide angle (1x) and telephoto (3x) positions.
Digital Zoom
NOTE Digital zoom is disabled while recording video clips.
Unlike optical zoom, digital zoom uses no moving lens parts. The camera essentially crops the image to give an appearance of the subject of the picture being an additional 1.1x to 5x larger with the HP M307 camera, or 1.1x to 3x larger with the HP M305 camera.
1Press Zoom In  on the Zoom lever to optically zoom in to the maximum level, then release the button.
2Press Zoom In  again and continue to press it until you reach the desired size in the Image Display. A yellow frame surrounds the area of the image that will be captured, and the image enlarges in the yellow frame.
The resolution number on the right side of the screen also becomes smaller as you digitally zoom. For example, 2.3MP appears in place of 3MP, indicating that the image is being reduced to a size of 2.3 Megapixels.
3When the image is at the desired size, press the Shutter button to take the picture.
To turn digital zoom off and return to optical zoom, press Zoom Out  on the Zoom lever until digital zooming stops. Release Zoom Out
  , and then press it again.

NOTE Digital zoom reduces the resolution of an image, so your picture will tend to be more pixilated than the same image taken with optical zoom. If you just intend to
Setting the Flash
The Flash button  allows you to cycle through the flash settings on the camera. To change the flash setting, press the Flash
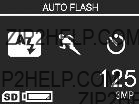
button until the desired setting appears on the Image Display. The following table describes each of the flash settings on the camera.
NOTE The flash is disabled with the Burst setting, Fast Shot shooting mode, and while recording video clips.

Setting Description
Flash Off The camera will not use flash, no matter the lighting conditions.
Night The camera uses the flash if necessary and
NOTE The
If the flash setting is anything other than the default Auto Flash setting, the icon for the setting (in the previous table) will appear in the Live View screen. The new setting remains in effect until it is changed again or until the camera is turned off. The flash setting resets to the default Auto Flash setting when you turn the camera off.
NOTE To restore the flash setting to what it was when you last turned the camera off, hold down the Menu/OK button as you turn the camera back on.
Using the Shooting Modes
Shooting modes are
NOTE The shooting mode does not apply when you are recording video clips.
To change the shooting mode, press the MODE button on the back of the camera until the desired shooting mode appears on the Image Display. The following table describes each of the shooting mode settings on the camera.
Setting Description
Auto The camera automatically selects the best
mode works well for most shots in normal situations. This mode is also useful when you need to take a good shot quickly, and do not have time to select a special shooting mode on the camera.
Macro This mode allows you to take
Fast Shot The camera uses a fixed focus instead of auto focus, allowing you to take pictures very quickly. Use this mode in bright light conditions when the subject is moderate to long distances away from the camera.

Setting Description
Action The camera uses fast shutter speeds and higher ISO
speeds to stop motion. Use Action mode to capture sporting events, moving cars, or any scene where you want to stop the action.
Portrait The camera combines a smaller
background, with lower sharpness for a more natural
effect. Use Portrait mode for pictures that have one or more people as their primary focal point.
Landscape The camera combines a higher
Beach & This mode allows you to capture bright outdoor Snow scenes and balance out harsh lighting.
If the shooting mode setting is anything other than the default Auto Mode setting, the icon for the setting (in the previous table) will appear in the Live View screen. The new setting remains in effect until it is changed again or until the camera is turned off. The shooting mode setting resets to the default Auto setting when you turn the camera off.
NOTE To restore the shooting mode setting to what it was when you last turned the camera off, hold down the Menu/OK button as you turn the camera back on.
Using the
1Secure the camera to a tripod or set it on a stable surface.
2Press the Timer/Burst  button until
  or Self- Timer - 2 Shots
  appears in the Image Display.
3Frame the subject in either the viewfinder or in Live View. (See Using Live View on page 30.)
4The next steps depend on whether you are capturing one or two still pictures, or are recording a video clip.
For Still Pictures:
a.Press the Shutter button halfway down to gain Focus Lock (the camera measures and then locks the focus and exposure). The camera will hold these settings until it takes the picture.
b.Press the Shutter button all the way down. If the Image Display is on, a
NOTE If you immediately press the Shutter button all the way down without using Focus Lock, the camera will lock focus and exposure just before the end of the
NOTE You cannot record audio with a still picture when using the
For Video Clips:
To start recording video, press the Video  button and then release it. If the Image Display is on, a
NOTE With either the
To stop recording the video clip, press the Video  button again; otherwise, the video will continue recording until the camera runs out of memory.
If the  or Self-
Timer - 2 Shots  ) will appear in the Live View screen. The
NOTE To restore the Timer/Burst setting to what it was when you last turned the camera off, hold down the Menu/OK button as you turn the camera back on.
Using the Burst Setting
Burst allows you to take up to 4 still pictures as quickly as possible. The camera then continues taking burst pictures at a slower rate until you release the Shutter button or the camera runs out of memory.
NOTE The Burst setting is disabled while recording video clips. You also cannot record audio when using the Burst setting, but you can add an audio clip later (see Record Audio on page 61). Also, the flash is disabled while using the Burst setting.
1Press the Timer/Burst  button until Burst

 appears in the Image Display.
2Frame the subject and press the Shutter button halfway down to lock the focus and exposure. Then press the Shutter button all the way down and hold it. The camera takes 4 pictures as quickly as possible and continues taking burst pictures until you release the Shutter button or the camera runs out of memory.
The Image Display remains off during the burst capture. After the burst pictures have been taken, each image appears one at a time on the Image Display.
If the Burst setting is anything other than the default Normal
setting, the Burst 

 icon will appear in the Live View screen. The Burst setting remains in effect until it is changed again or until the camera is turned off. The camera resets to the default Normal timer/burst setting when you turn the camera off.
NOTE To restore the timer/burst setting to what it was when you last turned the camera off, hold down the Menu/OK button as you turn the camera back on.

Using the Capture Menu
The Capture Menu allows you to adjust various camera settings that affect the characteristics of the images and video clips you capture with your camera.
1To display the Capture Menu, press the Live View  button, and then press the Menu/OK button. If the Image Display is already off, you can simply press Menu/OK.
2Use the 
 buttons to scroll through the Capture Menu options.
3Either press Menu/OK to select a highlighted option
and display its
4Within a 
 buttons and then the Menu/OK button to change the setting for the Capture Menu option.
5Use one of several ways to exit the Capture Menu. If, immediately after entering the Capture Menu, you decide not to change anything, simply press Menu/OK again to exit the menu. After you have used the Capture Menu, you can navigate to another menu via the menu tabs at the top of the Image Display. You can also select the  EXIT menu option and press Menu/OK. If you want to switch to another camera state, press the appropriate button on the back of the camera.
NOTE To restore Capture Menu settings to what they were when you last turned the camera off, hold down the Menu/OK button as you turn the camera back on.
Help for the Menu Options
Help... is the last option in each of the Capture
option provides information about that Capture menu option and its settings. For example, if you press
Menu/OK when Help... is highlighted in the White Balance
Use the 
 buttons to scroll through the Help screens. To exit the Help and return to the particular Capture
EV Compensation
In difficult lighting conditions, you can use EV (Exposure Value) Compensation to override the automatic exposure setting that the camera makes.
EV Compensation is useful in scenes that contain many light objects (like a white house in the snow) or many dark objects (like a black cat on a dark background). Scenes containing many light objects or many dark objects could turn out gray without the use of EV Compensation. For a scene with many light objects, increase the EV Compensation to a positive number to produce a brighter result. For a scene with many dark objects, decrease the EV Compensation to darken the scene to be closer to black.

1In the Capture Menu (page 43), select EV Compensation.
2In the EV Compensation sub-
menu, use the buttons to change the EV setting in 0.5 steps from
3Press Menu/OK to save the setting and return to the
Capture Menu.
If the setting is anything other than the default setting of 0.0, the number value will appear in the Live View screen next to
the  icon. The new setting remains in effect until it is changed again or until the camera is turned off. The EV Compensation setting resets to the default 0.0 setting when you turn the camera off.
Image Quality
NOTE This setting does not apply when recording video clips.
This setting allows you to set the resolution and JPEG compression of the still images you capture with your camera. The Image Quality
NOTE The resolution portion of all the Image Quality settings except for the VGA setting is represented by a number and MP (Megapixels), such as 3MP or 1MP. The higher the number of Megapixels, the higher the resolution. In the case of the VGA setting, the image will be 640 by 480 pixels (0.31 MP), which is the lowest resolution.
1In the Capture Menu (page 43), select Image Quality.
2In the Image Quality
use the 
 buttons to highlight a setting.
3Press Menu/OK to save the setting and return to the
Capture Menu.
The following table explains the
Image Quality settings in more detail:
Setting Description
3MP Best Images will be full resolution and have the lowest compression. This setting produces very high quality images, with greater color accuracy, but uses the most memory. This setting is recommended if you plan to print images at a size larger than 18 by 24 cm (8 by 10 in).
3MP Images will be full resolution and have medium compression. This setting produces high quality images, but uses less memory than the 3MP Best setting above. This is the default setting and is recommended if you plan to print images up to a size of 13 by18 cm (5 by 7 in).
1MP Images will be 1280 by 960 (low) resolution and have medium quality and compression. This is a memory- efficient setting, ideal for images that you want to send via
VGA Images will be 640 by 480 (lowest) resolution and have medium compression. This is a
The Image Quality setting not only affects the quality of the images but, as a result, also the number of images that can be stored either in the internal memory in the camera or on an optional memory card. Higher resolution and lower compression images will take up more space than images with lower resolution and/or higher compression. For example, the highest setting, 3MP Best, results in high quality images, but consumes more storage space in memory than the next lower setting, 3MP. Likewise, many more still images can be stored in memory at the 1MP or VGA settings than at 3MP; however, these settings will result in much lower quality images.
The Pictures remaining count at the bottom of the Image Quality
The Image Quality setting (in the previous table) will appear in the Live View screen. The new setting remains in effect until it is changed again, even when you turn the camera off.
NOTE When you use digital zoom, the resolution changes as you zoom in. See Digital Zoom on page 35.
White Balance
Different kinds of lighting conditions cast different colors. For example, sunlight is more blue, while indoor tungsten light is more yellow. Scenes dominated by a single color may require an adjustment of the white balance setting to help the camera reproduce colors more accurately and ensure that whites appear white in the final image. You can also adjust the white balance to produce creative effects. For example, using the Sun setting can produce a warmer look to the image.
1In the Capture Menu (page 43), select White Balance.
2In the White Balance 
 buttons to highlight a setting. The new setting is applied to the Live View screen behind the menu, so you can see the effect each setting will have on the picture.
3Press Menu/OK to save the setting and return to the
Capture Menu.
The following table explains the settings in more detail:
Setting Description
Auto The camera automatically identifies and corrects for scene illuminance. This is the default setting.
Sun The camera balances color assuming the subject is outdoors under sunny or bright cloudy conditions.
Shade The camera balances color assuming the subject is outdoors in shade, in dark cloudy conditions, or at
dusk.
Tungsten The camera balances color based on incandescent or halogen lighting (typically found in homes).
Fluorescent The camera balances color based on fluorescent 

 lighting.
If the setting is anything other than the default Auto setting, the icon for the setting (in the previous table) will appear in the Live View screen. The new setting remains in effect until it is changed again or until the camera is turned off. The White Balance setting resets to the default Auto setting when you turn the camera off.
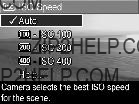
ISO Speed
NOTE This setting does not apply when recording video clips, or when the shooting mode is set to Fast Shot.
This setting adjusts the sensitivity of the camera to light. When ISO Speed is set to the default Auto setting, the camera selects the best ISO speed for the scene.
Lower ISO speeds will capture the best quality images with the least amount of grain (or noise), but result in slower shutter speeds. If taking a picture in low light conditions without a flash at ISO 100, you may want to use a tripod. In contrast, higher ISO numbers allow faster shutter speeds, and can be used when taking pictures in dark areas without a flash, or pictures of fast moving objects. Higher ISO speeds produce pictures with more grain (or noise) and, thus, can be of
lower quality.
1In the Capture Menu (page 43), select ISO Speed.
2In the ISO Speed 
 buttons to highlight a setting.
3Press Menu/OK to save the setting and return to the
Capture Menu.
If the setting is anything other than the default Auto setting, the icon for the setting will appear in the Live View screen. The new setting remains in effect until it is changed again or until the camera is turned off. The ISO Speed setting resets to the default Auto setting when you turn the camera off.

Color
This setting allows you to control the color in which your images will be captured. For example, when you set Color to Sepia, your images will be captured in brown colors to make them look aged or
NOTE After you have taken a picture using either the Black & White or Sepia setting, the image cannot be adjusted back to Full Color later.
1In the Capture Menu (page 43), select Color.
2In the Color

 buttons to highlight a setting. The new setting is applied to the Live View screen behind the menu, so you can see the effect each setting will have on the picture.
3Press Menu/OK to save the setting and return to the
Capture Menu.
The new setting remains in effect until it is changed again or until the camera is turned off. The Color setting resets to the default Full Color setting when you turn the camera off.
Date & Time Imprint
NOTE This setting does not apply when recording video clips.
This setting imprints either the date or the date and time of when the image was captured in the lower
NOTE After you have taken a picture using either the Date Only or Date & Time setting, the date or date and time that is imprinted on the image cannot be removed later.
NOTE The date or date and time imprint will be visible in Playback, but it will not be visible in Instant Review.
NOTE If you rotate the image using the Rotate option in the Playback Menu (page 58), the date or date and time imprint will likewise rotate with the image.
1In the Capture Menu (page 43), select Date & Time Imprint.
2In the Date & Time Imprint sub- menu, use the
 buttons to highlight a setting.
3Press Menu/OK to save the setting and return to the
Capture Menu.
The following table explains the settings in more detail:
Setting Description
Off The camera will not imprint a date or date and time on the image.
Date Only The camera will permanently imprint the date in the lower
Date & Time The camera will permanently imprint the date and time in the lower
If the new setting is anything other than the default Off setting, the icon for the setting (in the previous table) will appear in the Live View screen. The new setting remains in effect until it is changed again, even when you turn the camera off.

Chapter 3:
Reviewing Images and
Video Clips
You can use Playback to review the images and video clips stored in your camera. When reviewing images in Playback, you can use the Zoom lever to view thumbnails of images, or to magnify images so you can take a closer look at them on the camera. See Viewing Thumbnails on page 56 and Magnifying Images on page 57. In addition, the Playback Menu allows you to delete images or video clips, record audio to attach to still images, and rotate images. See Using the Playback Menu on page 58.
Using Playback
1There are two ways to activate Playback.
???With the camera turned on, press the Playback  button.
???With the camera turned off, hold down the Playback 
button while also sliding the  ON/OFF switch to turn the camera on. This allows you to activate Playback without the camera lens extending.
The most recently taken or reviewed image or video clip appears on the Image Display.

NOTE Video clips play automatically after the first frame of the video clip displays for 2 seconds.
3To turn off the Image Display after reviewing your images and video clips, press the Playback  button again.
NOTE Because the camera does not have a speaker, you cannot hear audio clips that are attached to still images or the audio portion of video clips when using Playback on the camera. Instead, you must use a computer or television (TV) to hear audio. If you have an optional HP Photosmart
During Playback, the Image Display also indicates additional information about each image or video clip. The following table describes this information.
1 2
3
4
5
7 6
1Displays only when an optional memory card is installed in the camera.
3Displays for the first few seconds when you enter Playback to indicate that you can scroll through the images or video clips using the 
 buttons.

Total Images Summary Screen
When you press the  button while viewing the last image, a screen appears showing the number of pictures taken, and the number of pictures remaining. Counters indicating the total number of images
selected for HP Instant Share  and
and
for printing  are shown in the upper
Viewing Thumbnails
Thumbnail view allows you to view the still images you have taken and the first frames of the video clips you have recorded arranged in a matrix of nine thumbnail images and video clip frames per screen.
1While in Playback (page 53), press Thumbnails 

 (same as
Zoom Out  ) on the Zoom lever. A Thumbnail view of up to nine images and video clip frames appears on the Image Display. A yellow border surrounds the current image or video clip frame.
2Use the 
 buttons to scroll horizontally to the previous or next thumbnail.
3Press the 
 buttons to scroll vertically to the thumbnail directly above or below the current thumbnail.

4Press the Menu/OK button to exit Thumbnail view and return to Playback. The current image or video clip (that was in the yellow border in Thumbnail view) is displayed in full view on the Image Display again.
At the bottom of each thumbnail, an HP Instant Share  icon signifies that the still image is selected for one or more
HP Instant Share destinations, a printer  icon signifies that it is selected for printing, a video
  icon signifies that this is a
video clip, and an audio  icon signifies that an audio clip is attached to this still image.
Magnifying Images
NOTE This feature is only available for still images; video clips cannot be magnified. Also, this feature is for viewing purposes only; it does not permanently alter the image.
1While in Playback (page 53),
press Magnify  (same as Zoom In
  ) on the Zoom lever. The currently displayed image is automatically magnified 2x. The center portion of the magnified image is displayed along with four
arrows, which indicate that you can pan around the magnified image.
3Use Zoom In  and Zoom Out
 to increase or decrease the magnification.
4Press the Menu/OK button to exit Magnify view and return to Playback. The current image is displayed in full view on the Image Display again.

Using the Playback Menu
The Playback Menu allows you to delete still images or video clips, undelete images, and format the camera's internal memory or optional memory card. Additionally, you can attach audio clips to still images and manipulate still images by rotating them.
1To display the Playback Menu, press the Menu/OK button while you are in Playback. If you are not currently in Playback, press the Playback  button first, then press the
Menu/OK button.
2Use the 
 buttons to highlight the Playback Menu option that you want to use on the left side of the Image Display. The Playback Menu options are explained later in this section.
3Move to the image or video clip you want to use by pressing
the buttons. This makes it easy to perform the same action on several images or video clips, such as deleting multiple images or video clips.
4Select the highlighted Playback Menu option by pressing the
Menu/OK button.
5Use one of several ways to exit the Playback Menu. If, immediately after entering the Playback Menu, you decide not to change anything, simply press Menu/OK again to exit the menu. After you have used the Playback Menu, you can navigate to another menu via the menu tabs at the top of the Image Display. You can also select the  EXIT option and press Menu/OK. If you want to return to Playback, or switch to another camera state, press the appropriate button on the back of the camera.

The following table summarizes each of the Playback Menu options and describes the information in the bottom right corner of each image or video clip while the Playback Menu is displayed.
2Record Audio - Records an audio clip to attach to this still image. (See Record Audio on page 61.)

Chapter 4: Using HP Instant Share on
103/24/ Shows the date that this image was captured or 2004 this video clip was recorded.
110:37 Visible if this is a video clip, with the length of the
video clip displayed to the left of the icon.
Delete
In the Playback Menu (page 58), when you select Delete, the Delete
z
the currently displayed image or video clip.
zThis
zAll Images (in Memory/on
zFormat
zUndelete
NOTE With the Undelete Last option, you can recover only the most recent delete operation. When you proceed to another operation, for example, powering off the camera or taking another picture, the last delete operation you performed is permanent, and the camera can no longer recover the image or images you last deleted.
Use the 
 buttons to highlight an option, and then press the Menu/OK button to select it.
Record Audio
NOTE This menu option is not available for video clips.
To record an audio clip for a still image that does not already have an audio clip attached to it:
1 In the Playback Menu (page 58), select Record Audio. Audio recording starts immediately after you select this menu option. A microphone icon and an elapsed time counter are displayed during recording.
2To stop recording, press Menu/OK; otherwise the audio continues to record until the camera runs out of memory. When recording stops, the display returns to the
Playback Menu.
If the currently displayed image already has an audio clip attached to it, when you select Record Audio, the Record Audio
zKeep Current
zRecord New
zDelete
NOTE Because the camera does not have a speaker, you cannot hear audio clips when using Playback on the camera. Instead, you must use a television (TV) or computer to hear audio clips. If you have an optional HP Photosmart
Rotate
NOTE This menu option is not available for video clips.
In the Playback Menu (page 58), when you select Rotate, the currently displayed image is automatically rotated 90 degrees clockwise. The image is displayed in its new orientation. You can then press Menu/OK to rotate the image again as many times as needed to gain the orientation of the image you want. When you exit the Rotate menu option, the image will be saved in its new orientation.
Chapter 4:
Using HP Instant Share
This camera has an exciting feature called HP Instant Share. This feature allows you to easily select still images in your camera to be automatically sent to a variety of destinations the next time you connect the camera to your computer. For example, you can select images that you want to have printed, then connect the camera to your computer or printer, and the selected images will be printed automatically. As another example, you can select images in your camera to be automatically sent to
NOTE Available online services vary by region. Visit www.hp.com/go/instantshare to see HP Instant Share in action.
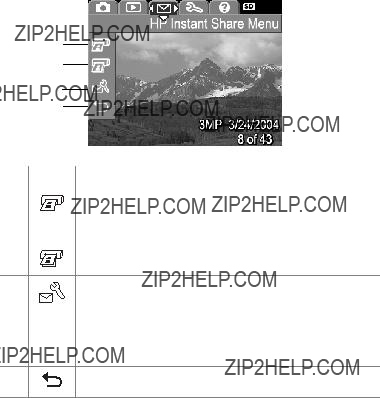
Using the HP Instant Share
Menu
When you press the HP Instant Share/Print  /
/ button on the back of the camera, the most recently taken or viewed image appears on the Image Display, with the HP Instant Share Menu overlaid on top. The following table describes each of the default HP Instant Share Menu options as shown in the following example HP Instant Share screen.
1
2
3
4
3HP Instant Share Setup... allows you to add more

With the default HP Instant Share Menu, you can now select images in your camera so they will print automatically the next time you connect your camera to your computer or printer. You
do this by selecting either or both the Print 1 copy  and the Print 2 copies
  menu options for each image you want to
print. See Selecting Images for HP Instant Share Destinations on page 69 for instructions on how to do this.
You can also set up the HP Instant Share Menu with other HP Instant Share destinations, such as
option, as explained in the following section.
Setting Up Destinations in the
HP Instant Share Menu
NOTE You will need an Internet connection to complete this procedure on a Windows computer. Macintosh users, however, will not need an Internet connection.
NOTE If you have an optional memory card installed in your camera, make sure that the memory card in your camera is not locked and has some free space on it.
1Make sure that the HP Image Zone software is installed on your computer (see page 14).
2Turn on the camera, and then press the HP Instant Share/
Print  /
/ button on the back of the camera. The HP Instant Share Menu appears on the Image Display.
3Use the  button to highlight HP Instant Share Setup...
  , and press the Menu/OK button.

appears on the Image Display asking you to connect the camera to your computer.
NOTE If your computer is running Windows XP, when you connect the camera to your computer in the next step, a dialog box may display that requests you to Select the program to launch for this action. Simply click Cancel to close this dialog box.
4Connect the camera to your computer either by using the special USB cable that came with your camera for connecting the camera to a computer, or by using the optional HP Photosmart
???Connect the camera to the computer with the USB cable by connecting the larger end of the cable to the computer, and connecting the small end of the cable to the USB connector behind the rubber door on the side of the camera.
???Connect the camera to the computer with an optional HP Photosmart
the dock and pressing the Save/Print 
 button on the dock.
Connecting the camera to the computer with the USB cable or the dock activates the camera HP Instant Share Menu setup wizard on your computer. See Setting Up Destinations on a Windows Computer on page 67 or Setting Up Destinations on a Macintosh Computer on page 68 for instructions for your computer.
Setting Up Destinations on a Windows Computer
1At the Welcome screen, click Start.
2The Set Up Your HP Instant Share Destinations screen appears. Any HP Instant Share destinations you have already set up will be listed here. Click Create to add a new destination to your camera HP Instant Share Menu.
3The Go Online screen appears, prompting you to connect to your Internet service provider. Connect to the Internet, if not already online, and click Next.
4Sign in to your secure HP Instant Share account:
???If this is your first time using HP Instant Share, the Region and Terms of Use screen appears. Select your region, read and agree to the Terms of Use, and click Next to continue. Then follow the instructions to register for a secure HP Instant Share account.
???If you have used HP Instant Share before, sign in to your
HP Instant Share account.
Click Next to continue.
5Choose an HP Instant Share Service for your destination. Click Next, and follow the instructions to set up the service to be used when you select this destination.
6When you finish setting up the service for this destination, you are returned to the Set Up Your HP Instant Share Destinations screen, and the name of your new destination appears in the list of destinations.
NOTE You can configure a maximum of 32 HP Instant Share destinations (such as individual
7Click Create to add another destination (repeating steps 2, 5, and 6 above), or select a destination and do one of the following:
???Click Edit to modify the destination.
???Click Remove to delete the destination.
8When you have finished adding HP Instant Share destinations, click Save to my camera. The new destinations are then saved to the camera???s HP Instant Share Menu. When the computer confirms they have been saved to your camera, disconnect the camera from the computer.
Setting Up Destinations on a Macintosh Computer
1At the Modify Share Menu screen, any HP Instant Share destinations you have already set up will be listed. Click Add to add a new destination to your camera???s HP Instant Share Menu.
2The New Share Menu Item screen appears. Enter a name for the destination in the Menu Item Name field, and do either of the following:
???Select Use my local
???Select Use HP Instant Share
3Click OK to add the new destination to the camera???s
HP Instant Share Menu. You are returned to the Modify Share Menu screen, and the name of your new destination appears in the list of destinations.
NOTE You can configure a maximum of 32 HP Instant Share destinations (such as individual
4Click Add to add another destination (repeating steps 2 & 3), or select a destination and do one of the following:
???Click Edit to modify the destination.
???Click Remove to delete the destination.
5When you have finished adding destinations, click Update Camera. The new destinations are then saved to the camera's HP Instant Share Menu. When the computer confirms they have been saved to your camera, disconnect the camera from the computer.
Selecting Images for HP Instant Share Destinations
NOTE You can select any number of HP Instant Share destinations for each still image. However, you cannot select HP Instant Share destinations for video clips, because video clips are not currently supported by
HP Instant Share.
1Turn on the camera, and then press the HP Instant Share/ Print  /
/ button.
2Use the 
 buttons to highlight the first destination in the HP Instant Share Menu that you want to select, such as an
3Use the 
 buttons to scroll to a still image for which you want to select this HP Instant Share destination.
4Press the Menu/OK button to select the destination, and a
 appears over that destination in the HP Instant Share Menu. To deselect the destination, press the Menu/OK button again.
5Select any other HP Instant Share destinations that you want for this image by using the 
 buttons to highlight each destination in the HP Instant Share Menu, and pressing the Menu/OK button to select the destination.
6Scroll to other images by using the 
 buttons, and select HP Instant Share destinations for each of the other images
in the same manner. You can also use the 
 buttons to scroll to other images to simply review their destinations.
7When you are finished selecting all of the HP Instant Share destinations for your images, select the  EXIT menu option and press Menu/OK.
8Connect the camera to your computer and transfer the images as explained in Transferring Images to a Computer on page 73. After the images are transferred to your computer, they will be automatically sent to their respective HP Instant Share destinations. Macintosh users will need to add addressing information for their HP Instant Share destinations before the images and messages can be sent.
How HP Instant Share
The way images are
Images are not
On Windows, the process of
On Macintosh, the process of
Chapter 5:
Transferring and
Printing Images
Transferring Images to a Computer
NOTE You can also use the optional HP Photosmart
1Confirm the following:
???The HP Image Zone software is installed on your computer (see Installing the Software on page 14). To transfer images to a computer that does not have the HP Image Zone software installed on it, see Using Your
Camera without Installing the HP Image Zone Software on page 89.
???If you are using a Macintosh computer, the camera???s
USB Configuration is set to Disk Drive in the Setup Menu (see USB Configuration on page 83.)
???If images on the camera are selected for printing or selected for HP Instant Share destinations, make sure the computer is connected to a printer and/or the internet.
2Turn off the camera.

3Your camera came with a special USB cable for connecting the camera to a computer. Connect the larger end of that USB cable to the computer.
4Open the rubber door on the side of the camera and connect the small end of the USB cable to the USB connector on the camera.
5Turn on the camera. The HP Image Transfer software will launch on your computer. If you have set the software to automatically transfer the images in the camera, the images will automatically transfer to the computer. Otherwise, in the
Transfer Images from Camera/Card screen, click Start Transfer. The images are transferred to the computer, and then if there are any still images that were previously selected for HP Instant Share destinations (page 63), those actions are started.
6When the Image Action Summary screen appears on the computer, you can disconnect the camera from the computer.

Printing Images Directly from the Camera
NOTE You can also use the optional HP Photosmart
You can connect the camera directly to any HP Photosmart printer or
NOTE HP does not support printers from other manufacturers. If your printer will not print, contact the manufacturer of your printer.
NOTE You can only print still images; video clips cannot be printed.
1Check that the printer is turned on. There should be no blinking lights on the printer or error messages displayed about the printer. Load paper into the printer, if needed.
2Connect your camera to the printer.
???If you are printing directly to an HP printer that does not display the PictBridge logo (see logo on next page), use the special USB cable for connecting the camera directly to an HP printer. Connect the square
end of that USB cable to the HP printer.

???If you are connecting the camera to a printer displaying the PictBridge logo (see logo on right) from HP or another manufacturer, do the following:
a.Make sure the camera???s USB Configuration setting is set to Digital Camera (see USB Configuration on
b.Using the USB cable that you would normally connect between the camera and the computer, connect the larger, flat end of the USB cable to the corresponding connector on the PictBridge printer.
3Open the rubber door on the side of the camera and connect the small end of the USB cable to the USB connector on the camera.
4When the camera is connected to the printer, a Print Setup menu displays on the camera. If you already selected images to print using the camera HP Instant Share Menu, the number of images selected is shown.
Otherwise, Images: ALL is displayed.
NOTE There is a print preview in the lower
For PictBridge printers only: If default is displayed for the
Print Size or Paper Size, then no print preview is shown. The printer will automatically determine the page layout that will be used for printing images.
5If all the settings in the Print Setup menu look correct, press Menu/OK on the camera to begin printing. Or you can change the settings in the Print Setup menu using the arrow keys on the camera, and then follow the instructions on the screen to begin printing.
Chapter 6:
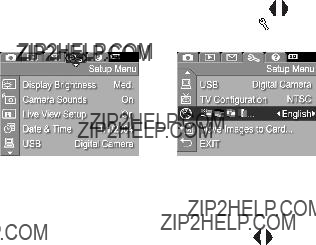
Using the Setup Menu
The Setup Menu allows you to adjust a number of camera settings, such as the camera sounds, date and time, and the configuration of the USB or TV connection.
1 To display the Setup Menu, first display any other menu (see
2Use the 
 buttons to scroll through the Setup Menu options.
3Either press the Menu/OK button to select a highlighted
option and display its
4Within a 
 buttons and then the Menu/OK button to change the setting for the Setup Menu option.

5Use one of several ways to exit the Setup Menu. After you have used the Setup Menu, you can navigate to another menu via the menu tabs at the top of the Image Display. You can also select the  EXIT menu option and press Menu/ OK. If you want to switch to another camera state, press the appropriate button on the back of the camera.
Display Brightness
This setting allows you to adjust the brightness of the Image Display for the viewing conditions. You can use this setting to increase the brightness for harsh lighting environments, or reduce the brightness to extend battery life.
The default Display Brightness setting is Medium.
1In the Setup Menu (page 79), select Display Brightness.
2In the Display Brightness sub- menu, highlight the brightness level you prefer for the Image Display. The new setting is applied to the Live View screen behind the menu so you can see the effect the setting will have on the display brightness.
3Press Menu/OK to save the setting and return to the
Setup Menu.
The new setting remains in effect until it is changed again, even when you turn the camera off.
Camera Sounds
Camera sounds are the sounds that the camera makes when you turn it on, press a button, or take a picture. Camera sounds are not the audio sounds recorded with images or video clips.
The default Camera Sounds setting is On.
1In the Setup Menu (page 79), select Camera Sounds.
2In the Camera Sounds
3Press Menu/OK to save the setting and return to the Setup Menu.
The new setting remains in effect until it is changed again, even when you turn the camera off.
Live View at Power On
This setting allows you to have the camera automatically display Live View every time you turn the camera on, or to have the Image Display turned off every time.
The default Live View at Power On setting is Live View On.
NOTE Setting Live View at Power On to Off can save battery power.
1In the Setup Menu (page 79), select Live View Setup.
2In the Live View at Power On sub- menu, highlight Live View On or
Live View Off.
3Press Menu/OK to save the setting and return to the Setup Menu.
The new setting remains in effect until
it is changed again, even when you turn the camera off.

Date & Time
This setting allows you to set the date/time format, as well as the current date and time for the camera. This is usually done when you first set up the camera; however, you may need to
NOTE The date/time format chosen will be used to display the date information in Playback. Also, the format chosen in this setting is what is used in the Date & Time Imprint feature (see Date & Time Imprint on page 50).
1In the Setup Menu (page 79), select Date & Time.
2In the Date & Time 
 buttons.
3Press the 
 buttons to move to the other selections.
4Repeat steps 2 and 3 until the
correct date/time format, date, and time are set.
5Press Menu/OK to save the setting and return to the
Setup Menu.
The date/time format setting remains in effect until it is changed again, even when you turn the camera off. The date and time settings also remain current as long as the camera batteries that are installed have a charge, or the camera is connected to an optional HP AC power adapter.

USB Configuration
This setting determines how the camera is recognized when connected to a computer.
1In the Setup Menu (page 79), select USB.
2In the USB Configuration
???Digital
camera as a digital camera using the Picture Transfer Protocol (PTP) standard. This is the default setting on the camera.
???Disk
page 90). This setting may be unavailable with a Windows 98 computer that does not have the HP Image Zone software installed on it.
3Press Menu/OK to save the setting and return to the
Setup Menu.
The new setting remains in effect until it is changed again, even when you turn the camera off.

TV Configuration
This setting allows you to set the format of the video signal for displaying camera images on a television (TV) that is connected to the camera with an optional HP Photosmart
The default TV Configuration setting depends on the language that you selected when you turned on the camera for the first time.
1In the Setup Menu (page 79), select TV Configuration.
2In the TV Configuration
???
???
3Press Menu/OK to save the setting and return to the Setup Menu.
The new setting remains in effect until it is changed again, even when you turn the camera off.
For more information on connecting the camera to a TV, see the dock User???s Manual.
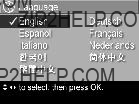
Language
This setting allows you to set the language used in the camera interface, such as the text in menus.
1In the Setup Menu (page 79), select  .
.
2In the Language
3Press Menu/OK to save the setting and return to the
Setup Menu.
The new setting remains in effect until it is changed again, even when you turn the camera off.
Move Images to Card
The Move Images to Card... option is available in the Setup Menu if an optional memory card is installed in the camera and the internal memory contains at least one image.
In the Setup Menu (page 79), if you press Menu/OK when the Move Images to Card... option is highlighted and there is room on the memory card, a confirmation screen appears explaining that there is enough room to move all internal files to the memory card. If only some of the images will fit, then a confirmation screen appears explaining how many images in internal memory can be moved to the memory card. If no images can be moved to the memory card, then the screen displays CARD FULL.
During the move, a progress bar is shown. All of the images that are successfully moved to the memory card are then deleted from the camera's internal memory. When the move is complete, you return to the Setup Menu.
Chapter 7:
Troubleshooting and
Support
This chapter contains information on the following topics:
zResetting the camera (page 88)
zUsing the camera without installing the HP Image Zone software (page 89)
zCleaning the camera lens (page 94)
zPossible problems, causes, and solutions (page 95)
zError messages on the camera (page 109)
zError messages on the computer (page 119)
zHow to get assistance from HP (page 122)
NOTE For more information about solutions to problems mentioned here, as well as any other issues you might have with your camera or the HP Image Zone software, see the HP Customer Support website: www.hp.com/ support
Resetting the Camera
If your camera does not respond when you press any buttons, try resetting the camera as follows:
1Turn off the camera.
2If you have an optional memory card installed, remove it. (Although removing an optional memory card is not necessary for performing the reset, it eliminates the memory card as a possible cause of the problem.)
3Reset the camera by removing power from it as follows:
???If you are powering the camera with only batteries, open the Battery/Memory card door and remove both batteries for approximately 5 seconds.
???If you are using only an optional HP AC power adapter to power the camera, disconnect it from the camera for at least 5 seconds.
???If you are using both batteries and the HP AC power adapter, remove both for at least 5 seconds.
4Reinsert the optional memory card (if you have one). Then reinsert the batteries and close the Battery/Memory card door, and/or reconnect the HP AC power adapter to the camera. You may now use the camera again.
Using Your Camera without Installing the HP Image Zone Software
If you do not, or cannot, install the HP Image Zone software on your computer for some reason (such as there is not enough RAM in your computer, or your computer is not running a supported operating system), you can still use your camera to take pictures and video clips. However, some of the things you can do with the camera will be affected:
zThe HP Instant Share feature depends on the HP Image Zone software, so if the software is not installed on your computer, you will not be able to use the HP Instant Share feature on the camera.
zImages you have marked for printing using the HP Instant Share Menu on the camera will not automatically print out when the camera is connected to the computer. However, this feature will still work in the following scenarios:
???When you connect the camera directly to a printer.
???If your printer has a memory card slot in it, and if you are using a memory card in your camera, you can simply remove the memory card from the camera and insert it in the memory card slot in the printer.
zThe process for transferring images and video clips from the camera to your computer will be different, since normally the HP Image Zone software handles this task. See the following section for details.
Transferring Images to a Computer without HP Image Zone Software
NOTE If you have a Windows Me, 2000, or XP system, or a Mac OS X system, you do not need to read this section. Simply connect the camera to your computer with the USB cable, and the operating system will launch a program to help you transfer images.
If you do not, or cannot, install HP Image Zone on your computer, there are two ways to transfer images from your camera to the computer: using a memory card reader, or configuring the camera as a disk drive.
Using a Memory Card Reader
If you are using a memory card in your camera, you can simply remove it from the camera and put it in a memory card reader (purchased separately). The memory card reader acts just like a floppy disk drive or
Transferring Images to a Windows Computer
1Remove the memory card from your camera and insert it into the memory card reader (or the memory card slot in your computer or printer).
2
3A screen appears that shows a list of disk drives under My Computer. The memory card shows up as a removable disk drive called either HP_M305 or HP_M307. Click on the + sign just to the left of the removable disk.
4Two directories (folders) appear under the removable disk. Click on the + sign next to the folder called DCIM, and a subdirectory should appear. When you click on the subdirectory under DCIM, the list of your images should appear on the right side of the Explorer screen.
5Select all the images (in the Edit
6Click on the Local Disk under My Computer. You are now working in your computer's hard disk drive.
7Create a new folder under Local Disk (go to the File pull- down menu and click on New, then click on Folder. A folder called New Folder appears in the right side of the Explorer screen). While the text of this new folder is highlighted, you can type in a new name (for example, Pictures). To change the name of the folder later, you can simply
8Click on the new folder you just created, then go to the Edit
9The images you copied in step 5 are pasted into this new folder on your computer's hard drive. To verify that the images were successfully transferred from the memory card, click on the new folder. You should see the same list of files in that folder that you saw when you looked at them on the memory card (step 4).
10When you have verified that the images were successfully transferred from the memory card to your computer, put the card back in your camera. To free up space on the card, you can either delete the images or format the card (under the Delete option in the Playback Menu in the camera).
Transferring Images to a Macintosh Computer
1Remove the memory card from your camera and insert it into the memory card reader (or the memory card slot in your computer or printer).
2Depending on the configuration and/or version of the Mac OS X operating system you are running, either an application called Image Capture or one called iPhoto will launch automatically and guide you through the process of transferring images from your camera to your computer.
???If the Image Capture application is launched, click on either the Download Some or Download All button to transfer the images to your computer. By default, the images will be put in the Pictures or Movies folder (depending on which kind of file they are).
???If the iPhoto application is launched, click on the Import button to transfer the images to your computer. The images will be stored in the iPhoto application. So to access the images later, simply run iPhoto.
???If no application launches automatically or if you want to copy the images manually, look on the desktop for a disk drive icon which represents the memory card, then copy the images from there to your local hard drive. For more information about how to copy files, visit Mac help, the help system included with your computer.
Configuring the Camera as a Disk Drive
This method sets up your camera to function as a disk drive when it is connected to your computer.
NOTE This method may be unavailable with Windows 98 computers.
1Set your camera to Disk Drive mode (you only need to do this step once):
a.Turn the camera on, then press the Menu/OK button to display the Capture Menu.
b.Use the  button to navigate to the Setup Menu
  .
.
c.Use the  button to highlight the USB menu option, and then press Menu/OK.
d.Use the  button to select Disk Drive, and then press
Menu/OK.
e.Use the  button to highlight EXIT, and then press
Menu/OK.
2When you have set your camera to Disk Drive mode, connect the camera to your computer using the USB cable.
3At this point, the process for transferring images is the same as described in the section Using a Memory Card Reader on page 90. On Windows computers, the camera will appear as a removable disk in the Windows Explorer screen. On Macintosh computers, either the Image Capture or iPhoto application will launch automatically.
4When you have finished transferring images from the camera to the computer, simply disconnect the camera from the computer. If your computer is running Windows 2000 or XP, you may get an ???Unsafe Removal??? warning upon disconnecting the camera. You can disregard this warning.
NOTE On Macintosh computers, if either Image Capture or iPhoto do not launch automatically, look on the desktop for a disk drive icon with the label HP_M305 or HP_M307. For more information about how to copy files, visit Mac help, the help system included with your computer.
Cleaning the Camera Lens
Do the following to remove lubricant that has seeped from the lens wink mechanism onto the camera lens, as well as fingerprints, dust, and so forth that have accumulated on the lens. To clean the lens, you will need standard lens cleaning paper commonly available at
1Turn the camera on to open the lens wink mechanism and to extend the lens.
2Wrap the lens cleaning paper around the end of the cotton swab.
3Using the cotton swab with the lens paper, wipe the lens clean using a circular motion.
When handling the camera after cleaning the lens, use care not to press on the wink mechanism cover when the lens is in the retracted position because this may cause lubricant to seep from the wink mechanism onto the lens.
Problems and Solutions


Error Messages on the Camera


Error Messages on the Computer
Getting Assistance
This section contains support information for your digital camera, including support website information, an explanation of the support process, and support phone numbers.
HP Accessibility Website
Customers with disabilities can get help by visiting www.hp.com/hpinfo/community/accessibility/prodserv
HP Photosmart Website
Visit www.photosmart.hp.com or www.hp.com/photosmart for the following information:
zTips on using your camera more effectively and creatively
zHP digital camera driver updates and software
zRegister your product
zSubscribe to newsletters, driver and software updates, and support alerts
Support Process
The HP support process works most effectively if you perform the following steps in the order specified:
1Review the troubleshooting section of this User???s Manual (see Problems and Solutions on page 95).
2Access the HP Customer Care website for support. If you have access to the Internet, you can obtain a wide range of information about your digital camera. Visit the HP website for product help, drivers, and software updates at www.hp.com/support
Customer Support is available in the following languages: Dutch, English, French, German, Italian, Portuguese, Spanish, Swedish, Traditional Chinese, Simplified Chinese, Japanese, Korean. (Danish, Finnish, and Norwegian support information is available in English only.)
3Access HP
4(US and Canadian customers, skip this step and go on to Step 5.) Contact your local HP dealer. If your digital camera has a hardware failure, take it to your local HP dealer for a solution. Service is free during your digital camera???s limited warranty period.
5Contact HP Customer Care for support by phone. Please consult the following website to check the details and conditions of phone support in your country/region: www.hp.com/support. As a part of HP???s continuing efforts to improve phone support information services, we advise you to check the HP website on a regular basis for new information regarding service features and delivery. If you cannot solve the problem using the above options, call HP while you are in front of your computer and digital camera. For faster service, please be prepared to provide the following information:
???The digital camera???s model number (on the front of the camera)
???The digital camera???s serial number (on the bottom of the camera)
???The computer???s operating system and available RAM
???The version of the HP software (on the CD label)
???Messages displayed at the time the situation occurred
The applicable conditions for HP phone support are subject to change without notice.
Telephone support is free from the date of purchase for the period specified unless otherwise noted.
Phone Support in the United States
and Canada
Support is available both during and after the warranty period.
Within the period of your warranty, telephone support is provided free of charge. Call
HP Total Care phone support is available in both English and Spanish 24x7. (Days and hours of support may change without notice.)
After the warranty period, call
Phone Support in Europe, the
Middle East, and Africa
HP Customer Support phone numbers and policies may change. Visit the following website to check the details and conditions of phone support in your country/region: www.hp.com/support
Algeria +213 61 56 45 43
Austria +43 1 86332 1000
Bahrain 800 171
Belgium 070 300 005 (Dutch) 070 300 004 (French)
Czech Republic +420 261307310
Denmark +45 70 202 845 Egypt +20 2 532 5222 Finland +358 (0)203 66 767
France +33 (0)892 69 60 22 (Euro 0.34/minute) Germany +49 (0)180 5652 180 (Euro 0.12/minute)
Greece +30 210 6073603 (international number) 801 11 22 55 47
800 9 2649
Hungary +36 1 382 1111 Ireland 1890 923 902 Israel +972 (0) 9 830 4848 Italy 848 800 871
Luxembourg 900 40 006 (French) 900 40 007 (German)
Middle East +971 4 366 2020 (international number) Morocco +212 22 404747
Netherlands 0900 2020 165 (Euro 0.10/minute) Nigeria +234 1 3204 999
Norway +47 815 62 070
Poland +48 22 5666 000 Portugal 808 201 492 Romania +40 (21) 315 4442
Russian Federation +7 095 7973520 (Moscow)
+7 812 3467997 (St. Petersburg) Saudi Arabia 800 897 1444
South Africa 086 0001030 (Republic of South Africa) +27 11 2589301 (international number)
Spain 902 010 059
Sweden +46 (0)77 120 4765
Switzerland 0848 672 672 (German, French, Italian??? Peak time 0.08 CHF/Outside peak 0.04 CHF)
Tunisia +216 71 89 12 22
Turkey +90 216 579 71 71
Ukraine +7 (380 44) 4903520 (Kiev)
United Arab Emirates 800 4520
West Africa +351 213 17 63 80
Other Phone Support Worldwide
HP Customer Support phone numbers and policies may change. Visit the following website to check the details and conditions of phone support in your country/region: www.hp.com/support.
Argentina
Canada
Chile
China +86 (21) 3881 4518 Colombia
Costa Rica
Ecuador
Guatemala
Hong Kong SAR +852 2802 4098
India 1 600 447737
Indonesia +62 (21) 350 3408
Jamaica
Japan 0570 000 511 (inside Japan)
+81 3 3335 9800 (outside Japan)
Korea, Republic of +82
Malaysia 1 800 805 405
Mexico
Panama
Republica Dominicana
Singapore +65 6272 5300
Taiwan +886 0 800 010055
Thailand +66 (0)2 353 9000
Trinidad & Tobago
United States +1 (800)
Venezuela
Vietnam +84 (0) 8 823 4530
Appendix A:
Managing Batteries
Your camera uses two AA batteries. Do not use ordinary alkaline batteries. For best results, use Energizer Lithium AA or rechargeable Nickel Metal Hydride (NiMH) AA batteries.
Top Points About Batteries
zThe first time that you use a set of NiMH batteries, be sure that you fully charge them before using them in the camera.
zIf you do not intend to use your camera for extended periods of time (more than two months), HP recommends that you remove the batteries unless you are using rechargeable batteries and are leaving the camera docked or connected to an optional HP AC power adapter.
zWhen inserting the batteries in the camera, always be sure to orient the batteries as directed by the markings in the battery compartment. If the batteries are inserted improperly, the compartment door may close but the camera will not operate.
zNever use batteries of different chemistries (Lithium and NiMH), brands, or ages. This can cause erratic camera behavior, as well as battery leakage. Always use two identical batteries of the same chemistry, brand, and age.
zThe performance of all batteries will decrease as the temperature drops. For best performance in cold environments, use Energizer Lithium AA batteries. NiMH batteries may also provide acceptable low temperature performance. To improve the performance of all battery types, keep the camera and/or batteries stored in a warm inside pocket when in a cold environment.
Extending Battery Life
Here are some tips for extending battery life:
zTurn off the Image Display and use the viewfinder instead when framing pictures and video. Leave the Image Display off whenever possible.
zChange the Live View at Power On setting in the Setup Menu to Live View Off, so that your camera does not power on in Live View (see Live View at Power On on page 81).
zChange the Display Brightness setting in the Setup Menu to
Low, so that the Image Display consumes less power when in Live View (see Display Brightness on page 80).
zMinimize the use of flash by setting your camera to Auto Flash, instead of Flash On (see Setting the Flash on page 36).
zUse zoom only when necessary to minimize moving the lens (see Using Zoom on page 34).
zMinimize unnecessary power cycling. If you expect to average more than two pictures every five minutes, leave the camera on with the Image Display off, rather than turning off the camera after each shot. This minimizes the number of times the lens must extend and retract.
zUse the optional HP AC power adapter or HP Photosmart
Safety Precautions for Using NiMH Batteries
zDo not charge any batteries other than NiMH batteries in the camera, the optional HP Photosmart
zDo not place an NiMH battery in fire or heat the battery.
zDo not connect the positive terminal and the negative terminal of an NiMH battery to each other with any metal object (such as wire).
zDo not carry or store an NiMH battery together with coins, necklaces, hairpins, or other metal objects. Placing an NiMH battery in contact with coins is especially dangerous to you! To avoid injury, do not drop this battery into a
zDo not pierce the battery with nails, strike the battery with a hammer, step on the battery, or otherwise subject it to strong impacts or shocks.
zDo not solder directly onto the battery.
zDo not expose the battery to water or salt water, or allow the battery to get wet.
zDo not disassemble or modify the battery. The battery contains safety and protection devices, which, if damaged, may cause the battery to generate heat, explode, or ignite.
zImmediately discontinue use of the battery if, while using, charging, or storing the battery, the battery emits an unusual smell, feels excessively hot (note that it is normal for the battery to feel warm), changes color or shape, or appears abnormal in any other way.
zIn the event the battery leaks and the fluid gets into your eye, do not rub the eye. Rinse well with water and immediately seek medical care. If left untreated, the battery fluid could cause damage to the eye.
Performance per Battery Type
The following table shows how Lithium and rechargeable NiMH batteries perform in different types of use scenarios.

Power Indicators
The following icons may be displayed on the status screen, in Live View, in Playback, and when the camera is connected to a computer or printer. If no icon is displayed, this means that the camera is using battery power.
NOTE When you remove the batteries from the camera, the date and time settings are preserved for approximately 10 minutes. If the camera is without batteries for longer than 10 minutes, the clock is set to the last date and time at which the camera was used. You may be prompted to update the date and time the next time you power on the camera.

Recharging NiMH Batteries
NiMH batteries can be recharged in the camera when the camera is connected to an optional HP AC power adapter or HP Photosmart
When the HP AC adapter is used to charge the batteries and the camera is off, the Power light on the back of the camera will blink during charging. When the dock is used, the dock light will blink. When the quick recharger is used, the light on the quick recharger will be red.
The following table shows the average time it takes to recharge NiMH batteries that have been fully discharged, depending on where the batteries are being charged. The table also notes the signal you will see when the batteries have been recharged.
If you will not be using your camera immediately after charging the batteries, we recommend that you leave the camera in the dock or plugged in to the HP AC adapter. The camera will top off the batteries periodically to ensure that the camera is always ready for use.
Some things to keep in mind when using NiMH batteries are as follows:
zThe first time that you use a set of NiMH batteries, be sure that you fully charge them before using them in the camera.
zYou may notice that the first several times you use NiMH batteries, the battery life seems shorter than what you expect. Performance will improve and become optimal after the batteries have been charged and then discharged (used) completely four or five times. You can use the camera normally to discharge the batteries during this ???conditioning??? period.
zAlways recharge both NiMH batteries at the same time. One
zNiMH batteries discharge when not in use, whether they are installed in a camera or not. If they have not been used for more than two weeks, recharge them before using them again. Even if you are not using your batteries, it is a good idea to charge them every six months to a year to prolong their useful life.
zThe performance of all rechargeable batteries, including NiMH, will degrade over time, especially if they are stored and used at high temperatures. If battery life has become unacceptably reduced over time, replace the batteries.
zThe camera, the dock, or the quick recharger may be warm while operating and charging NiMH batteries. This is normal.
zNiMH batteries can be left in the camera, the dock, or the quick recharger for any period of time without harm to the batteries or the camera, the dock, or the quick recharger.
Always store charged batteries in a cool location.
Safety Precautions for Recharging NiMH Batteries
zDo not charge any batteries other than NiMH batteries in the camera, the dock, or the quick recharger.
zInsert the NiMH batteries in the correct orientation in the camera, the dock, or the quick recharger.
zUse the camera, the dock, or the quick recharger in a dry location only.
zDo not charge NiMH batteries in a hot location, such as in direct sunlight or near a fire.
zWhen recharging NiMH batteries, do not cover the camera, the dock, or the quick recharger in any way.
zDo not operate the camera, the dock, or the quick recharger if the NiMH batteries appear damaged in any way.
zDo not disassemble the camera, the dock, or the quick recharger.
zUnplug the HP AC power adapter or the quick recharger from the electrical outlet before cleaning the power adapter or quick recharger.
zAfter extensive use, an NiMH battery may begin to swell. If it becomes difficult to insert an NiMH battery into or remove the battery from the camera, the dock, or the quick recharger, discontinue use of the battery and replace it with a new one. Please recycle the old battery.
Sleep
To conserve battery power, the Image Display turns off automatically if there is no button activity for 20 seconds when in Live View or 30 seconds when in any other mode. When the camera is connected to a computer, the Image Display turns off automatically 10 seconds after the connection is made. When the camera is in this ???sleep??? state, pressing any button will wake up the camera again. If no buttons are pressed during the sleep state, the camera will turn off after an additional
5 minutes, unless it is connected to a computer, printer, or optional HP AC power adapter.
Appendix B:
Purchasing Camera
Accessories
You can purchase additional accessories for your camera.
For information on your HP M305/M307 and compatible accessories, go to:
zwww.hp.com/go/myhpcamera (US)
zwww.hp.ca/myhpcamera (Canada)
zwww.hp.com (all other countries)
To purchase accessories, visit your local retailer or order online at:
zwww.hpshopping.com (US)
zwww.hpshopping.ca (Canada)
zwww.hp.com/eur/hpoptions (Europe)
zwww.hp.com/apac/homeandoffice (Asia Pacific)

Some accessories for this digital camera are as follows:
zHP Photosmart
C8907A
Recharge the AA NiMH batteries in your camera so your camera is always ready to go. Transfer photos easily to your computer, send photo
Includes a dock with two rechargeable AA NiMH batteries, an audio/video cable, a USB cable, and an HP AC power adapter.
zHP Photosmart
One hour recharging of AA NiMH batteries, plus stylish protection for your HP Photosmart
zHP Photosmart 3.3V AC power adapter for HP Photosmart
This is the only power adapter supported for use with
zHP Photosmart SD memory cards (North America only) (For important information about supported types of memory cards, see Storage on page 145.)
???HP Photosmart 64 MB SD memory card
???HP Photosmart 128 MB SD memory
???HP Photosmart 256 MB SD memory
???HP Photosmart 512 MB SD memory
zHP Photosmart
Protect your HP Photosmart
z
Appendix C:
Specifications

z
Single video taken after
z
z


Interfaces z USB mini A/B connector to a computer or printer
zDPS
zUSB to HP DeskJet and HP Photosmart printers
zDC input 3.3 Vdc @ 2500 mA
zHP Photosmart
Orientation No
Sensor
Standards z PTP transfer (15740)
zMSDC transfer
zNTSC/PAL
zJPEG
zMPEG1 level 1
zDPOF 1.1
zEXIF 2.2
zDCF 1.0
zDPS

Memory Capacity
The following table lists the approximate number and average size of still images that can be stored in the internal memory in the camera when the camera is set to different Image Quality settings available in the Capture Menu.
NOTE Not all 16 MB of internal memory is available for storing images, because some memory is used for internal camera operations. Also, the actual file sizes and number of still images that can be stored in the internal memory in the camera or on an optional memory card will vary, depending on the content of each still image.
Index
A
AA batteries, types to use 129 AC power adapter
connector on camera 20 purchasing 140
accessories for camera 139 Action mode, setting 39 AF viewfinder light 19
arrow buttons on Controller 18 audio clips, record 28, 61 automatic exposure, override 38
B batteries
door on camera 18 extend life of 130 indicators 133 install 10
Beach & Snow mode, setting 39 blinking lights on camera 17,
brackets in Live View screen 31 brightening an image 44
Burst
restore setting 42 setting 42 Timer/Burst button 18
Index
C camera
accessories, purchasing 139 cleaning the lens 94
purchasing case for 141 reset 88
turn on/off 12 camera dock
connector on camera 21 description 9 purchasing 140
camera parts
back and first side of camera 16
front, second side, and bottom of camera 20
top of camera 21 Camera Sounds, setting 81
capacity of internal memory 148 Capture Menu
Help for menu options 44 restore settings 44
case for camera, purchasing 141
Color of images, setting 50 compression format 146 computer, connect camera to 73
149
connections
as a Picture Transfer Protocol (PTP) device 83
as a USB Mass Storage Device Class (MSDC) 83
connectors
AC power adapter 20 camera dock 21
conserving battery life 130 Controller with arrow buttons,
description 18 crosshairs in viewfinder 31 customer support 122
D
Date & Time Imprint, setting 50 Date & Time, setting 13, 82 delete during Instant
Review 27, 29 Delete, using 60 digital zoom 35 direct print
HP Instant Share/Print button 18
printing images from camera to printer or computer 75
disk drive, camera as 83 Display Brightness, setting 80
E
error messages on camera 109 on computer 119
150
EV Compensation, setting 44 extending battery life 130
F
Fast Shot mode, setting 38 flash
description 20 restore setting 37 settings 36 using 36
working distance 144 Flash button, description 18 focus
brackets, using 31 camera shake 34 lock 34
range 143 format
internal memory 61 memory card 61
H
help from customer support 122 Help, online
for Capture Menu options 44 Help Menu, using 24
HP AC power adapter connector on camera 20 purchasing 140
HP Image Zone software installing 14
not using 89 HP Instant Share
customizing the HP Instant Share Menu 65
HP Instant Share/Print button 18, 65
Index
selecting individual images 69 turn on/off 65
using the HP Instant Share Menu 64
HP Instant Share Menu customizing 65 description 64
selecting individual images 69 setting up destinations 65 using 64
HP Instant Share/Print button 65 HP web sites 122
I
Image Display description 18
Live View at Power On setting 81
Live View button 19 status screen 25 using 30
Image Quality, setting 45 images
brightening 44 Color setting 50 darkening 44
Date & Time Imprint 50 Image Quality setting 45 ISO Speed setting 49 magnifying 57
number remaining 25, 31, 56 number saved in internal
thumbnails view 56 too dark/light 44 transferring camera to
White Balance setting 47 indicators, power 133 install
batteries 10 memory card 11 software 14, 15 wrist strap 10
internal memory format 61
image capacity of 148 pictures remaining 25, 31, 56
L
Landscape mode, setting 39 Language
change setting 85 choose at first startup 13
LEDs (lights) on camera AF light 19
Memory light 17 Power light 17
life of battery, conserving 130 Live View
M
Macintosh computer connect to 73 install software 15
USB setting on camera 83 Macro mode, setting 38 Magnify
control on Zoom lever 17 using 57
magnifying images 57 memory card
pictures remaining 25, 31, 56 supported types and sizes 145
Memory light, description 17 memory, internal
image capacity 148 Menu/OK button,
menus Capture 43 Help 24
HP Instant Share 64 overview 22 Playback 58
Setup 79 messages
N
NiMH batteries recharging 134
safety precautions 131 number of
images stored in internal memory 148
O
ON/OFF switch, description 17 online Help
for Capture Menu options 44 Help menu, using 24
optical zoom 34
P
parts of camera
back and first side of camera 16
front, second side, and bottom of camera 20
top of camera 21 performance per battery
type 132 pictures
record audio clips 28 share 63
take
Playback
power indicators 133 light 17
specifications 147 turn on/off 12
power adapter, HP AC 20 connector on camera 20 purchasing 140
Power light, description 17 Power ON/OFF switch,
description 17 print images
directly to printer 75 HP Instant Share/Print
using HP Instant Share 63 problems, troubleshooting 87 product support 122 purchasing camera
R range
Exposure Compensation 145 flash 144
recharging NiMH batteries 134 record
audio clips 28, 61 video clips 29
remaining pictures count 25, 31, 56
restore settings 25, 37, 39, 41, 42, 44
Index
reviewing images 53 rotate images 62
S
safety precautions for NiMH batteries 131
selecting images for HP Instant Share destinations 69
restore setting 41 settings 40 Timer/Burst button 18
settings, restore 25, 37, 39, 41, 42, 44
Setup Menu, using 79 share pictures 63 shooting mode
button 18 restore setting 39 settings 38
Shutter button description 21
lock exposure and focus 31 shutter speed range 144 software
using camera without 89 sounds of camera 81
space remaining in memory 25, 31, 56
specifications 143 states, camera 22 status screen 25
still pictures, take 27 support for users 122
153
T
technical support 122 Thumbnails
control on Zoom lever 17 viewing 56
Time & Date, setting 13, 82 Timer/Burst button 18
TV (television) Configuration setting 84
U
USB
configuration setting 83 connector on camera 21
V
Video button, description 21 video clips, recording 29 Video viewfinder light 19 viewfinder
crosshairs 31 description 18 lights 19 using 31
W
web sites for HP 122 White Balance, setting 47 Windows computer
connect to 73 install software 14
154


