reference guide
hp StorageWorks SSL1016 tape autoloader
Fourth Edition (June 2003)
Part Number:
This guide provides
reference guide
hp StorageWorks SSL1016 tape autoloader
Fourth Edition (June 2003)
Part Number:
This guide provides
?? 2003
This document contains proprietary information, which is protected by copyright. No part of this document may be photocopied, reproduced, or translated into another language without the prior written consent of
Microsoft??, Windows??, and Windows NT?? are U.S. registered trademarks of Microsoft Corporation. Oracle?? is a registered U.S. trademark of Oracle Corporation, Redwood City, California.
UNIX?? is a registered trademark of The Open Group.
Solaris??? a trademark of Sun Microsystems in the U.S. and other countries.
SSL1016 Tape Autoloader Reference Guide
Fourth Edition (June 2003)
Part Number:

contents

Contents

Contents
Using the

Contents

Contents

Contents

about this guide
This reference guide provides information to help you:
???Install and configure the autoloader
???Properly use and maintain tape cartridges
???Operate the autoloader
???Troubleshoot the autoloader
???Upgrade or replace Customer Replaceable Units About this Guide topics include:
???Conventions, page 10
???Getting Help, page 13

About this Guide
Conventions
Conventions consist of the following:
???Text Symbols
Document Conventions
The document conventions included in Table 1 apply in most cases.
Text Symbols
The following symbols may be found in the text of this guide. They have the following meanings.
WARNING: Text set off in this manner indicates that failure to follow directions in the warning could result in bodily harm or loss of life.
About this Guide
Caution: Text set off in this manner indicates that failure to follow directions could result in damage to equipment or data.
Note: Text set off in this manner presents commentary, sidelights, or interesting points of information.
Equipment Symbols
The following equipment symbols may be found on hardware for which this guide pertains. They have the following meanings.
Any enclosed surface or area of the equipment marked with these symbols indicates the presence of electrical shock hazards. Enclosed area contains no operator serviceable parts.
WARNING: To reduce the risk of injury from electrical shock hazards, do not open this enclosure.
Any
WARNING: To reduce the risk of electrical shock, fire, or damage to the equipment, do not plug telephone or telecommunications connectors into this receptacle.
Any surface or area of the equipment marked with these symbols indicates the presence of a hot surface or hot component. Contact with this surface could result in injury.
WARNING: To reduce the risk of injury from a hot component, allow the surface to cool before touching.

About this Guide
Power supplies or systems marked with these symbols indicate the presence of multiple sources of power.
WARNING: To reduce the risk of injury from electrical shock, remove all power cords to completely disconnect power from the power supplies and systems.
Any product or assembly marked with these symbols indicates that the component exceeds the recommended weight for one individual to handle safely.
WARNING: To reduce the risk of personal injury or damage to the equipment, observe local occupational health and safety requirements and guidelines for manually handling material.
Rack Stability
Rack stability protects personal and equipment.
WARNING: To reduce the risk of personal injury or damage to the equipment, be sure that:
???The leveling jacks are extended to the floor.
???The full weight of the rack rests on the leveling jacks.
???In single rack installations, the stabilizing feet are attached to the rack.
???In multiple rack installations, the racks are coupled.
???Only one rack component is extended at any time. A rack may become unstable if more than one rack component is extended for any reason.

About this Guide
Getting Help
If you still have a question after reading this guide, contact an HP authorized service provider or access our website: http://www.hp.com.
HP Technical Support
In North America, call technical support at
Note: For continuous quality improvement, calls may be recorded or monitored.
Outside North America, call technical support at the nearest location. Telephone
numbers for worldwide technical support are listed on the HP website under support: http://www.hp.com/support.
Be sure to have the following information available before calling:
???Technical support registration number (if applicable)
???Product serial numbers
???Product model names and numbers
???Applicable error messages
???Operating system type and revision level
???Detailed, specific questions
HP Storage Website
The HP website has the latest information on this product, as well as the latest drivers. Access storage at: http://www.hp.com. From this website, select the
appropriate product or solution.
HP Authorized Reseller
For the name of your nearest HP authorized reseller:
???In the United States, call
???In Canada, call
???Elsewhere, see the HP website for locations and telephone numbers: http://www.hp.com.

About this Guide

The HP StorageWorks SSL1016 Tape Autoloader provides a compact,
Front View
The mailslot, LCD, function keys, status LEDs, On/Off button, and left and right magazines are visible on the front panel of the autoloader.
4Right magazine

Overview
Mailslot
The autoloader has a manual entry port, the mailslot, which allows you to load or unload a single cartridge. To maintain security, the mailslot can be password protected. Provided that the tape drive is empty, a cartridge can be inserted in the mailslot even if both magazines are completely filled.
LCD
The LCD allows you to use the scrolling menu to perform diagnostics and to enter commands.
Function Keys
The function keys allow you to move through the scrolling menu and to make selections.
34
Figure 2: Function keys
1 Scroll up. Press to move through a menu or number series.
2 Escape. Press to return to the previous menu or to move backwards on a screen.
3 Scroll down. Press to move through a menu or number series.
4 Enter. Press to select an option.

Overview
Status LEDs
The status LEDs show autoloader and drive status information. The left, green LED shows ready status information, and the right, amber LED shows fault status information.
On/Off Button
The On/Off button is a soft key, which means that if the autoloader is moving any cartridges when you press the On/Off button, it finishes moving them before powering off. However, any other functions, such as writing to a tape or performing a diagnostic test are interrupted and terminated when you press the On/Off button.
Magazines
The magazines contain part of the robotics that move the cartridges inside the autoloader. The autoloader is equipped with two cartridge magazines. The magazines are removable, and each magazine accommodates up to eight cartridges. The magazines store your data tape cartridges and can also store your cleaning cartridge.
Figure 3: Magazine

Overview
Rear View
The fans and connection ports are visible on the back of the autoloader.
345 67
4Ethernet connector
Cooling Fans
The autoloader has a system cooling fan, plus a second fan to cool the power supply. These fans maintain the acceptable temperature range for the tape drive path and all internal electronics. See Appendix C, ???Specifications,??? for details about required specifications.
AC Power Plug
The autoloader requires a 110/220 volts AC power connection.

Overview
Ethernet Connection
The ethernet connection lets you connect the autoloader to a network, enabling remote administration. Via the network, the autoloader can access an SNMP server and a Simple Network Time Protocol (SNTP) time server. The ethernet connection supports File Transfer Protocol (ftp) and Hyper Text Transfer Protocol (http). You can download firmware updates using ftp and perform administrative tasks, including diagnostics, using http.
SCSI Connection
The autoloader supports both
For best performance, an LVD connection using an Ultra3 adapter is recommended for the Ultrium 460 drive.
A
Note: Adding a SE device to an LVD bus causes the entire bus to operate at SE speeds and with SE cable length requirements.
DCA Switches
The switches on the back of the drive carrier assembly (DCA) have no user function at this time.

Overview
Internal View
Figure 5 shows the internal components of the autoloader. The picker sits behind the front panel and mailslot, and can accept and eject cartridges from the mailslot, magazines, and tape drive. The drive carrier assembly (DCA) contains the tape drive, internal power supply, controller board, and cooling fan; it can be removed and replaced as a single component.
12
Figure 5: Autoloader internal view
1Picker
2Drive carrier assembly
Picker
The picker moves the cartridges from one location to another. One motor rotates the picker platform to position the picker arm in front of the drive, mailslot, or desired magazine. Another motor positions the picker arm to retrieve or replace the cartridge. The rotation motor engages the arm on a notch of the cartridge, and the translation motor moves the cartridge from the picker to the drive (or magazine or mailslot) or from the drive (or magazine or mailslot) to the picker.
Overview
DCA
The drive carrier assembly (DCA) is configured with one DLT1, SDLT 320, or Ultrium 460 tape drive, depending on the model. The DCA facilitates the easy removal of the drive. To change tape drives, you can replace the DCA without having to remove the top cover of the autoloader.
Barcode Reader
The barcode reader provides inventory feedback to the host application and/or LCD panel by reading the cartridge barcode labels. The autoloader stores the customized inventory data in its
For best performance, HP recommends using only HP barcode labels:
???Part number
???Part number C7970B for Ultrium data cartridges
Supported Software
The autoloader supports most major operating systems and is also compatible with most popular backup software applications.
Note: Information on specific supported operating systems and backup applications can be found at http://www.hp.com and at vendor websites.

Overview

Preparation
Make sure that the work area is free from conditions that could cause electrostatic discharge (ESD). See Appendix B, ???Electrostatic Discharge,??? for additional information. You will need a #2 Phillips screwdriver for rackmount installations.
SCSI Bus Requirements
The autoloader contains a SCSI interface that supports both Single Ended (SE) and Low Voltage Differential (LVD) communication, however, data transfer rates and SCSI cable lengths will be reduced if an SE connection is used. The autoloader is not compatible with a High Voltage Differential (HVD) SCSI bus.
The following SCSI host adapter cards are currently supported on the autoloader:
Table 2: Supported Adapters
Note: For best performance, an LVD connection is recommended.

Installation and Configuration
The following cables are shipped with your autoloader:
???
???
???
SCSI Cable and Terminator Requirements
If the autoloader is the last device on the SCSI bus you must attach a terminator to the SCSI connector on the back panel of the autoloader. There must be a terminator on each end of the SCSI bus. Typically, the host adapter provides the
SCSI Cable Length
LVD SCSI configurations have a maximum allowable bus length of 39.4 feet (12 meters). To determine the cable length of the bus, measure the lengths of the SCSI cables connecting each device to that bus and add those lengths together for the total length. To that total length, add 16 inches (40.64 cm) for the internal SCSI cable length used in the autoloader.
Accessories
The following accessories are shipped with each autoloader:
???Installation poster
???SCSI cable(s)
???
???SCSI terminator
???Hardware brackets and handles to rackmount the autoloader
???Standalone configuration hardware
???Two magazines
???1 data cartridge
???Power cord
???Rackmount template

Installation and Configuration
???Documentation CD (documents in PDF format)
Installation Location
Caution: To prevent damage to the tapes and the tape drives, position the autoloader so that no cooling vents are located directly in front of the unit; this helps minimize the amount of foreign debris entering the tape path.
Choose a location that meets the following criteria:
???Room temperature: 10??C to 35??C (50??F to 95??F)
???Power source:
???AC power voltage: 100 V to 127 V or 200 V to 240 V
???Line frequency: 50 Hz to 60 Hz
???Air quality: Minimal sources of particulate contamination. Avoid areas near frequently used doors and walkways, stacks of supplies that collect dust, and smoke filled rooms. Avoid placing the autoloader near printing machines as airborne ink contaminates tape drives.
Note: Excessive dust and debris can damage tapes and tape drives.
???Humidity: 20% to 80% relative humidity
???Front Clearance: about 2 inches (about 5 cm) from rack door; about 6 inches (about 15 cm) from wall or solid object; about 12 inches (about 30 cm) to insert a cartridge in the mailslot, and about 28 inches (about 71 cm) to insert or remove a magazine.

Installation and Configuration
Required Tools and Hardware for Rackmount Installation
You need a Phillips screwdriver to install your autoloader into a rack.
Make sure you have all the necessary parts you need before you begin installation. You need the following parts:
???8 clip nuts, plus four additional clip nuts (included with your rack) if using the optional installation rails
???2
???2 rear support brackets
???8 rear support bracket screws
???8 mounting screws (plus four additional mounting screws if using the optional installation rails)
???Rack template
Rackmounting
WARNING: It takes two people to safely rackmount your autoloader.
WARNING: Before you begin, make sure that the rack is sufficiently stable. If provided, lower the rack leveler feet and make sure any required stabilizers are installed. If provided, extend the rack
Caution: Do not remove the top cover of the autoloader during the installation process. Removing the top cover could result in damage to the autoloader. It also causes the autoloader chassis to bow and prevents correct installation.
Caution: Make sure that the rack and all equipment mounted in the rack have a reliable ground connection. Verify that the total current of the rack components does not exceed the current rating of the power distribution unit or outlet receptacles.
Installation and Configuration
To rackmount the autoloader:
1.Use the template that shipped with the library to mark the location of the clip nuts and mounting hardware on the mounting rails of the rack.
Figure 6: Measuring with the rack template
2.Install two clip nuts into each front rail of the rack in the hole locations marked using the template.
3.Install two clip nuts into each back rail of the rack in the hole locations marked using the template.
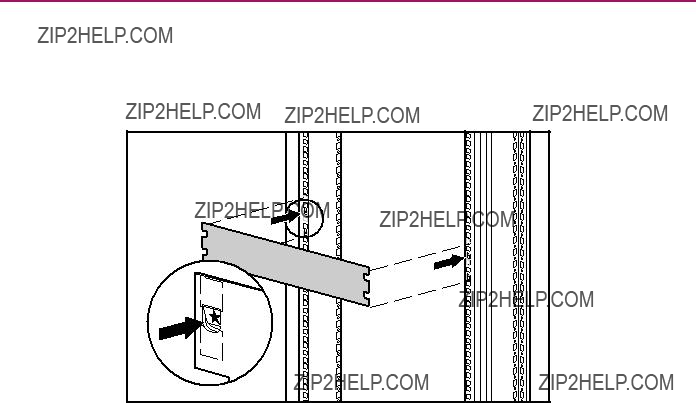
4.If there are no devices installed below the autoloader, use the optional installation rails to help support the autoloader during installation:
a.Install four clip nuts at the front of the rack, two on each rail. Install the first clip nuts two holes below the bottom autoloader clip nut. Install the second clips nuts two holes below the first clip nuts.
b.Insert one optional mounting rail into the rack with the support ledge facing in.

Installation and Configuration
c.Hook the curved tabs around the rear rail of the rack 1.
d.Align the rail so that the holes are over the previously installed clip nuts 2.
e.Secure with two screws 3.
f.Attach the other optional mounting bracket using steps b through e.
Figure 7: Installing the optional installation rails
Installation and Configuration
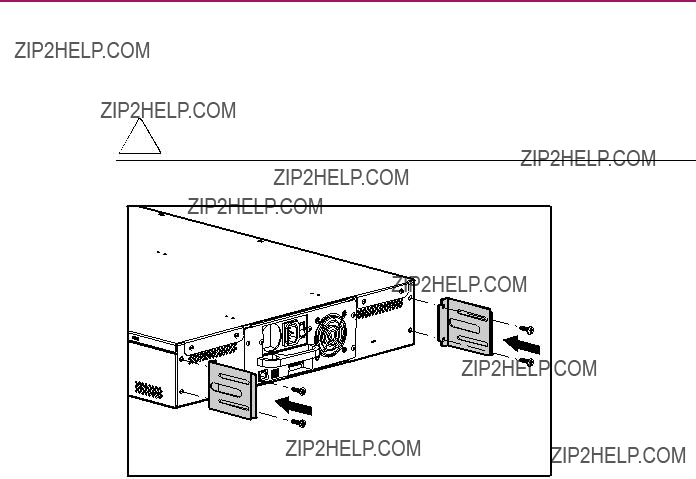
5.Attach the two support brackets to the rear of autoloader, tightening screws until snug.
Caution: Be sure the support brackets are aligned straight with the sides of the autoloader for proper installation into the
Figure 8: Attaching the autoloader support brackets
Installation and Configuration
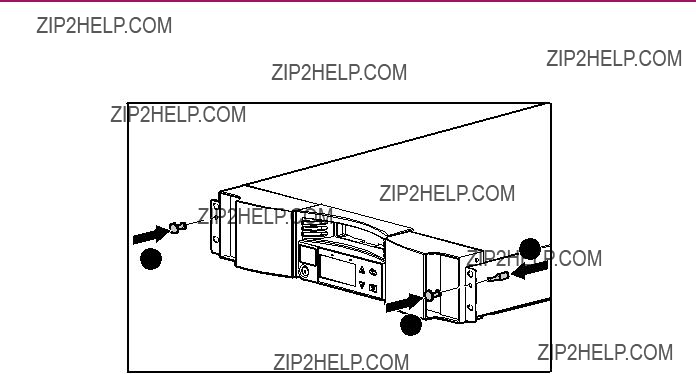
6.Attach the two rackmount handles 1 to the front of the autoloader, tightening the studs 2 until snug.
1
2
1
Figure 9: Attaching the front rackmount handles
Installation and Configuration
7.Attach one
Figure 10: Attaching the
8.Position the autoloader in the rack so that each support bracket rests on a
Figure 11: Positioning the autoloader in the rack
Installation and Configuration
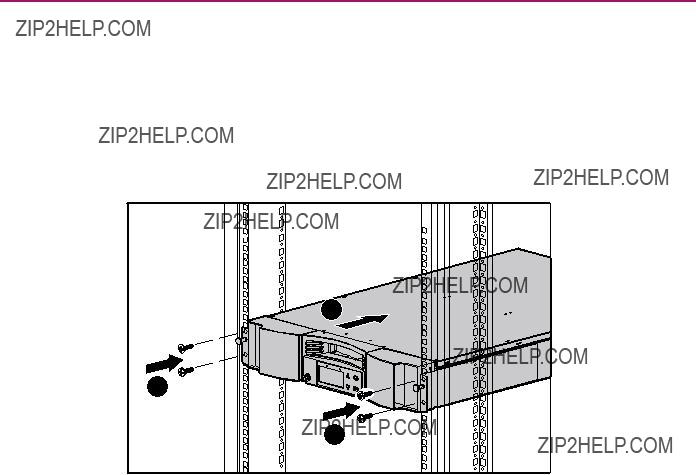
9.Slide the autoloader in place 1 so that:
a.The mounting studs on the front ears of the autoloader slide into the holes between the clip nuts.
b.The front ears of the autoloader align with the front clips.
c.The rear support brackets engage the locking tab on the rear
1
2
2
Figure 12: Attaching the autoloader to the front of the rack
10.Loosely install a screw in each front clip nut to attach the ears 2.
11.Verify that the autoloader is level. Adjust as needed.
12.Tighten the four screws that attach the ears to the front clip nuts.
13.Tighten the four screws that connect the
14.Install and tighten the four screws that connect the support brackets to the
Installation and Configuration
Figure 13: Rear
15.If additional products are going to be installed below the autoloader, remove the optional installation brackets:
a.Remove the two screws securing each bracket to the front of the rack.
b.Pull the bracket forward and down, then push back to release the rear tabs.
c.Remove the rail from the rack.
Caution: To avoid personal injury or damage to the equipment, be sure that the optional installation brackets or other properly installed rack products are in place below the autoloader at all times.
Note: Be sure to save the optional installation brackets in a safe place for use if the autoloader needs to be removed.

Installation and Configuration
Removing the Autoloader From the Rack
When removing the autoloader from the rack:
???Always use at least two people.
???Install the optional installation brackets if there is no device installed below the autoloader.
???Before powering off the autoloader, remove the magazines.
Standalone Installation
Use these instructions if you will not be installing your autoloader into a rack.
Preparation
To prepare your autoloader for standalone installation:
1.Place one rear standalone leg into place and secure with two screws. Repeat for the other side.
Figure 14: Installing the rear standalone leg

Installation and Configuration
2.Install the front standalone bracket cover:
a.Place the cover over the autoloader bracket.
b.Place the washers over the bracket holes and secure with a screw.
c.Repeat for the other side.
Figure 15: Installing the front standalone bracket covers
Clearance
Place the autoloader on a desk, table, or other stable, horizontal surface. Make sure the fan at the rear of the autoloader is not obstructed. Allow about 6 inches (about 15 cm) from wall or solid object at the rear. Allow about 12 inches (about 30 cm) to insert a cartridge in the mailslot, and about 28 inches (about 71 cm) to insert or remove a magazine at the front.

Installation and Configuration
SCSI Connection
The SCSI connection lets the host computer communicate with the autoloader.
Note: If you do not already have a compatible and available SCSI HBA installed in the host computer, install one before proceeding.
Caution: When installing cables, be careful not to damage the SCSI pins on the connectors. Damaged pins will cause the connection to fail.
To make the SCSI connection:
1.If the host computer is connected to a network, check with the system administrator before turning off power.
2.Properly power off all peripheral devices connected to the host computer.
3.Power off the host computer.
4.Install the supplied
Note: Use an appropriate cable that matches your host connector.

Installation and Configuration
Figure 16: Attaching the cables
Note: The connector on the end of the cable is offset. Make sure that you install it with the correct orientation so that you can fit a terminator or another cable in the other port.
5.If the autoloader will be the last device on the SCSI bus, install the supplied SCSI terminator to the remaining port that is on the DCA and then tighten the screws.
6.Attach the other end of the SCSI cable to the SCSI host adapter card using the appropriate cable.
7.Power on any peripheral devices you powered off in Step 2.
Note: Do not power on the host computer at this time. You must first configure the autoloader.

Installation and Configuration
Daisy Chaining
The autoloader does not support daisy chaining with other products. You can daisy chain one additional autoloader using the
Ethernet Connection
Attach one end of the
Note: This step is not required for operation, but is necessary if you want to use the autoloader Web administration feature.
Power On
Carefully inspect your power cord and make sure that it is the correct one for your country or region. If the power cord is not correct, contact your customer service representative.
To connect the power cord:
1.Make sure that the power switch on the back of the autoloader is off (the 0 is pressed).
2.Connect the female end of the power cord to the power connector on the back of the autoloader.
3.Plug the male end of the power cord into the power source.

Installation and Configuration
Figure 17: Connecting the power cord
Note: Do not power on the host before powering on the autoloader.
To power on the autoloader:
1.Push the power switch that is on the back of the autoloader to the on position (the | is pressed).
Wait while the autoloader performs its
???The cooling fans begin to operate.
???The LCD illuminates and displays
???The autoloader performs a
???The autoloader performs a calibration and magazine element status.
Note: Depending on how the autoloader was last powered off, you may need to press the On/Off button on the front of the autoloader.

Installation and Configuration
Verification
When you first power on the autoloader, it automatically runs a Power On Self Test (POST). During the POST, the right (amber) LED flashes rapidly. After the POST, the left (green) LED illuminates steadily, and after approximately three minutes the LCD displays the HP logo and drive type. Do one of the following:
???If the autoloader powers on successfully, continue configuring the autoloader. See ???Configuration.???
???If the autoloader does not power on successfully, make sure that:
???The rear power switch is on.
???The power cord is inserted correctly.
???The SCSI bus is terminated.
???The SCSI cable is connected to the autoloader and host computer.
???The On/Off button on the front of the autoloader has been pressed.
???There is not an error code displayed on the autoloader???s LCD. (If an error message is displayed, see Chapter 6, ???Troubleshooting.???)
If you cannot resolve the problem yourself, contact your authorized service representative.
Configuration
To configure your autoloader, use the Configuration submenu on the front panel. When you first power on the autoloader, it defaults to no password protection. After you set the security option, however, all the configuration functionality is
Installation and Configuration
The Configuration submenu has the following options:
Configuration
SCSI ID
Ethernet
Set IP
Dynamic (DHCP)
Static
Set Subnet Mask
Set Gateway
Set SNMP Server
Set Time Server
Time
Set Timezone
Set Date/Time
Change Mode
Random
Mixed
Sequential
Seq Cycle Mode
Cleaning Tape
Auto Clean
Tape Location
Compression
I/E Slot
Security
Security
Set Password
Operator
Administrator
System Update
Figure 18: Configuration submenu
Note: The autoloader ships with English firmware installed. To install firmware in other languages, see ???Update Firmware??? in Chapter 4.

Installation and Configuration
To configure the autoloader, you must set the following:
???SCSI ID
???Ethernet IP address (if you are not using DHCP)
???SNMP server IP address (for SNMP alerts)
???Time server IP address (or the timezone, date, and time, if configuring manually)
Note: The DLT1 and SDLT autoloaders do not have a battery so if time is manually set, it is lost and needs to be reset whenever the autoloader is power cycled.
???Control mode
???Security option
SCSI ID
Each SCSI device attached to a server or workstation must have a unique SCSI ID.
For the DLT1 and SDLT autoloaders you need to set only one SCSI ID for the autoloader; you do not need to set up separate SCSI IDs for the tape drive and autoloader. Because the autoloader uses LUNs to address the drive and robotics, only the autoloader requires a SCSI ID.
For the Ultrium 460 autoloader you must set two SCSI IDs; one for the autoloader and one for the tape drive. The default SCSI ID for the autoloader is 4. The default SCSI ID for the tape drive is 5.
Check the IDs on all other SCSI devices that are on the SCSI bus, including the SCSI host adapter, and select an unused SCSI ID for the autoloader. The default ID for the autoloader is 5, but you can select any unused number between and including 0 and 15. If the factory default SCSI ID (5) is not already being used by another device on the SCSI bus, you do not need to change the autoloader SCSI ID from 5 if you do not want to.
Note: Disregard the SCSI ID switch on the back of the DCA. The autoloader does not use the switch to set the SCSI ID.
Installation and Configuration
To set the SCSI ID:
1. On the main menu, scroll to Configuration.
Status
Commands
Configuration
Diagnostics
Figure 19: Main menu
2.Press Enter.
3.On the Configuration submenu, scroll to SCSI ID.
SCSI ID
Ethernet
Time
Change Mode
Figure 20: Select SCSI ID
4.Press Enter.
5.Scroll to the number you want to set as the autoloader SCSI ID.
to change Enter to continue SCSI ID: 05
Figure 21: Set SCSI ID
6.Press Enter.
7.Reboot for the new SCSI ID to take affect.
a.Press and hold the power button on the front panel until Power Off appears on the LCD.
b.Press the power button again to power on the autoloader.
The new SCSI ID is now in effect.

Installation and Configuration
Control Mode
You can set the autoloader to either Random, Mixed, Sequential, or Seq Cycle Mode. The default control mode is Random.
Note: If the I/E slot is enabled, the autoloader cannot be used in Mixed or Sequential Mode.
The Sequential mode supports certain backup applications that do not manage media. During backup, when one cartridge is read or written to the end of the tape, the autoloader automatically returns that cartridge to its slot and loads the cartridge from the next higher numbered slot to the tape drive to be read or written to. This continues until the backup software stops accessing the drive or until all the cartridges have been sequentially accessed.
In Random control mode you can specify which cartridge you want to use and where you want it to go. You will probably use this mode the most.
In Mixed mode, the autoloader supports both Sequential and Random mode functions. This mode can be useful in network environment.
Note: Do not use Mixed mode unless you are certain all applications support Mixed mode operation.
In Seq Cycle mode, the autoloader automatically starts over with magazine slot 1 when the last cartridge is used (slot 16 or highest filled slot). If this control mode is not set, the autoloader stops when the last cartridge available has been used. In Seq Cycle mode, the autoloader continues to cycle until a user stops it.
Caution: Seq Cycle mode could cause data to be overwritten. Only use Seq Cycle mode if you are sure that the size and frequency of your backups will not prematurely overwrite your data.

Installation and Configuration
To set the control mode:
1. On the main menu, scroll to Configuration.
Status
Commands
Configuration
Diagnostics
Figure 22: Main menu
2.Press Enter.
3.On the Configuration submenu, scroll to Change Mode.
SCSI ID
Ethernet
Time
Change Mode
Cleaning Tape
Figure 23: Select Change Mode
4.Press Enter.
The mode options appear. A checkmark appears after the enabled mode.
3Random Mixed Sequential
Seq Cycle Mode
Figure 24: Mode Options
5.Do one of the following:
???To change the control mode, scroll to the desired mode and press Enter. A checkmark appears. Press Enter again.
???To leave the control mode unchanged, press Escape.
6.Reboot for the new mode to take affect.
a.Press and hold the power button on the front panel until Power Off appears on the LCD.
b.Press the power button again to power on the autoloader.
The new control mode is now in effect.

Installation and Configuration
Note: When you enable the Sequential mode, LUN 1 no longer appears on the SCSI bus.
Sequential Mode Operation
If you enable the Sequential control mode you must use the Sequential Ops submenu under the Commands menu to operate the autoloader after it has been rebooted.
???Start allows you to load the first cartridge.
???Resume allows you to continue if the cycle was stopped.
???Stop stops the cycle.
To start Sequential Mode operation:
1.On the main menu, scroll to Commands.
2.Press Enter.
3.On the Commands submenu, scroll to Sequential Ops.
4.Press Enter.
5.On the Sequential Ops submenu, scroll to Start.
6. Press Enter. Moving first tape to drive is displayed. To stop Sequential Mode operation:
1.On the main menu, scroll to Commands.
2.Press Enter.
3.On the Commands submenu, scroll to Sequential Ops.
4.Press Enter.
5.On the Sequential Ops submenu, scroll to Stop Cart.
6.Press Enter. Ejecting tape from drive is displayed. To resume Sequential Mode operation:
1.On the main menu, scroll to Commands.
2.Press Enter.
3.On the Commands submenu, scroll to Sequential Ops.
4.Press Enter.

Installation and Configuration
5.On the Sequential Ops submenu, scroll to Resume.
6.Press Enter.
Ethernet
Ethernet is the method the autoloader uses to access a network. With an Ethernet connection, you can remotely access the autoloader over the network to which it is connected. To use the Ethernet connection, you must define the following:
???A dynamic or static IP address for the autoloader
???A subnet mask
???An IP gateway
If you want SNMP alerts or a link to a time server you must define the following:
???A Simple Network Management Protocol (SNMP) server (for SNMP alerts)
???A Simple Network Time Protocol (SNTP) time server, or set the time and timezone manually
Note: The DLT1 and SDLT autoloaders do not have a battery so if time is manually set, it is lost and needs to be reset whenever the autoloader is power cycled.
Autoloader IP Address
An Internet Protocol (IP) address is the address of any device that is attached to a network. Each device must have a unique IP address. IP addresses are written as four sets of numbers separated by periods ranging from 0.0.0.0 to 255.255.255.255.
IP addresses are either permanent or dynamically assigned. A permanent address remains the same each time the device connects to a network. A dynamic address changes each time the device connects to the network, and is assigned by the network server using a class of software called Dynamic Host Configuration Protocol (DHCP).
When you first power on the autoloader, the default method for setting the IP address is the dynamic method (DHCP). If you want to use DHCP you can skip this step. To determine the IP address when using DHCP, view the Ethernet status information (see ???View Ethernet Information???).

Installation and Configuration
To set a dynamic IP address:
1. On the main menu, scroll to Configuration.
Status
Commands
Configuration
Diagnostics
Figure 25: Main menu
2.Press Enter.
3.On the Configuration submenu, scroll to Ethernet.
SCSI ID
Ethernet
Time
Change Mode
Figure 26: Select Ethernet
4.Press Enter.
5.On the Ethernet submenu, scroll to Set IP.
Set IP
Set Subnet Mask
Set Gateway
Set SNMP Server
Figure 27: Set IP
6.Press Enter.
7.Scroll to Dynamic (DHCP).
Dynamic
3 Static IP
016.117.076.045
Figure 28: Set Dynamic IP
8. Press Enter.

Installation and Configuration
9.Reboot to change the IP address.
a.Press and hold the power button on the front panel until Power Off appears on the LCD.
b.Press the power button again to power on the autoloader.
The IP address is changed.
To set a permanent IP address:
1.On the main menu, scroll to Configuration. (See Figure 25.)
2.Press Enter.
3.On the Configuration submenu, scroll to Ethernet. (See Figure 26.)
4.Press Enter.
5.On the Ethernet submenu, scroll to Set IP. (See Figure 27.)
6.Press Enter.
7.Scroll to Static IP. (See Figure 28.)
8.Press Enter.
9.At each position of the IP address, scroll to the correct number and press Enter to advance your cursor.
Note: Use the Escape key to backspace to a previous text box, if necessary.
When you have set the IP address, the autoloader displays Enter to save.
10.Press Enter.
The Configuration submenu reappears and the permanent IP is now in effect. You do not need to reboot the autoloader.
11.Press Escape or Enter to return to the Ethernet submenu.
Subnet Mask
Creating a subnet mask is a method to split IP networks into a series of subgroups, or subnets, to improve performance and security.
To set a subnet mask:
1.On the main menu, scroll to Configuration. (See Figure 25.)
2.Press Enter.

Installation and Configuration
3.On the Configuration submenu, scroll to Ethernet. (See Figure 26.)
4.Press Enter.
5.On the Ethernet submenu, scroll to Set Subnet Mask. (See Figure 27.)
6.Press Enter.
7.At each position of the mask address, scroll to the correct number and press Enter to advance your cursor.
Subnet Mask: 255.255.195.000
Figure 29: Setting the Subnet Mask
Note: Use the Escape key to backspace to a previous text box, if necessary.
When you have set the mask, the autoloader displays Enter to save.
8.Press Enter.
SUB addr changed to appears on the LCD. You do not need to reboot the autoloader.
9.Press Escape or Enter to return to the Ethernet submenu.
IP Gateway
An IP gateway is a device that converts data into the IP protocol.
To set an IP gateway:
1.On the main menu, scroll to Configuration. (See Figure 25.)
2.Press Enter.
3.On the Configuration submenu, scroll to Ethernet. (See Figure 26.)
4.Press Enter.
5.On the Ethernet submenu, scroll to Set Gateway. (See Figure 27.)
6.Press Enter.
Installation and Configuration
7.At each position of the gateway address, scroll to the correct number and press Enter to advance your cursor.
Default Gateway: 016.117.065.001
Figure 30: Setting the gateway address
Note: Use Escape to backspace to a previous text box, if necessary.
When you have set the gateway address, the autoloader displays Enter to save.
8.Press Enter.
GW changed appears on the display. You do not need to reboot the autoloader.
9.Press Escape or Enter to return to the menu.
SNMP Server
An SNMP server monitors a network by processing reporting activity in each network device (hub, router, bridge, and so on). The server uses this information to define what is obtainable from each device and what can be controlled (turned off, on, and so on).
To set an SNMP server:
1.On the main menu, scroll to Configuration. (See Figure 25.)
2.Press Enter.
3.On the Configuration submenu, scroll to Ethernet. (See Figure 26.)
4.Press Enter.
5.On the Ethernet submenu, scroll to Set SNMP Server. (See Figure 27.)
6.Press Enter.

Installation and Configuration
7.At each position of the server address, scroll to the correct number and press Enter to advance your cursor.
SNMP Server: 255.255.255.255
Figure 31: Setting the SNMP server address
Note: Use the Escape key to backspace to a previous text box, if necessary.
When you have set the server address, the autoloader displays Enter to save.
8.Press Enter.
SNMP Server changed to appears on the LCD. You do not need to reboot the autoloader.
9.Press Escape or Enter to return to the Ethernet submenu.
Time Server
You can connect the autoloader to a server that will supply the correct date and time using Simple Network Time Protocol (SNTP). The autoloader uses this information to time stamp information in its memory.
To set a time server:
1.On the main menu, scroll to Configuration. (See Figure 25.)
2.Press Enter.
3.On the Configuration submenu, scroll to Ethernet. (See Figure 26.)
4.Press Enter.
5.On the Ethernet submenu, scroll to Set Time Server. (See Figure 27.)
6.Press Enter.

Installation and Configuration
7.At each position of the server address, scroll to the correct number and press Enter to advance your cursor.
Time Server: 192.005.044.041
Figure 32: Setting the time server address
Note: Use the Escape key to backspace to a previous text box, if necessary.
When you have set the server address, the autoloader displays Enter to save.
8.Press Enter.
Time Server changed to appears on the panel display. You do not need to reboot the autoloader.
9.Press Escape or Enter to return to the Ethernet submenu.
Time
If you cannot access a time server because your server does not support SNTP or for security reasons, you can set the time manually. If you want to include time changes such as daylight savings time, you must make those changes manually as well.
Note: The DLT1 and SDLT autoloaders do not have a battery so if time is manually set, it is lost and needs to be reset whenever the autoloader is power cycled.
To set the timezone:
1. On the main menu, scroll to Configuration.
Status
Commands
Configuration
Diagnostics
Figure 33: Main menu

Installation and Configuration
2.Press Enter.
3.On the Configuration submenu, scroll to Time.
SCSI ID
Ethernet
Time
Change Mode
Figure 34: Select Time
4.Press Enter.
5.On the Time submenu, scroll to Set Timezone.
Set Timezone
Set Date/Time
Figure 35: Select Set Timezone
6.Press Enter.
The timezone screen appears.
Timezone: set hrs
GMT +0:00
Figure 36: Timezone screen
7.Scroll to set the number of hours difference between your local time and Greenwich Mean Time (GMT).
8.Press Enter.

Installation and Configuration
A new timezone screen appears.
Timezone: set mins
GMT +0:00
Figure 37: New timezone screen
9.Scroll to set the number of minutes??? difference between your local time and Greenwich Mean Time (GMT).
10.Press Enter.
The new timezone is set.
To set the date and time:
1.On the main menu, scroll to Configuration. (See Figure 33.)
2.Press Enter.
3.On the Configuration submenu, scroll to Time. (See Figure 34.)
4.Press Enter.
5.On the Time submenu, scroll to Set Date/Time.
Set Timezone
Set Date/Time
Figure 38: Selecting Set Date/Time
6.Press Enter.
The Date/Time screen appears, with the cursor under the first digit in the second row.
YYYY.MM.DD.HH.MM 2001.01.01.12.00 Use 24 hour format, Time zone GMT +0:00
Figure 39: Date/Time screen

Installation and Configuration
7.The first four digits represent the current year. For each digit, scroll to the correct number and press Enter to advance your cursor.
Note: Use the Escape key to backspace to a previous text box, if necessary.
8.The next two digits represent the current month. For each digit, scroll to the correct number and press Enter to advance your cursor.
9.The next two digits represent the current day. For each digit, scroll to the correct number and press Enter to advance your cursor.
10.The next two digits represent the current hour. For each digit, scroll to the correct number and press Enter to advance your cursor.
11.The last two digits represent the current minute. For each digit, scroll to the correct number and press Enter to advance your cursor.
Enter to save appears on the LCD.
12.Press Enter.
Security
Your autoloader includes a security option to
Set Security
When you first power on the autoloader, the security option is set to Off. Use the following procedure to enable the security option. If the passwords are already set you must have an
To set the security option:
1. On the main menu, scroll to Configuration.
Status
Commands
Configuration
Diagnostics
Figure 40: Main menu

Installation and Configuration
2.Press Enter.
3.On the Configuration submenu, scroll to Security.
Cleaning Tape
Compression
I/E Slot
Security
Figure 41: Select Security
4.Press Enter.
5.On the Security submenu, scroll to Security. If a checkmark appears after the word, the security option is on. If no checkmark appears, the security option is off.
3Security
Set Password
Figure 42: Security options
6.To change the setting, press Enter.
This toggles the security option. For example, if the security option was set to On, it is now set to Off, and no checkmark appears.
Set Passwords
Many operations on the autoloader are
Passwords must be exactly six numbers long. The default password is 000000.
To set a password:
1.On the main menu, scroll to Configuration. (See Figure 40.)
2.Press Enter.
3.On the Configuration submenu, scroll to Security. (See Figure 41.)
4.Press Enter.
Installation and Configuration
5. On the Security submenu, scroll to Set Password.
3Security
Set Password
Figure 43: Select Set Password
6.Press Enter.
7.To set a password at the operator level, scroll to Operator. To set a password at the administrator level, scroll to Administrator.
Operator
Administrator
Figure 44: Select password level
8.Press Enter.
The Set Password screen appears.
Login as OP
Enter New Password
??? ??? ??? ??? ??? ???
Figure 45: Set Password screen
9.Press Enter again.
A text box appears above the first asterisk.
10.In the text box, scroll to the first number of the password.
11.Press Enter.
The text box above the asterisk disappears and another text box appears above the next asterisk.
12.Repeat steps 10 and 11 to enter the remaining numbers of the password.

Installation and Configuration
Note: Use the Escape key to backspace to a previous text box, if necessary.
When you have entered six numbers, the autoloader displays Submit
Password below the asterisks.
13.Press Enter to submit the password.
Password Successfully Changed appears on the LCD.
14.Press Enter.
The Operator and Administrator options reappear. You can either enter another password, or press Escape or Enter to return to the main menu.
Lost Passwords
If you forget the

Installation and Configuration
This chapter describes the magnetic tapes and how to handle them properly.
Tape Cartridges Defined
The following tables list the types of media supported in each tape autoloader.
Table 3: DLT1 Supported Media
*Note: DLT IV media, which has a format other than DLT 1, must be bulk erased to allow a DLT 1 drive to perform writes to the media. Erasing the data cartridge in its original drive is not adequate because the existing, incompatible format remains on the tape cartridge. The degaussing equipment used to bulk erase previously formatted media must have an Oersted rating at least equal to, and preferably two or three times greater than, the rating for the media being erased. For example, DLT Type IV media is rated at 1850 Oersteds. Specific procedures for degaussing your media should be included with your degaussing equipment.
CAUTION: All previously recorded data is removed if you bulk erase a tape cartridge.
Note: Ultrium cartridges are not compatible with DLT drives. Ultrium cartridges are not compatible with the SSL1016 DLT magazines.

Tape Cartridge Usage
Table.4: SDLT 320 Supported Media
???DLTtape IV data cartridges provide a storage capacity of up to 40 GB (native)/80 GB (compressed) per cartridge. The tape cartridge shell is dark brown and has no pattern.
???SDLT data cartridges are green and have a storage capacity of up to 160 GB (native)/320 GB (compressed).
???400 GB (Ultrium 2) data cartridges are dark red and provide a storage capacity of up to 200 GB (native)/400 GB (compressed). The 400 GB (Ultrium 2) data cartridges provide the highest capacities.

Tape Cartridge Usage
???200 GB (Ultrium 1) data cartridges are blue and provide storage capacity of up to 100 GB (native)/200 GB (compressed).
Tape Cartridge Maintenance
To greatly reduce the chance of problems with your tape cartridges or damage to your tape drive, use the following guidelines.
Inspecting Tape Cartridges
Inspect your tapes to identify any potential tape cartridge problems and prevent accidental loss of data or damage to your cartridges. Inspect your tapes:
???When you change or load a new tape cartridge
???If a tape cartridge is dropped or subjected to physical shock
???If the tape drive becomes inoperable after loading a tape cartridge
???If you receive a shipment of tape cartridges that shows any sign of shipping damage
To inspect a tape:
1.Remove the tape cartridge from its protective plastic case.
2.Check the tape cartridge for obvious cracks or other physical damage. Look for broken or missing parts.
3.Gently shake the tape cartridge. Listen for any rattling or sounds of loose pieces inside the cartridge.

Tape Cartridge Usage
4.If you hear anything on DLT or SDLT cartridges, do not use the cartridge.
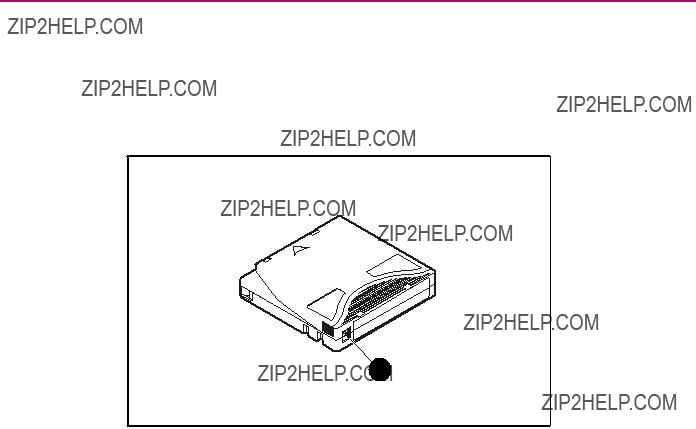
a.If it doesn't rattle, check the tape leader inside the cartridge. To do this, open the door on the rear of the cartridge by releasing the door lock.
Figure 46: Opening the cartridge door

Tape Cartridge Usage
b.For SDLT cartridges: The loop should stick up about an eighth of an inch when viewed from the edge; the loop must be a closed loop. If the loop is torn, bent, pulled in, or not sticking up about an eighth of an inch, do not use the tape cartridge.
Figure 47: Checking the SDLT tape leader
1Good
2Worn (do not use)
Tape Cartridge Usage
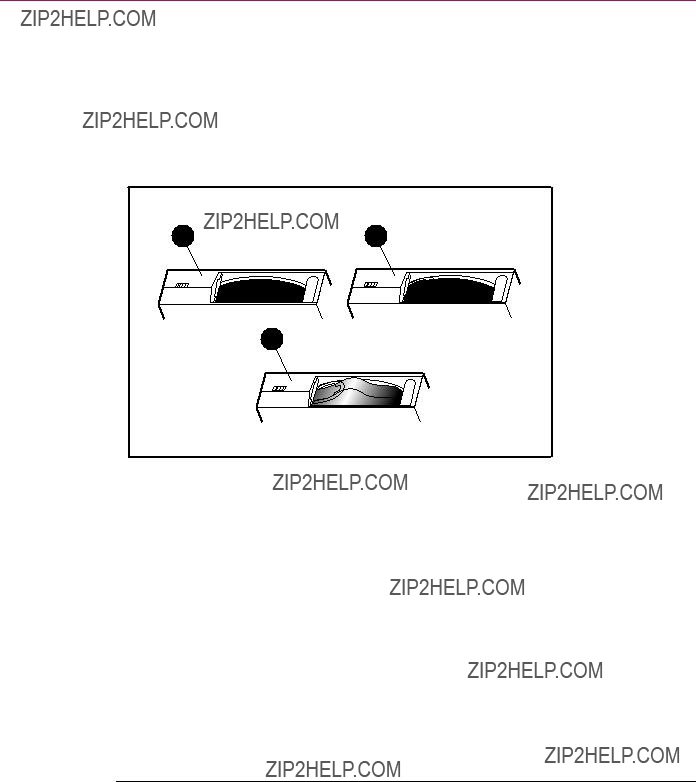
c.For DLTtapes: hold the tape cartridge so that the end that is inserted into the tape drive is facing you. On the left side of the tape cartridge you should see a small plastic tab. This is the left reel lock and can break if the cartridge is dropped. If you cannot see the tab, do not use the cartridge.
d.For DLTtapes: Do not use the cartridge if you see any of the following conditions:
Figure 48: DLTtape faulty leader situations
1Swallowed leader - leader is completely wound around into the cartridge, leaving no loop for the buckling link to catch.
2Torn leader loop - if the loop gets ripped to create an opening, the buckling link will fail to grab the loop and thus not transport the tape into the drive.
3Creased leader loop - the loop is stuck and the cartridge leader cannot unwind into the drive. As the drive leader???s buckling link engages the cartridge leader loop, it can detach the loop and drag it into the drive causing damage.
e.For DLTtapes: look at the bottom of the tape cartridge. The bottom reel lock is located in the lower right corner and can break if the cartridge is dropped. If you cannot see the tab, do not use the cartridge.
Note: On the DLTtape cartridge, the reel lock is white and easy to see.
5. Check for proper operation of the tape cartridge

Tape Cartridge Usage
Protecting Tape Cartridges
To extend the life of your tape cartridges:
???Remove dust on the outside of tape cartridges with a damp cloth.
???Do not use adhesive labels or
???Do not use graphite pencils,
???Replace ??? never erase ??? a label.
???Put unused cartridge labels in a separate location. A static electricity charge on a cartridge may cause a label to cling to the cartridge. If you accidentally insert a label into the drive along with a cartridge, the label may cause problems with or damage to the tape drive.
???Do not touch or allow direct contact with tape or tape leader. Dust or natural skin oils may contaminate the tape and impact tape performance.
???Do not expose the tape cartridge to moisture or direct sunlight.
???Do not expose cartridges to extreme temperatures or humidity. Refer to the documentation that comes with your tape media for appropriate operating and storage temperatures.
???Do not expose tape cartridges to magnetic fields.
???Avoid unnecessary opening of the cartridge door; this can expose the tape to contamination or physical damage.
???Do not drop the tape cartridges or subject the cartridges to physical shock.
???Do not insert any cartridge that has been dropped into a tape drive without carefully inspecting for damage. A dropped cartridge can have dislodged, loosened, or damaged internal components which can also damage the tape drive.
???Do not take tape cartridges apart.
???Do not leave cartridges in the tape drive when the autoloader power is off.

Tape Cartridge Usage
Transporting Tape Cartridges
To safely transport tape cartridges:
???Always keep each tape cartridge in its protective plastic case when it is not in the tape drive.
???When carrying tape cartridges in their cases, always orient the cases so that the grooves in the cases interlock. This prevents the cases from slipping apart and falling.
???Do not carry cartridges loosely in a box or in any other container. Allowing cartridges to hit together exposes them to unnecessary physical shock.
Storing Tape Cartridges
To store tape cartridges properly:
???Never stack more than five tape cartridges.
???When placing tape cartridges in archival storage, make sure you stand each tape cartridge vertically.
???Store tape cartridges in their plastic containers and in the environmental conditions recommended in your tape media documentation.
???If storage and/or transportation of a tape cartridge has exposed it to conditions outside the recommended environment, ???condition??? the tape cartridge to its operating environment for a
???Do not place cartridges on or near devices that may produce magnetic fields such as computer monitors, motors, or video equipment. Such exposure can alter or erase data on the tape.

Tape Cartridge Usage
Using the
All tape cartridges have a
Note: Before loading a cartridge into your autoloader, make sure that you set the
DLT IV Cartridges
1
2
Figure 49:
1
2

Tape Cartridge Usage
Tape Cartridge Usage
SDLT 320 Cartridge
Figure 50 illustrates using the
Figure 50:
Tape Cartridge Usage
Ultrium Data Cartridge
1 shows the location of the right protect switch. By moving the switch on the bottom of the cartridge to the right, the cartridge is
Figure 51:

You can operate the autoloader by any of the following methods:
???Autoloader front panel ??? Operate manually to insert and eject tapes and to unload magazines.
???Ethernet Web Administration ??? The Ethernet connection lets you perform administrative functions remotely using Web Administration. You can also move tapes within the autoloader through the Ethernet connection.
???Host backup software ??? The SCSI bus connects the autoloader to the host server and the backup software. You can perform any functions contained in the backup software.
Front Panel Components
The front panel includes a blue backlit liquid crystal display (LCD), four function keys ( [scroll up],
  [scroll down],
  Enter, and
  Escape), and two LEDs.
Function Keys
Use the function keys to navigate through the menu and select options. Use the up and down scroll buttons to position the cursor next to the item you want. Once the cursor is in place, press Enter to select the item. To return to a previous menu without making a selection, press Escape. The Escape button can also function as a backspace key.

Autoloader Operation
LEDs
The LEDs display autoloader and drive status information. When the autoloader is powered on, the left, green LED gives ready status information, and the right, amber LED gives fault status information.
Table 7: Indicator Activity
LCD
The LCD displays a scrolling menu that lets you to access information and execute commands.
Note: When the autoloader is idle for more than 60 seconds, the logo screen appears on the LCD, similar to the screensaver function on your PC. Press any function key to display the
The four menus displayed on the LCD are circular menus; you can scroll through the options using either the up or down scroll buttons. The first menu you access on the front panel contains the

Autoloader Operation
Figure 52: Menu Tree Structure
Configuration
SCSI ID
Ethernet
Set IP
Dynamic (DHCP)
Static IP
Set Subnet Mask
Set Gateway
Set SNMP Server
Set Time Server
Time
Set Date/Time
Set Time Zone
Change Mode
Random
Mixed
Sequential
Seq Cycle Mode
Cleaning Tape
Auto Clean
Tape Location
Compression
I/E Slot
Security
Security
Set Password
System Update
Diagnostic Tests
Error Logs
Halt Test
Self Test
Health Check
Picker Test
Magazine Test
Inventory Test
Drive Read
Drive Write
Drive Read/Write
Note: For SSL1016 Ultrium 460 tape autoloaders, drive logs and drive read/write tests must be accessed using Library & Tape Tools. L&TT is available at: http://www.hp.com/support/tapetools.
All the functionality accessed from the scrolling menu is

Autoloader Operation
The administrator password accesses all the available functionality. The operator password accesses all the functionality in the Commands and Status submenus.
Front Panel Functionality
For most functions, you can use either the front panel or the Web Administration tool through the Ethernet connection.
Setting Passwords
Many functions on the autoloader may be
To set a password, see the section ???Set Passwords??? in Chapter 2.
When a password has been entered, all
Default Front Panel Password
The default password for the front panel is 000000.
Logout
To logout:
1.On the main menu, scroll to Commands.
2.Press Enter.
3.On the Commands submenu, scroll to Log Out.
4.Press Enter.
Session Complete appears on the LCD.

Autoloader Operation
Using Data Cartridges
Typically, when you first install your autoloader, you insert your cartridges into the magazines and then insert the magazines into the autoloader. However, you can insert and eject cartridges individually using the mailslot, or you can eject a magazine, manually insert and remove cartridges, then insert the magazine back into the autoloader. The autoloader automatically detects the presence of a cartridge in the mailslot and in a magazine slot.
Note: On the front panel menu, Enter or Eject means the tape enters and leaves the autoloader through the mailslot. Whenever you see Load or Unload, it means the tape is loaded into or unloaded from the tape drive.
If you try to perform an illegal operation, the autoloader refuses to perform the operation. For example, if you try to insert a cartridge through the mailslot to the drive but the drive already contains a cartridge, the mailslot does not unlock. If you try to unload a cartridge from the drive while the autoloader is writing to the tape, your command is ignored.
Inserting a Single Cartridge
Use the mailslot to insert a single cartridge into the autoloader. You must enter a valid password to unlock the mailslot before you can insert a cartridge. When you insert a cartridge through the mailslot, you can load it into the tape drive or store it in a magazine.
Note: Be sure you are using a cartridge that is compatible with your tape drive. See Chapter 3, ???Tape Cartridge Usage,??? for compatibility tables.
To insert a cartridge into the tape drive:
1.On the main menu, scroll to Commands.
2.Press Enter.
3.On the Commands submenu, scroll to Enter.
4.Press Enter.
5.On the Enter submenu, scroll to To Drive.
6.Press Enter.

Autoloader Operation
After Load cartridge appears on the LCD, a countdown appears. You have 20 seconds to load a cartridge through the mailslot before it relocks. The autoloader automatically loads the cartridge into the tape drive.
Note: Only insert the cartridge until you meet resistance.
Figure 53: Inserting a cartridge into the mailslot
To insert a cartridge to a magazine slot:
1.On the main menu, scroll to Commands.
2.Press Enter.
3.On the Commands submenu, scroll to Enter.
4.Press Enter.
5.On the Enter submenu, scroll to To Location.
6.Press Enter.
A map of all the magazine slots appears. Occupied slots are indicated by an asterisk.
7.Scroll to the slot where you want to store the cartridge.
8.Press Enter.

Autoloader Operation
After Load cartridge appears on the LCD, a countdown appears. You have 20 seconds to load a cartridge through the mailslot before it relocks. The autoloader automatically loads the cartridge into the selected slot.
Moving a Single Cartridge
To move a single cartridge from one location to another inside the autoloader:
1.On the main menu, scroll to Commands.
2.Press Enter.
3.On the Commands submenu, scroll to Move.
4.Press Enter.
The Move screen appears.
5.Under From:, scroll to the current location of the cartridge you want to move. Occupied slots are indicated by an asterisk.
Note: If you select an empty location No Source Element appears on the LCD. Choose a different location.
6.Press Enter.
7.Under To:, scroll to the location to which you want to move the cartridge. Occupied slots are indicated by an asterisk.
Note: If you select a location that is already occupied Destination Full appears on the LCD. Choose a different location.
8.Press Enter.
The LCD displays Ent or Esc? below your selections.
9.Press Enter.
An hourglass appears on the LCD as the autoloader moves the cartridge to its new location.

Autoloader Operation
Ejecting a Single Cartridge
You can remove a single cartridge from the autoloader by specifying the desired cartridge by barcode or location, or by choosing the cartridge currently in the tape drive.
To eject a cartridge by barcode:
1.On the main menu, scroll to Commands.
2.Press Enter.
3.On the Commands submenu, scroll to Eject.
4.Press Enter.
5.On the Eject submenu, scroll to Cartridge.
6.Press Enter.
7.Scroll to By Barcode.
A barcode label appears.
8.Scroll to the label that corresponds to the cartridge you want to unload.
9.Press Enter.
An hourglass appears on the LCD as the cartridge you want is ejected from the mailslot.Wait until the hourglass disappears from the LCD before pulling out the cartridge.
To eject a cartridge by location:
1.On the main menu, scroll to Commands.
2.Press Enter.
3.On the Commands submenu, scroll to Eject.
4.Press Enter.
5.On the Eject submenu, scroll to Cartridge.
6.Press Enter.
7.Scroll to By Location.
A map of all the magazine slots appears. Occupied slots are indicated by an asterisk.
8.Scroll to the slot containing the cartridge you want to eject.
9.Press Enter.
Autoloader Operation
An hourglass appears on the LCD as the cartridge you want is ejected from the mailslot.Wait until the hourglass disappears from the LCD before pulling out the cartridge.
To eject a cartridge from the tape drive:
1.On the main menu, scroll to Commands.
2.Press Enter.
3.On the Commands submenu, scroll to Eject.
4.Press Enter.
5.On the Eject submenu, scroll to Cartridge.
6.Press Enter.
7.Scroll to From Drive.
8.Press Enter.
An hourglass appears on the LCD as the cartridge you want is ejected from the mailslot. Wait until the hourglass disappears from the LCD before pulling out the cartridge.
Note: After ejecting a single cartridge, immediately remove it from the mail slot when prompted.
Removing a Magazine
When you want to remove several cartridges at once, remove the magazine(s) first.
To remove a magazine:
1.On the main menu, scroll to Commands.
2.Press Enter.
3.On the Commands submenu, scroll to Eject.
4.Press Enter.
5.On the Eject submenu, scroll to Right Magazine or Left Magazine.
6.Press Enter.

Autoloader Operation
You will hear a distinctive popping sound as the appropriate magazine is ejected from the autoloader. Left magazine has been ejected or Right magazine has been ejected appears on the LCD.
Caution: To prevent damage to the autoloader or the magazine, use both hands when removing the magazine from the autoloader, supporting the entire length of the magazine.
7.Grasp the magazine by the handle with one hand and slide it out, supporting it underneath with the other hand.
Note: Once you eject a magazine, you must fully remove it or fully
Figure 54: Removing a magazine

Autoloader Operation
Installing a Magazine
To install a magazine:
Note: Be sure you are using the proper magazine for your autoloader. DLT/SDLT magazines are not compatible with the SSL1016 Ultrium 460 Autoloader. Ultrium magazines are not compatible with the SSL1016 DLT1 Autoloader or the SSL10106 SDLT 320 Autoloader.
1.Grasp the magazine by the handle with one hand and support it underneath with the other hand.
2.Slide the magazine into the magazine bay. Make sure you position the magazine correctly; it should slide smoothly.
Caution: Be sure that you install only a
Figure 55: Installing a magazine
3.The magazine is correctly installed when you feel it click into place and the front is flush with the front panel. Left Mag Inserted or Right Mag Inserted appears on the LCD.

Autoloader Operation
Inserting and Removing Cartridges
The magazine must be fully removed to insert and remove cartridges.
There are two gears located on both ends of the magazine. Move the slots within the magazine by using these two gears. Use the two openings along the top of the magazine and the four openings along the bottom of the magazine to insert and remove cartridges from the eight slots within each magazine.
To insert a cartridge into the magazine:
1.Center a slot within one of the six openings on the side of the magazine.
2.Properly orient the cartridge.
Note: There is a keying feature in each slot that only lets you fully insert the cartridge one way.
3.Fully insert the cartridge into the slot. When pushing the cartridge into the slot you will feel slight resistance until the cartridge is properly seated into the slot.
Figure 56: Inserting a cartridge
To remove a cartridge, use the handles to center the desired slot in the openings on the side of the magazine. Use your thumb and index finger to pull out the cartridge. You will feel slight resistance when removing the cartridge.

Autoloader Operation
Manually Removing a Magazine
To remove a magazine manually:
1.Power off the autoloader.
2.Place the autoloader on a flat, stable surface.
3.Locate the small rectangular opening on the back of the autoloader behind the magazine that you want to remove.
1
2
Figure 57: Manually removing a magazine
Autoloader Operation
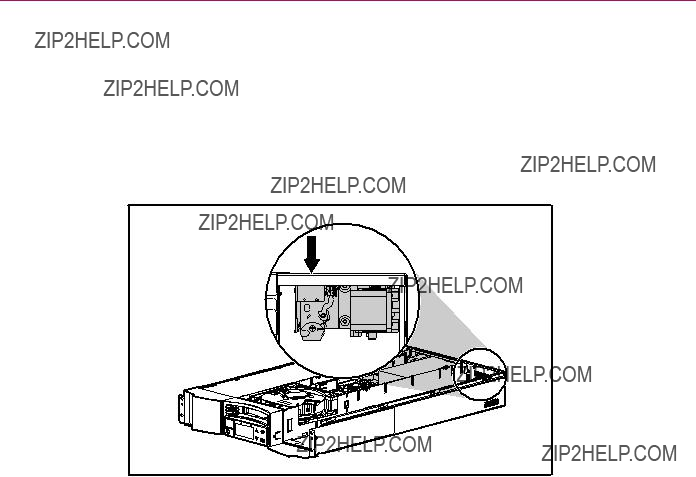
4.Carefully insert the end of a small, sturdy tool, such as a jeweler???s screwdriver, about one inch into the opening. On a right magazine, keep the tool as far to the left as you can. On a left magazine, keep the tool as far to the right as you can.
5.On a right magazine, slide the tool to the right. On a left magazine, slide the tool to the left. You will feel resistance as the tool presses against the latch. Press hard enough to release the latch.
Figure 58: Inside release latch
When you release the latch, the magazine pops forward so that the front of the magazine is no longer flush with the front panel.
6.With one hand, grasp the magazine by the handle and slide it forward to remove. Place your other hand under the magazine to support it and prevent it from falling.

Autoloader Operation
Changing the Orientation
Any magazine can be configured to fit in the right or left magazine bay.
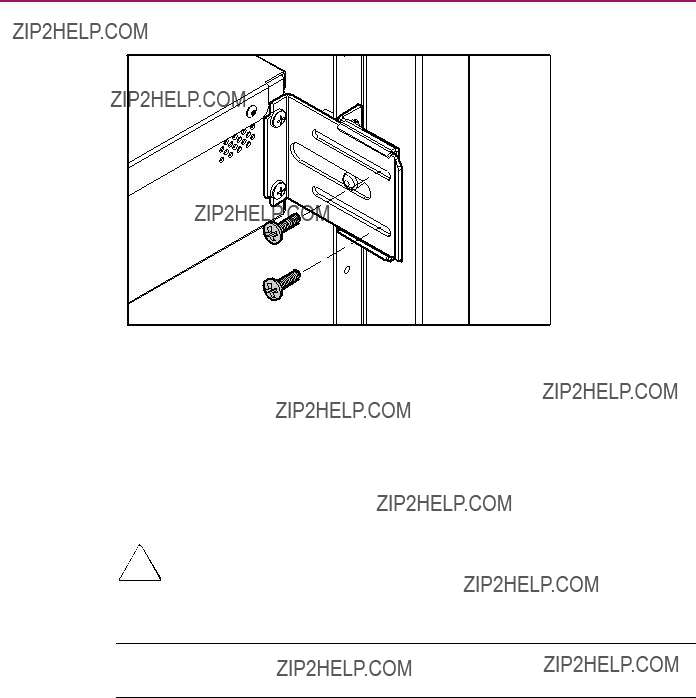
To change the orientation of a magazine:
1. Remove the two screws that attach the handle to the front of the magazine.
Figure 59: Removing the screws
2.Unsnap the handle carefully, ensuring you do not break the hinge.
3.Rotate the handle 180 degrees so that what was the top of the handle is now the bottom.
4.Rotate the magazine 180 degrees so that what was the front of the magazine is now the rear.

Autoloader Operation
2
1
Figure 60: Removing the handle
5.Snap the handle back on the end of the magazine.
6.Install the two screws to attach the handle securely to the magazine.
Viewing Status Information
From the scrolling menu, you can view the following information:
???Autoloader status
???Firmware version
???Element status
???Tape drive status
???Tape drive version
???Ethernet information
???System performance

Autoloader Operation
Autoloader Status
The autoloader status provides information about:
???Whether a magazine is installed or not
???SCSI connection activity
???Ethernet connection activity
To view the autoloader status:
1. On the main menu, scroll to Status.
Status
Commands
Configuration
Diagnostics
Figure 61: Main menu
2.Press Enter.
3.On the Status submenu, scroll to autoloader Info.
Autoloader Info
Drive Info
Ethernet Info
Figure 62: Select Autoloader Info
4.Press Enter.
5.On the Autoloader Info submenu, scroll to Status.
Status
Version
Element Status
Figure 63: Select Status
6. Press Enter.

Autoloader Operation
A list of messages similar to the following screen appears.
Magazines: L ??? R ???
Loader: ONLINE
Drive: ONLINE
Mode: Mixed
Barcode Reader: ???
Figure 64: Autoloader status message
Table 8: Autoloader Status Messages
NOTE: ISVs support different modes of operation. Be sure your autoloader is set to the correct mode of operation. The autoloader defaults to Random mode. See ???Control Mode??? in Chapter 2 for additional information.
Autoloader Operation
View Firmware Version
To view the firmware version:
1.On the main menu, scroll to Status. (See Figure 61.)
2.Press Enter.
3.On the Status submenu, scroll to Autoloader Info. (See Figure 62.)
4.Press Enter.
5.On the autoloader Info submenu, scroll to Version. (See Figure 63.)
6.Press Enter.
A list of messages similar to the following screen appears.
Firmware: V7.0
EDC: 575A49B8
HW + ME Rev: 1 1
Figure 65: Autoloader version messages
Table 9: Autoloader Version Messages

Autoloader Operation
View Element Status
The element status reports the status of the magazine slots. The status indicates whether a slot contains a cartridge, and which slot is allocated as the cleaning cartridge???s slot.
To view an element???s status:
1.On the main menu, scroll to Status. (See Figure 61.)
2.Press Enter.
3.On the Status submenu, scroll to Autoloader Info. (See Figure 62.)
4.Press Enter.
5.On the autoloader Info submenu, scroll to Element Status. (See Figure 63.)
???Drive: ADI285 Mailslot: Picker:
Enter to View Magazines
Figure 66: Element status
Press Enter to view magazines. A map of all the magazine slots appears.
An asterisk (*) indicates a slot occupied by a data cartridge, a (@) indicates a slot occupied by a cleaning cartridge, and an (!) indicates an empty slot designated as cleaning slot.
Figure 67: Magazine map
Note: If the I/E slot is enabled, I/E Slot replaces either Slot 1 or Slot 16.
6.Scroll to the slot containing the cartridge for which you want to see the status.
7.Press Enter.

Autoloader Operation
The Element Status screen appears, displaying the barcode label for that cartridge (if an inventory has previously been run). A move command also appears on the screen.
Label:
DRC101
Move Slot 2 To:
Slot 9
Esc to Exit
Figure 68: Element status screen
a.If you want to move the cartridge scroll until the location you want to move to appears under TO:, then press Enter.
b.If you do not want to move the cartridge, press Escape.
View Tape Drive Status
To view the tape drive status:
1.On the main menu, scroll to Status. (See Figure 61.)
2.Press Enter.
3.On the Status submenu, scroll to Drive Info. (See Figure 62.)
4.Press Enter.
5.On the Drive Info submenu, scroll to Status. (See Figure 63.)
6.Press Enter.
A list of messages similar to the following screen appears.
Compression Enabled
Drive Cart Present
Figure 69: Drive status screen

Autoloader Operation
Table 10: Tape Drive Status Messages
Loader LUN The number indicates the Logical Unit Number of the autoloader.
Compression Indicates whether the tape drive compression is enabled or disabled.
Drive Cart Indicates whether a cartridge is present in the drive.
View Tape Drive Version
To view the tape drive version:
1.On the main menu, scroll to Status. (See Figure 61.)
2.Press Enter.
3.On the Status submenu, scroll to Drive Info. (See Figure 62.)
4.Press Enter.
5.On the Drive Info submenu, scroll to Version. (See Figure 63.)
6.Press Enter.
A list of messages similar to the following screen appears.
Product Type: DLT 1 Policy Version:
35.52
Servo Version: 65.6
Figure 70: Tape drive version screen
Table 11: Tape Drive Version Messages
Product Type The number indicates the type of product installed (DLT1).
Policy Version The number indicates the version of the policy processor for the tape drive, typically the tape drive firmware version.
Servo Version The number indicates the servo processor firmware version.

Autoloader Operation
View Ethernet Information
To view Ethernet information:
1.On the main menu, scroll to Status. (See Figure 61.)
2.Press Enter.
3.On the Status submenu, scroll to Ethernet Info. (See Figure 62.)
4.Press Enter.
A list of messages similar to the following screen appears.
MAC address:
Network: Disconnected
Figure 71: View Ethernet information
Table 12: Ethernet Information Messages
Run Inventory
The autoloader provides a method to keep track of the cartridges currently loaded in the magazines. If your autoloader is equipped with a barcode reader, it can scan the cartridge barcode labels and store the data in its
The autoloader automatically runs an inventory whenever you power it on or insert a magazine.
To take inventory:
1.On the main menu, scroll to Commands.
2.Press Enter.

Autoloader Operation
3.On the Commands submenu, scroll to Inventory.
4.Press Enter.
The autoloader scans the barcodes on all the cartridges present.
Note: If no barcode label is present the autoloader checks for the presence or absence of cartridges in all locations.
Set Data Compression
You can set the autoloader to write data to the tape in its native (uncompressed) format or to compress it. Compressing the data means that the autoloader can typically write twice as much data to the same amount of tape. Actual compression may vary, depending on the type of data being backed up. Compression also increases the performance of the data transfers from or to the SCSI bus.
Typically you will want to leave this option enabled unless you are backing up data that is already compressed. Attempting to compress compressed data can reduce performance and increase data size.
To set compression option:
1. On the main menu, scroll to Configuration.
Status
Commands
Configuration
Diagnostics
Figure 72: Main menu
2.Press Enter.
3.On the Configuration submenu, scroll to Compression.
Time
Change Mode
Cleaning Tape
Compression
Figure 73: Set Compression

Autoloader Operation
4.Press Enter.
If a check appears next to Compression, the compression option is enabled. If no checkmark appears, the compression option is disabled.
a.To leave the compression option unchanged, press Escape.
b.To change the compression option, press Enter.
Update Firmware
Autoloader firmware can be updated by using Library & Tape Tools (L&TT). Additional details can be obtained at:
http://www.hp.com/support/tapetools
Configuration
To change any Ethernet configurations, see ???Ethernet??? in Chapter 2.
Import/Export Slot
Note: Any change requires a power cycle of the autoloader and reconfiguration of the ISV software.
To change the configuration of the Import/Export slot:
1. On the main menu, scroll to Configuration.
Status
Commands
Configuration
Diagnostics
Figure 74: Main menu
2. Press Enter.

Autoloader Operation
3. On the Configuration submenu, scroll to I/E Slot.
Cleaning Tape
Compression
I/E Slot
Security
Figure 75: Configure Import/Export Slot
4.Press Enter.
If a check appears next to Import/Export Slot, the I/E slot is enabled. If no checkmark appears, the I/E slot is disabled.
a.To leave the I/E slot unchanged, press Escape.
b.To change the I/E slot, press Enter.
Any change requires a power cycle of the autoloader and reconfiguration of the ISV software. If the autoloader is not power cycled:
???The changes will not occur.
???The front panel red LED flashes and displays a ???Please power cycle??? message.
When the I/E slot is enabled, Slot 16 is designated as the I/E slot, when two magazines are present.

Autoloader Operation
Web Administration
Many of the same operations performed from the front panel can also be performed remotely using Web Administration.
The following browsers are recommended for use with Web Administration:
???Windows??
???Internet Explorer 5.0, 5.5, and 6.x
???Netscape 4.x and 6.x
???Linux, Unix??, and Sun Solaris??? 8
???Netscape 4.x and 6.x
After establishing a connection to the autoloader, open the HTML browser and enter the IP address of the autoloader. (See ???Autoloader IP Address??? or contact your web administrator.) Be sure that proxy server settings in your browser are disabled.
Figure 76: Web Administration Home Page

Autoloader Operation
Default Password
The default user ID is guest. The default password is guest. See ???Set Security Option??? in this chapter for information on changing the user ID and password.
Status information appears on the right side of the home page and every page of Web Administration. The menu headings also appear at the top of every page. To access the functionality under the menu heading, click the menu heading. Web Administration prompts you for your username and ID, then displays the opening page for that menu.
The Configuration page includes a submenu on the left side of the page. When Web Administration displays the first Configuration page, it is open to the Systems Operations submenu. You can click Networking to access Ethernet settings options, and Security to access security settings options.
Figure 77: Configuration Page
Usually, after you have set the options, you click a Submit button to implement the new settings. Next to all Submit buttons is a Reset button. The Reset button does not reset the autoloader to its default settings, it just clears the settings in the option so that you can change them.
Autoloader Operation
View Status Information
To view status information from Web Administration, you only have to open it. You do not need to execute any command to see it because the status information appears on the right side of every page. This information is updated automatically every 10 seconds, so the status you see is
Move Tapes
To move a tape:
1.On any Web Administration page, click Commands.
2.From the
Note: You can also click the slot on the graphic to select it.
3.From the
4.Click submit.
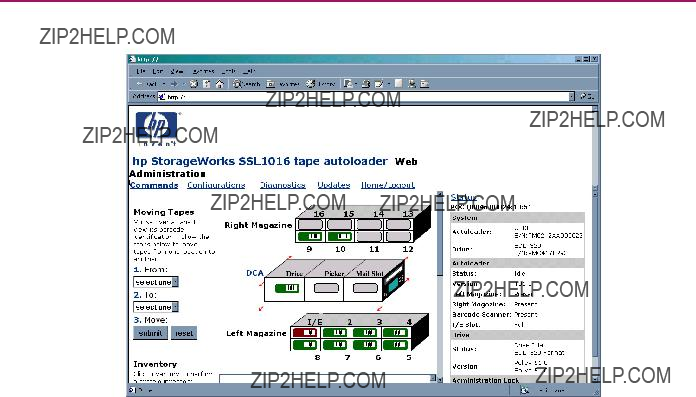
Autoloader Operation
Figure 78: Moving tapes using Web Administration

Autoloader Operation
Run Inventory
The autoloader automatically runs an inventory when you power it back on or insert a magazine. If you need to run an inventory in addition to this, you can use Web Administration to do it remotely.
To run an inventory:
1.On any Web Administration page, click Commands.
2.On the Commands page, click Inventory.
Set to Home
If the autoloader is not able to successfully execute a move or inventory command, try executing a HOME command and then retry the move or inventory command again.
The HOME command resets the autoloader as a means to help the autoloader recover from an unknown internal condition. You should very rarely need to use this command.
To set to Home:
1.On any Web Administration page, click Commands.
2.On the Commands page, click Home.
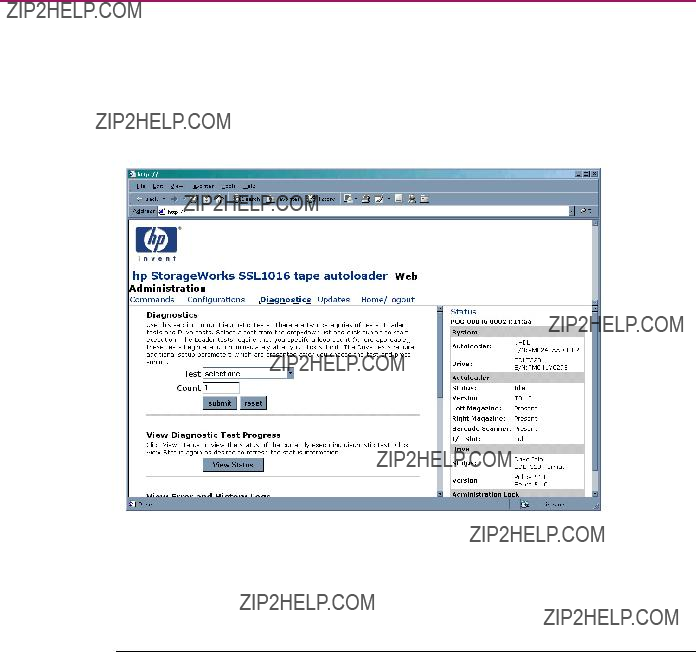
Autoloader Operation
Run Diagnostic Tests
If the status information indicates an error, view the event log.
To view the event log:
1. On any Web Administration page, click Diagnostics.
Figure 79: Diagnostic page
2. Click View Log.
Note: See Chapter 6, ???Troubleshooting,??? for a list of error messages.
When an error message appears in the status information, you may need to run a diagnostic test.
To run a diagnostic test:
1.On any Web Administration page, click Diagnostics.
2.From the Test
3.Click submit.

Autoloader Operation
4.While the test is running, you can view the status of the test by clicking View Status. To refresh the status information, click the Back button on your browser, and then click the View Status button again.
5.To save the report, click File, Save As, then navigate to the directory where you want it saved.
Set the System Time
If your autoloader is not connected to a time server, you can set the time manually with Web Administration.
Note: The DLT1 and SDLT autoloaders do not have a battery so if time is manually set, it is lost and needs to be reset whenever the autoloader is power cycled.
Enter the time zone first, then the date and time. If you want to include time changes, such as daylight savings time, you must set those manually when they occur.
To set the time zone:
1.On any Web Administration page, click Configurations.
2.From the first
3.From the second
4.Click submit.

Autoloader Operation
Figure 80: Setting system time
To set the date and time:
1.On any Web Administration page, click Configurations.
2.From the month
3.From the day
4.From the year
5.In the hour text box, type the current hour, in
6.In the minute text box, type the current minute.
7.Click submit.
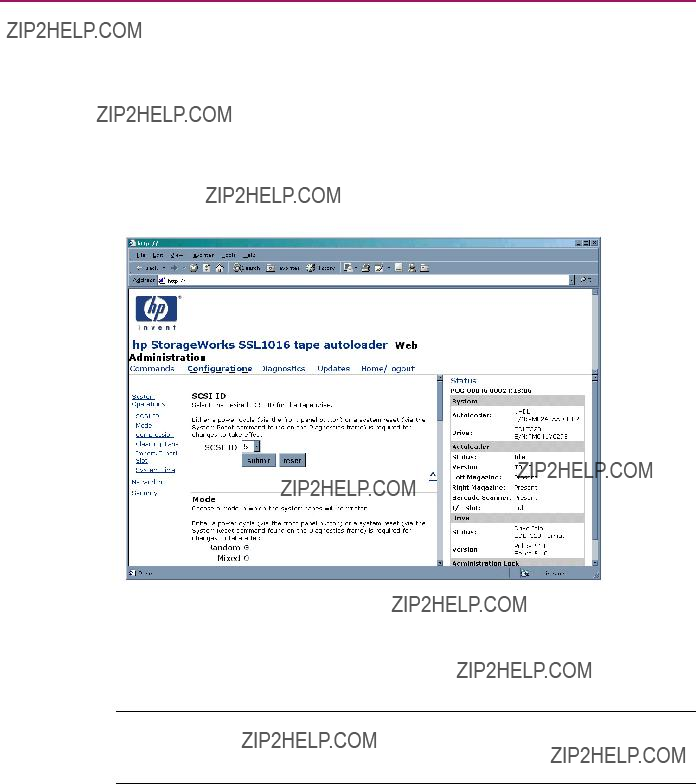
Autoloader Operation
Change the SCSI ID
If you need to change the autoloader???s SCSI ID, you can do so from the Web Administration tool.
To change the SCSI ID:
1.On any Web Administration page, click Configurations.
2.From the
Figure 81: Setting the SCSI ID
3. Click submit.
You must reboot the autoloader before the new SCSI ID takes effect.
Note: For the Ultrium 460 autoloader you must set two SCSI IDs; one for the autoloader and one for the tape drive. The default SCSI ID for the autoloader is 4. The default SCSI ID for the tape drive is 5.

Autoloader Operation
Set the Control Mode
To set the control mode:
1.On any Web Administration page, click Configurations. Under Mode, the current mode is selected.
Figure 82: Setting the Control Mode
2.To change the mode, click a different option.
3.Click submit.
You must reboot the autoloader before the new mode takes effect.

Autoloader Operation
Set the Compression
Note: Typically you will want to leave this option enabled unless you are backing up data that is already compressed. Attempting to compress compressed data can reduce performance and increase data size.
To set the compression:
1.On any Web Administration page, click Configurations.
2.If a checkmark appears in the box next to Compression, compression is enabled. To disable compression, click the box to remove the checkmark.
3.If no checkmark appears in the box next to Compression, compression is disabled. To enable compression, click the box to enter a checkmark.
4.Click submit.
Figure 83: Setting the compression

Autoloader Operation
Set the Cleaning Mode
To enable the Auto Clean function, you must have a slot designated for the cleaning tape cartridge. If you or another user have already designated a slot, that slot???s number appears next to Cleaning Cartridge Location. If a slot has not been designated, the box is empty.
Note: Auto Clean is not supported on Windows 2000 removable storage.
To set the cleaning tape slot:
1.On any Web Administration page, click Configurations.
2.From the
3.Click submit.
Figure 84: Cleaning Tape
If you want to set the Auto Clean option, use the following procedure. To clean the tape drive manually, use the Move function to load and unload the cleaning tape from the tape drive.
Autoloader Operation
To set Auto Clean:
1.On any Web Administration page, click Configurations.
2.If a checkmark appears in the box next to Enable Auto Clean, the option is enabled. To disable Auto Clean, click the box to remove the checkmark. If no checkmark appears in the box next to Enable Auto Clean, the option is disabled. To enable Auto Clean, click the box to enter a checkmark.
3.Click submit.
Note: A cleaning tape should be present in the cleaning tape slot to configure Auto Clean. When Auto Clean is turned off, the cleaning tape is ejected to the mailslot.
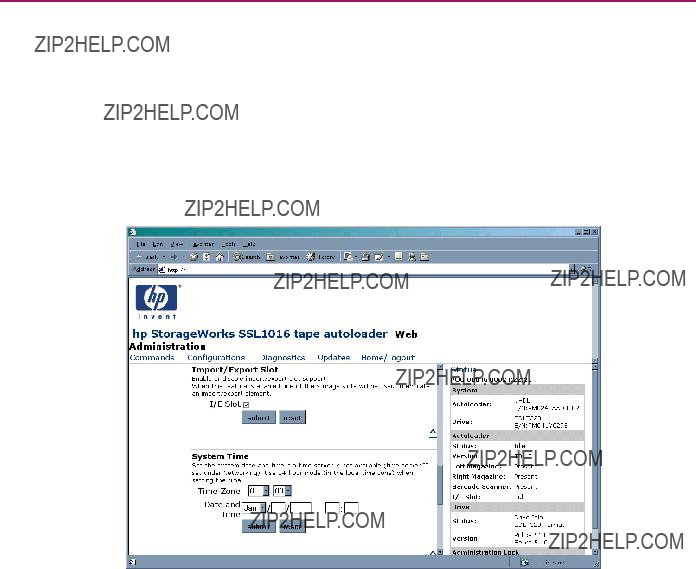
Autoloader Operation
Set the Import/Export Slot
To set the I/E slot:
1.On any Web Administration page, click Configurations.
2.If a checkmark appears in the box next to I/E Slot, the I/E slot is enabled.
3.If no checkmark appears in the box next to I/E Slot, the I/E slot is disabled.
4.Click submit.
Figure 85: Import/Export Slot
Any change requires a power cycle of the autoloader and reconfiguration of the ISV software. If the autoloader is not power cycled:
???The changes will not occur
???The front panel red LED flashes and displays a ???Please power cycle??? message When the I/E slot is enabled, Slot 16 is designated as the I/E slot.

Autoloader Operation
Set Ethernet Configurations
When you originally installed the autoloader, you set the Ethernet connections through the front panel. However, you can change them through the Web Administration tool.
To change the Ethernet configurations:
1.On any Web Administration page, click Configurations.
2.On the secondary menu, click Networking. The current settings appear on the screen.
Figure 86: Networking options
3.If a checkmark appears in the box next to DHCP, the dynamic IP address option is enabled. To set a permanent IP address:
a.Click the box to remove the checkmark.
b.In the IP address fields, type in the new address, using your Tab key to move from box to box.
4.If no checkmark appears in the box next to DHCP, the permanent IP address option is enabled. To change a permanent IP address, in the IP address fields, type in the new address, using your Tab key to move from box to box.

Autoloader Operation
5.To set the IP address from a permanent address to a dynamic address, click the box next to DHCP, and delete the IP address from the IP address fields.
6.To change the IP address of the subnet mask, gateway, SNMP server, or the time server:
a.Click the box to left of the address you want to change to enter a checkmark.
b.Type in the new address, using your Tab key to move from box to box.
7.Click submit.
Note: If the preceding steps change the IP address, the new address must be entered into the browser to continue using the Web Administration feature.

Autoloader Operation
Set Security Option
When you enable the security option, users must enter a password to access the autoloader???s functionality. A password allows either
To set the security option:
1.On any Web Administration page, click Configurations.
2.On the secondary menu, click Security.
Figure 87: Security option
3.If a checkmark appears in the box next to Security, the security option is enabled. To disable the security option, click the box to remove the checkmark. If no checkmark appears in the box next to Security, the security option is disabled. To enable the security option, click the box to enter a checkmark.
4.Click submit.

Autoloader Operation
Set Passwords
When you enter your password on the autoloader front panel, there is no associated username. However, when you click any menu heading on the Web Administration???s home page, Web Administration prompts you for a username and password.
In Web Administration, you can set up to four usernames and IDs, which can include both alpha and numeric characters. Usernames and IDs must be between four and seven characters long.
To set a password:
1.On any Web Administration page, click Configurations.
2.On the secondary menu, click Security.
3.From the
4.In the Username field, enter a username.
5.In the Password field, enter the password.
6.In the Verify Password field,
7.Click submit.
You can reset the operator password for the front panel from Web Administration. However, you cannot reset the front panel administrator password this way.
To reset the front panel operator password:
1.On any Web Administration page, click Configurations.
2.On the secondary menu, click Security.
3.Click the box next to Reset Front Panel Password. A checkmark appears.
4.Click submit.

Autoloader Operation
Update the Firmware
To update the firmware:
1. On any Web Administration page, click Updates.
Figure 88: Get system updates
2.Click Browse.
3.Navigate to the location of the firmware update.
4.Click Submit.
The autoloader automatically uploads the new code and updates the firmware.
Note: A message displays on the LCD to indicate that the update is complete. Do not power cycle the autoloader until this message displays.

Autoloader Operation

Your tape drive read/write head should be cleaned periodically. When cleaning is needed, the drive automatically requests the backup software to perform a cleaning operation. However, you can also initiate cleaning from the front panel as needed.
Use a cleaning tape to clean your tape drive.
???The DLT1 tape cleaning tape looks just like a DLTtape IV cartridge, except that its shell is beige and has a stop next to the door hinge to prevent insertion in a
???The SDLT cleaning tape is gray.
???The Ultrium cleaning tape is orange.
Note: See Chapter 3, ???Tape Cartridge Usage,??? for a list of compatible cleaning cartridges and part numbers.
Configuring the Cleaning Tape Location
Before inserting the cleaning tape you must configure the cleaning tape location.
1.On the main menu, scroll to Configuration.
2.Press Enter.
3.Scroll to Cleaning Tape.
4.Press Enter.
5.Log in as Administrator.
6.Scroll to Cleaning Tape Location.
7.Press Enter.
8.Select an available slot (no * next to the slot number).

Tape Drive Cleaning
9.Press Enter.
The selected slot has a ! next to the slot number.
10.To deconfigure the slot, press Enter again.
The selected slot no longer has a ! next to the slot number.
Inserting the Cleaning Tape
There are two methods for inserting the cleaning tape:
???Load the cleaning tape directly into an ejected magazine and then reload the magazine.
???Insert the cleaning tape through the mailslot.
To insert the cleaning tape through the mailslot:
1.On the main menu, scroll to Command.
2.Press Enter.
3.On the Command submenu, scroll to Cleaning Tape.
4.Press Enter.
5.Log in as Operator.
6.On the Cleaning Tape submenu, scroll to Enter Cleaning Tape.
7.Press Enter.
A countdown appears on the LCD. You have 20 seconds to insert the cleaning tape through the mailslot before it relocks. Push the cartridge in. When prompted, press Enter. The system accepts the tape. If you try to load a cleaning tape through the mail slot without having configured a cleaning slot, the autoloader rejects the tape.
8.Once you insert the cleaning tape through the mailslot, do one of the following:
???Proceed directly to manual cleaning.
???Store the cleaning tape in a magazine slot to be used later.
Storing the Cleaning Tape
When you store the cleaning tape, you can use it in the following ways:
???Use it for manual cleaning.
Tape Drive Cleaning
???If the Auto Clean function is enabled, the autoloader can move the cleaning tape from the magazine slot to the tape drive and, after the cleaning cycle, return it to its slot.
???If backup software cleaning function is enabled, the software can move the cleaning tape from the magazine slot to the tape drive and, after the cleaning cycle, return it to its slot (for more information, see your backup software???s documentation).
To store the cleaning tape:
1.After you have inserted the tape through the mailslot into the drive for cleaning, on the main menu, scroll to Configuration.
2.Press Enter.
The Configuration submenu appears.
3.On the submenu, scroll to Cleaning Tape Location.
4.Press Enter.
5.Log in as Administrator.
A map of all the magazine slots appears.
Note: When a map of the magazine slots appears on the display, an asterisk (*) indicates a slot occupied by a data cartridge, a (@) indicates a slot occupied by a cleaning cartridge, and an (!) indicates an empty slot designated as cleaning slot.
Figure 89: Magazine slot map
6. Scroll to the slot where you want to store the cleaning tape.
Note: If you store the cleaning tape, you must specify in which slot the tape is to be stored.

Tape Drive Cleaning
7.Press Enter to unload the cleaning tape from the drive. The autoloader moves the tape to its new location.
Ejecting the Cleaning Tape
You need to eject the cleaning tape from the autoloader under the following conditions:
???If you do not want to store the cleaning tape in a magazine slot after manually cleaning the tape drive.
???If the cleaning tape has expired.
A cleaning tape cartridge can be used for 20 cleanings.
To eject a cleaning tape:
1.On the main menu, scroll to Command.
2.Press Enter.
3.On the Command submenu, scroll to Cleaning Tape.
4.Press Enter.
5.Log in as Operator.
6.On the Cleaning Tape submenu, scroll to Eject Cleaning Tape.
7.Press Enter.
The autoloader ejects the cleaning tape from the mailslot.
Tape Drive Cleaning Methods
You can clean your tape drive in three ways:
???Manual Cleaning
???Auto Clean
???Software
Manual Cleaning
If neither Auto Clean nor the backup software???s cleaning option are enabled and the drive requires cleaning, the autoloader displays a cleaning message on the LCD.

Tape Drive Cleaning
Caution: Because the cleaning cartridge is abrasive, you should not use it unless the cleaning message appears.
To clean the tape drive manually:
1.On the main menu, scroll to Command.
2.Press Enter.
3.On the Command submenu, scroll to Cleaning Tape.
4.Press Enter.
5.Log in as Operator.
6.On the Cleaning Tape submenu, scroll to Load to Drive.
7.Press Enter.
The autoloader moves the cleaning tape from its slot to the tape drive and then cleans the drive with it. When the cleaning is finished, you must return the cleaning tape to its magazine slot.
8.On the main menu, scroll to Command.
9.Press Enter.
10.On the Command submenu, scroll to Cleaning Tape.
11.Press Enter.
12.Log in as Operator.
13.On the Cleaning Tape submenu, scroll to Unload from Drive.
14.Press Enter.
The autoloader removes the cleaning tape from the tape drive.
15.When you have finished manually cleaning the tape drive, do one of the following:
???Store it to its magazine slot (see ???Storing the Cleaning Tape???).
???Eject the cleaning tape from the autoloader (see ???Ejecting the Cleaning Tape???).

Tape Drive Cleaning
Auto Clean
Note: Auto Clean is not supported on Windows 2000 removable storage.
The Auto Clean function permits the autoloader to perform the cleaning process automatically without interrupting normal operation. The Auto Clean feature is turned off by default.
With Auto Clean enabled, the autoloader monitors the cleaning requirements of the tape drive. When the drive indicates a Cleaning Required status, the autoloader automatically removes the cleaning cartridge from its slot and inserts it into the tape drive. After completing the cleaning cycle, the autoloader returns the cleaning cartridge to its slot.
When Auto Clean is enabled, the autoloader automatically cleans the tape drive when a Cleaning Required status occurs. During the cleaning cycle, the LCD displays messages indicating the progress of the process:
???Loading Cleaning Cartridge. The autoloader is loading the cleaning cartridge from its magazine slot into the tape drive.
???Cleaning Drive. The cleaning cartridge is running in the tape drive.
???Unloading Cleaning Cartridge. The autoloader is returning the cleaning tape to its magazine slot.
Note: If you enable Auto Clean, make sure the cleaning option in your backup software is turned off.
Before you enable the AutoClean option, you must designate which slot contains the cleaning cartridge and load the cleaning cartridge into that slot. If you have not done this, the autoloader will not allow you to enable Auto Clean.
To set Auto Clean:
1.On the main menu, scroll to Configuration.
2.Press Enter.
3.On the Configuration submenu, scroll to Cleaning Tape.
4.Press Enter.
5.Log in as Administration.

Tape Drive Cleaning
6.On the Cleaning Tape submenu, scroll to Auto Clean On/Off.
If Auto Clean is enabled, the menu item appears as Auto Clean On. If Auto Clean is disabled, it appears as Auto Clean Off.
7.To change the setting, press the up or down scroll key once.
8.Press Enter.
Software
Set the cleaning option in your software application (if available) so that the software monitors drive cleaning. If your application software supports automatic cleaning, store a cleaning cartridge in the slot specified by the application.
Note: If automatic cleaning is enabled in your application software, make sure the Auto Clean option is disabled on the autoloader either via the LCD front panel or Web Administration.

Tape Drive Cleaning

Before Contacting Technical Support
Before you contact technical support, use the information in this chapter to try and resolve the problem.
Problems with the autoloader can occur in the following forms:
???Operational Problems
???Error Messages
Operational Problems
Operational problems can range from compatibility issues with the operating system to failure of the front panel. Table 13 describes the probable cause and suggested action for each operational problem you may encounter.
Table 13: Suggested Actions for Operational Problems

Troubleshooting
Table 13: Suggested Actions for Operational Problems
Error Messages
Failures can occur while operating the autoloader. They prevent the autoloader from completing a specific action. When a failure occurs, two things can happen:
???No error message appears, but the autoloader fails to complete the action. If no message appears, you will need to call a service representative to troubleshoot the problem.
???An error message appears on the front panel or Web Administration. If an error message appears, follow the procedures listed in Table 14 to try and resolve the problem.

Troubleshooting
Understanding Error Messages
When a failure first occurs, a
When viewing the error log from the front panel, the text that appears is similar to the following:
Task: Picker
Error: 02b9202f
Contxt: 03ac/00400100
POC: 00022
POH: 00000:07:41: #14
Find the eight characters following ???Error:??? in the second line of the block of text. The third and fourth digits are the error code. In the example above, the error code is b9. In Table 14, you will see that this is an error event related to the picker.
Note: POH is the time of the error with an assigned number. The higher the error number is, the more recent it is.
If you need to view an error log from Web Administrator, the text that appears is similar to the following:
0014: PC: 00022 POH: 00000 : 07 : 41 Error: 02b9202f, Context: 03ac/00400100 070d02c7 : a70dfd3a : 0708000a : 00000000
00000000 : 00000000 : 00000000 : 00000000
00000000 : 00000000 : 00000000 : 00000000
Find the eight characters following ???Error:??? in the first line of the block of text. The third and fourth digits are the error code. In the example above, the error code is b9. In Table 14, you will see that this is an error event related to the picker.

Troubleshooting

Troubleshooting

Troubleshooting

Troubleshooting

Troubleshooting

Troubleshooting
Diagnostic Tests
Table 15 lists the diagnostic tests.
Table 15: Diagnostic Tests

Regulatory Compliance
Notices
A
Federal Communications Commission Notice
Part 15 of the Federal Communications Commission (FCC) Rules and Regulations has established Radio Frequency (RF) emission limits to provide an
The rating label on the device shows which class (A or B) the equipment falls into. Class B devices have an FCC logo or FCC ID on the label. Class A devices do not have an FCC logo or FCC ID on the label. Once the class of the device is determined, refer to the following corresponding statement.
Class A Equipment
This equipment has been tested and found to comply with the limits for a Class A digital device, pursuant to Part 15 of the FCC Rules. These limits are designed to provide reasonable protection against harmful interference when the equipment is operated in a commercial environment. This equipment generates, uses, and can radiate radio frequency energy and, if not installed and used in accordance with the instructions, may cause harmful interference to radio communications. Operation of this equipment in a residential area is likely to cause harmful interference, in which case the user will be required to correct the interference at personal expense.

Regulatory Compliance Notices
Class B Equipment
This equipment has been tested and found to comply with the limits for a Class B digital device, pursuant to Part 15 of the FCC Rules. These limits are designed to provide reasonable protection against harmful interference in a residential installation. This equipment generates, uses, and can radiate radio frequency energy and, if not installed and used in accordance with the instructions, may cause harmful interference to radio communications. However, there is no guarantee that interference will not occur in a particular installation. If this equipment does cause harmful interference to radio or television reception, which can be determined by turning the equipment off and on, the user is encouraged to try to correct the interference by one or more of the following measures:
???Reorient or relocate the receiving antenna.
???Increase the separation between the equipment and receiver.
???Connect the equipment into an outlet on a circuit different from that to which the receiver is connected.
???Consult the dealer or an experienced radio or television technician for help.
Modifications
The FCC requires the user to be notified that any changes or modifications made to this device that are not expressly approved by
Cables
Connections to this device must be made with shielded cables with metallic RFI/EMI connector hoods in order to maintain compliance with FCC Rules and Regulations.
Regulatory Compliance Notices
Declaration of Conformity for products marked with the FCC logo - United States only
This device complies with Part 15 of the FCC Rules. Operation is subject to the following two conditions: (1) this device may not cause harmful interference, and
(2) this device must accept any interference received, including interference that may cause undesired operation.
For questions regarding this FCC declaration, contact:
Regulatory Engineer, MS
825 14th Street S.W.
Loveland, CO 80537
Or, call
(970)
To identify this product, refer to the Part, Series, or Model number found on the product.
Canadian Notice (Avis Canadien)
Class A Equipment
This Class A digital apparatus meets all requirements of the Canadian
Cet appareil num??rique de la classe A respecte toutes les exigences du R??glement sur le mat??riel brouilleur du Canada.
Class B Equipment
This Class B digital apparatus meets all requirements of the Canadian
Cet appareil num??rique de la classe B respecte toutes les exigences du R??glement sur le mat??riel brouilleur du Canada.

Regulatory Compliance Notices
European Union Notice
Products bearing the CE marking comply with the EMC Directive (89/336/EEC) and the Low Voltage Directive (73/23/EEC) issued by the Commission of the European Community and if this product has telecommunication functionality, the R&TTE Directive (1999/5/EC).
Compliance with these directives implies conformity to the following European Norms (in parentheses are the equivalent international standards and regulations):
???EN 55022 (CISPR 22) - Electromagnetic Interference
???EN55024
???
???
???EN 60950 (IEC 60950) - Product Safety
BSMI Notice

Regulatory Compliance Notices
Japanese Notice

Regulatory Compliance Notices

Electrostatic Discharge
B
To prevent damage to the system, be aware of the precautions you need to follow when setting up the system or handling parts. A discharge of static electricity from a finger or other conductor may damage system boards or other
To prevent electrostatic damage, observe the following precautions:
???Avoid hand contact by transporting and storing products in
???Keep
???Place parts on a grounded surface before removing them from their containers.
???Avoid touching pins, leads, or circuitry.
???Always be properly grounded when touching a

Electrostatic Discharge
Grounding Methods
There are several methods for grounding. Use one or more of the following methods when handling or installing
???Use a wrist strap connected by a ground cord to a grounded workstation or computer chassis. Wrist straps are flexible straps with a minimum of 1 megohm ?? 10 percent resistance in the ground cords. To provide proper grounding, wear the strap snug against the skin.
???Use heel straps, toe straps, or boot straps at standing workstations. Wear the straps on both feet when standing on conductive floors or dissipating floor mats.
???Use conductive field service tools.
???Use a portable field service kit with a folding
If you do not have any of the suggested equipment for proper grounding, have an authorized reseller install the part.
Note: For more information on static electricity, or for assistance with product installation, contact your authorized reseller.

Specifications
Physical Specifications
Table 16: Physical Specifications
C
Performance Specifications

Specifications
Power Specifications

Specifications
Safety and Regulatory
The autoloader carries the following Regulatory Agency product safety certifications.
Table 21: Regulatory and Product Safety Certifications
This appendix describes how to upgrade or replace the drive carrier assembly (DCA).
Configuration and Tools
If you replace or upgrade the autoloader DCA, you need to check settings for the DCA and the SCSI bus.
You will need a Phillips screwdriver to replace a DCA.
Removing a DCA
Before you replace the autoloader DCA, you must make sure the tape drive does not contain a cartridge. To unload a tape from the tape drive, see ???Move a Single Cartridge??? or ???Eject a Single Cartridge??? in Chapter 4.
You must also turn off power to the autoloader and disconnect the power and SCSI cables from the back of the DCA.
Caution: The DCA contains electronic sensitive components. Be sure to wear your wrist ground strap whenever handling the DCA.

Upgrading or Replacing the DCA
To remove the DCA:
1.Power off the autoloader.
2.Disconnect all cords and cables from the back of the DCA.
3.Remove the four screws anchoring the DCA to the chassis.
Figure 90: Removing the screws on the rear of the chassis

Upgrading or Replacing the DCA
4.With one hand, grasp the DCA handle and slide it backward to remove. Being careful not to touch the exposed board on the bottom of the DCA, place your other hand under the DCA to support it and prevent it from falling.
Figure 91: Removing the DCA
Caution: Avoid touching the exposed board on the bottom of the DCA. See Figure 92.

Upgrading or Replacing the DCA
Figure 92: Bottom of DCA

Upgrading or Replacing the DCA
Installing a DCA
To install a DCA:
1.Put on ground wrist strap and connect to appropriate ground.
2.Grasp the DCA by the handle with one hand and support it underneath with the other hand.
Caution: Avoid touching the exposed PCBA on the bottom of the DCA.
3.Slide the DCA into the DCA bay 1. Make sure you position DCA correctly; it should slide smoothly.
1
2
2
Figure 93: Installing the DCA
4.Install the four screws that secure the DCA to the chassis 2. Tighten firmly.
5.Make sure the power switch on the back of the DCA is off (the 0 is pressed), then connect the power cord and SCSI cable.
6.On the power switch on the back of the DCA, press the | to power on the autoloader.

Upgrading or Replacing the DCA

A
altitude 149
authorized reseller, HP 13 auto clean 124 autoloader
front view 15 internal view 20 IP address 47 rear view 18 status 89
status messages 90
C
cartridges ejecting 80
inserting into mailslot 78 inserting single 77 moving 79
using 77 cleaning
cleaning tape ejecting 122 inserting 120 storing 120
configuration menu 41
control mode, setting 44
index
conventions document 10
equipment symbols 11 text symbols 10
cooling fans 18
D
daisy chaining 38 date, setting 55
DCA described 20 installing 155 removing 151 replacing 151
default password 76, 100 document
conventions 10
E
element status 92 equipment symbols 11 error messages 129 Ethernet
view information 95 ethernet connection 38 European Union Notice 142

Index
F
fans, cooling 18 firmware
front panel components 73 default password 76
G
getting help 13
H
handles, rackmount, installing 30 height
rackmount 147 help, obtaining 13
HP
authorized reseller 13 storage website 13 technical support 13
humidity 149
I
installation location 25 preparation 23 rackmount 27
SCSI bus requirements 23 standalone 34 verification 40
IP address

Index
S
SCSI
bus requirements 23 cable requirements 24 connection 36 connector 19
ID
terminator requirements 24 security, configuring 56 sequential mode operation 46 set compression 96, 97 SNMP server 51
status information 88 subnet mask 49 symbols in text 10 symbols on equipment 11
T
tape cartridges inspecting 63 protecting 67 storing 68 transporting 68
version 94
technical support, HP 13 temperature
text symbols 10 time server 52 time, changing 53 time, setting 55
U
updating firmware 97
W
warning
rack stability 12
symbols on equipment 11 Web Administration
accessing 99
default password 100 websites
HP storage 13 weight
rackmount 147 width

Index