HP Media Vault
User's Guide
Revision C
HP Media Vault
User's Guide
Revision C

Copyright
The information contained herein is subject to change without notice. The only warranties for HP products and services are set forth in the express warranty statements accompanying such products and services. Nothing herein should be construed as constituting an additional warranty. HP shall not be liable for technical or editorial errors or omissions contained herein.
This document contains proprietary information that is protected by copyright. No part of this document may be photocopied, reproduced, or translated to another language without the prior written consent of HP.
Cupertino, CA
Copyright ?? 2006
Microsoft and Windows are U.S. registered trademarks of Microsoft Corporation.
HP supports lawful use of technology and does not endorse or encourage the use of its products for purposed other than those permitted by copyright law.
The information in this document is subject to change without notice..

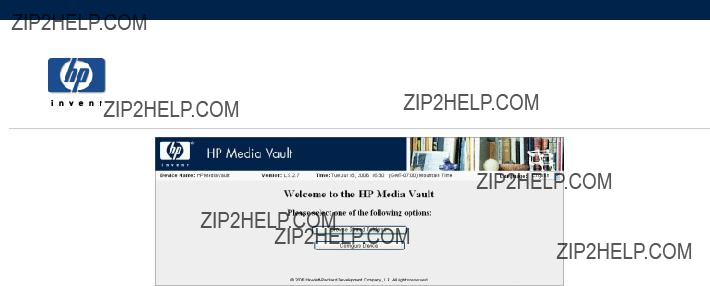
Welcome to the HP Media Vault
Start using your HP Media Vault quickly and efficiently.
Learn how to use the HP Media Vault's suite of flexible backup and restore applications.
??How to configure your HP Media Vault
Explore the HP MediaVault's more advanced options, such as configuring hard disks, securing Shared Folders, and modifying system settings.
??Troubleshooting your HP Media Vault
Troubleshoot problems with installation, connections, printer setup, and media streaming.
??Glossary
Provides definitions for a better understanding of your HP Media Vault's features and capabilities.

Get started topics
Learn how to use Shared Folders for storing and sharing files and folders.
??How to change the time zone on your HP Media Vault
Learn how to set your HP Media Vault to your time zone.
??How to browse, access, and save your files
Learn how to save files to your HP Media Vault for quick and easy access.
??How to map drive letters to Shared Folders
Learn how to map drive letters to your Shared Folders.
Learn how to organize your folders and files on the Media Vault.
??How to secure your HP Media Vault from intruders
Learn how to keep intruders from accessing your HP Media Vault's files and folders.
??How to use the HP Media Vault to transfer files from an old PC to a new PC
Learn how to conveniently transfer files using your HP Media Vault.
??How to connect to the HP Media Vault from a Linux system
Learn how to access the Shared Folders and configuration screens on the HP Media Vault from a Linux system.
??How to connect to the HP Media Vault from a Macintosh
Learn how to set up a Macintosh computer to access the Shared Folders and configuration screens on the HP Media Vault.

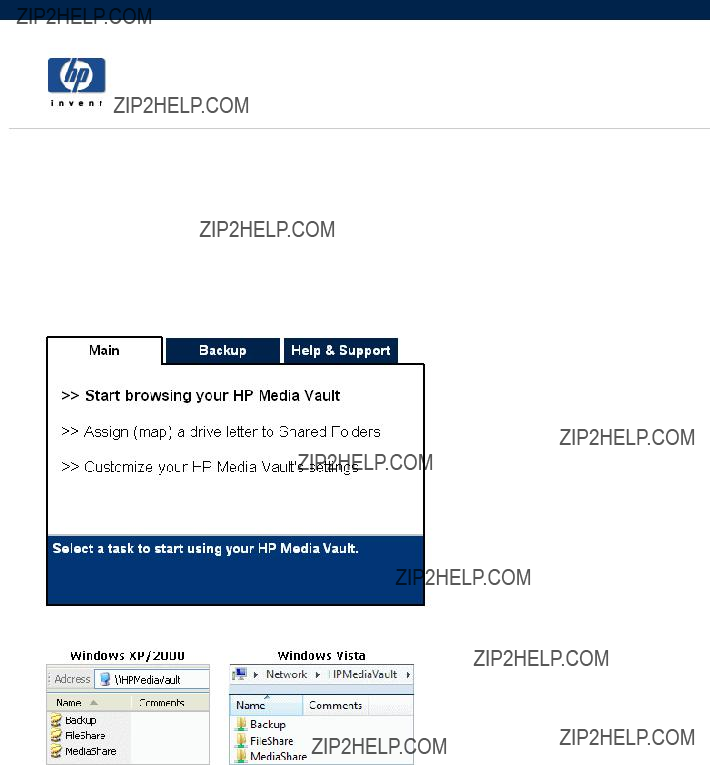
How to get started
The HP Media Vault allows you to store all of your important documents, pictures, music, and video files in one location ??? on the media vault! After you install the media vault on your network, the PCs on your network are able to access the media vault???s folders and files. You can also share a USB printer with the other computers on your network by connecting a printer to your media vault. (For more information on attaching printers, see Install a printer.)
Backup software and other applications are included with the media vault, but you can get started saving files to the media vault immediately after installation. (For more information on using the backup software, see Backup and restore.)
To help you get started saving and organizing your files, the media vault comes configured with three Shared Folders: FileShare, MediaShare and Backup. Shared Folders are special
The following table offers suggestions on which types of files to save to the media vault???s Shared Folders.
Recommendations
The media vault comes
The three Shared Folders are named:
???FileShare
???MediaShare
???Backup
During the installation process, an HP drive mapping application gives you the opportunity to map drive letters to the Shared Folders on your media vault. Mapping drive letters means assigning ???letters??? to folder names. This makes it easier to manage files because you can save files and folders to mapped drive letters just as you can to other drive letters on your computer such as the C: and D: drives.
Let???s say you mapped the letter ???Z??? to FileShare. In Windows XP, when you open My Computer, you will see this folder listed under Network Drives as FileShare on ???HPMediaVault (Hpmediavault)??? (Z:). In Window Vista, when you open Computer , you will see this folder listed under Network Location as fileshare (\\HPMediaVault) (Z:).
If you???re already familiar with networking, you might have used Shared Folders on a networked PC. Note that the term Shared Folders used in reference to the media vault are different folders from those stored on a networked PC. However, the term Shared Folders means the same in both cases: Folders that you set up on a network that are accessible to all network users.
If familiar with networking terms, you might also have heard the phrase ???mapping a Share??? rather than mapping a Shared Folder. A ???Share??? means the same as ???Shared Folder,??? and you can use these terms interchangeably. A Share is a
For more information on mapping drive letters, see Map drive letters to Shared Folders.
For information on browsing, accessing, and saving files to the HP Media Vault, see Browse, access, and save your files.
Recommendations for using the Backup Shared Folder are found at the following links: Organize your files, Run automatic backups for important files, and Create a drive backup.
How to change the time zone on your HP
Media Vault
The HP Media Vault is set to Mountain Standard Time (MST) (USA + Canada).
To access the System Settings screen:
???
???Click Customize your HP Media Vault???s setting.
???If the Welcome Screen appears, click Configure Device.
???Click the System Settings tab.
To reset the time zone on your media vault:
1.Click Clock Settings.
2.Click the Select Time Zone
3.If you don???t live in a
4.If finished, click Accept or Cancel. (If you click Cancel, the changes that you made will not be accepted.)
For more information on changing your time and date settings, see Set the date and time.
How to browse, access, and save your files
On your PC, you browse your file system to find, open and save files to your hard drive. You can also use your PC to browse to the Shared Folders on your HP Media Vault. After browsing to your media vault???s Shared Folders, you can save folders and files to them.
You can use several methods to browse to and access your media vault???s Shared Folders.
Use HP software to browse:
1.On your desktop,
2.On the Main tab, click Start browsing your HP Media Vault.
3.A browser window opens showing you a list of your Shared Folders.
4.
Use My Network Places in Windows XP or Windows 2000 to browse:
1.Click Start, My Computer, My Network Places.
2.In the Name column, locate the Shared Folder you want to open. For example, if opening FileShare,

Windows lists the name as FileShare on HPMediaVault (HPmediavault).
3.Click FileShare on HPMediaVault (HPmediavault) to open FileShare and see what files you have stored in this folder. (If you haven???t yet saved any files to FileShare, the window that appears will be empty; otherwise you will see your saved files.)
4.After opening FileShare, look at the Windows Address bar. You will see the network address of your media vault, which is: \\HPMediaVault\FileShare.
Use Network in Windows Vista to browse:
1.Click Start menu, Network.
2.If network discovery is turned off, you will see a notification bar. Click this bar, and then click Turn on network discovery and file sharing.
3.
Note: The Network window may also display the name of the HP Media Vault media server, as shown below. Be sure to click the media vault, not the media server.
3.
4.Click FileShare to open FileShare and see what files you have stored in this folder. (If you haven???t yet saved any files to FileShare, the window that appears will be empty; otherwise you will see your saved files.)
5.After opening FileShare, look at the Windows Address bar. You will see the network path of your media vault.
Network addressing
Network addressing means that you can access resources on your network by entering their ???addresses??? in a browser???s Address bar.
1.Delete the address in the Address bar, and in its place enter \\HPMediaVault\MediaShare.
A screen opens showing you the folders and files saved to the MediaShare folder on your media vault. (If you haven???t saved anything to MediaShare, the screen will be empty.)
2.Close this window.
3.Open a standard browser window, such as Internet Explorer, Netscape, or Firefox.
4.Delete everything in the Address bar.
5.In the Address bar, enter \\HPMediaVault\FileShare, and then press Enter. You will see any saved files in the FileShare folder on your media vault.

Note: In Windows Vista, you can use this method from any window containing an Address bar.
Network addressing uses the Uniform Naming Convention (UNC) format. This format looks like the following:
\\device name\share name. In this example, HPMediaVault is the device name, and FileShare is the Shared Folder or ???share name.??? (For those more familiar with networking terms, the word ???Share??? is often used instead of ???Shared Folder.???)
Note: The media vault comes
Use Windows Explorer to browse:
When you installed the media vault, you had the choice of mapping drive letters to FileShare, MediaShare and Backup. If you mapped drive letters to those Shared Folders, you can browse to those folders using Windows Explorer. (See Map drive letters to your Shared Folders. )
1.Click Start, All Programs, Accessories, Windows Explorer, My Computer.
2.
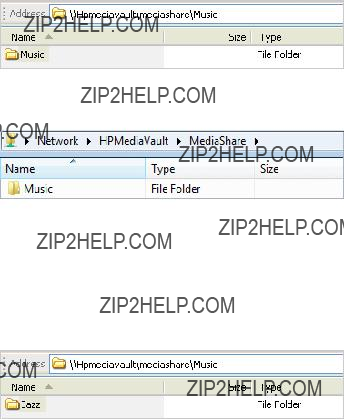
In this example, MediaShare is mapped to drive letter ???M.??? FileShare is mapped to drive letter ???Q."
Use Windows Vista Explorer to browse:
When you installed the media vault, you had the choice of mapping drive letters to FileShare, MediaShare and Backup. If you mapped drive letters to those Shared Folders, you can browse to those folders using Windows Explorer. (See Map drive letters to your Shared Folders. )
1.Click Start, Computer.
2.
In this example, MediaShare is mapped to drive letter ???T.??? FileShare is mapped to drive letter ???V."
How to map drive letters to Shared Folders
Mapping drive letters means assigning ???letters??? to the names of Shared Folders. Mapping drive letters is one of the easiest ways to manage files because you can save files and folders to mapped drive letters just as you can to other drive letters on your computer, such as the C and D drives. (For more information on browsing, accessing, and saving files to the media vault, see Browse, access, and save files.)
When you installed the HP Media Vault, you had the choice of mapping drive letters to FileShare, MediaShare and Backup. If you didn???t map drive letters during installation, you can map letters by using one of the following methods:
To map a drive letter using HP software:
1.On your desktop,
2.On the Main tab, click Assign (map) a drive letter to Shared Folders.
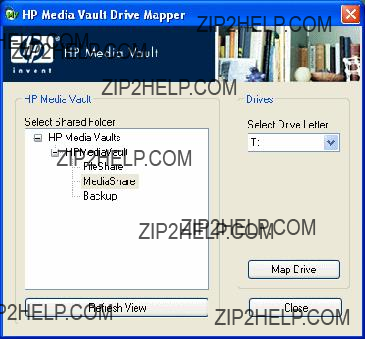
3. The HP Media Vault Drive Mapper opens. Follow these steps to map a drive letter:
a.Click a Shared Folder in the Select Shared Folder box.
b.Select a drive letter from the Select Drive Letter
c.Click Map Drive.
d.Click Close when you are finished mapping drive letters to Shared Folders.
Map a drive letter using Windows XP or Windows 2000:
1.Click Start, All Programs, Accessories, Windows Explorer, My Computer.
2.Click the Tools menu, Map Network Drive...
3.Mapping drives usually defaults to the letter Z:. but you can select another drive letter by following the next two steps:
a.To view a list of available drive letters, click the Drive
b.Click a drive letter to select it.
4.To enter the Shared Folder in the Folder box, you have two options:
???Click the Browse button and then use Windows Explorer to locate the Shared Folder. After you find the folder, click to highlight it, and then click OK. The path to the folder will appear in the
Folder box.
???In the Folder box, use the Uniform Naming Convention (UNC) to enter the path to the Shared Folder you want to map. For example: enter \\HPMediaVault\FileShare (HPMediaVault is the device name; FileShare is the name of the Shared Folder.)
5.Select Reconnect at logon. Windows will
6.Click Finish.
Special considerations when mapping a drive letter:
???If you change the name of your media vault, you will enter the new name instead of HPMediaVault in step 4 above.
???When mapping drive letters to Shared Folders that are password protected, you must complete an additional step: You will have to enter the Shared Folder???s password when prompted. (For more information on password protecting Shared Folders, see Enhance security on your Shared Folders.)
???If your media vault is configured for
If you mapped a drive letter, but now want to disconnect it:
1.Click Start, All Programs, Accessories, Windows Explorer, My Computer.
2.
3.Click Disconnect.
This only removes the drive letter; you can still access the resource from My Network Places.
Map a drive letter using Windows Vista
Before taking the following steps be sure that Network discovery is turned on. For more information, see Ensure that Network Discovery is turned on.
1.Click Start menu, Computer .
2.In the tool bar, click  .
.
3.Mapping drives usually defaults to the letter Z:, but you can select another drive letter by following the next two steps:
a.To view a list of available drive letters, click the Drive
b.Click a drive letter to select it.
4.To enter the Shared Folder in the Folder box, you have two options:
???Click the Browse button and then use Browse For Folder to locate the Shared Folder. After you find the folder, click to highlight it, and then click OK. The path to the folder will appear in the Folder dialog box.
???In the Folder box, use the Uniform Naming Convention (UNC) to enter the path to the Shared Folder you want to map. For example: enter \\HPMediaVault\FileShare (HPMediaVault is the device name; FileShare is the name of the Shared Folder.)
5.Select Reconnect at logon. Windows will
6.Click Finish.

How to organize your files
The HP Media Vault comes
You should consider creating other folders and saving them in the
You can rename or delete FileShare, MediaShare, and Backup folders. Before doing so, please read the recommendations in the following table:
Recommendations
Creating
Creating folders on your PC and saving them to the MediaShare folder on your media vault provides an easy way to organize your media files. Follow the example below to learn how to create
In this example, you will create
1.Create a
a.On your PC, browse to MediaShare. (For information on how to browse to MediaShare, see Browse, access, and save files.
b.Do one of the following:
???Windows XP or Windows 2000: Click the File menu, click New, Folder, and then enter Music in the highlighted box. Click somewhere else to clear the highlight.
???Windows Vista: Click the Organize menu, click New Folder, and then enter Music in the highlighted box. Click somewhere else to clear the highlight.
2.Create two separate
a.
b.To create the first folder, do one of the following:
???Windows XP or Windows 2000: Click the File menu, click New, Folder, and enter
Jazz in the highlighted box. Click somewhere else to clear the highlight.
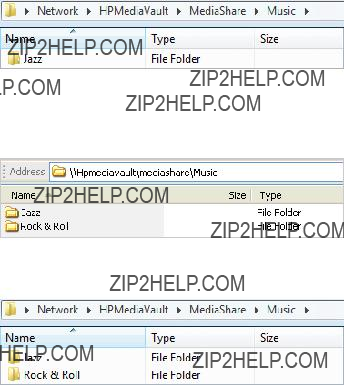
???Windows Vista: Click the Organize menu, click New Folder, and enter Jazz in the highlighted box. Click somewhere else to clear the highlight.
c. To create the second folder, do one of the following:
???Windows XP or Windows 2000: Click the File menu, click New, Folder, and enter
Rock & Roll in the highlighted box. Click somewhere else to clear the highlight.
???Windows Vista: Click the Organize menu, click New Folder, and enter Rock & Roll in the highlighted box. Click somewhere else to clear the highlight.
You should now have two folders, Jazz and Rock & Roll, saved to your Music folder. All three folders are considered

How to secure your HP Media Vault from intruders
The HP Media Vault is designed as an "always on" device, which comes in handy for accessing files any time your network users need or want them. But a network device that is set up for file sharing also presents certain security risks. Because the media vault can be used on a network that has both wireless and wired functionality, you'll want to ensure that unauthorized users can't access your media vault and your files stored on it.
If your network comes with wireless capability, it has a piece of equipment called a Wireless Access Point (WAP). A WAP can come within an
Most wireless networking equipment supports two forms of data encryption as security features: Wired Equivalent Privacy or WEP and
You should install
 Remember to keep your
Establishing an administrator username and password
Setting up an administrator username and password is one way to safeguard your folders and files. If you do set up a username and password, you will be prompted to enter this information each time you enter the Configuration screens. For information on setting up a username and password, see Change the administrator username and password. For information on entering the Configuration screens, see Access the configuration screens.
Securing the HP Media Vault???s Shared Folders on your LAN
The media vault offers additional security options for your network users and specific Shared Folders. For more information on Shared Folder and user security on your local area network (LAN), see Enhance security on your Shared Folders.
How to use the HP Media Vault to transfer files from an old PC to a new PC
Your HP Media Vault can help you simplify transferring files and settings from an old computer to a new computer.
Using a feature found in the Windows XP and Windows 2000 operating systems called the Files and Settings Transfer Wizard, you can transfer files, folders, and settings for Internet Explorer and Outlook Express in addition to desktop and display settings,
The Windows Files and Settings Transfer Wizard must be available on the Windows operating system on both your old and new computers.
Windows Vista: A similar feature exists in Windows Vista called Windows Easy Transfer. Instructions for using this feature are in the Windows Vista help. Because Windows Easy Transfer copies files directly from the old computer, you do not need to use the media vault for this process.
Steps for Windows XP and Windows 2000:
On your old PC:
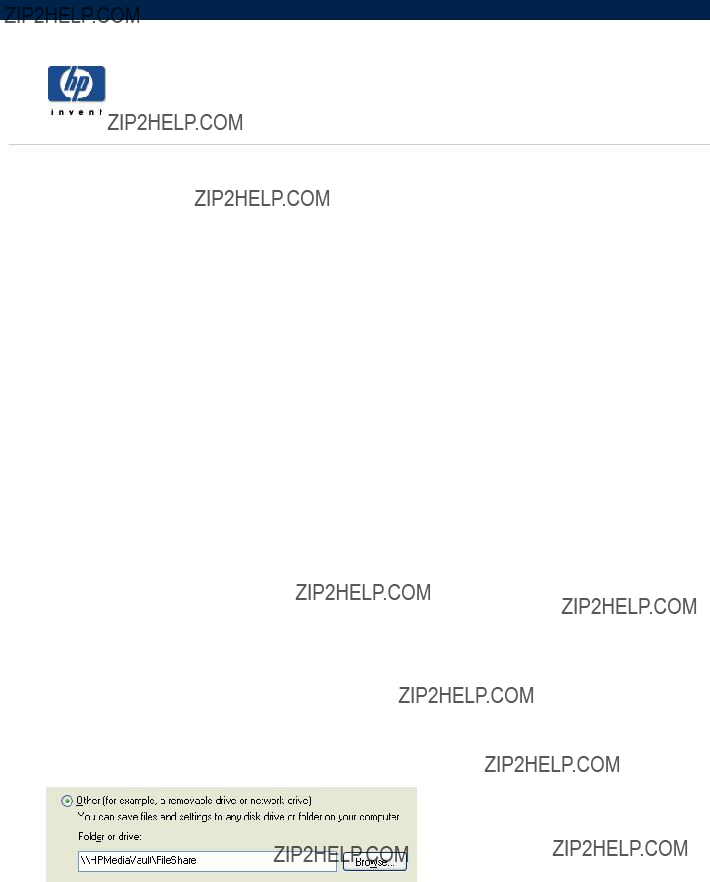
1.Click Start, All Programs, Accessories, System Tools, Files & Settings Wizard. The Wizard???s first dialog box will appear.
2.Click Next.
3.Click Old Computer.
4.Click Next.
5.Click Other.
6.Either Browse to a folder on your media vault, or use the Uniform Naming Convention (UNC) to type in the path. For example, to save your settings to FileShare, type in the Folder or drive: box: \\HPMediaVault\FileShare.
(HPMediaVault is the name of your media vault. To change the media vault???s name, see Change the name of your HP Media Vault.)
7.Click Next.
8.Click one of the following:
???Settings only
???Files only
???Both files and settings
???Let me select a custom list of files and settings when I click Next (for advanced users.) If you click on this option, you will be asked to select specific Settings, Folders, Files and File Types that you wish to transfer.
9.Click Next.
10.Click Next after reading any messages that appear on this screen.
11.Wait while the wizard collects your files and settings. Depending on the size and type of the files you???re saving, this could take several minutes. Click Finish.
On your new PC:
1.Follow steps
2.Click New Computer.
3.Click I don???t need the Wizard Disk, I have already collected my files and settings from my old computer.
4.Click Next.
5.Click Other. Browse to or type in the path that you entered in step 6 above. This path directs the new computer to the Shared Folder on your media vault where you stored your files, folders and settings. If you used the example above, the path is the same: \\HPMediaVault\FileShare.
6.Click Next.
7.Wait while the wizard transfers your files and settings to your new PC. Depending on the size and type of the files you???re transferring, this could take several minutes. Click Finish.

How to connect to the HP Media Vault from a Linux system
This topic provides general guidelines and instructions on how to access the Shared Folders and configuration screens on the HP Media Vault from a Linux system. The particular steps needed to configure a Linux system for connection to the media vault may vary depending on the particular Linux installation.
To connect to HP Media Vault using Samba
Samba provides a simple and secure way of connecting a Linux computer to the media vault using the SMB (Server Message Block) and CIFS (Common Internet File System) protocols. The SMB network protocol is the native
To use Samba, the Linux system must have Samba installed. For information about how to install Samba, see the documentation or man pages included with the Linux distribution.
Using a Linux graphical interface to connect
Linux distributions have numerous versions and graphical interfaces. Consequently, it is not possible to provide specific steps when using a graphical interface to connect a Linux system to the media vault. General steps for connection include using a network browser to find the media vault.
Note: If a firewall is running, turn it off or configure the system to allow Samba to connect to the SMB Shares. The path to the media vault is as follows:
1.Domain - default, Windows Network
2.Workgroup - default, MSHome
3.Machines - default, HPMediaVault
If any of these default names have changed, use the new name.
Using an IP Address or NetBIOS name to access the HP Media Vault
Connecting to the media vault requires either the media vault's IP address or NetBIOS name. NetBIOS is an acronym for Network Basic Input/Output System. The advantage of using the NetBIOS name is that even if the media vault's IP address changes, the Linux system can find the media vault. The following two sections describe each method.
Obtaining the HP Media Vault's IP address
The IP address for the media vault can be found on the router's configuration screens, usually under DHCP Client Table or Show Connected Devices.
Using the NetBIOS name instead of the IP address
Some Linux installations, such as Ubuntu??, may not be able to find the media vault by name without additional configuration. The default NetBIOS name for the HP Media Vault is HPMediaVault. To use the NetBIOS name, take the following steps:
1.First, check if the Linux system can already resolve the NetBIOS name of the media vault.
a.Open a terminal session.
b.Enter ping hpmediavault
2.If pinging fails, edit the nsswitch.conf file, as follows:
a.Become root.
b.In a terminal session, edit the /etc/nsswitch.conf file.
c.In the nsswitch.conf file, add wins to the following line: hosts: files dns
so it reads
hosts: wins files dns
3.Install winbind, which provides Name Service Switch capability.
4.To ensure that the installation works, ping the media vault: ping hpmediavault
It is now much easier to mount volumes or access configuration screens because the IP address does not have to be known.
Connecting to HP Media Vault using Samba command lines
The method described here is not persistent. To have the Linux system automatically connect to the media vault every time it is rebooted, see the documentation or man pages for the Linux distribution.
Take the following steps to connect a Linux system to the media vault:
1.Open a Terminal session.
2.Become root.
3.If necessary install the Samba plugin.
4.Create a directory for the shared files. Example: mkdir /mnt/sharefiles
5.Mount the media vault Shared Folder to the Linux computer, using the following syntax: mount
NetBIOS name example: mount
IP address example: mount
Note: FileShare is one of the default Shared Folders on the Media Vault.
Connecting to HP Media Vault using NFS
NFS (Network File System) is a file system that allows users to access files across a network and treat them as if they resided in a local file directory. NFS is native to all Linux distributions. Unlike, Samba, no installation is necessary. To use NFS, take the following steps:
1.Open a Terminal session.
2.Become root.
3.Create a directory for the shared files. Example: mkdir /mnt/sharefiles
4.Mount the media vault Shared Folder to the Linux computer, using the following syntax: mount
NetBIOS name example: mount
IP address example: mount
Note: For information on using the NetBIOS name or obtaining the media vault's IP address, see Using an IP Address or NetBIOS name to access the HP Media Vault above.
???Be sure to include shares in the path as it is part of the absolute path to the Shared Folder on the media vault.
???Volume1 is the default name for the media vault's internal hard drive. (To view the volume name, access the Disk Setting tab in the configuration screens. For information on how to access configuration screens, see Access the HP Media Vault's configuration screens .)
???FileShare is the name of one of the default Shared Folders.
Access the HP Media Vault's configuration screens
To access the media vault's configuration screen, use a browser such as FireFox or Konqueror.
1.Open the web browser.
2.In the Location box, enter the IP address or name of the media vault. IP address example: http://192.168.1.100
NetBIOS name example: http://hpmediavault
Note: If the web browser cannot find the media vault with the NetBIOS name, the firewall may be blocking the request. If the Linux system has just been configured to use the NetBIOS name, the web browser may require restarting.
Depending on the media vault settings, the web browser displays either The Welcome Page or the Shared Folders tab.
How to connect to the HP Media Vault from a
Macintosh
You can configure a Macintosh computer to access the Shared Folders and configuration screens on the HP Media Vault. These instructions apply only to computers with the latest Macintosh OS X operating system.
To map Shared Folders from a Macintosh
1.In the Finder, click Go, Connect to Server.
2.In the Connect to Server dialog box, click Browse.
3.In the Network window, click Mshome, HPMediaVault.
Note: Mshome is the default name of the workgroup. If this name has been changed, use the new name.
4.In the panel that shows the available shares, click Connect.
5.In the
6.In the SMB/CIFS File System Authentication window, do one of the following:
???If the shared folder is password protected, enter the appropriate password, then click OK.
???If the shared folder is not password protected, click OK.
7.Repeat steps 5 and 6 for each shared folder.
To access the HP Media Vault's configuration screens
1.Open a web browser, such as Safari or Firefox.
2.In the Location box, enter the IP address or name of the media vault.
3.IP address example: http://192.168.1.101
4.Name example: http://hpmediavault
Note: The IP address for the media vault can be found on your router's configuration screens, usually under DHCP Client Table or Show Connected Devices.
Depending on the media vault settings, the web browser displays either The Welcome Page or the Shared Folders tab.

How to backup and restore
Quickly, easily, and automatically back up My Documents, My Pictures, My Music, My Videos, and My Desktop.
??How to run automatic backups for important files
Use NTI Shadow for more advanced backup capabilities.
??How to create a drive backup
Use NTI Backup to protect your system files and data by backing up an entire hard drive or partition.
Change the settings on previously created backup jobs, enable or disable jobs, and delete jobs.
??How to restore a drive backup
Restore the data that you have backed up using NTI Backup.
??How to use the PC Restore Disc
Use the PC Restore Disc to restore a system drive.

How to use HP Easy Backup
Using HP Easy Backup is a good way to get started in protecting your data. Easy Backup provides a way for you to easily back up the following folders (including their
 HP Easy Backup will back up only the My Desktop, My Pictures, My Music, My Videos, and My Documents folders that are installed by Windows for each User Account.
After configuring Easy Backup, each file will be backed up every time you make a change to the file. Additionally, Easy Backup creates one version of each file and places that file in a directory called Revision.
To back up your files using Easy Backup:
1.Start the software:
a.
b.Click the Backup tab.
c.Click Back up your important files.
2.If the NTI Shadow application appears, click Switch to HP Easy Backup, located in the
Note: To change whether Easy Backup or NTI Shadow is launched, see To switch to NTI Shadow from HP Easy Backup below.
3.In the Easy Backup screen, click Simple Selection.
4.Select one or more of the following options:
Note: Only the following folders and their
???My Documents
The default folder for documents, graphics, and other personal files. Many programs automatically save data files to this folder.
???My Music
The default folder for audio files, such as those you download from the Internet or save on your hard drive.
???My Pictures
The default folder for photographs. Many
???My Videos
The default folder for video clips, such as those you download from the Internet or saved on your hard drive.
???My Desktop
All files and folders on the Desktop are backed up, including shortcuts. Note that backing up a shortcut does not backup the program that the shortcut opens.
Note: Any file stored in one of the above folders is backed up regardless of its type. For example, a document file stored in My Music will be backed up.
5.Click Start.
The backup process will start. Your first back up could take some time, depending on the amount of data.
Note: If you need more backup capability, see Run automatic backups for important files.
Switch between Simple (HP Easy Backup) or Custom (NTI Shadow) backup
To change whether HP Easy Backup or NTI Shadow is launched from the Backup tab:
To switch to HP Easy Backup from NTI Shadow:
1.From NTI Shadow, click Switch to HP Easy Backup, located in the
2.In the HP Easy Backup screen, click the Simple Selection option.
Note: If you want Easy Backup to be launched each time you click Back up your important files from the HP Software, under Custom Selection, clear the checkbox labeled Skip this screen in the future (always go directly to NTI Shadow software).
3.Select the folders you want to backup, as described.
4.Click Start.
To switch to NTI Shadow from HP Easy Backup:
1.From HP Easy Backup, click Custom Selection.
2.Click Start.
3.For more information, see Run automatic backups for important files.
Note: If you want NTI Shadow to be launched each time you click Back up your important files from the HP Software, select the checkbox labeled Skip this screen in the future (always go directly to NTI Shadow software).
How to run automatic backups for important files
Your HP Media Vault is bundled with NTI Shadow software. NTI Shadow is an
Note: If you have already created a backup job and wish to modify it, see Modify a backup job.
You can either back up your files/folders every time they change or schedule a specific time for backups. Note: If you wish to back up an entire drive, see Create a drive backup.
To back up important files/folders:
1.Start the software:
a.
b.Click the Backup tab.
c.Click Back up your important files.
2.If the HP Easy Backup screen appears, click Custom Selection, and then Start. Otherwise, continue to the next step.
Note: HP Easy Backup provides a way for you to easily backup commonly used folders such as My Music. For more information, see Use HP Easy Backup.
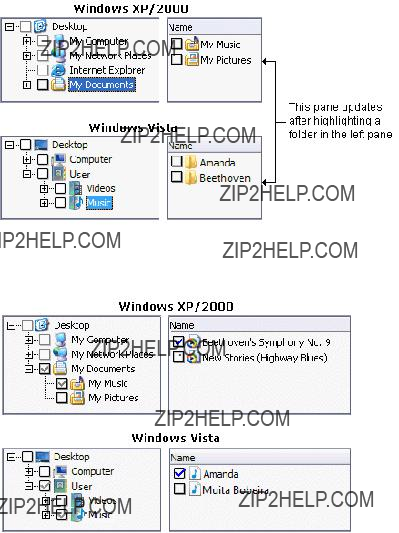
3.In the NTI Shadow screen, click Create Backup Job.
4.To back up an entire folder:
???In the Backup job wizard, click the checkbox next to the folder that you want to back up. A blue checkbox  next to the folder indicates that you have selected to backup the entire contents of that folder.
To back up specific files:
a.In the left pane, select the folder that contains the files you want to back up. Selecting a folder opens the folder and displays its contents in the right pane.
b.In the right pane, select the files you want to back up. To select a file or folder, click its associated checkbox.
In the above illustration, notice that in the left column some of the checkboxes are gray  . This indicates that only some of the files contained in the folder have been selected for backup.
 If you add any new files to a folder that has a gray checkbox next to it, these files will not be included in future automatic backups.
Click Next.
5.Select your backup destination using either of the following methods:
???Browse for the backup destination.
???Enter the network address using the Uniform Naming Convention (UNC) format. For example:
\\HPMediaVault\Backup
Click Next.
6.Schedule your backup using one of the following options:
???Save your folder/file to the HP Media Vault every time you save changes to your PC
???Save your folder/file changes every
???Use the
Days.
???Save your folder/file changes every
???Select one or more checkboxes for the days you want to schedule your backup
???Select the Hours, Minutes, and AM or PM (for the
Note: If you select a fixed schedule (specific day or time), to ensure optimum performance, choose a different time for each PC to back up its files. This avoids multiple backups to the media vault at the same time.
Click Next.
7.Select the number of previous file versions to save:
???Save all the previous file versions
Selecting this option will back up each version of your files. This options keeps all previous versions of your files
???Save a limited number of previous file versions
Selecting this option will back up the number you specify in the list box up to nine versions.
???Do not save any previous file version
Selecting this option will store only the latest version of the files.
???Option button
Allows you to delete the backup files/folders from your media vault when you delete the file from your computer. Select Delete the file on the HP Media Vault when the file is deleted on your PC, and then click OK.
Click Next.
8.Backup Job Summary:
???Name this backup job box
NTI Shadow automatically names the file based on the computer name, date, and time. You can rename the backup if desired. You should use a unique name to identify the backup.
???To show the progress of the backup, click Show progress bar.
9.Click Finish to start the backup.
The Start Backup dialog box appears asking whether you want to start the backup now.
???Select Yes to start the backup immediately.
???Select No to save the backup. If you chose this option, you can start the backup in the Modify Backup Job pane (see Modify a backup job).
10.If you have chosen to immediately start the backup, click Yes to start the backup.
Note: The NTI Shadow icon  is displayed in the computer Task Bar whenever a backup job is
configured.
How to back up specific file types
NTI Shadow backs up all file types unless you specify that you want to back up only specific kinds of files for backup. For example, you can specify that only the audio files in a folder are backed up. You can select which files you want to back up either by including or excluding files types:
???Include option
Backs up only the specified files types.
???Exclude option
Backs up all files except those specified.
To select specific file types for backup, follow these steps:
1.In the Select Files/Folders screen of the Backup job wizard, click Option.
2.In Step 1, select one or more file types.
If you select Custom types, you can enter the file extension for the type of file in the associated box. Enter " *.extension type", such as *.gif.
3.In Step 2, select Include or Exclude.
4.Click OK.
To reset the Select File Types dialog box to the default settings:
???Click Restore Defaults. The checkboxes are cleared and the Include option is selected. All files types will then be backed up.
Feedback about this guide
?? 2006

How to create a drive backup
Your HP Media Vault is bundled with NTI DriveBackup!. NTI DriveBackup! is an
Note: You can also use DriveBackup! to restore a previous drive backup to your disk drive. For more information, see Restore a drive backup.
To create a drive backup, follow these steps:
1.Start the software:
a.
b.Click the Backup tab.
c.Click Back up your entire drive.
2.In Step 1 Select Drive to Backup, from the Source drive
 Note the amount of used space shown in this step and make sure that your media vault has enough storage capacity for the backup.
3.In Step 2 Select Destination for Your Backup, select where to store the backup either from the
4.In Step 3 Name Backup File, NTI DriveBackup! automatically names the backup file using the computer name, date, and time. You can rename the backup if desired. You should use a unique name to identify the backup.
5.In Step 4 Select Options, select the desired backup options:
???Data Compression
Selecting this option enables NTI DriveBackup! to reduce the size of the backup.
Note: The size reduction depends on the kind of data being compressed. Some kinds of audio and a video files are already compressed; subsequently, further compression is negligible.
???Backup Verification
If you select this option, NTI DriveBackup! performs a verification step to ensure that the correct files exist on the backup.
???Password button.
Click Enable Password Protection, and then enter and confirm the passwords in the associated boxes.
6.To schedule your backup for a specific time, click Schedule, otherwise go to the next step.
Note: When selecting a schedule, to ensure optimum performance, choose a different time for each PC to back up its files. This avoids multiple backups to the media vault at the same time.
a.In the Scheduler Setup dialog box, select the frequency of the backup: Once, Weekly,
Monthly, or Daily.
b.If you select Daily, you can specify the particular days of the week you want the backup to occur.
???Click Which Days.
???Select one or more days of the week, and then click OK.
c.The Start at group changes according to the frequency you previously selected. Select the time for the backup as follows:
???Once
Select the time, month, day, and year. For example: 12:00 AM, January, 20, 2007.
??? Weekly
Select the time and day of the week. For example: 15:15, Sunday.
???Monthly
Select the time and day of the month. For example: 10:30 PM, 1. Because not every month has 31 days, we suggest that you use the first day of the month for monthly backups.
???Daily
Select the time of day. For example: 21:33.
Note: To set the hour and minute of the time option, you can select each column (Hours, Minutes, and AM or PM (for the
7.To start the backup immediately, click Start.
The Create Drive Image Backup screen appears. This screen shows the details and progress of the backup process.
8.After the backup finishes, you can do the following:
???To view a report of the backup, click View Report.
???To close the Create Drive Image Backup screen, click Close.
DriveBackup! Menus
The DriveBackup! menus provide additional functionality for backing up your drive or drive partition.
???Job Menu
Provides the following standard file capabilities: New, Open, Save, Save As, Exit.
???Options Menu
Sets password protection as described in Password button above.
???Reports Menu
Allows you to view or delete reports of all backup and restore operations. Every time a backup is created or restored, DriveBackup! creates a report file that contains information to help you to trace and diagnose problems that might occur. DriveBackup! will report all errors that have occurred in backup or restore process in these files.
???View Backup Reports
Opens the Backup Report dialog box where you can View or Remove reports by highlighting the report and selecting the appropriate button.
???View Restore Reports
Opens the Restore Report dialog box where you can View or Remove reports by highlighting the report and selecting the appropriate button.
???Help Menu
Provides the
NTI Schedule Viewer
The NTI Schedule Viewer is a backup monitoring program that you can use to delete, suspend, or resume already scheduled NTI DriveBackup! jobs.
To access the NTI Schedule Viewer:
??? Click Start, All Programs, NTI DriveBackup! 4, NTI Schedule Viewer.
All scheduled backup jobs can be viewed from the NTI Schedule Viewer window.
To delete a scheduled backup job:
1.In the NTI Schedule Viewer window,
2.In the confirmation dialog box, click Yes.
To suspend or resume a job:
1.In the NTI Schedule Viewer window,
Within the context window, a checkmark next to Suspend job indicates that the job is suspended. If no checkmark is visible, the job will be processed normally.
2.Click Suspend job to suspend or resume a job.
How to modify a backup job
Your HP Media Vault is bundled with NTI Shadow software. NTI Shadow is an
To modify a backup job, follow these steps:
1.Start the software.
a.
b.Click the Backup tab.
c.Click Back up your important files.
2.If the Easy Backup screen appears, click Custom Selection, and then Start. Otherwise, the NTI Shadow screen appears.
Note: Easy Backup provides a way for you to easily backup commonly used folders such as My Music. For more information, see Use Easy Backup.
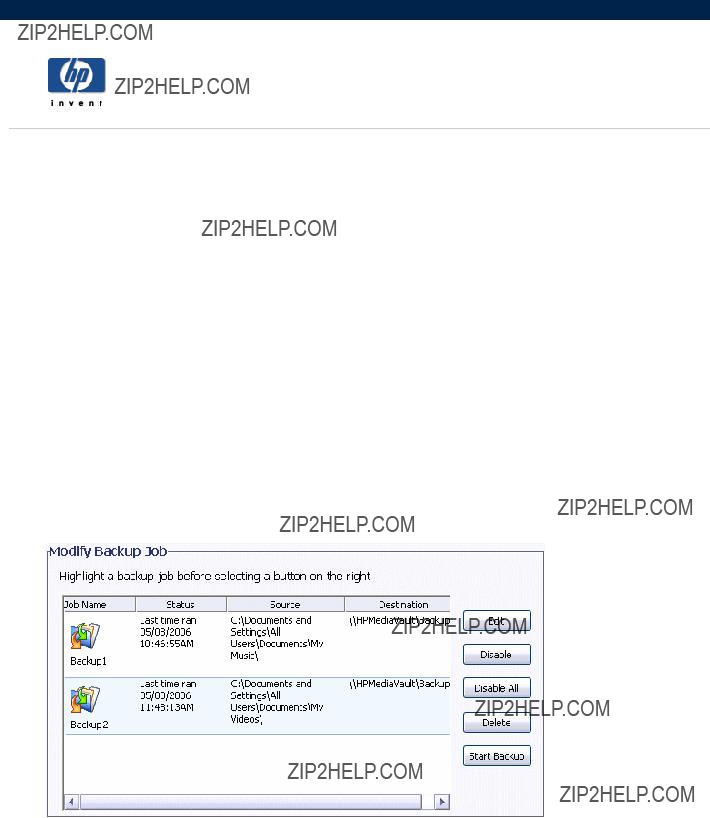
The Modify Backup Job list box shows the list of backup jobs that have been created. The list includes the name of the backup job, the last time the job ran, which folder/files were backed up, and the location of the backup folders.
3.You can modify a backup as follows:
???Edit
Opens the Backup job wizard, where you can modify the backup as described in Run automatic backups for important folders or files.
???Disable/Enable
Disables or enables the selected backup job. A disabled backup will not run until it is
???Disable All
Disables all backup jobs.
???Delete
Deletes the selected backup job.
???Start Backup
Immediately starts the selected backup. The backup must be enabled to start.
4.You can also view the log file, complete the modification, and cancel some kinds of modifications:
???View Log File
Displays information about the backup process.
???Done
Closes the NTI Shadow screen. If a backup is running, it will continue to run. Changes to the enabling or disabling of any backup jobs are saved.
How to restore a drive backup
Your HP Media Vault is bundled with NTI DriveBackup!. NTI DriveBackup! is an
If you wish to restore the system drive, you must use the PC Restore Disc. A system drive cannot be restored from the Windows operating system because it would have to write over itself.
About restoring a drive backup
Keep the following in mind when restoring from NTI DriveBackup!:
 When restoring a disk drive, any content that exists on the target hard drive or drive partition will be erased.
???Restored NTFS partitions cause the Windows chkdsk utility to run when the system is rebooted. This utility creates and displays a status report for a disk based on the file system. Windows 2000 SP4 or Windows XP will run the verification process and then restart. The restored drive should be fully operational after the computer restarts.
???You cannot select a partition that is smaller than the amount of data on the original partition. However, you may select a larger partition. In some cases, you may need to select a target partition that is the same size as the original partition.
???When you select a drive to restore, you must pay attention to the compatibility of the file systems between the source backup and the target drive. The following table lists all compatible combinations of source and target file systems and the resulting partition format.
Compatible Combinations
Any other combinations are not supported.
To restore a drive backup, follow these steps:
1.Start the software:
a.
b.Click the Backup tab.
c.Click Restore your entire drive.
2.In Step 1, from the
3.Click Browse to find and select the specific backup file to restore. DriveBackup! files have a .npf file extension.
The selected file appears in the box below the list box and Browse button.
4.In Step 2, from the
5.Click Start.
The time it takes to restore the drive or drive partition depends on the size of the backup file.
DriveBackup! Menus
The DriveBackup! menus provide additional functionality for backing up your drive or drive partition.
???Job Menu
This menu provides the following standard file capabilities: New, Open, Save, Save As, Exit.
???Options Menu
Sets password protection.
???Reports Menu
Allows you to view or delete reports of all backup and restore operations. Every time a backup is created or restored, DriveBackup! creates a report file that contains information to help you to trace and diagnose problems that might occur. DriveBackup! will report all errors that have occurred in backup or restore process in these files. By default, all report files are located in the Report Files directory found in the installation directory for your DriveBackup! software.
???View Backup Reports
Opens the Backup Report dialog box where you can view or remove reports by highlighting the report and selecting the appropriate button.
???View Restore Reports
Opens the Restore Report dialog box where you can view or remove reports by highlighting the report and selecting the appropriate button.
???Help Menu
Provides the
NTI Image Explorer
The NTI Image Explore allows you to restore individual folders and files from a DriveBackup! file. DriveBackup! files have an .npf extension. To restore an entire drive or partition, see Restore a drive backup.
To restore individual folders or files from an .npf file, follow these steps:
1.Start NTI Image Explorer:
a.Click Start, All Programs, NTI DriveBackup! 4, NTI Image Explorer.
b.In the EasySteps 1: What to restore? screen, select the location of the backup file you want to restore from the

c.Click Browse to find and select the particular backup file you want to restore.
The selected file appears in the box below the list box and Browse button. The backup files contained in the DriveBackup! file appear in the selection panes in the bottom part of the screen.
d.In the left pane, navigate to the folder that contains the files that you want to restore. (The selection of folders and files is identical to that described in Run automatic backups for important files.)
e.In the right pane, select the folder or files that you want to restore.
2.Click EasySteps 2.
3.Select one of the following options to restore the files:
???To restore the files to their original location, select Original.
???To restore the files to a different location, select Other and then Browse.
4.Click EasySteps 3.
5.Select the overwrite options of the restore:
???Never replace a file with its backup copy
???Replace a file only if its backup copy has a newer file date and time
???Always replace a file with its backup copy
6.Click Start.
7.In the Operation Finished dialog box, click Close; or if you want to view a report of the restore, click
View Report.
How to use the PC Restore Disc
To help you recover your system and data in the event of a disaster, HP Media Vault includes a PC Restore Disc.
Important: To ensure that you have the latest version of the PC Restore Disc, consult the HP support web site at www.hp.com/support.
To use the PC Restore Disc, you must have previously created a drive backup with DriveBackup!, you can use this disc for the following:
???To restore the system drive.
???If you cannot use the Windows operating system to restore the system files.
???The operating system will not start (boot).
For information about creating a drive backup, see Create a drive backup.
The Microsoft?? Windows?? Preinstallation Environment software included with this computer or software may be used for boot, diagnostic, setup, restoration, installation, configuration, test or disaster recovery purposes only.
NOTE: THIS SOFTWARE CONTAINS A SECURITY FEATURE THAT WILL CAUSE END USER CUSTOMER'S
SYSTEM TO REBOOT WITHOUT PRIOR NOTIFICATION TO THE END USER CUSTOMER AFTER 24 HOURS
OF CONTINUOUS USE.
To recover your system and data using the bootable disc:
Note: The PC Restore Disc does not support wireless networking. To restore your computer, you must connect it to your router via a
1.Insert the PC Restore Disc into your CD/DVD drive.
Note: If the PC Restore Disc is not recognized by your computer, you may have to configure the computer's BIOS to recognize your CD/DVD drive as a bootable device. For more information, see your computer's documentation.
 After inserting the PC Restore Disc, it may take several minutes for the NTI DriveBackup! application to appear. Please be patient.
Note: If the following error message appears: Failed to install network
2.When the Language Selection dialog box appears, select the language you want to use from the
3.In Step 1, select the drive/partition that you want to restore. a. Restore the C: partition
Use this option when you have only one drive partition.
b.Restore the C: and D: partition
Use this option when you have only two drive partitions.
Note: If you have more than two partitions, refer to the Microsoft documentation for Disk Management.
4.In Step 2, select the backup file from the list or Browse for the backup file. Drive backup files have a .npf file extension.
Note: The backup file may be split into multiple files. Select the file with 001 in the name.
5.In Step 3, select the drive you want to restore.
 When restoring a hard drive, any content that exists on the target hard drive or drive partition will be erased.
Note: To exit NTI DriveBackup! before starting your restore, click Job, Exit.
6.Click Start.
Note: If you want to exit the restore after clicking start, click the Cancel button.
To verify proper disk operation, NTI DriveBackup! runs the Windows chkdisk utility when the system is rebooted on restored drives with NTSF files system.
The target partition may be larger than the original partition where desired. You cannot select a partition that is smaller than the amount of data on the original partition. In some cases, such as Windows 2000, Service Pack 2, you may need select a target partition that is the same size as the original partition.

How to configure the HP Media Vault
Access the configuration screens to change settings on your HP Media Vault.
Install or remove an internal hard drive from your HP Media Vault; install and remove an external USB drive.
??Manage Shared Folders and users
Manage your network user and Shared Folders on your HP Media Vault.
??How to stream media to your entertainment center
Enable media files stored on your HP Media Vault to play on your entertainment center.
??Monitor and configure the HP Media Vault's hard drives
Monitor and configure your HP Media Vault???s hard drives.
Change your HP Media Vault???s network security mode and network settings.
Connect a printer to your HP Media Vault.

Configuration screens
??How to access the configuration screens
Learn different ways to access HP Media Vault's configuration screens.
Use the Welcome screen to access the configurations screens.
Change the HP Media Vault's default settings.

How to access the configuration screens
The HP Media Vault???s configuration screens contain settings for a number of activities beyond saving files to the media vault. For example, the configuration screens let you create new Shared Folders, set privilege levels on folders and files, stream media, add or reformat a hard drive, and add a printer. The configuration screens appear in a standard browser window, such as Microsoft Internet Explorer. (Most standard browsers installed on PCs today will work with the media vault's configuration screens.)
To access the configuration screens from the HP Media Vault desktop icon:
???
???Click Customize your HP Media Vault???s settings.
???If the Welcome Screen appears, click Configure Device.
To access the configuration screens from the Start menu:
???Click Start, All Programs, HP Media Vault, Customize your HP Media Vault???s settings, Configure Device.
To access the configuration screens from an Internet browser:
1.Open your Internet browser.
2.Highlight the address line of the browser window up to http//:
3.Press the Delete key.
4.Enter HPMediaVault (or, if you???ve changed the media vault???s name, enter the new name).
5.Press the Enter key.
After using one of these methods, your default web browser will open and you will see the Shared Folders screen, which provides basic information on your Shared Folders. This screen also allows you to create new Shared Folders and make changes to your Shared Folders. For more information on Shared Folders, see Manage Shared Folders.
The Welcome Screen
The Welcome Screen allows you to select Browse Shared Folders or Configure Device. The Welcome Screen opens only if you have selected to allow Web Browser Access for one or more Shared Folders. Your media vault defaults to No Access for Web Browser access, so you must change this setting to enable this method for accessing your files. You can change to Web Browser Access on the Create a new Shared Folder screen or on the Modify an Existing Shared Folder. On both screens, the Web Browser Access option appears under Permit Access to this Folder from.
Web Browser Access refers to HTTP access. HTTP access lets you access folders and files on your media vault in a browser window. You should use HTTP access cautiously because HTTP access also lets you use a browser to access media vault files on computers outside of your local area network (LAN). To keep your files secure, you should only enable HTTP access if you understand network security.
Browse Shared Folders
Click to browse the contents of your media vault using a web browser window.
Configure Device
Click to access the configuration pages, which lets you modify settings on the media vault. When you select this option, the first screen titled Shared Folders opens. (See How to use the Shared Folders screen.)
System Settings
Select a topic
??What are the factory default settings?
??How to change the administrator username and password
??How to change the name of your HP Media Vault
??How to set the date and time
??How to turn off the alert beep
??How to make a language selection
??How to enable the

What are the factory default settings?
What is the default network name given to the HP Media Vault?
???HPMediaVault
???If you have more than one media vault, the second is called HPMediaVault01, the third is called HPMediaVault02, and so on.
(See Change the name of your HP Media Vault.)
What is the default hard drive name of the HP Media Vault?
???SYSTEM
(See Hard drive settings.)
What is the default hard drive volume name?
???Volume1
(See Hard drive settings.)
What default time zone does the media vault use?
???Mountain Standard Time (MST)
(See Change the time zone on your HP Media Vault.)
What are the names of the three default shares configured on the HP Media Vault?
???FileShare
???MediaShare
???Backup
(See Get started.)
What is the default security mode of the HP Media Vault?
???Workgroup mode
(See Enhance security on your Shared Folders.)
What are the three allowable
???Full access
???
???No access
(See Enhance security on your Shared Folders.)

How to change the administrator username and password
The HP Media Vault does not come
To access the User Settings screen:
???
???Click Customize your HP Media Vault???s setting.
???If the Welcome Screen appears, click Configure Device.
???Click the User Settings tab.
To change the administrator username and password:
In Administrator Settings, complete the following:
1.Enter a username in the Administrator Username box.
2.Enter a password in the Password box.
3.
4.Click Accept or Cancel. (If you click Cancel, the username and password will not be accepted.)

How to change the name of your HP Media
Vault
You can change the name of the HP Media Vault. This is useful if you have more than one media vault on the same network. The default network name is HPMediaVault.
Keep in mind that renaming a media vault forces all your network computers to remap their shared network resources, such as Shared Files and Shared Printers. Change the name of the media vault only when necessary.
To access the Network Settings screen:
???
???Click Customize your HP Media Vault???s settings.
???If the Welcome Screen appears, click Configure Device.
???Click the Network Settings tab.
To change the name:
1.In the Device Name box, enter the new name for the media vault. Do not include spaces in the name. Only 15 alphanumeric characters are allowed.
2.Click Accept or Cancel. If you click Cancel, you media vault will not be renamed.
Two or more HP Media Vaults:
If you have more than one media vault, the second is called HPMediaVault01, the third is called HPMediaVault02, and so on.
How to set the date and time
To access a Clock Settings:
1.
2.Click Customize your HP Media Vault???s setting.
3.If the Welcome Screen appears, click Configure Device.
4.Click the System Settings tab.
5.Click Clock Settings.
You can make one or more date and time changes on the Clock Settings screen.
Synchronizing the date and time
If you have Internet access on your network, the HP Media vault automatically synchronizes its date and time with an Internet public Network Time Protocol (NTP) server. This synchronization feature called Automatically Set Clock from Internet (NTP) Server is set at the factory. The checkbox for this feature is located in the
By default, the media vault connects to the first available NTP Server. Under normal circumstances, you should not have to modify the addresses of the three
If you want to set the clock manually, you should clear Automatically Set Clock from Internet (NTP) Server check box. If you set the clock manually without clearing this feature, the next time the media vault checks its time against the NTP sever, the NTP Server will change your manual settings.
Setting the clock manually
1.Enter the appropriate Year, Month, and Day.
2.Enter the Hours, Minutes, and Seconds.
3.If you have set the Time Display Format to use a 12 Hour Clock, click either AM or PM. (See the second bullet item in Other clock settings below.)
4.Click Set Clock Manually.
Other clock settings
If you do not want your media vault to automatically adjust for Daylight Saving Time, click the Automatically Adjust Clock for Daylight Savings Time checkbox to clear it. If you live in a
???To select a new time zone, click the Select Time Zone
???To switch from a
???To change the date format, click the appropriate Date Display Format. If finished making changes, click Accept or Cancel. (If you click Cancel, the changes that you make will not be accepted.)
???To set the media vault???s time to the PC???s clock running your browser, click Set Clock from Browser. (You do not have to click Accept for this change to be accepted.)

How to turn off the alert beep
Your HP Media Vault comes enabled with an alert beep. The alert beep notifies you of certain activities taking place on the media vault. You will hear beeps for routine functions, such as the media vault powering up or down. However other beeps may signal potential critical problems with your media vault, such as an internal hard drive error.
If you have installed the HP software from the Software Installation Disc, you can check the media vault icon located in your system tray for messages when you hear the alert beep.
To access the System Settings screen:
???
???Click Customize your HP Media Vault???s setting.
???If the Welcome Screen appears, click Configure Device.
???Click the System Setting tab.
To turn off the alert beep:
1.Click Disable Audio Alarm.
2.When you are finished making changes, click Accept or Cancel. (If you click Cancel, the change you made will not be accepted.)

How to make a language selection
To access the System Settings screen:
???
???Click Customize your HP Media Vault???s setting.
???If the Welcome Screen appears, click Configure Device.
???Click the System Settings tab.
To change the language:
1.Click the Language
2.Select a language. (You do not have to click Accept.)

How to update the firmware
To access the System Settings screen:
???
???Click Customize your HP Media Vault???s setting.
???If the Welcome Screen appears, click Configure Device.
???Click the System Settings tab.
To update the firmware:
1.In the Select Firmware Update Package box, enter the path to the firmware file that you've downloaded to your local PC, or click Browse to locate the file.
2.Click Apply Firmware Update.
3.The upgrade process will take a few moments as your media vault automatically reboots to initialize the new firmware.
 Do not turn off the HP Media Vault during the firmware update process.

How to enable the
Your HP Media Vault comes with
When you use
To access the System Settings screen:
???
???Click Customize your HP Media Vault???s setting.
???If the Welcome Screen appears, click Configure Device.
???Click the System Settings tab.
To make changes to the
???To change the default time settings, click the Hours and Minutes
???To turn off
When you are finished making changes, click Accept, or Cancel. (If you click Cancel, any changes that you made will not be accepted.)

How to display the system event log
To access system event log:
1.
2.Click Customize your HP Media Vault???s setting.
3.If the Welcome Screen appears, click Configure Device.
4.Click the System Settings tab.
5.Click Display System Event Log.
This screen will show you a record of activity that has taken place on the HP Media Vault. Each activity will have a time and date associated with it, a description of the activity that took place, and an activity importance level also called a critical alert.
For example, mounting a new hard drive will be listed with a relatively minor importance, or alert, but a hard drive failure would be listed with a critical alert. You can clear the log by clicking Clear System Event Log.

How to restart and reset the HP Media Vault
To restart the HP Media Vault:
1.
2.Click Customize your HP Media Vault???s setting.
3.If the Welcome Screen appears, click Configure Device.
4.Click the System Settings tab.
5.Click Restart Device. Restarting the media vault simply turns it off and on ??? as if you unplugged and plugged it back in. You will not lose any of your current settings.
Note: You can also Restart the media vault by pressing the power button on the front of the media vault, or pressing the restart/reset button on the back of the media vault. If you use the button located on the back of your media vault, do not press the button for more than four to five seconds. Pressing this button for longer than five seconds will completely Reset your media vault. (See Troubleshooting.)
To reset the HP Media Vault:
1.
2.Click Customize your HP Media Vault???s setting.
3.If the Welcome Screen appears, click Configure Device.
4.Click the System Settings tab.
5.Click Reset Device to Factory Default. Only select this option if you have a media vault that is failing to respond to normal commands. Many of the settings you might have changed through the media vault???s configuration screens will be reset to their factory default settings. For example usernames and passwords established in
Note: You can also Reset the media vault by pressing the restart/reset button on the back of the media vault. To achieve a complete reset, you must press and hold in the button for at least 10 seconds. Pressing this button for less than 10 seconds will only Restart your media vault. (See Troubleshooting.)
How to expand your storage
Select a topic
??How to install an internal hard drive in your HP Media Vault
How to install and remove internal hard drive from your HP Media Vault
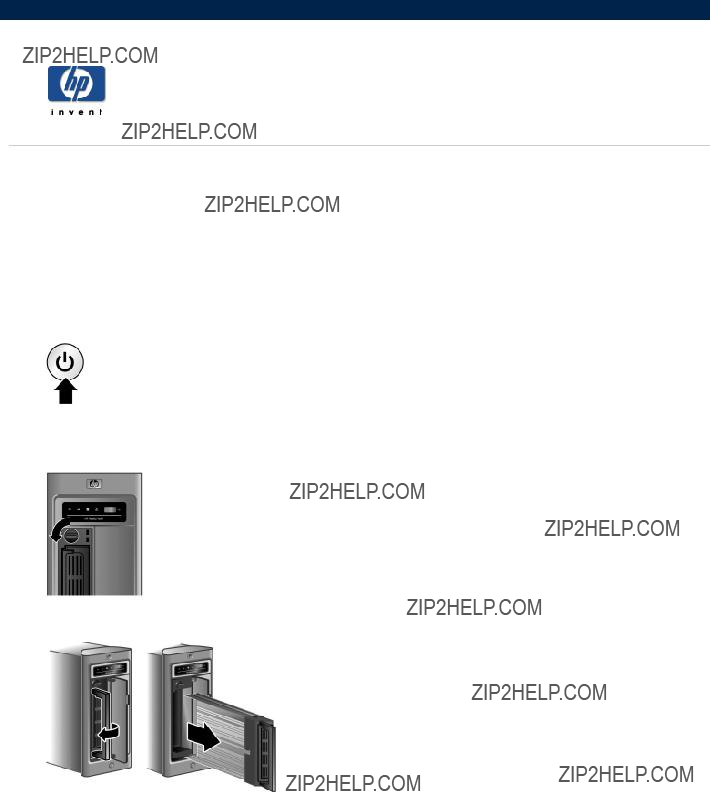
The HP Media Vault???s primary system hard disk uses the Serial ATA (SATA) interface. The internal expansion bay will accommodate a second SATA disk. (The media vault does not support adding Integrated Drive Electronics (IDE) disks.)
 You cannot remove or add a hard disk to the media vault while it is powered on and running.
To add a SATA disk into the expansion slot:
1.Power down the media vault by pressing the power button on the front of the media vault and wait until it completely shuts down.
2.Open the front left door of the media vault.
3.Turn the security knob on the hard drive tray
4.Lift the drive tray handle out and gently pull the hard drive tray out of the expansion bay.
5. Slide the hard drive into the tray.
6. Align the hard drive connector with the notch on the back of the tray.
7.Use a screwdriver to attach the four screws, which secures the SATA drive to the tray. Make sure that the hard drive connector is still aligned with the notch on the back of the tray after tightening the screws.
8.Slide the tray with the inserted hard drive into the expansion bay.
9. Turn the security knob clockwise to secure the drive tray into place.

10. Power up the system.
You can now use the additional hard drive. (For information on formatting the hard disk, see Format a disk.)
To remove an internal expansion:
1.Power down the media vault by pressing the power button on the front of the unit and wait until it completely shuts off.
2.Turn the security knob
3.Lift the drive tray handle out and gently pull the hard drive tray out of the expansion bay.
4.Use a screwdriver to unscrew the four screws.
5.Remove the hard drive from the tray. To prevent losing the tray, insert the empty tray back into the media vault.
6.Power the system back up to use the single internal drive.
 Removing hard disks can cause unexpected and undesirable behaviors. If the media vault has volumes that span across multiple disks, removing any one of the disks will make the whole volume unusable (at least until the disk is reconnected).
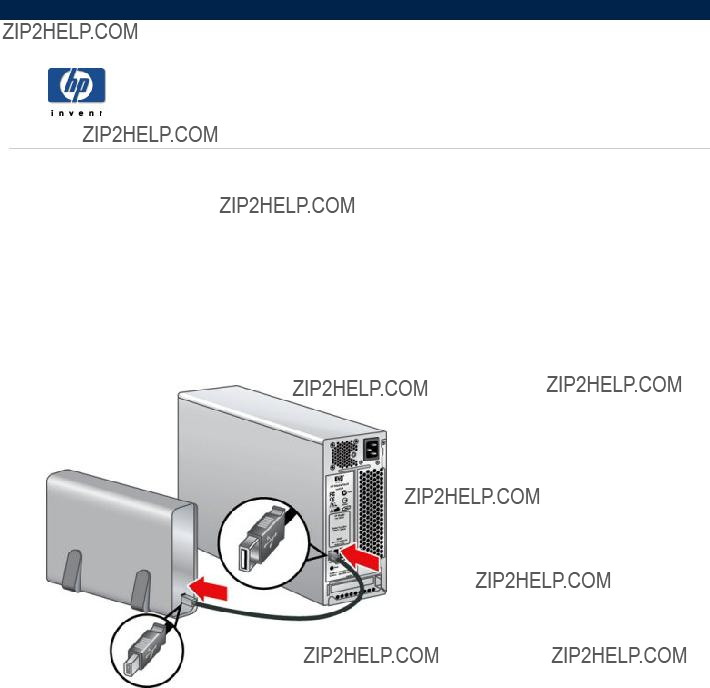
How to install and remove an external USB hard drive
You can add external USB disks to any of the HP Media Vault???s three USB ports (two on the back and one on the front). Small USB disks, such as key disks and jump drives, also can be attached. Portable devices, such as cameras and phones, can be attached if your system detects those devices as USB storage devices. If you have any questions, check with the USB manufacturer to verify that the device is classified as a USB storage device.
 The total amount of storage space connected to the media vault, for all disks, cannot exceed 1.2 terabytes.
To connect an external USB disk:
???Plug in the USB cable into one of the USB ports on your media vault.
???To plug in and power up your external USB drive, see the documentation that came with your USB drive.
 The addition of multiple USB disks through an external USB hub is neither recommended nor supported.
To access the Disk setting screen:
1.
2.Click Customize your HP Media Vault???s settings.
3.If the Welcome Screen appears, click Configure Device.
4.Click the Disk Settings tab.
To remove an external USB disk:
1.Select a hard disk by clicking the Select a Disk
2.Click Safely Disconnect Disk.
3.When the media vault is ready, you will receive a message telling you that it???s okay to physically disconnect the disk from the system. Click OK.
4.Disconnect the disk from the media vault.

Manage Shared Folders and users
??Enhance security on your Shared Folders
Control who has access to your HP Media Vault files.
??How to manage Shared Folders
Create, modify, and delete Shared Folders.
Create, modify, and delete HP Media Vault users.

Enhance security on your Shared Folders
The HP Media Vault comes with different options for securing folders and files saved to the media vault. You can permit everyone on your network access to all your media vault???s files, or you can set the access levels on individual folders that contain sensitive information so that only you have access to those files.
The media vault???s two primary security modes are:
???Workgroup mode
???
Workgroup mode
The media vault???s default security mode is workgroup mode, which is the lowest level of security for your Shared Folders. In workgroup mode, everyone on your network has equal access to all your folders. However, you can add one level of security in workgroup mode by password protecting your Shared Folders. With password protection enabled, network users must enter appropriate passwords before gaining access to the folders.
 Password protection in workgroup mode is problematic in Vista; the behavior is inconsistent. Therefore, if you want to password protect a Shared Folder, you should switch to
To password protect Shared Folders, see Modify a Shared Folder in workgroup mode.
To select
1.
2.Click Customize your HP Media Vault???s setting.
3.If the Welcome Screen appears, click Configure Device.
4.Click the Network Settings tab.
5.Click
6.Click Accept or Cancel. (If you click Cancel, the change from workgroup mode to
As administrator, you must create usernames for each user. You must also assign one of the following three privilege levels for every user, for every Shared Folder on the media vault:
???Full access
???
???No access
You can switch out of this mode by going to the Network Settings tab and selecting another mode.
Why switch to
Let's say you store all your financial files on the media vault. All your network users store their music files to the media vault so that they can download songs only once from the Internet. But you don't want all your network users to have access to your financial files. In this case, you would create separate usernames for each user giving them "Full access" to the Shared Folders containing music. You would then assign "No access" to these users on Shared Folders that contain financial files. (See Organize your files.)
 User-based
How to manage Shared Folders
Select a topic
??How to use the Shared Folder screen
??How to create a Shared Folder in workgroup mode
??How to create a Shared Folder in
??How to modify a Shared Folder in workgroup mode

How to use the Shared Folders screen
The Shared Folders screen is the opening page of the configuration screens. Shared Folders are the HP Media Vault???s primary resources shared on your network. Similar to folders on your computer, you can set up Shared Folders to store and share files or to restrict access to certain network users.
To access the Shared Folder screen:
???
???Click Customize your HP Media Vault???s setting.
???If the Welcome Screen appears, click Configure Device.
???Click the Shared Folders tab.
The first time you enter the configuration screens and before you???ve created other Shared Folders, you see the three
Shared Folders table
This table contains the following:
???Shared Folder Name
The media vault comes
???FileShare
???MediaShare
???Backup
???Volume Name
The volume name identifies the volume on your hard disk where a Shared Folder resides.
???Folder is Accessible from
The access level for Network Computers, Web Browsers, and FTP Clients and their associated protocols is listed below for each type of protocol.
Supported protocols:
???CIFS and NFS (Network Computers)
Network computer access includes the CIFS (Common Internet File System) and NFS ( Network File System) protocols. Your media vault automatically defaults to Full Access, which enables CIFS and NFS. These two protocols allow users access to media vault files from Windows, Mac or Linux computers.
???HTTP (Web Browsers)
Web Browsers use the HTTP (HyperText Transfer Protocol) protocol. Your media vault defaults to No Access for Web browser access, so you must change this setting to enable this method for accessing your files. HTTP file access lets you access folders and files on your media vault using a web
browser. HTTP access also lets you use a browser to access media vault files on computers outside of your local area network (LAN). To keep your files secure, you should only enable HTTP access if you understand how firewalls operate.
???FTP (FTP Clients)
FTP clients use the FTP (File Transfer Protocol) protocol. Your media vault defaults to No Access for FTP access so you must change this setting to enable this method for accessing your files. FTP file access lets you access files on your media vault within your LAN and on computers outside of your LAN. To keep your files secure, you should only enable FTP access if you understand how firewalls operate.
This screen also lets you:
???Modify Selected Folder (See Modify a Shared Folder in workgroup mode.)
???Delete Selected Folder (See Delete a Shared Folder.)
???Create New Shared Folder (See Create a Shared Folder in workgroup mode.)
How to create a Shared Folder in workgroup mode
To access the Shared Folder screen:
???
???Click Customize your HP Media Vault???s setting.
???If the Welcome Screen appears, click Configure Device.
???Click the Shared Folders tab.
To create a Shared Folder in workgroup mode:
1.Click Create New Shared Folder.
2.In the New Shared Folder Name box, enter a descriptive name.
3.From the Volume
Before changing the default access mode from Network Computers, see Supported Protocols at How to use the Shared Folders screen.
4.Complete one or more of the following steps:
???Click Network Computers (CIFS). Select either
???Click Network Computers (NFS). Select either
???Click Web Browser. Select either
???Click FTP. Select either
5.Select a user from the Select Username
6.To secure the Shared Folder so that users must use a password to access it, click Password Protect this folder. (See Enhance security on your Shared Folders.)
Note: NFS does not allow password protection.
a.Enter a password in the Password box.
b.
7.Click Accept or Cancel. (If you select Cancel, everything that you entered on this screen will not be accepted.)
How to create a Shared Folder in
To access the Shared Folder screen:
???
???Click Customize your HP Media Vault???s setting.
???If the Welcome Screen appears, click Configure Device.
???Click the Shared Folders tab.
To create a Shared Folder in
1.Click Create New Shared Folder.
2.In the New Shared Folder Name box, enter a descriptive name.
3.From the Volume
Before changing the default access mode from Network Computers, see Supported Protocols at How to use the Shared Folders screen.
4.Complete one or more of the following steps:
???Click Network Computers (CIFS). Select either
???Click Network Computers (NFS). Select either
???Click Web Browser. Select either
???Click FTP. Select either
The screen???s lower section contains an information box that lists your currently defined users and their privilege levels. Each defined user must have a privilege level for every Shared Folder you create. To assign privilege levels for each user:
5.Select a user from the Select Username
6.Select a privilege level from the Select Privilege Level
7.Click Add.
8.Repeat steps 5 through 7 for each defined user.
9.Click Accept or Cancel. (If you select Cancel, everything that you entered on this screen will not be accepted.)
How to modify a Shared Folder in workgroup mode
To access the Shared Folder screen:
???
???Click Customize your HP Media Vault???s setting.
???If the Welcome Screen appears, click Configure Device.
???Click the Shared Folders tab.
To select a Shared Folder to modify:
1.From the Select a Shared Folder
2.Click Modify Selected Folder.
The Modify an Existing Shared Folder screen provides you with different ways to make changes to your Shared Folders. For example, you can change the name of a Shared Folder, change file access settings, and apply a password to a Shared Folder.
To change the name of the Shared Folder:
1.Highlight the folder???s current name in the New Shared Folder Name box.
2.Enter a new name.
3.If you???re finished modifying Shared Folders, click Accept or Cancel. Otherwise continue to the next section. (If you click Cancel, your changes will not be accepted.)
To change file access settings:
Before changing the default access mode from Network Computers, see Supported protocols in How to use the Shared Folders screen.
1.Complete one or more of the following steps:
???Click Network Computers (CIFS). Select either
???Click Network Computers (NFS). Select either
???Click Web Browser. Select either
???Click FTP. Select either
2.If you???re finished modifying Shared Folders, click Accept or Cancel. Otherwise continue with the next section. (If you click Cancel, your changes will not be accepted.)
Note: In workgroup mode, if password protection is enabled on a folder that you have granted Web Browser or FTP access, use the name of the shared folder for the user name. For example, if the name of the Share Folder is FileShare, enter "fileshare" for the user name in the authentication dialog box.
To apply or change the password on the Shared Folder:
By enabling this option, users must use a password to access a Shared Folder. (See Enhance security on your Shared Folders.)
 Password protection in workgroup mode is problematic in Vista; the behavior is inconsistent. Therefore, if you want to password protect a Shared Folder, you should switch to
Note: NFS does not allow password protection.
1.Click Password Protect this folder.
2.Enter a password in the Password box.
3.
4.Click Accept or Cancel. (If you click Cancel, your changes will not be accepted.)
How to modify a Shared Folder in
To access a Shared Folder:
???
???Click Customize your HP Media Vault???s setting.
???If the Welcome Screen appears, click Configure Device.
???Click the Shared Folders tab.
To select a Shared Folder to modify:
1.Select a Shared Folder from the Select a Shared Folder
2.Click Modify Selected Folder.
About modifying a Shared Folder
The Modify an Existing Shared Folder screen provides you with different ways to modify Shared Folders. For example, you can change the name of a Shared Folder, change file access settings, and change a user???s access privileges on a specific Shared Folder.
To change the name of the Shared Folder:
1.Highlight the folder???s current name in the New Shared Folder Name box.
2.Enter a new name.
3.If you???re finished modifying Shared Folders, click Accept or Cancel. Otherwise continue with the next section. (If you click Cancel, your changes will not be accepted.)
To change file access settings:
Before changing the default access mode from Network Computers, see Supported protocols in How to use the Shared Folders screen.
1.Complete one or more of the following steps:
???Click Network Computers (CIFS). Select either
???Click Network Computers (NFS). Select either
???Click Web Browser. Select either
???Click FTP. Select either
2.If you???re finished modifying Shared Folders, click Accept or Cancel. Otherwise continue with the next section. (If you click Cancel, your changes will not be accepted.)
To modify a user???s access privileges:
1.Select a user from the Select Username
2.Select a privilege level from the Select Privilege Level
3.Click Add.
4.Repeat steps 1 through 3 for each username and privilege level you want to modify.
5.If you???re finished modifying Shared Folders, click Accept or Cancel. Otherwise continue with the next section. (If you click Cancel, your changes will not be accepted.)
To create new users
1.Click Create New User
When you click Create New User, you are taken to the User Settings page.
2.Enter the username in the User???s Name dialog box.
3.Enter a password name in the Password dialog box. All users must have a password.
4.In Confirm Password,
To assign Shared Folder privilege levels for the new user:
1.Select a Shared Folder from the Select Shared Folder
2.Select a privilege level from the Select Privilege Level
3.Click the Add button.
4.Repeat steps 4 through 6 for each Shared Folder on your media vault.
5.Click Accept or Cancel. (If you click Cancel, your changes will not be accepted.)

How to delete a Shared Folder
The Delete an Existing Shared Folder screen provides you with information on the folder you are about to delete, such as the total amount of files and folders saved to this Shared Folder, and the amount of hard disk spaced used by the Shared Folder.
To access the Shared Folder screen:
???
???Click Customize your HP Media Vault???s setting.
???If the Welcome Screen appears, click Configure Device.
???Click the Shared Folders tab.
To delete a Shared Folder:
1.Click the Shared Folders tab.
2.Select a Shared Folder to delete from the Select a Shared Folder
3.Click Delete Selected Folder.
 Deleting a Shared Folder automatically deletes all of the
4.As a safety measure, you must enter the name of the Shared Folder you intend to delete in the blank box.
5.Click Accept or Cancel. (If you click Cancel, the selected Shared Folder will not be deleted.)
How to manage users
Select a topic

How to create a new user
To access the User Settings screen:
???
???Click Customize your HP Media Vault???s setting.
???If the Welcome Screen appears, click Configure Device.
???Click the User Settings tab.
Important: To create new users, you must be in
To create a new user:
1.In the User Settings tab, click Create New User.
2.Enter the username in the User???s Name box.
3.Enter a password in the Password box. All users must have a password.
4.
Privilege level
Each user you define must have a privilege level for every Shared Folder on your HP Media Vault. The media vault automatically assigns each user
To change the User???s Default Privilege Level:
1.Select either
???You can also change a user???s access (privilege) level on a specific Shared Folder. For example, you could keep a user???s default privilege level to full access on all Shared Folders except for one folder where you have saved financial or other personal data.
2.If you want to make specific privilege level changes, proceed to the next section. Otherwise, click Accept or Cancel. (If you click Cancel, your changes will not be accepted.)
To assign a different access (privilege) level to a specific Shared Folder
1.Select the Shared Folder from the Select Shared Folder
2.Select the privilege level from the Select Privilege Level
3.Click the Add button.
4.Repeat steps 1 through 3 for changing the default privilege level for each Shared Folder on your media vault.
5.Click Accept or Cancel. (If you click Cancel, everything that you entered on this screen will not be accepted.)
How to modify a user
To access the User Settings screen:
???
???Click Customize your HP Media Vault???s setting.
???If the Welcome Screen appears, click Configure Device.
???Click the User Settings tab.
To modify a user:
1.Select a username from the Select User Name
2.Click Modify Selected User.
a.To change the username, highlight the name in the New Name box and enter the new name.
b.To change the password, highlight the password in the Password box and enter the new password. All users must have a password.
c.
Each user you define must have a privilege level for every Shared Folder on your HP Media Vault. The media vault automatically assigns each user
To change the User???s Default Privilege Level
1.Select either
You can also change a user???s access (privilege) level on a specific Shared Folder. For example, you could keep a user???s default privilege level to full access on all Shared Folders except for one folder where you have saved financial or other personal data.
2.If you want to make privilege level changes on a specific Shared Folder, proceed to the next section. Otherwise, click Accept or Cancel. (If you click Cancel, your changes will not be accepted.)
To assign a different access (privilege) level for a user on a specific Shared Folder:
1.Select the Shared Folder from the Select Shared Folder
2.Select the privilege level from the Select Privilege Level
3.Click the Add button.
4.Repeat steps 1 through 3 for changing the default access level for each Shared Folder on your media vault.
5.Click Accept or Cancel. (If you click Cancel, your changes will not be accepted.)

How to delete a user
To access the User Settings screen:
???
???Click Customize your HP Media Vault???s setting.
???If the Welcome Screen appears, click Configure Device.
???Click the User Settings tab.
To delete a user:
1.Select the username you want to delete from the Select User Name
2.Click Delete Selected User.
 Make sure that you have selected the correct username to delete from the Select User Name

How to stream media to your entertainment center
Steaming media
If you have a Digital Media Adapter (DMA) attached to your television and/or stereo, you can enable the media files you store on your media vault to play on these entertainment devices. The DMA accesses your stored media files and coordinates the streaming process between your media vault and the entertainment device. The media vault???s media server will work with both wired or wireless DMAs. Your network must have wireless functionality to use a wireless DMA.
Two conditions are required for media streaming with the media vault:
1.Your DMA must use Universal Plug and Play (UPnP) A/V streaming. (See UPnP A/V streaming explained below.)
2.Only the media files are available for media streaming. The types of files that are considered ???media??? are: photographs, music (audio), and video.
To access the Media Streaming screen:
???
???Click Customize your HP Media Vault???s setting.
???If the Welcome Screen appears, click Configure Device.
???Click the Media Streaming tab.
To configure a Shared Folder for streaming:
1.Select a Shared Folder from the Select a Shared Folder
2.Click Enable Media Streaming for Selected Folder.
3.After configuring a Shared Folder for streaming, a ???Yes??? will appear next to the selected folder in the table. When a Shared Folder is made available or unavailable for streaming, all of its
Note: It can take a long period of time for files that you copy to a Shared Folder to appear on your DMA
??? even if the Shared Folder has been enabled for media streaming.
To disable a Shared Folder???s streaming configuration:
1.Select the Shared Folder from the Select a Shared Folder
2.Click Disable Media Streaming for Selected Folder.
3.After disabling the streaming, a ???No??? will appear next to the selected folder in the Shared Folders table located in the table.
Reset media streaming
The media vault???s media server scans your stored media files to gather information, such as artist names, song titles, video names, and so on, to create a database. The Reset media streaming button deletes this database and rebuilds it. (Your data will not be deleted.) Resetting may take a long time depending on the number of multimedia files.
UPnP A/V streaming
UPnP is a set of network protocols that allow networked devices to communicate seamlessly in a home- networking environment. The UPnP A/V streaming method currently only supports the streaming of unprotected media files. Some files may be protected by a Digital Rights Management system, which may prevent the streaming of those files. Media files purchased and downloaded from an online Internet store are most likely protected.

Monitor and configure the HP Media Vault's hard drives
Select a topic

Hard drive settings
To access the Disk Settings screen:
???
???Click Customize your HP Media Vault???s settings.
???If the Welcome Screen appears, click Configure Device.
???Click the Disk Settings tab.
You can manually monitor and configure your HP Media Vault???s hard drives. (The terms hard drives and hard disks are used interchangeably.)
The Physical Disks section of the Disk Settings screen displays horizontal
The media vault comes with one primary hard disk named SYSTEM, and one logical volume named Volume1. To store and access data on your media vault???s hard disk, you must assign logical volumes to the connected hard disks. The Logical Volumes section of the Disk Settings page contains a table that shows all volumes currently defined on the media vault???s hard drives. The volumes are
Available hard disk space can be used to create more than one volume. (See Logical Volumes below.)
To configure or change hard disk settings:
1.To select a hard disk, click the Select a Disk
2.Click one of following options:
Note: If an option is dimmed, that option is not available for the selected disk.
Logical Volumes
To configure or change volume settings:
1.To select a volume, click the Select a Volume
2.Click one of following options:
Note: If an option is dimmed, that option is not available for the volume.
Option Description
Create This option opens a screen that lets you create a new volume from available hard New disk space. For instructions on using the Create New Volume screen, see Create
Volume
Create a
Mirror
Remove
Mirror
Modify
Volume
Delete
Volume
a new volume.
This option opens a screen that lets you create a mirror of a selected volume. For instructions on using the Create a Mirror screen, see Create a mirror. Also see Understanding disk mirrors and concatenated disks.
This option opens a dialog box from which you can remove a mirror. For instructions on using the Remove a Mirror screen, see Remove a mirror.
This option opens a screen that lets you change the name and/or size of the selected volume. For instructions on using the Modify an Existing Volume screen, see Modify an Existing Volume.
This option opens a screen that lets you delete the selected volume. For instructions on using the Delete an Existing Volume screen, see Delete an Existing Volume.
 When you delete a volume all Shared Folders and all files on the volume are permanently destroyed.

How to rename a disk
This option allows you to assign names to your hard disks. Assigning your hard disks unique names can help you monitor your system when you have more than one disk connected to your HP Media Vault. (You cannot rename the SYSTEM disk.)
To access the Disk Settings screen:
???
???Click Customize your HP Media Vault???s settings.
???If the Welcome Screen appears, click Configure Device.
???Click the Disk Settings tab.
To rename a disk:
1.Select a hard disk by clicking the Select a Disk
2.Click Rename Disk.
A screen opens that permits you to rename the hard disk.
3.To select a different disk from the one displayed, click the Old Disk Name
4.Enter the new disk name in the New Disk Name box.
5.Click Accept or Cancel. If you click Cancel, your changes will not be accepted.

How to format a disk
This option allows you to:
???Name the hard disk.
???Name a logical volume on the hard disk.
???Format the disk for use on the media vault.
To access the Disk Settings screen:
1.
2.Click Customize your HP Media Vault???s settings.
3.If the Welcome Screen appears, click Configure Device.
4.Click the Disk Settings tab.
To format a hard disk:
1.Select a hard disk by clicking the Select a Disk
2.Click Format Disk.
 Formatting disk drives erases all the disk???s contents, including boot records, partition tables, logical volumes, and all Shared Folders and their
Do not format a new disk if you want to concatenate (also known as JBOD) the hard disk???s capacity with an existing volume. For more information on disk concatenation, see Understanding disk mirrors concatenated disks and Create a mirror.
Name the hard disk and volume:
1.Enter the hard disk???s name in the New Disk Name box.
2.Enter the volume???s name in the New Volume Name box.
Select one of the following format types:
???Disk is dedicated for permanent use on this device. Format for best performance (Reiser). This option will format the disk into a proprietary Linux file system (a modified form of ReiserFS). Formatting the disk using this file system does not allow the disk to be disconnected from the media vault and used on another
???Disk may be disconnected from NAS and connected to a computer. Format for maximum portability (FAT32). This option will format the disk using the FAT32 file system. Formatting the disk using this file system will allow you to disconnect the hard drive from the media vault and use it on another computer. See Understanding file systems for formatting hard disks.
???Click Accept or Cancel. If you click Cancel, your changes will not be accepted.

How to erase a disk
This option allows you to erase a hard disk currently connected to the HP Media Vault.
To access the Disk Settings screen:
???
???Click Customize your HP Media Vault???s settings.
???If the Welcome Screen appears, click Configure Device.
???Click the Disk Settings tab.
To erase a hard disk:
1.Select a hard disk by clicking the Select a Disk
2.Click Erase Disk.
A screen opens that lets you erase all content and logical volumes from a selected hard disk. (You cannot erase the SYSTEM disk.)
 Erasing disk drives erases all the disk???s contents, including boot records, partition tables, logical volumes, and all Shared Folders and their folders and files. Erase disks only when you know that it is safe to proceed.
3.If you are certain you want to erase a hard disk, enter Yes, destroy everything on this disk. in the box.
4.Click Accept to begin the disk erase. Click Cancel to return to the Disk Settings page without erasing the disk.
Understanding file systems for formatting hard disks
Reiser
The HP Media Vault comes with a primary hard disk called SYSTEM. The SYSTEM disk is formatted into a proprietary Linux file system (a modified form of ReiserFS).
Formatting a second internal hard disk into the proprietary Linux file system gives you the best read/write performance. However, a
FAT32
The FAT32 file system allows you to read and write to the hard disk. Microsoft used this file system for Windows versions 95, 98, 98SE and ME. Files on FAT32 disks cannot be larger than 4 GB. If you format a media vault hard disk in FAT32, you can disconnect the disk and use it on Windows, Macintosh and Linux computers.
However, you cannot store files larger than 4GB on FAT32 file systems.
NTFS
You cannot format a media vault hard disk in the New Technology File System (NTFS) format. Microsoft replaced the FAT32 file system with NTFS for Windows NT, 2000, XP, Windows Server 2003, and Windows Vista. If you import a hard drive formatted in NTFS to the media vault, you will only be able to read content from the disk, not write to it.

How to create a new volume
This option creates a new volume from the unallocated space on one or more disks. A volume is a portion of one or more hard disks configured to store data on the HP Media Vault. Volumes can be a defined as part of a disk or an entire disk. You configure the size of a volume.
To create a new volume on a hard disk that has all of its space already allocated to a volume, you must first resize the established volume to create unallocated space. (To resize volumes, see Modify an existing volume.)
To access the Disk Settings screen:
???
???Click Customize your HP Media Vault???s settings.
???If the Welcome Screen appears, click Configure Device.
???Click the Disk Settings tab.
To create a new volume:
1.Click Create New Volume.
2.Enter the new volume???s name in the New Volume Name box.
Note: If the next two options are dimmed, the hard disk is already formatted and you can proceed to step 4.
3.Select one of the following format types:
???Disk is dedicated for permanent use on this device. Format for best performance (Reiser). This option will format the disk into a proprietary Linux file system (a modified form of ReiserFS). Formatting the disk using this file system does not allow the disk to be disconnected from the media vault and used on another
???Disk may be disconnected from NAS and connected to a computer. Format for maximum portability (FAT32). This option will format the disk using the FAT32 file system. Formatting the disk using this file system will allow you to disconnect the hard drive from the media vault and use it on another computer. See Understanding file systems for formatting hard disks.
4.Assign a size to the new volume by completing one of the following:
???Use the slider arrows to resize the volume.
???Enter a new size in the GB Assigned box.
???Click Assign All Available Space to this Volume.
5.Click Accept or Cancel. If you click Cancel, your new volume will not be created.
6.A screen shows you that a volume has been successfully created. To continue, select one of the next options:
???To return to the Disk Settings screen, click Disk Management.
???To create a new Shared Folder on your new volume, click Create Share.

How to create a mirror
This option creates a mirror of an existing volume or source volume on the HP Media Vault. A volume is a portion of one or more hard disks configured to store data. A mirror duplicates the source volume on another hard disk. For more information on mirroring, see Understanding disk mirrors and concatenated disks.
When you save files to a mirrored volume, your files are saved to both hard disks. The end result is that half the total amount of space is available to store your files. For example, two 200GB drives mirrored together result in a mirrored volume of 200GB, not 400GB.
Note: When creating a mirror, you must use a blank hard disk or unallocated space on a hard disk that is the same size or larger than the source volume you want to mirror. If any there is not enough unallocated space on the expansion disk, you can do one of the following: erase the disk, or resize or delete one or more volumes on the disk. For information on how to do these procedures, see Erase a disk, Modify a volume, and Delete a volume.
 Data on a mirror volume is safe unless both disks fail at the same time. If one hard disk fails, the media vault will administer a warning. The failed hard disk should be replaced immediately.
To access the Disk Settings screen:
???
???Click Customize your HP Media Vault???s settings.
???If the Welcome Screen appears, click Configure Device.
???Click the Disk Settings tab.
To create a mirror:
1.Select the volume you want to mirror by clicking the Select a Volume
2.Click Create a Mirror.
Note: If the expansion disk is not blank or does not have enough unallocated space, the Create Mirror button is dimmed. For information on how to increase unallocated space, see the Note above.
A screen opens displaying the volume you have chosen. For example: You have chosen Volume1 to mirror.
3.In the Disk Assignment
4.Click Accept or Cancel. If you click Cancel, a mirror will not be created.
This process may take several hours before the volume is completely mirrored. You can continue to use the media vault during this time.
 The media vault does not automatically show the progress of the mirroring. To view the progress,
click Refresh or Reload on your browser. The progress status is indicated under Logical Volumes on the Disk Settings screen.

How to remove a mirror
This option removes a mirror of an existing volume on one of the HP Media Vault???s hard disks.
Removing a mirror erases all of your duplicated content saved to a mirrored volume. When you remove a mirror, you create unallocated storage space; however, you also lose a duplicate copy of a volume.
To access the Disk Settings screen:
???
???Click Customize your HP Media Vault???s settings.
???If the Welcome Screen appears, click Configure Device.
???Click the Disk Settings tab.
To remove a mirror:
1.Select the mirrored volume you want to remove by clicking the Select a Volume
2.Click Remove Mirror.
3.A screen shows you which mirrored volume you selected to remove. To select a different volume, click the
Remove mirrored volume
4.Checkboxes display the hard disks that contain the source and mirrored volumes. Click on the hard disk from which you want to remove the mirrored volume.

How to modify an existing volume
This option modifies the name and/or size of an existing volume. A volume is a portion of one or more hard disks configured to store data on the HP Media Vault. Volumes can be a defined as part of a disk or an entire disk. You configure the volume???s size.
 You will not be able to shrink the volume???s size below the size required to store all of the volume???s current files and folders.
To access the Disk Settings screen:
???
???Click Customize your HP Media Vault???s settings.
???If the Welcome Screen opens, click Configure Device.
???Click the Disk Settings tab.
To select the volume to modify:
1.Select a volume by clicking the Select a Volume
2.Click Modify Volume.
To change the volume???s name:
1.Enter the volume???s new name in the New Name box.
2.If you are finished, click Accept or Cancel. (If you click Cancel, your changes will not be accepted.) Otherwise continue with the next section.
To resize the volume:
1.Complete one of the following:
???Use the slider arrows to resize the volume.
???Enter a new size in the GB Assigned box.
???Click Assign All Available Space to this Volume.
2.Click Accept or Cancel. If you click Cancel, your changes will not be accepted.

How to delete an existing volume
This option deletes an entire volume. A volume is a portion of one or more hard disks configured to store data on the HP Media Vault. Volumes can be a defined as part of a disk or an entire disk.
 Deleting a volume will permanently destroy all Shared Folders on the volume, including all the folders and files saved to the Shared Folders.
To access the Disk Settings screen:
???
???Click Customize your HP Media Vault???s settings.
???If the Welcome Screen opens, click Configure Device.
???Click the Disk Settings tab.
To delete a volume:
1.Select a volume by clicking the Select a Volume
2.Click Delete Volume.
3.Read the Warning statement on the screen.
4.If you still want to continue, enter the volume???s name in the box.
5.Click Accept or Cancel. If you click Cancel, the selected volume will not be deleted.
Understanding disk mirrors and concatenated disks
Mirroring
The type of mirroring supported on the media vault is called Redundant Array of Independent Disks (RAID) RAID- 1.
In
Disk Concatenation
Disk concatenation (also called JBOD) is another type of advanced storage configuration. This type of configuration combines the available space from two or more hard disks into one large logical volume.

Advanced network settings
The HP Media Vault Network Settings screen contains settings to view or change the following:
???HP Media Vault name
???MAC address
???Network security mode
???Network protocol settings
To access the Network Settings screen:
???
???Click Customize your HP Media Vault???s settings.
???If the Welcome Screen appears, click Configure Device.
???Click the Network Settings tab.
Change the HP Media Vault name
To change the name of the HP Media Vault, see Change the name of your HP Media Vault.
MAC Address
This displays the MAC (Media Access Control Address) address, which is located on the back of your media vault.
Network security mode
To change the security mode, see Enhance security on your Shared Folders.
Network protocol settings
Use these settings to configure IP protocol settings for the media vault. In most cases, the default network settings will work without any changes. The following options are available:
???
This is the default setting for the media vault. When this option is selected:
???The media vault automatically acquires its IP address and IP settings from the DHCP (Dynamic Host Configuration Protocol) server on your network.
???Renew DHCP will automatically renew itself.
???The values of the IP Address, Gateway Server, Subnet Mask, Domain Extension, DNS Servers, and WINS Servers set by the DHCP server are displayed.
???Manually Configuring IP Settings
If you use a static IP address, you may want to manually configure the IP settings on the media vault.
 This should be done only by experienced network administrators.
To manually configure the settings
1.Obtain the DNS server information from your internet service provider or use an existing IP address.
2.In the IP Address box, enter a unique IP address.
3.In the Gateway Server box, enter the IP address of your Gateway/Router.
4.In the Subnet Mask box, enter the same subnet used in your other network devices.
5.In the Domain Extension box, enter your domain extension.
6.In the DNS Server boxes, enter the IP addresses.
Note: Entering two DNS servers is recommended for stability.
7.If required by your network configuration, in the WINS Server boxes, enter the IP address.
8.Click Accept or Cancel. (If you click Cancel, your changes will not be accepted.)
Network security considerations
Network security depends not only on the security setting of the Media Vault, but on the settings and capabilities of all hardware and software on your LAN (Local Area Network). For more information, see Secure your HP Media Vault from intruders.

How to install a printer
You can share a USB printer with other computers on your network by connecting the printer to your HP Media Vault.
 Some printers, such as host printers, are not network compatible. Please check the documentation that came with your printer before setting up a shared printer.
Some printer tools, such as
If you set up an
Attaching a printer to the HP Media Vault
???Plug one end of the printer's USB cord into the printer and the other end into the media vault. (The HP Media Vault comes with one USB port on the front and two on the back.)
Installing a printer on a Windows PC
1.Access the new printer:
a.On your desktop,
b.On the Main tab, click Start browsing your HP Media Vault.
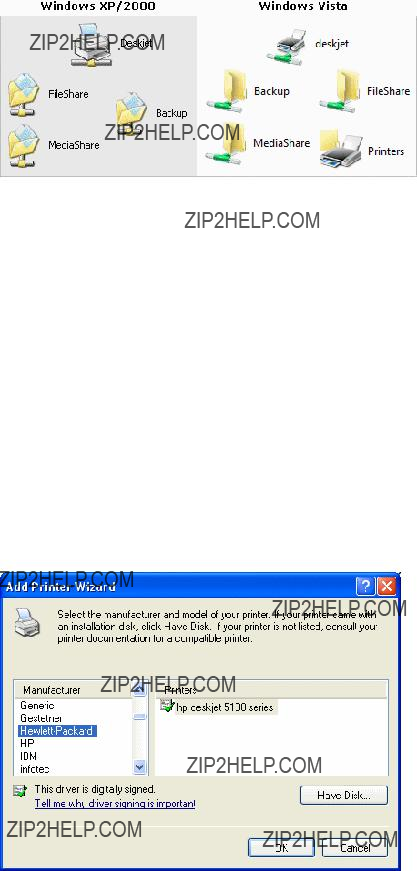
c.A window opens showing you a list of your Shared Folders and the printer that you connected to the media vault.
2.Configure the printer driver:
a.
b.You may see a dialog box that informs you that you are about to connect to a printer. Click Yes.
c.Typically you will see a dialog box containing the following text that lets you know that you need to install a printer driver.
Connect to Printer
The server for the printer does not have the correct printer driver installed. If you want to search for the proper driver, click OK. Otherwise, click Cancel and contact your network administrator or original equipment manufacturer for the correct printer driver.
d.Click OK.
e.Select your printer manufacturer and model number from the list, then click OK.
Note: If the exact model is not listed, you can use a close match. For example, if your printer is an HP Deskjet 5150, choose hp deskjet 5100 series from the list. If a close match is not listed, see Troubleshoot a printer attached to the HP Media Vault.
3.If desired, set the printer as the default printer:
a.
b.In the Printer dialog box, click Printer.
c.Select Set As Default Printer.
After you install the printer, you can print to it by selecting its name from the print dialog box.

Troubleshooting
Select a topic
??Your network cannot find the HP Media Vault
??You receive Microsoft Vista permission messages
??You receive firewall blocking messages
??You're unable to stream media to your entertainment center
??You prefer to set static IP Addresses
??Troubleshoot a printer attached to the HP Media Vault
Note: If your problem is not listed, consult the HP support web site at www.hp.com/support.
Your network cannot find the HP Media Vault
Check all cords, cables and outlets
1.Make sure all devices on your network are correctly installed and the cables are connected to the proper ports.
2.Check the voltage switch on the back of the media vault to ensure that it is set correctly.
3.Make sure you press in the power button until you feel the button ???click.??? Failure to press in the button far enough can cause the media vault to automatically power itself off after starting.
4.Make sure your router has power.
5.Restart your router (or unplug and plug it back in).
6.Restart all the devices on your network, including your computers and the media vault.
7.If you???re using your own Ethernet cable, try using the Ethernet cable that came with the media vault.
Check the LED lights on the front of the HP Media Vault
???The OK LED light  should be green.
???The Link LED  should be green.
???The Warning LED should be off (no color).
If the Link LED is not green and/or the Warning LED is yellow  or red
  , ensure that you have gone through steps

Ensure that your router is correctly configured for DHCP
Your HP Media Vault comes automatically set to use a Dynamic Host Configuration Protocol (DHCP) server to dynamically assign IP addresses. Your router usually comes with a built in DHCP server.
???Ensure that your router has the DHCP server correctly enabled. Check the documentation that came with your router for instructions on proper DHCP server configuration.
Windows XP and Windows 2000: Ensure your network is set up properly for TCP/IP
1.Click Start, Control Panel.
2.
3.
4.
5.Click Properties. In the dialog box that opens, check to ensure that TCP/IP is listed and selected.
???If TCP/IP is not listed, click Install, Protocol , Add. In the dialog box that appears, select
Internet Protocol (TCP/IP).
???If TCP/IP is listed and checked, highlight it and click Properties, then select Obtain IP address automatically and Obtain DNS server address automatically.
6.Check all the computers on your network to ensure that Obtain IP address automatically and Obtain DNS server address automatically are selected. (All computers should be set identically.)
Windows Vista: Ensure that Network Discovery is turned on.
1.Click Start menu, Control Panel.
2.In the Control Panel, click View network status and tasks.
3.In the Network and Sharing Center, make sure that Network Discovery is on.
4.If Network discovery is off, click  , Turn on network discovery, Apply.
Windows Vista: Ensure your network is set up properly for TCP/IP
1.Click Start, Control Panel.
2.Click View network status and tasks under Network and Internet.
3.In the left pane, click Manage Network Connections.
4.
network or
5.Click Properties. In the dialog box that opens, check to ensure that Internet Protocol Version 4 (TCP/IPv4) is listed and selected.
???If TCP/IP is not listed, click Install, Protocol , Add. In the dialog box that appears, select
Internet Protocol (TCP/IP).
???If TCP/IP is listed and checked, highlight it and click Properties, then select Obtain IP address automatically and Obtain DNS server address automatically.
6.Check all the computers on your network to ensure that Obtain IP address automatically and Obtain DNS server address automatically are selected. (All computers should be set identically.)
Ensure your network has the correct NetBIOS set up
1.Click Start, Control Panel.
2.
3.
4.Click Properties.
5.Highlight Internet Protocol (TCP/IP).
6.Click Properties.
7.Click Advanced.
8.Click the WINS tab.
9.NetBIOS settings are found at the bottom of the dialog box. Make sure that the NetBIOS setting is NOT set to Disable NetBIOS over TCP/IP.
Windows Vista: Ensure your network is set up properly for TCP/IP
1.Click Start, Control Panel.
2.Click View network status and tasks under Network and Internet.
3.In the left pane, click Manage Network Connections.
4.
5.Click Properties.
6.Highlight Internet Protocol Version 4 (TCP/IPv4).
7.Click Properties.
8.Click Advanced.
9.Click the WINS tab.
10.NetBIOS settings are found at the bottom of the dialog box. Make sure that the NetBIOS setting is NOT set to Disable NetBIOS over TCP/IP.
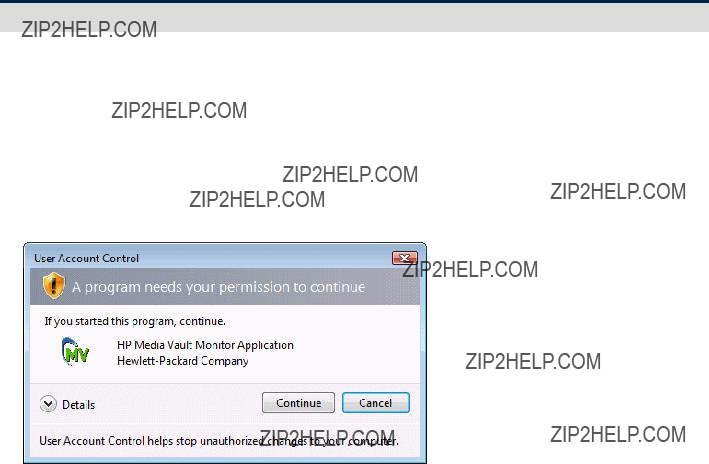
Ensure that you have connected the HP Media Vault to the correct network adapter
???Do you have multiple network adapters connected to different physical networks? If so, enable the network adapter on the network that you have attached the media vault, and disable the other network adapters. On laptops you can typically turn off the wireless network radio to disable that adapter.
You receive Microsoft Vista permission messages
As part of its enhanced security, the Microsoft Vista operating system may display User Account Control dialog boxes. These dialog boxes help stop unauthorized changes to your computer and require permission to continue with the action.
 Always check that the action needing your permission is one that you intended. The source of the action is displayed in the middle band of the dialog box.
A list of the media vault's applications that may require permission is located below the following User Account Control dialog boxes:
User Account Control ??? Consent
User Account Control ??? Administrator Password
The following media vault applications may require permission to continue:
???HPMVTray.exe ??? HP Media Vault System Tray utility
???Cddib32.exe ??? NTI DriveBackup!
???Shadow.exe ??? NTI Shadow
???HPEZBKUP.exe ??? HP Easy Backup
???HPMVCheck.exe ??? Firmware check utility
You receive firewall blocking messages
If you update Windows XP to the most recent software and service packs, it is likely that you've installed the Windows Firewall. You might also have another firewall program installed on your PC. Firewalls block certain types of communications between various network devices. This helps protect your data from hackers, viruses, spyware, and
The media vault comes with software applications that must communicate over the network, but sometimes these programs are blocked, by default, by a firewall. When this happens, security alerts pop up on your screen. Security alert dialog boxes usually have a list of possible options. For example, the dialog box might ask you the following three questions:
1.Click Keep Blocking.
2.Click Unblock.
3.Defer the choice and be reminded later.
If you see a security alert dialog for an HP Media Vault application or an NTI backup application, you

should unblock the communication to permit the application to run. You are safe to unblock the communications because you are not enabling any connection or communication with the Internet, only between the media vault and its software applications.
The following list comprises the software applications that need to communicate with the media vault:
???HPMVTray.exe ??? HP Media Vault System Tray utility
???NASSelector.exe ??? HP Media Vault Browse utility
???NASDriveMapper.exe ??? HP Media Vault Drive Mapping utility
???Cddib32.exe ??? NTI DriveBackup!
???Shadow.exe ??? NTI Shadow
???HPEZBKUP.exe ??? HP Easy Backup
???HPMVCheck.exe ??? Firmware check utility
If any software is reinstalled, moved to a new disk location, or if the application is deleted from the exception list using the Security Center control panel, communications between that software and the media vault may once again be blocked by the firewall.
You're unable to stream media to your entertainment center
1.Make sure that your HP Media Vault is powered up and working before you power up your Digital Media Adapter (DMA).
2.Check to make sure that your DMA supports the DLNA/UPnP protocols, which are the protocols supported by the media vault. Some DMAs use proprietary protocols that do not operate with the media vault???s media server. For a list of compatible DMAs, consult the HP support web site at www.hp.com/support.
3.Ensure that your DMA is using the latest firmware revision. Consult your DMA documentation for more information on updating its firmware.
4.The media vault???s media server supports the playback of the following file types:
Video: .mpg | .wmv | .mp4 | .avi | .asf | .mov | .vob | .mpe | .ts
Music: .mp3 | .ogg | .wav | .lpcm | .pcm | .wma | .mp2 | .ac3 | .m4a | .aac | .mpa | .mp1 | .aif
Photo: .jpg | .jpeg | .png | .tif | .tiff | .bmp | .gif
Note: Some DMAs have playback restrictions for certain types of multimedia files. Check your DMA documentation for supported and unsupported file types.
5.New multimedia files can take a considerable amount of time to show up on your DMA. The streaming process requires the media vault???s media server to scan through new multimedia files to gather information, such as artist names, song titles, video names, and so on. This process often takes a long
6.Reset the media streaming database. For more information, see Reset media streaming.
You prefer to set static IP Addresses
If you have a router with a DHCP server properly configured, the DHCP server automatically (dynamically) assigns an IP address to the media vault. When you install the media vault, it waits for your router to automatically assign it an IP address. If the router fails to assign an IP address, the media vault automatically uses the following IP address and subnet mask:
???Auto IP address: 169.254.xxx.xxx
???Subnet mask: 255.255.0.0
You may prefer to assign static IP addresses. To assign the media vault a static IP address:
1.Turn on the DHCP server in your router. Consult your router documentation for more information.
2.Ensure that the IP addresses assigned by your router are within the same subnet as your other network devices.
3.Restart your router and the media vault.
4.
5.Click Customize your HP Media Vault???s settings.
6.If the Welcome screen appears, click Configure Device.
7.Click the Network Settings tab.
8.Click the Manually Configure IP Settings option.
9.In the IP Address box, enter a unique IP address.
10.Click Accept.
11.In the Subnet Mask box, enter the subnet.
12.Reconfigure your router back to its original settings.
13.Restart your media vault.
Restoring a mirrored volume
A mirrored volume is a volume that protects sensitive data by keeping two copies of your data on separated physical hard disks. This insures that if a hard disk failure occurs, all the data on the volume is still intact and the volume is still available for reading and writing. But your data will no longer be protected by a redundant copy.
When one half of a mirrored volume is missing from the device, or has failed, you should restore the missing or failed disk as soon as possible.
Removing a mirror
Removing a mirror does not destroy the entire volume, but only one of the redundant copies. To remove a mirrored volume that you no longer want or need, see Remove a Mirror.

Mirror rebuilding when one of the disks has been removed, then reconnected
If one disk containing a volume mirror is disconnected, mirroring is interrupted. Reconnecting the same disk causes the mirror to completely rebuild. Once that same disk is reconnected to the media vault, a mirrored volume will automatically begin rebuilding. You do not need to take any action to force the rebuild to occur. However, please be aware that while this rebuilding operation is taking place, your data is not protected with a redundant copy. Also be aware that the mirror rebuild may take many hours.
Mirror restoration when a disk (other than the SYSTEM disk) has failed
When a disk (other than the SYSTEM disk) for a mirrored volume fails, the media vault will raise a system tray alert that warns you of the loss of data redundancy. To restore the device to the same level of protection, you must remove the failed hard disk and replace it with a new, working disk. However, the device will not presume that the new disk was attached to recreate the missing half. To
You must now go through the process of creating a new mirror using the new hard disk. (See Create a Mirror.)
Troubleshoot a printer attached to the HP Media Vault
Problems with installing a printer to media vault
This troubleshooting solution describes what to do if you are trying to configure a network printer and your printer is not listed in the Windows Add a Printer dialog box, as described in the instructions for Installing a printer.
If your printer is not listed in the Add a Printer dialog box, visit the HP Customer Care Support Web site at www.hp.com/support. The HP Media Vault support section includes a comprehensive list of the printers that have been tested with the media vault. This list is constantly being updated.
If your printer has been found to support networking, you can locate its printer driver in the following ways:
???From your computer's system files.
???From the installation disc that came with your printer.
???From the printer manufacturer's support web site.
Installing a printer driver from your computer's system files:
These instructions continue from Step 2: Configure the printer driver in Install a printer.
1.In the Add Printer Wizard dialog box, click Have Disk....
2.In the Install From Disk dialog box, click Browse....
3.Locate the .inf file for your printer. For example: C: printer_manufacturer\drivers\your_printer.inf .
4.Select the appropriate .inf file, and then click Open.
Note: If you select the wrong file, a message box appears saying that the specified location does not

contain information about your hardware.
5.In the Install From Disk dialog box, click OK.
6.Your printer should be listed in the Printer pane of the Add Printer dialog box. Click Next.
7.To complete the installation, follow the instructions in the dialog boxes that appear.
Installing a printer driver from the printer installation disc:
These instructions continue from step 2: Configure the printer driver in Install a printer.
1.If the Add Printer Wizard is open, close it.
2.Insert the printer disc into your computer's CD/DVD drive.
3.Follow the instructions that appear on your screen to install the printer software.
4.After the printer software is installed, go to Install a printer for instructions on attaching your printer to the media vault.
Installing a printer driver from the support area of your printer manufacturer:
These instructions continue from step 2: Configure the printer driver in Install a printer.
1.If the Add Printer Wizard is open, close it.
2.Open a web browser and navigate to your printer manufacturer's support web site. For example http://www.hp.com/support .
3.Find the driver for the model of your printer and operating system, such as Windows XP.
4.Follow the instructions that the printer manufacture provides. Depending on the manufacturer, you can install the printer software directly from the support site or download an installation file.
5.After the printer software is installed, go to Install a printer for instructions on attaching your printer to the media vault.
Troubleshoot User's Guide
What are the minimum browser requirement needed by the online User's Guide?
For best results, use the latest version of browser with JavaScript enabled. See instructions below:
The navigation menu does not appear in the browser window
JavaScript is not enabled in your web browser.
To enable JavaScript in Internet Explorer 6.0 or 7.0:
Internet Explorer 6.0 or later is required for this product.
1.Go to Tools, Internet Options.
2.Click the Security tab.
3.Click Default Level. This sets the level to Medium and enables javascript.
4.To enable only javascript:
a.Click Custom Level.
b.In the Security Settings window scroll down until you get to the section called Scripting (near the bottom).
c.In the category Active scripting, select Enable.
d.In the Security Settings window, click OK.
5.In the Internet Options window, click OK.
To enable Javascript in Firefox:
These instructions apply to Firefox 1.5 and above.
??? Go to Tools, Options , and then select Enable Javascript.
To enable Javascript in Netscape:
These instructions apply to Netscape 8.1.
1.Go to Tools, Options .
2.In the Options window, click Site Controls.
3.In the Master Settings pane, click I trust this Site.
4.Click OK.
To enable JavaScript in Safari:
These instructions apply to Safari 1.2.
1.Go to Safari, Preferences.
2.Click the Security icon.
3.In the Web Content pane, click the Enable JavaScript checkbox.
4.Close the window.
The menu appears garbled after resizing the text
Refresh the screen.

Glossary
This glossary defines terms that are used in the HP Media Vault. For easy access, click a letter in the glossary index.
A device that provides multiple network features such as a router, modem, LAN switch, firewall, and/or a wireless access point.
Software that checks a hard drive for viruses (harmful computer code) that may infect a computer.
Browser window
A browser window is used to display web pages either on a web site or stored locally such as the HP Media Vault User's Guide.
Common Internet File System (CIFS)
A protocol for how a computer requests files from other computers on the network. This is the public version of the Server Message Block protocol by IBM and modified by Microsoft.
Concatenate
Combines disk space on multiple disk drives into one logical volume.
Digital Living Network Alliance (DLNA)
An alliance of leading companies in consumer electronics. Its purpose is to create industry standards that will allow products from all companies to be compatible with each other and to enable a network of electronic devices in the home.
Digital Media Adapter (DMA)
Digital Media Receiver (DMR)

Digital Media Player (DMP)
A consumer electronic device that communicates with the HP Media Vault and brings digital media streams??? such as photos, music, or
Digital Rights Management
Technology built into digital media, such as music and movies, that allows companies in charge of their copyrights to decide how and where media can be used.
Domain Name System (DNS)
A server that associates network names with IP addresses.
Domain Extension
A domain extension is an optional part of a network name used to logically divide a large network into smaller networks.
Drive partition
A logical division of a hard disk that create the appearance of having separate hard drives for file management, multiple users, or other purposes.
Dynamic Host Configuration Protocol (DHCP)
The Protocol used to assign IP addresses to network devices, such as computers. DHCP automatically assigns IP addresses to network devices; the assigned address can change over time. Also see Static IP Address.
No terms begin with the letter E.
The
File system
A way for files to be organized and stored in a computer. Some examples of file systems are Reiser, FAT32, and NTFS.
File Transfer Protocol (FTP)
A protocol to exchange files and information through the internet, usually used for downloading information.
Full access
Users have access to all Shared Folders and drives on a network
Gateway server
A network device that connects one network to another network.
The print page is rendered on the PC rather than on the printer.
HTTP Access
Allows you to access folders and files on your media vault in a browser window.
HyperText Transfer Protocol (HTTP)
The format used to transfer and send web page information across networks, on the internet, and in help systems. Also see protocol.
IP Address
An IP (Internet Protocol) address is a number that uniquely identifies devices, such as computers, on a network.
JBOD
See concatenate.
No terms begin with the letter K.
Linux
An operating system based on UNIX.
Local area network (LAN)
A small number of computers that are connected together in a small area, usually in the same building.
Logical
Logical volume
A device, such as a drive partition named by the logic of a software system, regardless of its physical relationship to the system. For example, a computer with a single physical hard drive that contains two logical drives, C: and D:. Another example is an HP Media Vault with two hard drives that contains a single logical volume spanning both drives.
Map drive letters
Map
Mapping drive letters means assigning a letter on a PC to a Shared Folder on the HP Media Vault.
Media Access Control (MAC) Address
A unique number assigned by the manufacturer to all devices, such as computers, that can connect to a network. Also known as a physical address.
Media streaming
Media streaming sends
Mirror
The automatic copying of data on two separate physical disks that creates two separate copies of the same material. If one disk fails, a copy of the material will be available on the other disk.
Network address
A numeric value that uniquely identifies a device on a network.
Network File System (NFS)
A file system commonly used in Linux systems. NFS allows users to access files on other network computers as if they were stored locally on their own computer.
Network computer
A computer that is connected to other computers, creating a network..
No access
A setting that does not allow a user to access files and folders on the shared network.
NTFS (New Technology File System)
Current standard file system for Windows. NTFS replaced Microsoft's previous FAT32 file system, and improves performance, reliability, disk space, and security.
NTP Server
NTP stands for Network Time Protocol, which allows the HP Media Vault to update its internal date and time automatically.
No terms begin with the letter O.
Partition
A logical division of a physical hard disk. A partition divides a physical disk into separate units, which can be formatted independently.
Physical disks
Physical hard drive
The actual hard disk(s) located in a device that stores files and data.
Protocol
The standard(s) of how computers communicate data with each other.
Privilege level
A level assigned by the user that decides what access levels are available to other users..
No terms begin with the letter Q.
RAID
RAID stands for redundant array of independent disks. RAID is a system which uses multiple hard drives to share or replicate data among the drives.
Read only
A setting that does not allow the user to write data. The user is only able to read information.
Reiser FS
Reiser
A computer file system used in the Linux operating system. HP Media Vault uses a modified form of Reiser FS.
Router
A device connected to your computer that joins two or more networks. For example, a router connects your local network to the internet.
Serial ATA (SATA)
Serial Advanced Technology Attachment is an interface standard that moves information to and from a storage device, such as a hard disk.
Share

Shared Folder
A ???Share??? means the same as ???Shared Folder,??? and you can use these terms interchangeably: A Share is a top- level folder that stores other folders within it. For example, FileShare and MediaShare can store other folders (called
Static IP Address
A number assigned to a device, such as a computer, on a network to be its permanent IP address. Also see DHCP.
A folder within a folder or a Shared Folder.
Subnet Mask
Identifies the portion of the network IP address that can be used for subnetworks.
System drive
The hard drive (or drive partition) containing the operating system.
TCP/IP (Transmission Control Protocol/Internet Protocol)
A set of communications protocols used to transmit data over networks. TCP provides for the establishment of connections and exchanges streams of data. IP specifies the format of the data. Also see IP Address. TCP/IPv4 is the standard protocol in use today. TCP/IPv6 is the standard protocol used by Windows Vista. IPv6 main advantage is the increase in number of available addresses.
Terabyte
Refers to a data storage capacity equal to approximately 1000 gigabytes.
Uniform Naming Convention (UNC)
UNC identifies shared network devices, such as the HP Media Vault. It is a format for specifying the location of resources on a
\\mediavault
For example: \\HPMediaVault\FileShare
UPnP
Universal Plug and Play (UPnP) is a networking protocol that allows for many different types of devices to interact with one another. UPnP is the protocol used by media streaming.
Version
One copy of a file. A version is created when a file is modified and the original copy is kept. When configuring

the backup option, the NTI Shadow software allows you to save multiple versions of a file. The backup versions would be named as follows: mydocument(00).doc (the initial version), mydocument(01).doc (the first version), and so on.
Volume
A partition formatted with a specific file system, such as Reiser or Fat32. Also see logical volume.
Volume name
A name given to a logical volume designated on a hard drive.
Web browser
An application used to access information on networks, on the internet, and in help systems. Common web browsers include Internet Explorer, Netscape, Firefox, and Safari.
A technology that allows for increased security with wireless networks.
WINS Server
WINS (Windows Internet Naming Service) is a server that converts NetBIOS network names to IP addresses.
Wireless Access Point (WAP)
A device, such as a wireless router, that connects wireless communication devices together to form a wireless network. A WAP often connects to a wired network, and can relay data between wireless devices and wired devices.
Wired Equivalent Privacy (WEP)
A protocol that encrypts data on a wireless system for security.
No terms begin with the letter X.
No terms begin with the letter Y.
No terms begin with the letter Z.

Product specifications
Minimum system requirements
Your computer should meet or exceed these requirements:
System requirements
500MHz Intel Pentium III processor or equivalent with128MB RAM
Operating system
File and Drive backup: Microsoft Windows XP, 2000 Professional SP4
File sharing: Windows 2000 (SP4), Windows XP, ME, 98SE, MAC OS 10, Linux
Hard drive
150 MB free for included software installation
Other requirements
Home Network
Internet connectivity recommended for software updates
Browser
Internet Explorer 6.0 or greater, Netscape 7.0 or greater; Firefox 1.0 or greater; Safari 2.0.1 or greater
Security (access levels)
Group
Folder
User
Internal drive storage
300 GB (MV2010)
500 GB (MV2020)
Drive expandability
1 Serial ATA expansion bay
3 USB 2.0 ports
Maximum storage space: 1.2 TB
Dimensions
Height: 330mm (13")
Width: 240mm ( 9.4")
Depth: 110mm (4.3")
Weight: MV2010: 5.03 kg (11.1 lb), MV2020: 5.13 kg (11.3 lb)
Networking
Supported network standards
IEEE 802.3
IEEE 802.3u
UPnP??? AV 2.0
Network speed
10/100/1000 Mbps
Access method (methods used to record data)
CSMA/CD
Connector type
1x RJ45
Encoding method
Maximum transmission distance
100 meters
Other
Print server
Default network ID
HPMediaVault
Environmental
Temperature
Operating: 5?? to 35?? C (41?? to 95?? F)
Nonoperating:
Humidity (no condensation allowed)
Operating: 10% to 80% RH
Nonoperating: 10% to 95% RH
Shock
Operating: 15 G
Nonoperating: 200 G
Vibration
Operating: 0.5 Grms
Nonoperating: 2.0 Grms
Electrical ratings
AC INPUT
Power consumption
26W single drive, 36W dual drive
Safety
IEC
USA ??? UL, CDRH Radiation Control Standards 21 CFR 1010 and
Canada ??? CSA or CUL
Europe ??? LVD 73/23/EEC 93/68/EC IEC 60950 plus amendments, EN60825 plus amendments,
EMCD 89/336/EEC plus amendments
Regulatory statements
The product herewith complies with the requirements of the Low Voltage Directive 73/23/EEC, the EMC Directive 89/336/EEC and the R&TTE Directive 1999/5/EC and carries "CE Marking" accordingly.
This Device complies with Part 15 of the FCC Rules. Operation is subject to the following two conditions: (1) this device may not cause harmful interference, and (2) this device must accept any interference received, including interference that may cause undesired operation.
Fort Collins, CO USA July, 2006
For regulatory compliance information only

European contact:
(FAX:
North America Contact: Hardware Quality Eng. Manager, PSB, 3404 E Harmony Rd, Fort Collins, CO 80528 Phone (970)

Software license agreements
Select a topic
??NTI
??Microsoft
HP software license terms
PLEASE READ CAREFULLY: THE USE OF SOFTWARE AVAILABLE AT THIS SITE IS SUBJECT TO THE TERMS
AND CONDITIONS THAT FOLLOW. IF YOU AGREE TO THESE TERMS, PLEASE CHOOSE THE ???I ACCEPT???
OPTION LOCATED ADJACENT TO THE SCREEN WHERE THIS AGREEMENT IS DISPLAYED. IF YOU DO
NOT AGREE TO THESE LICENSE TERMS, PLEASE CHOOSE THE ???I DO NOT ACCEPT??? OPTION AND DO
NOT INSTALL SOFTWARE.
End User License Agreement
PLEASE READ CAREFULLY BEFORE USING THIS EQUIPMENT: This
RIGHTS IN THE SOFTWARE PRODUCT ARE OFFERED ONLY ON THE CONDITION THAT YOU AGREE TO
ALL TERMS AND CONDITIONS OF THIS EULA. BY INSTALLING, COPYING, DOWNLOADING, OR
OTHERWISE USING THE SOFTWARE PRODUCT, YOU AGREE TO BE BOUND BY THE TERMS OF THIS
EULA. IF YOU DO NOT ACCEPT THESE LICENSE TERMS, YOUR SOLE REMEDY IS TO RETURN THE ENTIRE
UNUSED PRODUCT (HARDWARE AND SOFTWARE) WITHIN 14 DAYS FOR A REFUND SUBJECT TO THE
REFUND POLICY OF YOUR PLACE OF PURCHASE.
1. GRANT OF LICENSE. HP grants you the following rights provided you comply with all terms and conditions of this EULA:
a.Use. You may use the Software Product on the computers connected to your network. If the Software Product is provided to you via the internet and was originally licensed for use on more than one computer, you may install and use the Software Product only on those computers. You do not have the right to distribute the Software Product. You may load the Software Product into Your Computer's temporary memory (RAM) for purposes of using the Software Product.
b.Storage. You may copy the Software Product into the local memory or storage device of the HP Product.
c.Copying. You may make archival or
all of the original Software Product's proprietary notices and that it is used only for back
d.Reservation of Rights. HP and its suppliers reserve all rights not expressly granted to you in this EULA.
e.Freeware. Notwithstanding the terms and conditions of this EULA, all or any portion of the Software Product which constitutes
2.UPGRADES. To use a Software Product identified as an upgrade, you must first be licensed for the original Software Product identified by HP as eligible for the upgrade. After upgrading, you may no longer use the original Software Product that formed the basis for your upgrade eligibility.
3.ADDITIONAL SOFTWARE. This EULA applies to updates or supplements to the original Software Product provided by HP unless HP provides other terms along with the update or supplement. In case of a conflict between such terms, the other terms will prevail.
4.TRANSFER.
a.Third Party. The initial user of the Software Product may make a
b.Restrictions. You may not rent, lease or lend the Software Product or use the Software Product for commercial timesharing or bureau use. You may not sublicense, assign or transfer the license or Software Product except as expressly provided in this EULA.
5.PROPRIETARY RIGHTS. All intellectual property rights in the Software Product and user documentation are owned by HP or its suppliers and are protected by law, including but not limited to United States copyright, trade secret, and trademark law, as well as other applicable laws and international treaty provisions. You shall not remove any product identification, copyright notices or proprietary restrictions from the Software Product.
6.LIMITATION ON REVERSE ENGINEERING. You may not reverse engineer, decompile, or disassemble the Software Product, except and only to the extent that the right to do so is mandated under applicable law notwithstanding this limitation or it is expressly provided for in this EULA.
7.TERM. This EULA is effective unless terminated or rejected. This EULA will also terminate upon conditions set forth elsewhere in this EULA or if you fail to comply with any term or condition of this EULA.
8.CONSENT TO USE OF DATA. You agree that HP and its affiliates may collect and use technical information you provide in relation to support services related to the Software Product. HP agrees not to use this information in a form that personally identifies you except to the extent necessary to provide such services.
9.DISCLAIMER OF WARRANTIES. TO THE MAXIMUM EXTENT PERMITTED BY APPLICABLE LAW, HP
AND ITS SUPPLIERS PROVIDE THE SOFTWARE PRODUCT ???AS IS??? AND WITH ALL FAULTS, AND HEREBY
DISCLAIM ALL OTHER WARRANTIES AND CONDITIONS, EITHER EXPRESS, IMPLIED, OR STATUTORY,
INCLUDING, BUT NOT LIMITED TO, WARRANTIES OF TITLE AND
WARRANTIES, DUTIES OR CONDITIONS OF MERCHANTABILITY, OF FITNESS FOR A PARTICULAR PURPOSE, AND OF LACK OF VIRUSES ALL WITH REGARD TO THE SOFTWARE PRODUCT. Some
states/jurisdictions do not allow exclusion of implied warranties or limitations on the duration of implied warranties, so the above disclaimer may not apply to you in its entirety.
10.LIMITATION OF LIABILITY. Notwithstanding any damages that you might incur, the entire liability of HP and any of its suppliers under any provision of this EULA and your exclusive remedy for all of the foregoing shall be limited to the greater of the amount actually paid by you separately for the Software Product or U.S. $5.00.
TO THE MAXIMUM EXTENT PERMITTED BY APPLICABLE LAW, IN NO EVENT SHALL HP OR ITS SUPPLIERS
BE LIABLE FOR ANY SPECIAL, INCIDENTAL, INDIRECT, OR CONSEQUENTIAL DAMAGES WHATSOEVER
(INCLUDING, BUT NOT LIMITED TO, DAMAGES FOR LOSS OF PROFITS OR CONFIDENTIAL OR OTHER
INFORMATION, FOR BUSINESS INTERRUPTION, FOR PERSONAL INJURY, FOR LOSS OF PRIVACY
ARISING OUT OF OR IN ANY WAY RELATED TO THE USE OF OR INABILITY TO USE THE SOFTWARE
PRODUCT, OR OTHERWISE IN CONNECTION WITH ANY PROVISION OF THIS EULA, EVEN IF HP OR
ANY SUPPLIER HAS BEEN ADVISED OF THE POSSIBILITY OF SUCH DAMAGES AND EVEN IF THE REMEDY FAILS OF ITS ESSENTIAL PURPOSE. Some states/jurisdictions do not allow the exclusion or limitation of incidental or consequential damages, so the above limitation or exclusion may not apply to you.
11.U.S. GOVERNMENT CUSTOMERS. Consistent with FAR 12.211 and 12.212, Commercial Computer Software, Computer Software Documentation, and Technical Data for Commercial Items are licensed to the U.S. Government under HP's standard commercial license.
12.COMPLIANCE WITH EXPORT LAWS. You shall comply with all laws and regulations of the United States and other countries ("Export Laws") to assure that the Software Product is not (1) exported, directly or indirectly, in violation of Export Laws, or (2) used for any purpose prohibited by Export Laws, including, without limitation, nuclear, chemical, or biological weapons proliferation.
13.CAPACITY AND AUTHORITY TO CONTRACT. You represent that you are of the legal age of majority in your state of residence and, if applicable, you are duly authorized by your employer to enter into this contract.
14.APPLICABLE LAW. This EULA is governed by the laws of the State of California, U.S.A.
15.ENTIRE AGREEMENT. This EULA (including any addendum or amendment to this EULA which is included with the HP Product) is the entire agreement between you and HP relating to the Software Product and it supersedes all prior or contemporaneous oral or written communications, proposals and representations with respect to the Software Product or any other subject matter covered by this EULA. To the extent the terms of any HP policies or programs for support services conflict with the terms of this EULA, the terms of this EULA shall control.
?? 2003
Rev. 10/03
Copyright
The NTI DriveBackup! software and the contents of this associated User Manual are the property of NewTech Infosystems, Inc. (NTI) and are protected by copyright. Any reproduction either in whole or in part is strictly prohibited. For additional copies of the software or this documentation, please contact NTI. Software as well as many other types of works are protected by international copyright laws. Unauthorized copying of those works in any manner may violate the rights of the owner of the copyright in those works and may expose you to civil and criminal penalties.
Trademarks
NTI DriveBackup! is a trademark of NewTech Infosystems, Inc. (NTI). NTI
Limited Warranty
NewTech Infosystems warrants for a period of (30) thirty days from the date of delivery that, under normal use and without unauthorized modification, the program performs in substantial compliance with the User Manual and those set forth in NewTech Infosystems, authorized advertising material; that, under normal use, the magnetic media upon which the software is distributed is substantially free from significant defects in materials and workmanship. Warranty claims must be made in writing during the Warranty Period and within seven (7) days of the observation of the defect, accompanied by evidence satisfactory to NewTech Infosystems. If NewTech Infosystems is unable to correct it within 90 days of the date you report the defect, you may return the Software and accompanying materials to NewTech Infosystems distributor from which they were purchased (if not purchased directly from NewTech Infosystems) and shall be shipped by the returning party with freight paid.
EXCEPT AS STATED ABOVE, THERE IS NO OTHER WARRANTY, EXPRESSED OR IMPLIED, REGARDING THE
PRODUCT INCLUDING, BUT NOT LIMITED TO, THE IMPLIED WARRANTIES OF MERCHANTABILITY AND
FITNESS FOR A PARTICULAR PURPOSE.
Limit of NewTech Infosystems' Liability
NewTech Infosystems' entire liability for damages to you or any other party for any cause whatsoever, whether in contract or in tort, including negligence, shall not exceed the price you paid for the unit of the software that caused the damages or that are the subject matter of, or are directly related to the cause of action. In no event will NewTech Infosystems be liable for any damages caused by your failure to perform your obligations, or for any loss of data, profits, savings, or any other consequential and incidental damages, even if NewTech Infosystems has been advised of the possibility of damages, or for any claims by you based on any

Termination
Your failure to comply with the terms in this Agreement shall terminate your license and this Agreement.
ENVIRONMENT
By installing, copying, downloading, accessing or otherwise using the SOFTWARE, you agree to be bound by the terms of this EULA. If you do not agree to the terms of this EULA, Manufacturer and Microsoft Licensing, GP, Microsoft Ireland Operations Limited and Microsoft (China) Co. Limited (collectively, ???MS???) are unwilling to license the SOFTWARE to you. In such event, you may not use or copy the SOFTWARE, and you should promptly contact Manufacturer for instructions on return of the unused product(s) for a refund in accordance with Manufacturer???s return policies.
SOFTWARE LICENSE
The SOFTWARE is protected by copyright laws and international copyright treaties, as well as other intellectual property laws and treaties. The SOFTWARE is licensed, not sold.
1.GRANT OF LICENSE. This EULA grants you the following rights, provided that you comply with all of the terms and conditions of this EULA:
Software. You may only install, use, access, display and run one (1) copy of the SOFTWARE on the SYSTEM only as a boot, diagnostic, setup, restoration, installation, configuration, test or disaster recovery tool for the Customer System and not for use as a general purpose operating system or as a substitute for an operating system product.
2.DESCRIPTION OF OTHER RIGHTS AND LIMITATIONS.
???Limitations on Reverse Engineering, Decompilation and Disassembly. You may not reverse engineer, decompile, or disassemble the SOFTWARE, except and only to the extent that such activity is expressly permitted by applicable law notwithstanding this limitation.
???Single System. The SOFTWARE is licensed for use solely with the SYSTEM.
???Rental. You may not loan, rent, lease or lend the SOFTWARE.
???Software Transfer. You may permanently transfer all of your rights under this EULA only as part of a permanent sale or transfer of the SYSTEM, provided you retain no copies, you transfer all of the SOFTWARE (including all component parts, the media, any upgrades or backup copies, this EULA, and if applicable, the Certificate(s) of Authenticity), and the recipient agrees to the terms of this EULA. If the SOFTWARE is an upgrade, any transfer must include all prior versions of the
SOFTWARE.
???Termination . Without prejudice to any other rights, Manufacturer or MS may terminate this EULA if you fail to comply with the terms and conditions of this EULA. In such event, you must destroy all copies of the SOFTWARE and all of its component parts.
???Single EULA. The package for the SOFTWARE may contain multiple versions of this EULA, such as multiple translations and/or multiple media versions (e.g., in the user documentation and in the software). In this case, you are only licensed to use one (1) copy of the SOFTWARE.
???Security Feature. The SOFTWARE contains a security feature that will cause the Customer System to reboot without prior notification to the
???Export Restrictions. You acknowledge that the SOFTWARE is subject to U.S. export jurisdiction. You agree to comply with all applicable international and national laws that apply to the products, including the U.S. Export Administration Regulations, as well as
???Reservation of Rights. Manufacturer, MS and its suppliers (including Microsoft Corporation) reserve all rights not expressly granted to you in this EULA.
3.INTELLECTUAL PROPERTY RIGHTS. All title and intellectual property rights in and to the SOFTWARE, the accompanying printed materials, and any copies of the SOFTWARE, are owned by MS or its suppliers (including Microsoft Corporation). The SOFTWARE is licensed, not sold. All title and intellectual property rights in and to the content that is not contained in the SOFTWARE, but which may be accessed through use of the SOFTWARE is the property of the respective content owner and may be protected by applicable copyright or other intellectual property laws and treaties. This EULA grants you no rights to use such content. If this SOFTWARE contains documentation that is provided only in electronic form, You may print one copy of such electronic documentation. You may not copy the printed materials accompanying the SOFTWARE.
4.PRODUCT SUPPORT. Product support for the SOFTWARE is not provided by MS, its parent corporation, Microsoft Corporation, or their affiliates or subsidiaries. For product support, please refer to Manufacturer's support number provided in the documentation for the SYSTEM. Should you have any questions concerning this EULA, or if you desire to contact Manufacturer for any other reason, please refer to the address provided in the documentation for the SYSTEM.
5.LIMITED WARRANTY.
???Limited Warranty. Manufacturer warrants that the SOFTWARE will perform substantially in accordance with the accompanying written materials for a period of ninety (90) days from the date of receipt. Any implied warranties on the SOFTWARE are limited to ninety (90) days. Some states/jurisdictions do not allow limitations on duration of an implied warranty, so the above limitation may not apply to you.
???CUSTOMER REMEDIES. Manufacturer???s and its suppliers' entire liability and your exclusive remedy FOR A BREACH OF THIS LIMITED WARRANTY shall be, at Manufacturer's option, either (a) return of the price paid, or (b) repair or replacement of the SOFTWARE that does not meet the above Limited Warranty and which is returned to Manufacturer with a copy of your receipt. This Limited Warranty is void if failure of the SOFTWARE has resulted from accident, abuse, or misapplication. Any replacement SOFTWARE will be warranted for the remainder of the original warranty period or thirty (30) days, whichever is longer.

???DISCLAIMER OF ANY OTHER WARRANTIES. MANUFACTURER???S LIMITED WARRANTY IS
THE ONLY EXPRESS WARRANTY OR CONDITION MADE TO YOU AND IS PROVIDED IN LIEU
OF ANY OTHER EXPRESS WARRANTIES OR SIMILAR OBLIGATIONS (IF ANY) ALLEGED TO BE
CREATED BY ADVERTISING, DOCUMENTATION, PACKAGING OR ANYTHING ELSE. EXCEPT
FOR MANUFACTURER???S LIMITED WARRANTY AND TO THE MAXIMUM EXTENT PERMITTED BY
APPLICABLE LAW, ALL SOFTWARE, HARDWARE, ALL DATA, CONTENT AND SERVICES (IF
ANY), AND ANY PROVISION OR USE OF ANY OF THE FOREGOING ARE PROVIDED AS IS
AND WITH ALL FAULTS. REGARDING THE FOREGOING, MANUFACTURER AND ITS SUPPLIERS
DISCLAIM ALL OTHER WARRANTIES AND CONDITIONS, EITHER EXPRESS, IMPLIED OR
STATUTORY, INCLUDING, BUT NOT LIMITED TO, ANY (IF ANY) IMPLIED WARRANTIES, DUTIES
OR CONDITIONS OF MERCHANTABILITY, OF FITNESS FOR A PARTICULAR PURPOSE, OF
RELIABILITY OR AVAILABILITY, OF ACCURACY OR COMPLETENESS OF RESPONSES, OF
RESULTS, OF WORKMANLIKE EFFORT, AND OF LACK OF VIRUSES OR NEGLIGENCE. ALSO,
THERE IS NO WARRANTY OR CONDITION OF TITLE, QUIET ENJOYMENT, QUIET
POSSESSION, CORRESPONDENCE TO DESCRIPTION OR
???EXCLUSION OF INCIDENTAL, CONSEQUENTIAL AND CERTAIN OTHER DAMAGES.
TO THE MAXIMUM EXTENT PERMITTED BY APPLICABLE LAW, IN NO EVENT SHALL
MANUFACTURER OR ITS SUPPLIERS BE LIABLE FOR ANY DAMAGES WHATSOEVER
(INCLUDING WITHOUT LIMITATION, SPECIAL, INCIDENTAL, PUNITIVE, CONSEQUENTIAL, OR
INDIRECT DAMAGES FOR PERSONAL INJURY, LOSS OF BUSINESS PROFITS, BUSINESS
INTERRUPTION, LOSS OF CONFIDENTIAL OR OTHER INFORMATION, LOSS OF PRIVACY,
FAILURE TO MEET ANY DUTY (INCLUDING OF GOOD FAITH OR OF REASONABLE CARE),
NEGLIGENCE, OR ANY OTHER PECUNIARY LOSS) ARISING OUT OF OR IN ANY WAY
RELATED TO THE USE OF OR INABILITY TO USE THE SOFTWARE, OR THE PROVISION OF OR
FAILURE TO PROVIDE SUPPORT SERVICES, OR OTHERWISE UNDER OR IN CONNECTION
WITH ANY PROVISION OF THIS EULA, EVEN IF MANUFACTURER HAS BEEN ADVISED OF THE
POSSIBILITY OF SUCH DAMAGES.
???LIMITATION OF LIABILITY AND REMEDIES. NOTWITHSTANDING ANY DAMAGES THAT
YOU MIGHT INCUR FOR ANY REASON WHATSOEVER (INCLUDING, WITHOUT LIMITATION,
ALL DAMAGES REFERENCED ABOVE AND ALL DIRECT OR GENERAL DAMAGES),
MANUFACTURER'S AND ITS SUPPLIERS' ENTIRE LIABILITY UNDER ANY PROVISION OF THIS
EULA AND YOUR EXCLUSIVE REMEDY FOR ALL OF THE FOREGOING SHALL BE LIMITED TO
ACTUAL DAMAGES INCURRED BY YOU BASED ON REASONABLE RELIANCE UP TO THE
GREATER OF THE AMOUNT ACTUALLY PAID BY YOU FOR THE SOFTWARE OR U.S.$5.00. THE
FOREGOING LIMITATIONS, EXCLUSIONS AND DISCLAIMERS SHALL APPLY TO THE MAXIMUM
EXTENT PERMITTED BY APPLICALE LAW, EVEN IF ANY REMEDY FAILS ITS ESSENTIAL PURPOSE.
6.U.S. GOVERNMENT RESTRICTED RIGHTS. All SOFTWARE provided to the U.S. Government pursuant to solicitations issued on or after December 1, 1995 is provided with the commercial rights and restrictions described elsewhere herein. All SOFTWARE provided to the U.S. Government pursuant to solicitations issued prior to December 1, 1995 is provided with RESTRICTED RIGHTS as provided for in FAR, 48 CFR
If you acquired this EULA in the United States, this EULA is governed by the laws of the State of Washington.
If you acquired this EULA in Canada, this EULA is governed by the laws of the Province of Ontario, Canada. Each of the parties hereto irrevocably attorns to the jurisdiction of the courts of the Province of Ontario and further agrees to commence any litigation which may arise hereunder in the courts located in the Judicial District of York, Province of Ontario.

If this EULA was acquired outside the United States, then local law may apply.
Should you have any questions concerning this EULA, please contact the Manufacturer of your SYSTEM.

Feedback about this guide
If you find an error in this guide or just have a suggestion for it, send
If you require customer support instead, see the HP Media Vault Support Guide or go to the website www.hp.com/support.
Limited Warranty and Technical Support
Statement
HP Media Vault Limited Warranty
Duration
Hardware: 1 year Limited Warranty
Software: 90 days Technical Support
General Terms
This HP Hardware Limited Warranty gives you, the customer, express limited warranty rights from HP, the manufacturer. Please refer to HP???s Web site for an extensive description of your limited warranty entitlements. In addition, you may also have other legal rights under applicable local law or special written agreement with HP.
HP MAKES NO OTHER EXPRESS WARRANTY OR CONDITION, WHETHER WRITTEN OR ORAL, AND HP
EXPRESSLY DISCLAIMS ALL WARRANTIES AND CONDITIONS NOT STATED IN THIS LIMITED WARRANTY.
TO THE EXTENT ALLOWED BY THE LOCAL LAW OF JURISDICTIONS OUTSIDE THE UNITED STATES, HP
DISCLAIMS ALL IMPLIED WARRANTIES OR CONDITIONS, INCLUDING ANY IMPLIED WARRANTIES OF
MERCHANTABILITY AND FITNESS FOR A PARTICULAR PURPOSE. FOR ALL TRANSACTIONS OCCURRING
IN THE UNITED STATES, ANY IMPLIED WARRANTY OR CONDITION OF MERCHANTABILITY,
SATISFACTORY QUALITY, OR FITNESS FOR A PARTICULAR PURPOSE IS LIMITED TO THE DURATION OF
THE EXPRESS WARRANTY SET FORTH ABOVE. SOME STATES OR COUNTRIES/REGIONS DO NOT
ALLOW A LIMITATION ON HOW LONG AN IMPLIED WARRANTY LASTS OR THE EXCLUSION OR
LIMITATION OF INCIDENTAL OR CONSEQUENTIAL DAMAGES FOR CONSUMER PRODUCTS. IN SUCH
STATES OR COUNTRIES/REGIONS, SOME EXCLUSIONS OR LIMITATIONS OF THIS LIMITED WARRANTY
MAY NOT APPLY TO YOU.
THE LIMITED WARRANTY TERMS CONTAINED IN THIS STATEMENT, EXCEPT TO THE EXTENT LAWFULLY
PERMITTED, DO NOT EXCLUDE, RESTRICT, OR MODIFY BUT ARE IN ADDITION TO THE MANDATORY
STATUTORY RIGHTS APPLICABLE TO THE SALE OF THIS PRODUCT TO YOU.
This Limited Warranty is applicable in all countries/regions and may be enforced in any country/region where HP or its authorized service providers offer warranty service for the same product model number subject to the terms and conditions set forth in this Limited Warranty.
Under the HP Global Limited Warranty program, products purchased in one country/region may be transferred to another country/region, where HP or its authorized service providers offer warranty service for the same product model number, without voiding the warranty. Warranty terms, service availability, and service response times may vary from country/region to country/region. Standard warranty service response time is subject to change due to local parts availability. If so, your HP authorized service provider can provide you with details.
HP is not responsible for any tariffs or duties that may be incurred in transferring the products. Transfer of the products may be covered by export controls issued by the United States or other governments.
This Limited Warranty applies only to
HP warrants that the HP Hardware Products that you have purchased or leased from HP are free from defects in materials or workmanship under normal use during the Limited Warranty Period. The Limited Warranty Period starts on the date of purchase or lease from HP or from the date HP completes installation. Your dated sales or delivery receipt, showing the date of purchase or lease of the product, is your proof of the purchase or lease date. You may be required to provide proof of purchase or lease as a condition of receiving warranty service. You are entitled to hardware warranty service according to the terms and conditions of this document if a repair to your HP Hardware Product is required within the Limited Warranty Period.
Unless otherwise stated, and to the extent permitted by local law, new HP Hardware Products may be manufactured using new materials or new and used materials equivalent to new in performance and reliability. HP may repair or replace HP Hardware Products (a) with new or previously used products or parts equivalent to new in performance and reliability or (b) with equivalent products to an original product that has been discontinued. Replacement parts are warranted to be free from defects in material or workmanship for ninety (90) days or, for the remainder of the Limited Warranty Period of the HP Hardware Product they are replacing or in which they are installed, whichever is longer.
During the Limited Warranty Period, HP will, at its discretion, repair or replace any defective component. All component parts or hardware products removed under this Limited Warranty become the property of HP. In the unlikely event that your HP Hardware Product has recurring failures, HP, at its sole discretion, may elect to provide you with (a) a replacement unit of HP???s choosing that is the same or equivalent to your HP Hardware Product in performance or (b) to give you a refund of your purchase price or lease payments (less interest) instead of a replacement. This is your exclusive remedy for defective products.
Exclusions
HP does not warrant that the operation of this product will be uninterrupted or
This Limited Warranty does not apply to expendable or consumable parts and does not extend to any product from which the serial number has been removed or that has been damaged or rendered defective (a) as a result of accident, misuse, abuse, contamination, improper or inadequate maintenance or calibration, or other external causes; (b) by operation outside the usage parameters stated in the user documentation that shipped with the product (c) by software, interfacing, parts, or supplies not supplied by HP; (d) by improper site preparation or maintenance; (e) by virus infection; (f) from loss or damage in transit; (g) by modification or service by anyone other than (i) HP, (ii) an HP authorized service provider, or (iii) your own installation of
YOU SHOULD MAKE PERIODIC BACKUP COPIES OF THE DATA STORED ON YOUR HARD
DRIVE OR OTHER STORAGE DEVICES AS A PRECAUTION AGAINST POSSIBLE FAILURES,
ALTERATION, OR LOSS OF THE DATA. BEFORE RETURNING ANY UNIT FOR SERVICE, BE
SURE TO BACK UP DATA AND REMOVE ANY CONFIDENTIAL, PROPRIETARY, OR PERSONAL
INFORMATION. HP IS NOT RESPONSIBLE FOR DAMAGE TO OR LOSS OF ANY PROGRAMS,
DATA, OR REMOVABLE STORAGE MEDIA. HP IS NOT RESPONSIBLE FOR THE RESTORATION
OR REINSTALLATION OF ANY PROGRAMS OR DATA OTHER THAN SOFTWARE INSTALLED
BY HP WHEN THE PRODUCT IS MANUFACTURED. UNITS SENT IN FOR SERVICE MAY HAVE
THE DATA ERASED FROM THE HARD DRIVE AND THE PROGRAMS RESTORED TO THEIR
ORIGINAL STATE.
Exclusive Remedy
TO THE EXTENT ALLOWED BY APPLICABLE LOCAL LAW, THESE TERMS AND CONDITIONS CONSTITUTE
THE COMPLETE AND EXCLUSIVE WARRANTY AGREEMENT BETWEEN YOU AND HP REGARDING THE HP
HARDWARE PRODUCT YOU HAVE PURCHASED OR LEASED. THESE TERMS AND CONDITIONS
SUPERSEDE ANY PRIOR AGREEMENTS OR REPRESENTATIONS ??? INCLUDING REPRESENTATIONS MADE
IN HP SALES LITERATURE OR ADVICE GIVEN TO YOU BY HP OR AN AGENT OR EMPLOYEE OF HP ???
THAT MAY HAVE BEEN MADE IN CONNECTION WITH YOUR PURCHASE OR LEASE OF THE HP HARDWARE PRODUCT. No change to the conditions of this Limited Warranty is valid unless it is made in writing and signed by an authorized representative of HP.
Limitation of Liability
IF YOUR HP HARDWARE PRODUCT FAILS TO WORK AS WARRANTED ABOVE, HP???S MAXIMUM LIABILITY
UNDER THIS LIMITED WARRANTY IS EXPRESSLY LIMITED TO THE LESSER OF THE PRICE YOU HAVE PAID
FOR THE PRODUCT OR THE COST OF REPAIR OR REPLACEMENT OF ANY HARDWARE COMPONENTS
THAT MALFUNCTION IN CONDITIONS OF NORMAL USE.
EXCEPT AS INDICATED ABOVE, IN NO EVENT WILL HP BE LIABLE FOR ANY DAMAGES CAUSED BY THE
PRODUCT OR THE FAILURE OF THE PRODUCT TO PERFORM, INCLUDING ANY LOST PROFITS OR
SAVINGS OR SPECIAL, INCIDENTAL, OR CONSEQUENTIAL DAMAGES. HP IS NOT LIABLE FOR ANY
CLAIM MADE BY A THIRD PARTY OR MADE BY YOU FOR A THIRD PARTY.
THIS LIMITATION OF LIABILITY APPLIES WHETHER DAMAGES ARE SOUGHT, OR A CLAIM MADE, UNDER
THIS LIMITED WARRANTY OR AS A TORT CLAIM (INCLUDING NEGLIGENCE AND STRICT PRODUCT
LIABILITY), A CONTRACT CLAIM, OR ANY OTHER CLAIM. THIS LIMITATION OF LIABILITY CANNOT BE
WAIVED OR AMENDED BY ANY PERSON. THIS LIMITATION OF LIABILITY WILL BE EFFECTIVE EVEN IF
YOU HAVE ADVISED HP OR AN AUTHORIZED REPRESENTATIVE OF HP OF THE POSSIBILITY OF ANY
SUCH DAMAGES. THIS LIMITATION OF LIABILITY, HOWEVER, WILL NOT APPLY TO CLAIMS FOR
PERSONAL INJURY.
THIS LIMITED WARRANTY GIVES YOU SPECIFIC LEGAL RIGHTS. YOU MAY ALSO HAVE OTHER RIGHTS
THAT MAY VARY FROM STATE TO STATE OR FROM COUNTRY/REGION TO COUNTRY/REGION. YOU
ARE ADVISED TO CONSULT APPLICABLE STATE OR COUNTRY/REGION LAWS FOR A FULL
DETERMINATION OF YOUR RIGHTS.
Limited Warranty Period
The Limited Warranty Period for an HP Hardware Product is a specified, fixed period commencing on the date of purchase. The date on your sales receipt is the date of purchase unless HP or your reseller informs you otherwise in writing.
Types of Warranty Service
To enable HP to provide the best possible support and service during the Limited Warranty Period, you may be directed by HP to verify configurations, load most recent firmware, install software patches, run HP diagnostics tests, or use HP remote support solutions where applicable.
HP strongly encourages you to accept the use of or to employ available support technologies provided by HP. If you choose not to deploy available remote support capabilities, you may incur additional costs due to increased support resource requirements. Listed below are the types of warranty support service that may be applicable to the HP Hardware Product you have purchased.
Customer Self Repair Warranty Service
In countries/regions where it is available, your HP Limited Warranty may include a customer self repair warranty service. If applicable, HP will determine in its sole discretion that customer self repair is the appropriate method of warranty service. If so, HP will ship approved replacement parts directly to you to fulfill your HP Hardware Product warranty service. This will save considerable repair time. After you contact the HP Technical Support Center and the fault diagnosis identifies that the problem can be fixed using one of these parts, a replaceable part can be sent directly to you. Once the part arrives, replace the defective part pursuant to the provided instructions and documentation. If further assistance is required, call the HP Technical Support Center, and a technician will assist you over the phone. In cases where the replacement part must be returned to HP, you must ship the defective part back to HP within a defined period of time, normally thirty (30) days. The defective part must be returned with the associated documentation in the provided shipping material. Failure to return the defective product may result in HP billing you for the replacement.
With a customer self repair, HP will pay all shipping and part return costs and determine the courier/carrier to be used. If customer self repair applies to you, please refer to your specific HP Hardware Product announcement. You can also obtain information on this warranty service on the HP Web site at:
Pickup and Return Warranty Service
Your HP Limited Warranty may include a pickup and return warranty service. Under the terms of pickup and return service, HP will pick up the defective unit from your location, repair it, and return it back to your location. HP will incur all repair, logistics, and insurance costs in this process.
Under the terms of
Service Upgrades
HP has a range of additional support and service coverage for your product that can be purchased locally. However, some support and related products may not be available in all countries/regions. For information on availability of service upgrades and the cost for these service upgrades, refer to the HP Web site at:
http://www.hp.com/support
Options Limited Warranty, Software and Digital Content
Your Options Limited Warranty is a one (1) year (HP Options Limited Warranty Period) parts replacement warranty on any HP branded or
LICENSE OR PROGRAM LICENSE AGREEMENT, OR IF OTHERWISE REQUIRED BY LOCAL LAW,
SOFTWARE AND THIRD PARTY DIGITAL CONTENT, INCLUDING THE OPERATING SYSTEM OR ANY
SOFTWARE OR THIRD PARTY DIGITAL CONTENT PREINSTALLED BY HP ARE PROVIDED ???AS IS???. EXCEPT AS
SPECIFICALLY PROVIDED IN THIS LIMITED WARRANTY, IN NO EVENT WILL HP BE LIABLE FOR ANY
DAMAGES CAUSED BY OR ARISING FROM ANY THIRD PARTY DIGITAL CONTENT PREINSTALLED ON
YOUR HP HARDWARE PRODUCT.