t250 Digital Camcorder
Quick Start Guide
1
t250 Digital Camcorder
Quick Start Guide
1
1 Getting Started
All information presented is as accurate as possible but is subject to change without notice. There is no guarantee for the accuracy of the contents in this guide. We reserve the right to change any content or technical rule without prior notification. For more details about the camcorder operation and troubleshooting, please read the User Manual located on the CDROM disc included with your camcorder or visit http://www.hp.com/support
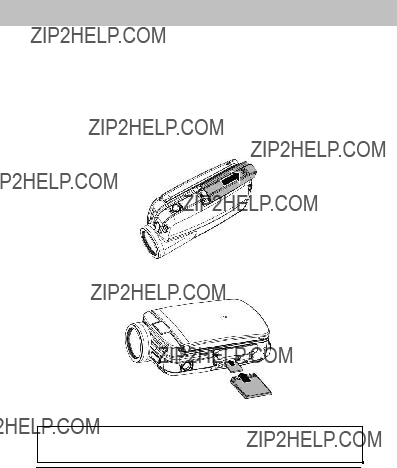
1.1Inserting SD Card(s)
1.Open the battery cover.
2.Insert the SD card gently into the slot. Make sure the copper contact faces upwards.
SD card 1:  : SD / SDHC card;
SD card 2:  : Micro SD card
Note: To avoid damage to the camcorder and memory cards, DO NOT insert while powered up. Damage to the memory card will result in loss of video and photos.
2

1.2Loading the Battery
ONLY use the provided battery or manufacturer recommended battery with this camcorder.
Note: Insert the battery correctly according to this description. Failure to due this could result in damage to this camcorder and rare cases result in fire.
1.Open the battery cover.
2.Insert the battery according to the illustration. Be sure to have the battery terminal contacts match with the camcorder.
3

3.Close the battery cover.
Battery Status Indicator:
Battery full
Battery half full
Battery empty
???Charging battery (A new battery should be charged at least 4 hours.)
???The device power is supplied by DC input. (No battery inside.)
1.3Charging the Battery
Use the AC adaptor to charge the lithium battery, whether the camcorder is on or off. Connect the camcorder to the cable of the AC adaptor. The camcorder battery can be charge by PC or laptop (via USB port) when powered off.
4

External View

1.4 Buttons & Functions
6

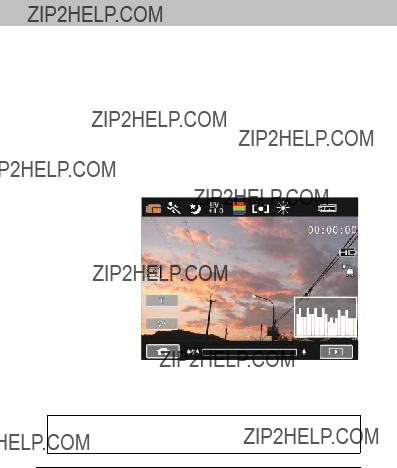
1.5 Initial settings before use
1.5.1Setting Date and Time
1.Power on the camcorder to set up the date and time for the initial use. Set the date and time by touching the screen to select the field to be modified and touch the up or down arrow icons to change the value as illustrated below.
2.Press Recording Button ( ) to store your changes.
3.Touch the ( ) icon to exit the settings menu.
7
2 Using the Camcorder
2.1 Recording a Video Clip
1.Power on the camcorder by opening the LCD panel or pressing
the power button. Press the Mode Button ( ) or touch the ???DV Mode icon??? on the LCD screen to switch to DV mode.
2.Press the Recording Button ( ) to start recording. Press the Recording Button (
 ) again to stop recording.
3.The camcorder will store the video clip automatically.
DV Mode Icon 
Note: It is recommended to use a 4 GB or greater SD / SDHC memory card for video recording.
8

2.2 Video Clip / Voice Clip Playback
Note: Video, Photos and Audios may not play back on the camcorder if:
1.The folder/file name has been changed on your computer.
2.If the file has been edited / processed on a computer or captured with another camcorder / camera.
1.In DV / Voice Recording Mode, pressing the Playback Button
( ) or touching the Playback Mode icon
  on the LCD screen to put the camcorder in playback mode.
Playback
Playback Mode icon
Playback Mode icon 
9
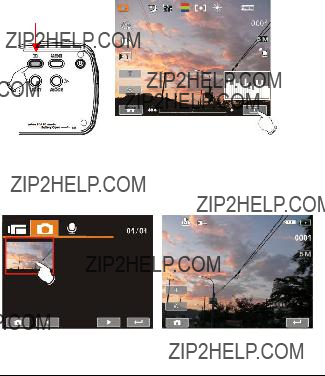
2.Recorded files will appear as thumbnails as illustrated below. Touch the desired mode icon (DV, DSC, or Audio). Touch the thumbnail or use the Zoom Button ( ) to select the file.
2.To Playback or pause the file, press the Recording Button ( ) or touch the screen icons (
 ).
).
3.Press Playback Button ( ) again or touch the screen to select the Return Button (
 ), the digital video camera will return to recording mode.
10
4.You can also playback the video clips at different speeds by
touching the screen icons ( and
and  ). To playback in slower speeds, touch the (
 ) icon to select ON/OFF then touch the (
  and
and  ) icons to vary the speed. Review the table below for details.
11

2.3Shooting / Playback Photos
2.3.1Taking a picture
1.Turn on the camcorder. Press the Mode Button ( ) or touch the screen to select the ???DSC Mode icon??? to switch to DSC Mode.
DSC Mode icon
2.Press the Recording Button ( ) half way to display the auto focus bracket. Wait for the bracket to green which indicates the
auto focus is ready and then press the Recording Button ( ) fully to capture the photo. The camcorder will store the picture automatically.
12
2.3.2Photo Playback
1.In DSC Mode, press Playback Button (  ) or touch the Playback icon to display the images on the LCD screen.
Playback
Playback Mode Icon
2.Touch the file thumbnail or press the Zoom Button ( ) to select the file, and press Recording Button (
 ).
).
13

3.Pressing the Zoom Button ( ) or touching the screen to select the Zoom icons (
 /
/  ) will zoom in or zoom out the picture. Press the Mode Button (
 ) or touch the screen to select the
4.Press Zoom Button ( ) or touch the Return Button (
 ) to return to full screen for viewing photos.
5.Press the Playback Button ( ) again or touch the screen to select the Return Button (
 ) will restore to DSC capture mode.
14

3 PC and TV Connection
3.1 Connecting to the Computer
As shown in the illustration below, use the USB cable provided to connect the camcorder to a PC for file transmission.
3.2 Connecting to a Standard TV
As shown in the illustrations below, either use the provided HDMI cable to connect to a HD TV or the video cable to connect to a standard TV.
15

4. Troubleshooting
16

17