
HP Photosmart M415/M417/M517 Digital Camera with HP Instant Share
Quick Start Guide
Gu??a de inicio r??pido
4" X 6" FRONT COVER

HP Photosmart M415/M417/M517 Digital Camera with HP Instant Share
Quick Start Guide
Gu??a de inicio r??pido
4" X 6" FRONT COVER

TahitiUM.book Page 4 Sunday, January 4, 2004 2:47 PM
RossRedfordNewmanQSG.fm Page 1 Thursday, January 6, 2005 10:17 AM
HP Photosmart M415/M417/M517 Digital Camera
with HP Instant Share
Quick Start Guide
English
1
RossRedfordNewmanQSG.fm Page 2 Thursday, January 6, 2005 10:17 AM
Legal Notices
?? Copyright 2005
The information contained herein is subject to change without notice. The only warranties for HP products and services are set forth in the express warranty statements accompanying such products and services. Nothing herein should be construed as constituting an additional warranty. HP shall not be liable for technical or editorial errors or omissions contained herein.
Windows?? is a U.S. registered trademark of Microsoft Corporation.
 SD logo is a trademark of its proprietor.
Important recycling information for our customers in the European Union: To preserve the environment, this product must be recycled after its useful life as required by law. The symbol below indicates that this product may not be disposed in the general trash. Please return the product for proper recovery/ disposal to the authorized collection location nearest to you. For more information regarding return and recycling of HP products generally, please visit:
www.hp.com/hpinfo/globalcitizenship/environment/recycle/index.html
For future reference, please enter the following information:
Model Number (on the front of the camera)
Serial Number
Date the camera was purchased
Printed in China
2 HP Photosmart M415/M417/M517 Quick Start Guide
RossRedfordNewmanQSG.fm Page 3 Thursday, January 6, 2005 10:17 AM
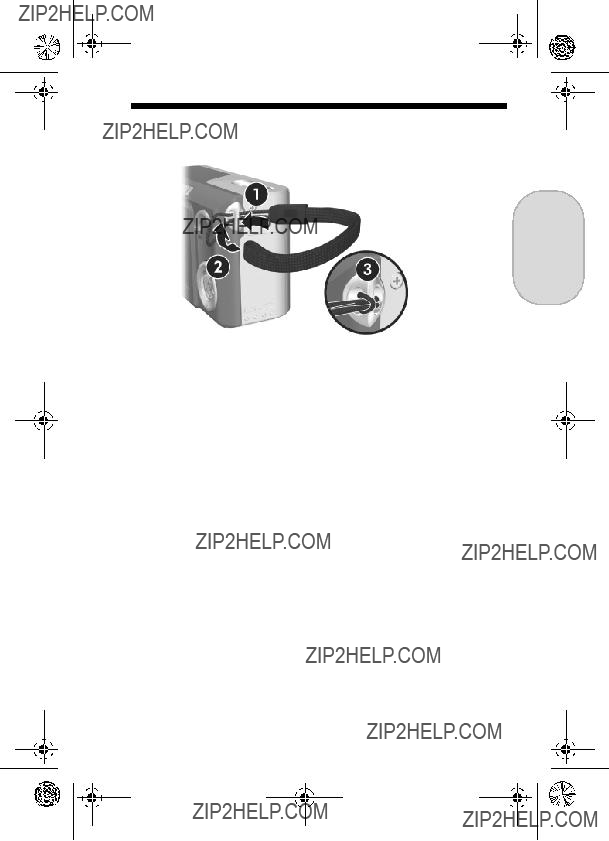
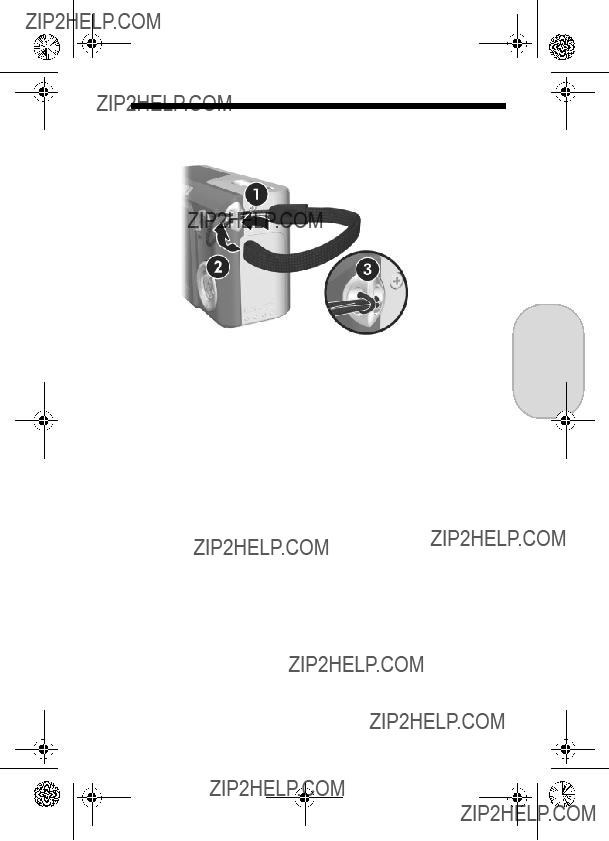
1.Attach the Wrist Strap
English
SAttach the wrist strap to the wrist strap mount on the side of the camera as shown.
3
RossRedfordNewmanQSG.fm Page 4 Thursday, January 6, 2005 10:17 AM
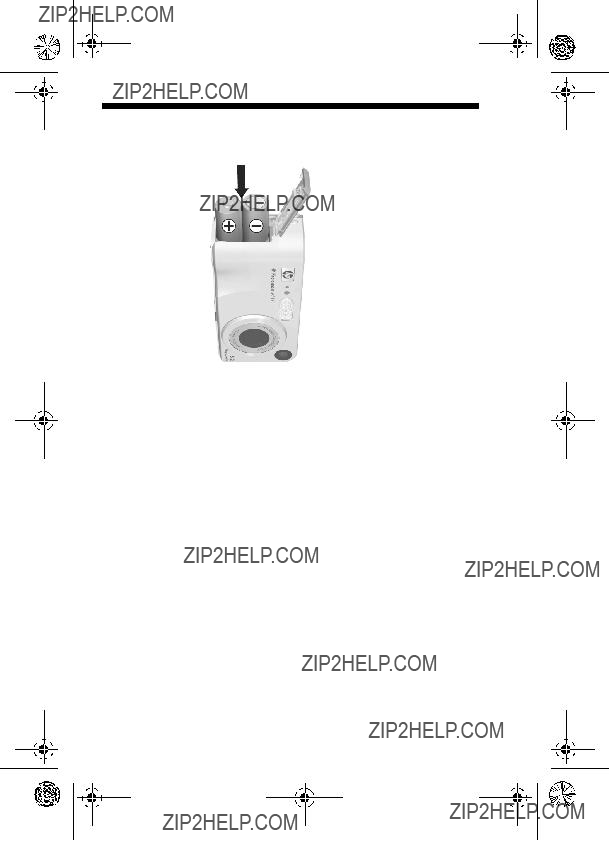
2.Install the Batteries
1.Open the Battery/Memory card door on the side of the camera by sliding the door toward the bottom of the camera.
2.Insert the batteries as indicated inside the door.
3.Close the Battery/Memory card door by pushing the door down and sliding the door toward the top of the camera until the door latches.
You can expect performance similar to the following from the different types of AA batteries that work in your camera:
4 HP Photosmart M415/M417/M517 Quick Start Guide
RossRedfordNewmanQSG.fm Page 5 Thursday, January 6, 2005 10:17 AM
3.Choose the Language
English
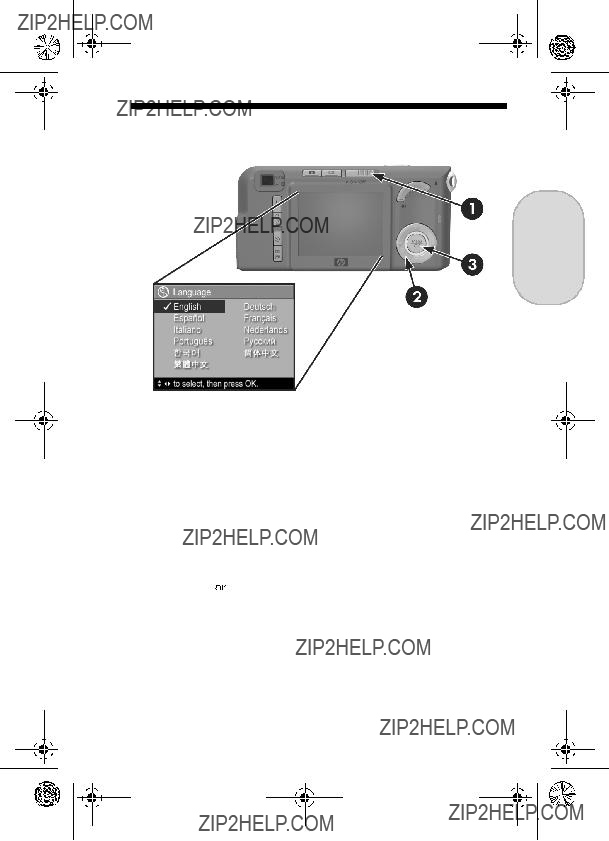
The first time you turn the camera on, you are prompted to choose a language.
1.Turn the camera on by sliding the 


 switch to the right and then releasing it. The lens extends and the
Power light to the left of the 


 switch turns on solid green. The HP logo also displays on the Image Display as the camera powers up.
2.Scroll to the language that you want by using the 

 buttons on the Controller
  .
.
3.Press the 
 button to select the highlighted language.
5
RossRedfordNewmanQSG.fm Page 6 Thursday, January 6, 2005 10:17 AM
4.Set the Region
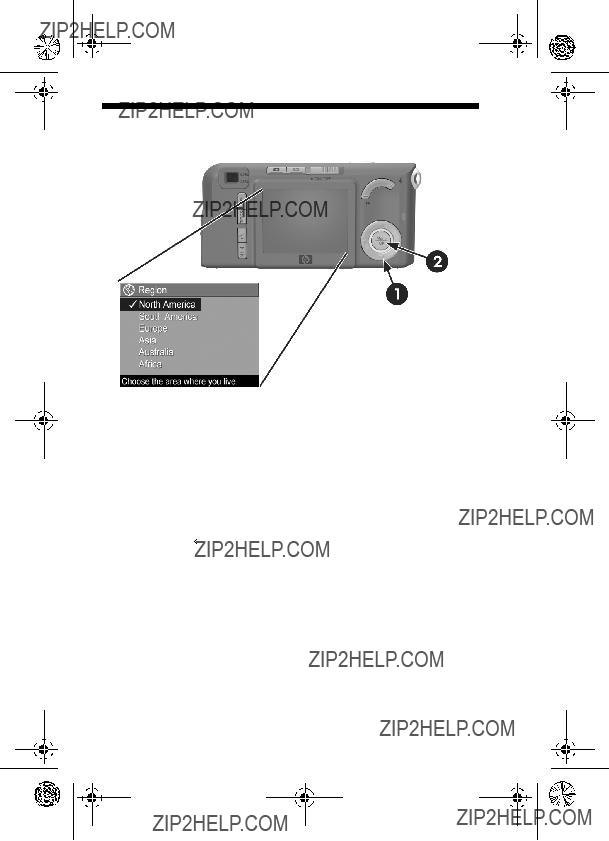
After choosing a language, you are prompted to choose the continent where you live. The Language and Region settings determine the defaults for the date format and the format of the video signal for displaying camera images on a television.
1.Scroll to the region that you want by using the  buttons.
2.Press the 
 button to select the highlighted region.
6 HP Photosmart M415/M417/M517 Quick Start Guide
RossRedfordNewmanQSG.fm Page 7 Thursday, January 6, 2005 10:17 AM
5.Set the Date and Time
English
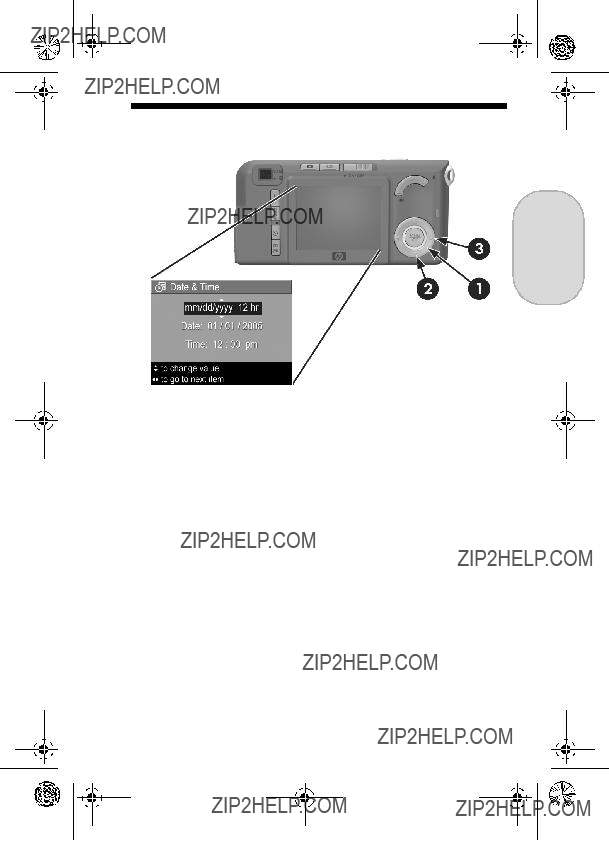
You are now prompted to set the date and time.
1.The first item highlighted is the date and time format. If you want to change the date and time format, use the
 buttons. If the date and time format is correct, press the
  button to move to the Date.
2.Adjust the value of the highlighted selection by using the
 buttons.
3.Press the 
 buttons to move to the other selections.
4.Repeat Steps 2 and 3 until the date and time are set correctly.
5.Press the  button when you have entered the proper values for the date and time. A confirmation screen appears, asking if the correct date and time have been
set. If the date and time are correct, press the  button to select Yes.
7
RossRedfordNewmanQSG.fm Page 8 Thursday, January 6, 2005 10:17 AM
6.Install and Format a Memory Card (Optional)
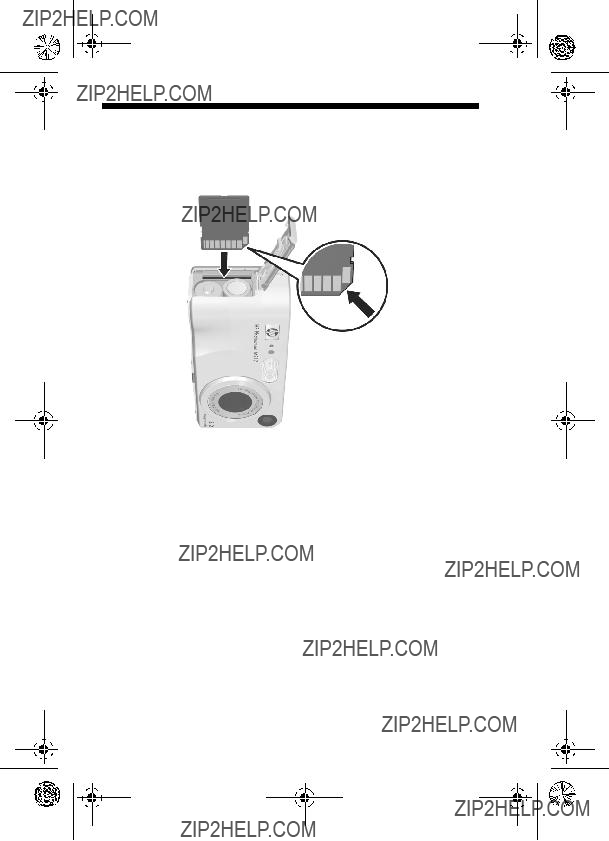
Your camera contains internal memory that allows you to store images and video clips. However, you can use a memory card (purchased separately) instead to store images and video clips.
1.Turn off the camera and open the Battery/Memory card door on the side of the camera.
2.Insert the memory card in the small slot above the batteries, with the notched side of the card going in first, as shown. Make sure the memory card snaps into place.
3.Close the Battery/Memory card door and turn on the camera.
8 HP Photosmart M415/M417/M517 Quick Start Guide
RossRedfordNewmanQSG.fm Page 9 Thursday, January 6, 2005 10:17 AM
To help prevent corrupted cards and images, you should format memory cards before you use them for the first time. To format the memory card:
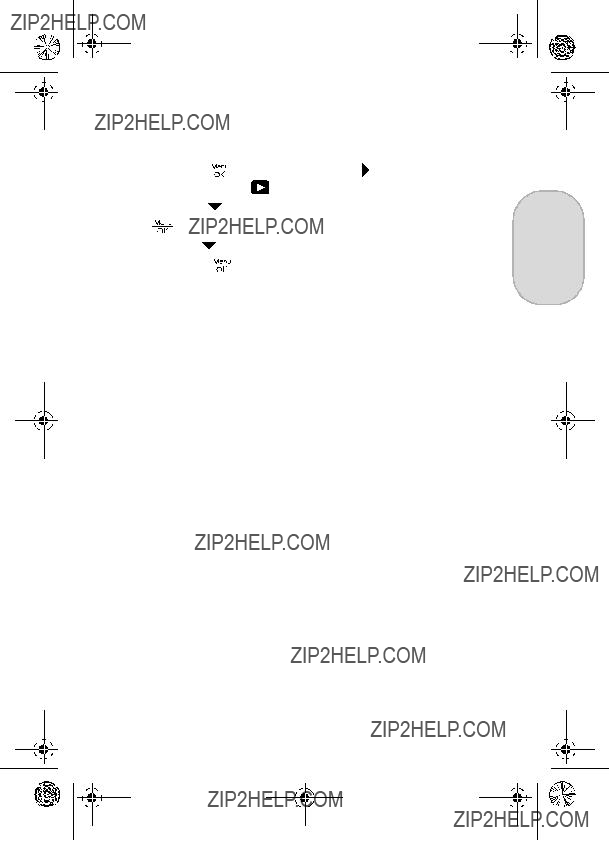
4. Press the  button to highlight Yes, and then press the

 button to format the card.
Formatting Card... appears in the Image Display while the camera is formatting the memory card. When the camera has completed the formatting, the Total Images Summary screen is displayed.
To remove the memory card from the camera, first turn the camera off. Then open the Battery/Memory card door, press down on the top edge of the memory card, and it will spring outward from the slot.
9
RossRedfordNewmanQSG.fm Page 10 Thursday, January 6, 2005 10:17 AM
7.Take a Still Picture
1.With the camera turned on, frame the subject for your picture in the viewfinder.
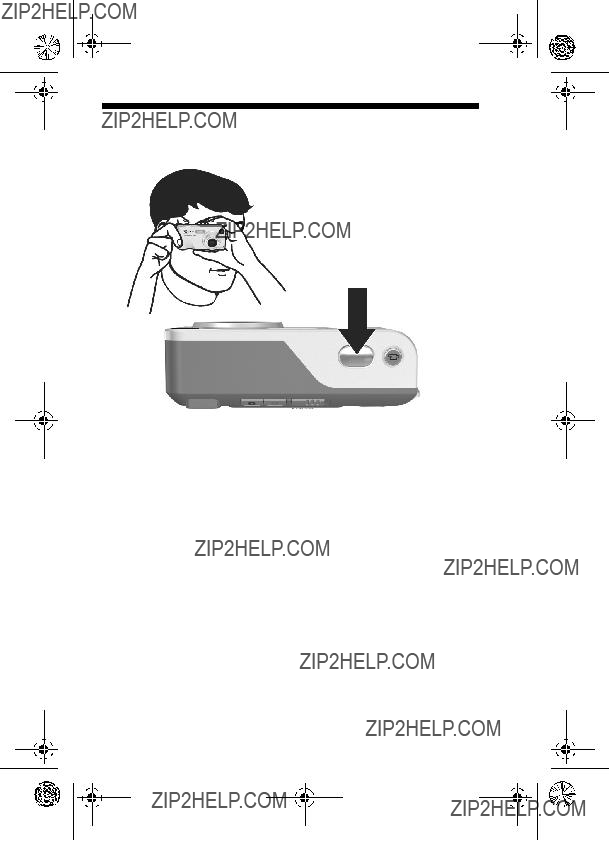
2.Hold the camera steady with both hands and press the Shutter button on the top of the camera halfway down. The camera measures and locks the focus and exposure. The focus brackets in the Image Display turn solid green when focus is locked.
3.Press the Shutter button all the way down to take the picture. The camera beeps after taking the picture. The image appears for several seconds on the Image Display.
10 HP Photosmart M415/M417/M517 Quick Start Guide
RossRedfordNewmanQSG.fm Page 11 Thursday, January 6, 2005 10:17 AM
8.Record a Video Clip
English
1.With the camera turned on, frame the subject for your video in the viewfinder.
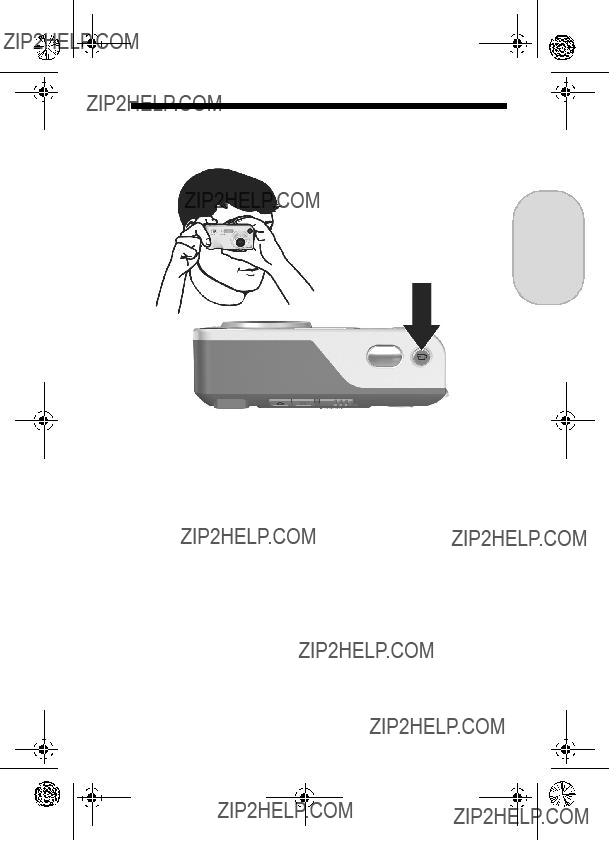
2.To start recording video, press and release the Video
 button on the top of the camera.
3.To stop recording video, press and release the Video
 button again; otherwise, the video will continue recording until the camera runs out of memory.
11
RossRedfordNewmanQSG.fm Page 12 Thursday, January 6, 2005 10:17 AM
9.Review Images and Video Clips
You will use Playback to review images and video clips.
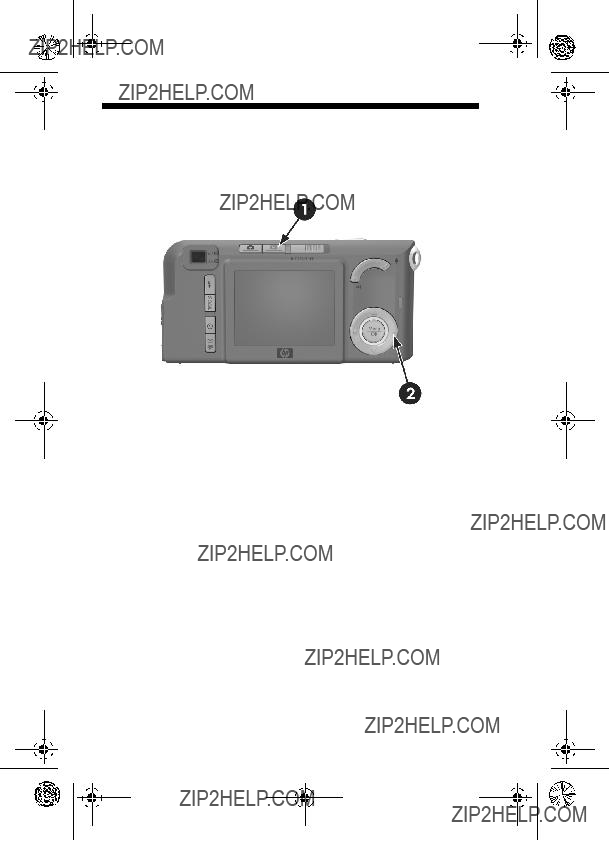
1.Press the Playback  button. The most recently taken or reviewed image or video clip appears on the Image Display.
2.Use the 
 buttons to scroll through your images and video clips.
Video clips play automatically after the first frame of the video clip displays for 2 seconds.
3.To turn the Image Display off after reviewing your images and video clips, press the Playback  button again.
12 HP Photosmart M415/M417/M517 Quick Start Guide
RossRedfordNewmanQSG.fm Page 13 Thursday, January 6, 2005 10:17 AM
10. Install the Software
English
The HP Image Zone software allows you to transfer images from the camera, and then view, edit, print, or
Windows System Requirements
To install the HP Image Zone software successfully, your computer must have a minimum of 64MB of RAM, Windows 2000, XP, 98, 98 SE, or Me, and Internet Explorer 5.5 Service Pack 2 or higher. If your computer meets the requirements above, the installation process installs either the full version of HP Image Zone or HP Image Zone Express. HP Image Zone Express lacks some features contained in the full version. For example, with HP Image Zone Express you cannot set up HP Instant Share destinations, as described in
Set Up HP Instant Share Destinations in the Camera (Optional).
13

RossRedfordNewmanQSG.fm Page 14 Thursday, January 6, 2005 10:17 AM
HP Image Zone Support
If you have trouble installing or using the HP Image Zone software, see the HP Customer Support website for more information: www.hp.com/support.
Windows
1.Close all programs and temporarily disable any virus protection software running on your computer.
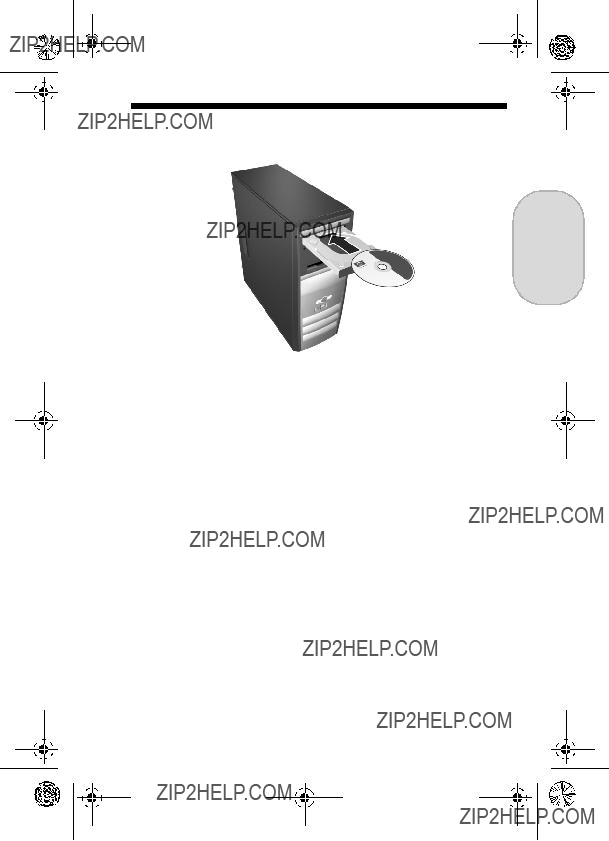
2.Insert the HP Image Zone software CD into the CD Drive of your computer and follow the
3.When the HP Image Zone software has finished installing,
Macintosh
1.Close all programs and temporarily disable any virus protection software running on your computer.
2.Insert the HP Image Zone software CD into the CD drive of your computer.
3.
4.
5.When the HP Image Zone software has finished installing,
14 HP Photosmart M415/M417/M517 Quick Start Guide

RossRedfordNewmanQSG.fm Page 15 Thursday, January 6, 2005 10:17 AM
11.Transfer Images to a Computer
English
1.Turn off the camera, then connect the camera to the computer either through the USB cable provided or through the optional HP Photosmart
2.If using the USB cable, turn on the camera. If using the
dock, press the Save/Print 
 button on the dock.
3.Follow the
4.Disconnect the camera from the computer.
15
RossRedfordNewmanQSG.fm Page 16 Thursday, January 6, 2005 10:17 AM
12.Set Up HP Instant Share Destinations in the Camera (Optional)
HP Instant Share lets you easily select still images in your camera to be automatically sent to a variety of destinations such as
NOTE: You will need an Internet connection to complete this procedure.
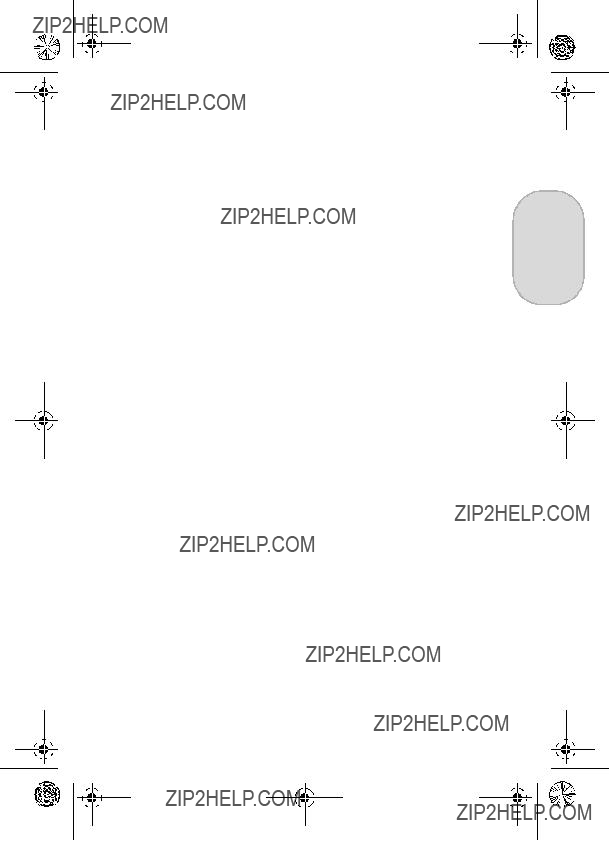
1.Turn on the camera, press the 
 button, then press the
HP Instant Share/Print  /
/ button to display the HP Instant Share Menu
  .
.
2.Use the  button to highlight HP Instant Share Setup...
 , and then press the
 button. A message will appear in the Image Display asking you to connect the camera to your computer.
16 HP Photosmart M415/M417/M517 Quick Start Guide
RossRedfordNewmanQSG.fm Page 17 Thursday, January 6, 2005 10:17 AM
3. Without turning off the camera, connect it to your computer again using the same procedure you used in the previous section, Transfer Images to a Computer.
4. The next step is slightly different on a Windows and
17
RossRedfordNewmanQSG.fm Page 18 Thursday, January 6, 2005 10:17 AM
Getting Assistance
View the User???s Manual on CD
Your camera has many more valuable features that are covered in detail in the User's Manual. These features include HP adaptive lighting technology,
1.Insert the HP Image Zone software CD into the CD drive of your computer.
2.On Windows: Click View User???s Manual on the Main page of the CD installation screen.
On Macintosh: Look in the readme file in the docs folder of the HP Image Zone software CD.
Additional Assistance
???For tips and tools to help you use your camera more effectively, visit www.hp.com/photosmart.
???HP online service and support is your easy, fast, and direct web resource for product assistance, diagnostics, and driver downloads. It is your one stop source for all service and support needs. Get award winning assistance 24x7 at www.hp.com/support.
???For help with the HP Image Zone software, see the online documentation.
18 HP Photosmart M415/M417/M517 Quick Start Guide
RossRedfordNewmanQSG.fm Page 1 Friday, January 7, 2005 4:04 PM
HP Photosmart M415/M417/M517 C??mara digital
con HP Instant Share
Gu??a de inicio r??pido
Espa??ol
1
RossRedfordNewmanQSG.fm Page 2 Friday, January 7, 2005 4:04 PM
Avisos legales
?? Copyright 2005
La informaci??n que aparece en este documento est?? sujeta a cambios sin previo aviso. Las ??nicas garant??as de los productos y servicios de HP se detallan en las declaraciones de garant??a expresa que acompa??an a dichos productos y servicios. Nada de lo que aqu?? se contenga se considerar?? como garant??a adicional. HP no se har?? responsable de los errores u omisiones t??cnicos o editoriales aqu?? contenidos.
Windows?? es una marca registrada en EE.UU. de Microsoft Corporation.
 El logotipo SD es una marca comercial de su propietario.
Informaci??n de reciclaje importante para nuestros clientes de la Uni??n Europea: Para respetar el medio ambiente, este producto debe reciclarse al final de su vida ??til seg??n la normativa vigente. El s??mbolo que aparece a continuaci??n indica que este producto no puede desecharse como basura normal. Devuelva el producto al punto de recogida autorizado m??s pr??ximo para que se recicle/deseche correctamente. Para obtener informaci??n adicional sobre la devoluci??n y el reciclaje en general de los productos HP, visite:
www.hp.com/hpinfo/globalcitizenship/environment/recycle/index.html
Para consultas en el futuro, introduzca la siguiente informaci??n:
N??mero de modelo (en la parte frontal de la c??mara)
N??mero de serie (n??mero de 10 d??gitos situado en la parte inferior de la c??mara)
Fecha de adquisici??n de la c??mara
Impreso en China
2 Gu??a de inicio r??pido de HP Photosmart M415/M417/M517
RossRedfordNewmanQSG.fm Page 3 Friday, January 7, 2005 4:04 PM
1.Fijaci??n de la mu??equera
3
RossRedfordNewmanQSG.fm Page 4 Friday, January 7, 2005 4:04 PM
2.Colocaci??n de las pilas
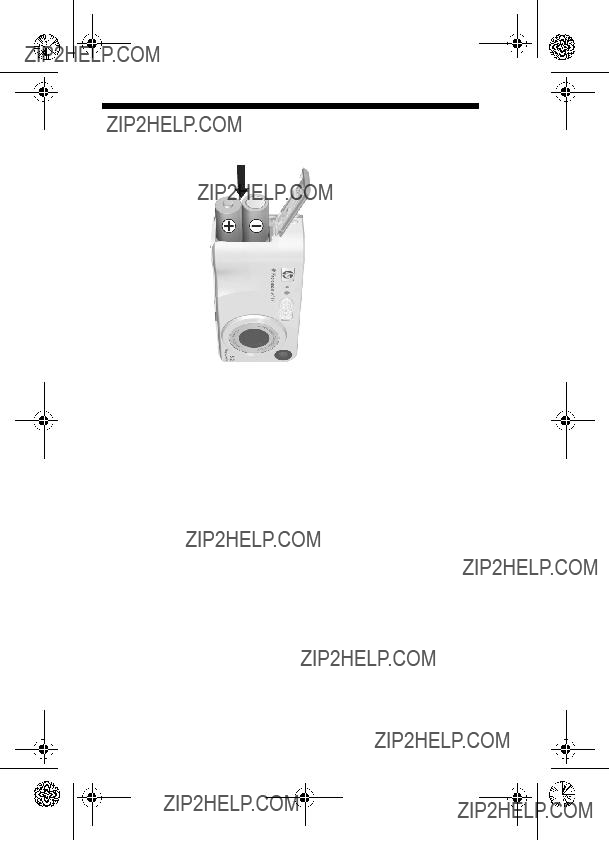
1.Abra la puerta de las pilas/tarjeta de memoria que se encuentra en el lateral de la c??mara desliz??ndola hacia la parte inferior de la c??mara.
2.Introduzca las pilas como se indica en el interior de la puerta.
3.Cierre la puerta de las pilas/tarjeta de memoria empuj??ndola hacia dentro y desliz??ndola hacia la parte superior de la c??mara hasta que quede cerrada.
Puede esperar un rendimiento parecido al siguiente de los diferentes tipos de pilas AA que pueden utilizarse en la c??mara:
de cargarlas por completo antes de usarlas en la c??mara.
4 Gu??a de inicio r??pido de HP Photosmart M415/M417/M517
RossRedfordNewmanQSG.fm Page 5 Friday, January 7, 2005 4:04 PM
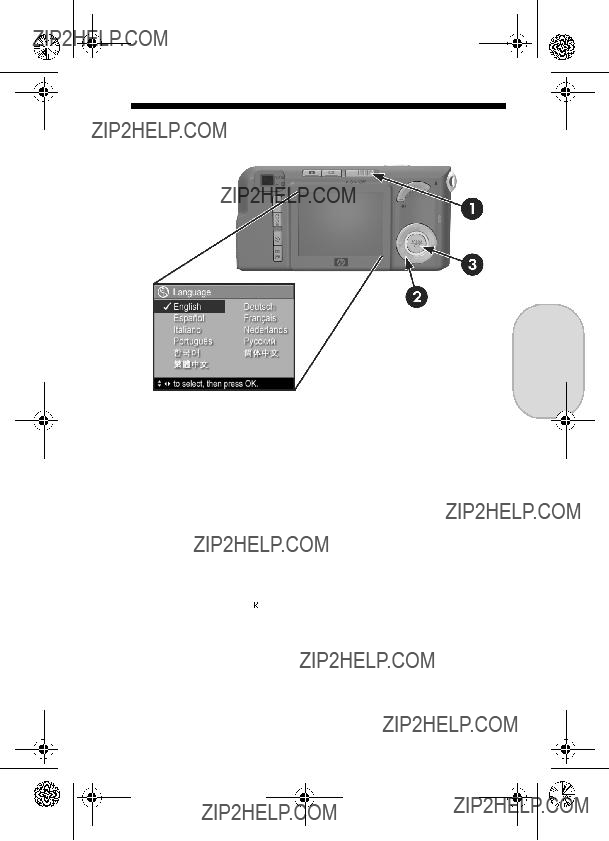
3.Selecci??n del idioma
Espa??ol
La primera vez que encienda la c??mara, ??sta le pedir?? que seleccione un idioma.
1.Para encender la c??mara, deslice el interruptor 


 hacia la derecha y, a continuaci??n, su??ltelo. El objetivo se ampl??a y el indicador luminoso de alimentaci??n situado
a la izquierda del interruptor 


 se iluminar?? en verde permanente. El logotipo HP tambi??n aparecer?? en la pantalla de imagen mientras se enciende la c??mara.
2.Despl??cese hasta el idioma deseado con los botones


 del Controlador
  .
.
3.Pulse el bot??n 
 para seleccionar el idioma resaltado.
5
RossRedfordNewmanQSG.fm Page 6 Friday, January 7, 2005 4:04 PM
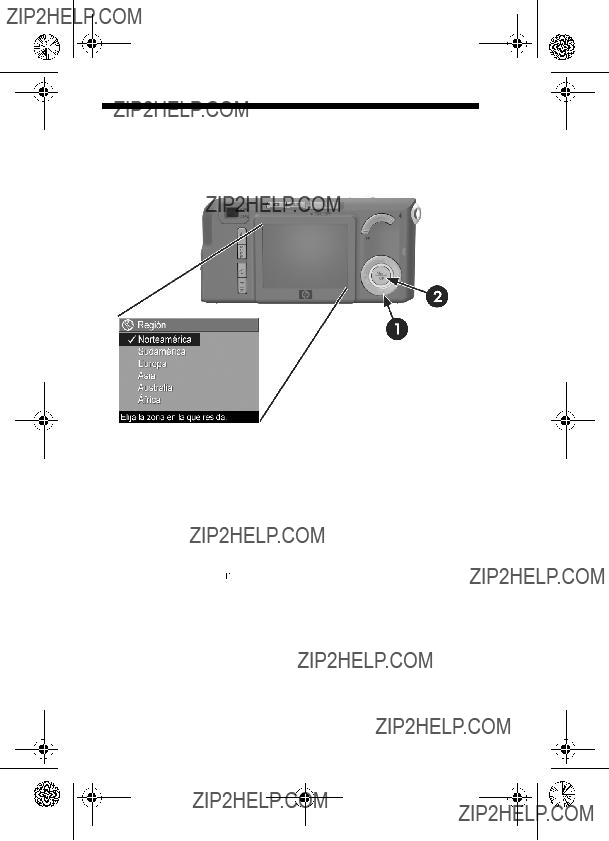
4.Configuraci??n de la regi??n
Despu??s de seleccionar el idioma, se le solicitar?? que seleccione el continente en el que resida. Los ajustes Idioma y Regi??n determinan los valores predeterminados de los formatos de fecha y se??al de v??deo para visualizar im??genes de la c??mara en un televisor.
1.Despl??cese hasta la regi??n deseada con los botones  .
.
2.Pulse el bot??n 
 para seleccionar la regi??n resaltada.
6 Gu??a de inicio r??pido de HP Photosmart M415/M417/M517

RossRedfordNewmanQSG.fm Page 7 Friday, January 7, 2005 4:04 PM
5.Ajuste de la fecha y la hora
Espa??ol
A continuaci??n se le solicitar?? que ajuste la fecha y la hora.
1. El primer elemento resaltado es el formato de fecha
y hora. Si desea modificar el formato de fecha y hora, utilice los botones  . Si el formato de fecha y hora es correcto, pulse el bot??n
  para desplazarse a la fecha.
2. Ajuste el valor de la selecci??n resaltada mediante los botones  .
.
3. Pulse los botones 
 para desplazarse a otras selecciones.
4.Repita los pasos 2 y 3 hasta que la fecha y la hora est??n ajustadas correctamente.
5. Pulse el bot??n 
 una vez que haya introducido los valores de fecha y hora correctos. Se abrir?? una pantalla de confirmaci??n en la que se le pregunta si la fecha
y hora establecidas son correctas. Si la fecha y hora son correctas, pulse el bot??n 
 para seleccionar S??.
7
RossRedfordNewmanQSG.fm Page 8 Friday, January 7, 2005 4:04 PM
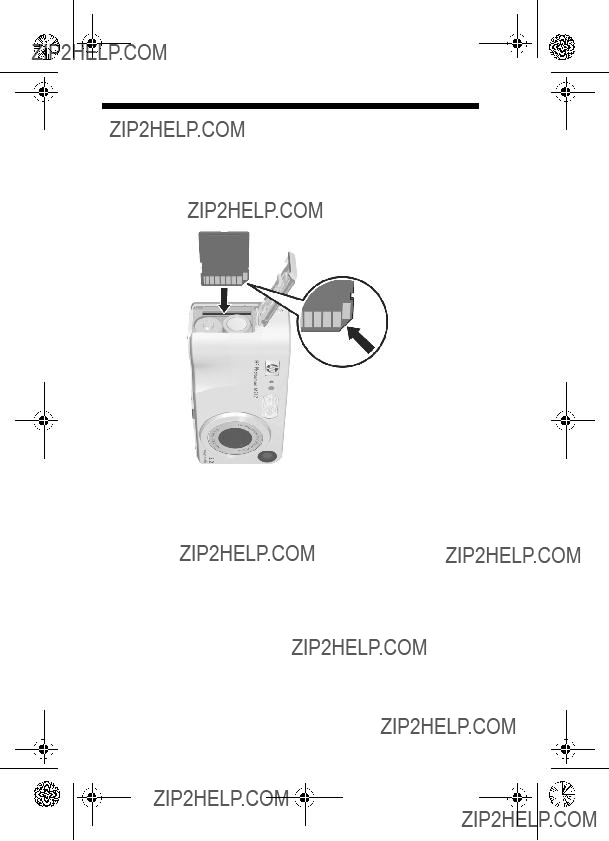
6.Instalaci??n y formateado de una tarjeta de memoria (opcional)
La c??mara dispone de memoria interna que le permite almacenar im??genes y videoclips. Sin embargo, tambi??n puede almacenarlos en una tarjeta de memoria (adquirida por separado).
1.Apague la c??mara y abra la puerta de las pilas/tarjeta de memoria que se encuentra en el lateral de la c??mara.
2.Inserte la tarjeta de memoria en la peque??a ranura situada encima de las pilas, con el lateral de la muesca hacia delante tal y como se muestra. Aseg??rese de que encaja en su sitio.
3.Cierre la puerta de las pilas/tarjeta de memoria y encienda la c??mara.
8 Gu??a de inicio r??pido de HP Photosmart M415/M417/M517
RossRedfordNewmanQSG.fm Page 9 Friday, January 7, 2005 4:04 PM
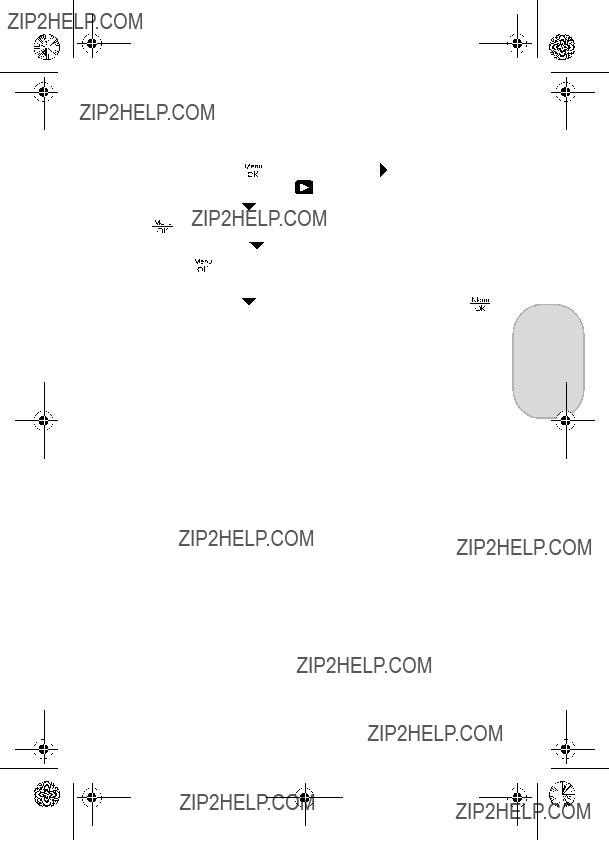
Para evitar que se da??en las tarjetas y las im??genes, deber?? formatear las tarjetas de memoria antes de usarlas por primera vez. Para formatear la tarjeta de memoria:
de formatear, aparecer?? la pantalla Resumen de im??genes totales.
Para extraer la tarjeta de memoria de la c??mara, primero apague la c??mara. Abra la puerta de las pilas/tarjeta de memoria y presione el borde superior de la tarjeta; ??sta saltar?? de la ranura.
9
RossRedfordNewmanQSG.fm Page 10 Friday, January 7, 2005 4:04 PM
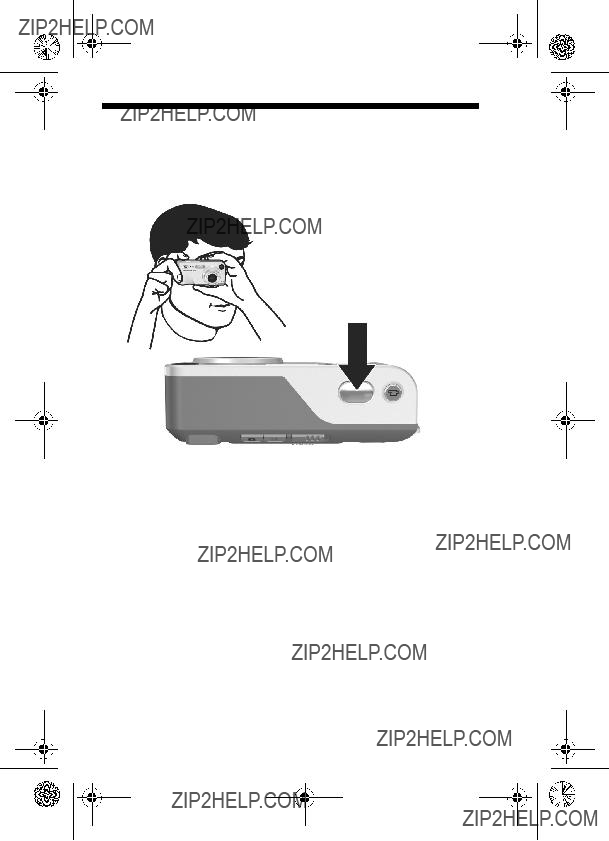
7.Toma de im??genes est??ticas
1.Con la c??mara encendida, encuadre el sujeto de la imagen en el visor.
2.Sujete la c??mara firmemente con las manos y presione el disparador de la parte superior de la c??mara hasta la mitad de su recorrido. La c??mara mide y bloquea el enfoque y la exposici??n. Los delimitadores de enfoque de la pantalla de imagen se iluminan en verde cuando se bloquea el enfoque.
3.Pulse el disparador hasta el final para tomar la fotograf??a. La c??mara emitir?? un pitido despu??s de tomar la fotograf??a. La imagen aparecer?? durante varios segundos en la pantalla de imagen.
10 Gu??a de inicio r??pido de HP Photosmart M415/M417/M517
RossRedfordNewmanQSG.fm Page 11 Friday, January 7, 2005 4:04 PM
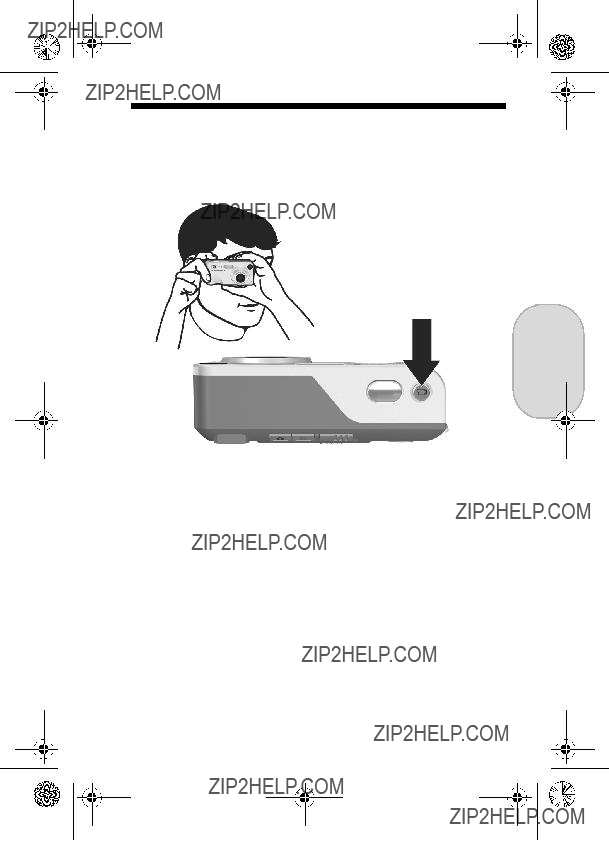
8.Grabaci??n de un videoclip
Espa??ol
1.Con la c??mara encendida, encuadre el sujeto del v??deo en el visor.
2.Para empezar a grabar el v??deo, pulse y suelte el bot??n
V??deo  , que se encuentra en la parte superior de la c??mara.
3.Para detener la grabaci??n de v??deo, pulse y suelte
otra vez el bot??n V??deo  ; de lo contrario, el v??deo continuar?? grab??ndose hasta que la c??mara se quede sin memoria.
11
RossRedfordNewmanQSG.fm Page 12 Friday, January 7, 2005 4:04 PM
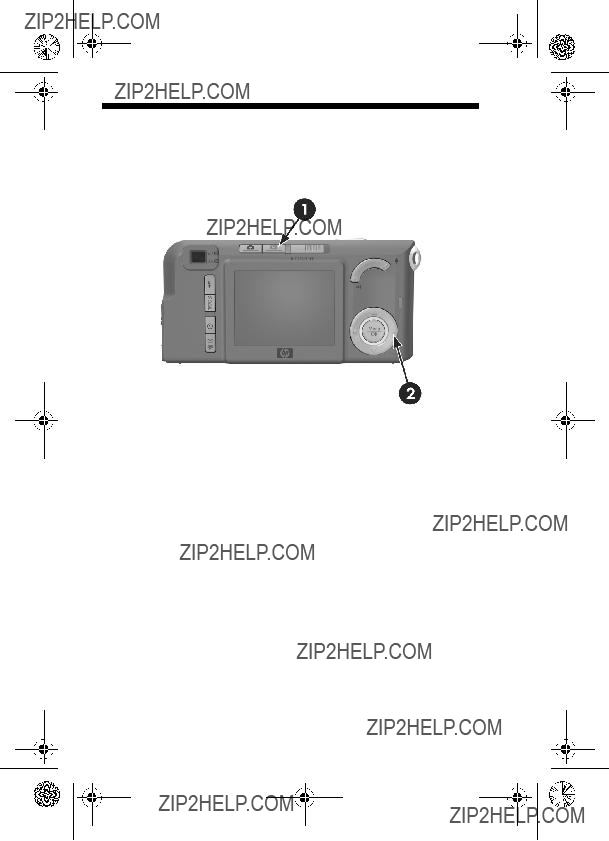
9.Revisi??n de im??genes y videoclips
Utilice Reproducci??n para revisar las im??genes y los videoclips.
1.Pulse el bot??n Reproducci??n  . La ??ltima imagen o el ??ltimo videoclip que se haya tomado o visualizado aparecer?? en la pantalla de imagen.
2.Utilice los botones 
 para desplazarse por las im??genes y los videoclips.
Cuando se muestra el primer fotograma de un videoclip durante dos segundos, ??ste se reproduce autom??ticamente.
3.Para apagar la pantalla de imagen despu??s de revisar las im??genes y los videoclips, vuelva a pulsar el bot??n
Reproducci??n  .
.
12 Gu??a de inicio r??pido de HP Photosmart M415/M417/M517
RossRedfordNewmanQSG.fm Page 13 Friday, January 7, 2005 4:04 PM
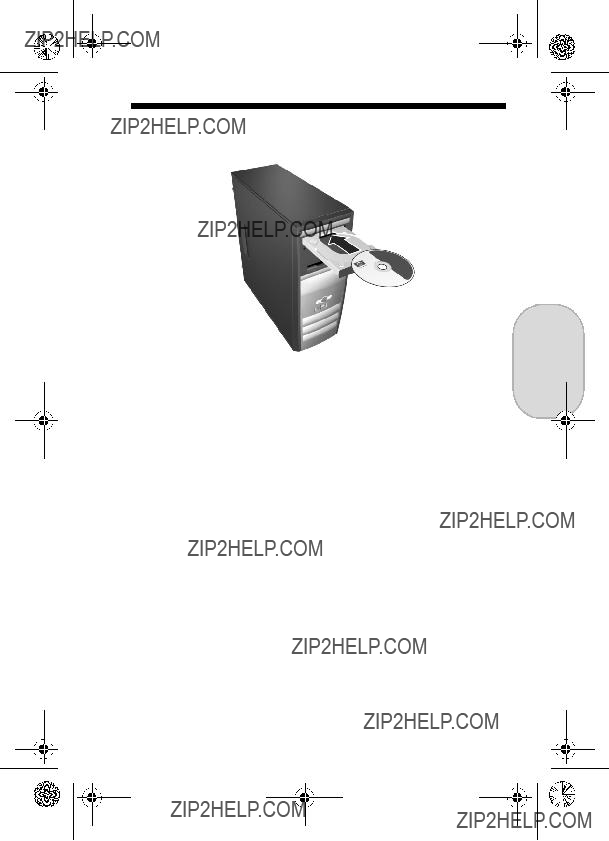
10. Instalaci??n del software
El software HP Image Zone le permite transferir im??genes de la c??mara, visualizarlas, editarlas, imprimirlas o enviarlas por correo electr??nico.
Requisitos del sistema para Windows
Para instalar el software HP Image Zone correctamente, el equipo debe tener un m??nimo de 64 MB de memoria RAM, Windows 2000, XP, 98, 98 SE o Me, e Internet Explorer 5.5 Service Pack 2 o superior. Si el equipo cumple los requisitos anteriores, el proceso de instalaci??n instalar?? la versi??n completa de HP Image Zone o HP Image Zone Express.
HP Image Zone Express no dispone de algunas funciones contenidas en la versi??n completa. Por ejemplo, con
HP Image Zone Express no puede configurar destinos de
HP Instant Share, como se describe en Configuraci??n de destinos de HP Instant Share en la c??mara (opcional).
Espa??ol
13

RossRedfordNewmanQSG.fm Page 14 Friday, January 7, 2005 4:04 PM
Asistencia t??cnica de HP Image Zone
Si tiene dificultades para instalar o utilizar el software HP Image Zone, encontrar?? m??s informaci??n en el sitio Web de asistencia t??cnica de HP: www.hp.com/support.
Windows
1.Cierre todos los programas y desactive temporalmente todos los programas antivirus que utilice en el equipo.
2.Introduzca el CD del software HP Image Zone en la unidad de CD del equipo y siga las instrucciones de la pantalla. Si no se abre la ventana de instalaci??n, haga clic en Inicio, Ejecutar, escriba D:\Setup.exe, donde D es la letra de la unidad de
3.Cuando finalice la instalaci??n del software HP Image Zone, active de nuevo los programas antivirus desactivados en el paso 1.
Macintosh
1.Cierre todos los programas y desactive temporalmente todos los programas antivirus que utilice en el equipo.
2.Introduzca el CD del software HP Image Zone en la unidad de CD del equipo.
3.Haga doble clic en el icono del CD en el escritorio del equipo.
4.Haga doble clic en el icono del instalador y,
a continuaci??n, siga las instrucciones mostradas en la pantalla.
5.Cuando finalice la instalaci??n del software HP Image Zone, active de nuevo los programas antivirus desactivados en el paso 1.
14 Gu??a de inicio r??pido de HP Photosmart M415/M417/M517
RossRedfordNewmanQSG.fm Page 15 Friday, January 7, 2005 4:04 PM
11.Transferencia de im??genes al equipo
Espa??ol
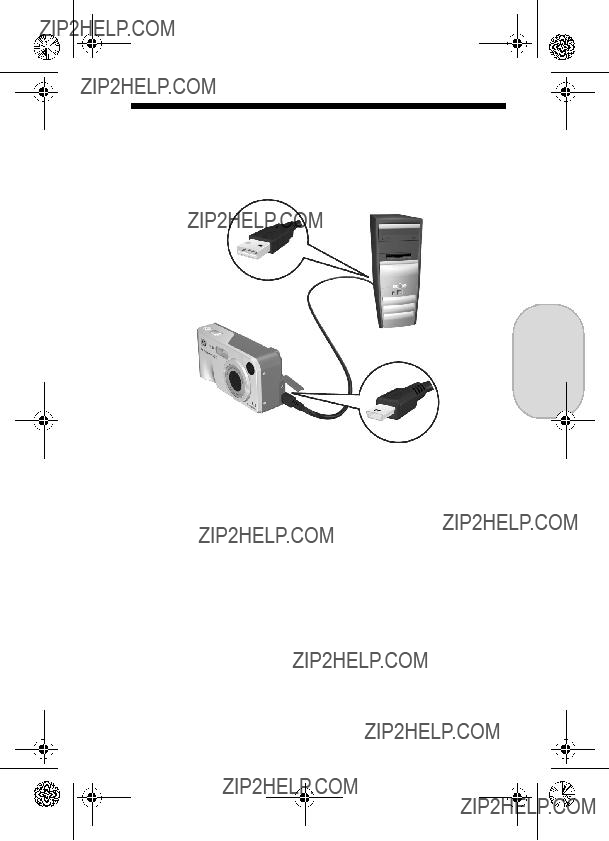
1.Apague la c??mara, con??ctela al equipo mediante el cable USB suministrado o mediante la base de acoplamiento opcional HP Photosmart para c??maras de la serie M.
2.Si utiliza el cable USB, encienda la c??mara. Si utiliza la base de acoplamiento, pulse el bot??n Guardar/Imprimir 
 de la base.
3.Siga las instrucciones de la pantalla para que el software transfiera las im??genes de la c??mara al equipo.
4.Desconecte la c??mara del equipo.
15
RossRedfordNewmanQSG.fm Page 16 Friday, January 7, 2005 4:04 PM
12.Configuraci??n de destinos de HP Instant Share en la c??mara (opcional)
HP Instant Share le permite seleccionar f??cilmente las im??genes est??ticas de la c??mara para enviarlas autom??ticamente a una variedad de destinos, como
direcciones de correo electr??nico, la pr??xima vez que conecte la c??mara al equipo. Siga estos pasos para configurar destinos en l??nea en la c??mara. Debe disponer de la versi??n completa del software HP Image Zone en el equipo para usar esta parte de la funci??n HP Instant Share de la c??mara.
NOTA: Necesitar?? conexi??n a Internet para llevar a cabo este procedimiento.
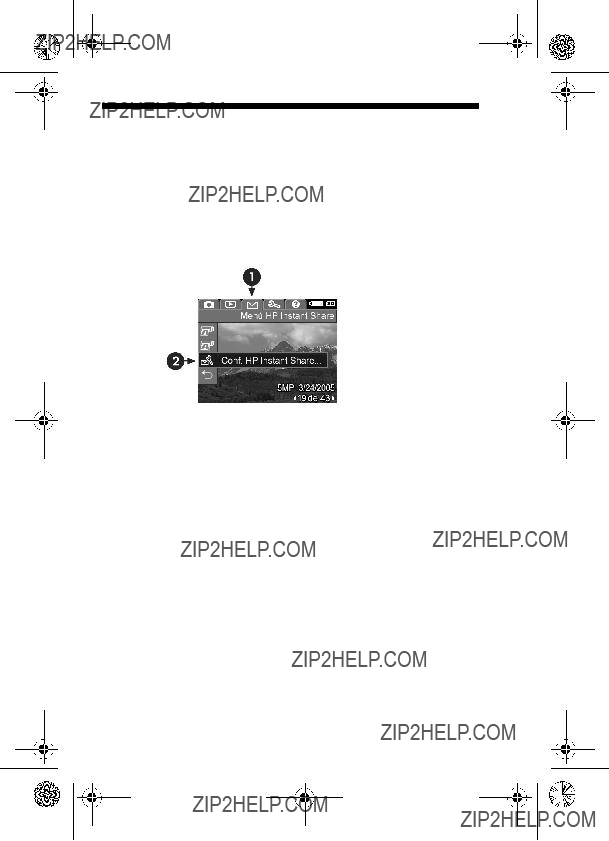
1.Encienda la c??mara, pulse el bot??n 
 y, a continuaci??n, pulse el bot??n HP Instant Share/Imprimir
  /
/ para visualizar el Men?? HP Instant Share
  .
.
16 Gu??a de inicio r??pido de HP Photosmart M415/M417/M517
RossRedfordNewmanQSG.fm Page 17 Friday, January 7, 2005 4:04 PM
3. Sin apagar la c??mara, con??ctela de nuevo al equipo mediante el mismo procedimiento utilizado en la secci??n anterior, Transferencia de im??genes al equipo.
4. El paso siguiente difiere ligeramente en equipos Windows y Macintosh:
??? Windows: Al conectar la c??mara al equipo se activa el programa de configuraci??n de HP Instant Share. Si aparece alg??n cuadro de di??logo adicional, ci??rrelo haciendo clic en Cancelar. En el programa de configuraci??n de HP Instant Share, haga clic en Inicio y siga las instrucciones de la pantalla para configurar destinos en el equipo y guardarlos en la c??mara.
???Macintosh: Al conectar la c??mara al equipo se activa el programa del asistente de configuraci??n de
HP Instant Share. Haga clic en Continuar y siga las instrucciones de la pantalla para configurar destinos en el equipo y guardarlos en la c??mara.
5.Desconecte la c??mara del equipo y vuelva al Men?? HP Instant Share para comprobar que los nuevos destinos se encuentran ya en la c??mara. Ahora puede marcar las im??genes de la c??mara que se van a enviar a uno o m??s de estos destinos de HP Instant Share. Consulte la secci??n titulada Env??o de im??genes a destinos en el cap??tulo 4 del manual del usuario de la c??mara para obtener detalles sobre c??mo hacerlo. Para saber c??mo consultar el manual del usuario en el CD de HP Image Zone, consulte la p??gina siguiente de esta Gu??a de inicio r??pido.
Espa??ol
17

RossRedfordNewmanQSG.fm Page 18 Friday, January 7, 2005 4:04 PM
C??mo obtener asistencia
Consulta del manual del usuario en el CD
La c??mara dispone de muchas funciones m??s descritas en detalle en el manual del usuario. Entre ellas se incluyen la tecnolog??a de iluminaci??n adaptable de HP, la eliminaci??n de ojos rojos, siete modos de fotograf??a, HP Instant Share, funciones de impresi??n directa, Ayuda incorporada en la c??mara, accesorios de la c??mara y mucho m??s. Existen copias del manual del usuario de esta c??mara en varios idiomas en el CD del software HP Image Zone. Para ver
el manual del usuario:
1.Introduzca el CD del software HP Image Zone en la unidad de CD del equipo.
2.En Windows: Haga clic en Ver manual del usuario en la p??gina principal de la pantalla de instalaci??n del CD.
En Macintosh: Consulte el archivo readme de la carpeta docs del CD del software HP Image Zone.
Asistencia adicional
???Para ver sugerencias y herramientas que le ayuden a hacer un uso m??s efectivo de la c??mara, visite www.hp.com/photosmart.
???El servicio de asistencia t??cnica en l??nea de HP es un recurso web directo, sencillo y r??pido para obtener asistencia sobre productos, diagn??sticos y descargas de controladores. Es un centro clave para todas sus necesidades de servicio y soporte. Obtendr?? la mejor asistencia todos los d??as de la semana durante las 24 horas del d??a en www.hp.com/support.
???Para obtener ayuda con el software HP Image Zone, consulte la documentaci??n en l??nea.
18 Gu??a de inicio r??pido de HP Photosmart M415/M417/M517

TahitiUM.book Page 4 Sunday, January 4, 2004 2:47 PM

?? 2005
Printed in China
www.hp.com
*L2011???90103*
*L2011???90103*
4" X 6" BACK COVER