MODEL G4176 1???4 HP
POWER FEEDER
OWNER'S Manual
Copyright ?? JUNE, 2008 By Grizzly Industrial, Inc. REVISED JULY, 2008.
Warning: No portion of this manual may be reproduced in any shape Or form without the written approval of Grizzly Industrial, inc.
#CR10815 printed IN TAIWAN
4HIS MANUALMPROVIDES CRITICALOSAFETY INSTRUCTIONSTON THE PROPER SETUP�T
OPERATION� MAINTENANCE AND SERVICE OFATHIS MACHINE�EQUIPMENT�V
&AILURELTO READ� UNDERSTANDAAND�FOLLOW THE INSTRUCTIONS GIVENDINNTHIS
MANUAL MAY RESULTAIN SERIOUS PERSONALIINJURY�EINCLUDINGSAMPUTATION�
ELECTROCUTIONOOR DEATH�O
4HEHOWNEROOF THISRMACHINE�EQUIPMENT IS SOLELYIRESPONSIBLEUFORPITS
SAFE USE� 4HIS RESPONSIBILITY INCLUDES BUT ISINOTILIMITEDYTO PROPER
INSTALLATION INAATSAFE ENVIRONMENT� PERSONNEL TRAINING AND USAGEE
AUTHORIZATION� PROPERIINSPECTION AND MAINTENANCE�SMANUAL AVAILABILITY
ANDNCOMPREHENSION� APPLICATION OFNSAFETY DEVICES�CBLADE�CUTTER INTEG
RITY�TAND�THEAUSAGE OF PERSONALSPROTECTIVE EQUIPMENT�
4HEHMANUFACTURER WILLCNOTUBE HELD LIABLE FOR INJURY OR PROPERTY DAMAGEM
FROM NEGLIGENCE� IMPROPERNTRAINING�IMACHINEOMODIFICATIONSAOR MISUSE�
3OME DUST CREATEDTBY POWER SANDING� SAWING�PGRINDING� DRILLING� AND
OTHERHCONSTRUCTION ACTIVITIESTCONTAINS CHEMICALS KNOWN TOSTHEC3TATEA
OF #ALIFORNIAITO CAUSE CANCER� BIRTH DEFECTS ORCOTHERCREPRODUCTIVEV
HARM�R3OME EXAMPLESEOF THESE CHEMICALS ARE�
ss ,EAD FROM LEAD
BASED PAINTS�
ss #RYSTALLINEASILICA FROM BRICKS�ICEMENT AND OTHER MASONRY PRODUCTS� ss !RSENICEANDICHROMIUM FROMCCHEMICALLY
TREATED LUMBER�
9OUR RISK FROM THESE EXPOSURES VARIES� DEPENDING ONSHOWROFTEN YOU
DO THISTTYPE OF WORK�P4O REDUCE YOUR EXPOSURE4TO THESE CHEMICALS�
7ORK INKA WELL VENTILATEDLAREA�VANDNWORK WITHTAPPROVED SAFETY�EQUIP
MENT�NSUCH ASSTHOSEHDUST MASKS THATSARE SPECIALLY DESIGNED TO FILTERT
OUTUMICROSCOPICRPARTICLES�
Customer Service #: (570) 546-9663 ?? To Order Call: (800) 523-4777 ?? Fax #: (800) 438-5901
MODEL G4176 1/4 HP POWER FEEDER
;ZVijgZh/
Rollers are Spring Tensioned
Heavy-Duty Gear Reduction with Hardened Gears
Universal Positioning with Handle Locks
Identification
Refer to Figure 1 and your power feeder to familiarize yourself with the controls, features, and terminology used in this manual. Doing so will make setup, use, and any future maintenance easier.
Figure 1. Controls and features.

3%#4)/..���3!&%49
&ORR9OURR/WNN3AFETY��2EADD)NSTRUCTIONN
-ANUALL"EFORE /PERATINGGTHISS-ACHINE
4HEEPURPOSEEOFFSAFETYYSYMBOLSSISSTOOATTRACTTYOURRATTENTIONNTOOPOSSIBLEEHAZARDOUSUCONDITIONS��4HISS
MANUALLUSESSAASERIESSOFFSYMBOLSSANDDSIGNALLWORDSSINTENDEDDTOOCONVEYYTHEELEVELLOFFIMPORTANCEE
OFFTHEESAFETYYMESSAGES��4HEEPROGRESSIONNOFFSYMBOLSSISSDESCRIBEDDBELOW��2EMEMBERRTHATTSAFETYY
MESSAGESSBYYTHEMSELVESSDOONOTTELIMINATEEDANGERRANDDAREENOTTAASUBSTITUTEEFORRPROPERRACCIDENTT
PREVENTIONNMEASURES�
)NDICATESSANNIMMINENTLYYHAZARDOUSUSITUATIONNWHICH��IF NOTTAVOIDED��
7),,,RESULTTINNDEATHHORRSERIOUSUINJURY�
)NDICATESSAAPOTENTIALLYYHAZARDOUSUSITUATIONNWHICH��IF NOTTAVOIDED��
#/5,$$RESULTTINNDEATHHORRSERIOUSUINJURY�
)NDICATESSAAPOTENTIALLYYHAZARDOUSUSITUATIONNWHICH��IF NOTTAVOIDED��
-!99RESULTTINNMINORRORRMODERATEEINJURY��)TTMAYYALSOOBEEUSEDDTOOALERTT
AGAINSTTUNSAFEEPRACTICES�
./4)#% 4HISSSYMBOLLISSUSEDDTOOALERTTTHEEUSERRTOOUSEFULLINFORMATIONNABOUTT
PROPERROPERATIONNOFFTHEEMACHINE�
Safety Instructions for Machinery
3AFETYY)NSTRUCTIONSSFORR-ACHINERY
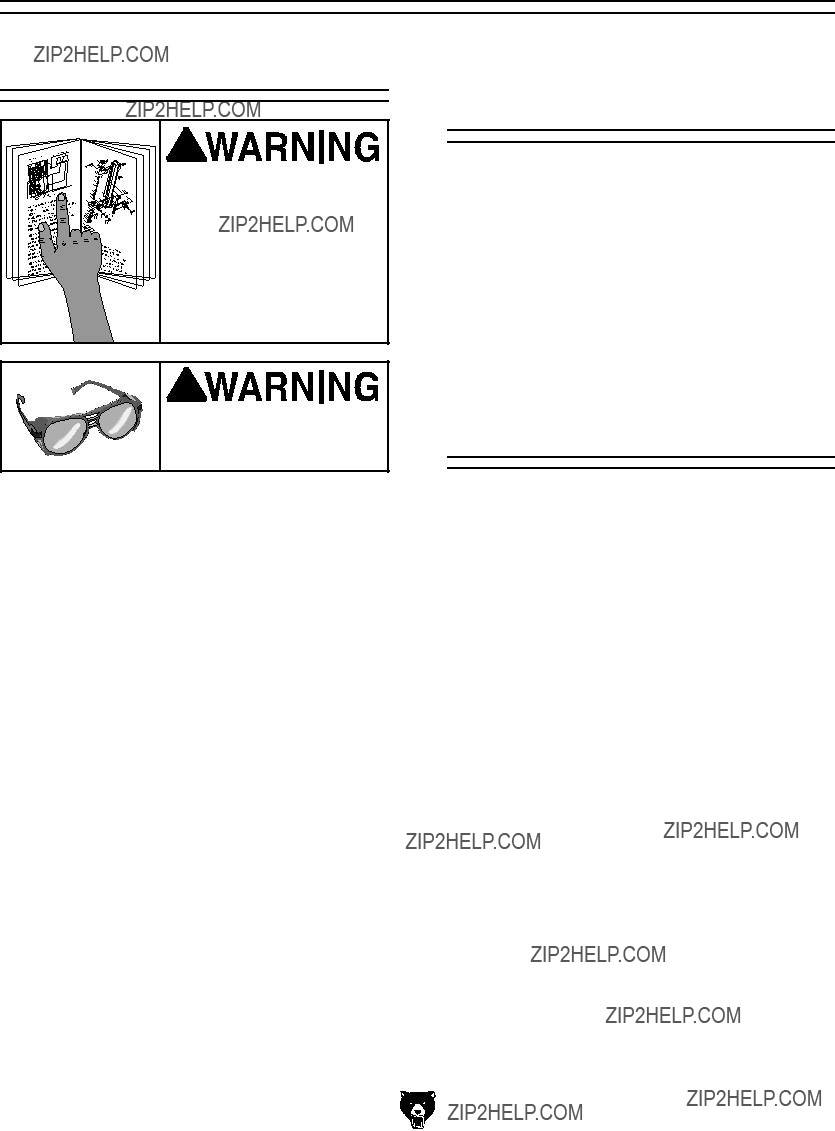
�� 2%!$ 4(%(%.4)2% -!.5!, "%&/2% 34!24).' -!#().%29� BVX]^cZgn�egZh" Zcih� hZg^djh� ^c_jgn� ]VoVgYh� id� jcigV^cZY� jhZgh#�
�� !,7!93 53% !.3) !002/6%$$ 3!&%49 ',!33%33 7(%. /0%2!4).'!
-!#().%29� :kZgnYVn� ZnZ\aVhhZh� dcan� ]VkZ� ^beVXi� gZh^hiVci� aZchZh i]Zn� VgZ� CDI�hV[Zin�\aVhhZh#
�� !,7!93 7%!2 !! .)/3(/ !002/6%$ 2%30)2!4/2 7(%. /0%2!4).' -!#().%29) 4(!4 02/$5#%3 $534��
Bdhi�ineZh�d[�Yjhi��lddY!�bZiVa!�ZiX#��XVc�
XVjhZ�hZkZgZ�gZhe^gVidgn�^aacZhhZh#
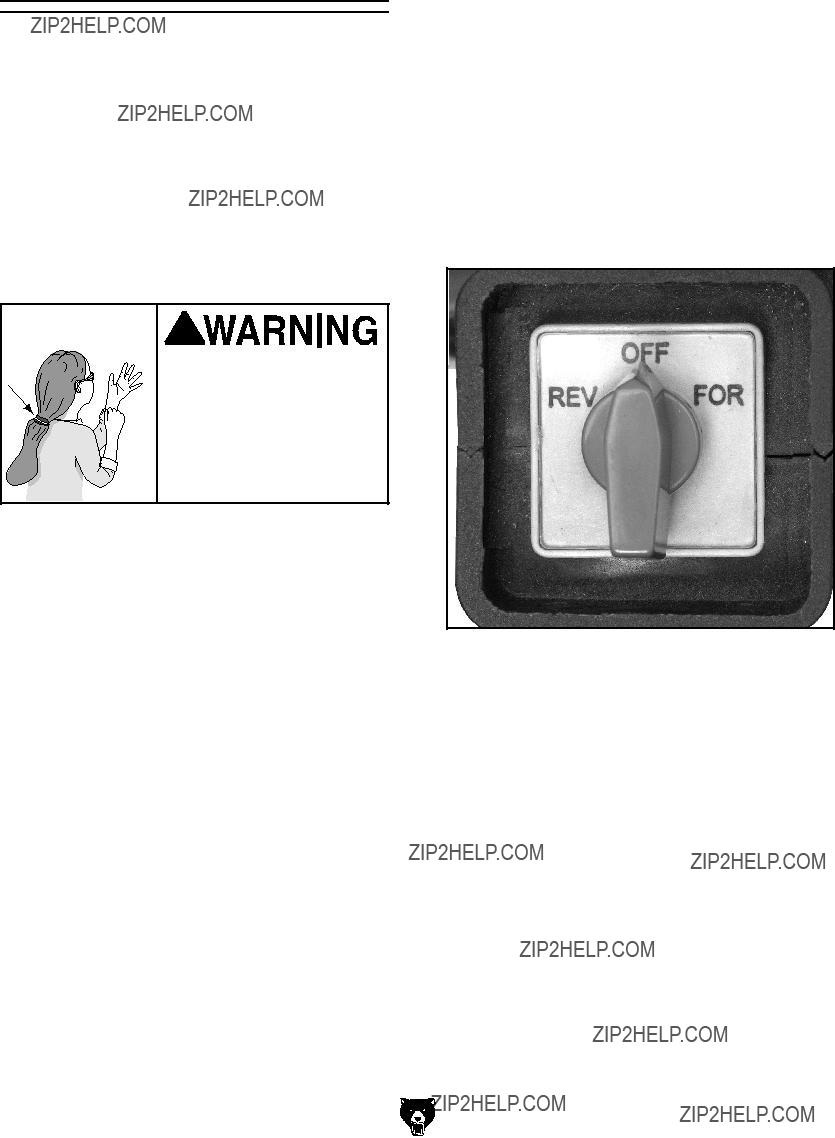
�� !,7!93 53%3 (%!2).'2 02/4%#4)/. 7(%. /0%2!4).'! -!#().%29��
BVX]^cZgn� cd^hZ� XVc� XVjhZ� eZgbVcZci� ]ZVg^c\�adhh#�
�� 7%!2 02/0%2 !00!2%,�� 9D� CDI� lZVg�addhZ�Xadi]^c\!�\adkZh!�cZX`i^Zh!�g^c\h!� dg� _ZlZagn� i]Vi� XVc� XViX]� ^c� bdk^c\� eVgih#� LZVg� egdiZXi^kZ� ]V^g� XdkZg^c\� id� XdciV^c� adc\�]V^g�VcY�lZVg�cdc"ha^e�[ddilZVg#
�� .%6%26 /0%2!4%2 -!#().%29) 7(%. 4)2%$2/2 5.$%2$4(%().&,5%.#%5/& $25'35/2 !,#/(/,� 7Z�bZciVaan�VaZgi� Vi�Vaa�i^bZh�l]Zc�gjcc^c\�bVX]^cZgn#
3AFETYY)NSTRUCTIONSSFORR-ACHINERY
�� /.,9 !,,/7, 42!).%$) !.$. 02/0
%2,9 350%26)3%$ 0%23/..%,/ 4/ /0%2!4%2 -!#().%29�� BV`Z� hjgZ� deZgVi^dc�^chigjXi^dch�VgZ�hV[Z�VcY�XaZVgan� jcYZghiddY#
�� +%%0 #(),$2%. !.$.6)3)4/23 !7!9�!
@ZZe� Vaa� X]^aYgZc� VcY� k^h^idgh� V� hV[Z� Y^h" iVcXZ�[gdb�i]Z�ldg`�VgZV#
�� -!+% 7/2+3(/0 #(),$02//&��JhZ� eVYadX`h!� bVhiZg� hl^iX]Zh!� VcY� gZbdkZ� hiVgi�hl^iX]�`Znh#
���� .%6%2 ,%!6% 7(%. -!#().% )33 25..).'� Ijgc�edlZg�/&&�VcY�Vaadl�Vaa� bdk^c\�eVgih�id�XdbZ�id�V�XdbeaZiZ�hide� WZ[dgZ�aZVk^c\�bVX]^cZ�jcViiZcYZY#
���� $/ ./4 53% ). $!.'%2/533 %.6)2/.-%.43�. 9D� CDI� jhZ� bVX]^c" Zgn� ^c� YVbe!� lZi� adXVi^dch!� dg� l]ZgZ� Vcn� [aVbbVWaZ�dg�cdm^djh�[jbZh�bVn�Zm^hi#�
���� +%%0 7/2+ !2%! #,%!.%!.$.7%,, ,)'(4%$� 8ajiiZg�VcY�YVg`�h]VYdlh�bVn� XVjhZ�VXX^YZcih#
���� 53%3!!'2/5.$%$ %84%.3)/..#/2$ 2!4%$4&/2/4(%(-!#().%(!-0%2!'%�2
<gdjcYZY�XdgYh�b^c^b^oZ�h]dX`�]VoVgYh# JcYZgh^oZY� XdgYh� XgZViZ� ZmXZhh^kZ� ]ZVi#� 6alVnh�gZeaVXZ�YVbV\ZY�ZmiZch^dc�XdgYh#
���� !,7!93 $)3#/..%#4 &2/- 0/7%27 3/52#% "%&/2% 3%26)#).' -!#().%29#�BV`Z�hjgZ�hl^iX]�^h�^c�D;;� edh^i^dc�WZ[dgZ�gZXdccZXi^c\#
���� -!).4!). -!#().%29 7)4( #!2%�� @ZZe�WaVYZh�h]Vge�VcY�XaZVc�[dg�WZhi�VcY� hV[Zhi�eZg[dgbVcXZ#�;daadl�^chigjXi^dch�[dg� ajWg^XVi^c\�VcY�X]Vc\^c\�VXXZhhdg^Zh#
���� -!+% 352% '5!2$3 !2%2 ). 0,!#% !.$. 7/2+ #/22%#4,9% "%&/2% 53).')-!#().%29�
���� 2%-/6% !$*534).' +%93 !.$$ 72%.#(%3��BV`Z�V�]VW^i�d[�X]ZX`^c\�[dg� `Znh�VcY�VY_jhi^c\�lgZcX]Zh�WZ[dgZ�ijgc" ^c\�bVX]^cZgn�/.#
���� #(%#+ &/2 $!-!'%$ 0!243 "%&/2%/53).')-!#().%29��8]ZX`�[dg� W^cY^c\�dg�b^hVa^\cZY�eVgih!�Wgd`Zc�eVgih!� addhZ�Wdaih!�VcY�Vcn�di]Zg�XdcY^i^dch�i]Vi� bVn� ^beV^g� bVX]^cZ� deZgVi^dc#� GZeV^g� dg� gZeaVXZ�YVbV\ZY�eVgih�WZ[dgZ�deZgVi^dc#
���� 53%3 2%#/--%.$%$- !##%33/2)%3�� GZ[Zg�id�i]Z�^chigjXi^dc�bVcjVa�[dg�gZXdb" bZcYZY� VXXZhhdg^Zh#� >begdeZg� VXXZhhd" g^Zh�^cXgZVhZ�g^h`�d[�^c_jgn#
���� $/ ./4/ &/2#%2 -!#().%29�� Ldg`� Vi� i]Z�heZZY�[dg�l]^X]�i]Z�bVX]^cZ�dg�VXXZh" hdgn�lVh�YZh^\cZY#
���� 3%#52% 7/2+0)%#%�� JhZ� XaVbeh� dg� V� k^hZ� id� ]daY� i]Z� ldg`e^ZXZ� l]Zc� egVXi^" XVa#� 6� hZXjgZY� ldg`e^ZXZ� egdiZXih� ndjg� ]VcYh�VcY�[gZZh�Wdi]�]VcYh�id�deZgViZ�i]Z� bVX]^cZ#
���� $/ ./4//6%22%!#(��BV^ciV^c�hiVW^a^in� VcY�WVaVcXZ�Vi�Vaa�i^bZh#
���� -!.9 -!#().%3 #!. %*%#4 7/2+0)%#%3 4/7!2$ /0%2!4/2�
@cdl�VcY�Vkd^Y�XdcY^i^dch�i]Vi�XVjhZ�i]Z� ldg`e^ZXZ�id��`^X`WVX`#�
���� !,7!93 ,/#+ -/"),% "!3%3 �)&) 53%$ % "%&/2% /0%2!4).' -!#().%29#
���� #%24!).4 $534 -!9! "% (!:!2$/53� id� i]Z� gZhe^gVidgn� hnhiZbh� d[� eZdeaZ� VcY� Vc^bVah!�ZheZX^Vaan�[^cZ�Yjhi#�7Z�VlVgZ�d[� i]Z� ineZ� d[� Yjhi� ndj� VgZ� ZmedhZY� id� VcY� ValVnh�lZVg�V�gZhe^gVidg�YZh^\cZY�id�[^aiZg� i]Vi�ineZ�d[�Yjhi#
Additional Safety for Power Feeders
1.SAFETY ACCESSORIES. Always use appro- 5. WORKPIECE SUPPORT. DO NOT feed long
2.TOOL SPEED. Make sure all cutting tools
are rotating at the operating speed before 6. STOPPING FEEDER. Always stop the feeder
3.FEEDING SPEED. DO NOT overload the 7. ADJUSTMENTS. Disconnect the feeder from
cutting tool by feeding too quickly. The cutting tool will perform better and be safer to work with at the rate for which it was designed.
4.HAND SAFETY. Keep hands away from rotating parts on the feeder and the cutting tool. Do not allow hands or clothing to be pinched beween the rollers and workpiece.
its power source before cleaning, repairing, or making adjustments.
8.EXPERIENCING DIFFICULTIES. If at any time you are experiencing difficulties per- forming the intended operation, stop using the machine! Contact Tech Support at (570) 546-9663.
Like all machines there is danger associated with this machine. Accidents are frequently caused by lack of familiarity or failure to pay attention. Use this machine with respect and caution to lessen the possibility of operator injury. If normal safety precautions are overlooked or ignored, serious personal injury may occur.
No list of safety guidelines can be complete. Every shop environment is different. Always consider safety first, as it applies to your individual working conditions. Use this and other machinery with caution and respect. Failure to do so could result in serious per- sonal injury, damage to equipment, or poor work results.
SECTION 2: CIRCUIT REQUIREMENTS
110V Operation
Serious personal injury could occur if you connect the machine to power before com- pleting the setup process. DO NOT connect the machine to the power until instructed later in this manual.
Electrocution or fire could result if machine is not grounded and installed in compliance with electrical codes. Compliance MUST be verified by a qualified electrician!
Full Load Amperage Draw
This machine draws the following amps under maximum load:
Power Supply Circuit Requirements
You MUST connect your machine to a grounded circuit that is rated for the amperage given below. Never replace a circuit breaker on an existing cir- cuit with one of higher amperage without consult- ing a qualified electrician to ensure compliance with wiring codes. If you are unsure about the wiring codes in your area or you plan to con- nect your machine to a shared circuit, consult a qualified electrician.
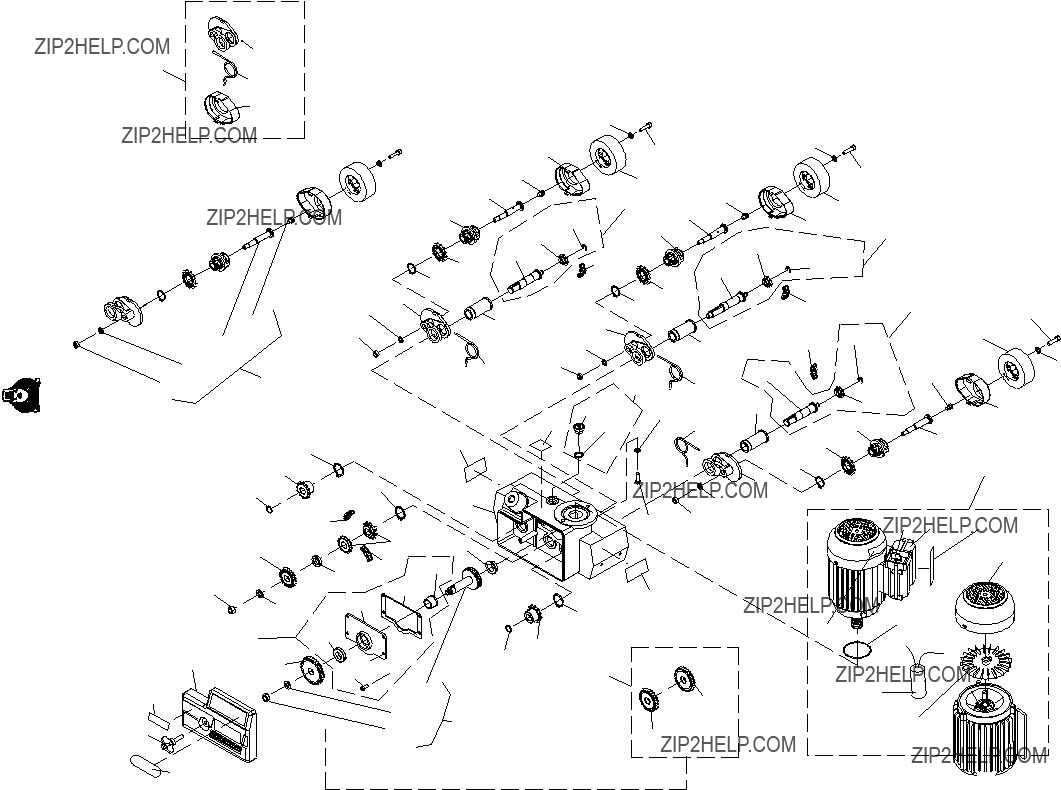
Model G4176 1???4 HP Power Feeder
Power Connection Device
The Model G4176 comes with a 5-15 plug, similar to Figure 2, to connect the machine to power.
<gdjcY^c\�Egdc\�^h� Adc\Zhi�d[�i]Z�I]gZZ Egdc\h
8jggZci 
 8Vggn^c\�Egdc\h <gdjcYZY
DjiaZi
Figure 2. Typical 5-15 plug and receptacle.
This machine MUST have a ground prong in the plug to help ensure that it is grounded. DO NOT remove ground?? prong from plug to fit into a two-pronged outlet! If the plug will not fit the outlet, have the proper outlet installed by a qualified electrician.
Extension Cords
We do not recommend using extension cords, but if you find it absolutely necessary:
???Use at least a 16 gauge cord that does not exceed 50 feet in length!
???The extension cord must have a ground wire and plug pin.
???A qualified electrician MUST size cords over 50 feet long to prevent motor damage. -9-
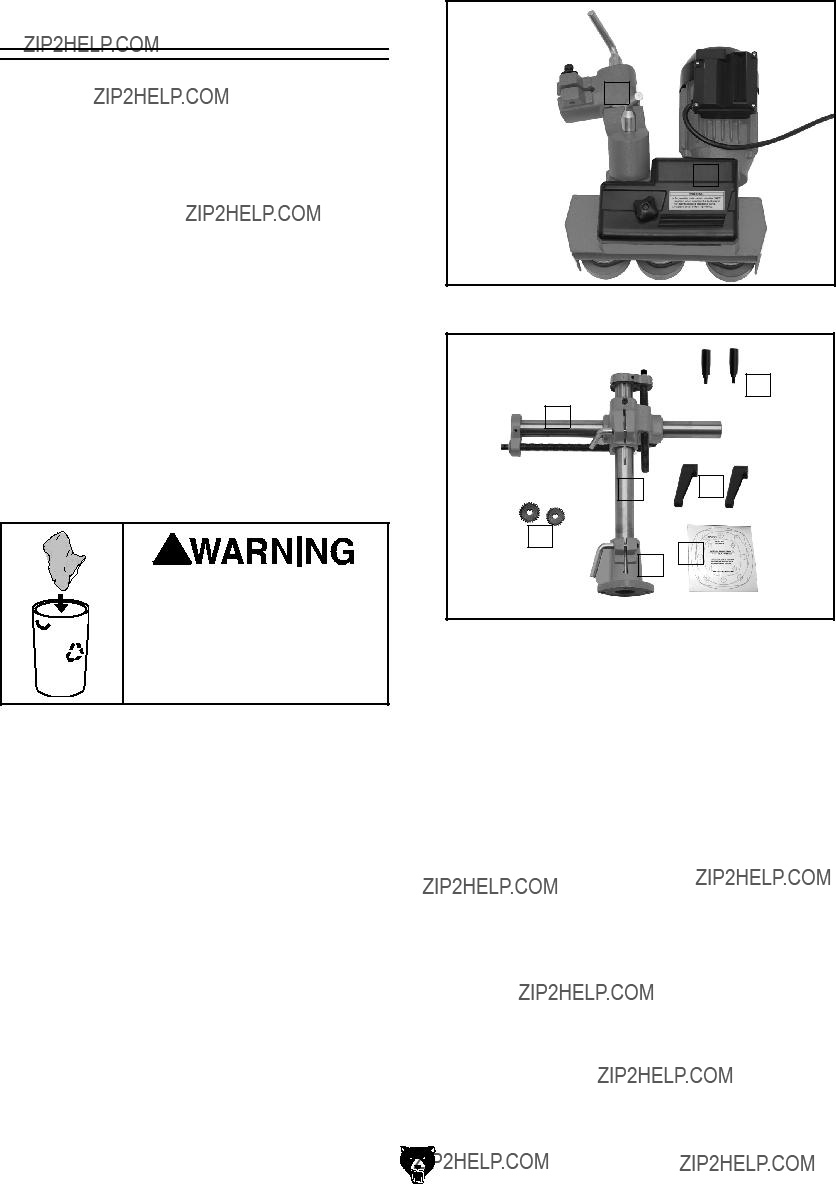
Hardware Recognition Chart
Base Mounting
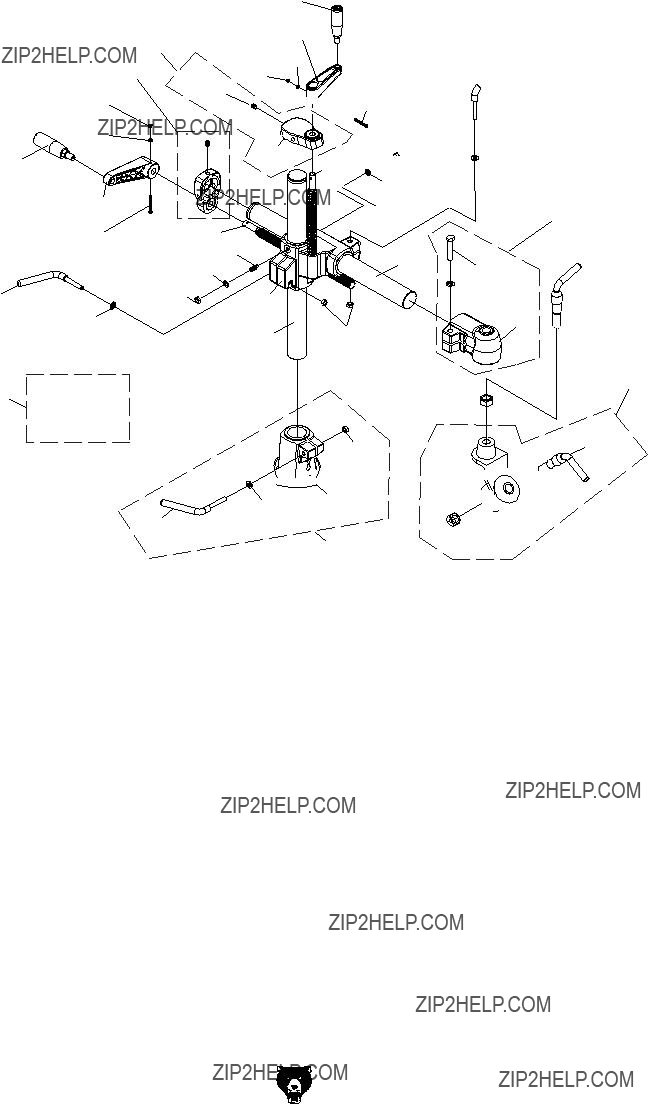
Position the power feeder on the table top to determine where to drill your base mounting holes, so you can maximize power feeder swing and adjustment options.
There are two mounting options available:
Through Bolt Mounting and Direct Mounting
(discussed on Page 15). Choose an option that suits your requirements.
Whichever way you mount your power feeder, you must be able to use the handcranks and lock levers to position the rubber wheels parallel with the table surface and 1???8" lower than the thickness of your workpiece.
Also, you must be able to point the power feeder slightly towards the machine fence (Figure 8). In other words, the tracking of the power feeder must be toed-in approximately 1?? to 1.5?? degrees toward the machine fence so the rubber wheels slightly push the workpiece against the fence during cut- ting operations.
Figure 8. Typical power feed mounting on a shaper, jointer, and tablesaw.
SECTION 6: SERVICE
Review the troubleshooting and procedures in this section to fix or adjust your machine if a problem devel- ops. If you need replacement parts or you are unsure of your repair skills, then feel free to call our Technical Support at (570) 546-9663.
Troubleshooting
Motor & Electrical
SECTION 7: WIRING
These pages are current at the time of printing. However, in the spirit of improvement, we may make changes to the electrical systems of future machines. Study this diagram carefully. If you notice differences between your machine and these wiring diagrams, call Technical Support at (570) 546-9663 for assistance.
Electrical Safety Instructions
1.CIRCUIT REQUIREMENTS. You MUST fol- 3. MOTOR WIRING. The motor wiring shown
low the CIRCUIT REQUIREMENTS given on Page 9. If you are unsure about the wiring codes in your area or you plan to connect your machine to a shared circuit, consult a qualified electrician.
2.SHOCK HAZARD. Disconnect the power from the machine before servicing electrical components. Touching electrified parts will result in personal injury including but not lim- ited to severe burns, electrocution, or death.
in these diagrams are current at the time of printing, but it may not match your machine. Always use the wiring diagram inside the motor junction box.
4.EXPERIENCING DIFFICULTIES. If at any time you are experiencing difficulties under- standing the information included in this sec- tion, contact our Technical Support at (570) 546-9663.
NOTICE
The photos and diagrams included in this section are best viewed in color. You can view these pages in color at www.grizzly.com.
Wiring Diagram
BdYZa�<)&,+�EdlZg�;ZZYZg�
&&%K�H^c\aZ"E]VhZ
Figure 17. Motor capacitor.
Figure 18. Motor power and direction switch.
;DA9�6ADC<�9DII:9�A>C:
EaVXZ
HiVbe
=ZgZ
'2)::,99).$5342)!,��).#� 0�/��"/88���� "%,,).'(!-� 7! �����
����
;DA9�6ADC<�9DII:9�A>C:
HZcY�V�<g^ooan�8ViVad\�id�V�[g^ZcY/
CVbZTTTTTTTTTTTTTTTTTTTTTTTTTTTTTTT HigZZiTTTTTTTTTTTTTTTTTTTTTTTTTTTTTTT 8^inTTTTTTTTTTTTTTHiViZTTTTTTO^eTTTTTT
I6E:�6ADC<�:9<:H""EA:6H:�9D�CDI�HI6EA:
WARRANTY AND RETURNS
7!22!.499!.$$2%452.3
<g^ooan�>cYjhig^Va!�>cX#�lVggVcih�ZkZgn�egdYjXi�^i�hZaah�[dg�V�eZg^dY�d[���YEAR�id�i]Z�dg^\^cVa�ejgX]VhZg�[gdb� i]Z�YViZ�d[�ejgX]VhZ#�I]^h�lVggVcin�YdZh�cdi�Veean�id�YZ[ZXih�YjZ�Y^gZXian�dg�^cY^gZXian�id�b^hjhZ!�VWjhZ!� cZ\a^\ZcXZ!�VXX^YZcih!�gZeV^gh�dg�VaiZgVi^dch�dg�aVX`�d[�bV^ciZcVcXZ#�I]^h�^h�<g^ooan??h�hdaZ�lg^iiZc�lVggVcin� VcY�Vcn�VcY�Vaa�lVggVci^Zh�i]Vi�bVn�WZ�^bea^ZY�Wn�aVl!�^cXajY^c\�Vcn�bZgX]VciVW^a^in�dg�[^icZhh!�[dg�Vcn�eVg" i^XjaVg�ejgedhZ!�VgZ�]ZgZWn�a^b^iZY�id�i]Z�YjgVi^dc�d[�i]^h�lg^iiZc�lVggVcin#�LZ�Yd�cdi�lVggVci�dg�gZegZhZci� i]Vi�i]Z�bZgX]VcY^hZ�Xdbea^Zh�l^i]�i]Z�egdk^h^dch�d[�Vcn�aVl�dg�VXih�jcaZhh�i]Z�bVcj[VXijgZg�hd�lVggVcih#� >c�cd�ZkZci�h]Vaa�<g^ooan??h�a^VW^a^in�jcYZg�i]^h�lVggVcin�ZmXZZY�i]Z�ejgX]VhZ�eg^XZ�eV^Y�[dg�i]Z�egdYjXi�VcY� Vcn�aZ\Va�VXi^dch�Wgdj\]i�V\V^chi�<g^ooan�h]Vaa�WZ�ig^ZY�^c�i]Z�HiViZ�d[�LVh]^c\idc!�8djcin�d[�L]ViXdb#
LZ�h]Vaa�^c�cd�ZkZci�WZ�a^VWaZ�[dg�YZVi]!�^c_jg^Zh�id�eZghdch�dg�egdeZgin�dg�[dg�^cX^YZciVa!�Xdci^c\Zci!�heZX^Va!� dg�XdchZfjZci^Va�YVbV\Zh�Vg^h^c\�[gdb�i]Z�jhZ�d[�djg�egdYjXih#
Id�iV`Z�VYkVciV\Z�d[�i]^h�lVggVcin!�XdciVXi�jh�Wn�bV^a�dg�e]dcZ�VcY�\^kZ�jh�Vaa�i]Z�YZiV^ah#�LZ�l^aa�i]Zc� ^hhjZ� ndj� V� ??GZijgc� CjbWZg!????� l]^X]� bjhi� WZ� XaZVgan� edhiZY� dc� i]Z� djih^YZ� Vh� lZaa� Vh� i]Z� ^ch^YZ� d[� i]Z� XVgidc#� LZ� l^aa� cdi� VXXZei� Vcn� ^iZb� WVX`� l^i]dji� i]^h� cjbWZg#� Egdd[� d[� ejgX]VhZ� bjhi� VXXdbeVcn� i]Z� bZgX]VcY^hZ#�
I]Z�bVcj[VXijgZgh�gZhZgkZ�i]Z�g^\]i�id�X]Vc\Z�heZX^[^XVi^dch�Vi�Vcn�i^bZ�WZXVjhZ�i]Zn�XdchiVcian�hig^kZ�id�
VX]^ZkZ�WZiiZg�fjVa^in�Zfj^ebZci#�LZ�bV`Z�ZkZgn�Z[[dgi�id�ZchjgZ�i]Vi�djg�egdYjXih�bZZi�]^\]�fjVa^in�VcY�
YjgVW^a^in�hiVcYVgYh�VcY�lZ�]deZ�ndj�cZkZg�cZZY�id�jhZ�i]^h�lVggVcin#
EaZVhZ�[ZZa�[gZZ�id�lg^iZ�dg�XVaa�jh�^[�ndj�]VkZ�Vcn�fjZhi^dch�VWdji�i]Z�bVX]^cZ�dg�i]Z�bVcjVa#�
I]Vc`�ndj�V\V^c�[dg�ndjg�Wjh^cZhh�VcY�Xdci^cjZY�hjeedgi#�LZ�]deZ�id�hZgkZ�ndj�V\V^c�hddc#


 in machinery and cause
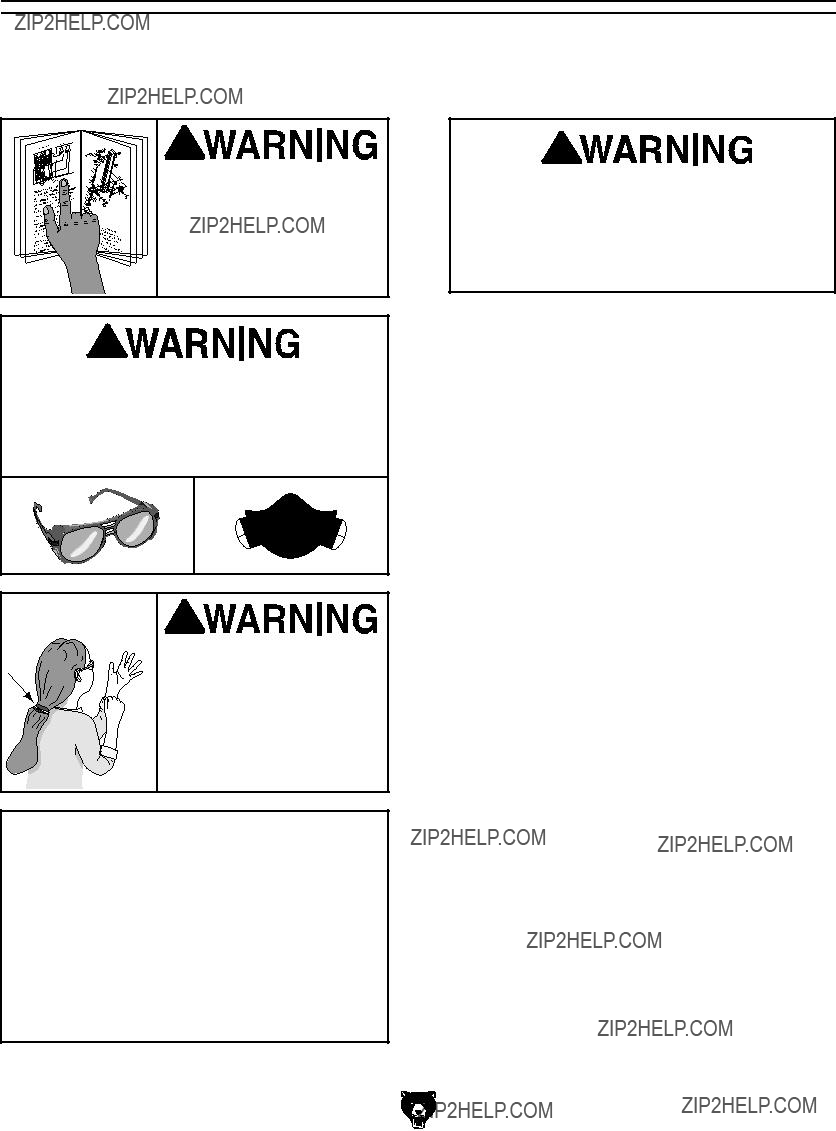
 in machinery and cause


 .)*
.)*


 -0'$(
-0'$( 


 7!22!.49 #!2$